In this blog we will learn how to delete selected (mass delete) record on button click in Salesforce Lightning Component.
Steps:
Steps to add the custom button and perform Mass Delete of selected record.
Step 1: Create a lightning component and add following code.
<aura:component implements="force:appHostable,flexipage:availableForAllPageTypes,flexipage:availableForRecordHome,force:hasRecordId,forceCommunity:availableForAllPageTypes" access="global" controller="accListClass" >
    <aura:attribute name="account" type="List"></aura:attribute>
    <aura:handler name="init" value="{!this}" action="{!c.accountList}"></aura:handler>
    <div class="slds-grid">
        <div class="slds-col slds-p-horizontal_small slds-size_1-of-2 slds-medium-size_5-of-6 slds-large-size_8-of-12"></div>
        <div class="slds-col slds-size_1-of-8 allBtn"><lightning:button label="Delete Selected"
                                              iconName="utility:delete"
                                              iconPosition="left"
                                              variant="destructive"
                                              onclick="{!c.deleteSlctd}">
                            </lightning:button></div>
    </div>
    <table class="slds-table slds-table--bordered slds-table--striped slds-table--cell-buffer slds-table--fixed-layout">
        <thead>
        	<tr class="slds-text-heading--label">
                <th scope="row" style="width: 50px;" class="slds-text-align--right"><ui:inputCheckbox aura:id="cbox" class="cBox" change="{!c.selectAll}"/></th>
                <th scope="row"><div class="slds-truncate" title="ID">ID</div></th>
                <th scope="row"><div class="slds-truncate" titile="NAME">Name</div></th>
                <th scope="row"><div class="slds-truncate" title="INDUSTRY">Industry</div></th>
                <th scope="row"><div class="slds-truncate" title="PHONE">Phone</div></th>
            </tr>
        </thead>
        <tbody>
            <aura:iteration items="{!v.account}" var="a">
            	<tr>
                    <td><ui:inputCheckbox aura:id="cboxRow" text="{!a.Id}" class="cBox" change="{!c.changeSelectAll}"/></td>
                	<th><div class="slds-truncate">{!a.Id}</div></th>
                    <td><div class="slds-truncate">{!a.Name}</div></td>
                    <td><div class="slds-truncate">{!a.Industry}</div></td>
                    <td><div class="slds-truncate">{!a.Phone}</div></td>
                </tr>
            </aura:iteration>
        </tbody>
    </table>
</aura:component>
Step 2: Create the client side controller of above mentioned Component and add the following code.
({
    accountList : function(component, event, helper) {
        helper.getAccountList(component);
    },
    selectAll: function(component,event, helper){
        var slctCheck = event.getSource().get("v.value");
        var getCheckAllId = component.find("cboxRow");

        if (slctCheck == true) {
            for (var i = 0; i < getCheckAllId.length; i++) {
                component.find("cboxRow")[i].set("v.value", true);
            }
        } else {
            for (var i = 0; i < getCheckAllId.length; i++) {
                component.find("cboxRow")[i].set("v.value", false);
            }
        }
    },
    changeSelectAll:function(component,event, helper){
        var slctCheckRow = event.getSource().get("v.value");
        var getCheckAllId = component.find("cbox");
        if(slctCheckRow == false) {
            component.find("cbox").set("v.value", false);
        }
    },
    deleteSlctd : function(component,event,helper) {
        var getCheckAllId = component.find("cboxRow");
        var selctedRec = [];
        for (var i = 0; i < getCheckAllId.length; i++) {

            if(getCheckAllId[i].get("v.value") == true )
            {
                selctedRec.push(getCheckAllId[i].get("v.text"));
            }
        }
        helper.deleteSelected(component,event,selctedRec);
    }
})
Step 3: Now create the helper controller of above mentioned Component and add the following code.
({
    getAccountList : function(component) {
        var action = component.get("c.getAccounts");
        var self = this;
        action.setCallback(this, function(actionResult){
            component.set("v.account",actionResult.getReturnValue());
        });
        $A.enqueueAction(action);
    },
    deleteSelected : function(component,event,selctedRec){
        var action = component.get("c.delSlctRec");
        action.setParams({
            "slctRec": selctedRec
        });
        action.setCallback(this, function(response){
            var state =  response.getState();
            if(state == "SUCCESS")
            {
                component.set("v.account",response.getReturnValue());
                console.log("Successfully Deleted..");
            }else if (state=="ERROR") {
                console.log(action.getError()[0].message);
        });
        $A.enqueueAction(action);
    }
})
Step 4: Last step create the apex class name accListClass and add the following code.
public class accListClass{
    @AuraEnabled
    public List<Account> accList = new List<Account>();

    @AuraEnabled
    public List<Account> delRec = new List<Account>();

    @AuraEnabled
    public static List<Account> getAccounts(String query)
    {
        accListClass alc = new accListClass();

        alc.accList = Database.query('SELECT Id,Name,Phone,Industry from Account');

        return alc.accList;
    }

    @AuraEnabled
    public static List<Account> delSlctRec(List<String> slctRec)
    {
        accListClass alc = new accListClass();
        alc.delRec = [SELECT Id FROM Account WHERE Id IN: slctRec ];
       try{
           delete alc.delRec;
           } catch(Exception ex)
          {
             throw new AuraHandledException(ex.getMessage());
          }
        alc.accList = Database.query('SELECT Id,Name,Phone,Industry from Account');

        return alc.accList;

    }
}
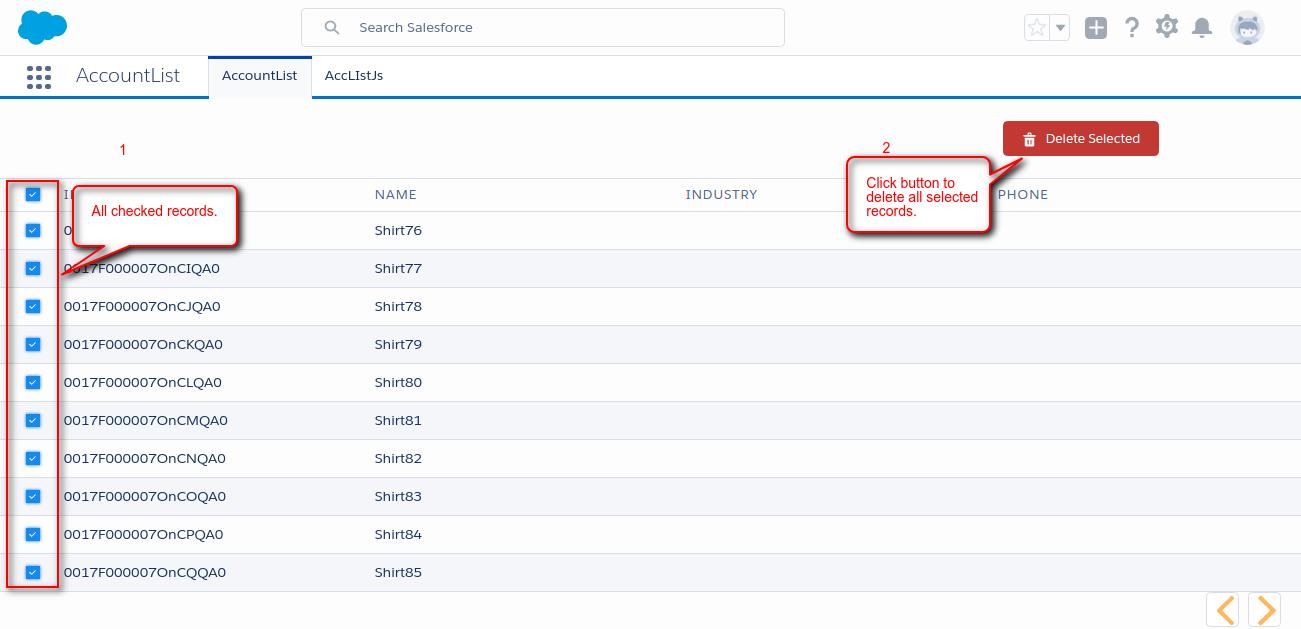
Output
Select all the record. To implement the pagination in lightning component Click Here

Click on the button to delete records:
Support
That’s all for implementation of mass delete in lightning component, still if you have any further query or seek assistance to make your salesforce classic apps compatible with lightning experience, feel free to add a ticket, we will be happy to help you . https://webkul.uvdesk.com/en/customer/create-ticket/

2 comments
“Sorry for the inconvenience caused! Please replace all the occurrences of accListJsClass to accListClass. It was a typo mistake, we have updated the same on the blog.