Magento 2 Marketplace Seller Groups Marketplace Add-on allows the admin to categorize sellers into Gold, Platinum, Silver, and many more groups.
So, these Groups will restrict the seller to upload a certain amount of product to his account. For example, it will limit the number of product uploads.
Thus, the admin can restrict sellers/vendors based on product quantity & time using Marketplace Seller Groups for Magento 2
Note I: The module is an add-on for the Magento 2 (Adobe Commerce)Marketplace module, so the Magento 2 Marketplace Module module must be installed before installing this module.
Note II: If the same functionalities are allowed in default and in membership after the expiry of membership functionalities will be removed from the seller end.
Apart from that, if you require a one time commission payment functionality for the vendors on your marketplace, then do check the Magento 2 Vendor One Time Pay Commission.
Features
- The admin can assign any group to any seller.
- By group limitation, sellers will be restricted to product upload.
- Allow the admin to add one-time membership groups and subscription type groups.
- Recurring payment with PayPal Express Checkout is provided for the seller’s payment.
- The seller groups can be Platinum, Gold, Silver, and much more.
- Group Payment will be done using the allowed payment methods set by the admin.
- The check can be applied to Products, Time, and Time & Product together.
- The seller can also view all the associated recurring profiles for any particular Seller Group.
- In the recurring profile, the seller has the option like Cancel, Suspend & Get update.
- Easy and manageable from the usage point of view.
- The seller can select the booster plans which will add functionalities to their existing membership plan.
- The seller can also cancel the membership plan and upgrade/downgrade the required plan whenever they want.
- The extension is compatible with the Hyva Theme.
Installation
The installation is quite simple just like the standard Magento 2 extensions.
Magento 2 Marketplace Seller Groups installation is super easy. Firstly, you have to unzip the module and then you will get a src folder.
Hence, click on the src folder, and then you will get the app folder. You need to move the app folder in Magento 2 root directory as per the screenshot.

After the successful installation, you must run these commands in the Magento 2 root directory.
php bin/magento setup:upgrade
php bin/magento setup:di:compile
php bin/magento setup:static-content:deploy
php bin/magento indexer:reindex
php bin/magento cache:flush
Installation using composer:
If the module is purchased from the official Magento Marketplace then please follow the below process.
Add the extension’s name and version to your composer.json file:
- Navigate to your Magento project directory and update your composer.json file.
| 1 | composer require <composer name>:<version> |
For this module we need to run:
composer require webkul/marketplace-seller-group:5.0.2
- Enter your authentication keys. Your public key is your username; your private key is your password.
- Wait for Composer to finish updating your project dependencies and make sure there aren’t any errors.
Verify the extension
To verify that the extension is installed properly, run the following command:
php bin/magento module:status Webkul_MpSellerGroup
By default, the extension is probably disabled:
| 1 | Module is disabled |
The extension name is in the format <VendorName>_<ComponentName> ; this is a different format from the Composer name. Use this format to enable the extension.
If you are unsure of the extension name, run:
php bin/magento module:status
and look for the extension under “List of disabled modules”.
Enable the extension
Some extensions won’t work properly unless you clear Magento-generated static view files first.
–clear-static-content
option to clear static view files when you’re enabling an extension.
1.Enable the extension and clear static view files:
php bin/magento module:enable Webkul_MpSellerGroup --clear-static-content
2.Register the extension:
php bin/magento setup:upgrade
3.Recompile your Magento project: In Production mode, you may receive a message to “Please rerun Magento compile command”. Magento does not prompt you to run the compile command in Developer mode.
php bin/magento setup:di:compile
4.Verify that the extension is enabled:
php bin/magento module:status Webkul_MpSellerGroup
You should see output verifying that the extension is no longer disabled:
| 1 | Module is enabled |
5. Clean the cache:
php bin/magento cache:clean
6. Configure the extension in Admin as needed.
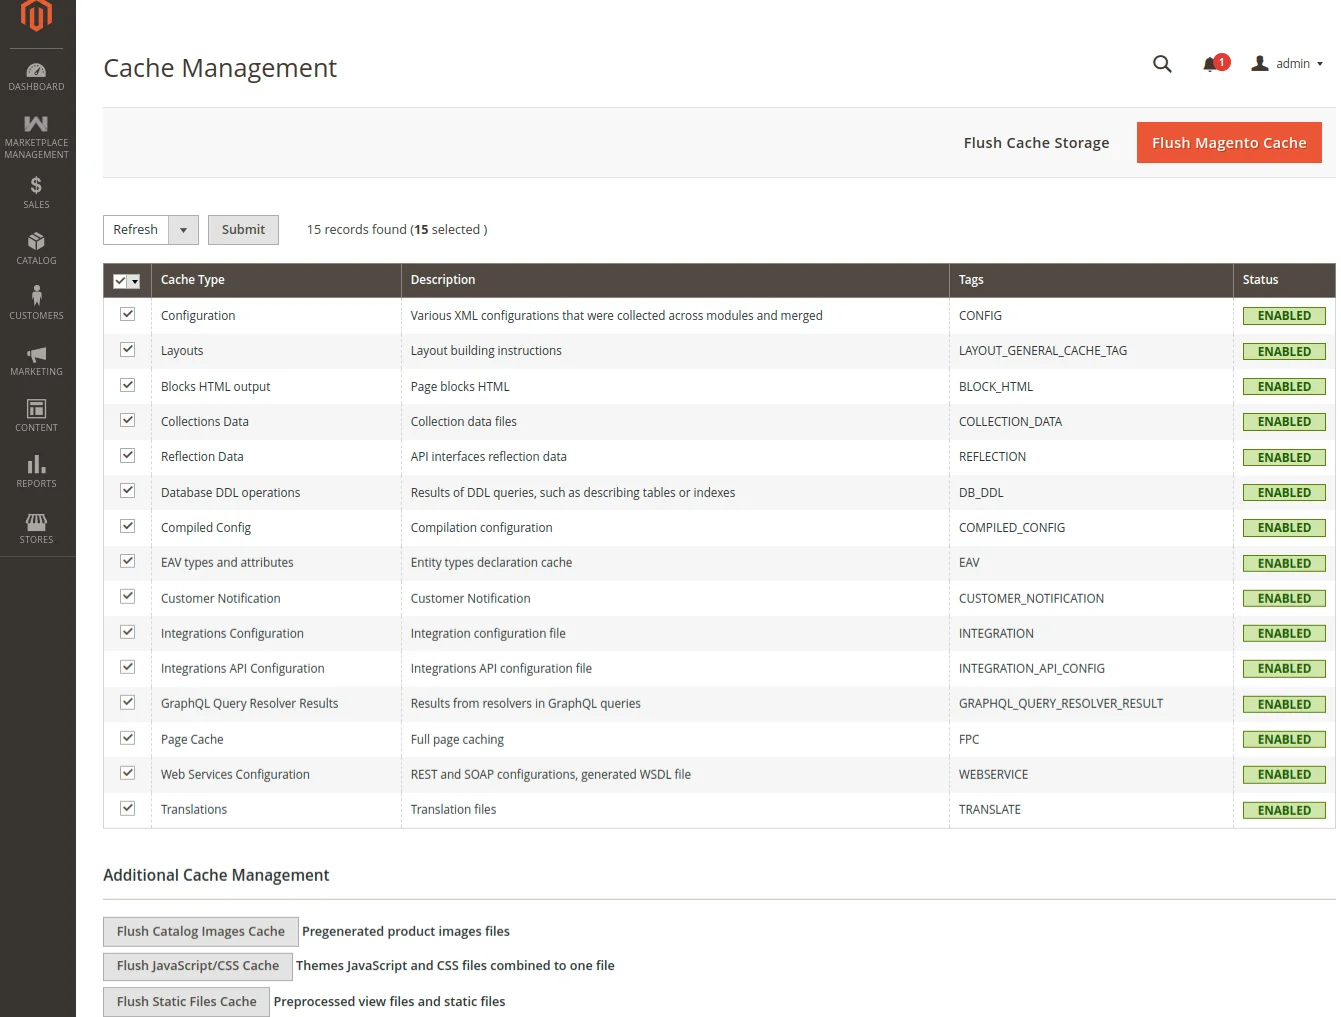
After running the commands, you have to log into the admin panel and you have to clear the Cache. So, you can refer to the below screenshot.
Configuration – Magento 2 Marketplace Seller Groups
So, for the multilingual support, the admin will navigate through Store->Configuration->General ->Locale Options.
Thus, select the locale as German (the language into which admin want to translate his store content).

Language Translation
If a user wants to translate their module from English to German then they need to follow the path app/code/Webkul/MpSellerGroup/i18n.
Hence their unzipped folder and will get a CSV file with name “en_US.csv”. Now they have to rename that CSV as “de_DE.csv” and translate all right side content after the comma in the German language.
Hereafter editing the CSV, save it, and then upload it to the path app/code/Webkul/MpSellerGroup/i18n where they have installed Magento 2 on their server.
So, the module will get translated into the German Language. It supports both the LTR and RTL languages.

How to Generate PayPal API Credentials?
You need to create the app. So, for this , log in here. Now navigate to My Apps & Credentials and then click on the Create app.

Thus, by Clicking on Create App, you can create a new app by filling in the required details –

Here, enter your App Name and select the Sandbox Business Account and proceed further hitting Create App button.
And now select the sandbox or live account and then select the created app for which you want to view the API credentials i.e. client ID and secret key.

Now, after selecting the app you can easily select the Client ID, and Secret key of the selected app.

Now, copy the client ID and secret key and configure them in the admin backend of the Magento 2 Marketplace Seller Groups module.
Configuration – Magento 2 Marketplace Seller Groups
After the successful installation of Marketplace Seller Groups for the Magento 2 module,
you can see the configuration panel under Store > Configuration > Marketplace Seller Group Options as per the below snapshot.
General Settings
These options are used to set the allowed payment methods to-
- buy a membership,
- default group configuration which restricts the seller(who has not purchased any membership) to upload products as per configuration,
- what happens to the products after the membership expires,
- when to notify the seller before the membership expires, etc.
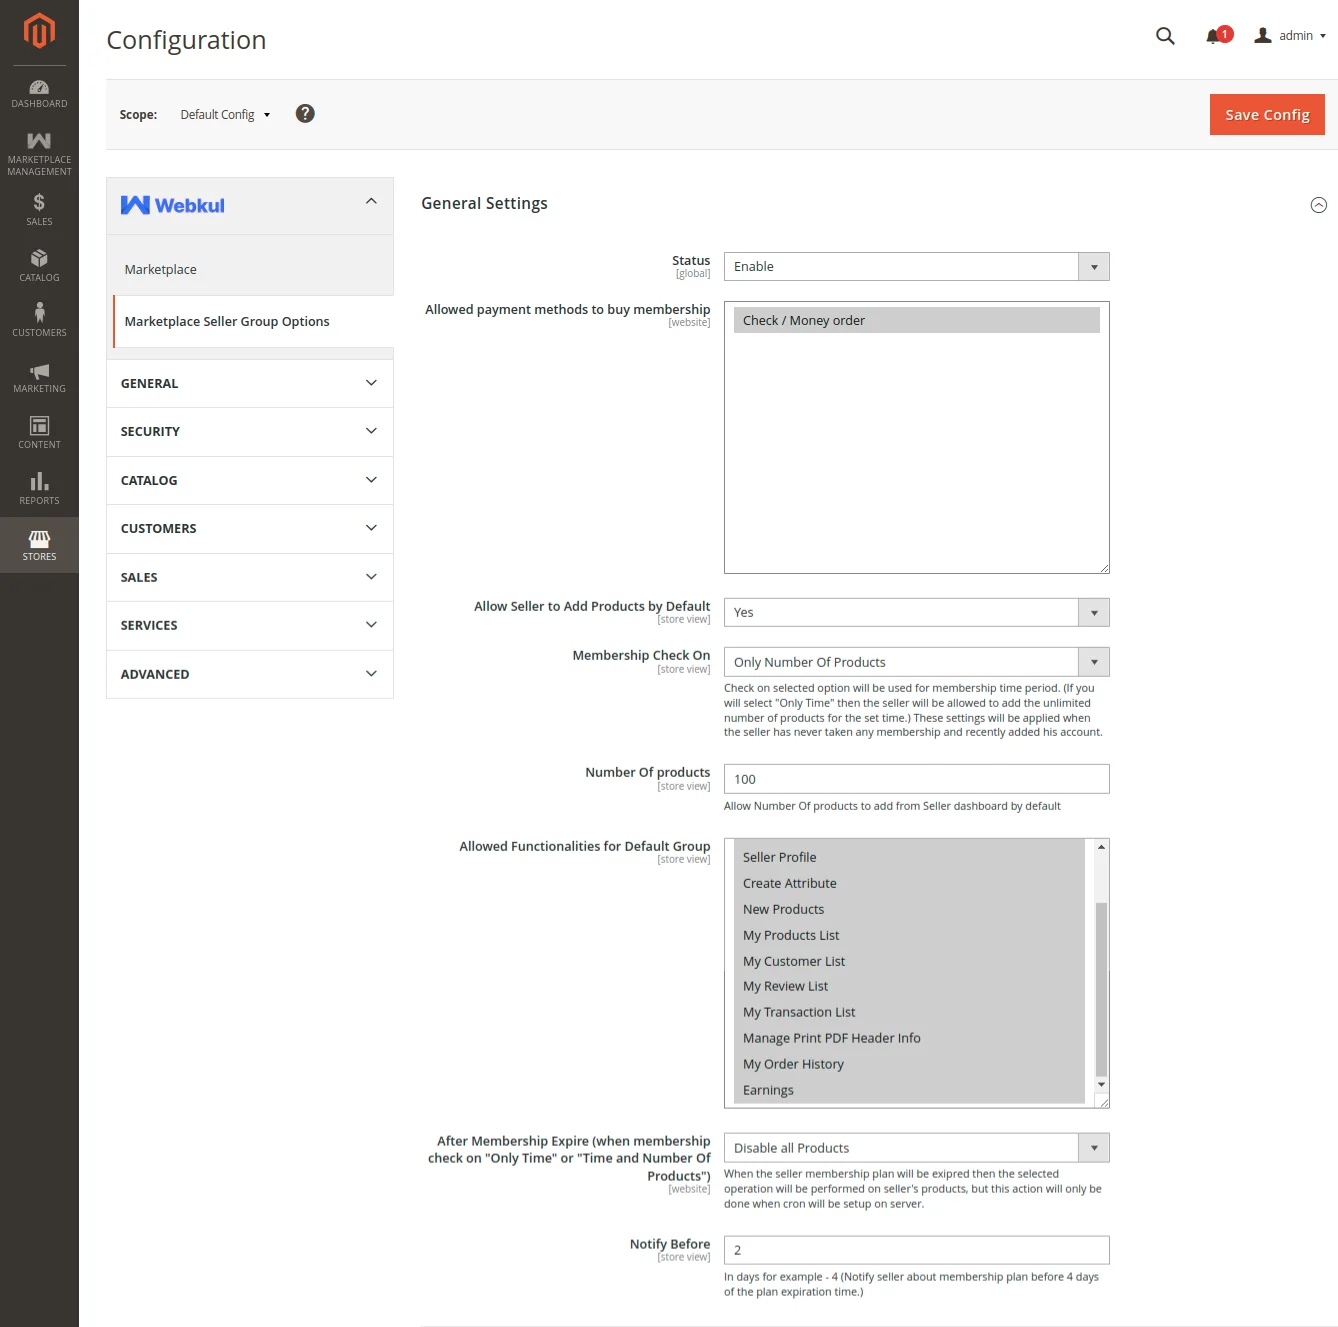
- Status – enable or disable the module as per the requirement.
- Allowed Payment Methods To Buy Membership – Select the “Allowed Payment Methods” that can be used to buy the Membership. Thus, Admin can select any of the available payment methods. However, these methods will be visible to the seller in the frontend for the sellers to purchase the membership.
Membership Check On
Set the membership time period by selecting any one option.
Only Number of Products
If the “Membership check on” is selected as “Only Number of Products”. Then the admin will enter the default number of products that the seller can add from the seller end .
However, if the seller has a new account and has not purchased any membership plan.

Only Time
If the “Membership check on” is selected as “Only Time”. Henceforth, the admin can set Membership Time for Seller in Days.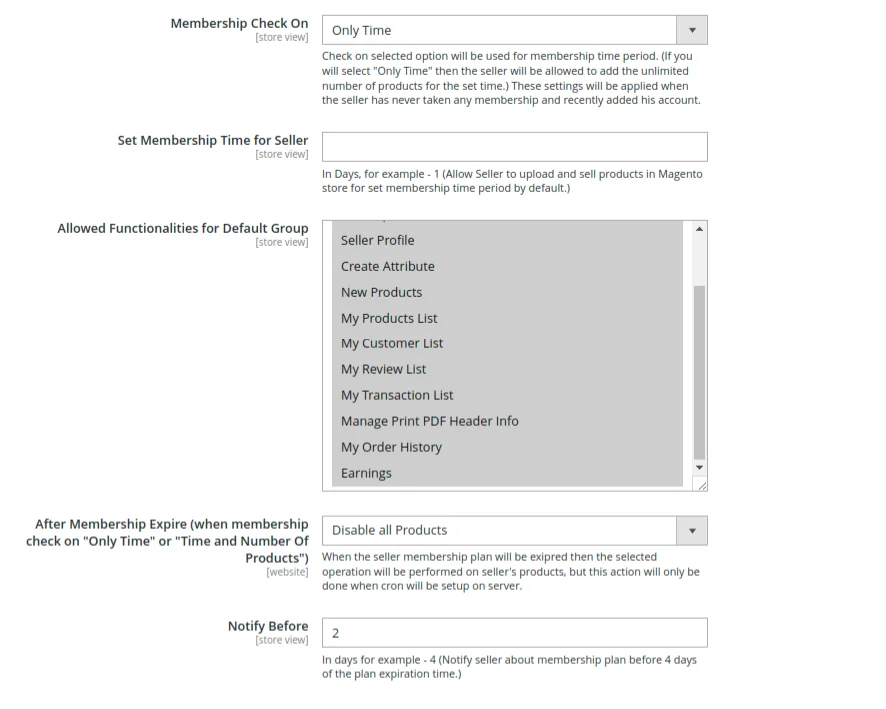
Time & Number of Products
So, if the “Membership check on” is selected as “Time & Number of Products“.
Then the admin enters the default number of products which a seller can add from the seller end and set Membership Time for Seller in days.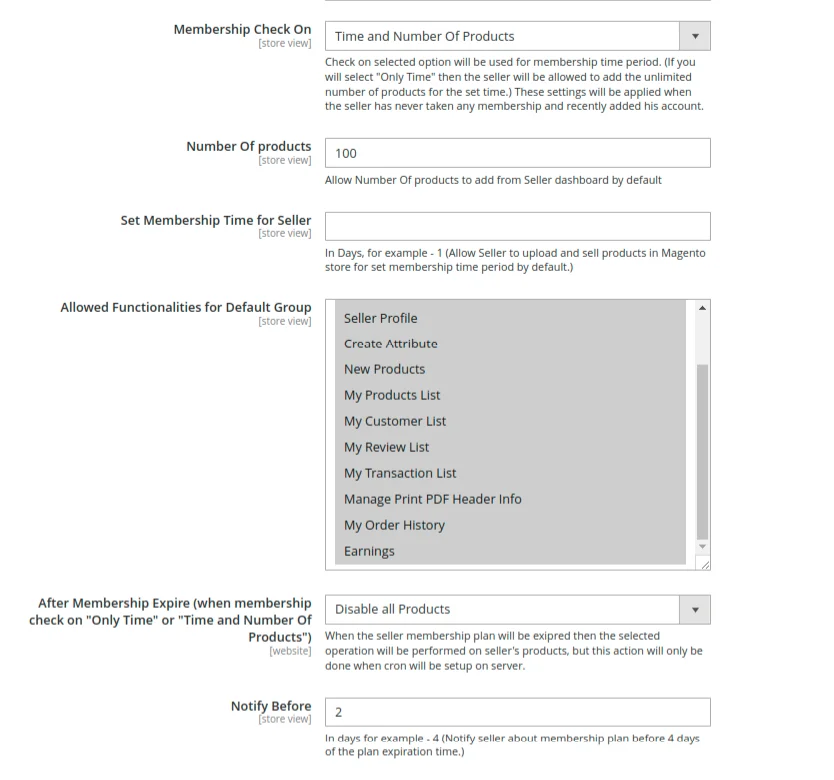
Allow Seller To Add Products By Default –
- So, if the seller is new and has never purchased a Membership plan then set as “Yes“.
- Thus, allowing the seller to add the default number of products set by the admin, after which he has to buy the membership plan. Else select “No”.
Default Number Of Products –
- Set the default number of products that can be added if the seller has never purchased a membership.
Allowed Functionalities For Default Group –
- Set the default functionalities/account menu items that will be available for the default group.
Set Membership Time For Sellers –
- Set membership time in days. For example – if seller membership time is set to 5, then this will allow the seller to upload and sell the products in the Magento store for the set membership time period by default.
After Membership Expire –
- So, when the seller membership plan will expire then the selected operation – “Disable All Products” or “Delete All Products” whichever is selected will be performed on the seller products.
- However, this action will only be done when the cron will be set on the server per day at 01:00 am. You need to set set up the cron as it is done in the Magento.
Notify Before –
- Here “Notify Before” can be set in days. For example – if 1 day is set then the seller will be notified of the membership plan before one day of the plan expiration time.
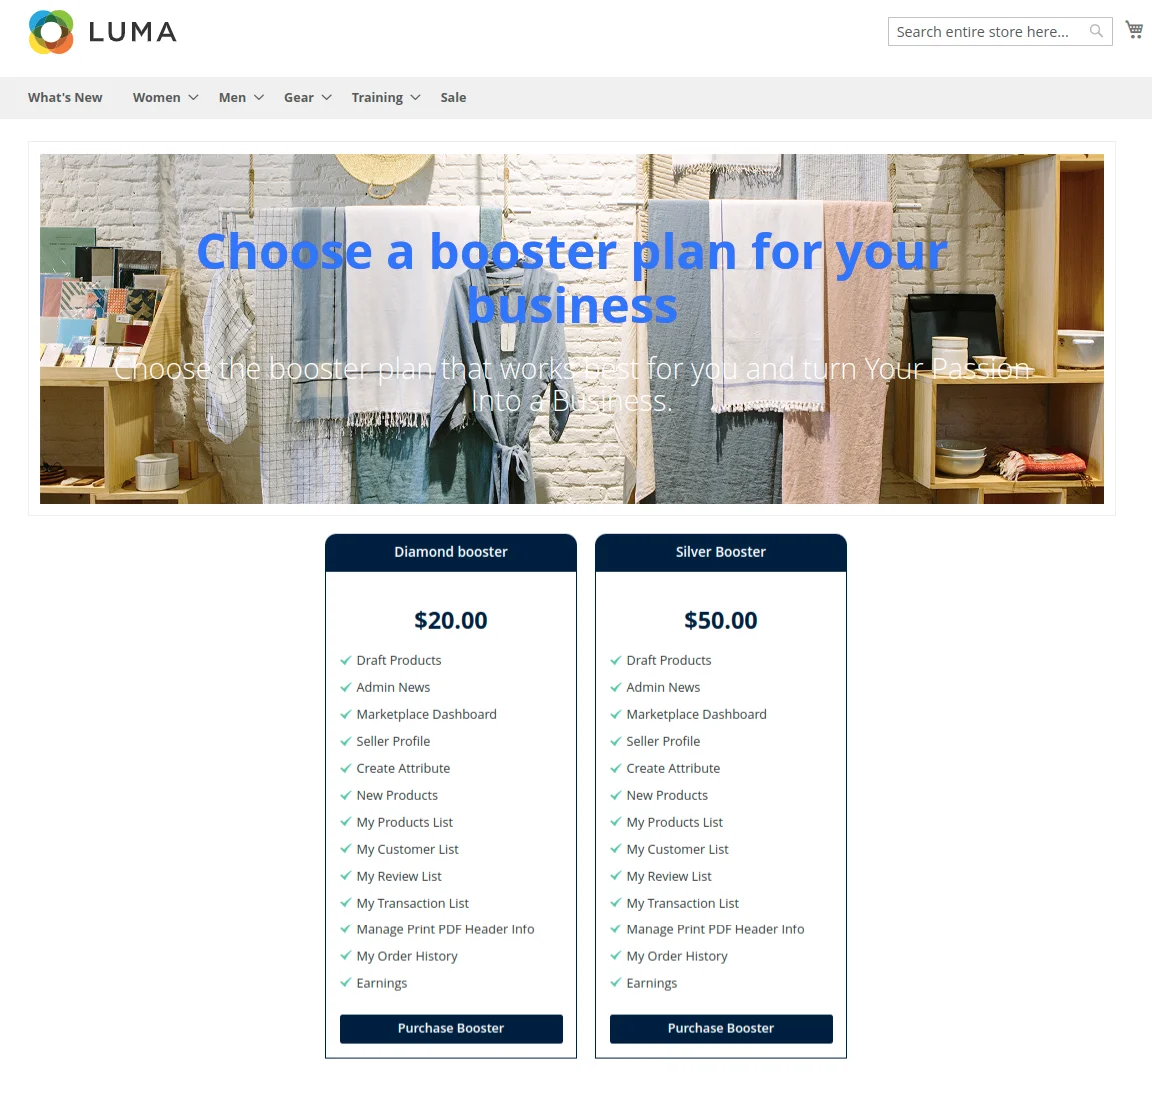
Membership Booster Page Settings
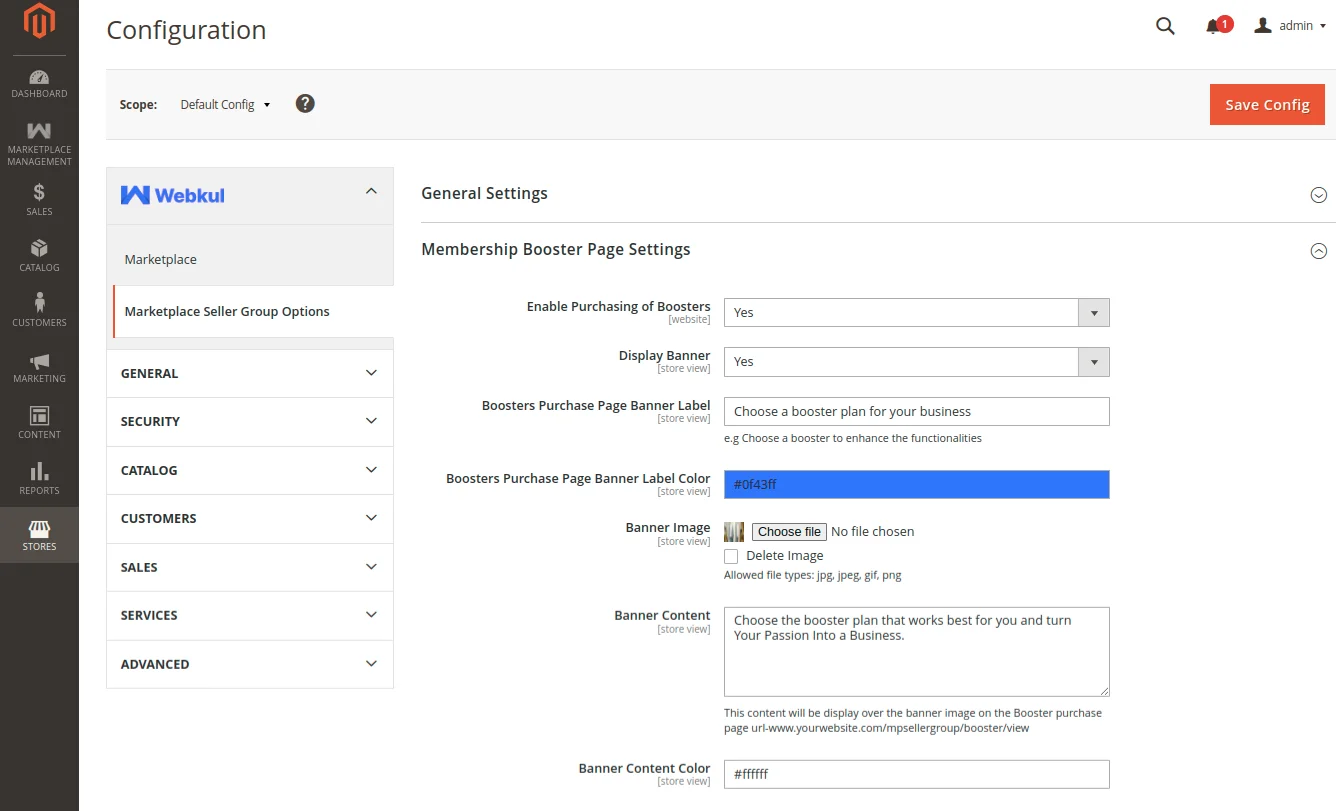
- Enable Purchasing of Boosters- The admin can enable a special membership booster plan for the sellers.
Display Banner- The booster plan banner can be made visible by the admin for the sellers. - Boosters Purchase Page Banner Label- The admin can add the label for the banner which the seller can view.
- Boosters Purchase Page Banner Label Color- This section allows the admin to select the color of the banner label.
- Banner
- Image- This image will be part of the booster banner, which will be in jpg, jpeg, gif, png formats.
- Content- A detailed description of the booster plans.
- Content Color- The color of the content of the banner that the admin wishes to display on the website.
Custom Emails
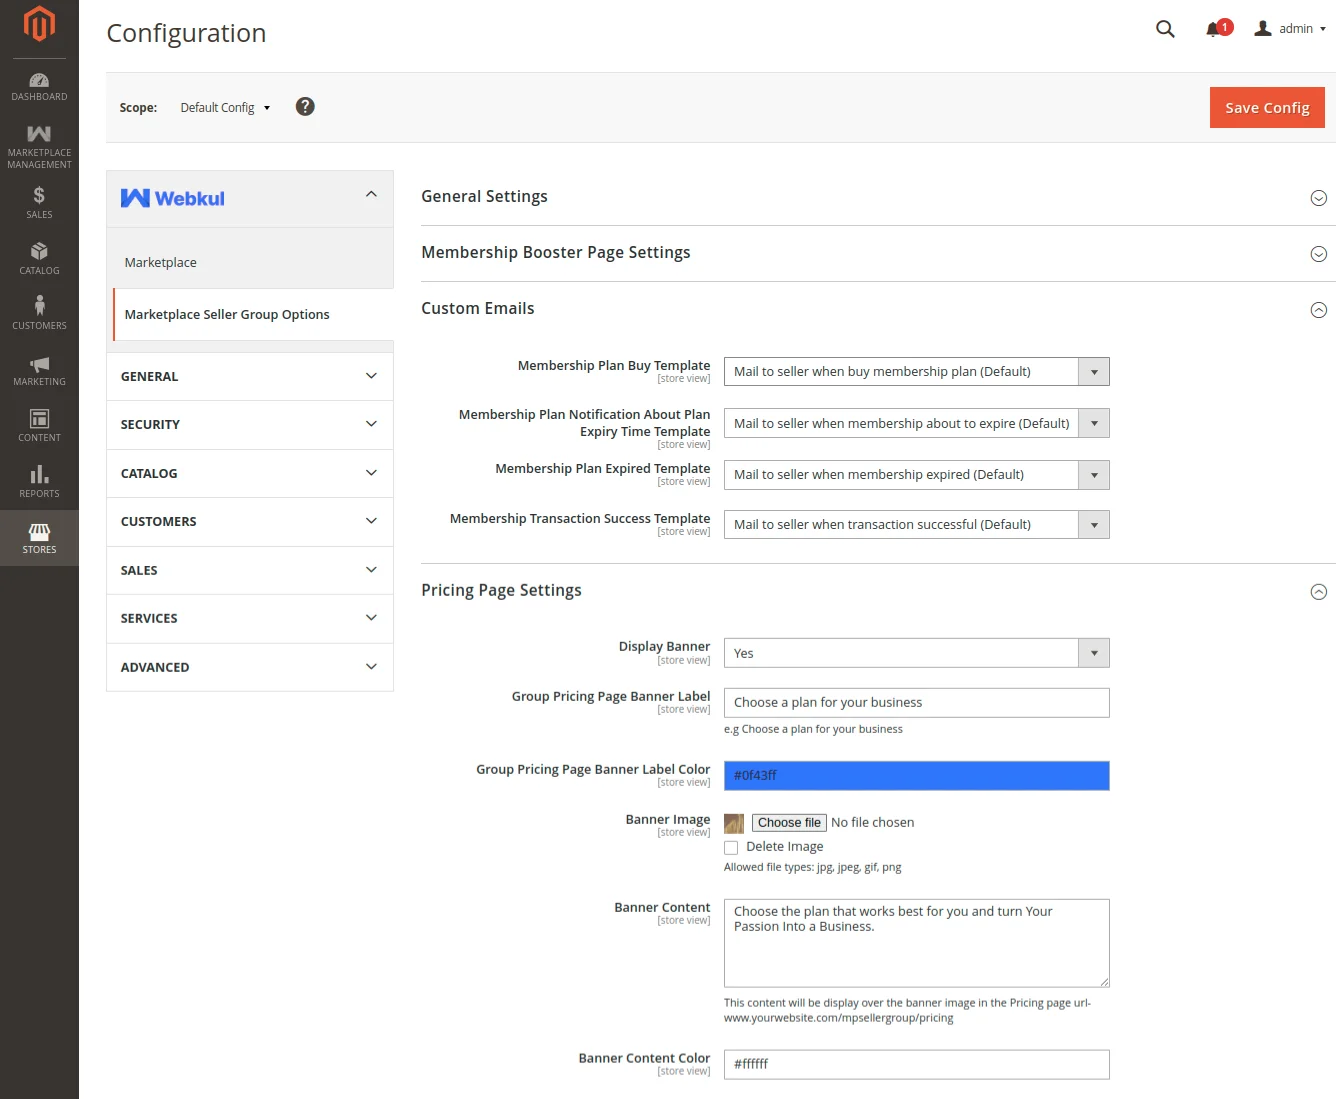
Here the admin can set the default or custom emails that will be sent to the seller on different occasions. Thus, the Admin will be able to send the custom emails for –
- When the seller buys a membership when the membership is about to expire.
- When the membership has expired and when the seller has made a successful transaction.
Pricing Page Settings

Here, the admin will:
- Display Banner – select “Yes” if you want to display the banner else select “No” if want to hide the banner on the group pricing page.
- Group Pricing Banner Label – enter the banner label that will be visible on the group pricing page.
- Group Pricing Banner Label Color – select the color for the banner label text.
- Banner
- Image – select the banner image for the group pricing page. Also, the admin will be able to delete the banner image from here.
- Content – enter the banner content which will be displayed over the banner image.
- Content Color – select the color for the banner content text.
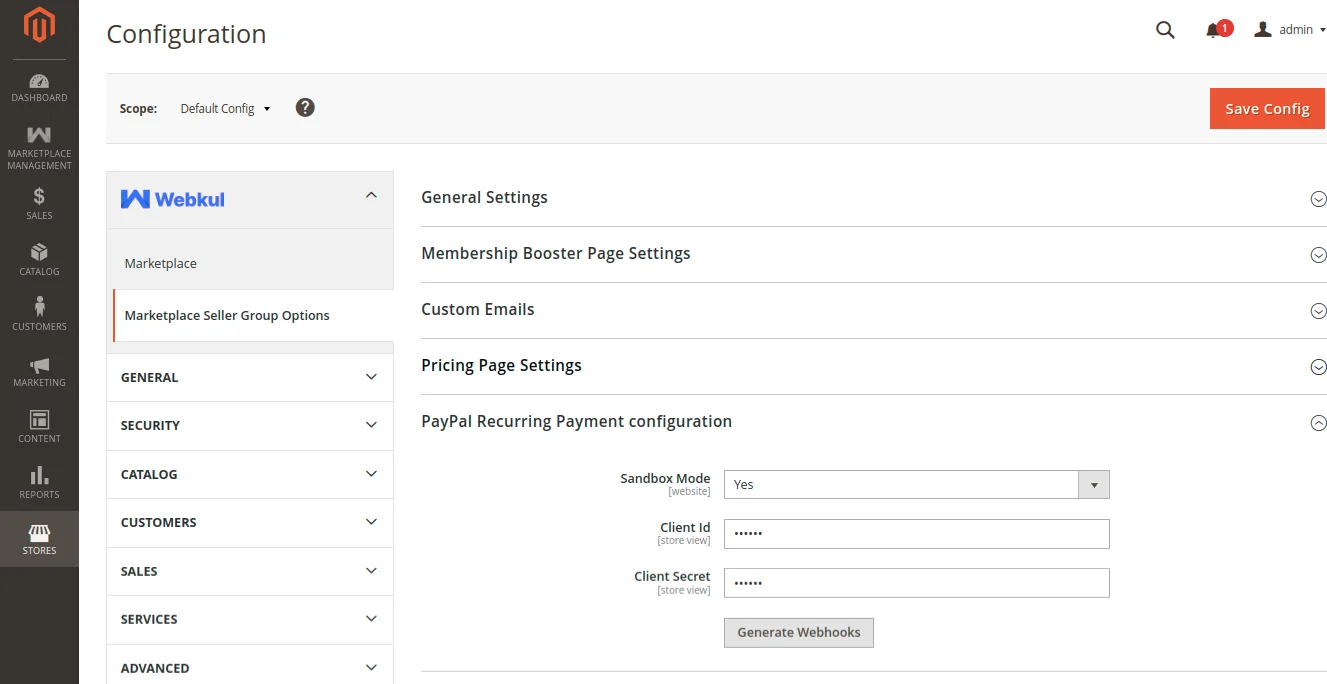
PayPal Recurring Payment Configuration
Here, the admin will:
- Sandbox Mode – Select the Sandbox Active as Yes(Testing Mode) or No(Production Mode).
- Client ID – Enter the client ID that the admin has created while creating the app.
- Client Secret – Enter the client secret key that the admin has created while creating the app.
Generate Webhooks in PayPal Payment Gateway for Payment Events
A webhook serves as a means to modify the functionality of a web page or web application through personalized callback mechanisms.
In essence, webhooks are custom HTTP callbacks defined by users and activated in response to specific events.
To generate Webhooks, the admin needs to click on the “Generate Webhooks” button and generate data.
Following the selection of “Generate Webhooks” the admin will receive the message in accordance with the provided screenshots below.
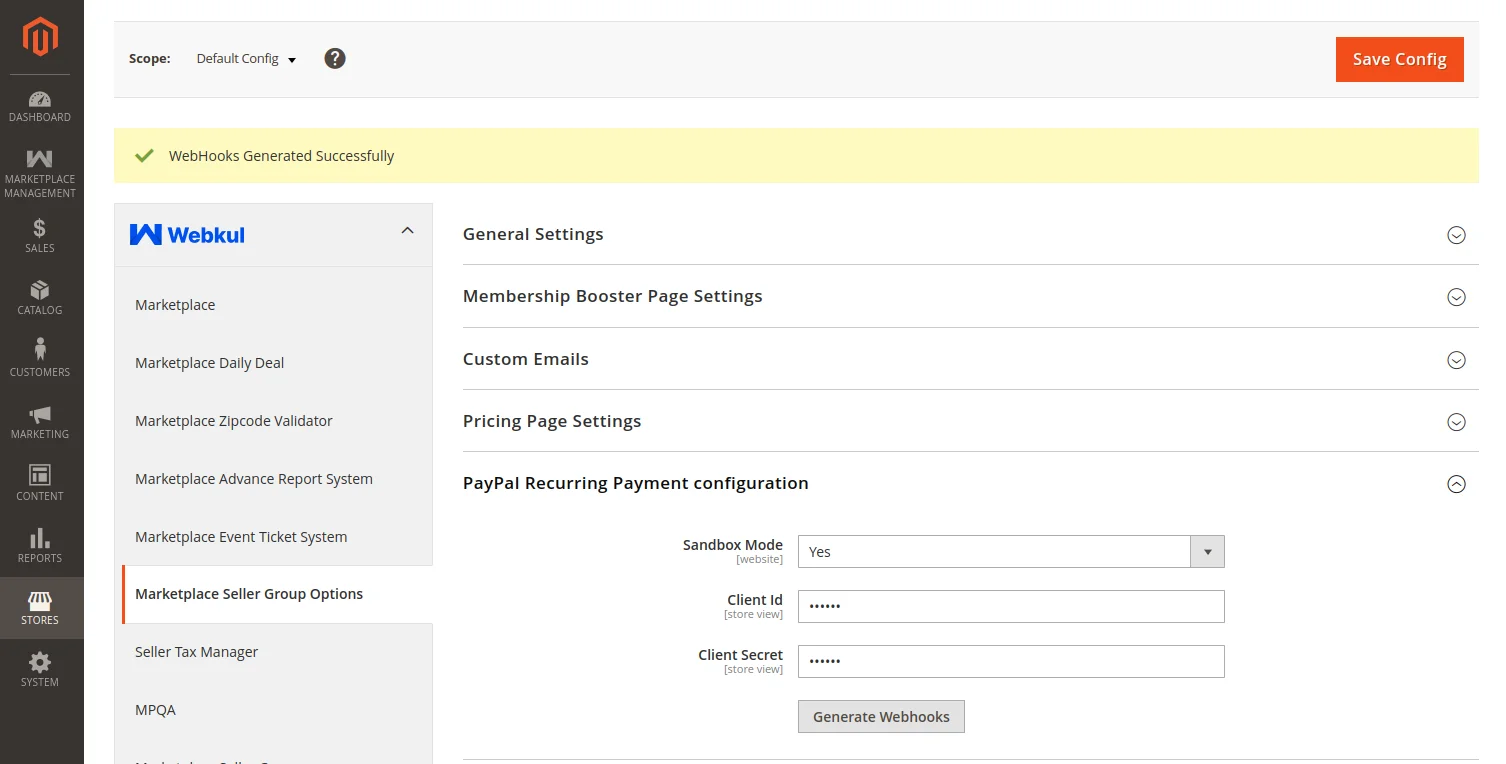
Each time the trigger event occurs on the website, the webhook detects the event and gathers the associated data.
Now, the admin can see the collected data from the PayPal dashboard by simply logging in and clicking on “Webhook Event” with PayPal as shown in the image below –

Admin End- Manage Seller Groups
After the module installation, the admin can create various seller groups. For this, the admin will navigate to Marketplace Management -> Manage Seller Groups as per the below image.
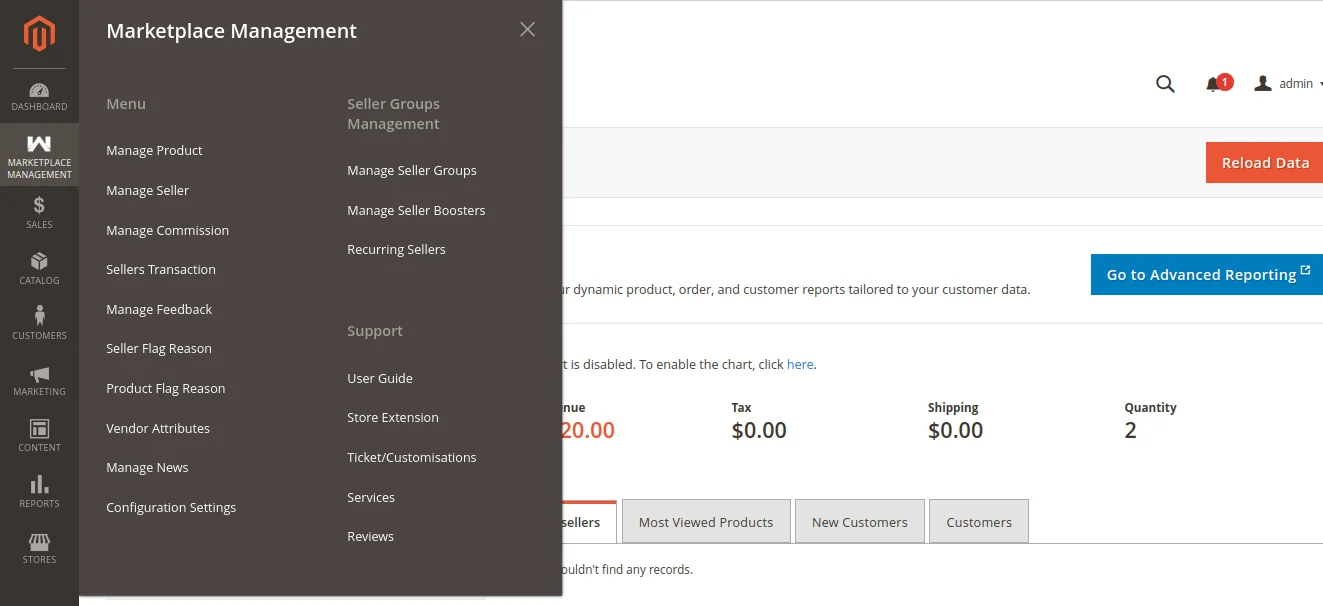
Clicking on Manage Seller Groups menu option, the admin gets navigated to the “Manage Seller Groups” page.
Thus, here, the admin can:
- View the complete list of seller groups.
- Delete or edit the existing seller groups.
- Add new seller groups.
Add New Group
Under this, the admin can add a new group by clicking on the ‘Add Group’ link. For this, the admin will enter:
- Status – set the status of the group as enabled/disabled.
- Group Name – the admin can enter any name he wants to give to a group.
- Group Code – the admin can enter the group code.
- Check Type – select the membership type for the sellers as follows:
Only Number of Products – If the admin wants to set the restriction for the number of products that a seller can add. Then the admin can select this option.
Only Time – If the admin wants to set the restriction for the time that the sellers will be able to add an unlimited number of products for the specified time in the group. - After the end of the subscription, the products will get disabled automatically.
Time & Number of Products – If this option is selected, then the limitation will apply both time and number of products. - Membership Time Period – define the membership time period.
- A number of Products Allowed – set a maximum number of products allowed to upload.
- Fee Amount – set amount for subscribing to this group.
- Group Image – upload the group image.
- Allowed Account Functionalities – set the default functionalities/account menu items that will be available for this group.
- Sort Order – set the sort order of this group.
- Enable Subscription – select ‘No’ for just allowing the seller to one-time subscription or ‘Yes’ for making the group a recurring type subscription membership

Recurring type subscription membership- Enable
If the admin has enabled the recurring type subscription membership, then the admin will also:
- Schedule Description: provide the subscription description in this field.
- Maximum Payment Failure: set maximum payment failures allowed.
- Auto Bill on Next Cycle: set whether to generate an auto bill on the next cycle or not.
- Billing Period Unit: set billing period as per Day, Month, Year, Week, or Semi-month.
- Billing Frequency: set the number of the billing periods that will make up one billing cycle.
- Maximum Billing Cycles: set the number of billing cycles for the payment period.
Suppose, Billing period Unit is Month, the Billing Frequency is 2, and the maximum Billing Cycles is 3 so it denotes the customer will be charged every second month up to 3 time (i.e. stop charging after 6 months).
- Initial Fees: set this one-time payment amount which is to be paid along with the first cycle payment.
- Allow Initial Fee Failure: allow initial fee failure by selecting Yes else select No.
Note–
- To sells the recurring subscription type groups admin needs to save the details of the PayPal Recurring Payment configuration.
- If the admin did not save these details and the customer tries to purchase the subscription type group then an error message displayed “Sorry! Admin has not added the payment details yet. Please try later!”
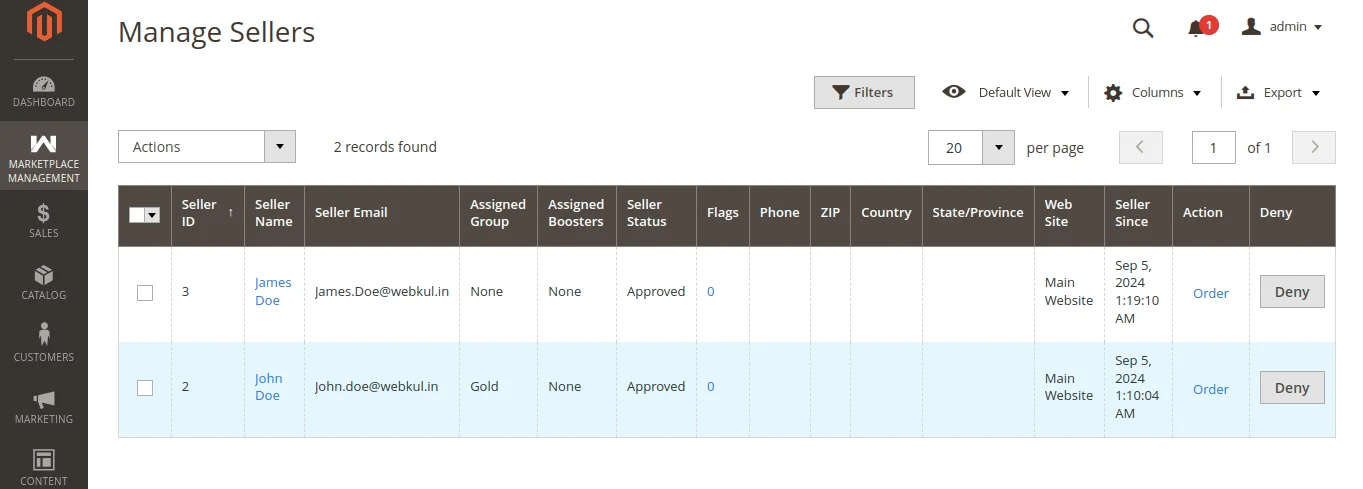
The admin will go to Marketplace Management > Manage Sellers and can assign multiple sellers to any single group.
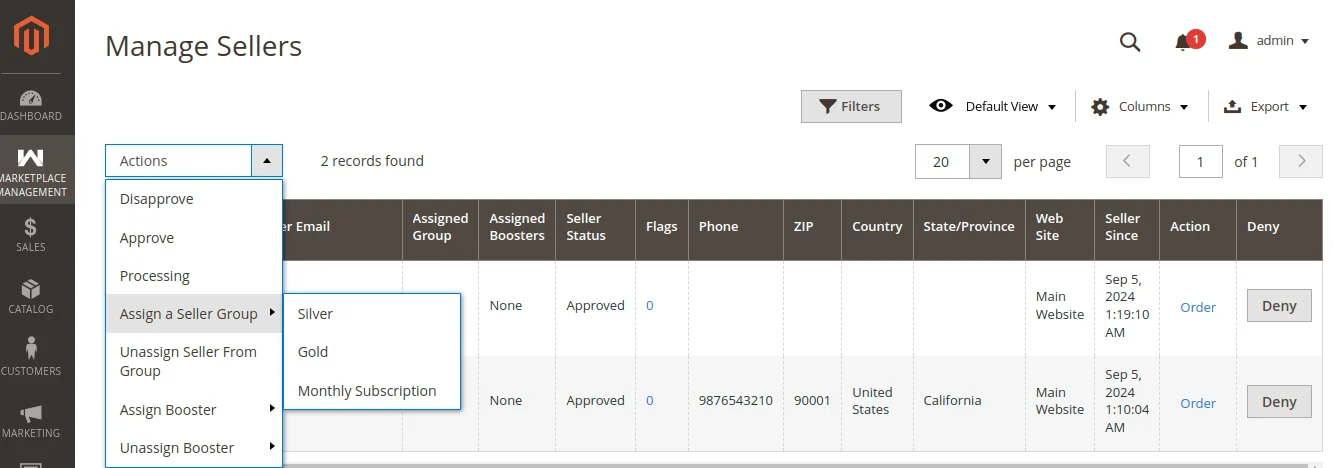
Assign Booster
Here, the admin can assign Booster plans to the sellers with one click.
Furthermore, the admin can manage Boosters under Manage seller Boosters.
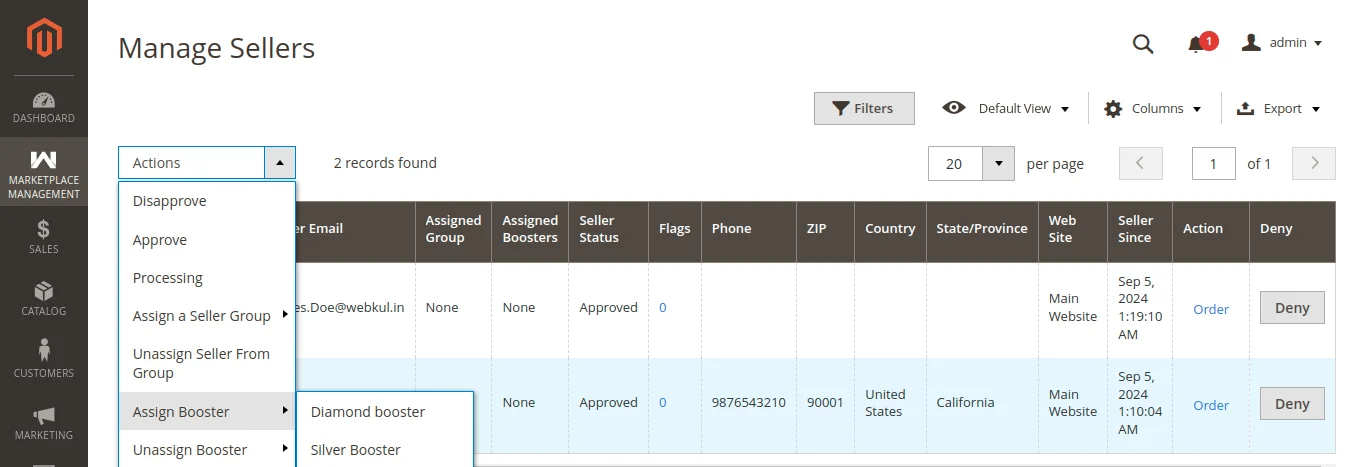
Unassign Seller From Group
The admin can unassign multiple sellers from the group by clicking on Unassign seller from the group under Actions.
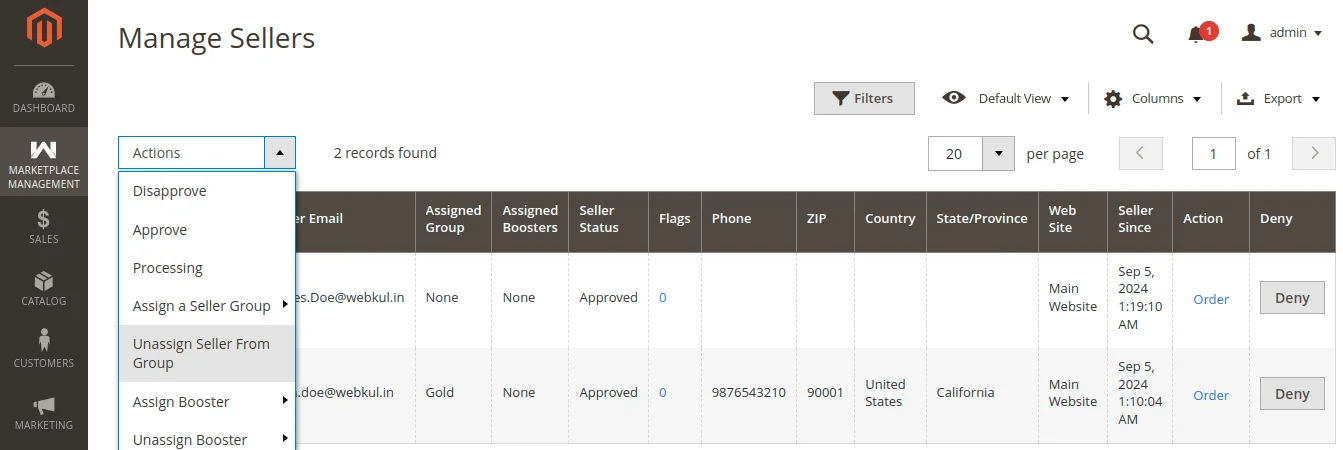
Unassign Booster
Here, the admin can unassign the booster by clicking on Unassign booster.

Manage Seller Boosters
The admin can introduce the booster plans that give the sellers an additional advantage of membership.
To add the booster plans the admin navigates through Marketplace Management>Manage Seller Booster.

The admin can edit/add the plans which to offer the sellers.

Booster Color
This color will be of the booster which can be set from this section.

Recurring Seller
In this section, the admin has the capability to review recurring seller information.
which includes details such as the seller’s name, payment status, membership start and expiration dates, payment reference ID, profile status, upcoming payment date, and previous payment date.

Seller End
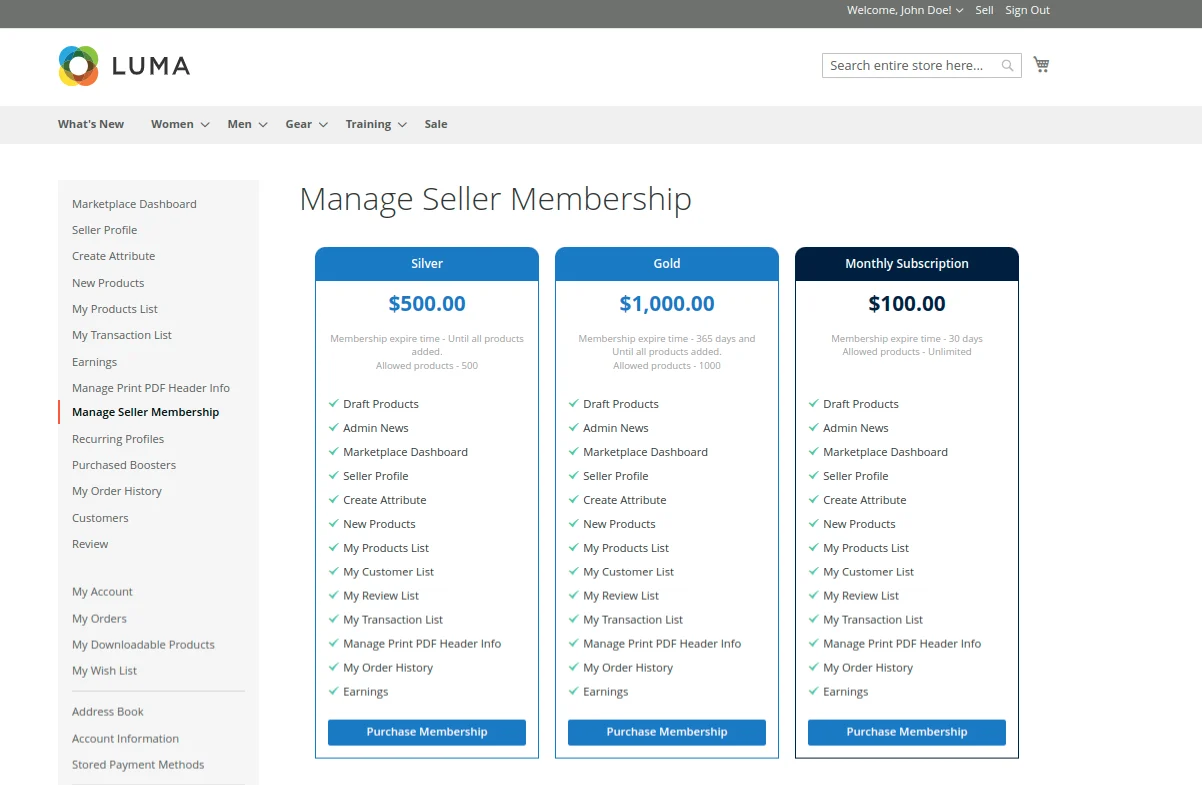
Here, the sellers can select their membership type and proceed to pay for the selected membership. This page opens as soon as the seller opens the login page.

Also, the seller can click on the menu item “Manage Seller Membership“. Here the seller will be able to purchase the membership type and the seller can pay thereafter as shown below in the snapshot.
The seller can add products to his Products List after logging into his seller account. But if Seller exceeds the default add product quantity limit then, an info message will be displayed.
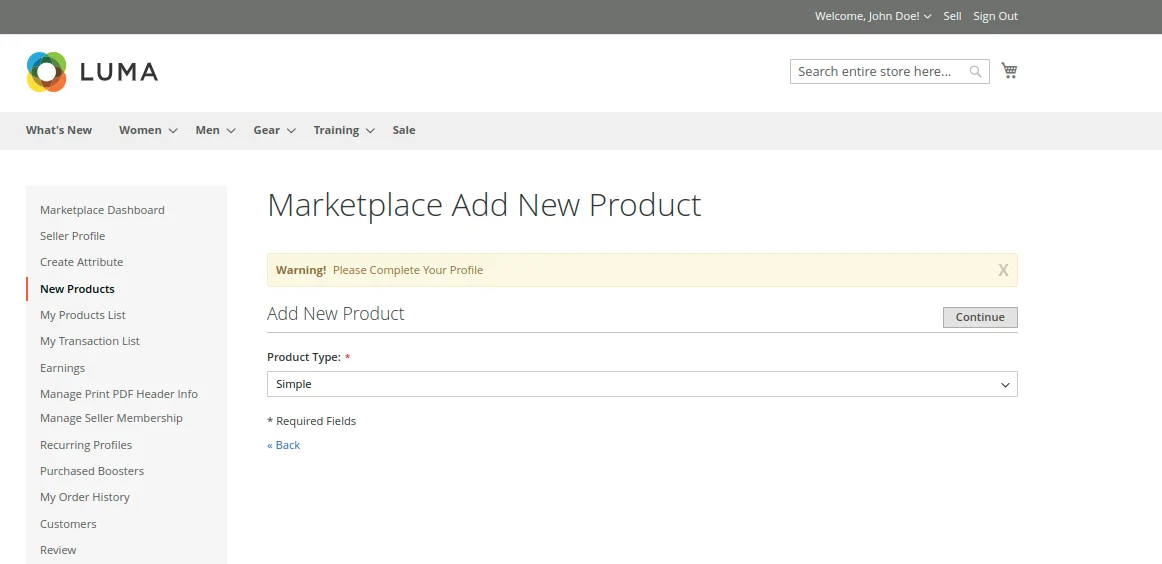
To add more products, the seller will click on the footer link “Pricing“, which will take them to the group pricing page.
Recurring Type Subscription
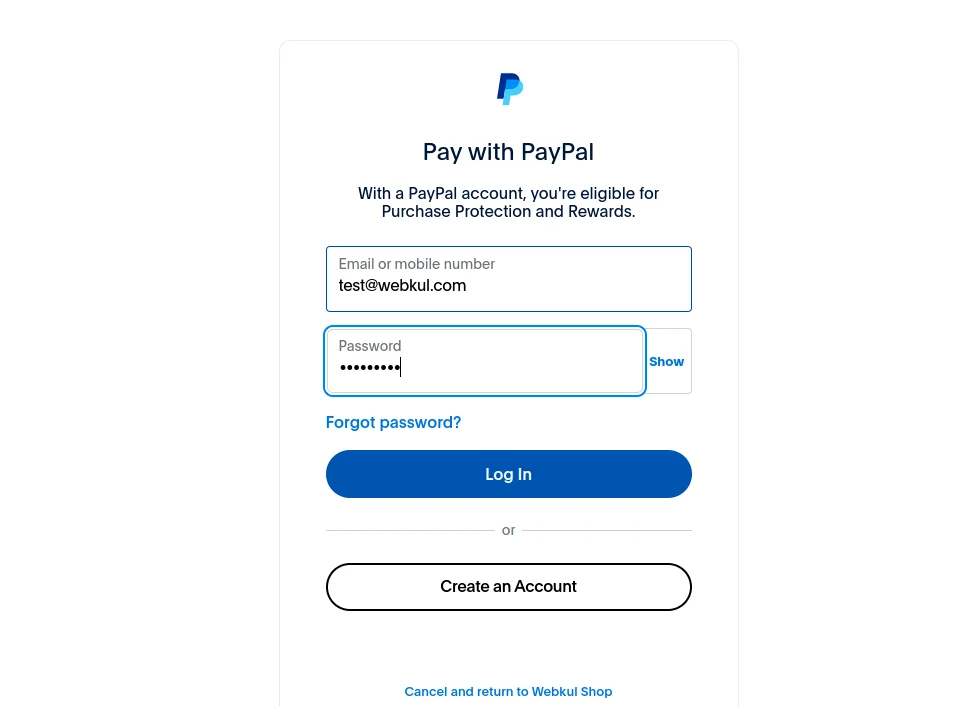
If the selected group is a recurring subscription type then the seller will make payment using PayPal from the seller account.
When the seller will click on the “Purchase Membership” button, the seller will be redirected to the PayPal Account as per the image.
After making the payment, the seller can add more products to his product list as per the membership group the seller has purchased.
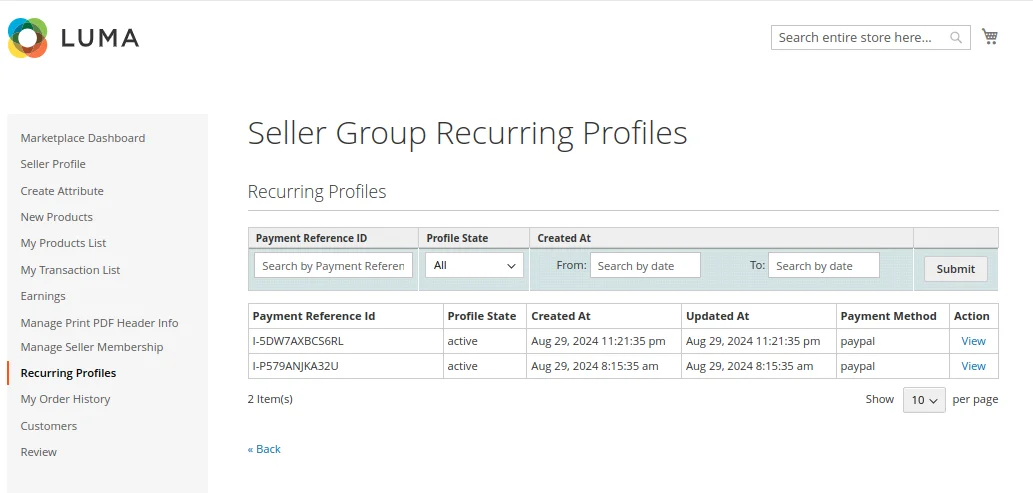
Also, one can view the payment information under the “Recurring Profiles” tab as per the below image.
Recurring Payment Details
On clicking on the ‘View’ link, the seller can view the recurring payment details like the image below:
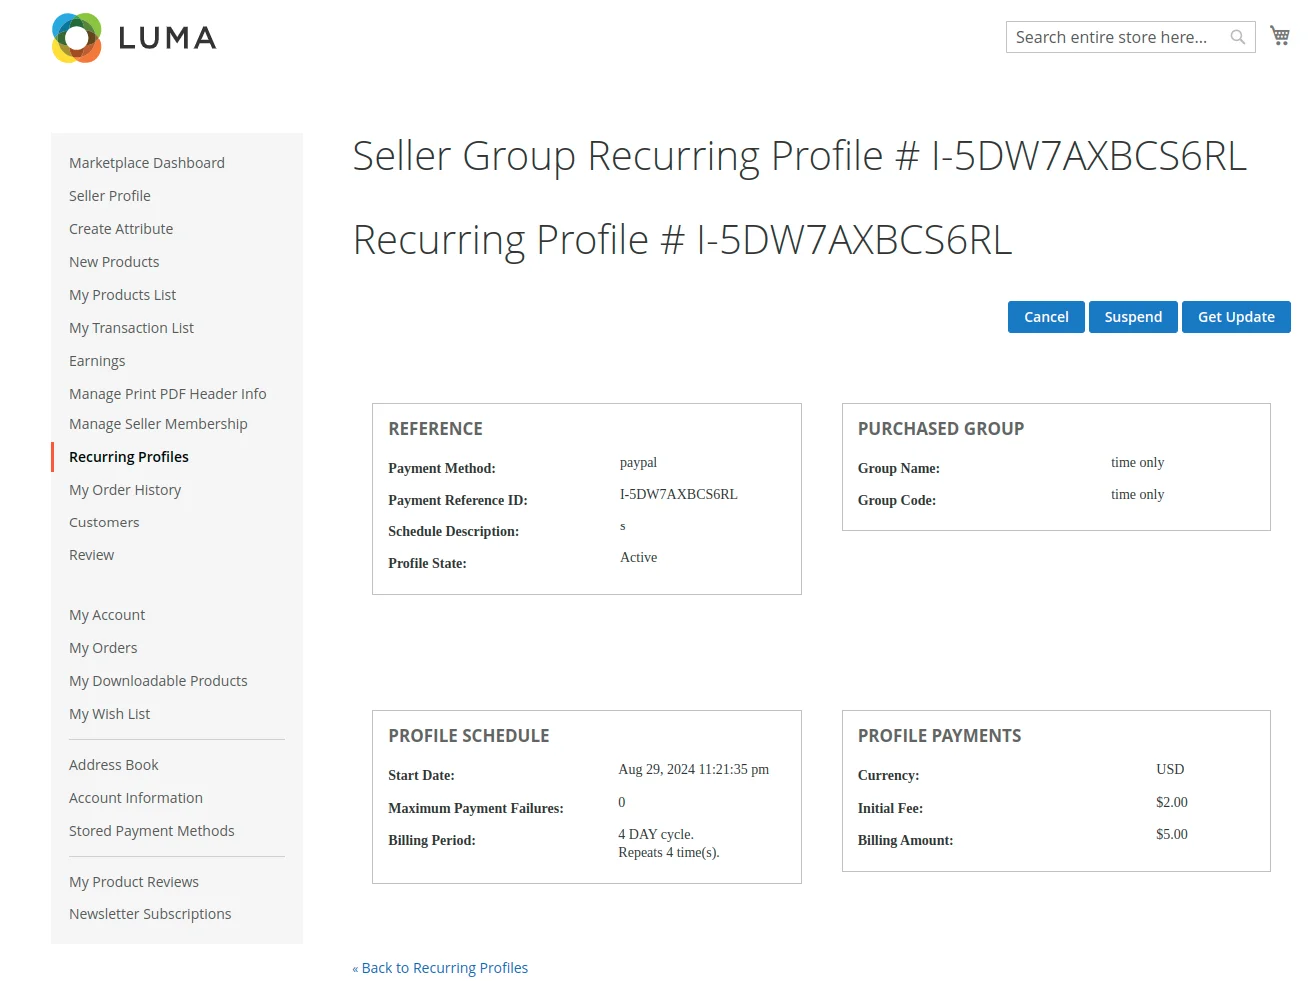
Here, the seller can also cancel, suspend and even get the updates for the recurring profiles.
- Cancel- This will completely end the membership plan.
- Suspend- This will pause the membership plan for time being.
- Get Update– This will restore the update in the membership plan.
Marketplace Seller Groups for Magento 2 One-Time Membership
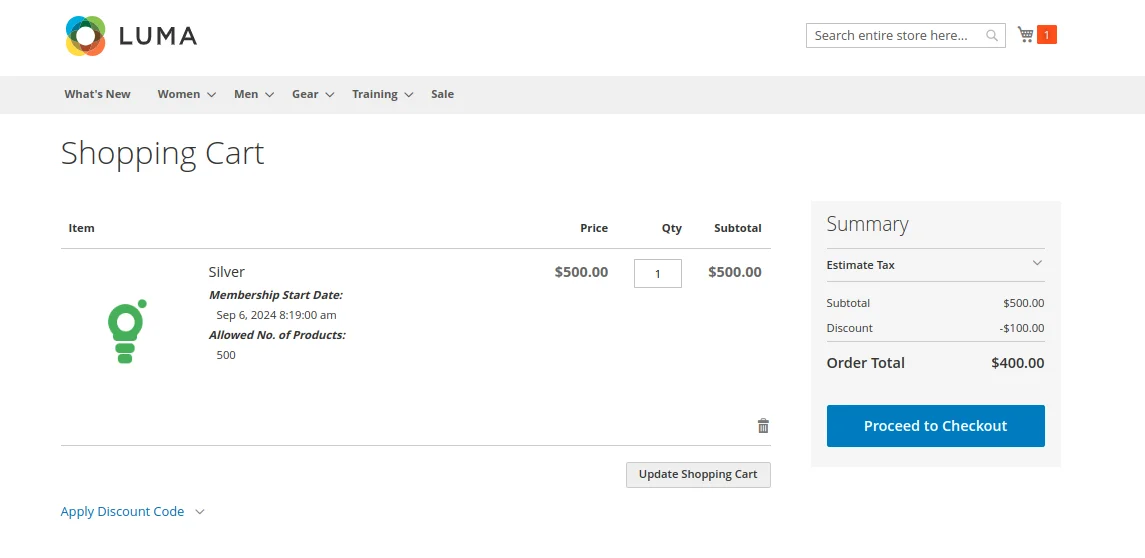
If the seller selects the One-time subscription group type, the seller will be able to purchase the subscription just like he would do for any of the web store products he wants to purchase.
Furthermore, the selected Group Type by the seller is ‘One-time subscription’, the seller will proceed to pay the group fee by clicking on the “Purchase Membership” button.
Then, the seller will be directed to the following page as per the screenshot.
After, clicking the “Proceed to Checkout” button, the seller will be able to make the payment using the allowed payment methods set by the admin as shown below in the screenshot.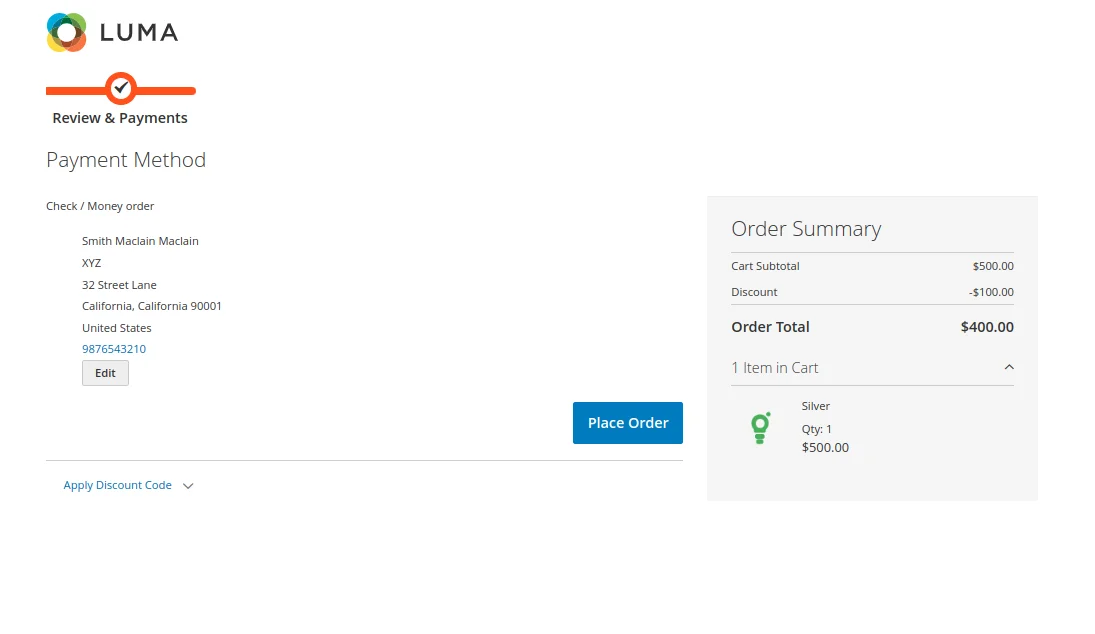
After making the payment, the seller can view the payment information under the “Manage Seller Membership” tab as per the below image.

Now Seller can add more products.
Subscription Expiration
If the seller exceeds the add product limit or time duration expires for any group then, a message will be displayed like the below image.

Therefore, now the seller needs to be assigned to a group again to add more products.
Marketplace Seller Groups for Magento 2 (Adobe Commerce)- Booster Plans
The seller in the front end can view the booster plans. However, these booster plans can be purchase it separately to add additional functionalities to the membership.
Thus, saving the seller from the trouble of purchasing new memberships again and again.
Moreover, the booster plans are purchas in the same pattern as the other memberships. For this, the seller has to navigate through the Manage membership section.

Hence, herein the seller can click on ‘Purchase Membership Booster’ which allows the seller to view the membership plans to purchase.
Furthermore, the purchased plan henceforth is visible in the Purchased Booster section.

However, the seller can view the same in the seller’s separate view section as below.

After that, the seller can view the details of the membership booster plan.

How Seller can cancel the Membership plan?
Also, the seller can cancel the membership plan from their panel and start a new membership plan.
To do so, the seller needs to navigate the dashboard –> Manage Seller Membership –> Cancel Membership.
Therefore, the seller needs to click on the cancel membership button to cancel the membership as shown below:-

That’s all for the Magento 2 Marketplace Seller Groups marketplace.
If you still have any issues feel free to add a ticket and let us know your views at [email protected].
Current Product Version - 5.0.5
Supported Framework Version - Magento 2.0.x, 2.1.x, 2.2.x,2.3.x, 2.4.x

6 comments
Thank you for reaching out to this user guide.
The answer to your query is, the booster plans will add the new features to your existing plans., No features will be replaced from the current plan. The sellers or seller groups will remain the same.
Regards,
Webkul Team
Please elaborate on your requirement in detail so that we can assist you better. You can raise a ticket at [email protected] so that our team will get back to asap.
Thanks
Webkul Team
This can be done through extra efforts so please mail us at [email protected] and the team will assist you further.
Thanks,
Webkul Team.