Marketplace Seller Badge for WooCommerce allows the admin to assign badges to sellers on the basis of their work conduct.
The seller can view the assigned badges under their own marketplace account panel.
It is rightly said, “appreciation leads to good work”.
Therefore, the admin can allot badges through the Marketplace Seller Badge for WooCommerce to a seller who deserves acknowledgment for good work.
Note: Marketplace Seller Badge for WooCommerce is an add-on to WooCommerce Multi-Vendor Marketplace Plugin
The user must first install WooCommerce Multi-Vendor Marketplace to make use of the Marketplace Seller Badge for WooCommerce.
Check the plugin Workflow in the video below –
Features – WooCommerce Marketplace Seller Badge
- The admin can assign badges to the seller on the basis of the seller’s performance.
- The admin can allocate any number of badges to any seller.
- Admin can add, edit, delete, or change the status of a badge.
- The admin can set the rank of each badge from the admin panel.
- The admin can assign or remove a seller’s badge.
- Admin can allocate any badge like Gold, Silver, etc, to a seller.
- The seller can see the allocated badges on the seller profile page.
- The seller will receive the email notification whenever any badge is assigned to them
- The customer can see the badges allocated to a seller on the seller’s profile page.
- The codes are open source and can customize as needed.
Installation – WooCommerce Marketplace Seller Badge
The user will get a zip file that needs to be uploaded in the “Add New” menu option in the WordPress admin panel.
For this login to WordPress Admin Panel and in the Dashboard hover your mouse over the “Plugins” menu option select the “Add New” option.
After this, the user will see an option on the top of the page that is “Upload Plugin”, click the option to upload the zip file.
On clicking the “Upload Plugin” option, the user will see a “Choose File” button. Click on the button to browse for the zip file as per the image below.
After browsing the file, click on the “Install Now” button so as to install the plugin as per the snapshot.
Once the plugin is installed, the user can see a “Plugin installed successfully” message and an option to activate the plugin.
The user needs to click on the “Activate Plugin” button to activate the plugin.
Backend Configurations – WooCommerce Marketplace Seller Badge
The admin can set the configurations for the seller badge by navigating through Marketplace Seller Badge > Add New Badge.
Under Add Badge panel, as shown below, the admin can configure the badge details.
The admin can configure the seller badge details as follows:
Badge Name: Set the name of the badge.
Badge Description: Define the description of the badge which describes the significance of the badge.
Rank: Set the Rank that is associated with the badge.
Status: Set the status of the badge as “enable” or “disable”.
Badge: Set or upload the image of the badge.
Admin-End Workflow
The admin can manage the badge under the Marketplace Seller Badge > Badge Manager.
Under the Badge Manager panel, all the badges created by the admin for the sellers are visible.
For instance, the Gold badge, along with the badge description, rank, badge image, and the badge status is visible.
If the admin wishes, then by checking the checkbox for Id, he can select all the badges and either enable, disable or delete the badges under “Bulk Actions” as shown in the image below.
The admin can disable or enable the status of the badge directly, under “Status” in the Badge List panel.
They can also edit or delete the badge details by clicking on the edit/delete button given against the id associated with the badge as in the image below.
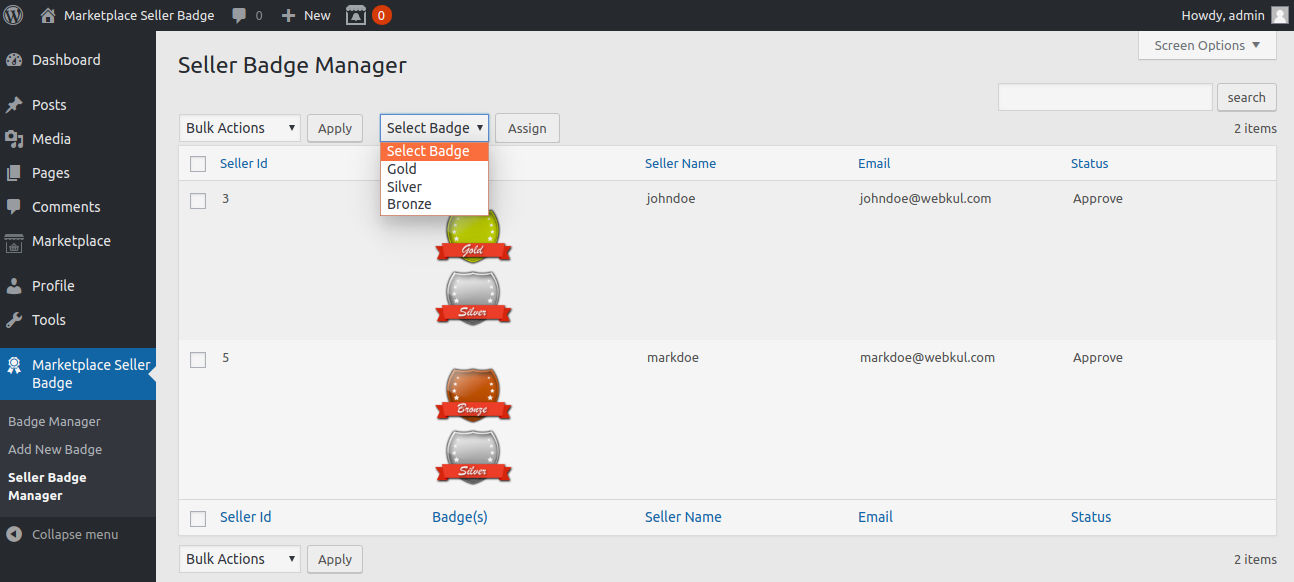
The admin can view the sellers and the badges allocated to the sellers by navigating through Marketplace Seller Badge > Seller Badge Manager. 
Admin can choose any seller and under “Bulk Actions” assign any badge to a seller or remove a seller’s badge.
The admin can select a badge name which is to be assigned from the “Select Badge” drop-down.
A dropdown list appears on clicking the Select Badge tab, and the admin can select from the given set of badge names.
Seller-end Workflow
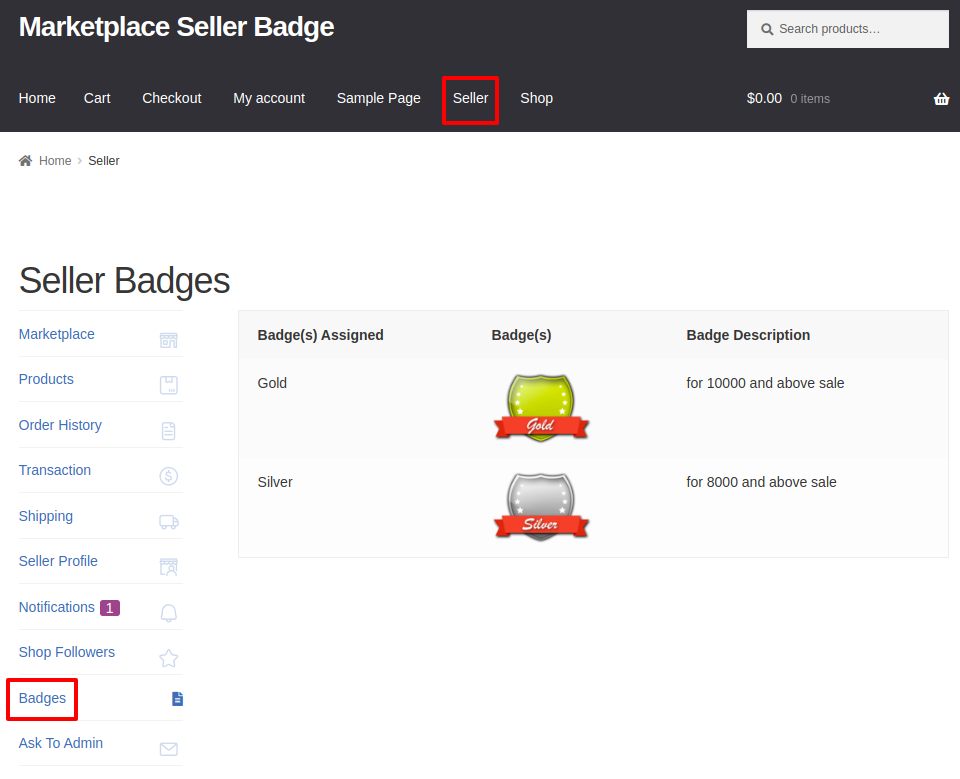
The seller can view the badges given to him by the admin under the “Badges” tab on the seller profile.
For instance, in the image below, the admin has assigned a silver and a gold badge to the seller on the basis of his performance.
Badge Assign Email Notification
Whenever the admin assigns a badge to the seller, the seller will receive an email notification of the same as per the below image:

Customer-end Workflow
Once the customer has logged in, the products will be visible on the product page and customers can easily make a purchase.
The customer can select any product which belongs to a particular seller as shown in the image below.
In the above image, the product which has been selected by the customer belongs to Seller- John Doe.
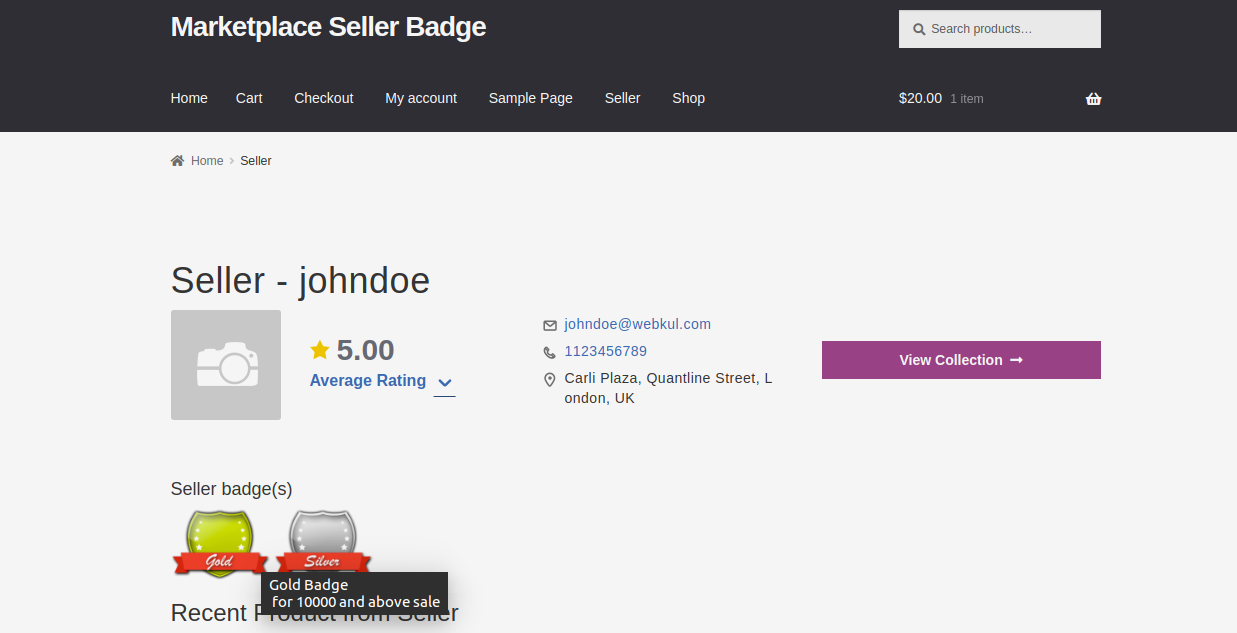
On clicking the seller’s name, the seller’s profile page opens, consisting of the products which belong to seller John Doe.
The customer can view badges allocated to the seller here. The customer can also view a related product list of the seller. 
If the customer hovers the mouse over the badges, the description of the related badge will display as shown in the image below.
Thus, that’s all for the Word Press Marketplace Seller Badge for WooCommerce.
If you still have any issues, feel free to add a ticket and let us know your views on our Webkul Support System.
Current Product Version - 1.0.4
Supported Framework Version - WordPress: 6.0.1 WooCommerce: 6.8.1 WooCommerce Marketplace: 5.2.2


Be the first to comment.