Marketplace MangoPay Payment Gateway For Magento2 is an ideal end-to-end payment solution for the marketplace stores.
Using this module, the platforms can accept multiple currencies and payment methods online via cards and direct debit (GiroPay and Sofort).
This module facilitates payment split, where the payment is split to multi sellers for your eCommerce store. MangoPay can hold the fund on segregated accounts, in trust. Furthermore, it fully automates the payouts.
Note:
- This payment gateway is an add-on of the Marketplace Module. To use this module you must have installed first Magento 2 Multi Vendor.
Features
- Provide split payment to all sellers for an order.
- Provide split payment to sellers for your Marketplace store.
- Allow buyers to make payment using cards Carte Bleue (CB), Visa, Mastercard, Maestro, and Diners (currency allow as per Mangopay) and Direct Debit (GiroPay and Sofort).
- The admin can allow the seller to carry out a Full or Partial online refund.
- Allow admin to do Full or Partial online refund.
- Allow sellers and the admin to transfer payment from their wallet to their bank.
Installation: Marketplace MangoPay Payment Gateway For Adobe Commerce Cloud
Customers will get a zip folder and they have to extract the contents of this zip folder on their system.
The extracted folder has an src folder, inside the src folder you have the app folder.
You need to transfer this app folder into the Adobe Commerce root directory on the server as shown below.

After the successful installation, you have to run these commands in the Adobe Commerce Cloud root directory:
First command – For Getting Mangopay API – Run the command given below.
composer require mangopay/php-sdk-v2:^3.3.0
Second Command –
php bin/magento setup:upgrade
Third Command –
php bin/magento setup:di:compile
Fourth Command –
php bin/magento setup:static-content:deploy
After running the commands, you have to log into the admin panel and you have to clear the Cache. You can refer to the below screenshot.

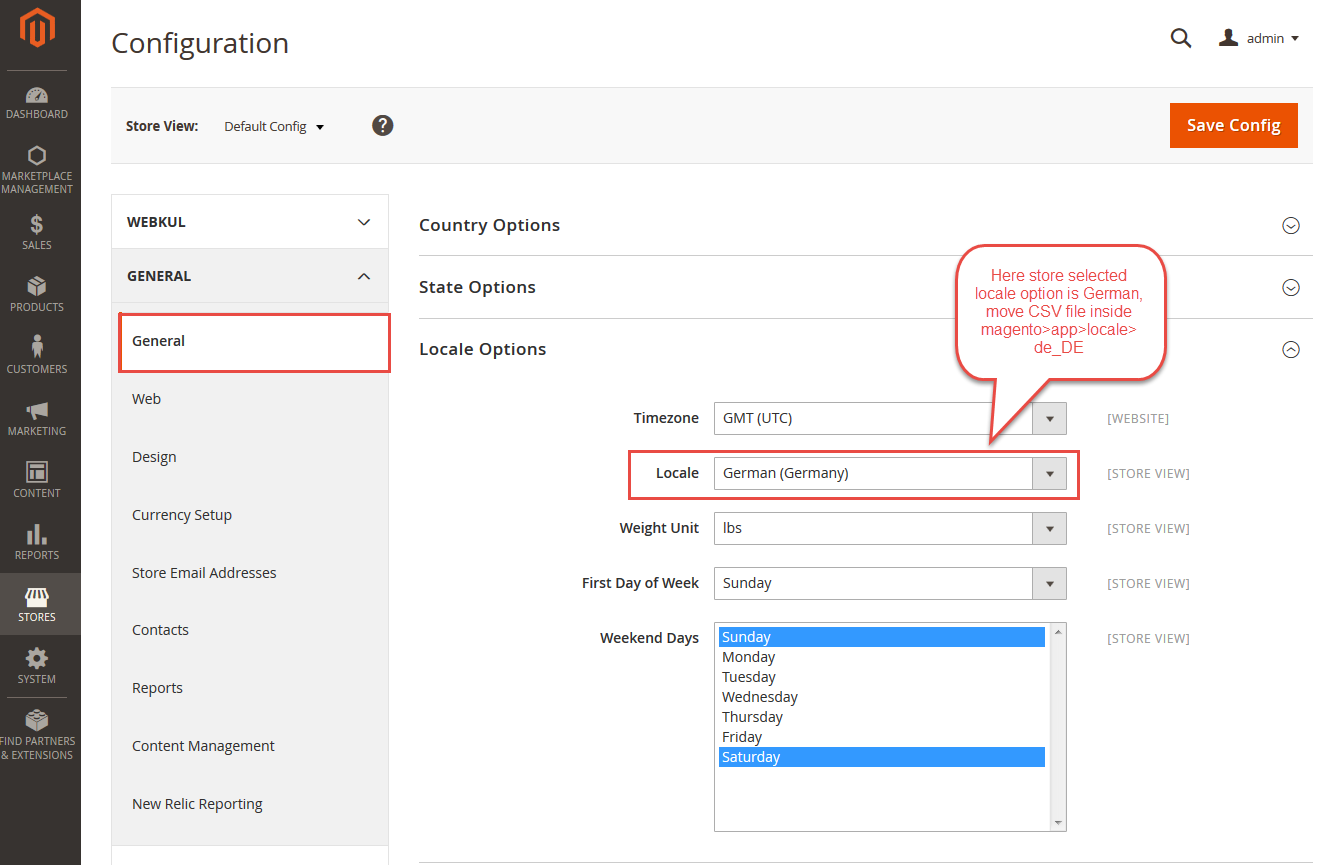
Multi-lingual Support
For the multilingual support, the admin will navigate through Store > Configuration > General > Locale Options and select the locale as German (the language into which the admin wants to translate his store content).
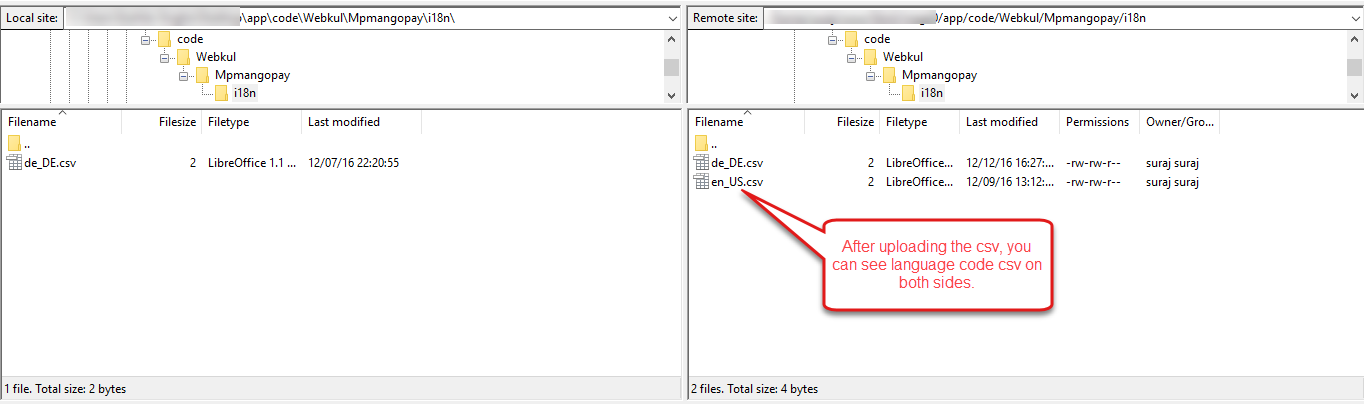
Language Translation
If a user wants to translate their module from English to German then they need to follow the path app/code/Webkul/Mpmangopay/i18n in their unzipped folder and will get a CSV file with name “en_US.csv”.
After that, they will rename that CSV as “de_DE.csv” and translate all right side content after the comma in the German language.
After editing the CSV, save it and then upload it to the path app/code/Webkul/Mpmangopay/i18n where they have installed Adobe Commerce on the server.
The module will get translated into the German Language. It supports both RTL and LTR languages.

The user can edit the CSV like the image below.
Mangopay Credentials
How to get Client Id and Passphrase –
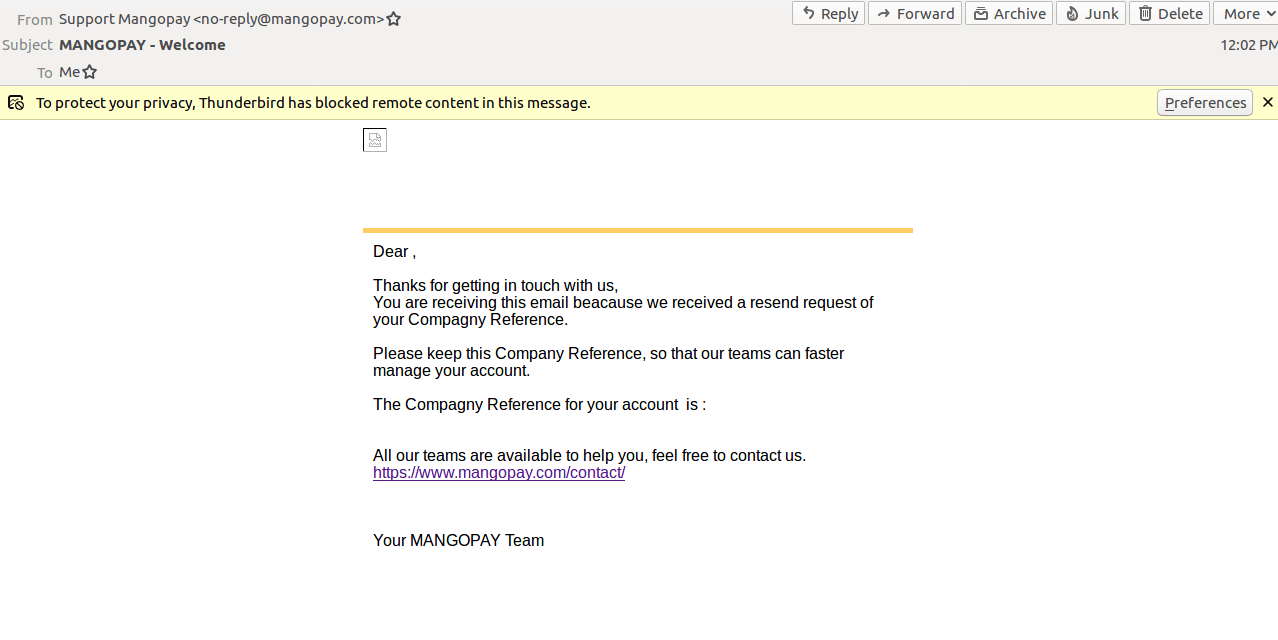
For getting MangoPay ClientId and Passphrase, you need to have your MangoPay account first. Here the company registration needs to take place. For company registration, the store owner needs to click on Need To Register. This will open up a Sign Up Form to register the company as below.

This will allow the generation of mail from the Mangopay side. This mail will contain the Company Reference.
The user needs to add the company reference Sandbox Account Page.

Along with the company reference, the client can enter other details like- Company Name, Email, Platform Type, Country, and Client ID.
Then the store owner must click on Create Your Sandbox. Thus, allowing the generation of a mail that will assure the completion of registration.

Now, to create access to the Sandbox Dashboard, we need to follow the link- Sandbox Environment.
This will allow the generation of mail from the Mangopay side. This mail will contain the Company Reference.
The user adds the company reference to the Sandbox Account Page.
Here along with the company reference, the client can enter other details like- Company Name, Email, Pl
Then we need to click on ‘First Time Login‘ as we are accessing the account for the first time.

Here, the account holder adds the login details as- Client id, First and last name, and email id account holder. This completes the registration process henceforth the account holder will enter the Sign-in details.
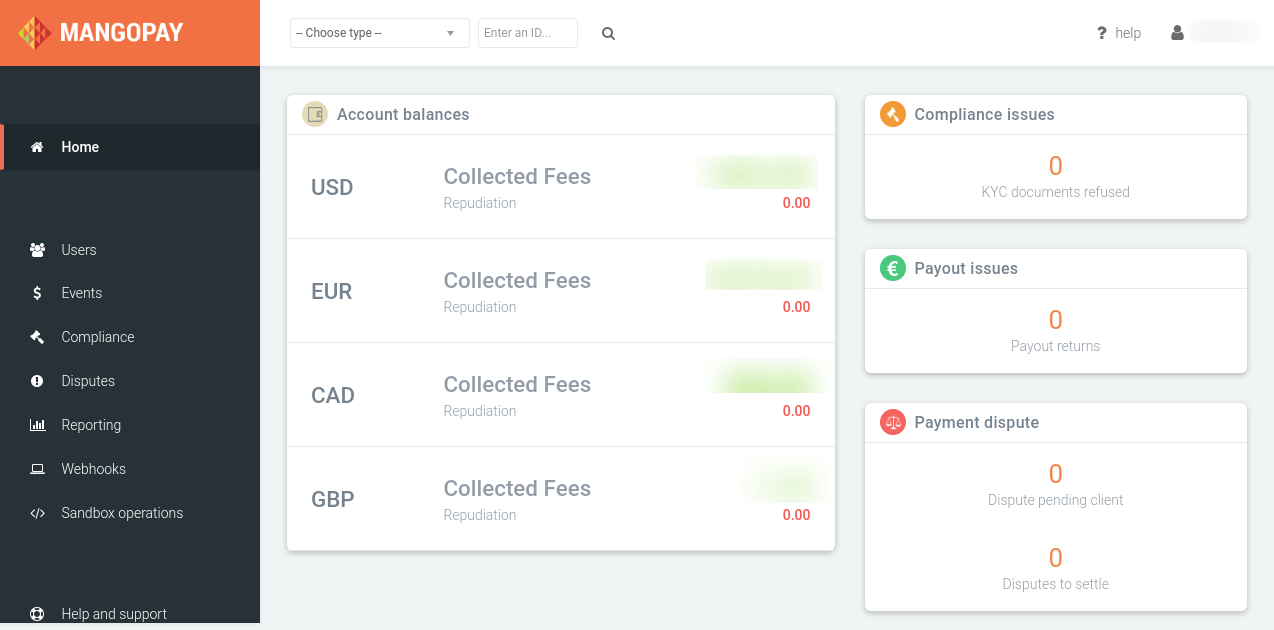
Thus, it redirects the user to the account Dashboard which includes the account details.
After creating the MangoPay account, you will get a ClientId and a passphrase.
Admin Configuration
After the successful installation of the module, you will find the configuration settings by navigating through Stores > Configuration > Sales > Payment methods >Marketplace Mangopay Payment Method.
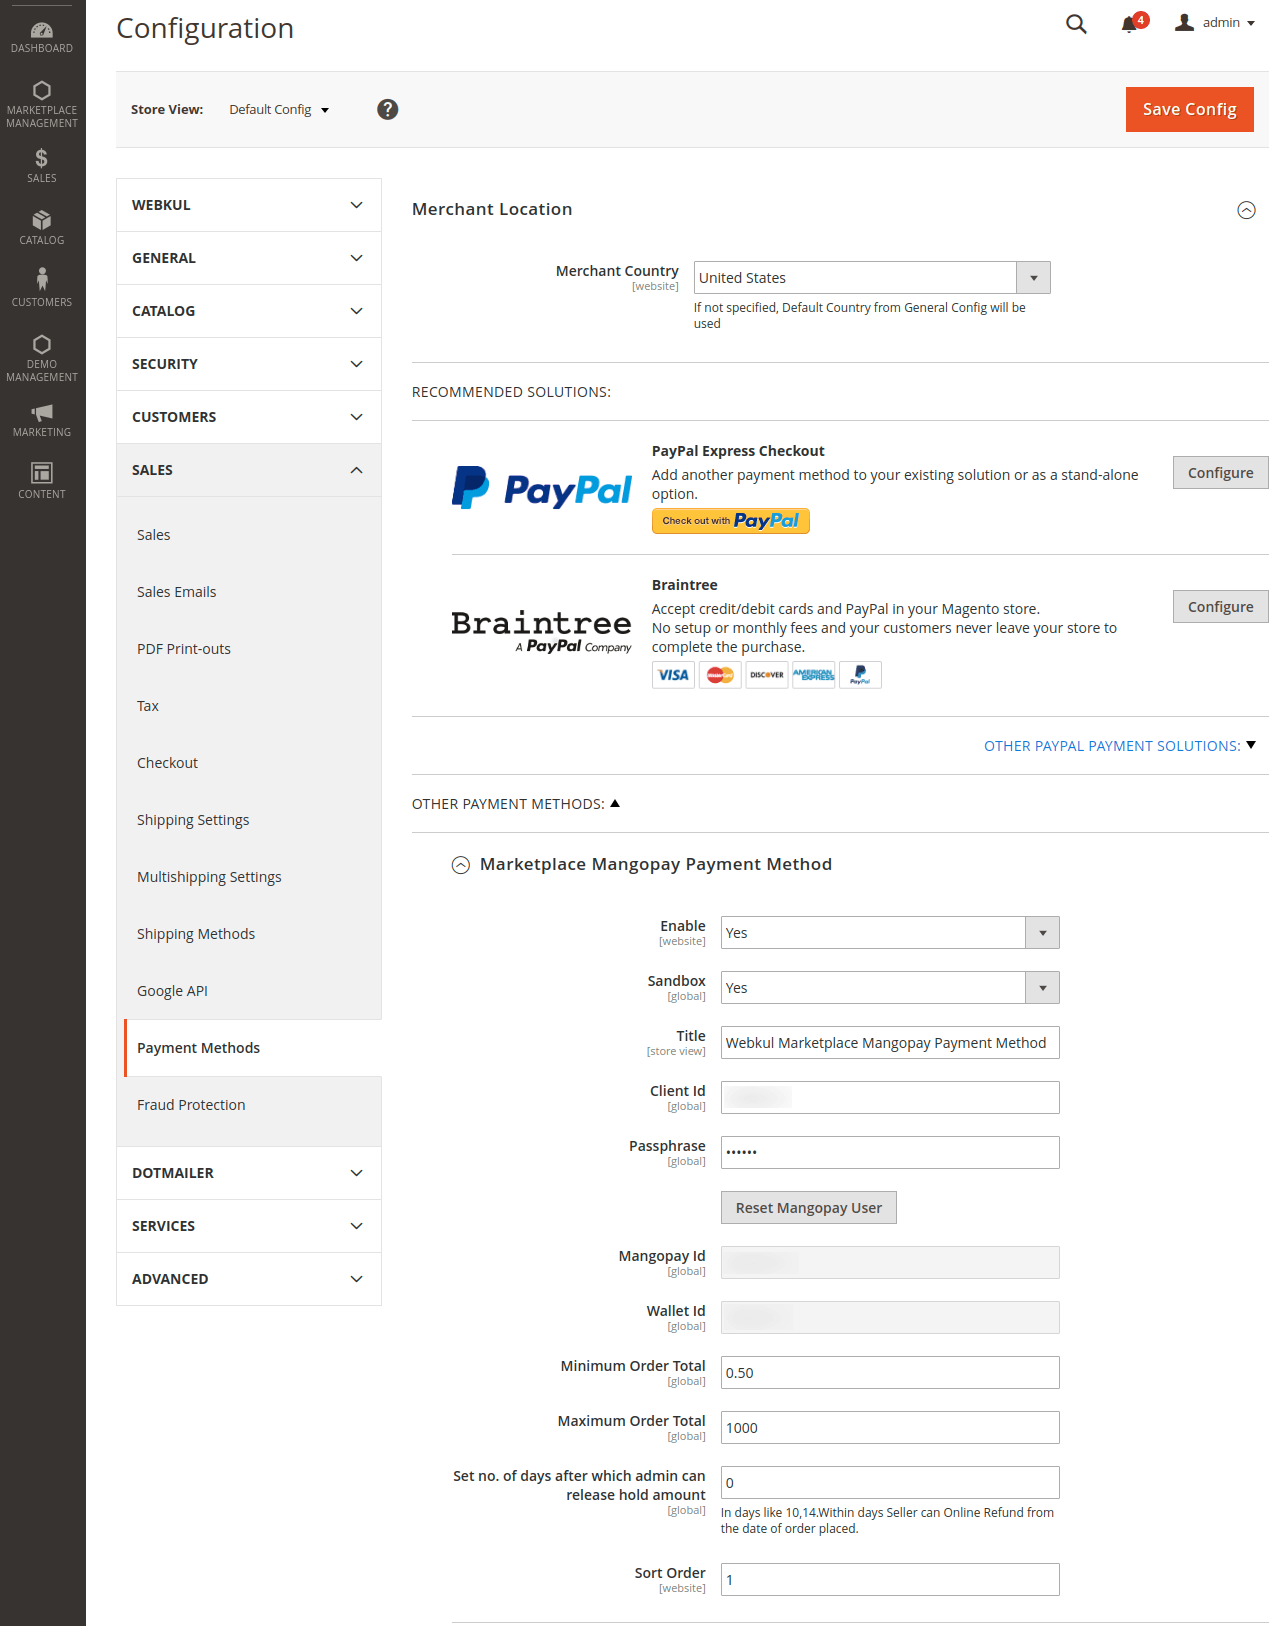
Enabled – The admin can enable/ disable Adobe Commerce Marketplace MangoPay Payment Gateway.
Sandbox Active –With this option, the admin can enable or disable the Testing(sandbox) mode.
Title – Here the admin can set the title which will display on the front-end.
Client Id – For which MangoPay user is registered.
Passphrase –Given by MangoPay after registration.
Generate MangoPay User and Wallet ID – Generate a MangoPay Escrow Account’s User and Wallet ID, so that money will be transferred to the admin’s escrow account.
Minimum Order Total – The Admin can set the minimum order total that is required for a transaction
Maximum Order Total – The Admin can set the maximum order total
Set no. of days after which admin can release hold amount – By using this field online refund process can be done.
First, the customer will request an online refund, and then in this field “no. of days” will be added by the customer. For example, if this field is set to 10 then the customer can not request for the online refund after 10 days.
Further, the seller will not be able to make a withdrawal before the validated time period which is 10 days in this example.
Also, the admin will transfer the amount to the seller’s account after the validated time period which is 10 days in this example.
Sort Order – Here admin can set the sort order value.
New Customer Account Creation
In this module, whenever a new customer registers with the store or creates a new account, a wallet ID is generated and for that, the customer must add the address in the customer detail form.
Every customer has a unique wallet id. To create an account the customer will click on “Create an Account” at the customer end and then fill up the details in the form as shown in the image below:

Hold in Escrow for Marketplace MangoPay Payment Gateway
The admin will navigate to Marketplace Management > MangoPay Payment > Hold in Escrow and click on the “Release Amount” button to release the payment.
Admin will be able to see the transactions with a “Release Amount” option button and a “Wait For Validation Period” option label.
For the transactions that have crossed the set validation period (For example- 10 days as set above) will have the “Release Amount” button option displayed.
The transactions that are still in the validation period will have the “Wait For Validation Period” option displayed in front of them.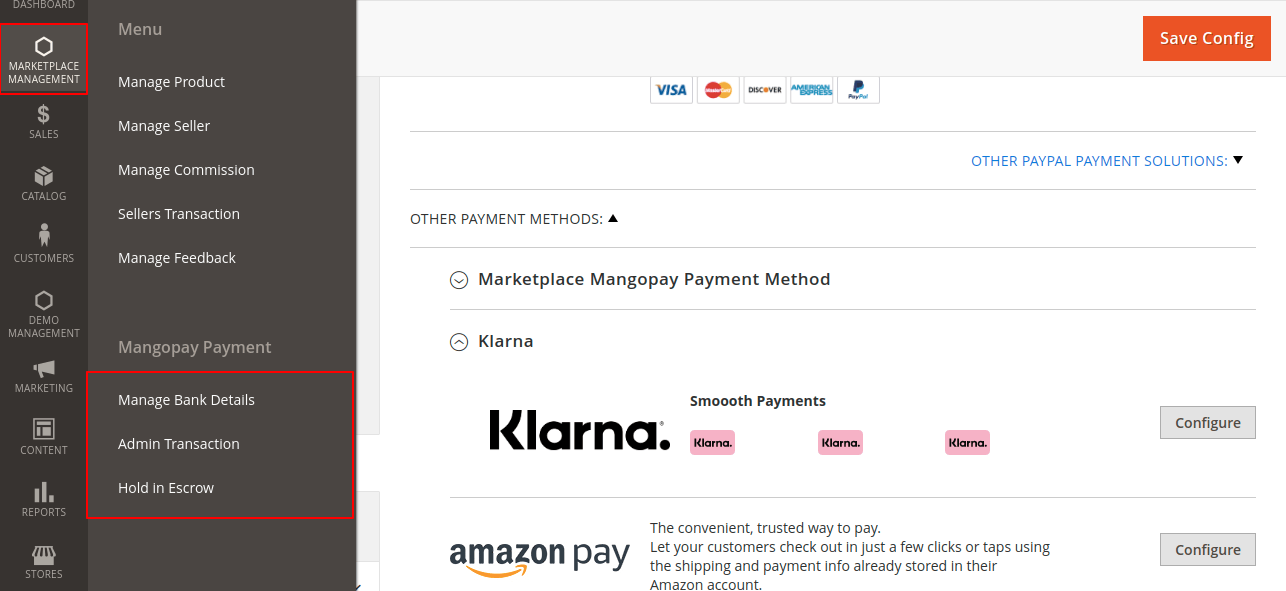
Marketplace MangoPay Payment
The MangoPay Payment sub-menu option includes three sub-sections, i.e.-
- Manage Bank Details,
- Admin Transaction, and
- Hold in Escrow
Manage Bank Details-

Admin Transaction-

Hold in Escrow-

Workflow Of Marketplace MangoPay Payment Gateway For Adobe Commerce Cloud
Payment Process Workflow
This is how the MangoPay payment process works. When the customer makes the payment, the money is escrowed in the customer’s e-wallet.
After the validation time is over, the admin can transfer the payment from the customer’s e-wallet to the seller’s e-wallet.

After getting client Id and passphrase, set these values to Marketplace MangoPay Payment Gateway’s Configuration settings, and now generate MangoPay user-id and wallet id to accept payment from the buyer and split the payment into sellers.
Just after the admin complete the configuration settings, the seller needs to set his Bank Account Information to make transfer money from his wallet to his account, like in the given screenshot.

Note – If the seller does not enter correct account details then he can not receive payment using the MangoPay payment gateway.
The seller can provide KYC (know your customer) documents to get some extra privileges ( transaction limits ). Also, KYC provides secure purchasing to customers. 
If the admin enables the Marketplace MangoPay Payment Gateway method then the buyer can see this payment method under the “Payment Information” as shown below in the given screenshot.

A snapshot to show the Direct Debit(GiroPay and Sofort) options at the checkout time.
After clicking on the “Place Order” button, the user will move to the Mangopay payment gateway where the user will input his card details to make the payment, as given in the image below:

After a successful checkout, amount payouts to MangoPay Escrow’s buyer wallet.
If any error occurs during a transaction then the order will have order status as “Pending Payment” otherwise status will be “Processing”.
Money Transfer Process: From Store to Account
For transferring money from store to account, the seller can request for withdrawal from his Marketplace Account > “MangoPay Transactions” tab as shown in the given screenshot.
The seller can request only for the orders for which payment has been done using Marketplace MangoPay Payment Gateway.
The “Transfer To Bank” button is hidden up to the set validation time (For example 10 days as set by the admin in the backend) and only after the 10th day, the button appears here in this section of the seller for requesting a withdrawal.
MangoPay Money Transfer
Money Transfer Process from Admin (ESCROW) wallet to Bank
For transferring money from admin wallet to bank, the admin needs to set correct bank details of administrator as shown in the attached screenshot –

The admin can transfer the money from the wallet to the bank account and can also see all the transactions:

Refund Process
Marketplace Mangopay Payment Gateway provides an easy refund to its customers. Now admin/seller both can do full/partial refund easily.
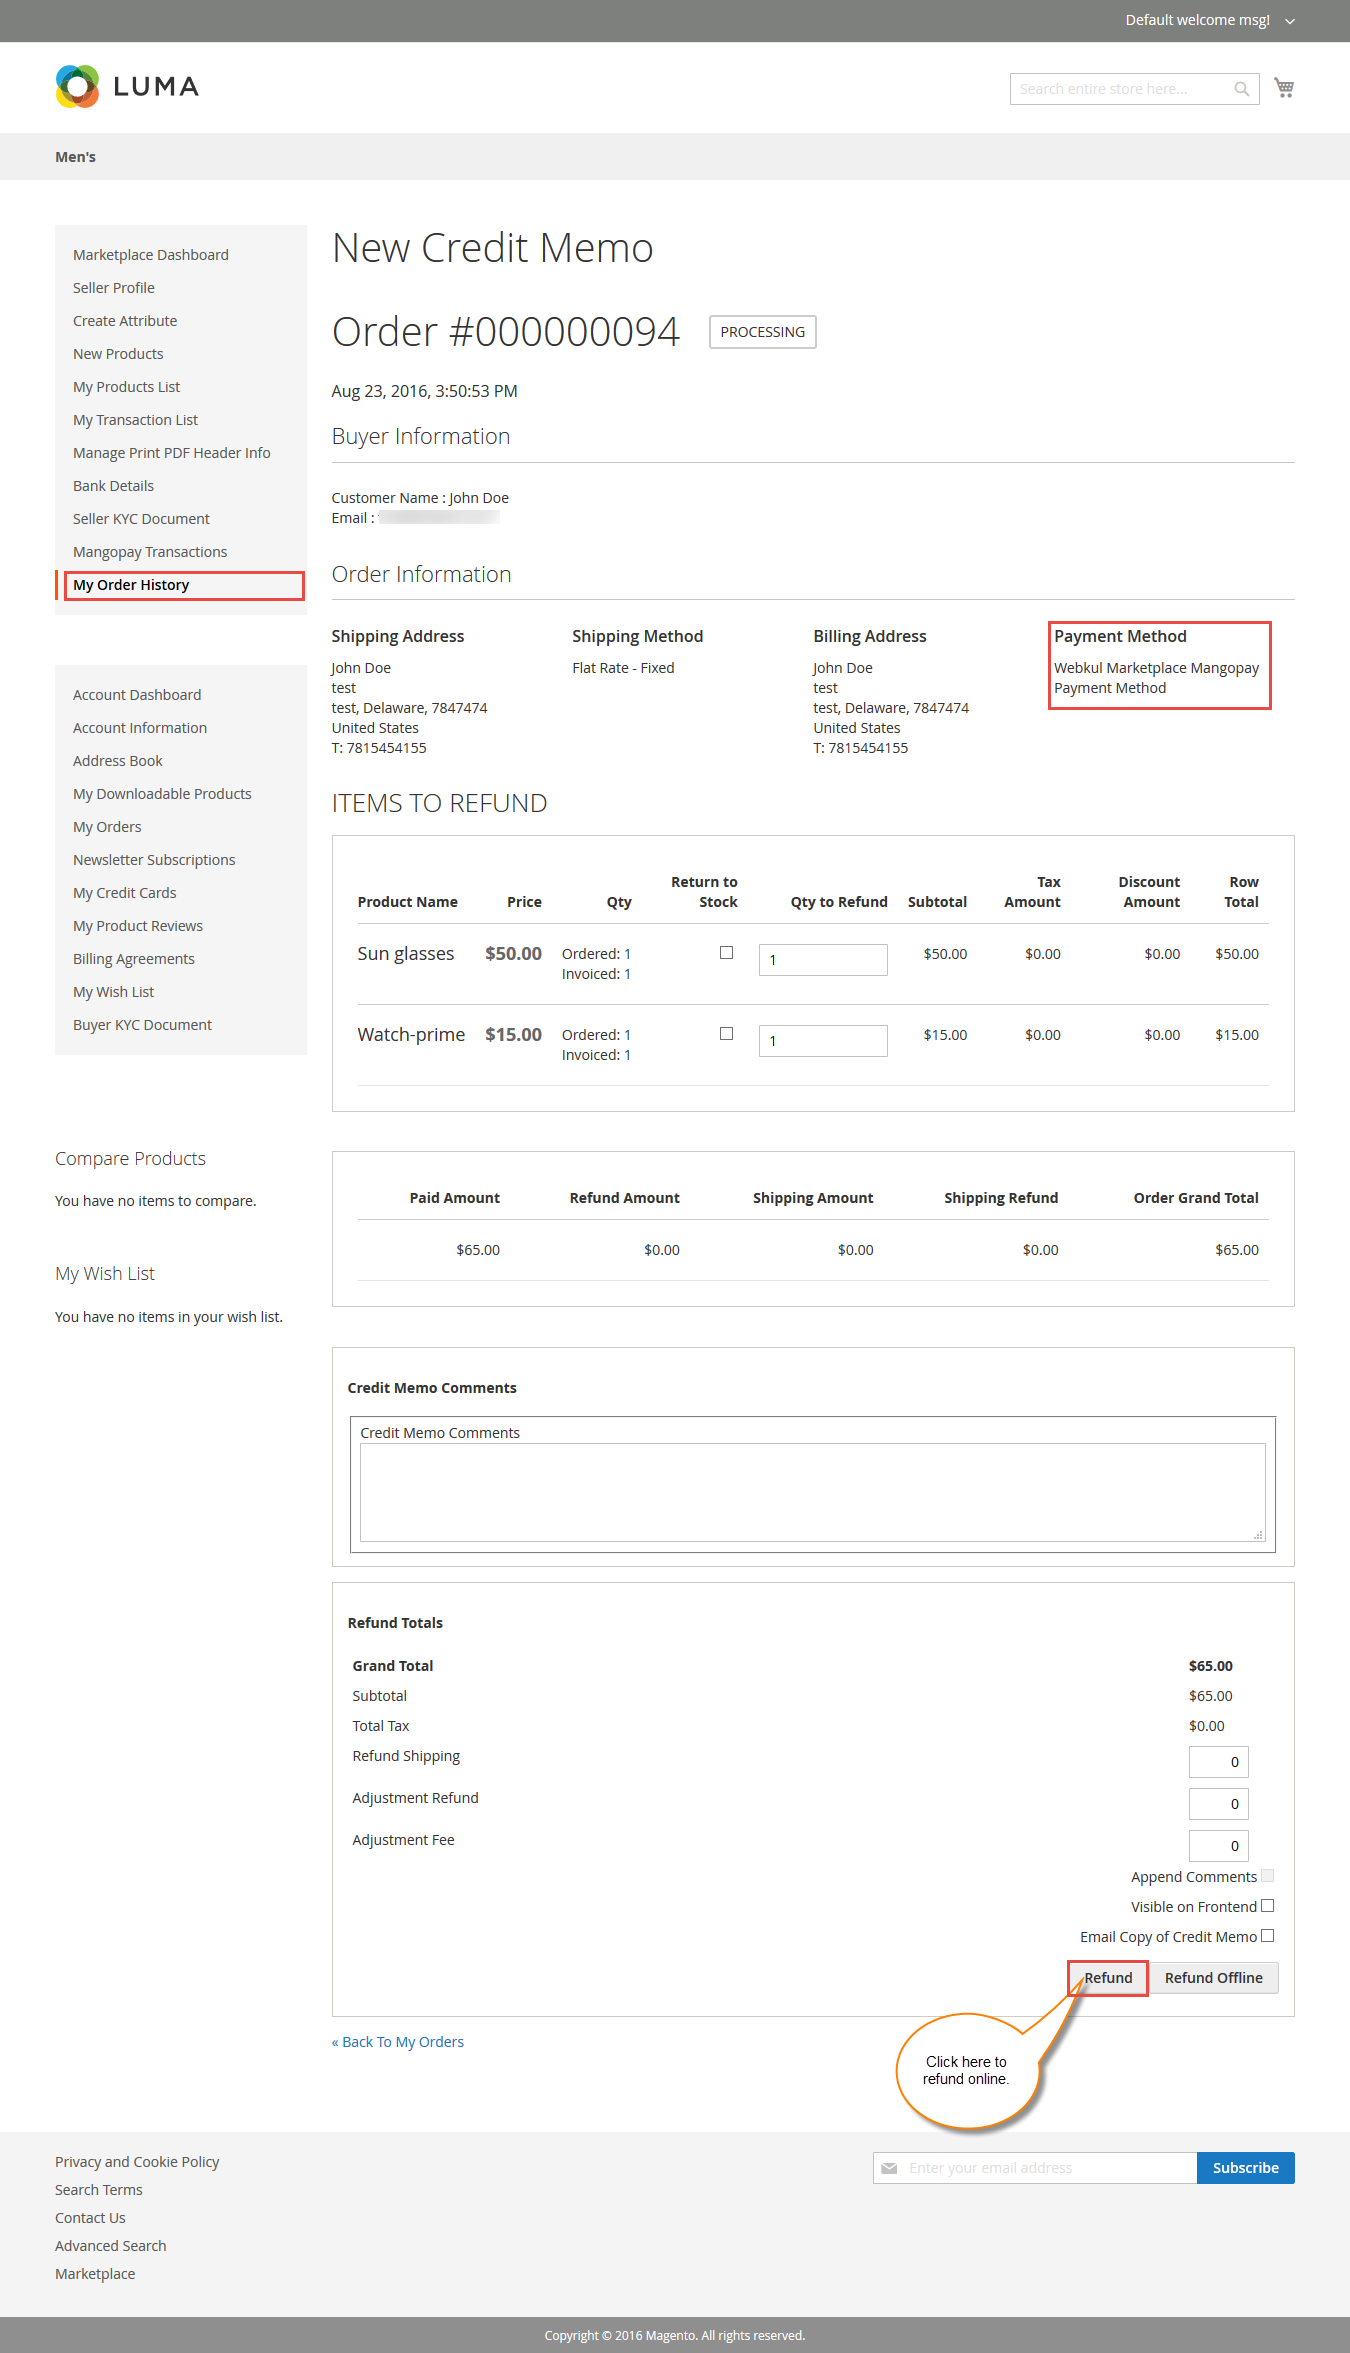
For the refund process, the seller will follow the steps:
- First, the seller will navigate to “My Order History”.
- From the available list of orders, the sellers will select the desired one.
- The seller will click on the Credit memo tab to request for refund.

- After that, the seller will click on the Refund Button to complete the refund process.
The escrowed amount in the buyer’s wallet will get transferred to the buyer’s account from which the payment is done.
For the refund admin will navigate to the invoice page to select the order for making the refund.
Now click on the invoice for which you want to generate the credit memo. After that, the page that opens up, click on the credit memo button.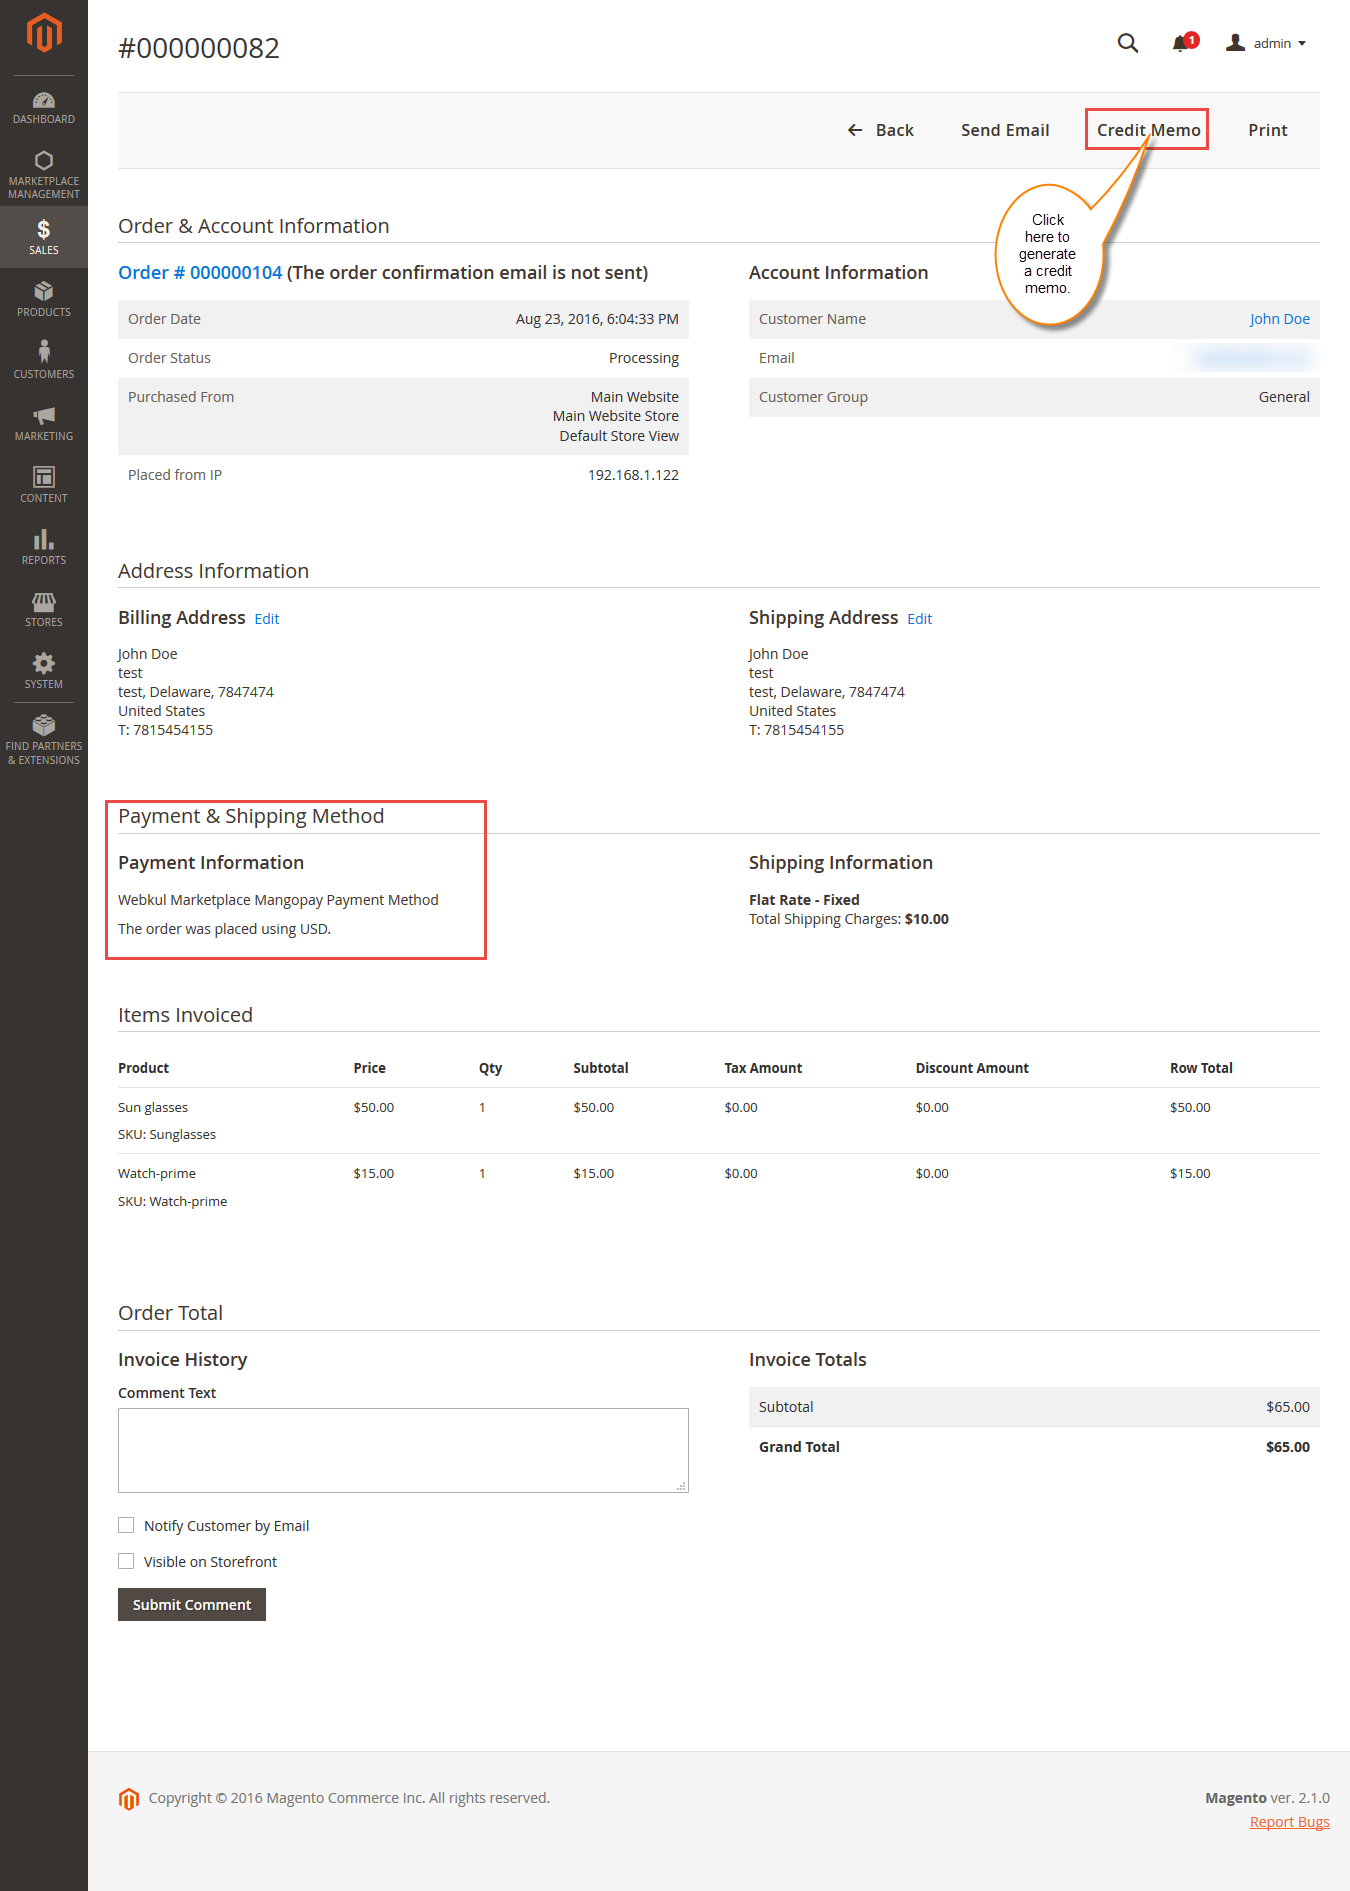
After clicking on Credit Memo, you have to click on the Refund button. When the admin does the refund, the escrowed amount in the buyer’s wallet goes back to the same bank from which the buyer made the payment earlier.
Admin can see the transaction details of the refunded order. That is all for the Marketplace MangoPay Payment Gateway For Magento 2. Still, have any issue feel free to add a ticket and let us know your views to make the module better at webkul.uvdesk.com
Current Product Version - 5.0.1
Supported Framework Version - Magento 2.0.x, 2.1.x, 2.2.x,2.3.x, 2.4.x

Attention
There was error during fetching results.