Magento 2 WooCommerce Integration – Every E-commerce merchant wants to expose the product range to more and more potential customers via multi-channel selling to grow their business.
However, if you are a multi-channel seller on Magento 2 and WooCommerce store then managing both the stores could be a tedious task.
But using the Magento 2 WooCommerce Integration module, the store owner can integrate the Magento store with the WooCommerce store.
Using the module, the store owner will no longer be required to configure the product data and information on both the stores separately.
The store owner can sync the product, orders from WooCommerce to the Magento store.
Note:
- Magento 2 WooCommerce Connector module is compatible with the latest version of WooCommerce
- Further, if you are using this module on the local host (http) you may require ‘wk-allowed-external-hosts’ files.
Video Tutorial of Magento 2 WooCommerce Connector
Check the overview of the WooCommerce Integration plugin in the video below.
Features for Magento 2 WooCommerce Integration
- Admin can import WooCommerce products to Magento 2 store.
- Can set a default category for the imported products in the Magento 2 store.
- Admin can set default quantity and weight values for imported products in the Magento 2 store.
- Admin can import Simple as well as Configurable product types.
- Admin can map WooCommerce categories with Magento 2 categories.
- The product information like base image, additional images, name, price, SKU, description, quantity, weight and super attributes with options import along with the product.
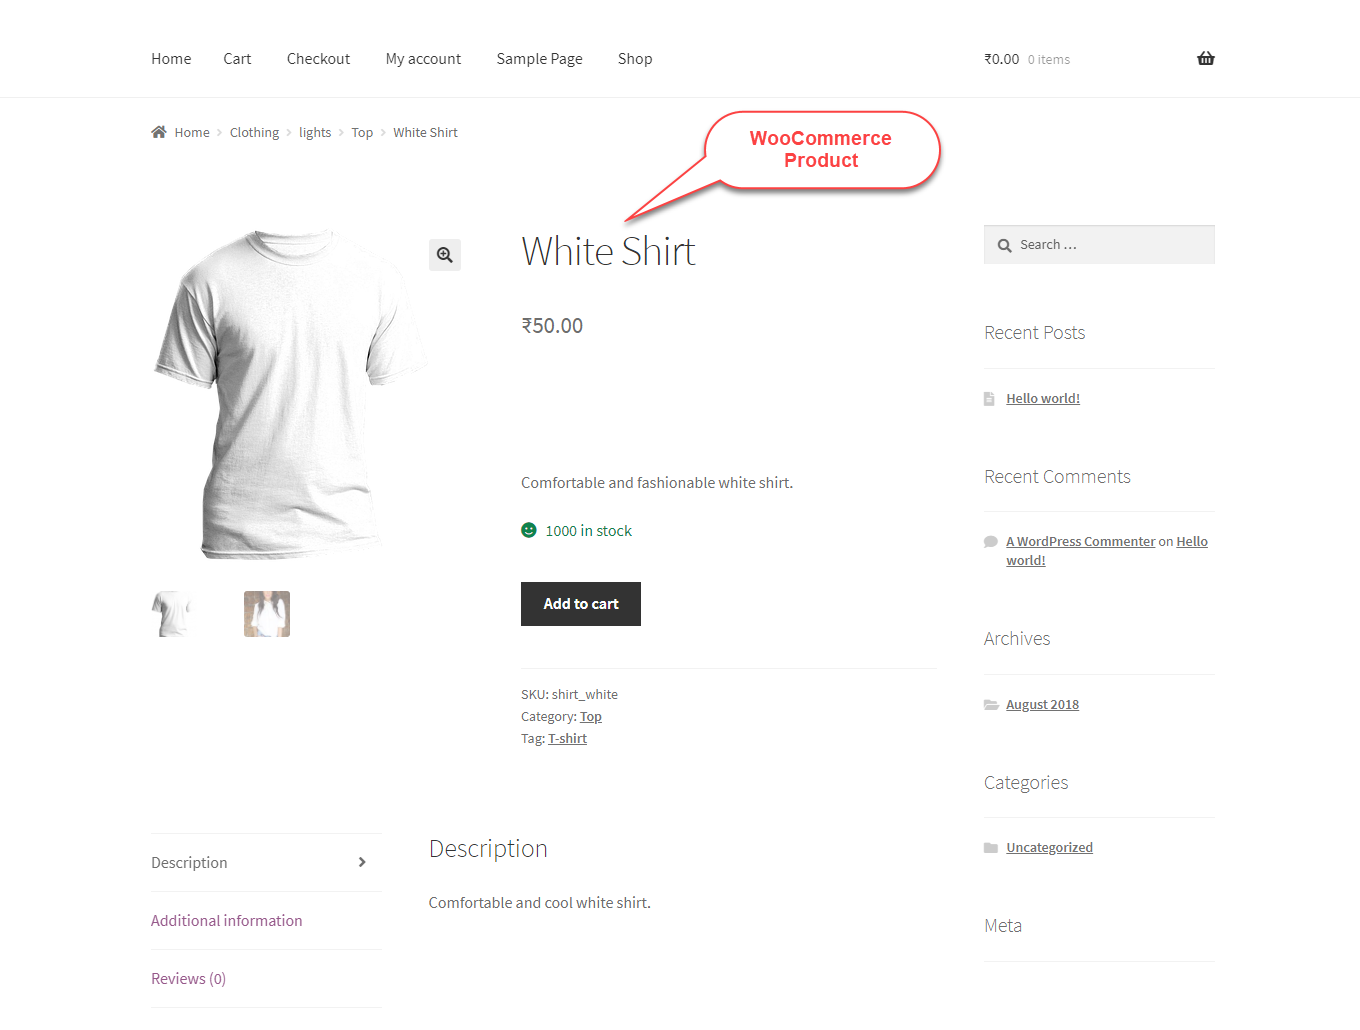
- Imported WooCommerce products work like same as Magento products.
- Admin can import WooCommerce orders to Magento 2 store.
- Admin can set the default store view for the import order in the Magento 2 store.
- Orders will fetch automatically via Cron and if order items do not exist in Magento, they will automatically be created.
- Admin can add multiple WooCommerce Accounts.
- Admin can view and manage the WooCommerce Accounts.
- Admin can export simple, and configurable products from magento to WooCommerce.
- Automatically export magento products to woo-commerce on product save.
Install Extension from Webkul Store
#1 Download Module
Firstly, you need to log in to Webkul Store, go to My Account>My Purchased Products section, verify and then download and extract the contents of this zip folder on the system.
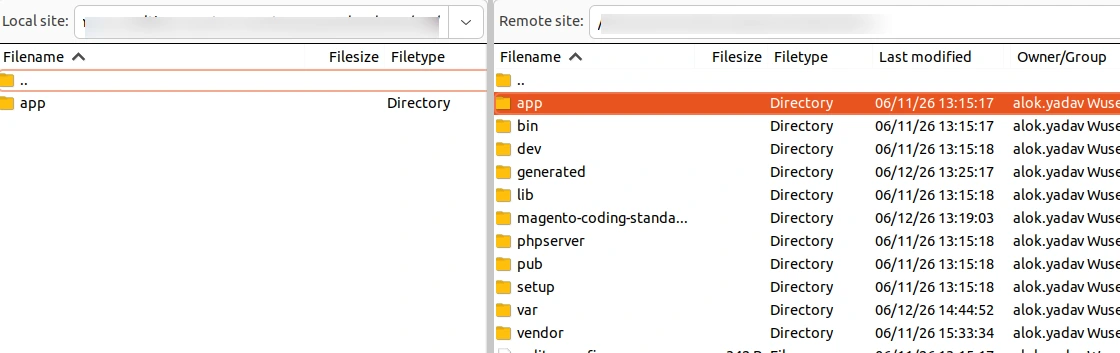
#2 Upload Folder
Once the module zip is extracted, follow path src>app and then copy the app folder into the Magento 2 root directory on the server as shown below:
#3 Run Commands
After uploading the module folder, you need to run the following commands in the Magento 2 root directory:
composer require automattic/woocommerce "2.0"
php bin/magento setup:upgrade
php bin/magento setup:di:compile
php bin/magento setup:static-content:deploy
php bin/magento indexer:reindex
php bin/magento cache:flush
Install Extension from Magento Marketplace
If you have purchased this extension from the Magento Marketplace then please follow the below process or visit this link.
#1 Get Access Keys
You need to get access keys, navigate to My Profile in Magento Marketplace, then choose Access Keys in the My Products section.

Go to Magento 2 and then you need to copy both the Access Keys – Public Key and Private Key. These access keys will be needed in the next steps for authentication.

If access keys are not created earlier, click Create A New Access Key, enter any name and click OK.

#2 Update composer.json File
To know the component name and version number, go to your Magento Marketplace account section, My Profile>My Purchases.
Now, find this extension to view the details. Please note – Below is an example image, every extension will have its unique component name and version.

After that, navigate to your Magento project directory and update your composer.json file in the following format.
composer require <component-name>:<version>
For example, to install version 4.0.0 of this extension you need to run the following command:
composer require webkul/module-woocommerce-connector:4.0.0
#3 Enter Access Keys
Now you will need to enter the Access Keys that you obtained as explained in the first step #1 Get Access Keys. Wait for Composer to finish updating your project dependencies and make sure there aren’t any errors.
#4 Run Command
You need to run the following commands:
php bin/magento setup:upgrade
php bin/magento setup:di:compile
php bin/magento setup:static-content:deploy
php bin/magento indexer:reindex
php bin/magento cache:flush
Multi-Lingual Configuration
For Multilingual support, please navigate to Store>Configuration>General >Locale Options. After that, select your desired language from the Locale option.

Language Translation
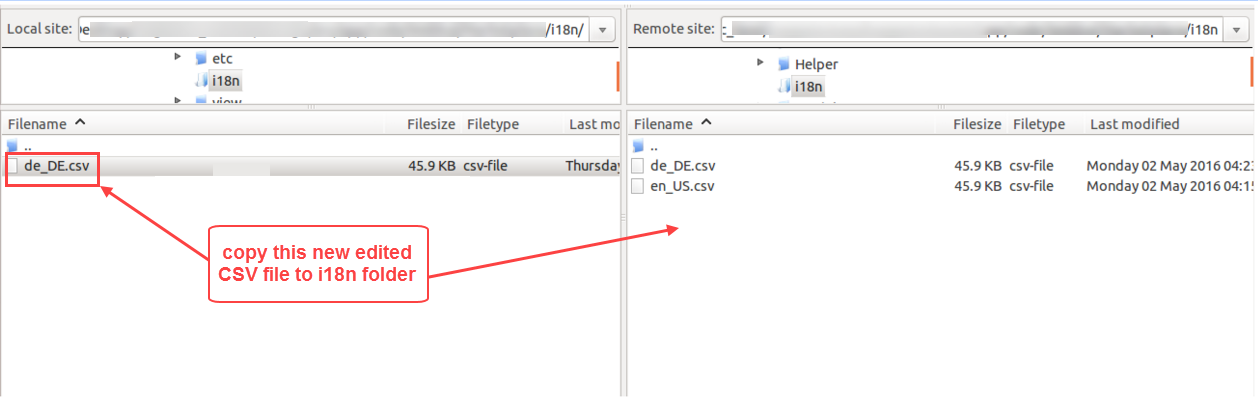
For module translation, navigate to the following path in your system app/code/Webkul/WooCommerceConnector/i18n/en_US.csv. Open the file named en_US.CSV for editing as shown in the below screenshot.

Similarly, replace the words after the comma(,) on the right in the file with your translated words.

After editing and translating the CSV file, you need to save the translated file name according to your region language and country code such as – de_DE.CSV. Followed by uploading the translated file to the same folder from where you have obtained it. Now your module translation is complete.
How To Get WooCommerce API Credentials?
To get the WooCommerce API you need to have WooCommerce installed on your existing WordPress site. After that, if not installed then install it from WooCommerce page.
Now, in your WordPress backend navigate to WooCommerce -> Settings as per the below image.

This will navigate you to the settings page where you will select the Advanced – > REST API -> Add Key as per the below image.

Clicking Add Key will navigate you to the Key Detail page where you will create the API key.

Here, fill in the key details and hit the Generate API Key to get the keys.
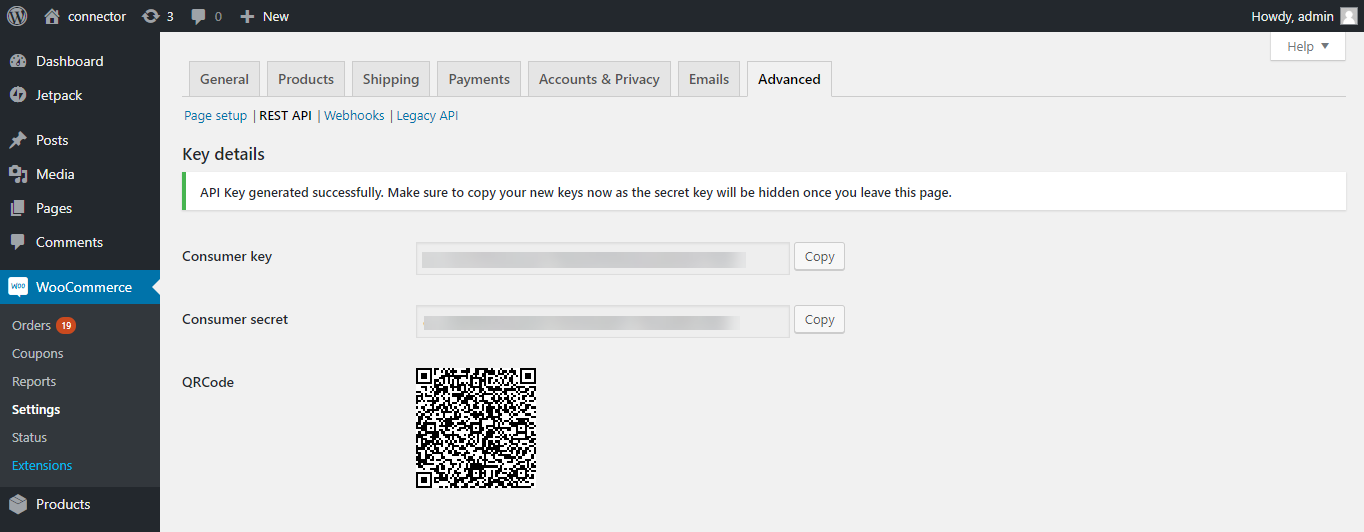
This will successfully create the keys which you can use while integrating the WooCommerce account in the Magento store.
After generating the keys navigate to Legacy API as shown below.

Here, the admin will check the checkbox available to enable Legacy REST API.
WooCommerce Integration Module Configuration
After the module installation of Magento 2 WooCommerce Integration, the admin will configure the module settings by navigating to the Stores -> Configuration -> Webkul -> WooCommerce Connector as per the below image.

Here the admin will:
- Allow Default Value- Set “Yes” to allow the use of default values for the imported product whose values are imported empty. Else set “No” to don’t allow the use of default values for the imported product whose values are imported empty.
- Product Delete From Catalog- Set “Yes” to allow the product deletion from the Magento Catalog if deleted from the imported product list. Else set “No” to don’t allow the product deletion from the Magento Catalog even if deleted from the imported product list.
- Export Product on Default Account – Here the created WooCommerce account will be selected from which products will be exported.
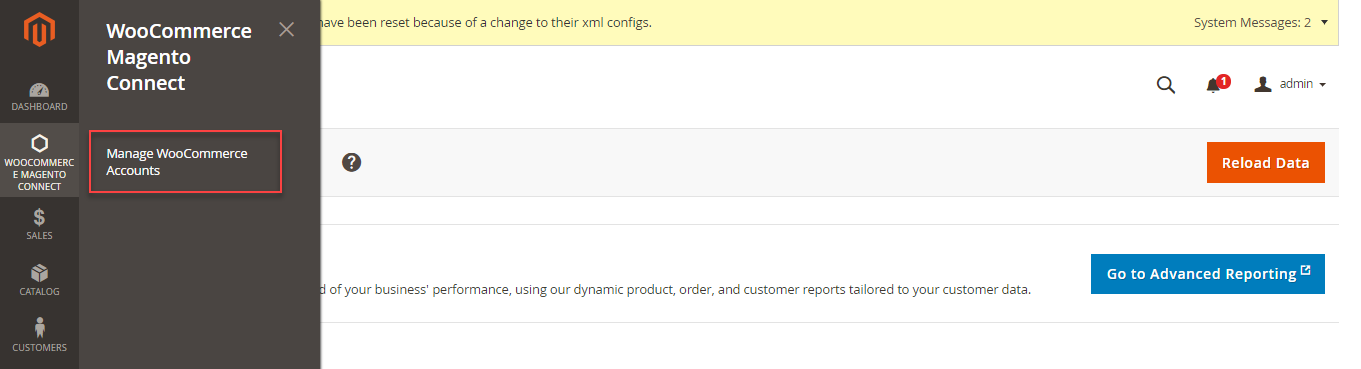
Manage WooCommerce Accounts
Now, the admin can add WooCommerce account credentials. Once, the admin can navigate to WooComemrce Magento Connect > Manage WooComemrce Accounts for managing and adding WooComemrce Accounts.
Likewise, clicking on Manage WooCommerce Accounts, the following page will open showing WooComemrce accounts list with the Store Name and Action.

Here, the admin can:
- Edit – edit the WooCommerce account details by clicking on this link.
- Delete – remove the existing WooCommerce account from the list using the action drop-down list.
- Add WooCommerce Account – add/create a new WooCommerce account.
After clicking on “Add WooCommerce Account“, the admin will navigate to the New WooCommerce Account page as per the below image.

Similarly, the admin will enter :
- Store Name: Enter your WooCommerce store name and this will not be changed once got saved in the Magento 2 store.
- Store URL: Enter the base URL of your WooCommerce store.
- Attribute set: Select the attribute set for the imported product.
- Enter the WooCommerce Consumer Key and WooCommerce Consumer Secret which the admin has received while creating the REST API from the WooCommerce account.
When the admin clicks on the “Save and Continue Edit” button, the following options become visible as per the below image.
WooCommerce General Configuration:

However, the admin will configure the “WooCommerce General Configuration” for Magento 2 WooCommerce Integration for the default options.
- Category: Select the Default Category of Magento 2 store for assigning to WooCommerce products.
- Store View – Choose Default Store View of the Magento 2 for order syncing.
- Website: Select Default Website.
- Qty – Default quantity will be assigned to the product when the WooCommerce product does not have quantity.
- Default Order Status – You can check the status of imported orders.
Category Mapping:
After that, the admin will map the Magento 2 store categories with the WooCommerce store categories by clicking on the Category Mapping tab which will navigate the admin to a new page as per the below image.

For mapping, select the Magento Store Category which the admin wants to map with the WooCommerce store Category.
Note:
- Only one category can be mapped at a time.
- You cannot map the parent categories.
- You need to select the sub-category for mapping.

For successful category mapping, hit the Map Category button. Similarly, by mapping the categories, the admin can view them in the list as per the image.

Import Products
The admin can import the desired products from the WooCommerce store to their Magento store.
To import products from the WooCommerce store, the admin will click on the Import Product From WooCommerce tab as per the image.

Here, the admin will:
- Import Product: when clicking on “Import Product”, the temporary product data is created and stored in Magento 2 database.

- Create Imported Product: It is used to create/add the imported products to Magento 2 store.

After that, Clicking the “Create Imported Product” tab will initiate the Run Profile.
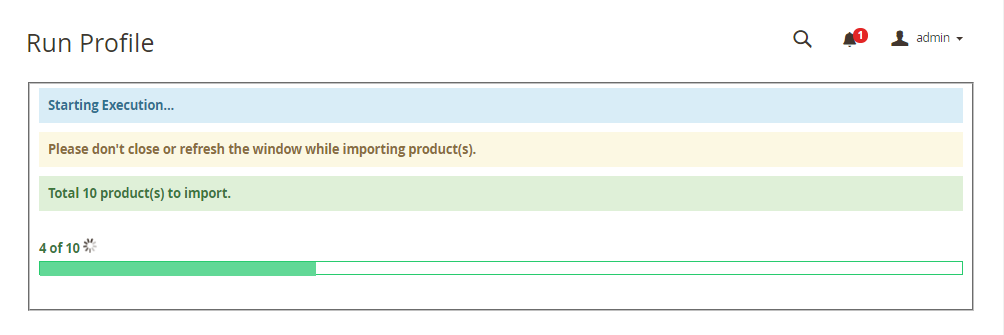
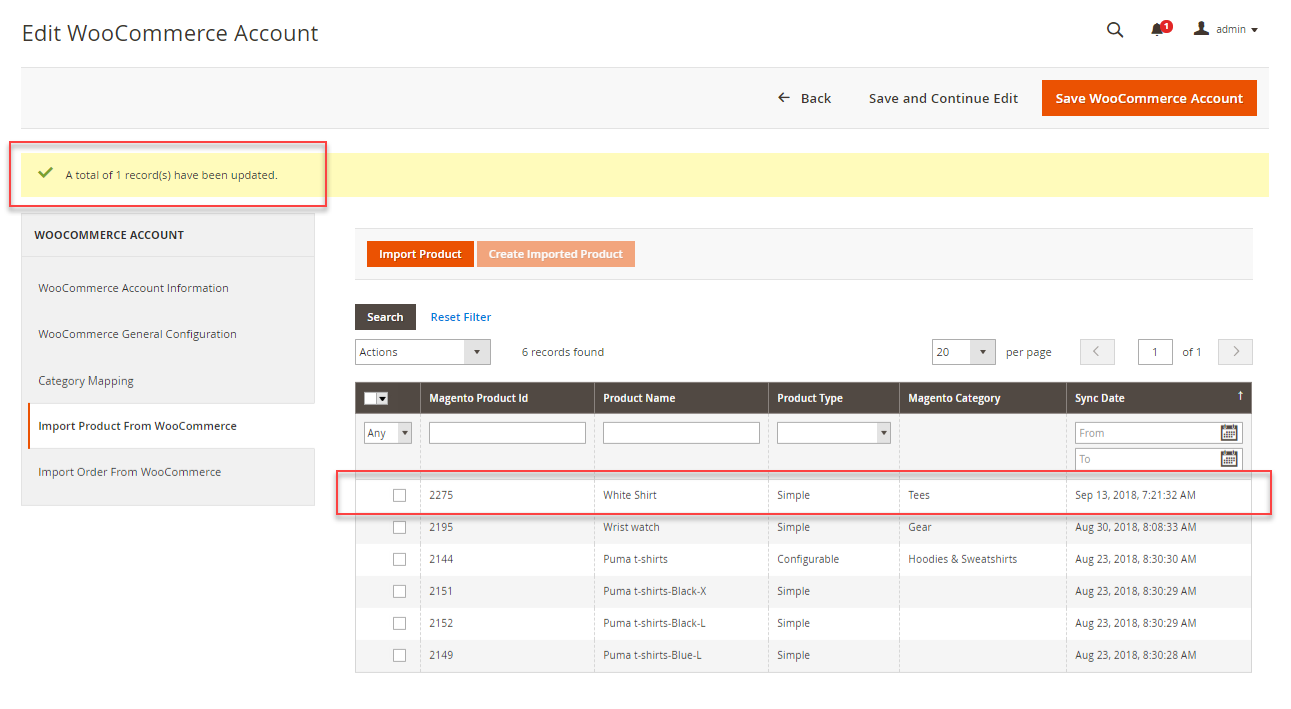
After successful execution, the admin can check the imported products in the imported product list.

Also, by navigating to the Magento store category as per the category mapping done for the imported product.

Note:
- If category mapping is not done for the WooCommerce product category, then the import products will assign to the default Category as per the configuration.
- If the category mapping is done for the WooCommerce product category, then the imported products are assigned to the default category. The imported products automatically assign to the mapped category only.
Configurable Product – Magento 2 WooCommerce Integration:
Along with the simple product, the admin can even import the configurable product from the WooCommerce store.
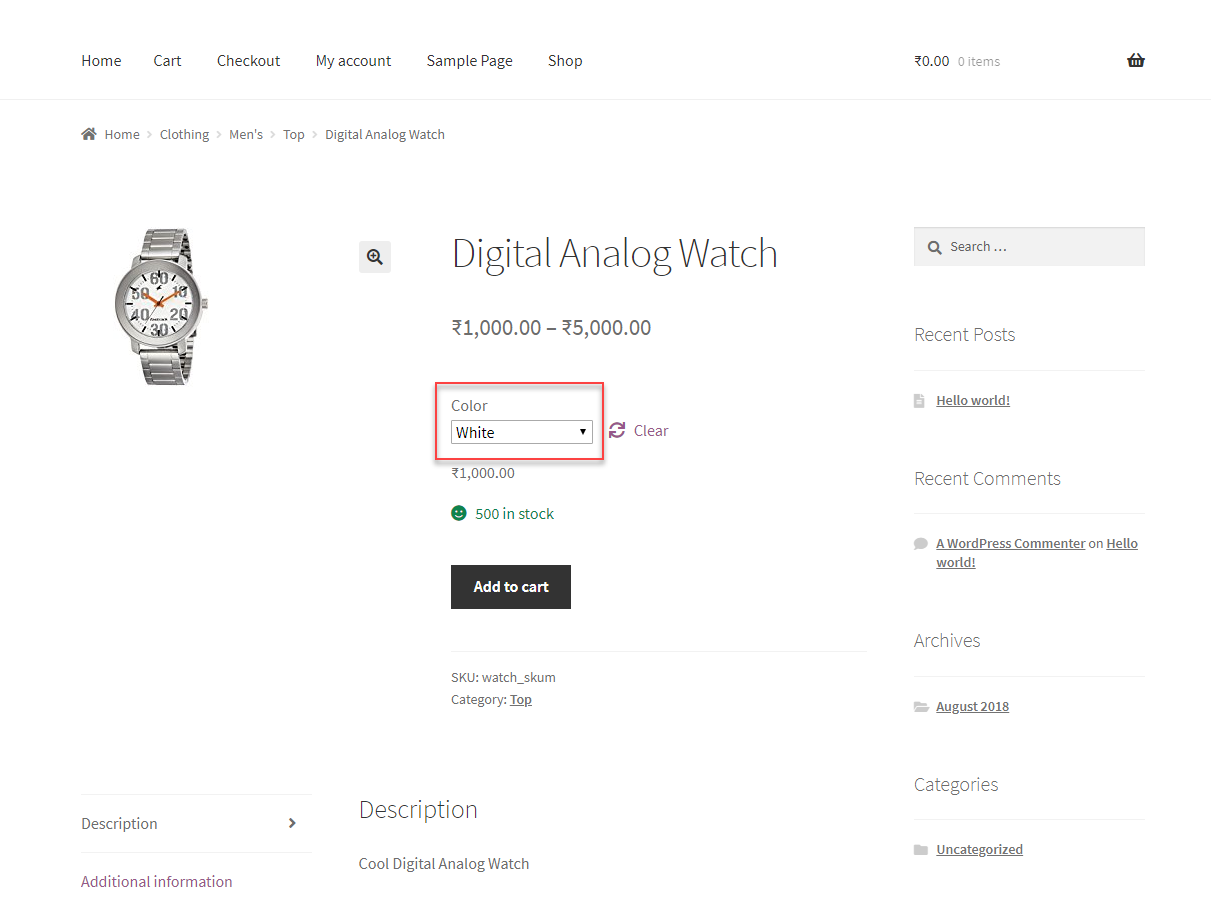
To import the configurable product successfully, simply follow the import process defined above for simple product import. Also, the import, the configurable product created with variation in the Magento 2 store as per the below image.

The admin can even check the imported configurable product at the front-end also.

HOW TO CHANGE THE CATEGORY OF THE IMPORTED PRODUCTS?:
The admin can change the category of the imported products. For this, the admin will click on the Import Product From WooCommerce tab as per the image.

Now, To change the category of the imported products, the admin will do the following:
- Select one or more than one product from the imported products list.
- Select Assign to Category option from the Actions drop-down list. This will display the Category field and Submit button beside the Actions drop-down list.
- Select the desired category from the Category drop-down list.
- Proceed further by clicking on the Submit button.
Also, the admin can check the newly assigned category of the product by navigating to the category and assign to the product.
NOTE:
- The product information like base image, additional images, name, price, SKU, description, quantity, weight and super attributes with options import along with the product.
- The module import simple and configurable product(variable product in WooCommerce) types.
Import Orders
To import the orders from the WooCommerce store, the admin will click on Import Order From WooCommerce tab as per the image.
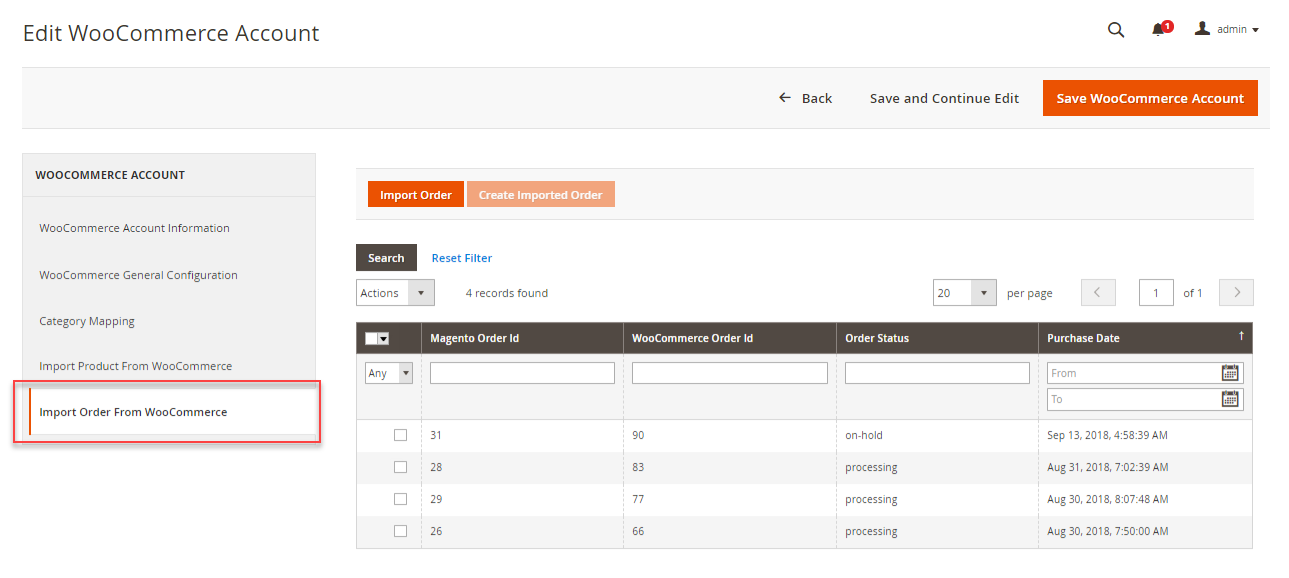
Here the admin will:
- Import Order: when clicking on the “Import Order” button, the temporary order data create and store in Magento 2 database.

- Create Imported Order: It uses to create/add the import orders to Magento 2 store.
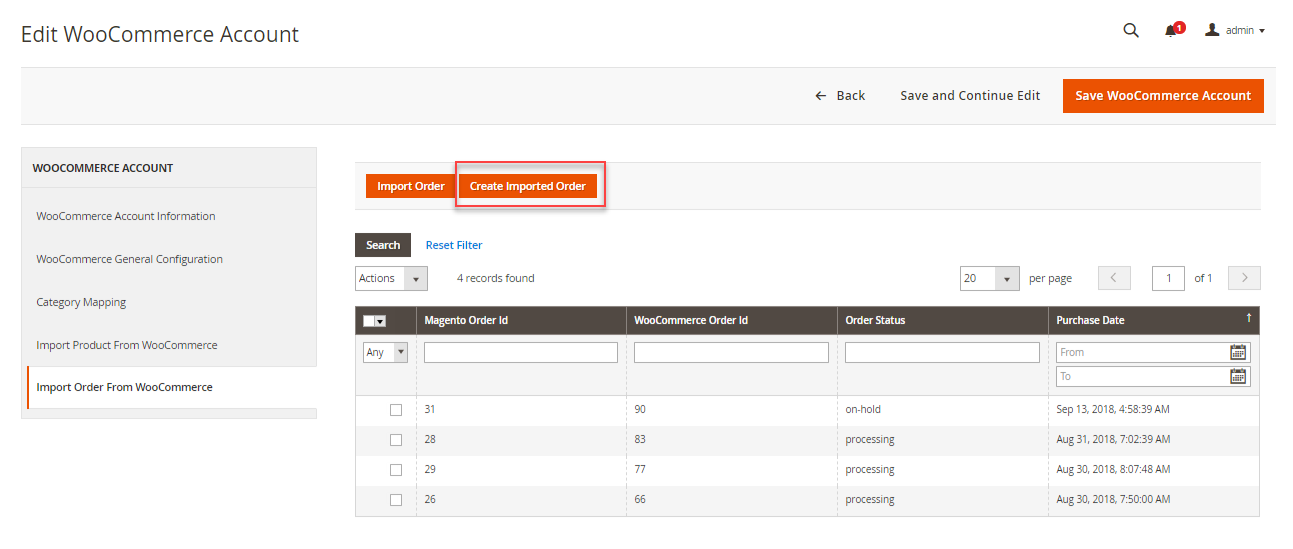
Clicking the “Create Imported Order” tab will initiate the Run Profile.

After successful execution, the admin can check the imported orders in the imported order list.

The admin can check the details of imported orders by navigating to the Sales>Orders.
Note –
- When cron set for this module for auto-synchronization of orders. However, The admin has to configure the cron on Magento 2 server which will automatically import the orders from the WooCommerce store to Magento 2 store after every one hour by default. The admin can even change the default cron time.
- If you are importing orders using cron and certain order items do not exist in Magento 2 store. Then, first, those items create automatically in your Magento 2 store. But if you are importing orders manually then, those products should be imported first.
- At the Magento end, the inventory of synced products will update when the orders are imported via cron. If the order is imported manually then the inventory of synced products will not get the update.
- The admin will not get any email notifications for any order place on the WooCommerce store. However, the admin needs to check those orders normally by navigating to Sales > Orders after importing them.
HOW WOOCOMMERCE CUSTOMER CREATE IN MAGENTO 2 WHILE ORDER IMPORT?:

If you are importing the order and that customer doesn’t exist in Magento 2.

Then, while order import that WooCommerce customer create in Magento 2 automatically.

That’s all for the Magento 2 WooCommerce Integration. If you still have any issues, feel free to add a ticket and let us know your views at http://webkul.uvdesk.com/
Current Product Version - 4.0.2
Supported Framework Version - Magento 2.0.x, 2.1.x, 2.2.x,2.3.x, 2.4.x

4 comments
In this module, the admin can import WooCommerce orders to Magento 2 store. Further, if you have some specific requirements it can be done through customization, please email your complete requirements at [email protected] and we will get back to you accordingly.
Thanks & Regards,
Webkul Team
Can the integration go the other way round from Magento to WooCommerce I mean, while the products are added/updated within Magento, it will also be updated within wordpress??
On updating a product on Magento, the updates reflect on WordPress as well, but if a new product is added, it won’t reflect on WordPress.
Please get back to us for more queries and suggestions at [email protected]
Thanks!