Vendor Invitation for Magento 2 (Adobe Commerce) module seller invitation extension focuses on the genuine registration of the seller.
The admin can send an invitation link to a customer then only the customer can register as a seller. It helps to maintain the record of which seller is registered in the store
This Magento plugin is also useful for customizing emails for the seller and maintaining the link expiry.
Note :- For Marketplace seller invitation, you need Webkul’s Magento 2 Multi Vendor Module.
Check a brief overview of the plugin –
Feature of Magento 2 Multi Vendor invitation
- The store owner can send the link for inviting the seller.
- The e-Mail will be sent to the seller for the invitation.
- Only one seller can register with one invite link.
- Admin can check all invited lists.
- Administrators can enable or disable the module.
- Admin can enable or disable the link expiration feature.
- If the invitation link is expire then the admin can send the invitation link to the client again.
- Existing customers will receive an invitation link from the admin to become sellers.
- The extension is fully compatible with the Hyva Theme.
Install Extension from Webkul Store
The installation is quite simple just like the standard Magento 2 extensions.
#1 Download Module
Log in to Webkul Store, then go to My Account>My Purchased Products section. Now verify and then click on download and extract the contents of this zip folder on your system.
#2 Upload Folder
Now extract the module zip file. Then follow path src>app and then copy the app folder into the Magento 2 root directory on the server as shown below:

#3 Run Commands
Now run the following commands in the Magento 2 root directory:
php bin/magento setup:upgrade
php bin/magento setup:di:compile
php bin/magento setup:static-content:deploy
php bin/magento indexer:reindex
php bin/magento cache:flush
Install Extension from Magento Marketplace
If you have purchased this extension from the Magento Marketplace then please follow the below process or visit this link.
#1 Get Access Keys
Get access keys, then go to My Profile in Magento Marketplace. After that choose Access Keys in the My Products column

Now move to Magento 2 and copy both the Access Keys – Public Key and Private Key. These access keys are useful for the next steps for authentication.

If access keys are not created earlier, click Create A New Access Key, enter any name and click OK.

#2 Update composer.json File
To get the component name and version number, go to your Magento Marketplace account section. Follow path My Profile>My Purchases.
Please note – Below is an example image, every extension will have its unique component name and version.

After that, Go to your Magento project directory. Now update your composer.json file in a given manner.
composer require <component-name>:<version>
For example, to install version 5.0.0 of this extension you need to run the following command:
composer require webkul/webkul/module-sellerinvitation:5.0.0
#3 Enter Access Keys
Now enter the Access Keys that you obtained as explained in first step #1 Get Access Keys. Wait till the Composer finishes updating your project dependencies.
#4 Run Command
You need to run the following commands:
php bin/magento setup:upgrade
php bin/magento setup:di:compile
php bin/magento setup:static-content:deploy
php bin/magento indexer:reindex
php bin/magento cache:flush
Language Translation
For translating the module language, navigate through src/app/code/Webkul/swebkul/sellerinvitation/i18n and edit the en_US.csv file.
Thereafter, rename the CSV as “en_SA.csv” and translate all right side content after the comma in the Arabic language. After editing the CSV, save it.
Then upload it to the path src/app/code/Webkul/sellerinvitation/i18nwhere the Magento 2 is installed on the server.
The module gets translated into the Arabic Language. It supports both RTL and LTR languages.

Module Configuration:- Seller invitation
Before inviting any seller the admin can set the following fields of seller invitation. Go to store> configuration> marketplace> seller invitation.
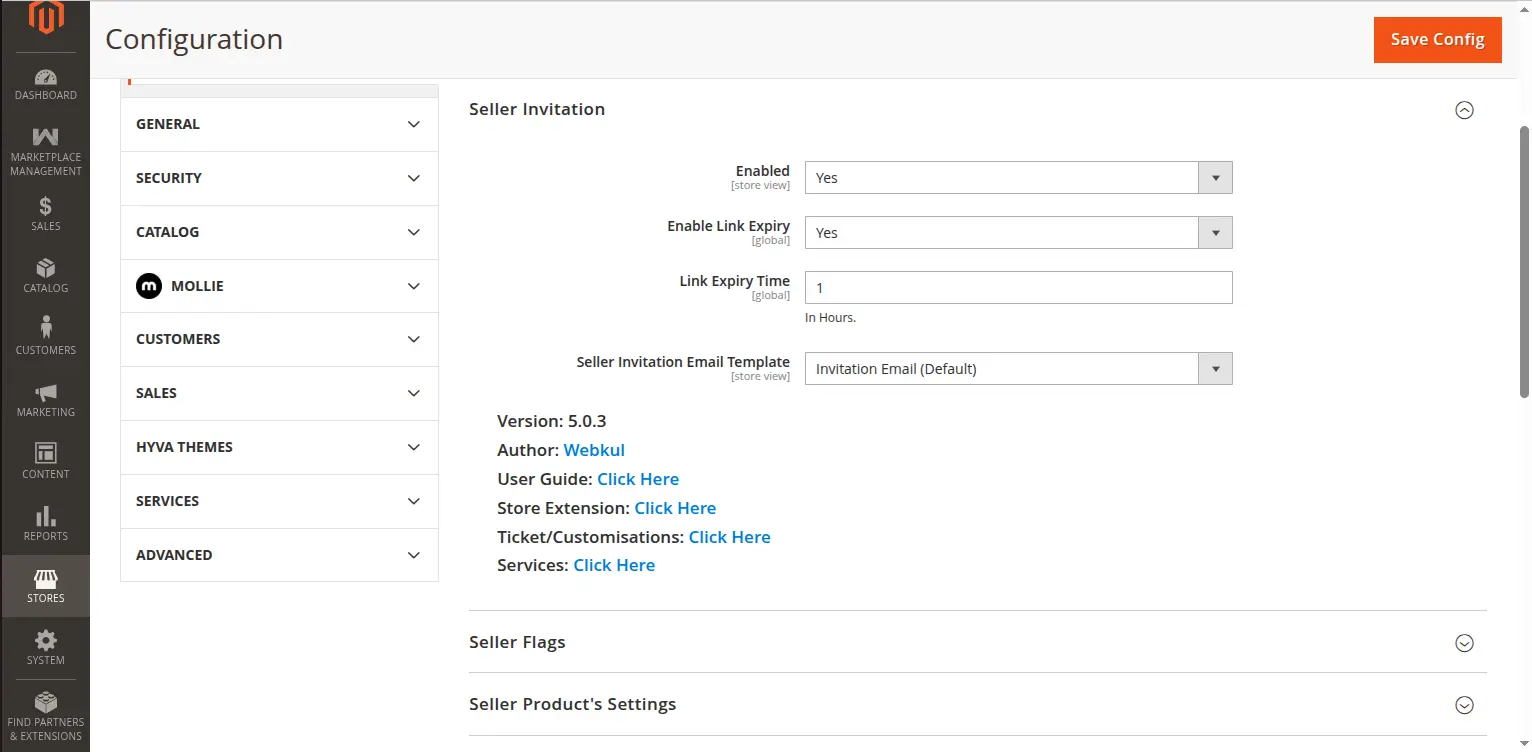
Enabled: Allows the admin to enable or disable the module by selecting Yes or No.
Enable link expiry: The admin can select the link to get expire or not. He can select yes or no.
Link expiry time: The admin will enter hours after which the link will expire.
Seller invitation email template: The admin can select the email template that he wants to send to the seller.
The admin can invite the seller to the store by their email id. This can be done by the following steps. Go to marketplace management>invite seller.

By clicking on Invite Seller, the Seller invite list will appear in which admin can check seller registration status and invitation link status.

After that, by clicking on send invite the page will open as shown in the below image.
Here the email id and name of the seller will be filled by the admin along with the description. Then click on send invite button. Then the invitation will be sent successfully.
 After that, the popup will be visible “invitation sent successfully.”

Once the above process is done, the seller will receive an email for the registration as a seller.

When the seller clicks on register now, then the browser window will open for registration.

Here the seller will fill in the details like the first name, last name, email address, and shop URL, and then he will set the password.
After this click on create an account button. Hence the seller gets register successfully.
This updated status of the registered seller can also be seen on the admin side.
Note:
The user cannot request directly during store signup to become a seller on the frontend. Therefore, only the admin can send them an invitation link that would allow the user to become a seller.

If any customer tries to become a seller without an invitation link then the below window will be open. They require to ask the admin to send the URL to register as a seller. 
That’s all for the seller invitation adobe commerce module.
Get in touch
Have any queries, feel free to reach out to us at [email protected]. You can also raise a ticket at our Help Desk system webkul.uvdesk.com.
Also, please visit our useful Magento 2 Extensions
Current Product Version - 5.0.3
Supported Framework Version - 2.0.x, 2.1.x, 2.2.x,2.3.x, 2.4.x

Be the first to comment.