Multi Vendor Recurring Payments & Subscription for Magento 2: E-Commerce has taken a leap towards the Subscription-Based E-commerce Paradigm and for that reason, online stores are introducing subscription products within their stores.
This module allows the admin and the sellers of the online store to create subscription products.
They can place subscription products under a specific category (such as Subscription Products).
The admin and sellers can add subscription plans or Duration Types along with their initial and subscription amounts.
Likewise, both can manage subscriptions & recurring payments for their store’s products.
The customers, on the other hand, can choose subscription plans for their subscription products as per their feasibility.
Most importantly, the customers need not log in to their accounts over and over again to make payments as this extension automates future payments.
However, the admin, the sellers, and the customers can unsubscribe from any subscribed product, at any point in time.
Subscription products and recurring payments are a boon to the e-commerce stores as it retains your customers, thus ensuring sales and revenue growth.
Important Note –
- This is a marketplace add-on, so you must install Webkul’s Magento 2 Multi Vendor Module first.
- “Magento 2 – How to Start Multi-Vendor Recurring Subscription Marketplace” depends on “Magento 2 recurring payments and subscriptions” module. So you must install it first.
Watch the below video tutorial to understand the extension workflow:
Features
- The admin/ sellers can create subscription products and add them under a separate category, (such as Subscription Products).
- Both the admin and the sellers can set the subscription amount and initial Fee for each of their subscription products.
- The admin can create Subscription Terms/ Duration Types.
- The seller, the admin, and the customer can unsubscribe any subscription, anytime.
- Guests users will have to log in to purchase any subscription product.
- The Subscribe button for any subscription product is visible on the Category page, Product Page, and the Search page.
- The customers can make payments using PayPal or Stripe, whichever seems feasible.
- More than one subscriptions products can be added to the cart, but some conditions apply.
- It supports Offline Recurring Payment.
- Also, supports online Stripe Recurring Payment and PayPal Recurring Payments.
- This extension supports simple, configurable, virtual, and downloadable product types.
Installation
Customers will get a zip folder. Then they have to extract the contents of this zip folder on their system. The extracted folder has an src folder, inside the src folder you have the app folder.
You need to transfer this app folder into the Magento 2 root directory on the server as shown below.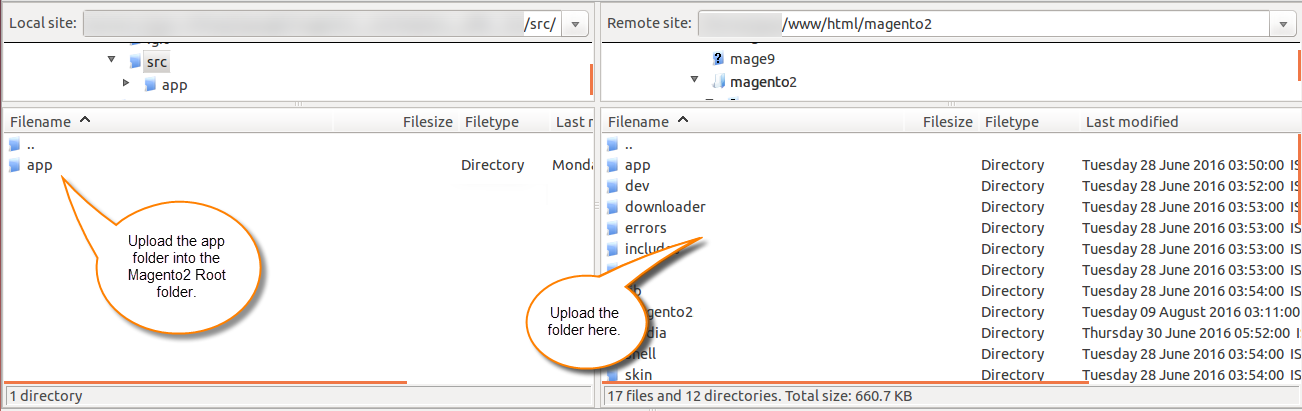
On successfully installing the module, you have to run these commands in the Magento2 root directory.
First command –
composer require stripe/stripe-php
Second Command –
composer require paypal/rest-api-sdk-php:*
Third Command –
php bin/magento setup:upgrade
Fourth Command –
php bin/magento setup:di:compile
Fifth Command –
php bin/magento setup:static-content:deploy
After running the commands, you have to flush the cache from the Magento 2 admin panel by navigating through->System->Cache management as shown below.
Language Translation
For translating the module language, navigate through src/app/code/Webkul/MpRecurringPayment/i18n, and edit the en_US.csv file.
Thereafter, rename the CSV as “en_SA.csv” and translate all right side content after the comma in the Arabic language. After editing the CSV, save it.
Then upload it to the path src/app/code/Webkul/MpRecurringPayment/i18n where the Magento2 is installed on the server.
The module gets translated into the Arabic Language. It supports both RTL and LTR languages.
Retrieving PayPal & Stripe Credentials: for Magento2 Multi-Vendor Recurring Subscription Marketplace
Given below are the steps to retrieve PayPal and Stripe credentials.
Steps: for PayPal
Initially, log in to PayPal business account and navigate through “Payment Setup”->
On your website”-> “continue” button.

Further, tap on “Option A” to select a third-party e-commerce solution where the PayPal payment process is built-in.
Thereafter, in Option A tap on the “Get your API Credentials” link.

Post this, click on the “Manage API Credentials” button to see API Credentials.

The user will find the API Username, API Password, and Signature.

Stripe Credentials
To get the API Keys you can use the link- https://dashboard.stripe.com/login.
The user has to Log in/ Sign up to their account to retrieve their API Keys.
In the following screenshot, the keys for the Test and live environments, i.e. Publishable Key and the Secret Key are visible.

Setting Up IPN Notifications on PayPal
The following method defines how to specify and activate the URL for your IPN listener in your PayPal profile.
Your listener must be located at the URL that you specify in the profile.
Before you activate your listener on PayPal, you should test the listener using the IPN simulator in the sandbox.
The steps to set up your listener for Sandbox testing and to set up your listener for live operation on PayPal are the same.
The only difference is that you log into the sandbox to set up your listener for Sandbox testing and you log into PayPal to set up your listener for live operation.
Note:
Sandbox testing goes beyond simply using the IPN simulator. The IPN simulator only sends IPN messages to a listener; it does not perform the complete operation; for example, it does not complete a transaction.
Sandbox testing involves performing the same actions in the sandbox as you expect to be performed when the listener goes live.
Post that you log in, follow these instructions to set up your listener:
- Log in to your PayPal business account at www.paypal.com.
- Click the settings icon at the top of your PayPal account page and then click Account Settings.
- On the Notifications page, click the Update link for the Instant payment notifications item.
- Click Choose IPN Settings to specify your listener’s URL and activate the listener. The following page opens:
- Specify the URL for your listener in the Notification URL field.
- Click Receive IPN messages (Enabled) to enable your listener.
- Click Save. The following page opens:
You can return to the Instant Payment Notification page to modify your notification URL, disable your listener, or turn off IPN.
Note:
IPN Url to be set: [magento-url]/recurring/paypal/notify
The IPN message is always sent to your notification URL unless you have disabled the preference to receive IPN messages.
Set Webhook in Stripe: for Magento 2 Multi-Vendor Recurring Subscription Marketplace
In web development, a webhook is a method of altering the behavior of a web page, or web application, with custom callbacks.
Webhooks are basically user-defined HTTP callbacks that are triggered by specific events.
Now for setting up the Webhook in Stripe, follow the steps listed below-
Step1: Login to Stripe Account

Step 2 –
- ‘View Test Data'(as per your need), and
- Tick on ‘Developers’ thence
- Go on ‘Webhook’.

Step 3 –
Here, Add Endpoint.

Step 4:
Fill in the details as shown in the screenshot and save details.

Step 5:
Go to the ‘Send Test Webhook’ to check the given URL is working or not.

Now you can easily send a test event to a webhook endpoint, by selecting the specific event type & by clicking on the Send test Webhook button.

Retrieving the Client ID and Key: for PayPal
PayPal: Partners Onboarding
- As the “PayPal Commerce Platform is currently available to approved partners.
- Initially, to register with the PayPal Commerce Platform, the store owner will have to navigate to the PayPal Commerce Platform Partner Onboarding page.
- Thereafter, the store owner must tap on the link- PayPal Partner form if the store owner wishes to be an approved partner of the PayPal Commerce Platform.
- It redirects to the PayPal Partner form page, where the store owner needs to fill in the necessary details as shown in the image below, and submit the same.

- Then a success message will display and a confirmation mail is sent to the store owner an account is created with PayPal.

Further, the store owner can carry on with retrieving the Client Id and Secret by following the steps below:
Generate Sandbox Client Id and Secret:
So, for retrieving the Client Id and Secret, login here.
Then navigate to My Apps & Credentials as shown in the given image:

Create App
On clicking the Create App, it redirects to the Create New App page.

Sandbox Create New App Page
Here, enter your App Name and select the Sandbox developer account and proceed further by hitting the Create App button.
Subsequently, select the sandbox or live account for which you want to create the API credentials ie; client ID and secret key.

Sandbox – Get Client Id and Secret

Get PayPal Live Client Id and Secret:
For the Client Id and Secret, login here.
Then navigate to My Apps & Credentials as shown in the given image:

Create App
On clicking the Create App, it redirects to the Create New App page.

Create New App Page
Here, enter your App Name and proceed further by hitting the Create App button.

Find the Live Client Id and Secret:

Hence, copy the client ID and secret key and configure them in the admin backend under PayPal Marketplace Payment systems configurations.
Retrieving the Client ID and Key: for Stripe
1st Step:
To get the API Keys you can use the Stripe website. First, you’ll need to Sign in to the stripe account.
Go to Stripe Login and enter your login details.

2nd Step:
Now from the stripe dashboard, you can click on the toggle button of the viewing test data, if you’re using the module for the test purpose or you can also use the live credentials of your stripe account APIs if you want to set up the module for the live website.
Now, enable the option “View test data” on the side panel if not enabled already.

3rd Step:
Click the API menu option on the side panel to see the Publishable key(API Publishable Key). Now, click the “Reveal test key token” to get your Secret Key(API Key).
Clicking the “Reveal test key token” will bring up the – Secret Key(API Key).
The admin can use API Publishable Key, and API Secret keys in the admin configuration to set up the module as per the below image:

4th Step:
To get the Client Secret key click the “Connect” menu option on the side panel and then click on the “Settings” option. Enter all the required information for the application.
Set the Website URL as – www.example.com/mprecurring/connect/stripe/
Set the Redirect URL as – www.example.com/mprecurring/connect/stripe/
Here, you have two keys for the client_Id that are used according to the mode –
- Development mode – This client_id is used when your site is in the testing mode.
- Product mode – This client_id is used when your site is in the live mode.
5th Step:
To get the Account ID to click on the “Profile” option on the right side and then navigate towards the Account section in the profile as per the below image:

Henceforth, the API Key, API Publishable key, Account ID, and the Client Key is used to configure the module.
Admin Configurations: for Magento 2 Multi-Vendor Recurring Subscription Marketplace
On installing the module successfully, the admin must navigate to Stores > Configurations > Subscription Configuration, in the admin panel, to configure the basic settings.

Under General Settings, the admin can configure the following fields:
Enable: The admin can set the status of the module as Yes.
Subscription Price Scope: The admin can set the price scope of subscription as Global or Store View.
Enable Discounts on Subscriptions: The admin can allow discounts on the subscriptions.
Allow Multiple Subscriptions in Cart: The admin can set this field as Yes or No. (Further explanation for the use case of this field is given in the customer workflow section).
Allowed payment methods to buy subscription: The admin can select payment methods, against this field; these are visible to the customer on the checkout page.
PayPal and Stripe Settings: for Multi-Vendor Recurring Subscription Marketplace
Configurations: for Webkul Recurring PayPal Express Checkout Payment Method
The admin needs to navigate to the Sales > Payment method > Webkul Recurring PayPal Express Checkout Payment Method to configure the basic settings for PayPal.

The admin can configure the fields as under:
Enable this Solution: The admin can set this field as Yes to enable this payment method.
Sandbox Mode: The admin may select Yes to enable the testing mode else No to make use of the Live mode.
Title: Set the Title for the Payment method which is visible to the customers at the checkout page.
Merchant PayPal ID: The admin needs to add the Merchant PayPal ID against this field.
PayPal API:-
- User Name: Set PayPal’s API username against this field.
- Password: Set PayPal’s API password against this field.
- Signature: Set PayPal’s API signature against this field.
Payment from Applicable Countries: The admin can choose any of the options present in the dropdown list or select All Allowed Countries.
Sort Order: Set the sort order of the payment method.
Client Id: The admin retrieves it from PayPal’s website.
Secret Key: The admin retrieves it from PayPal’s website.
Configurations: for Webkul Recurring Stripe Payment Method

The admin can set the configuration of the Webkul Recurring Stripe Payment Method as under:
Enable this Solution: The admin can set this field as Yes to enable this payment method.
Title: A Title can be set for the Payment method which is visible to the customers at the checkout page.
Sandbox Mode: The admin can choose Yes to enable the testing mode, else select No to make use of the Live mode.
Type of Integration: The admin needs to add a relevant integration against this field.
API Publishable Key: Enter your Stripe API publishable key.
Client ID: The admin enters the client id.
Account Id: The admin enters the Account Id against this field.
API Secret Key: The admin enters the Account Id against this field.
Set Name Display on Form: The admin sets a name that will display on the form.
Payment from Applicable Countries: The admin can choose any of the options present in the dropdown list or select All Allowed Countries.
Minimum Order Total: The admin can set the minimum order total.
Maximum Order Total: The admin can set the maximum order total.
Sort Order: The admin can set the sort order for the payment method.
Admin End Workflow: for Multi-Vendor Recurring Subscription Marketplace
Further, in the admin dashboard, the admin will find the Recurring menu option, clicking which two sub-menu options appear, i.e. Manage Duration Type and Manage Subscriptions.
Manage Duration Type
On clicking Manage Duration Type, the list of subscription plans is present such as Weekly, Monthly, Daily, etc. as shown below.
The admin can add a new Duration Type as well.

For that, the admin must click on the Add Duration Type button, which redirects to the New Duration Type page. 
The Information tab is present, which displays the Duration Type Information, where the admin configures the following fields:
Duration Title: The admin can set the Title for the Duration Type against this field.
Duration (days): The admin can set the number of days of the respective Duration type.
Status: The admin can Enable the status of the Duration type and also disable it if there is a need.
Sort Order: The admin sets the sort order for the respective Duration Type.
Manage Subscriptions:
The next sub-menu option is Manage Subscriptions. On clicking the same, it redirects the admin to the All Subscriptions page, where the seller listing with their respective subscriptions is present as shown in the image below.

On clicking the View link, the admin can go through the complete Subscription Information for a particular order as shown below.
It includes details such as Subscription Type, Start Date, Initial Order Id, Product Name, Status, etc.

Let us see how we can convert an Existing Product in the admin’s product list to a Subscription Product.
The admin can navigate to the Catalog > Products in the admin dashboard and choose any non-subscription product from the product list.
The admin can click on its Edit link, the details page for that respective product opens up.

On navigating to the bottom of the Edit Product page, the admin shall find a section namely, Subscription Configuration as shown in the image below.
The admin will have to choose Yes, against the Subscription field, to make it a Subscription Product.

The admin needs to click on Edit Configurations to add the subscription types and Save the product.

Creating a New Subscription Product: Admin End
The admin will navigate through Catalog > Products in the admin dashboard, in the Products listing page
Here, the admin needs to click on Add Product button to add a new product, which further redirects to the New Product page. Here the admin can fill in the product details.

As the admin navigates to the bottom of the Edit Product page, the admin shall find a section namely, Subscription Configuration
As shown in the image below choose Yes, against the Subscription field, to make it a Subscription Product.

The admin needs to click on Edit Configurations to add the subscription types and Save the product.

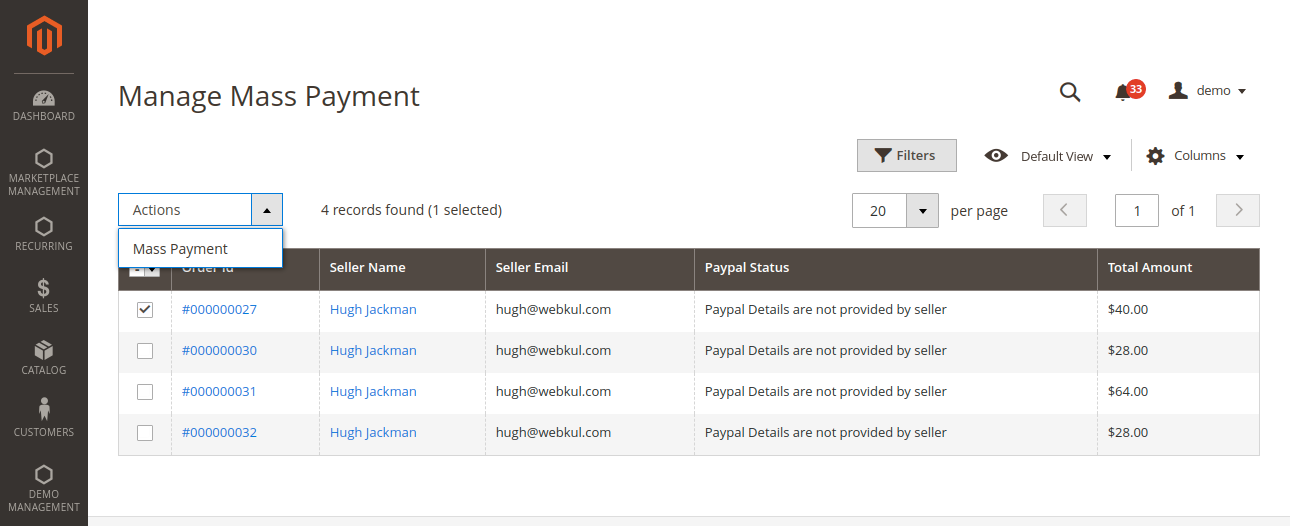
Admin end: PayPal Mass Payment
In the admin dashboard, under Marketplace Management, the admin will find the PayPal Mass Payment Menu > Manage PayPal Mass Payment.

As the admin click on the Manage PayPal Mass Payment, it redirects to the Manage Mass Payment page as shown in the image.
Here, the admin will find the list of sellers along with their Order Id, Seller Name, Email, PayPal Status ane Total Amount.
Under the Action tab, the admin shall find the Mass Payment option. The admin will have to select the order id(s) and click on Mass Payment.
In doing so, a pop-up appears as shown in the image below. The admin will have to click on OK, to make the mass payment to the chosen sellers.

On successful completion of the mass payment, a transaction is generated on behalf of the seller at the seller end.
Seller End Workflow: for Multi-Vendor Recurring Subscription Marketplace
The sellers can log in to the frontend and find the Recurring Subscriptions menu option in the seller dashboard
As the sellers hover on Recurring Subscription menu option, three sub-menu appears, i.e. Manage Product Subscriptions, Connect To Stripe, and Manage PayPal Details.

Moving on, let’s study the seller end menu options in detail.
Manage Product Subscriptions
As the sellers click on the Manage Product Subscriptions, it redirects to the Manage Subscriptions page as shown in the image below.
The sellers will find a listing of the customers who subscribe to the respective seller’s subscription products.
The tabular listing displays the details such as Order Id, Product Name, Customer Name, Subscription Type, Status, Created At, Start Date, etc.

To go through the complete information of a particular subscription, the seller must click on the View link for a particular subscription.
It redirects to the View Subscription page.
Here the seller will find the essential details such as Subscription Type, Start Date, Initial Order Id, Product Name, Status, Reference Profile Id, etc.

Connect To Stripe
The next sub-menu option is Connect To Stripe. The sellers can click on the same, which redirects them to the Connect To Stripe page.
The seller must click on the Connect to Stripe link (marked in the image), to establish an account with Stripe.

Manage PayPal Details:
Further, the sellers can navigate to the third sub-menu option, i.e. Manage PayPal Details.
On clicking the same, it redirects the seller to the Manage PayPal Details page. They can go forth and add the PayPal details such as PayPal ID, PayPal First Name, and PayPal Last Name and save the details. 
A success message, “PayPal Details Successfully Updated” shall display as the sellers click on the Save button.

Creating a New Subscription Product: Seller End
To add a new product, the seller will have to navigate to My Account > New Products to add a new product in the seller dashboard.
The Marketplace Add New Product page opens up, where the seller needs to choose the product type and Continue which further redirects to the Marketplace Add New Product page.
Here the seller needs to fill in the details of the new product.

On the bottom of the Marketplace Add New Product page, the seller will find Subscription Configuration section and choose Yes, against the Subscription field, to make it a Subscription Product.

Thereafter seller must click on Edit Configurations to add the subscription types and Save the product.

Convert an Existing Product in the seller’s product list to a Subscription Product.
The seller needs to My Account > My Product List in the seller dashboard and selects any existing non-subscription product from the product list.
Thereafter the seller must Edit the product after which the Marketplace Edit Product page opens up as shown below.

On navigating to the bottom of the Marketplace Edit Product page, the seller will find the Subscription Configuration section, and choose Yes, against the Subscription field, to make it a Subscription Product.

The seller needs to add the subscription types after clicking on Edit Configurations and Save the product.

Customer End Workflow: for Magento 2 Multi-Vendor Recurring Subscription
Meanwhile, customers can easily find subscription products as they navigate across the store.
For a guest user, the subscription product will display a button i.e. Login to Subscribe; which means the guest users will have to log in to purchase a subscription product as shown in the image below.

As soon as the customer logs in, the text on the same button changes to Subscribe as shown in the image below.

On clicking the Subscribe button for a specific subscription product, it redirects to the Products page as shown below.

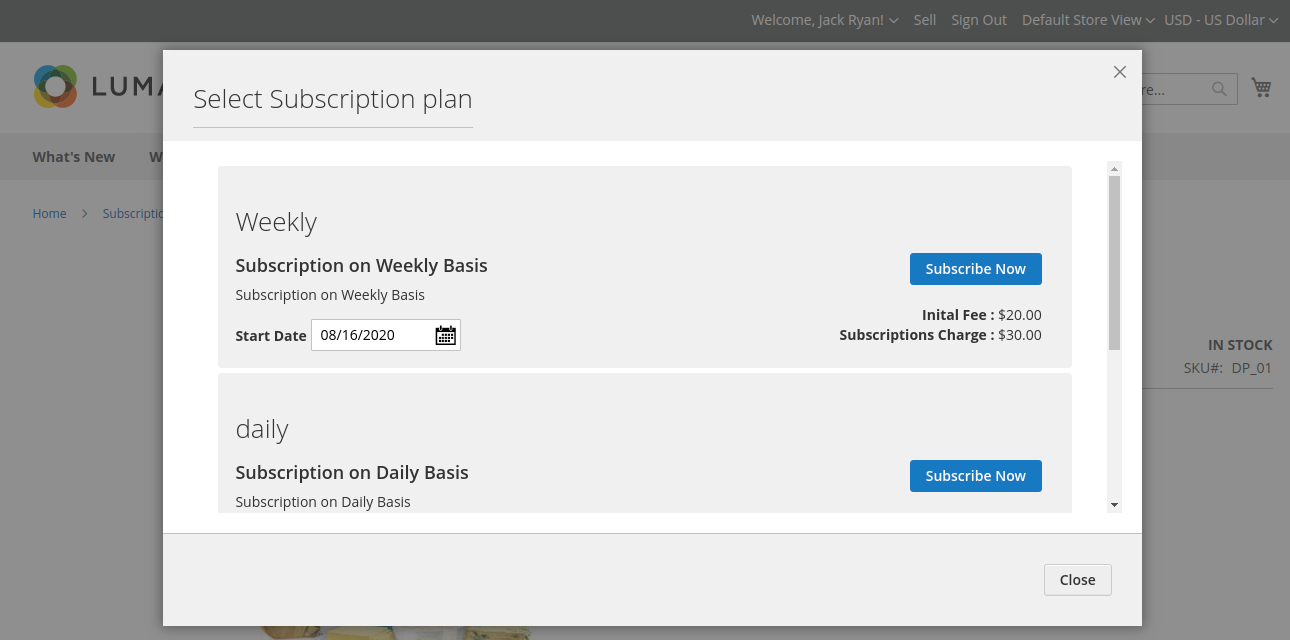
The customer must click on the Subscribe button on the product page to access and select subscription plans for the respective product.
Clicking the Subscribe button opens up the Select Subscription Plan popup as shown below.
The customer can choose from the given plans, selects a feasible date, and click on the Subscribe Now button.
This adds the product to the cart, and the customer can now Proceed to Checkout in the usual way.
The customer can select the Shipping Methods along with the address as shown in the image below.

Further, customers can either choose PayPal or Stripe to make the payments for the order.
Checkout with Offline Payment Method (Check/Money Order)
In the Review and Payments page, the customer can choose the Offline Payment Method such as Check/Money Order and click on the Place Order button.

In doing so, it redirects the customer to the website and displays the success message on order completion.

Checkout With PayPal:
In the Review and Payments page, the customer can choose the Webkul Recurring PayPal Express Checkout Payment Method and click on the Place Order button.

It redirects the customer to the PayPal login page where the customer needs to add their Username and Password.

Further, on clicking the Log In button, it redirects to the PayPal page, including details such as Ship to, Pay With, etc.
The customer must click on the Agree & Continue button to make payment for the order with PayPal.
 In doing so, it redirects the customer to the website and displays the success message on order completion.

Send Seller Payment tab in the Order Details Page: Admin End
If the customer places the order with PayPal, in the Order View page, another tab, namely, Send Seller Payment will be visible payment shall be visible as shown in the image below.

Payment with Stripe:
Likewise, the customer can also choose to pay using Stripe.
The customer can choose the Webkul Recurring Stripe Payment Method in the Review & Payments page.
Note:
- The Webkul Recurring Stripe Payment Method will be visible to the customers if they choose “today’s date on selecting the subscription plan” for a subscription product.

As the customer clicks on the Place Order button, it redirects to the Pay with card page, where the customer needs to add the Email Id, card details such as Name on the Card, Country or Region.
Thereafter the customer must click on the Subscribe button.

It redirects the customer to the website and displays the success message on order completion.

When the Customer Adds More than Two Subscription Products in the Cart
While configuring the basic settings, the admin has to set Allow Multiple Subscriptions in Cart as Yes.
The customer can add more than one subscription product into the cart, but some conditions apply.

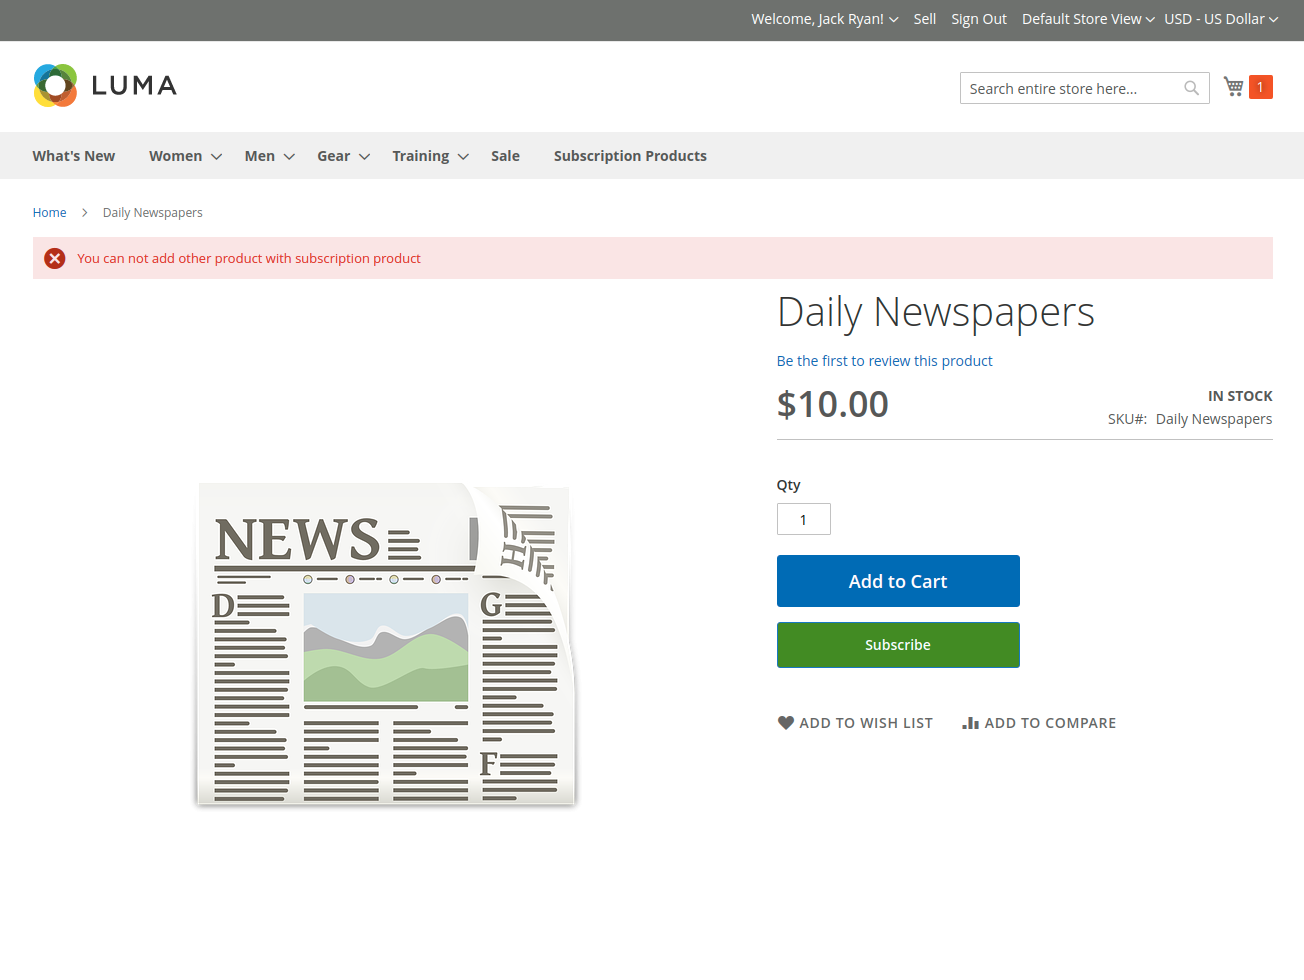
Condition 1:
If a subscription product is already present in the cart, and the customer tries to add another subscription product to the cart the usual way (i.e. by clicking the Add to Cart button),
- In such a case, an error message, “You can not add other product with subscription product” shall display as shown below.
Condition 2:
If a subscription product is already present in the cart, and the customer tries to add another subscription product to the cart after choosing its subscription plans.
- In this case, the customer must select the same Duration Type (such as Weekly) and Same Date as that of the subscription product that is already added in the cart.
- If any of the two are set different for the second subscription product, an error message, “Start dates and Duration types of all added subscriptions must be same” shall display as shown below.

For instance, for Daily Newspapers as well the customer must choose the Duration type as Weekly and Start date as of 08/12/2020, which is set as same for Dairy Product (already present in the cart).

Subsequently, a success message shall display and more than subscription products will be added to the cart.

Customer End Subscriptions: for Magento 2 Multi-Vendor Recurring Subscription Marketplace
Furthermore, customers can navigate to My Account > My Subscriptions.
In My Subscriptions page, the customers will find the list of subscriptions along with their details such as Order Id, Reference Profile Id, Product Name, Subscription Type, Status, etc.

The customer can click on the View link, and go through the complete details of the respective product.
Also, the customer can even UnSubscribe the subscribed product by clicking the UnSubscribed link.

That’s all for the Magento2 – How to Start Multi-Vendor Recurring Subscription Marketplace.
If you still have any issues, feel free to add a ticket and let us know your views on our Webkul Support System.
Current Product Version - 4.0.0
Supported Framework Version - Magento 2.0.x, 2.1.x, 2.2.x,2.3.x, 2.4.x

Be the first to comment.