Introduction
Magento 2 Recurring Payment Subscriptions module provides the functionality to manage subscription & recurring payment for the products of the admin
Apart from that, Magento 2 Stripe Recurring Payment extension allows the customers to make a subscription for the allowed products on a daily, weekly, Monthly & Yearly basis.
Check Magento 2 Recurring and Subscription plugin’s configuration part –
Check the plugin’s customer workflow part –
Recurring Payment for Magento 2 (Adobe Commerce) Features
- The merchant can enable/disable the Recurring Payment.
- The admin can manage PayPal Recurring payment.
- Also, the owner can view/unsubscribe customer subscriptions.
- Moreover, customers can view/unsubscribe to their subscriptions.
- Additionally, it supports online recurring payments with PayPal.
- Additionally, this module supports online Stripe recurring payments.
- Also, it supports offline recurring payments too
- Further merchants can add more than one subscription product.
- As well as the owner can select the subscription price scope as global or website wise.
- Furthermore, the admin sets the subscription amount & subscription initial fee product-wise.
- After that Magento 2 subscription extension supports simple, configurable, virtual, and downloadable product types.
- Then, the merchant can manage the duration type.
- The admin can allow customers to cancel and hold the subscription.
- The admin can manage the subscription labels.
- The admin can send an Email notification for subscription status.
- The admin can add subscription cancellation reasons for customers.
- The admin can add the terms for the child products of the configurable product.
-
Admin can check the subscription reports: Subscription revenue, active subscriptions, new subscriptions, subscriptions average, and churn rate.
-
Customers can choose the subscription cancellation reason to cancel the subscription.
- Customers can check the recent transactions related to subscriptions.
- GraphQL has been implemented in the extension.
- The extension is compatible with the Hyva Theme.
Magento 2 Recurring Payment Installation
Now, follow the below steps for installing the Magento 2 Recurring Payment extension –
Step 1:
first of all, Unzip the respective extension zip and then move the “app” folder (inside “src” folder) into the Magento (Adobe Commerce) root directory on the server.

Step 2:
After that, run the below-mentioned commands in the Magento 2 root directory via terminal.
composer require stripe/stripe-php:16.*
php bin/magento setup:upgrade
php bin/magento setup:di:compile
php bin/magento setup:static-content:deploy
php bin/magento indexer:reindex
php bin/magento cache:flush
How to Get PayPal & Stripe Credentials?
PayPal Credentials
After this, Log in to PayPal business account and navigate through “Payment Setup”->
On your website”-> “continue” button.

Then, tap on “Option A” to select a third party e-commerce solution where the PayPal payment process is built-in.
after that, in Option A tap on the “Get your API Credentials” link.

Post this, click on the “Manage API Credentials” button to see API Credentials.

Now here, you can see your API Username, API Password, and Signature.

Stripe Credentials
To get the API Keys you can use the link- https://dashboard.stripe.com/login.
You have to Log in/Sign up your account and you will get your API Keys.
As you can see in the following screenshot the keys are there for the Test and live environments – Publishable Key and the Secret Key.

Setting Up IPN Notifications on PayPal
Setting Up IPN Notifications on PayPal
The following method defines how to specify and activate the URL for your IPN listener in your PayPal profile.
Your listener must be located at the URL that you specify in the profile.
Before you activate your listener on PayPal, you should test the listener using the IPN simulator in the sandbox.
The steps to set up your listener for Sandbox testing and therefore to set up your listener for live operation on PayPal are the same.
The only difference is that you log into the sandbox to set up your listener for Sandbox testing whereas, you log into PayPal to set up your listener for live operation.
Note:
Sandbox testing goes beyond simply using the IPN simulator.
The IPN simulator only sends IPN messages to a listener; it does not perform the complete operation; for example, it does not complete a transaction.
Sandbox testing involves performing the same actions in the sandbox as you expect to be performed when the listener goes live.
Post that you log in, follow these instructions to set up your listener:
- Log in to your PayPal business account at www.paypal.com.
- Click the settings icon at the top of your PayPal account page and then click Account Settings.
- On the Notifications page, then click the Update link for the Instant payment notifications item.
- Next, click Choose IPN Settings to specify your listener’s URL and activate the listener. The following page opens:
- Specify the URL for your listener in the Notification URL field.
- Click Receive IPN messages (Enabled) to enable your listener.
- Click Save. The following page opens:
You can return to the Instant Payment Notification page to modify your notification URL, and additionally, disable your listener, or turn off IPN.
Note:
IPN Url to be set: [magento-url]/recurring/paypal/notify
The IPN message is always sent to your notification URL unless you have disabled the preference to receive IPN messages.
Set Webhook in Stripe for Webkul Recurring Payments
In web development, therefore a webhook is a method of altering the behavior of a web page, or web application, with custom callbacks.
Webhooks are basically user-defined HTTP callbacks that are triggered by specific events.
From the admin dashboard, the admin can click on the Generate Webhook and generate the data.

after successful generating the webhook, the admin can see the successful message from the admin dashboard as shown in the image below –

Whenever that trigger event occurs on the website, the webhook sees the event and collects the data.
Now, the admin can see the collected data from the stripe dashboard as shown in the image below –
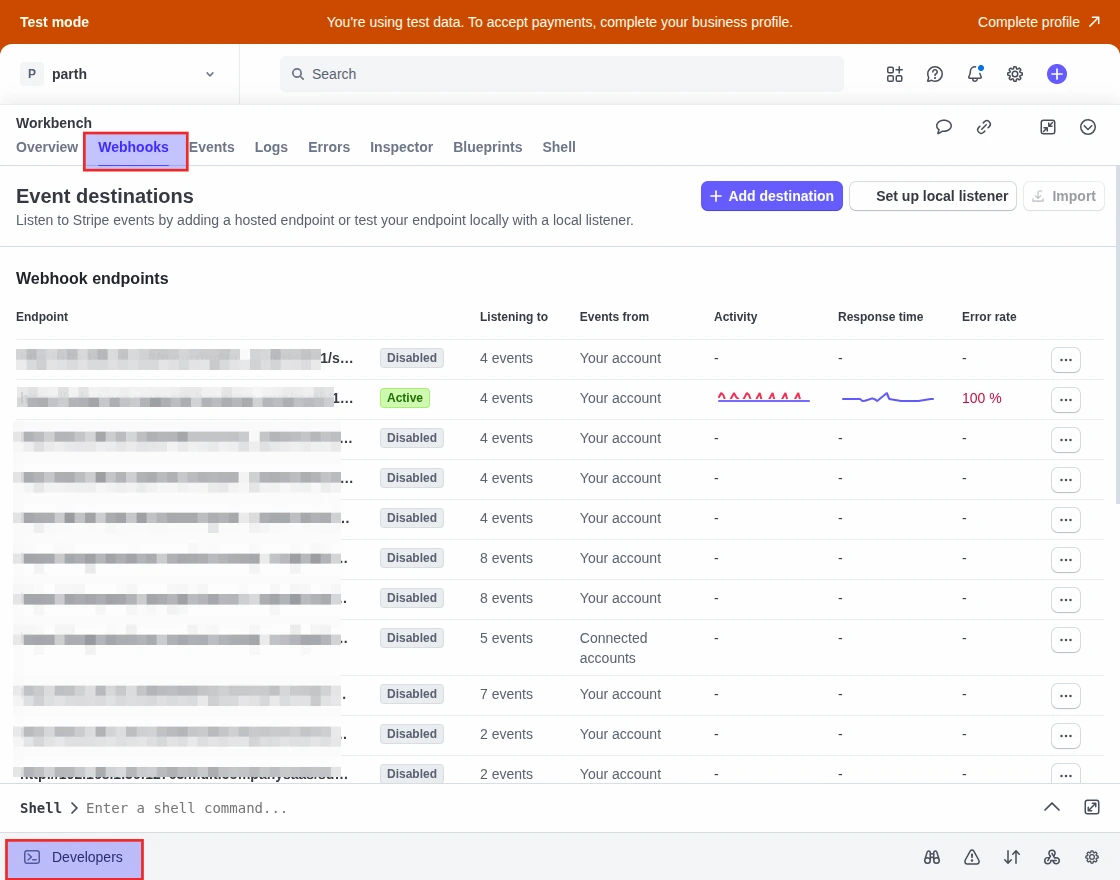
The admin can also click on the generated URL for the detailed view of the events as shown in the image below –

Magento 2 Recurring Payment Configuration – Admin
After that, the successful installation of Magento 2 Subscription extension,
the admin will configure the module settings. To do so, the admin will navigate through Stores->Configuration->Webkul->Subscription Configuration.
General Settings
Here, the admin will be able to –
- Enable the functionality by selecting a Yes option to select a NO for Disabling the functionality.
- Select the Subscription Price Scope – Select the scope for using the extension as Global or Website wise.
- Enable Discount on Subscriptions: Select a Yes to apply discounts on subscriptions, as it is valid only on the first order; otherwise, select No.
- Allow Multiple Subscriptions in Cart: Select a Yes multiple subscription products can be added to the cart at a time. If their “Start Date and Duration types” are the same.
- Allowed Payment Methods to Buy Subscription: Here, choose the payment methods after that will be available to customers for buying the subscription product.

Manage Customer Control Settings
- Allow Customer to Cancel Subscription: After that, Admin can allow their customer to cancel a subscription by enabling this feature.
- Allow Customer to hold Subscription: The admin can allow their customer to hold subscriptions by enabling this.
- Allow Customers to Subscribe multiple times for the same product: Also, admin can allow their customer to subscribe multiple times for the same products.

Manage Subscription Labels
- Label for Without Subscription: The admin can type the name visible on the product page for purchasing without a Subscription.
- Label for With Subscription: The admin can type the name visible on the product page for purchasing with Subscription.
- Subscriptions Information Message: The admin can define information messages regarding the subscription.

User Email Reminder and Notification Settings
- Send Email on Subscription Status: The admin can select subscription status and send an email notification to the customer.
- Send Email Copy To: Here the admin can enter their preference email ID to send a copy of the mail.
- Send Expiry and Renewal reminder mail days: The admin can set a reminder email days before to send expiry and renewal reminders.

Cancellation Reason for Customers
- Add Cancellation Reasons for Customers: Here the admin can also add and ask the reason for the cancellation subscription from the customer.

Configuration – Recurring PayPal Payment Method
Thereafter, the admin needs to navigate through Stores->Configuration->Sales->Payment Methods->Webkul Recurring PayPal Express Checkout Payment Method.
Here, the admin will configure the settings for the payment method as shown below in the snapshot.
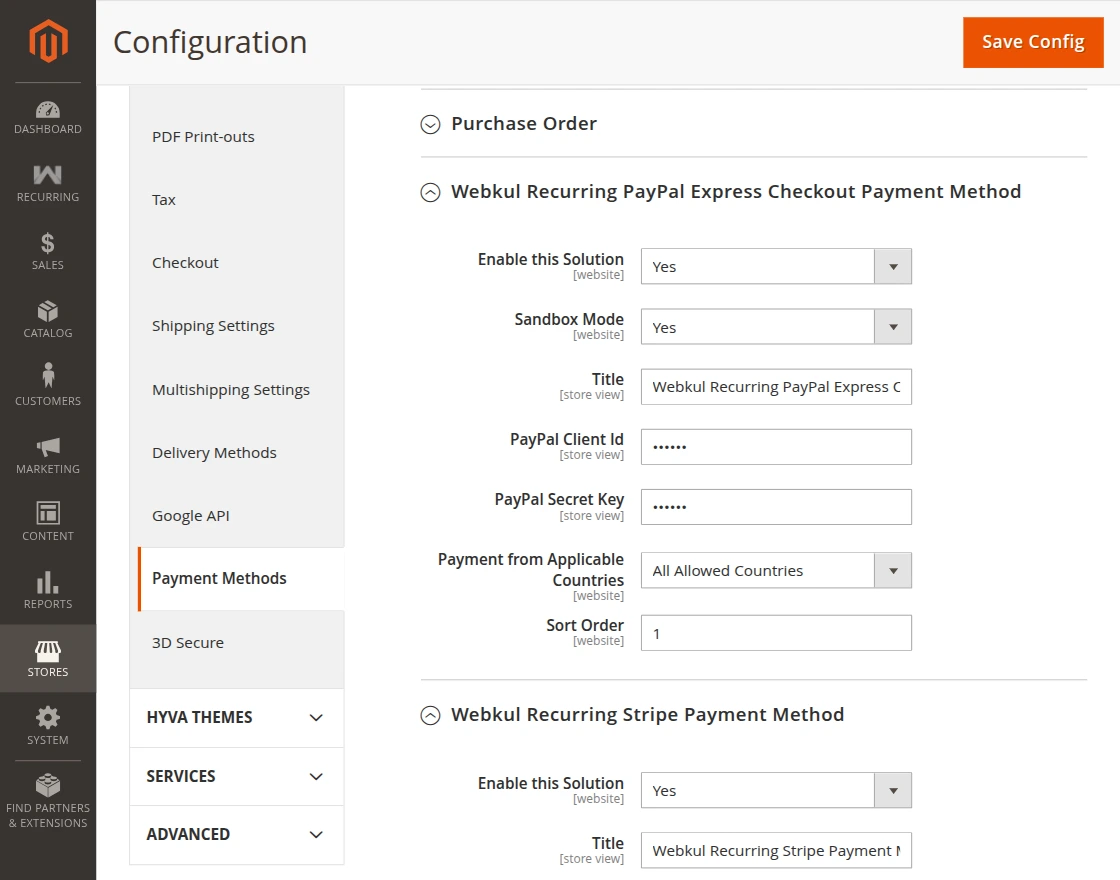
Here, the admin will –
- Enable this solution for making it available for use at the frontend.
- Sandbox Mode
Select Yes to enable the testing mode else select No to make use of the Live mode. - Title
Set the Title for the Payment method which is visible to the customers at the checkout page. - PayPal Client Id
Enter your PayPal Client Id - PayPal Secret Key
Enter your PayPal secret key - Payment From Applicable Countries
Select All to allow payment from all the countries else select Specific Countries. - Payment From Specific Countries
If Specific Countries is selected then you can select the specific countries from where you want to receive the payments. - Sort Order
Set the sort order for this Magento 2 payment method at the checkout time.
Configuration – Recurring Stripe Payment Method
The admin will be able to configure recurring stripe payment method by navigating through Stores->Configuration->Sales->Payment Methods->Webkul Recurring Stripe Payment Method
likewise shown in the image below:

Here, the admin will-
Enable this Solution: Select Yes to enable this payment method else to select No to disable this payment method.
Title: Set the Title for the Payment method which is visible to the customers at the checkout page.
Sandbox Mode: Select Yes to enable the testing mode else select No to make use of the Live mode.
API Publishable Key: Also, admin can enter Stripe API publishable key.
API Secret Key: Enter your Stripe API secret key.
Payment from Applicable Countries: Select All Allowed Countries to allow payment from all the countries else select Specific Countries to allow payment from specific selected countries.
Minimum Order Total: Here, the admin needs to enter the minimum amount allowed by stripe.
Maximum Order Total: The admin can enter the maximum amount allowed by stripe.
Sort Order: Set the sort order for this payment method at the checkout time.
Recurring Payments – Admin
The admin will have the Recurring section in the admin backend panel thenceforward the successful installation of Magento 2 Subscription Payments extension.
Merchant should have CRM Extension to retain customers.

Here the admin has three sub-sections to manage:
Manage Duration Type
- Here the admin can view and manage the duration type and furthermore add new duration by clicking on “Add Duration Type”.

After clicking “Add Duration Type” here the admin needs to fill and select for creation of new duration type.
- Status: Here the admin can enable or disable duration.
- Duration Title: The admin can enter the duration title.
- Duration Type: Here the admin can select the subscription duration type such as Day, Week, Month, and Year.
- Duration (Billing Cycle): The number of duration after which a subscriber is billed. For example, if the duration type is DAY with a duration of 2, the subscription is billed once every two days.
- Sort Order: Here the admin can enter the sort order.
- Initial Fees: Set “Yes” if you charge the initial fee to the customer. It will only deducted at the time of the first purchase of the subscription.

Manage Subscriptions
- Under this section, the admin will find all the recurring subscriptions listed.

To view a subscription detail, tap the View link and then you will be able to see the subscription information for that particular subscription.
The admin can unsubscribe from the particular subscription by clicking the “Unsubscribe” button.

Under the Orders section, the admin can see the recurring payment details for the particular customer.

Here, the admin can also cancel the customer subscriptions by selecting the subscription first and then from the Actions drop-down option select the Unsubscribe option as shown below in the snapshot.

After this, the admin can see a pop-up for Unsubscribing the selected Subscription, click Ok to confirm.

After this, the admin will see a confirmation message for the same.

Subscription Report
Here the admin can check their subscription report in dashboard format, such as Subscription Revenue, Active Subscription, Average Subscription Value, and New Subscription.

How To Create a Subscription Product?
Note – Magento 2 Subscription Payments extension supports simple, configurable, virtual, and downloadable product types.
To create a subscription product you need to navigate to the Catalog section and open any already created or new product. After that, go to the Subscription Configuration section for the product.
Here, set the Subscription option to Yes. After that, you will have to click the Edit Configuration button to add the subscription duration to this product.
For Subscription Only Product: Set “Yes” if you want to make this product “Only” available for Subscription

This brings up the below section to choose the duration type for the product. Here, you need to check the subscription types to set for this product.
The admin needs to choose any duration title such as weekly, monthly, and yearly.
Then they need to enter initial fee and need to select discount types and the final the admin will enter subscriptions charge.

Lastly, click the Save button at the top to save the configuration settings.

Manage Subscription on Configurable Products
Now the admin can manage subscription on configurable products
the admin needs to click on “Catalog>Products>Need to click edit on configurable types of Products<Subscription Configuration>Edit Configuration”.
Here the admin can choose configurable products and manage their subscription.

After clicking on “Edit Configuration” then admin needs to click on “Manage Subscription”.
The admin must select a duration title, such as weekly, monthly, or yearly.
Following that selection, they are required to input an initial fee and choose from various discount options. Finally, the admin will input the subscription charge.

Customer Workflow
Magento 2 Recurring Payment Subscription advances the website front, the customer will see a Login to Continue button.

After clicking the Login To Subscribe button, the user needs to login to his account on the website. And after which the customer can see the Subscribe button as shown below in the snapshot.
Then customer needs to click“Subscribe Now” the products after selecting thier plan, quantity and date.

Click the Proceed to Checkout button to proceed to the checkout.

Now, select your shipping address, shipping method and tap the Next button.

Under the payment section, the customer can select to either to go with the Check/Money Order(offline method for purchasing the subscription).
Or Magento 2 Paypal Recurring Payment (Online Payment) method or Stripe Recurring Payment(Online Payment).
PayPal Recurring Payment:
Post this, click the Place Order button.

Post the above step, the customer is redirected to the PayPal login. The customer has to login to his PayPal account.

Post that, select Accept and Continue to complete the payment for this particular order.

Stripe Recurring Payment:
Now the customers can also able to view the Stripe Recurring Payment method under the payment section. Post this, click the Pay With New Card button.

Tapping to Pay With New Card button, the customer is redirected to the Stripe login. The customer has to login to his Stripe account.

And then, select Accept and Continue to complete the payment for this particular order.
Note: Stripe recurring payment method only shows over the payment page if the subscription is selected from the current date.
Lastly, the customer can see the placed order details. Hence for more details check the below given snapshot.

Here, the customers need to click “My Subscription” then they can see the overview of the subscriptions they have subscribed to and can view/Unsubscribe the subscription as well.

To view the subscription, tap the view button and you can see the details of the particular subscription.
Here the customer can hold and unsubscribe the subscription.

Now, The customers also have an option to unsubscribe to the opted subscriptions.
Afterwards, to do so, the customer will tap on the Unsubscribe button that brings up a pop-up to select the reason for cancellation.
Thereupon tap the OK button to confirm the unsubscribe.

Next tapping the OK button you can see that the subscription status is unsubscribed.

The customers can also check the Billing information by tapping on the Billing info section.
It displays several information such as Amount to be billed, Initial Fee, Next Billing Date, Last Billing Date etc.

Subscription Emails
The customers will get subscription email on every new subscription.
It will contain details such as Transaction ID, Product details like Item, SKU and Quantity as well.
A reference screenshot of a New Subscription Email is provided below,

Run the following command for sending a reminder Email to the customer before their subscription expires,
php bin/magento cron:run --group default
If the customer cancels any existing subscription, they’ll notified through Email for the cancellation as well.

Support
That’s all for the Recurring Payment Subscription for Magento 2 (Adobe Commerce) extension.
If you have any queries or doubts get back to us on [email protected] or raise a ticket at webkul.uvdesk.com
Explore the Adobe Commerce Cloud development service by Webkul. You may also browse other Magento 2 marketplace add-ons.
You can check our quality Magento 2 extensions.
Current Product Version - 4.0.6
Supported Framework Version - Magento 2.0.x, 2.1.x, 2.2.x,2.3.x, 2.4.x

Recurring payment is there but need to check for follow up and retention.