Magento 2 Product Import Using XML URL extension – The admin just needs to add the XML URL and then map the XML file column names with the Magento 2 store product column names.
Then when the cron runs the products will get created automatically.
Also, if a new category is assigned to a product that is not available in the store then the category gets created and the product is assigned to the same.
Also, if you are looking to import and export the product reviews then you can check the Magento 2 Product Review Import Export extension.
Check the video mentioned below for an overview of the workflow of this extension:
Features
- Import simple, virtual, and configurable products using XML URLs, CSV provided by the wholesaler or distributors.
- Import product using cron.
- Map the product attribute in the admin configuration
- Enable or disable the extension.
- Category automatically created and product assigned if the category does not exist.
- On selecting Weekely: Cron will run on the first day of the week.
- On selecting Monthly: Cron will run on the first day of the Month.
- Import multiple images for products.
- Create products with customizable options.
- Supports MSI functionality.
Installation
#Download Module
Firstly, you need to log in to Webkul Store, go to My Account>My Purchased Products section, verify and then download and extract the contents of this zip folder on the system.
#Upload Folder
Once the module zip extracts, follow path src>app and then copy the app folder into the Magento 2 root directory on the server as shown below:

# Run Commands
You need to run the following commands:
php bin/magento setup:upgrade
php bin/magento setup:di:compile
php bin/magento setup:static-content:deploy
php bin/magento indexer:reindex
php bin/magento cache:flush
composer require nicolab/php-ftp-client
Language Translation
For translating the module language, navigate through src/app/code/Webkul/ProductImportXMLUrl/i18n and edit the en_US.csv file.
Thereafter, rename the CSV as “en_SA.csv” and translate all right side content after the comma in the Arabic language. After editing the CSV, save it.

Now, upload it to the path src/app/code/Webkul/ProductImportXMLUrl/i18n where the installation of Adobe commerce is on the server.
The module translates into the Arabic Language. It supports both RTL and LTR languages.
The user can edit the CSV like the image below.

Use Case – Magento 2 Product Import Using XML URL
You are running a dropshipping store on Adobe Commerce and work with multiple suppliers, such as D1, D2, and D3, who provide product data.
These suppliers typically share their product information in various file formats, like CSV, which can be cumbersome to manage and upload to your store.
However, if all suppliers use a standardized XML file with a live URL for their product feed, the store admin can easily import these products.
The suppliers can simply update their product details in the XML file and provide the live URL, allowing the store owner to add all the products without much effort.
Initial Configuration
To make the initial configuration settings for the Magento 2 Product Import Using XML URL extension, the admin will navigate through Stores->Configuration->Product Import XML.

Here, the admin will –
- Enable the module functionality as well as enable the side panel option “Product Import XML” for the extension.
- Select the attributes of the Adobe commerce store to be mapped with the XML file column names.

The Adobe Commerce Attributes that can be mapped with the XML file column names –
- Categories
- Description
- Image Gallery
- Product Name
- Price
- Quantity
- Short Description
- SKU
- Enable Product
- Tax Class
- Product Type and
- Variations
- Variation Images
Cron Frequency – Cron frequency can be set to Daily, Weekly, or Monthly as required.

- On selecting Weekly: Cron will run on the first day of the week.
- On selecting Monthly: Cron will run on the first day of the Month.
Admin can also select product source from the dropdown list and that product source will be auto allocated while creating new products.

This allows admin to seamless manage product data by assigning items to the preferred source for accurate inventory and sales tracking.
Note:- The Apache2 server must have the “allow_url_fopen” function enabled in php.ini file.
Product Import XML Options
The admin will find two options under the Product Import XML side panel option.

Workflow
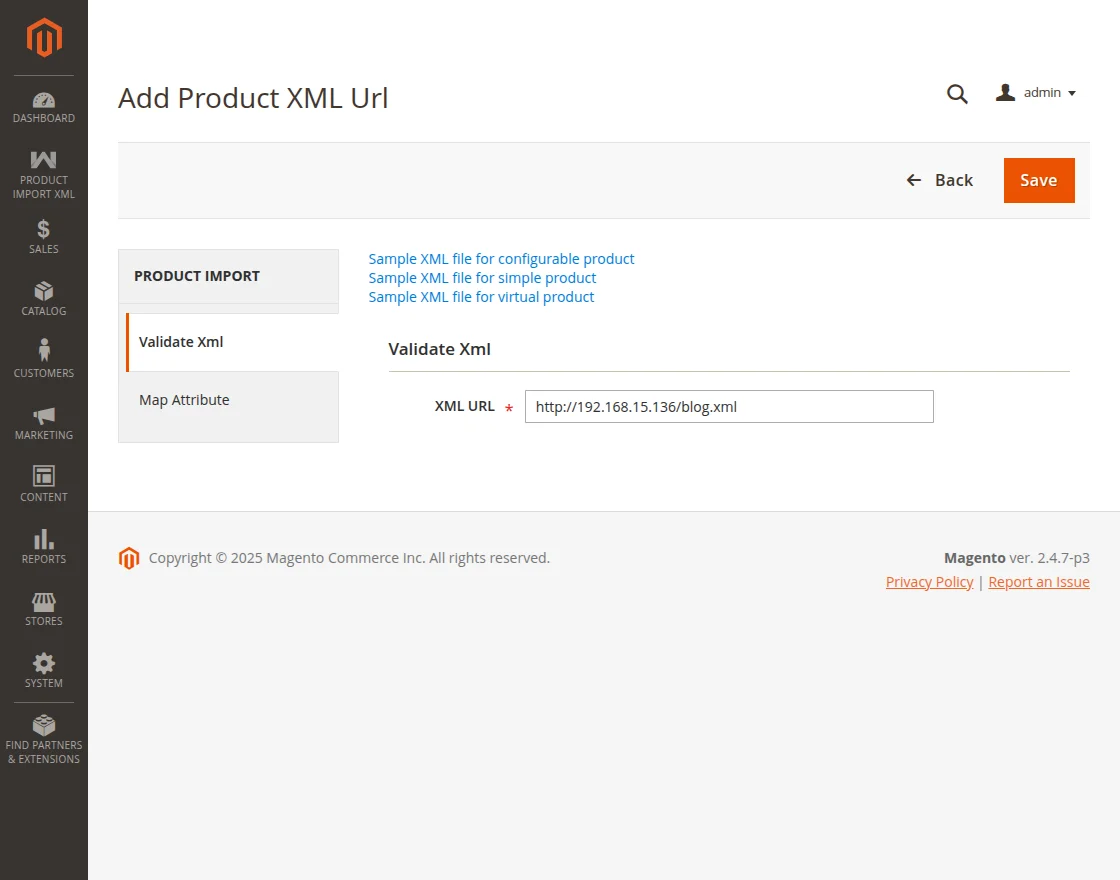
Note: If the XML file exists on the same server then just take the URL of that file and put it in the XML URL field.
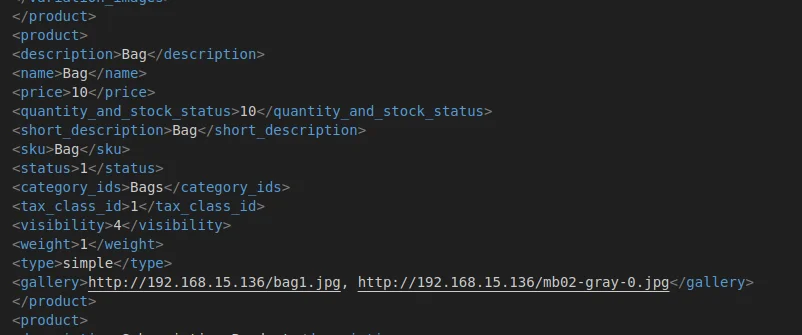
For this demonstration, I’ll be using the XML file URL with one product(simple).
XML file:
Now, navigate to the Add Product XML URL section, enter the XML URL of the file, and save it.

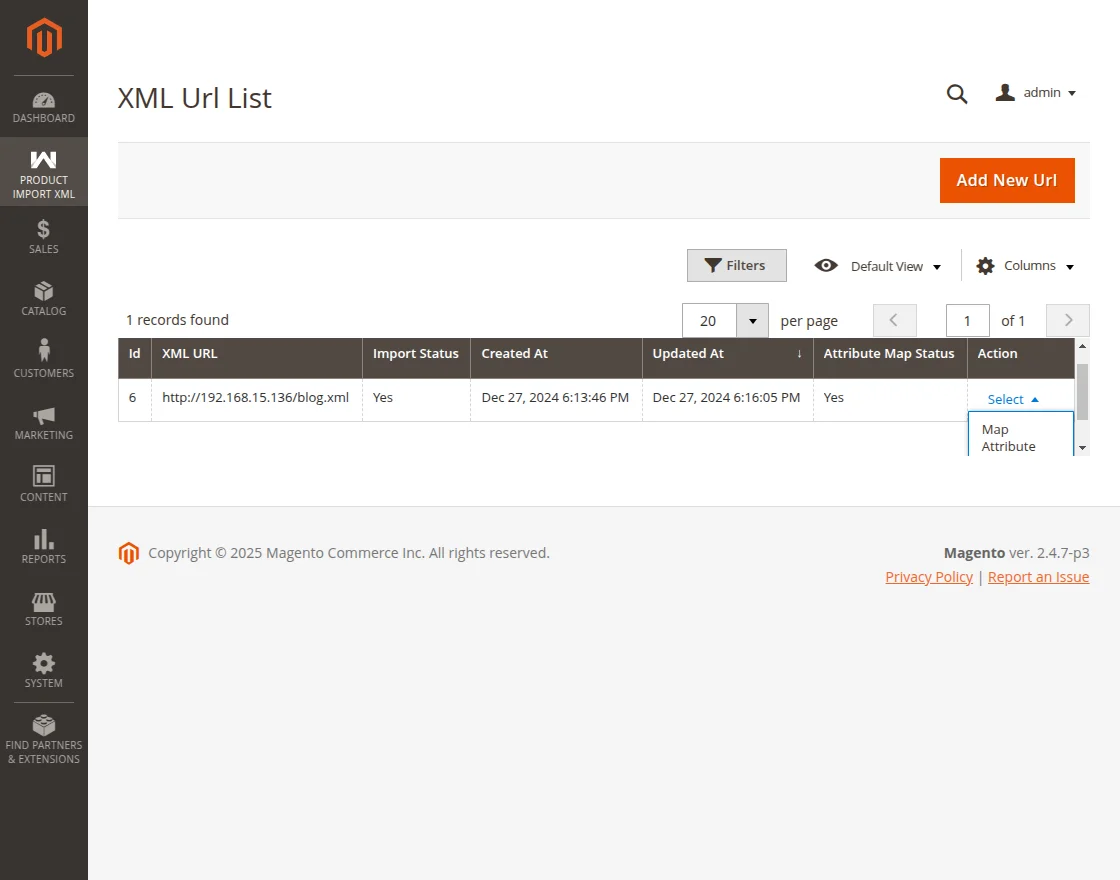
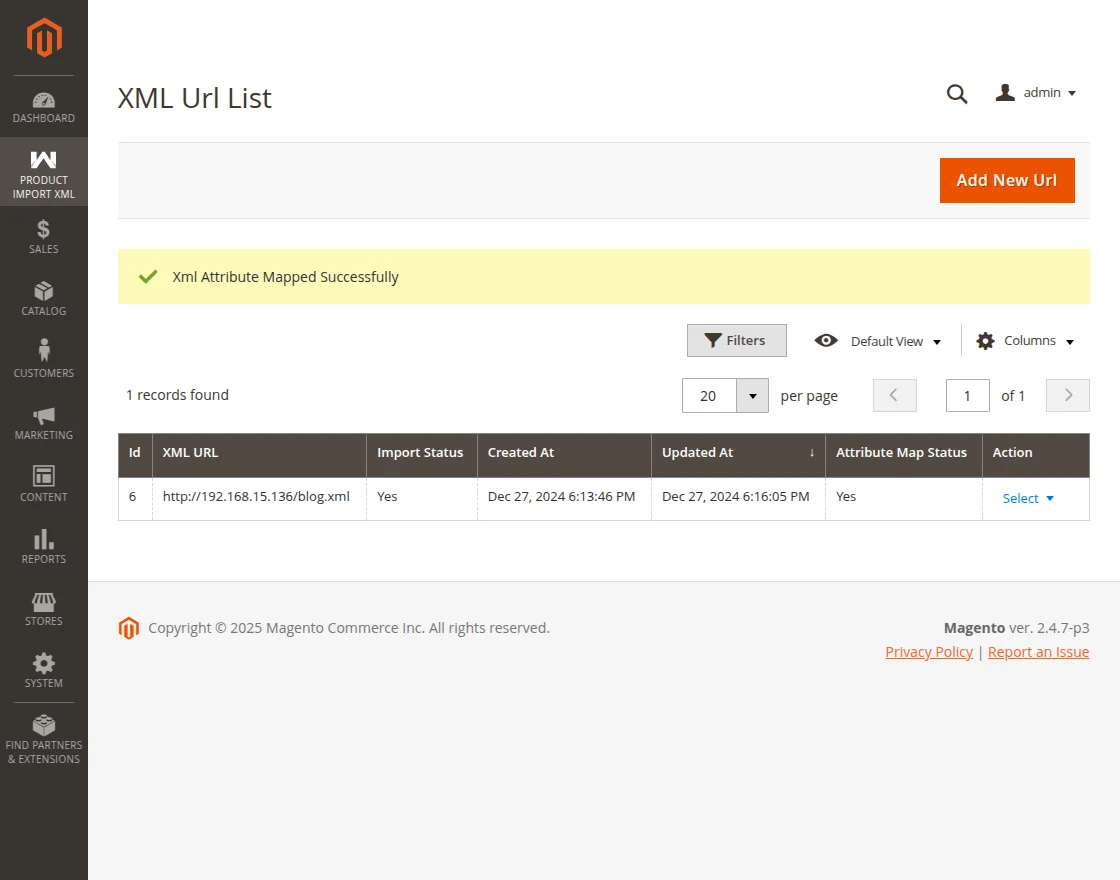
After saving the file, a success message for the same is displayed, and the added XML URL gets added.
Also, the column name Attribute Map Status for the newly added XML URL file shows the status as No.

Now we have to map the column names of the XML file with the Adobe Commerce attributes assigned from the configuration settings.
For the respective XML URL file, tap the Map Attribute option.
Here, the admin also has the delete option to delete the XML URL from the list.
This brings up the section where you have to go to the Map Attribute section and map the attributes as required.
Lastly, tap the Save button to save the mapping.

After saving the Mapping, a success message is displayed as shown below.
Also, now the Attribute Map Status displays the status as Yes.
After the above procedure, you need to run the below commands in the terminal.
php bin/magento cron:install
php bin/magento cron:run
After running the above commands, products will be created and you can check them in the backend and the storefront.
Backend:

Storefront:

Also, if you want to import the categories into the Magento 2 store in bulk using a CSV/XML/XLS file format then check the Category Bulk Upload Using CSV/XML/XLS for Magento 2 extension.
Demonstration in case of a Configurable Product:
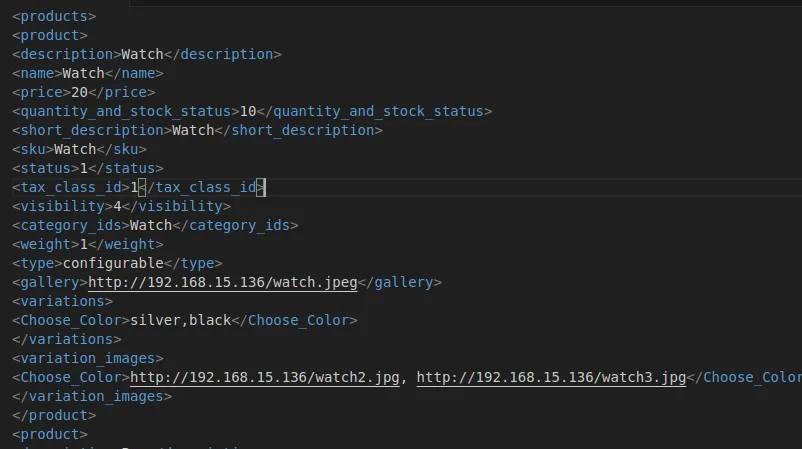
XML file:
For this demonstration, I’ll be using the XML file URL with one product(configurable).
Now, navigate to the Add Product XML URL section, enter the XML URL of the file, and save it.

After saving the file, a success message for the same is displayed, and the added XML URL gets added.
Also, the column name Attribute Map Status for the newly added XML URL file shows the status as No.

Now, we have to map the column names of the XML file with the Adobe Commerce attributes assigned from the configuration settings.
To do so, for the respective XML URL file tap the Map Attribute option.
This brings up the section where you have to go to the Map Attribute section and map the attributes as required. Lastly, tap the Save button to save the mapping.

After saving the Mapping, a success message is displayed as shown below. Also, now the Attribute Map Status displays the status as Yes.

After the above procedure, you need to run the below commands in the terminal.
php bin/magento cron:install
php bin/magento cron:run
After running the above commands, products will be created and you can check them in the backend and the storefront.
Backend:

Storefront:

Demonstration of Virtual Product:
XML file:
For this demonstration, I’ll be using the XML file URL with one product(virtual).

Now, navigate to the Add Product XML URL section, enter the XML URL of the file, and save it.

After saving the file, a success message for the same is displayed, and the added XML URL gets added.
Also, the column name Attribute Map Status for the newly added XML URL file shows the status as No.

Now, we have to map the column names of the XML file with the Adobe Commerce attributes assigned from the configuration settings.
To do so, for the respective XML URL file, tap the available Map Attribute option.

This brings up the section where you have to go to the Map Attribute section and map the attributes as required. Lastly, tap the Save button to save the mapping.

After saving the Mapping, a success message is displayed as shown below. Also, now the Attribute Map Status displays the status as Yes.
After the above procedure, you need to run the below commands in the terminal.
php bin/magento cron:install
php bin/magento cron:run
After running the above commands, products will be created and you can check them in the backend and the storefront.
Backend:

Storefront:

Import Product By FTP
Now Navigate to Product Import XML>Import Product By FTP and click on the same as given below.

On clicking the Import Product By FTP button you will come to the similar page below.
You can see Two buttons Sample CSV and Add File Path, Click on Sample CSV and download a Sample CSV file in your local System.

After Clicking on Sample CSV a CSV file will Download in your local System.
You have to fill the product details in the CSV file and store it in your local system.

Next, click on the Add File Path button in the Import Product By FTP page as given below.

After clicking the Add File Path you will land on the page as given below, then you have to fill up the column “Host, Port, Username, Password, File path”.
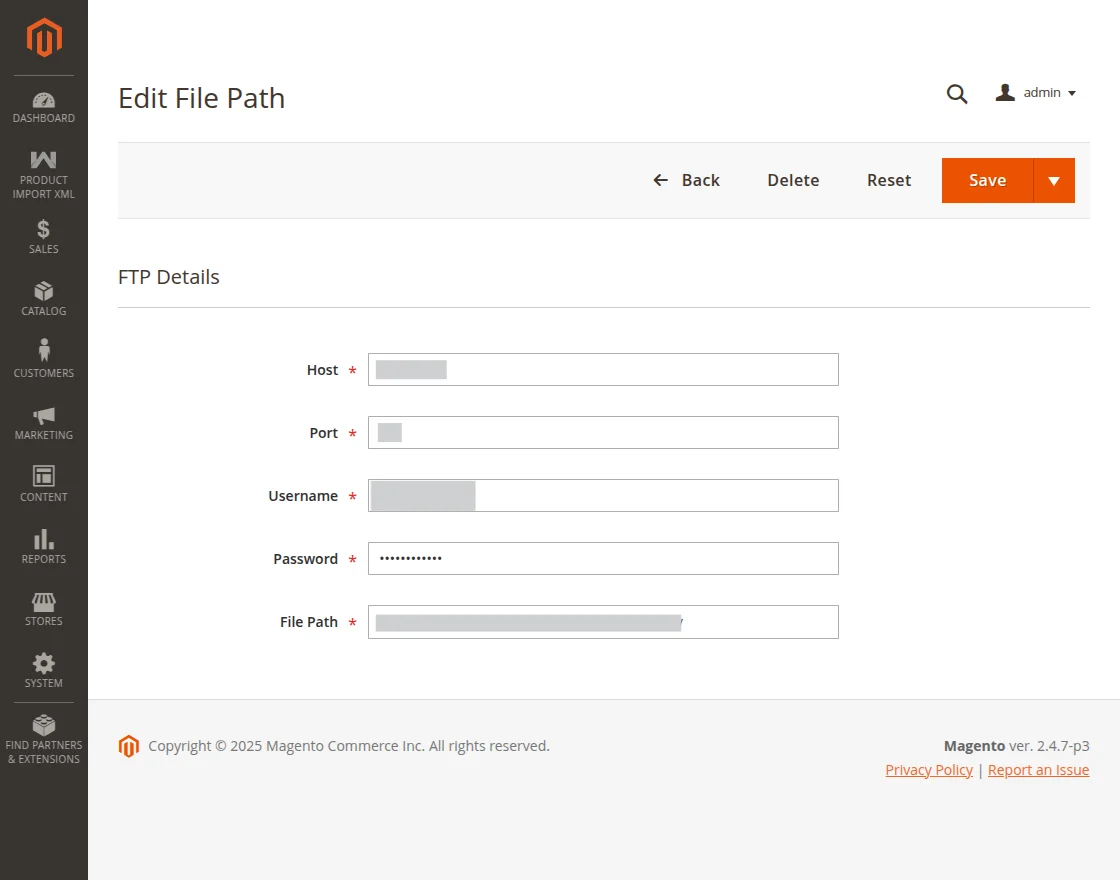
Now, after filling all the columns you have to press the Save button and a File Path Saved Successfully pop-up comes up.

After the above procedure, you need to run the below commands in the terminal.
php bin/magento cron:install
php bin/magento cron:run
After running the above commands, products will be created and you can check them in the backend and the storefront.
Backend:

Storefront:

Support
That is all about the Magento 2 Product import Using XML URL extension. If you have any queries regarding the plugin, please contact us at Webkul Support System.
If you’re looking to create a custom e-commerce website, it’s a great idea to hire Magento developers who can help you build a powerful and scalable online store.
You can also check our complete Magento 2 extensions.
Current Product Version - 4.0.3
Supported Framework Version - Magento 2.0.x, 2.1.x, 2.2.x,2.3.x, 2.4.x

Be the first to comment.