Magento 2 Multiple Wishlists Extension allows customers to maintain more than one wishlist in their account.
This gives them the flexibility to save different sets of products for future consideration — instead of being limited to a single list.
With this module, logged‑in users can create, rename, or delete various wishlists, and also move or copy items among them.
They can share wishlists via email (or other permitted channels) and later purchase selected items by adding them from any wishlist into their cart.
This module is very helpful when the customers don’t want to buy the product of their choice right at the moment, they can use the multiple wishlists functionality.
This module gives customers an easy way to remind themselves of a product and helps the admin to measure the product interest of the customers beyond a sale.
Video Tutorial of Magento 2 Multiple Wishlists Extension
Check the updated video for the plugin in the video mentioned-below:
Features
- Save the products of interest.
- Allow buying the products later instead of abandoning them.
- The logged-in user can create multiple wishlists.
- Convenient popup to choose a wishlist while adding the product to the wishlist.
- Add multiple products to a wishlist.
- Can move all the products of one wishlist to another.
- Add one or all products from wishlist to cart.
- Products can be moved from cart to wishlist.
- Delete the complete wishlist.
- Remove the number of items from the wishlist as per the choice.
- Ability to share wishlist with friends by email.
- Allows viral marketing for the e-commerce store products by sharing a wishlist with the other person.
- Support all types of products.
- Admin will get the notifications when any customer adds the products to their wishlists.
- The guest user can also create multiple wishlists.
- The guest users can sync created wishlists with their registered accounts.
- This extension supports the Hyva theme.
- GraphQL has been implemented for the extension.
Installation- Magento 2 Multiple Wishlists
The users will get a zip folder and they have to extract the contents of this zip folder on their system.
The extracted folder has an src folder, inside the src folder you have the app folder. You need to transfer this app folder into the Magento2 root directory on the server as shown below.

After the successful installation, you have to run these commands in the Magento2 root directory:
php bin/magento setup:upgrade
php bin/magento setup:di:compile
php bin/magento setup:static-content:deploy
php bin/magento indexer:reindex
php bin/magento cache:flush
Thus, in this way, you can install Magento 2 Multiple Wishlists extension.
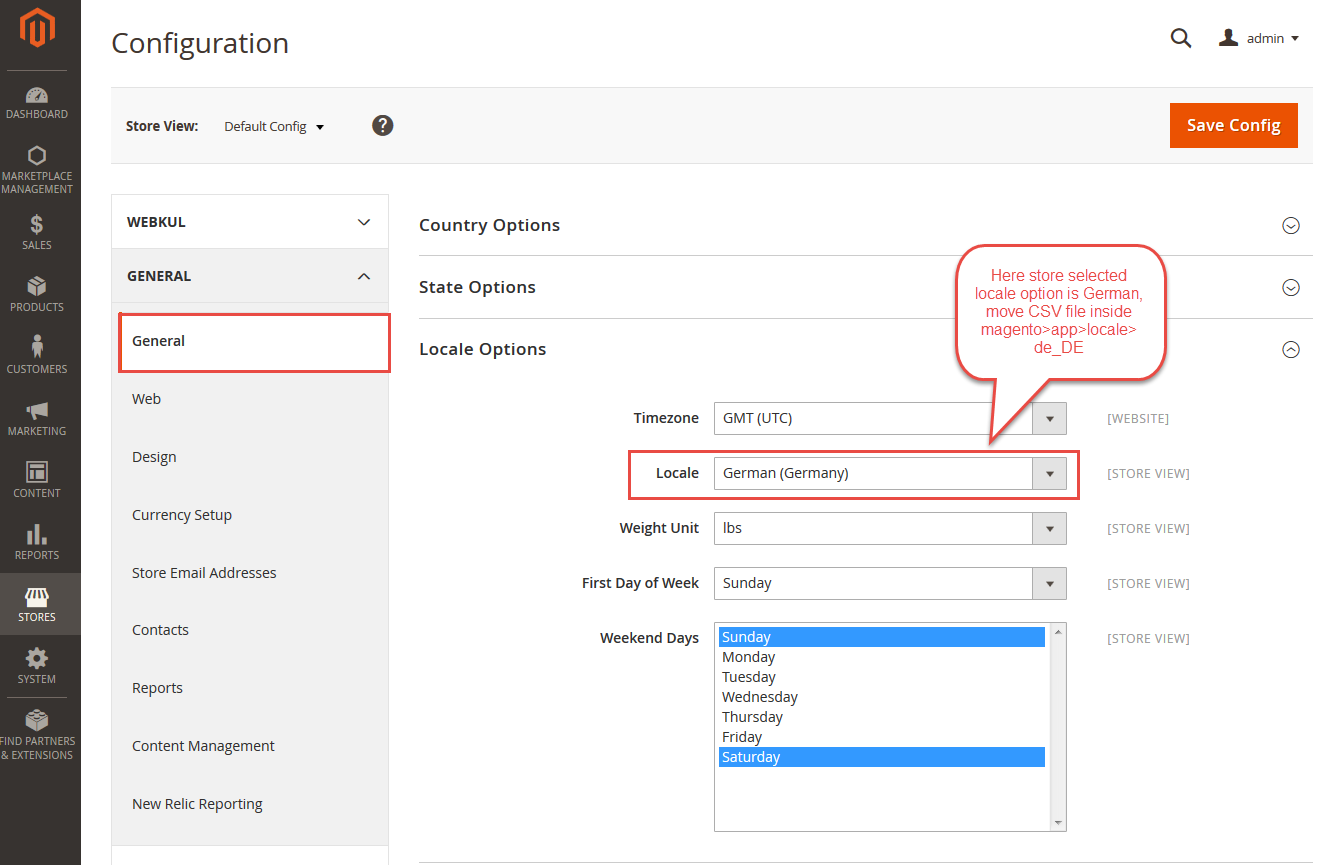
Multi-lingual Support
For the multilingual support, the admin will navigate through Store->Configuration->General ->Locale Options and select the locale as German (the language into which the admin wants to translate his store content).
Language Translation
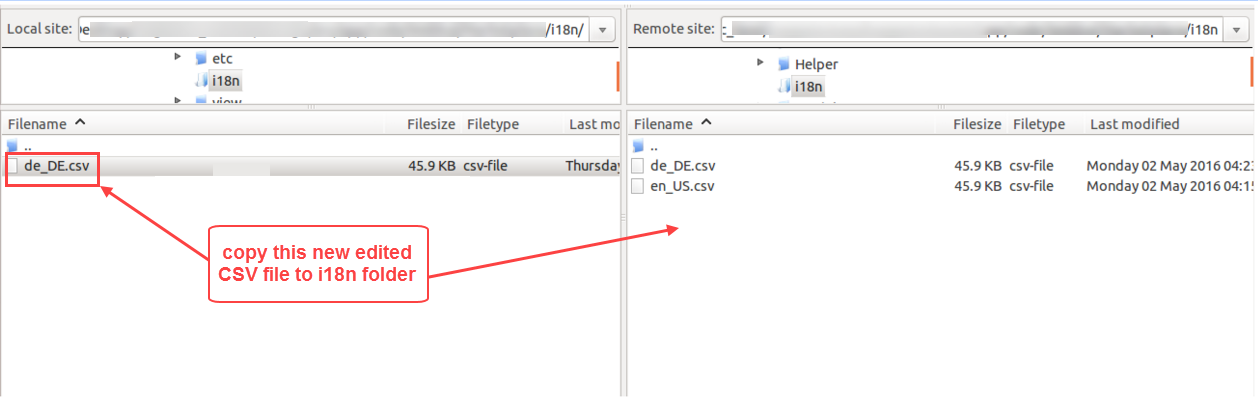
For module translation, navigate to the following path in your system app/code/Webkul/MultiWishlist/i18n/en_US.csv.
Open the file named en_US.CSV for editing as shown in the below screenshot.

Then replace the words after the comma(,) on the right in the file with your translated words.

After editing and translating the CSV file, you need to save the translated file name according to your region language and country code such as – de_DE.CSV.
Followed by uploading the translated file to the same folder from where you have obtained it. Now your module translation is complete.
Front End Flow
After the installation, the customers can easily use the multiple wishlists functionality.
The customers can save their desired products in their multiple wishlists to purchase them later.
For this, the customers will navigate to any product and click the heart shape icon as per the image.

After clicking on the heart shape icon, the customer will get a pop-up page as per the below image.

Here, the customer will enter the wishlist name as per the choice. Proceed further by clicking on Add New Wish List button and then the Add Wish List button.
This will create a wishlist and add the desired product to that wishlist.

The customer will get a success message for adding the product to the wishlist.
Note: The uncategorized products will be added to the “Default” wishlist as per the below image.

Add Product
The customer can add as many products to the multiple wishlists from multiple points in the Magento store.
Product Category Page-
When customers navigate to any product category page and move the cursor over the desired product. A heart shape icon becomes visible as per the below image.
Now the customer can click on the heart shape icon visible beside the “Add to Cart” button to add the product to the wishlist.

Product Page-
The customers can add products to the wish list from the product page also.

Shopping Cart-
The customers can add products to the wish list from the shopping cart page as well.

Compare Products Page-
The customers can add products to the wish list from the Compare Products page also.

Multiple Wishlists
Magento 2 Multiple Wishlists Extension module allows the customers to create multiple wishlists as per their choice.
When a new product is added to the wishlist, the customers can select if an existing wishlist should be used or a new one created.

For creating a new wishlist, the customers simply enter the wishlist name in the blank field. Proceed further by clicking on Add New Wish List button and then the Add Wishlist button.
Manage Wishlists
When the wishlist section is opened, all the wishlists are organized in particularly defined panels as per the below image. Customers can easily switch between them.


The Magento 2 Multiple Wishlists Extension module offers various functionalities like – Update, Move, Share, Add and Delete.
Note: In this module, all the wishlist functionalities except “Delete” gets disabled if the wishlist is empty. And also for the default wishlist.
Move All to Wishlist
This feature moves all the wishlist items to another wishlist. When the customer clicks on the Move All to Wishlist button will get a pop-up display with the list of the wishlists as per the image.
The customer can select any existing wishlist from the list to move all the products to that wishlist.

Also, the customer can create a new wishlist and move all the products to that new wishlist. For creating a new wishlist, the customers simply enter the wishlist name in the blank field.
Proceed further by clicking on Add New Wish List button. The new wishlist gets added to the existing list as per the image.

The customer will then select the created wishlist from the list and click on the Add Wish List button.
Share Wishlist
This feature allows customers to send emails to their friends or relatives with the product details.
This allows viral marketing for the E-commerce website as another person gets to know about your E-commerce website and products.
When the customer clicks on the Share Wishlist button will be redirected to the “wishlist sharing” page as per the image.

Here, the customer will enter the email address along with the message(optional) and then click on the Share Wishlist button.
The recipient will get a mail for the wishlist items details as per the image.

The receiver of the mail can click on the given link in the mail.
On clicking on the link the user will be redirected to the product page and can view the wishlist items details.
Add All to Cart
This feature allows customers to move all the products to the cart.
When the customer clicks on the Add All to Cart button, all the products move to the cart and will get a success message as per the image.

Delete wishlist
This feature allows customers to delete the complete wishlist.
When the customer clicks on the Delete Wishlist button, the complete wishlist gets deleted and will get a success message as per the image.

Update Wish List
The customers can also update the wishlist. For this, the customer has to click on the “Updated Wish List” button.

The customer can see the “Update Wishlist” along with the other functionality.
This will allow updating the wishlist like – the customer can add comments in the comment section and also update the product quantity.
The customers navigate to the “Manage Wishlist” page and move the cursor over the desired product. The “Add to Cart” and “Remove item” option becomes visible as per the below image.

Click the-
- “Add to Cart” option for moving that item to the other wishlist.
- “Remove item” option for removing that item from the wishlist.
Guest User
The guest users also can add the products to multiple wishlists and view those wishlists by clicking on ” View Guest wishlist” as shown below image. 
The guest users will get the complete wishlist delete and move all products to another wishlist features same as logged in customers.
Note:-Default wishlist is not available for guest users .
Wish List Sync
The guest users can sync created wishlist with their registered account. Once they are logged in, the customer will get the option to sync the wishlists as shown below-

After clicking on the ” here” hyperlink, the customer will get a notification to sync all data successfully as shown below –
After successfully sync the data, the customer can view the guest wishlist in their ” Manage Wishlist” section as shown below-

Wishlist Notification – Admin End
The admin will get notifications when any customer adds the products to their wishlists as per the below image.

The admin tap the bell icon to view the notifications.
View Wishlist – Admin Panel
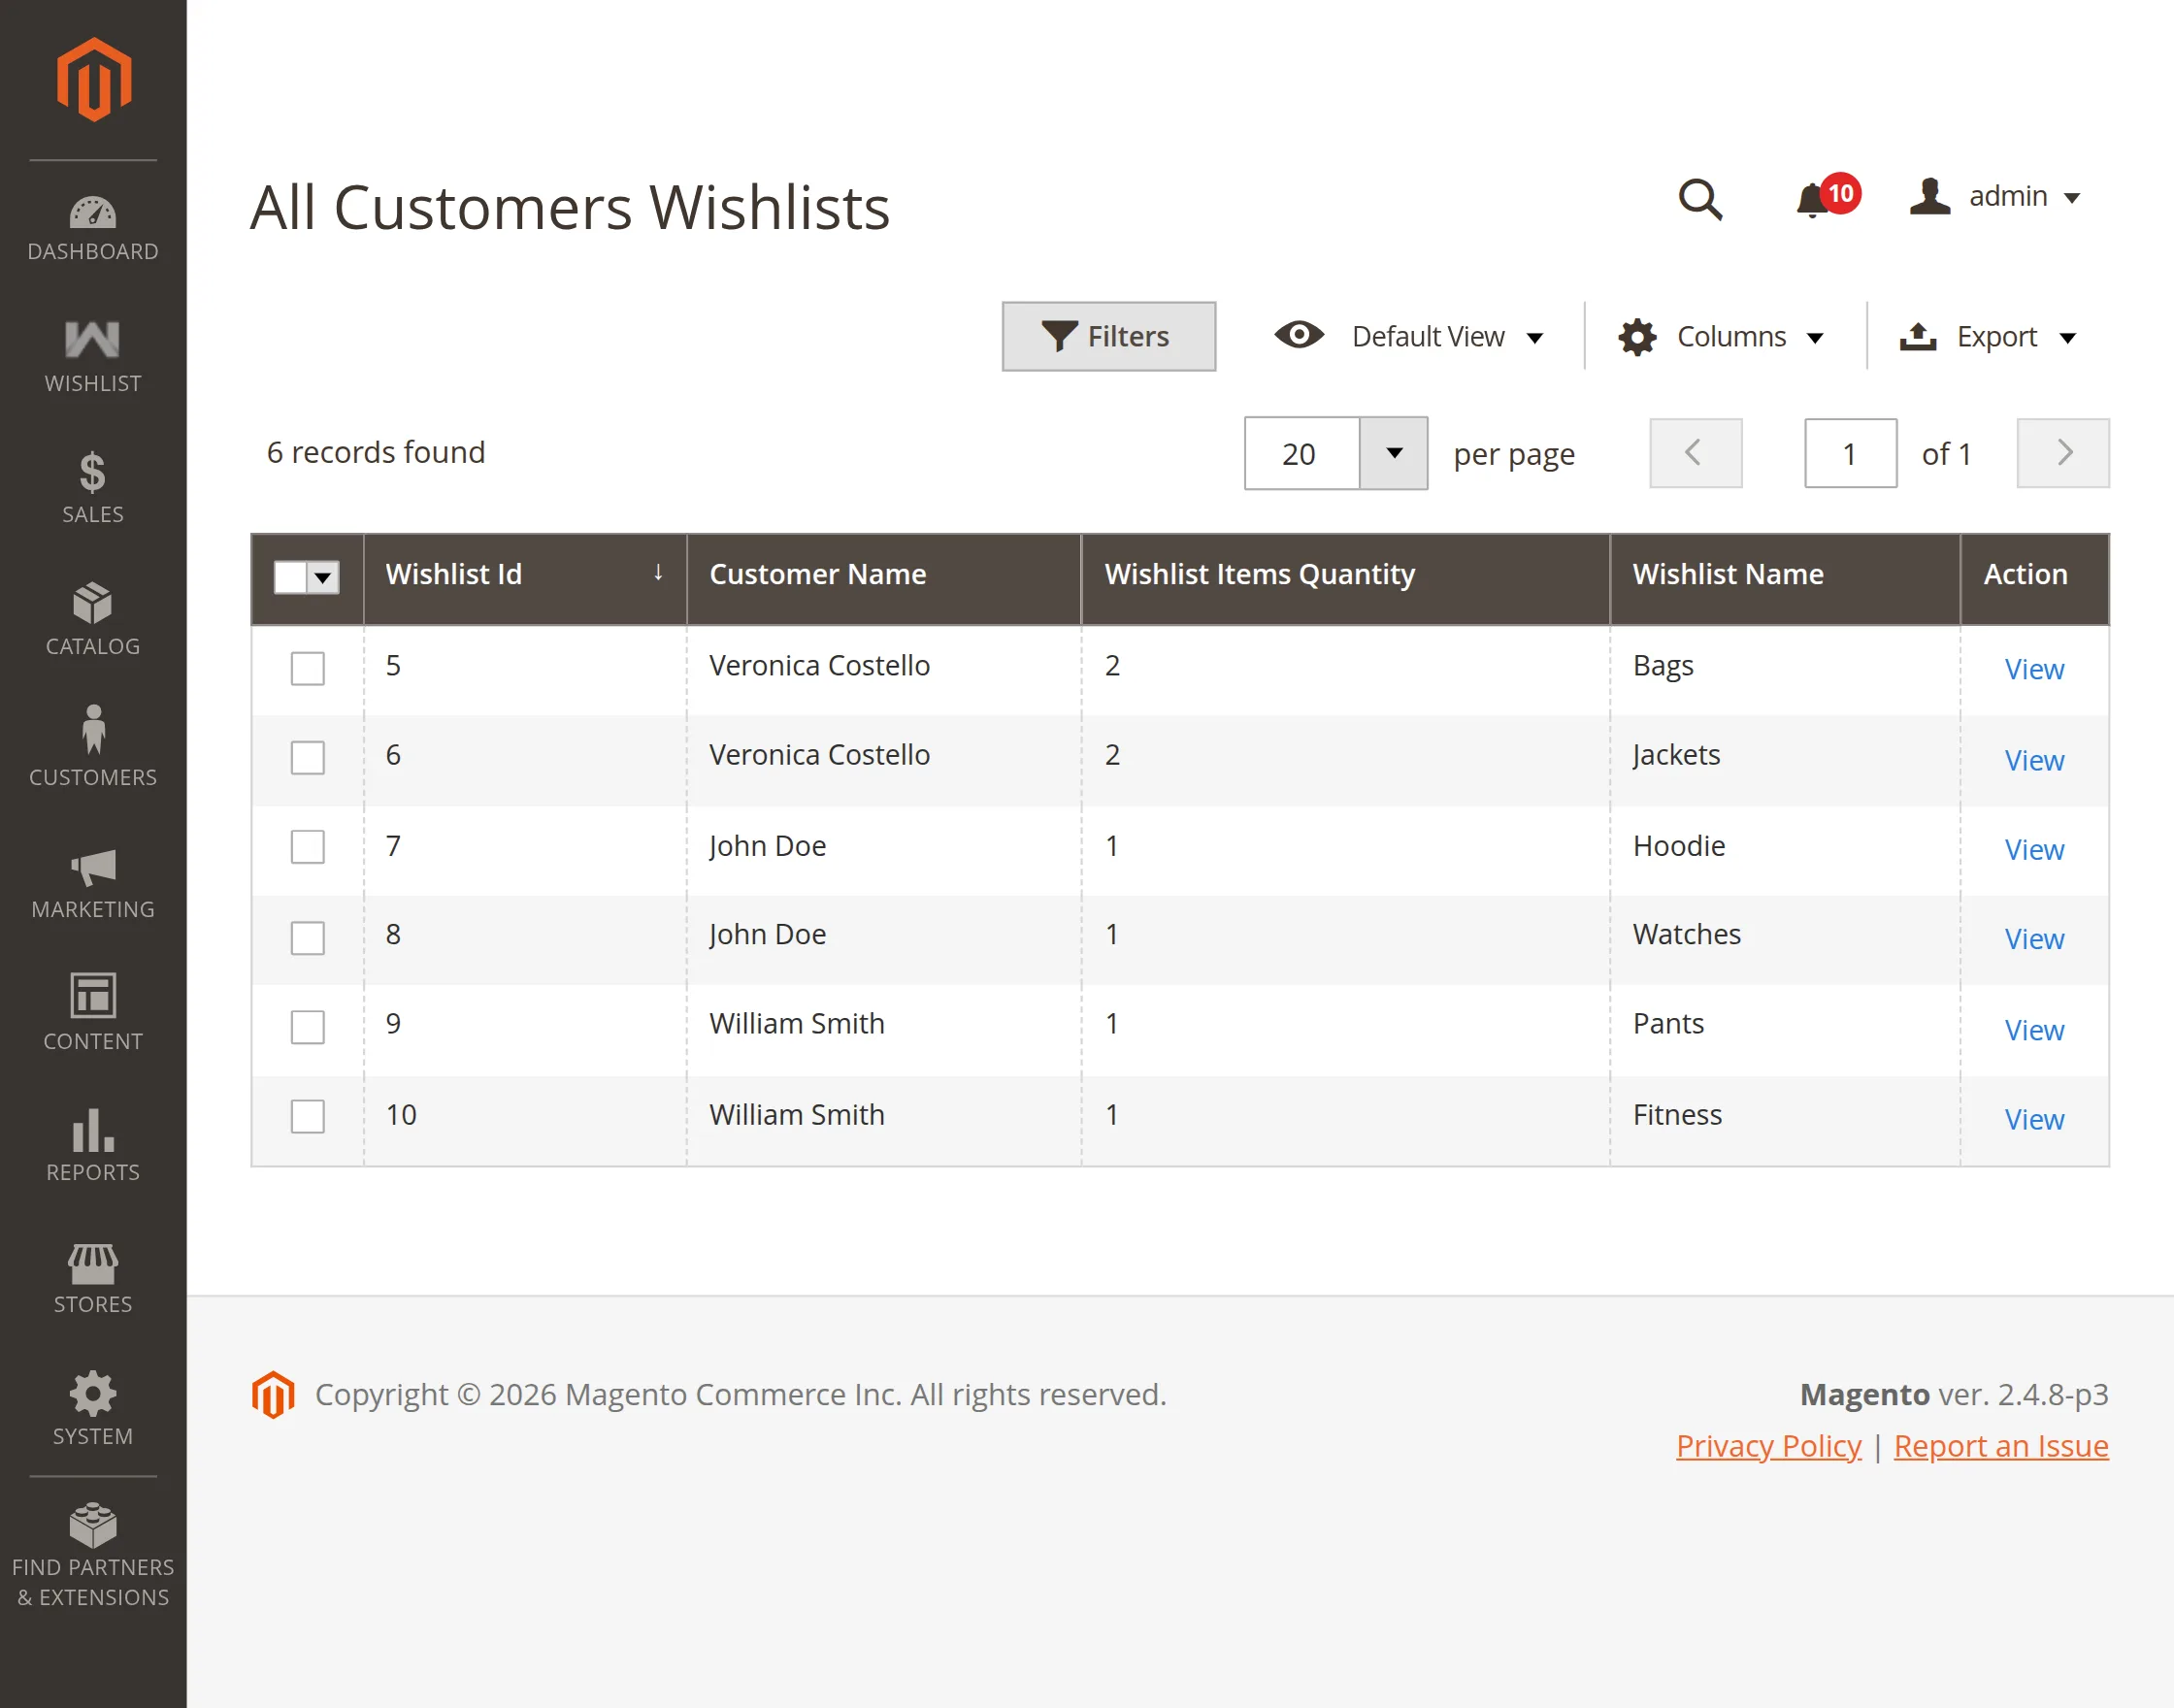
The admin can view the wishlist items of all customers. To access this, navigate to Wishlist > View Wishlist in the admin panel, as shown in the image below.

When the admin clicks on View Wishlist, the system displays a list of wishlist details.
It includes the wishlist name, the customer who created it, the number of products in the wishlist, and other relevant information, as shown in the image below.
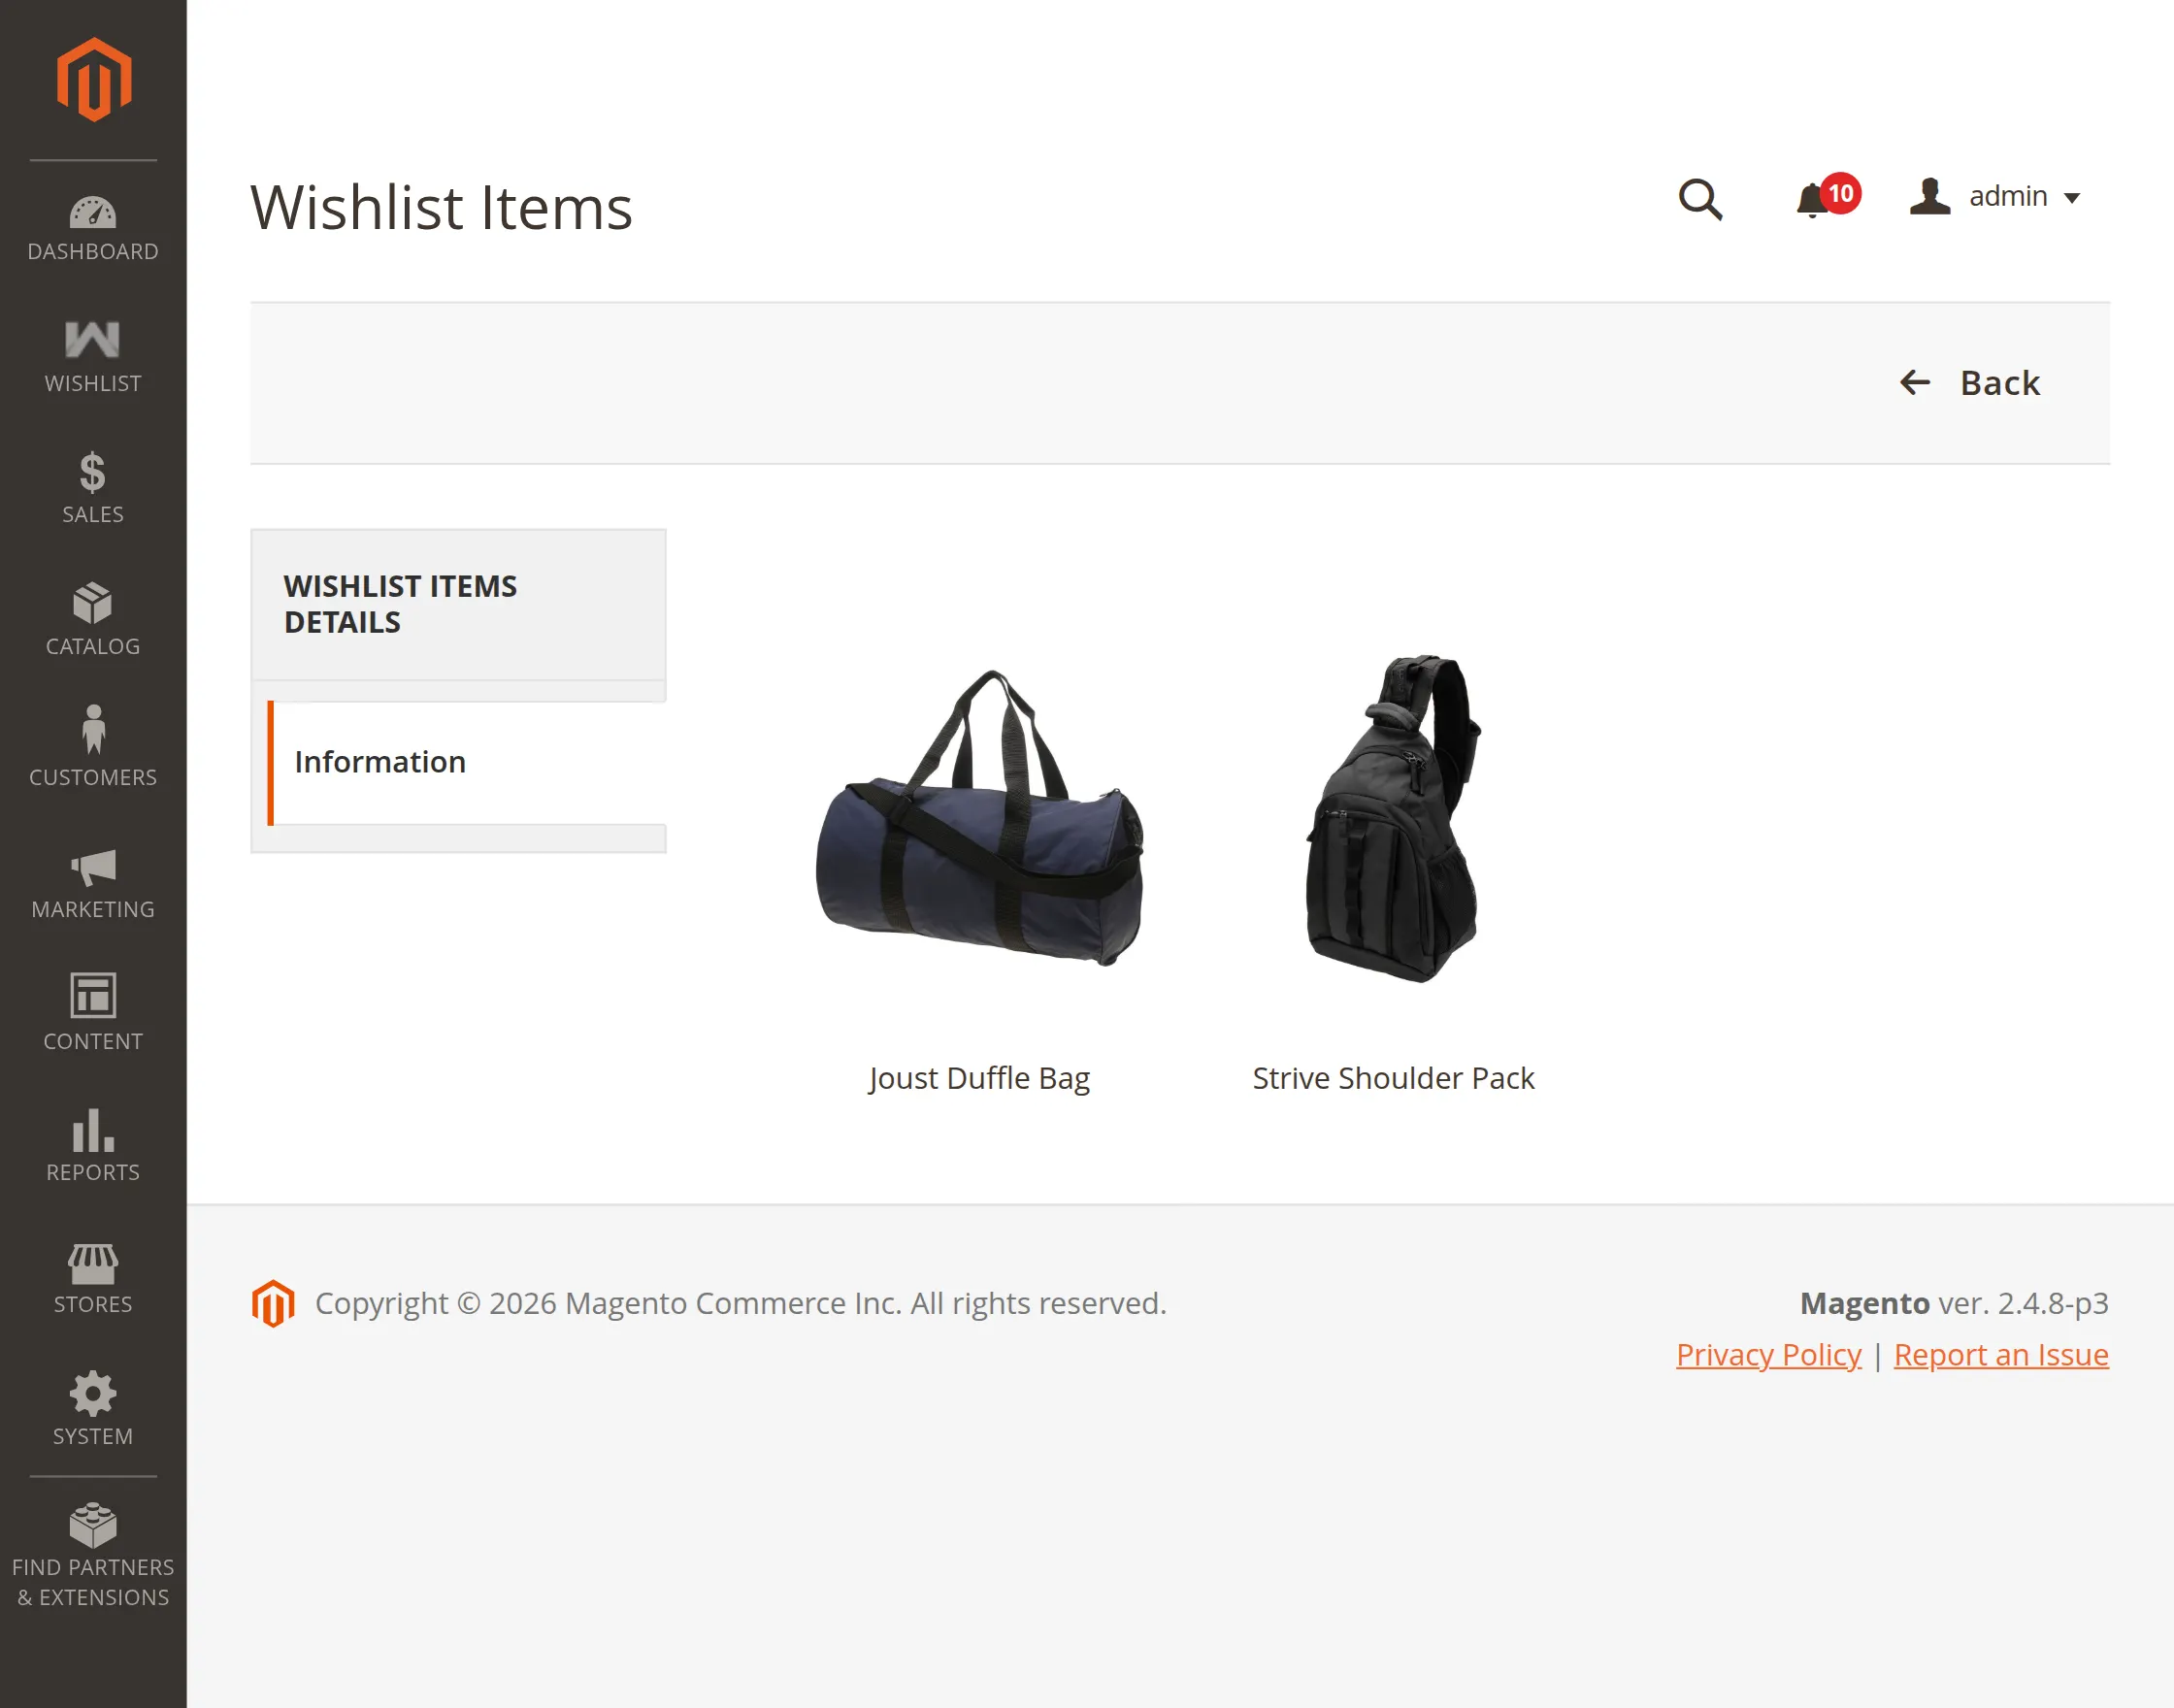
The admin can click the View button next to any customer in the list to review their wishlist items. The system then opens the selected wishlist, where the admin can view all added products.
The admin can also view and manage the wishlist items of all the customers. For this, the admin can navigate to the Customers > All Customers in the admin panel as per the image.

The admin gets redirected to the customer list page. Here, the admin will simply click on the Edit button against any customer for whom the admin wants to view the wishlist items.
This will navigate the admin to the Customer Information page as per the below image.

Here, the admin will click on the Wishlist tab under the Customer Information section and can:
- View all the wishlist items of the customer and their details.
- Delete the wishlist items of the customer by clicking on the Delete button.
- Place the order by clicking on the Create Order tab in the top menu section.
Place Order
For placing the order on the behalf of a customer, the admin will click on the Create Order tab in the top menu section.
This will navigate the admin to the Create New Order page as per the below image.


Here, the admin can select the wishlist items and add them to the cart. And, then click on the Update Changes button.
After updating changes, the admin will provide the payment mode and shipping method under the Payment & Shipping Information section. And then, place the order by clicking on the Submit Order button.
The customer also can view the details of the order created by the admin. Under the My Orders section, the customers can view the order in their customer account panel as per the below image.

The customer can click on the View Order link to view the complete order details.
That’s all for the Magento 2 Multiple Wishlists Extension module. Still, have any issue feel free to add a ticket and let us know your views to make the module better http://webkul.uvdesk.com/
Current Product Version - 5.0.4
Supported Framework Version - Magento 2.0.x, 2.1.x, 2.2.x,2.3.x, 2.4.x

4 comments
Greetings of the day!!
Thanks for the appreciation. Let me know if there is something else we could help you with. That will be a pleasure for us.
You can contact us at – https://webkul.uvdesk.com/en/customer/create-ticket/
Thanks & Regards,
Webkul Team
Is this functionality available in this module?
However, you can achieve the specified feature through customization where you can keep the products in wishlists even after adding them to the cart.
You can contact us at – https://webkul.uvdesk.com/en/customer/create-ticket/