Marketplace Rental System for Magento 2 will allow the sellers to add the rented properties from the seller end.
The customers can search properties for rent by location, property type, and budget. It also allows the customer to rent a property for a selected period of time.
The buyers can go to Rent Property Page for finding the properties according to location, property type, and budget.
The page also shows the top rented properties of the store. The buyers can give reviews and ratings to properties.
Note:
- This is a Marketplace Add-On, you need to install Magento 2 Multi Vendor Module first.
- Sellers can Add Only Rent Type of Products in Magento 2 Store. They cannot add any other type of products.
- You must have the Google API Key to make use of this extension.
Features
- Buyers can enter their desired location and view all the related properties.
- Restrict sellers to add only rent type products from their dashboard.
- Set Pay Mode as Day, Month, Year.
- Agents/Sellers can set the Rent Availability Dates.
- View Property Location on Google Maps within the store.
- Users can give their reviews and rating for the property.
- Mention Property Area, Available Floors, Parking, Age, Address.
- Set property as Not Furnished, Fully Furnished, Semi-Furnished.
- View amenities and facilities available in the property.
- The seller/admin both can add the total property units per floor.
- Buyers can contact sellers from category page or product page.
- Find properties and view Top Rented Properties on Rent Property page.
- An error message appears when no properties available.
- Google Maps API based location search.
- Supports multiple- language translations.
- Source code is open for customization.
Installation-Rental System Extension From Webkul Store
#1 Download Module
Firstly, you need to log in to Webkul Store, go to My Account>My Purchased Products section, verify and then download and extract the contents of this zip folder on the system.
#2 Upload Folder
Once the module zip is extracted, follow path src>app and then copy the app folder into the Magento 2 root directory on the server as shown below:

#3 Run Commands
After uploading the module folder, you need to run the following commands in the Magento 2 root directory:
php bin/magento setup:upgradephp bin/magento setup:di:compilephp bin/magento setup:static-content:deployphp bin/magento indexer:reindexphp bin/magento cache:flush
Install Extension from Magento Marketplace
If you have purchased this extension from the Magento Marketplace then please follow the below process or visit this link.
#1 Get Access Keys
You need to get access keys, navigate to My Profile in Magento Marketplace, then choose Access Keys in the My Products section.

Go to Magento 2 and then you need to copy both the Access Keys – Public Key and Private Key. These access keys will be needed in the next steps for authentication.

If access keys are not created earlier, click Create A New Access Key, enter any name and click OK.

#2 Update composer.json File
To know the component name and version number, go to your Magento Marketplace account section, My Profile>My Purchases, then find this extension to view the details.
Please note – Below is an example image, every extension will have its unique component name and version.

After that, navigate to your Magento project directory and update your composer.json file in the following format.
composer require <component-name>:<version>
For example, to install version 5.0.0 of this extension you need to run the following command:
composer require webkul/marketplace-rental-system:5.0.0
#3 Enter Access Keys
Now you will need to enter the Access Keys that you obtained as explained in the first step #1 Get Access Keys.
Wait for Composer to finish updating your project dependencies and make sure there aren’t any errors.
#4 Run Command
You need to run the following commands:
php bin/magento setup:upgradephp bin/magento setup:di:compilephp bin/magento setup:static-content:deployphp bin/magento indexer:reindexphp bin/magento cache:flush
Language Translation
If you need to do the module translation, please navigate the following path in your system. app/code/Webkul/Rentalsystem/i18n.
Open the file named en_US.CSV for editing as shown in below screenshot.

Once you have opened the file for editing. Replace the words after the comma(,) on the right with your translated words.
qusZYu6bC8Q
After editing the CSV file, save it and then upload it to the same folder. Now your module translation is complete.

How to Get Google API
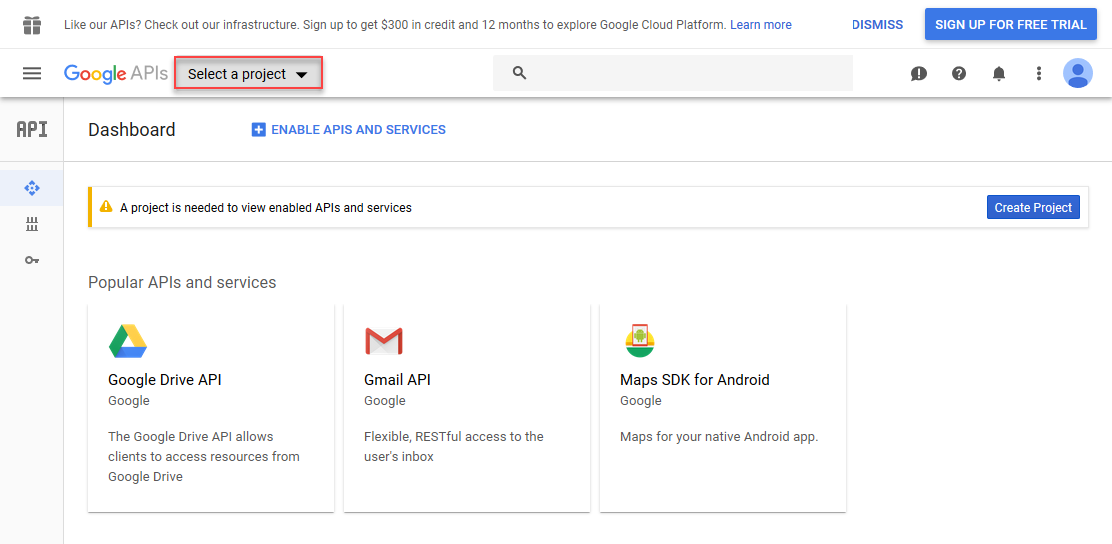
Step 1. Go to console.developers.google.com and log in using your Gmail ID. After that, click on select a project.
Step 2. Click on New Project Button. After that, you need to enter the name of the project and Browse the location of the organization.

Step 3. After creating the project click on the Enable API And Services.

Step 4. Then click on the Maps JavaScript API to get the API key.

Step 5. After clicking on the Maps JavaScript API, you need to click on the ENABLE button.

Step 6. Once you have enabled the API then you need to navigate through Credentials> Credentials in APIs & Services.

Step 7. After that, you need to click on the create credentials and select the API key.

Step 8. Now you can copy the generated API key.

Module Configuration-Rental System
After the module installation, go to the backend for entering Google API Key. Navigate through Stores>Webkul>Rental System, in the General Settings enter the Google API Key.
This key is essential for property location search.
Click Save Config to apply changes.

Seller Management-Rental System
The sellers can manage their properties from the front-end. They can add, edit, delete multiple properties. First, a seller needs to add properties in its catalog. Then, mention all the required information about the properties.
Note: – After Installing this module, the sellers can add only Rent Type of products. They cannot add any other type of products.
Add Property
For adding a new property navigate through My Account>New Products.
The following page will appear, enter all the required information.
Basic Product Information
Here, the seller will enter the basic product details first.
Category – Select the property categories for this new property.
Product Name – Enter a name for this new property.
Description – Enter a brief description of this new property.
Short Description – Enter some overview information about a property.
SKU – Enter the property SKU.
Price – Enter the rent amount for this property.
Stock Availability – Enter the details about the stock.
Visibility – Select where to make this property visible – Not visible individually. Catalog, search or both.
Tax Class – Select the tax class from the list.
Meta Title – Enter a meta title for the property page. It will appear on the SERP and web page header.
Meta Keywords – Enter some focus keywords that’ll help for SEO.
Product Images – Upload images of this new property.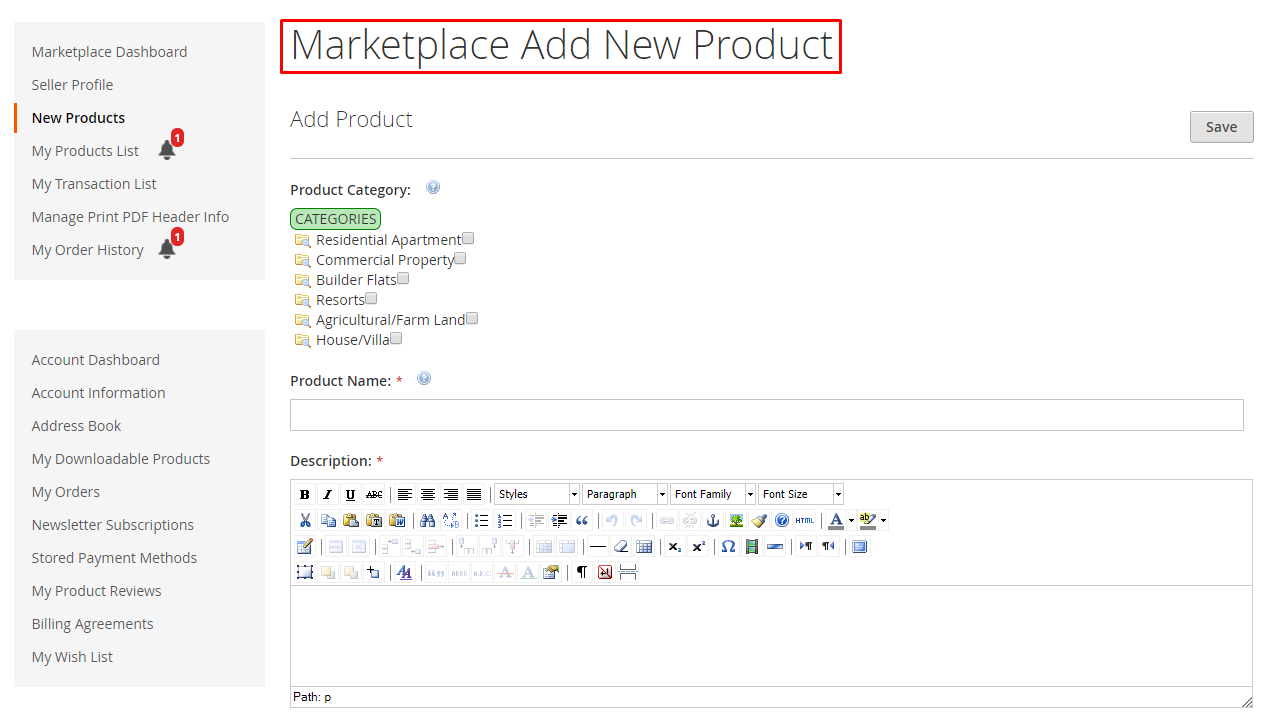
Rent Property Information-Rental System
After entering the basic product information, the seller needs to provide information about the rental property.
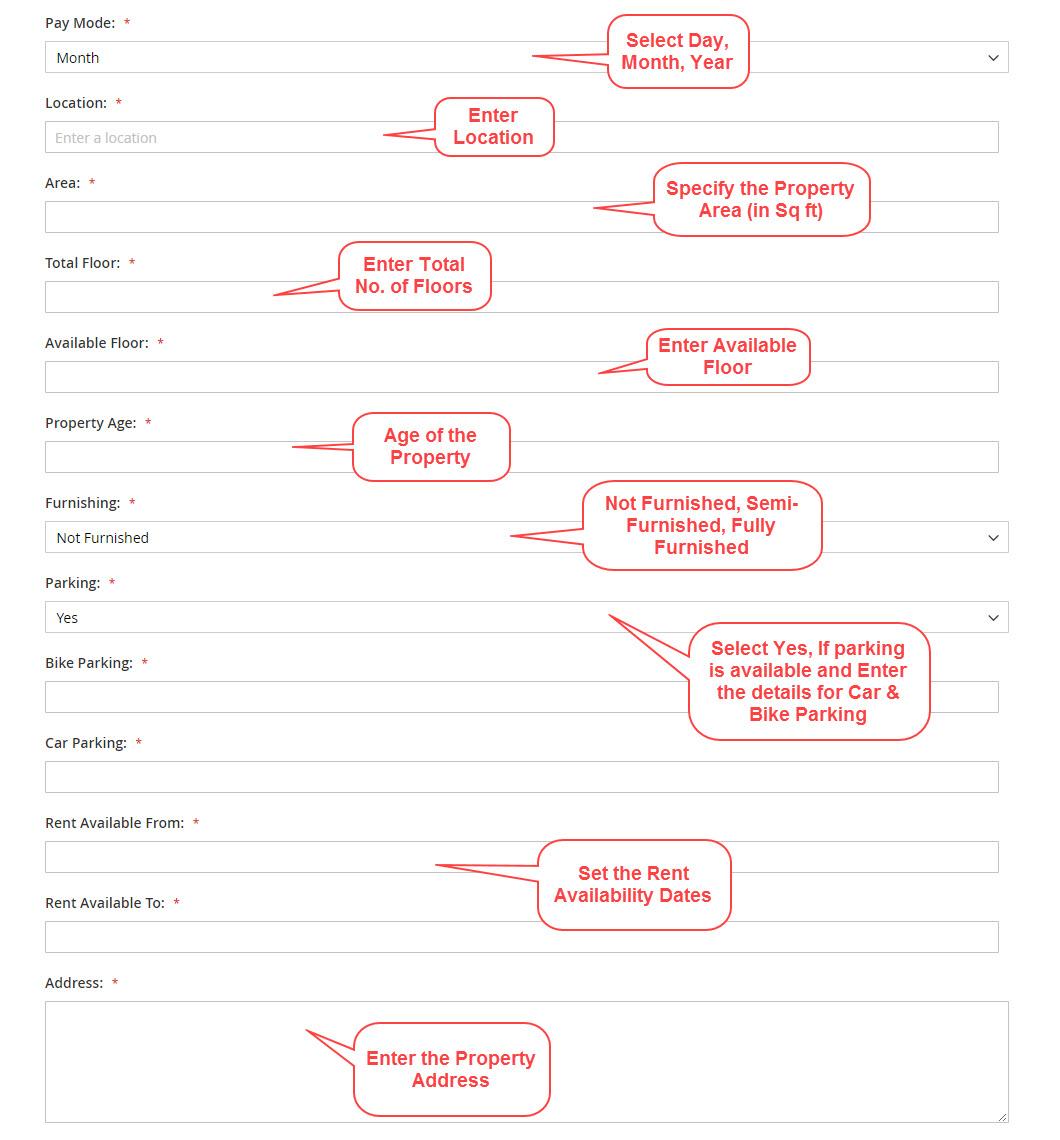
The seller can select how it wants to collect the rent payments – daily, monthly or yearly.
Pay Mode – Select Day, Month or Year for rent payment.
Location – Set the location of this property.
Area – Specify the property area in Square Foot.
Total Floor – Enter the total number of floors in the property.
Available Floor – Enter the available number of floors.
Property Age – Enter the age of the property.
Furnishing – Select Not Furnished, Semi-Furnished or Fully Furnished.
Parking – Select Yes or No. If Yes, then enter the following details.
Bike Parking – Enter details about bike parking space.
Car Parking – Enter details about car parking space.
Rent Available From & To- Select the rent availability dates from the calendar.
Address – Mention the complete address of the property.
Amenities and Facilities-Rental System
Select the Basic Amenities as follows, select either Yes if available else select No.
There are various amenities to configure such as – beds, garden, shower, room service, dinner, wi-fi, air-conditioner etc.
Apart from the amenities mentioned above, sellers can also add the total number of property units on a floor.

This number would be visible to the customers at the frontend under the more information section.

Property List
The property sellers can manage their properties by navigating through My Account>My Product List.
The following page will appear, from here the sellers can view all the properties created so far.
Sellers can view the property name, image, and price, status.
The list also shows the property’s quantity confirmed, pending, sold, and amount earned.
Edit – To update or change any existing property information, click Edit.
Delete – To remove the property from the store click Delete.
Search – To search any property from the list, enter a product name, date, product status and click Submit.
View Order Details – To view order details about the property click Qty Sold number.

View Order Details-Rental System
After clicking the Qty Sold number, the following page will open.
Here the seller can view the Order Details of the selected property with Order #, Buyer Name, Booked Date, Sold On.
Thus, The seller can download the Shipping Slip and Invoice Slip for the orders.

Buyer Management
Set Location
So after sellers have created the properties and added the information, the buyers can now view them.
But first, a buyer needs to enter its location.
A pop-up window will keep on appearing until the buyer sets its location.
The location entered here will only show those properties which are available in the specified location.

Rent Property Page
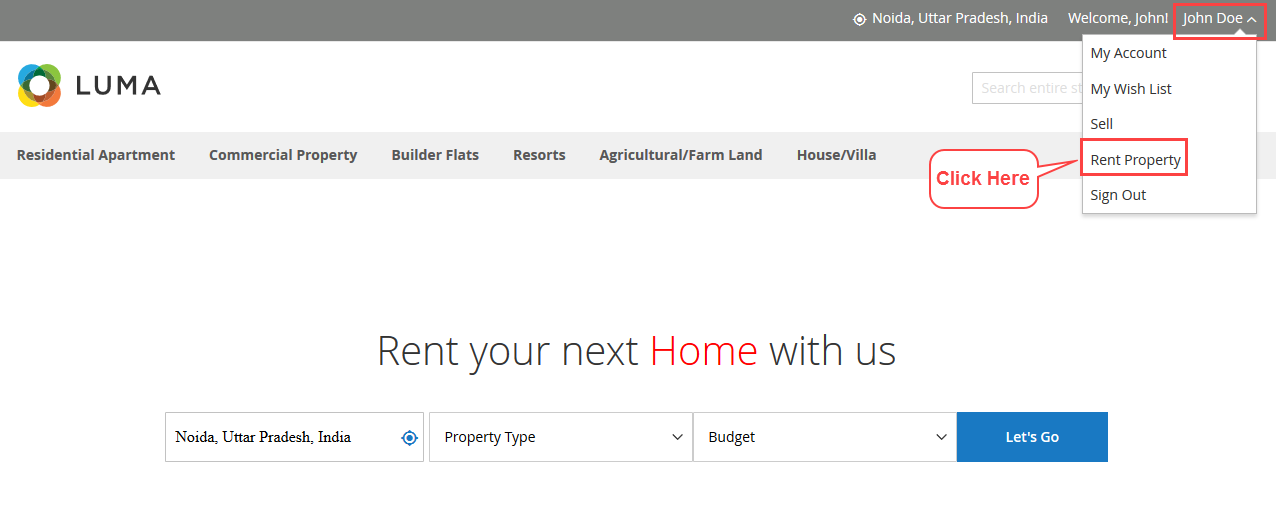
Once the buyers have set their location, they can go to Rent Property page to find properties.
There are two ways to visit this page –
- Option 1 click Rent Property link at the bottom of the page.
- Option 2, navigate through My Account menu as visible below:
After arriving at the Rent Property Page, the buyers can enter their Location, select Property Type, and pick the Budget.
In Property Type, the buyers can select Not Furnished, Semi-Furnished, Fully Furnished.
In Budget menu, the buyers will select the preferred rent price limit.
Click Let’s Go, to view the search results.
Top Rented Properties – At the bottom of the page, the buyers will also see the Top Rented Properties of the store.
The buyers can click any of the properties names for visiting its page.

Search Result
The buyers will see the property search result on the basis of the selected options.
From the screenshot below, you can see that the buyer has set Price: $1,000 and above and Furnishing: Full Furnished.
The search result shows 4000 Sq. Ft. Villa property, which is fully furnished and has a price of $18,000.

Category Page
The buyers can visit the category page for viewing all the properties in the selected category.
Here the buyers will see the property’s Name, Image, Ratings, Seller Name, Price, Pay Mode, Location on Map.
Also, the buyers can click the Contact Us for sending any query to the seller. Add a property to a wishlist, or do comparison of two or more properties.

Property Page
On the property page, the buyers will see the following – property name, images, rent amount, payment mode, address, specifications, seller/agent name with ratings and much more.
The buyers will have to pick the Available Rent Dates from the calendar first and then click Pay and Rent Now button.
Add Your Review – The buyer can click this to add a review for the property.
Location on Map – Clicking this, the page will be redirected to the Google Maps website for showing property location.
Seller Name – The buyers can see the property agent name with its ratings. The buyers can see and view the number of additional properties of the agent.
View all Specifications – Clicking this will show the More Information of the property.

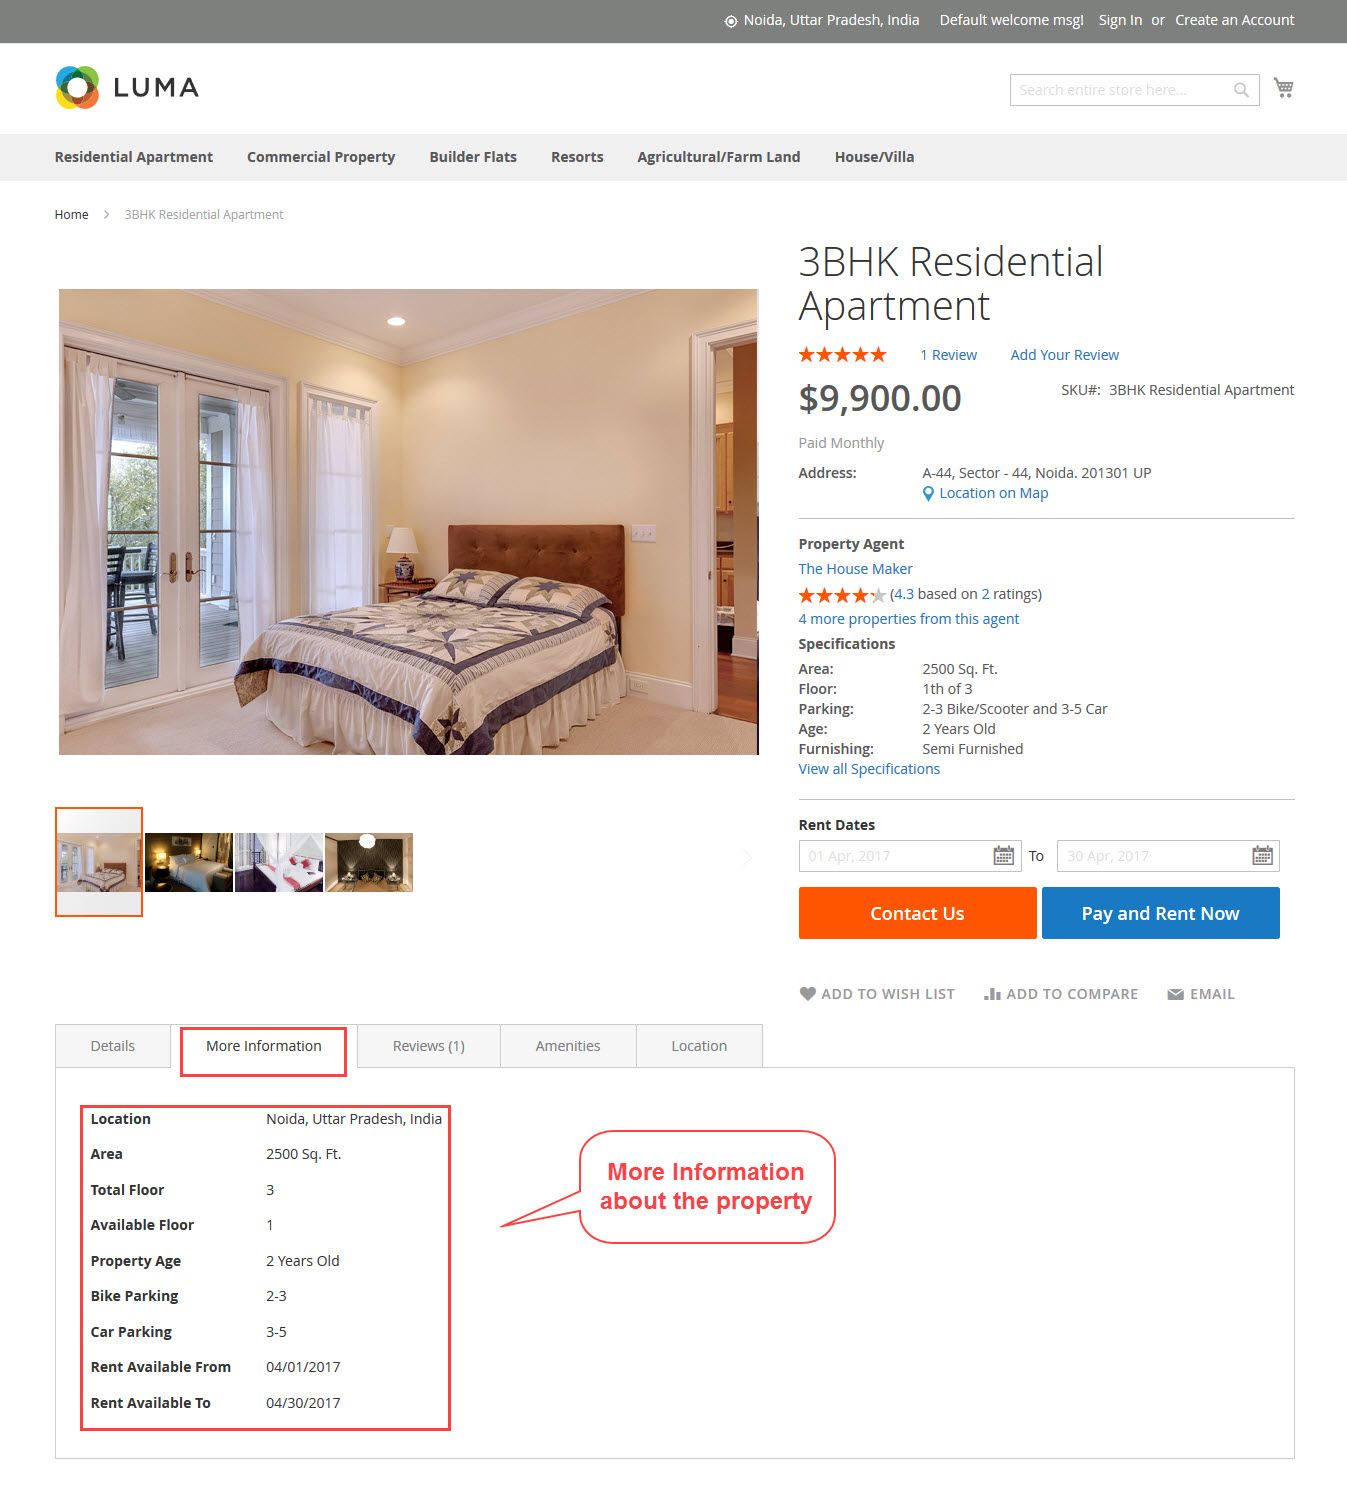
More Information
The buyers can click the More Information tab for viewing additional information about the property.
Here the buyers will see the location, parking, floor details, and rent available dates.
Reviews
On clicking the Reviews tab, the buyers can view the reviews & ratings given by various buyers.
Any user can write a review for any property.
After submitting the property review, it will be sent to the admin for consideration.
When the admin approves the review, it will be visible on the front-end.

Amenities
To view the amenities and facilities available in the property, click Amenities tab.
The buyers will see the amenities names with icons as visible in the screenshot below:

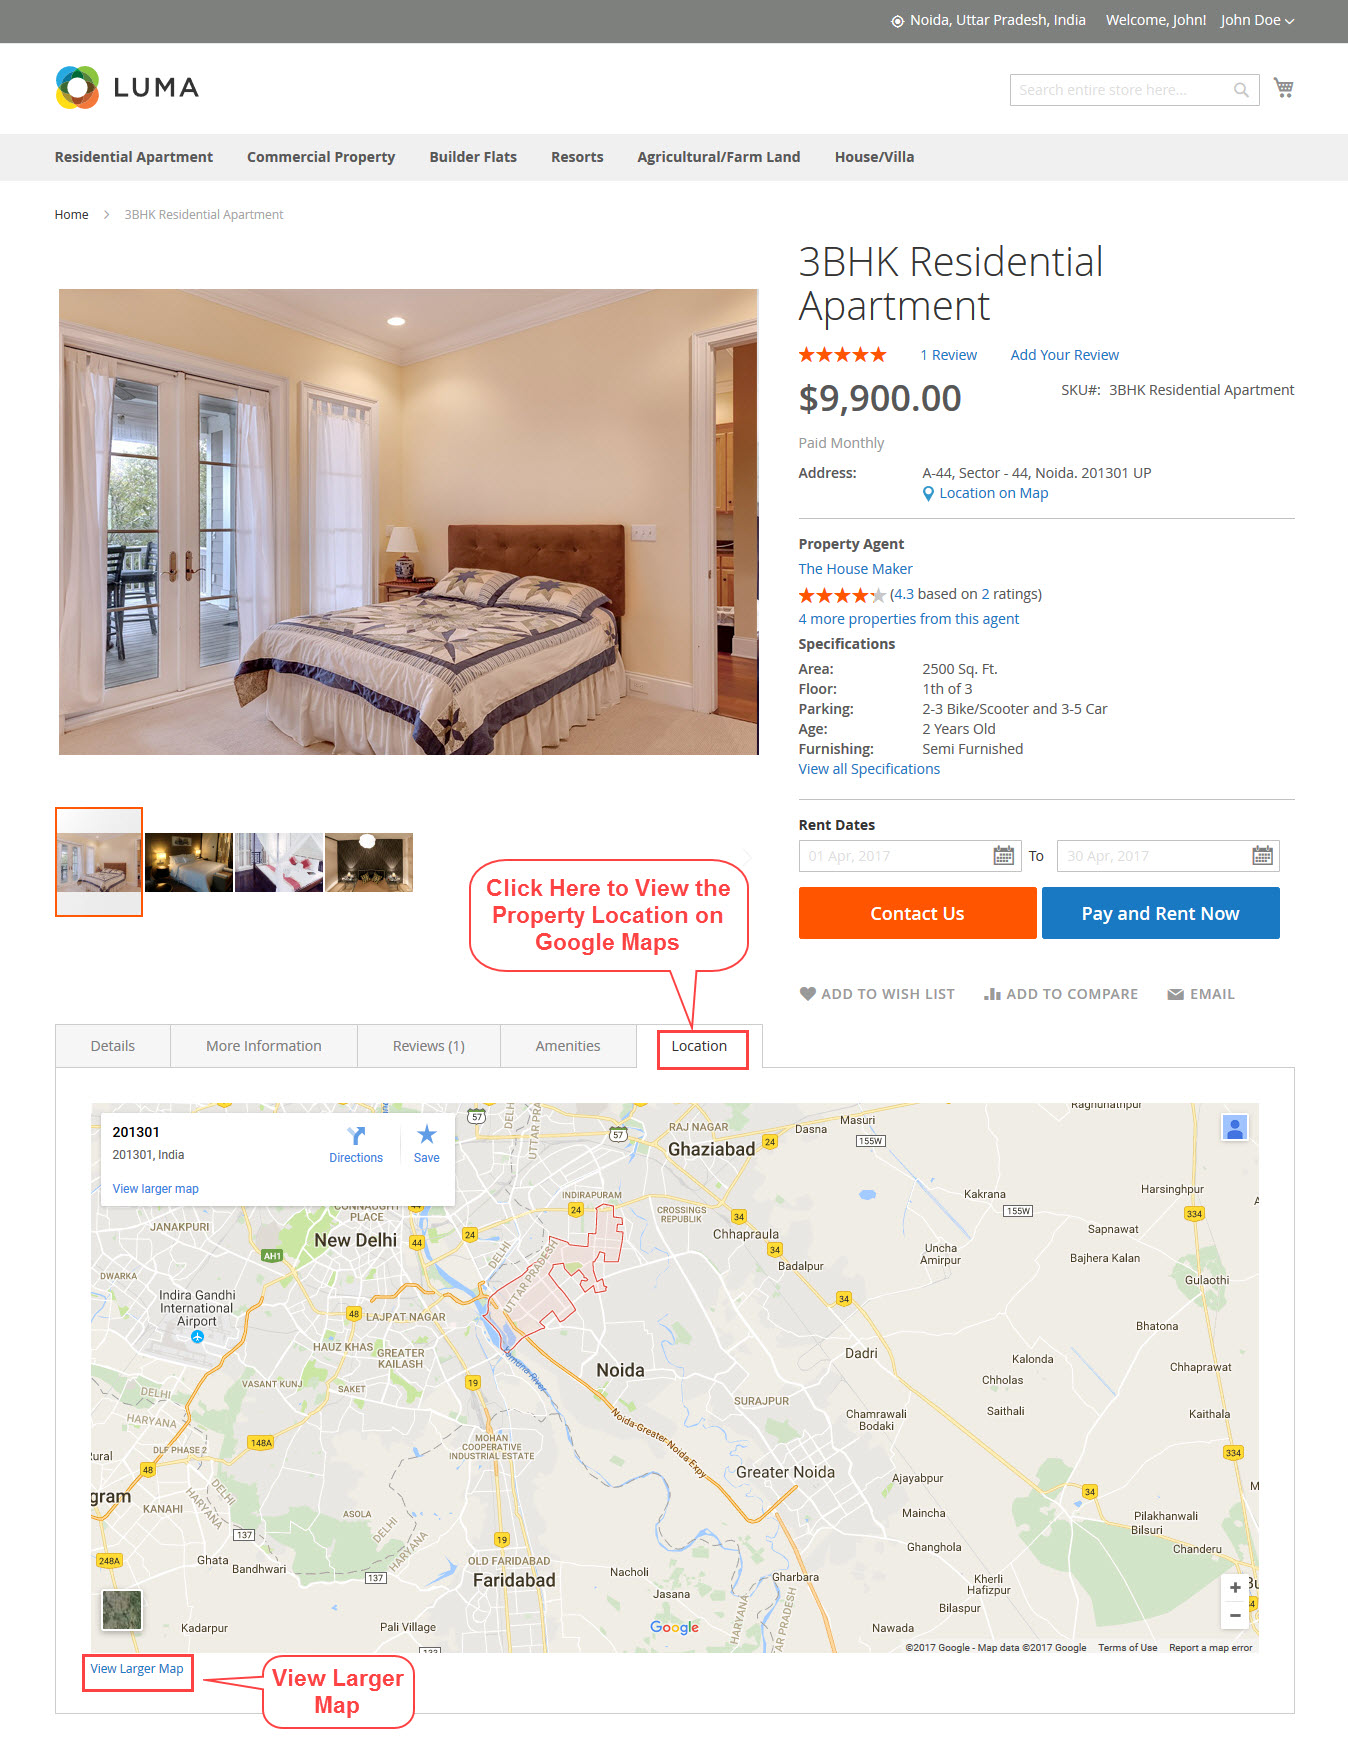
Location
The buyers can view the location of the property on Google Maps within the store.
On clicking the View Larger Map, the buyers will be redirected to the Google Maps website for viewing the property location.
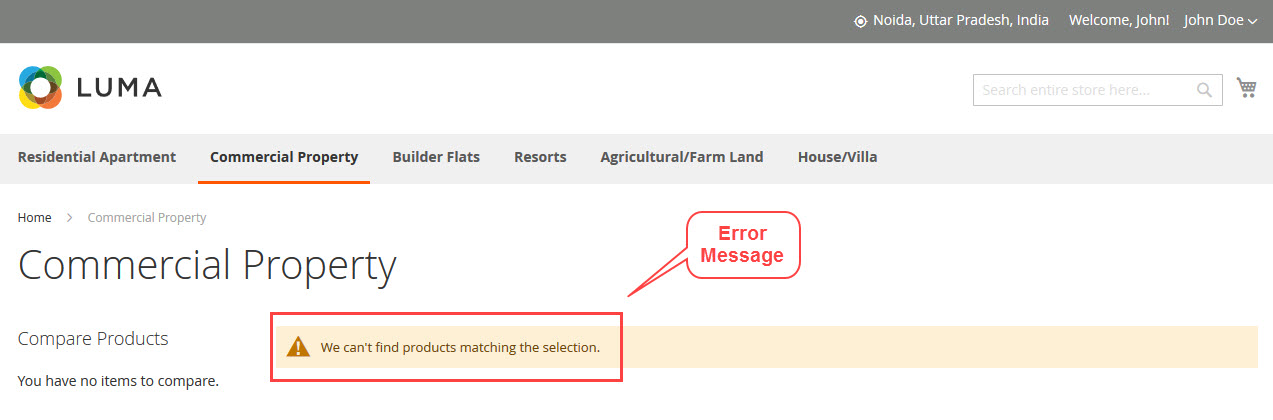
Error Message
If there are no properties available for the buyers, an error message will appear.
When there are no properties in the category or buyer location does not match seller location, this error will appear.
Booked Property
So if a buyer is visiting a property page which has already been booked by someone else. The buyer will see a small message mentioning the booked dates.
For booking this particular property, the buyer needs to select different dates.

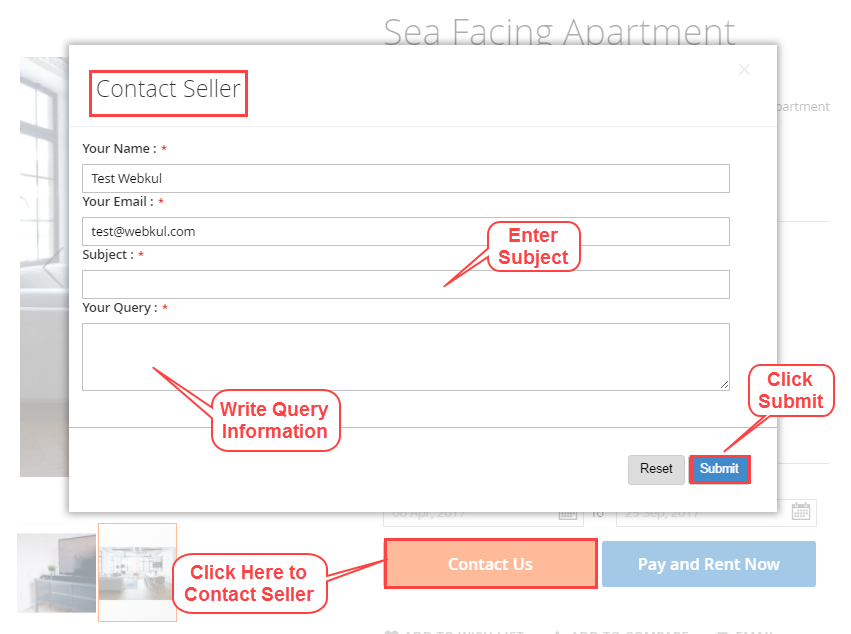
Contact Seller/Agent
The buyers can contact the sellers for any queries or questions related to property. From the category page or property(product) page, click Contact Us button.
The following pop-up window will appear, enter the subject and query information. Click Submit to send this query to the property seller.
Shopping Cart
After adding the property in the shopping cart, the buyer can view the booked property rental dates, agent’s name, and price.
Click Proceed to Checkout for selecting the payment method and placing the order.

Support
That’s all about Marketplace Rental System for Magento 2. If you have any further query please feel free to add a ticket at our Webkul Support System.
You may also browse other Magento 2 marketplace addons and our quality Magento 2 extensions.
Current Product Version - 5.0.0
Supported Framework Version - Magento 2.0.x, 2.1.x, 2.2.x,2.3.x, 2.4.x

Be the first to comment.