Introduction
Magento 2 Marketplace Import Vendors: This extension allows the admin to add bulk number of vendors into the marketplace. The admin can download the sample files and then upload bulk vendor data using CSV, XLS, XML files. The admin can see the list of all uploaded vendors. The vendors will get notified through the mail after uploading their profiles. They can set the new password for their account.
Note –
- This module is a marketplace add-on. To use this module you must have installed Webkul Magento 2 Marketplace Extension first.
- This module is compatible with the Magento 2 Vendor Attribute Manager Marketplace Add-On.
Check the plugin workflow in the video below –
Feature List
- The admin can bulk upload the vendor profiles.
- Download sample vendor upload files in CSV, XLS, XML formats.
- The admin can see the list of uploaded vendors.
- Set a custom profile label.
- Email notification to the seller in uploading the profile.
- The sellers can set the password from their end.
Module Installation
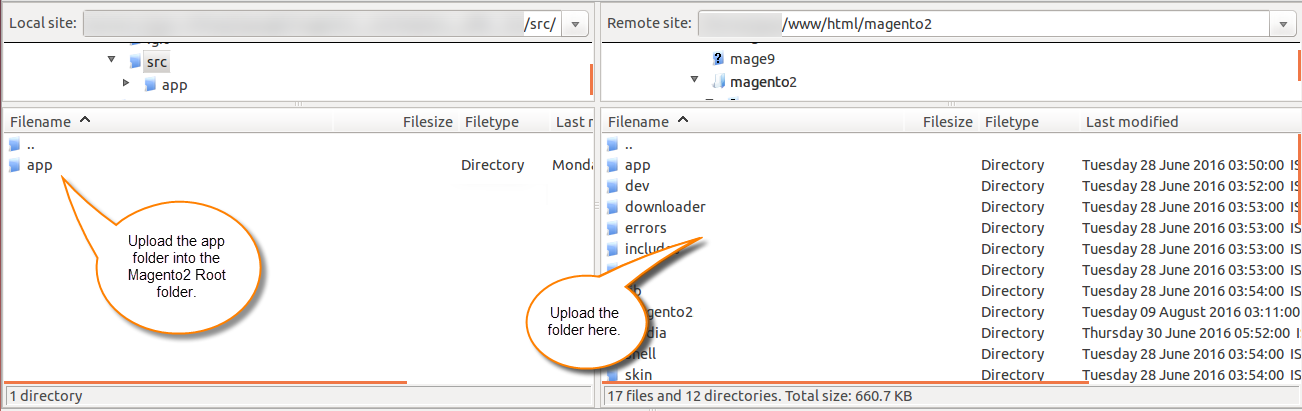
Customers will get a zip folder. Then they have to extract the contents of this zip folder on their system. The extracted folder has an src folder, inside the src folder you have the app folder.
You need to transfer this app folder into the Magento 2 root directory on the server as shown below:
After that, you have to run these commands in the Magento 2 root directory.
First Command –
composer require phpoffice/phpspreadsheet
Second Command –
php bin/magento setup:upgrade
Third Command –
php bin/magento setup:di:compile
Fourth Command –
php bin/magento setup:static-content:deploy
After running the commands, you have to flush the cache from the Magento admin panel by navigating through System > Cache management as shown below:

Language Translation
For translating the Magento 2 Marketplace Import Vendors module language, navigate through src/app/code/Webkul/MpVendorUpload/i18n and edit the en_US.csv file.
Thereafter, rename the CSV as “en_SA.csv” and translate all right side content after the comma in the Arabic language. After editing the CSV, save it.
Then upload it to the path src/app/code/Webkul/MpVendorUpload/i18n where the Magento 2 is installed on the server.
The module gets translated into the Arabic Language. It supports both RTL and LTR languages.

How to enable the module?
For enabling the module, the admin needs to navigate through Store > Configuration > Marketplace.
Here, the admin needs to enable the Marketplace Vendor Mass Upload as per below image:

Hence, in this way, the admin can enable the module.
How to upload vendors in bulk?
Now, for uploading the vendors in mass, the admin needs to navigate through Marketplace > Vendor upload > Vendor Mass Upload as per below image:

After that, under Vendor Mass Upload section, the admin needs to click on the vendor upload.
Under Vendor Upload Tab, the admin needs to provide the Profile Information such as:
Profile Label – Here the admin can enter the label of the seller profile.
Upload CSV/XML/XLS – Upload the supported type of file to mass import the vendor.

The admin can also download the sample CSV file, sample XML file and sample XLS file.
Sample of CSV file:

Here, the admin can also upload the default image zip file that the admin wants to make as the default seller profile image.
Once, the admin has uploaded the CSV file a message will gets pop up as “Your upload request have been successfully added to the queue” as shown below:

Under Column Attribute Tab, the admin can see the vendor attribute information:

For that, the admin needs to click on the drop-down and then can select the attribute as per below image:

From here, the admin can select the attribute as per their requirement as shown below:

The admin needs to keep the column name in the uploading files same as Column Code.
How to process the request queue?
Once the uploaded request has been added to the queue, the admin can run the below commands in the Magento 2 root directory to process it:
First command –
This command is used to check topic of consumer list.
php bin/magento queue:consumers:list
If the admin wants to run the queue process command in background, then the below command can be run:
php bin/magento queue:consumers:start vendorupload.topic&
Vendor Profiles
After uploading the vendors, now the admin can see all the uploaded vendor profiles under the Vendor Profiles section as per below image:

From here, the admin can see the complete list of the Import vendors. For the reference, you can check below snapshot:

Seller – End
Once the admin has uploaded the vendor profiles from the back-end, they will receive an email as shown below:

The vendor will also receive the mail to set a password as shown below:

The vendor can now set the password for the store by clicking on the link.

For here, the vendor can set the password of their account.

After setting the new password, the vendor can now login to the store as shown below:

How this extension works with Vendor Attribute Manager module
The admin can create vendor’s custom attributes by using Magento 2 Marketplace Vendor Attribute Manager module.
To know how the admin can create the vendor attribute, you can click here.
Once the admin has created an attribute for the vendor, they can see that attribute under the Vendor Attribute section as per below image:

Here, the “address” is the newly created attribute by the admin.
Now, the admin needs to enter the “address” attribute filed into the CSV/XML/XSL files as shown below:

After entering the details, the admin can upload file.
Support
Thus, that’s all for the Magento 2 Marketplace Import Vendors. If you face any issue, feel free to add a ticket at our HelpDesk System. You may also browse other Magento 2 marketplace addons and our quality Magento 2 extensions.
Current Product Version - 5.0.1-p1
Supported Framework Version - 2.0.x 2.1.x 2.2.x 2.3.x 2.4.x

2 comments
Please mail us at [email protected] so that we can look into it and update you accordingly.
Thanks