EasyPost allows businesses to integrate tracking statuses, address verification, rating, and more from DHL Global Mail, FedEx, UPS, USPS, and other regional carriers into their site or application and now we have integrated it and created the EasyPost Marketplace Shipping.
EasyPost works as a mediator wherein you can save your various carrier-specific credentials with them and you get a key that you can set up in the admin back-end.
Now, whenever you ship your products the shipping cost is automatically calculated according to the selected shipping method by the customers.
Please Note:
- This is a marketplace add-on, so must purchase and install Webkul’s Magento 2 Multi Vendor Module first.
- You need to have an EasyPost account to use this extension, please click here to signup on EasyPost
Features
- The admin can enable or disable the marketplace EasyPost shipping method.
- The admin can configure the module settings easily.
- The admin can set the Marketplace EasyPost shipping title name that will be shown from the front end.
- The admin can allow sellers to save their EasyPost credentials.
- The EasyPost shipping rate will be calculated from the seller’s address.
- The seller can manage their orders.
- The seller can download EasyPost shipment in PNG format.
- Buyers can see the Webkul EasyPost shipping on the checkout page.
Installation
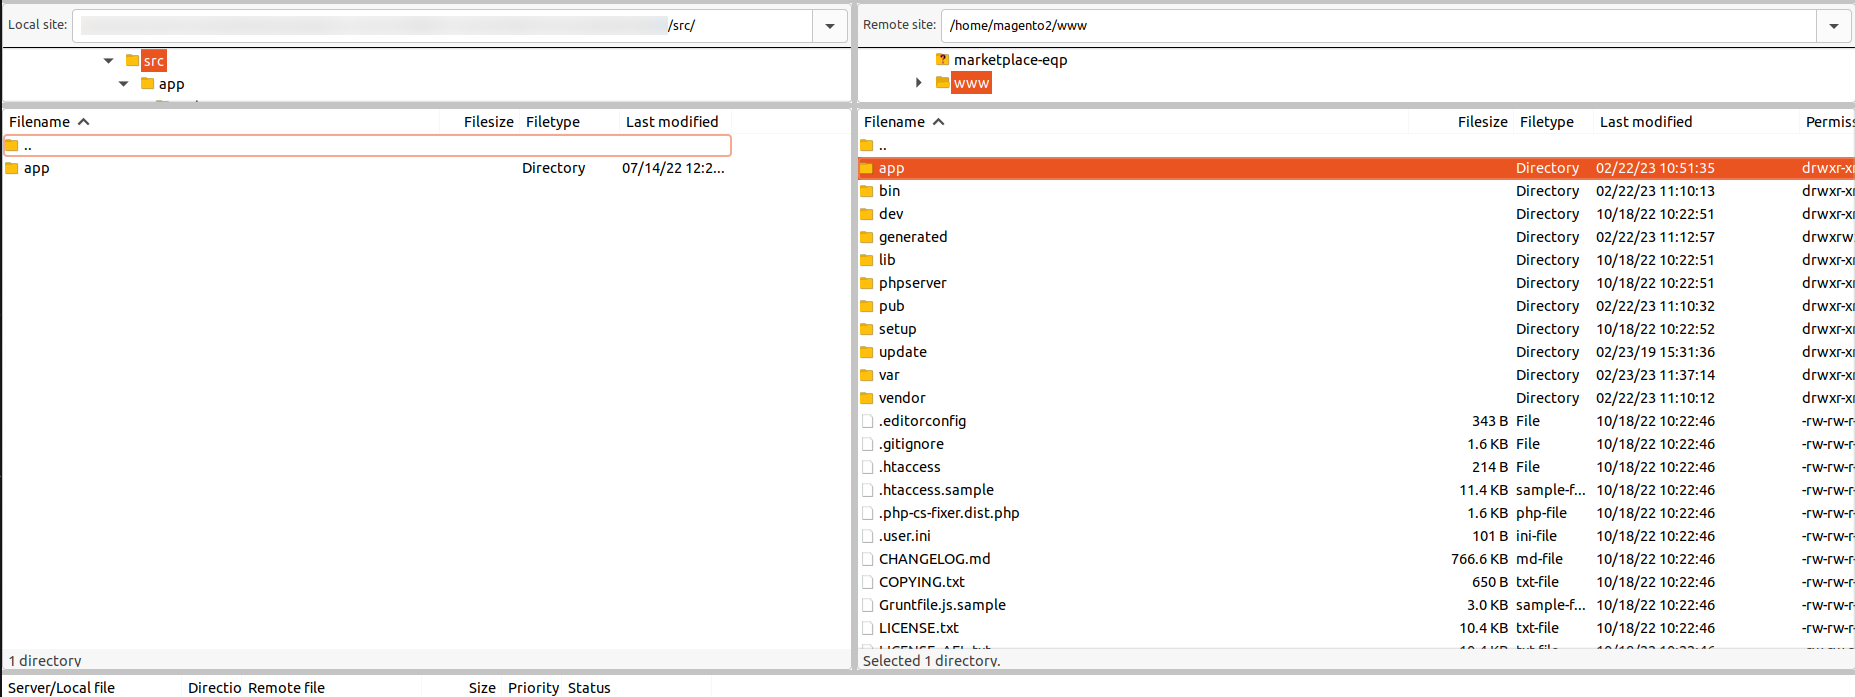
First, the customers will get a zip folder and they have to extract the contents of this zip folder on their system. The extracted folder has an src folder, inside the src folder you have the app folder. You need to transfer this app folder into the Magento 2 root directory on the server as shown below.
After the successful installation, you have to run these commands in the Magento 2 root directory:
First command –
php bin/magento setup:upgrade
Second Command –
php bin/magento setup:di:compile
Third Command –
php bin/magento setup:static-content:deploy
Now, after you have run the above commands, run below command –
composer require easypost/easypost-php
After running the commands, you have to flush the cache from Magento admin panel by navigating through System > Cache management as shown below.

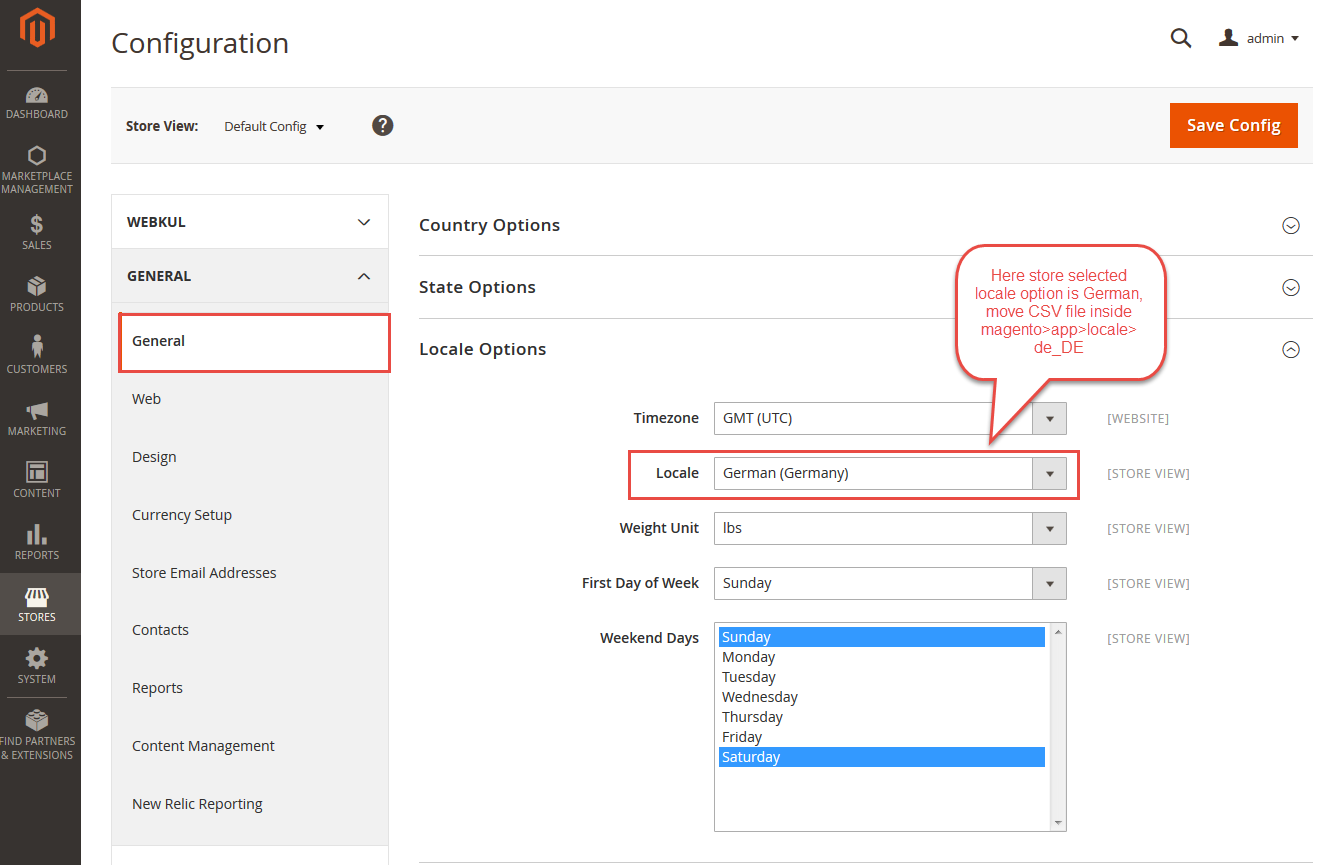
Configuration For Multi-Lingual Support
Further, for the multilingual support, the admin will navigate through Store > Configuration > General > Locale Options and select the locale as German (the language into which the admin wants to translate his store content).
Translation
If you need to do the module translation, please navigate the following path in your system app/code/Webkul/MpEasyPost/i18n. Now, open the file named en_US.CSV for editing.
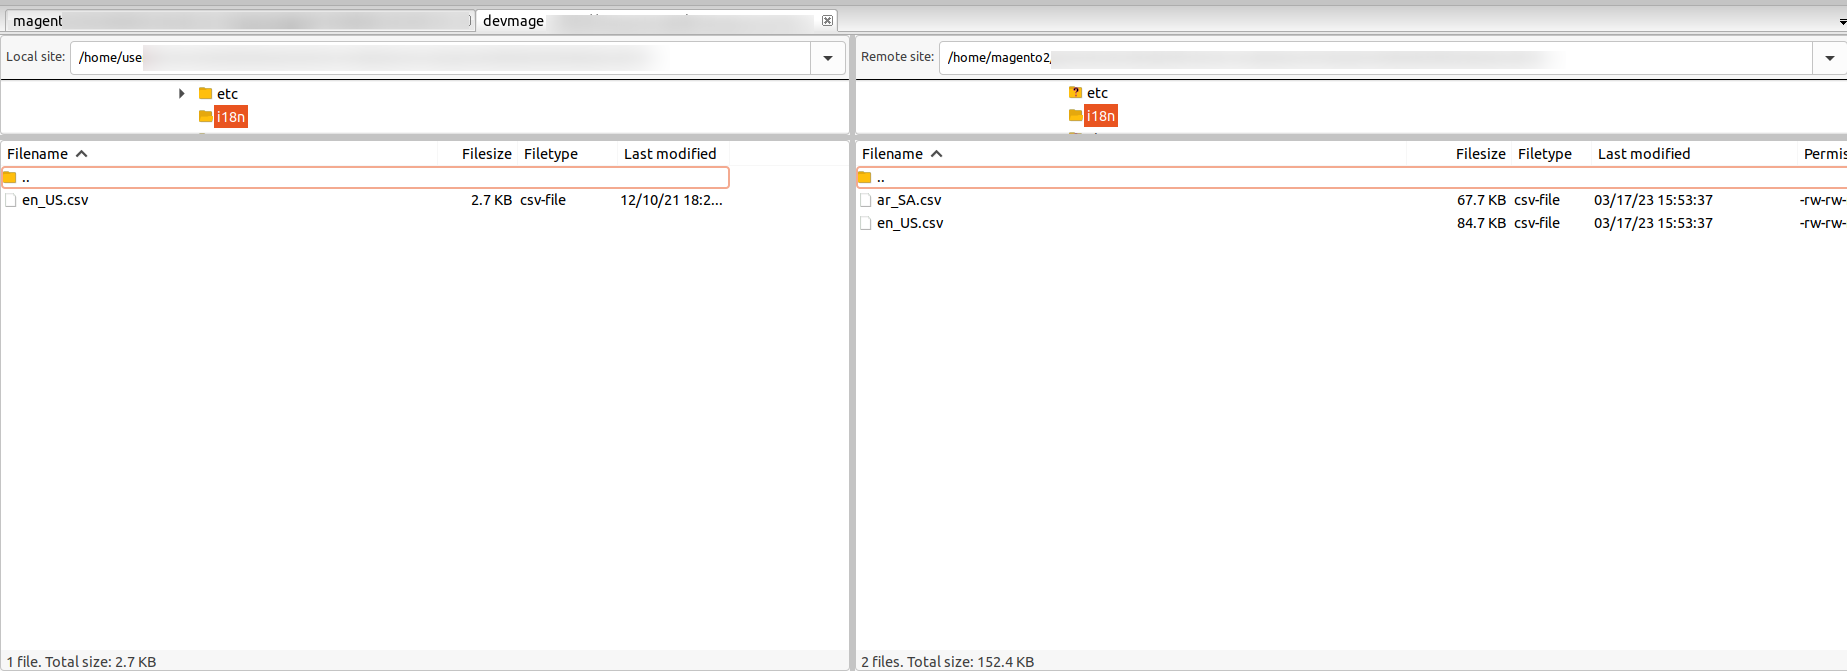
Once you have opened the file for editing. Replace the words after the comma(,) on the right with your translated words.

After editing the CSV file, save it and then upload it to the same folder. Now your module translation is complete.

Admin’s Configuration
After the successful installation of the extension, the admin will navigate to Stores > Configuration > Sales > Shipping Methods > Webkul Marketplace EasyPost Shipping.

To configure the extension, the admin will –
- Select “Yes” to enable the extension for use else select “No” to disable the extension.
- Then select “Yes” to select the Sandbox mode(Test mode) else select “No” to use the Production mode.
- Enter the Shipping Title that is visible to the customers at the front end.
- After that, enter the API key for the Admin’s EasyPost account. You can also get the API Key directly by clicking on the Get your Easypost credential link from the configuration itself.
- Select the weight unit as “Lbs” or “Kilograms” as per the requirement.
- Under “Allow Sellers to Save EasyPost Details” set “Yes” to allow the sellers to save their EasyPost Shipping credentials under their account panel else select “No“.
- Enter the Error Message that will be displayed if “Show Method If Not Applicable” is selected as “Yes“.
- Select “Yes” for “Show Method If Not Applicable” to show the error message if the method is not available.
- Choose “Yes” to generate the debug log in the system backend else select “No” to not generate a debug log.
- Set the length, width, and height of the package.
Seller’s Configuration
To use this shipping method, the seller needs to configure this by navigating through Marketplace Dashboard > Shipping Setting. The seller needs to fill up the following details as shown below:

If the admin has set “Allow Sellers to Save EasyPost Details” as “Yes” in the extension configuration settings, then the sellers will find a new menu option under their marketplace block – “Manage EasyPost Shipping”.
Here, the seller needs to enter his EasyPost account-related API Key. After entering the key tap the save button to save the configuration.

Workflow At Buyer’s End
EasyPost Shipping Method Marketplace add-on works for both the admin’s and the seller’s product.
The admin and the seller can save EasyPost Shipping configuration details from the admin panel and from the marketplace seller dashboard respectively as discussed above.
When the buyer adds the products to the cart & clicks on “View & Edit cart”, he will be able to see the Webkul EasyPost Shipping & get a shipping estimate based on the address of the buyer & origin.
When the buyers place an order, they can select the Webkul EasyPost Shipping Method on the shopping cart page for both the admin’s product and the seller’s product, as shown below:

The buyer can choose to purchase both the admin’s product and the seller’s product. The buyer can place an order for the same by opting for Webkul EasyPost Shipping as the delivery method on the shopping cart page.

After the order has been placed, the customer can see the order details under his account menu option “My Orders” as shown below.

Admin Order Management
Further, the admin can manage the order and can generate the shipping. From the Admin Panel, the admin can view and manage the orders by navigating through Sales -> Order.

Moreover, the admin can generate an invoice for his orders as shown below:

Invoice Slip

After that, the admin will be able to generate the shipment for the admin’s product.

In the end, the admin can successfully print the Shipping Slip for the order to be shipped by EasyPost Shipping Method.

Seller Order Management
When the order is placed, the seller can see the order under “My Order History” as shown in the image below.

If the admin sets the “Allow Seller to Manage Order” option as “Yes” then the seller can manage the orders from the front-end.
Now the seller can generate invoices for their ordered products, generate tracking numbers and shipment for the orders of their products.
Even the seller can notify the customers by sending them emails, cancel/refund the order and even print the order.

Moreover, the seller can generate an invoice for his orders as shown below:

The seller can download the Invoice Slip very easily. In this Slip, you can see the information related to the respective order as shown below.

After that, the seller will be able to generate the shipment for his product.

The seller can download the Shipping Slip very easily. In this Slip, you can see the information related to the respective order as shown below.

That’s all for the Magento 2 Marketplace EasyPost Shipping. If you have any queries regarding the plugin, please contact us at Webkul Support System.
You can also check our complete Magento 2 extensions.
Current Product Version - 5.0.4-p1
Supported Framework Version - Magento 2.0.x, 2.1.x, 2.2.x,2.3.x, 2.4.x

4 comments
You can download the shipping slips for the orders by the help of this add-on.
Thanks
For any doubts, you can always reach out to us at [email protected] and our support team will assist you to provide the best solution.