Magento 2 Marketplace Affiliate System is a performance-driven marketing module where the affiliate user will be benefited by getting rewards for each click, unique click, and also if the visitor makes a purchase via the advertisement links.
Using this Affiliate System module you can send the request to become an affiliate partner of any seller. The seller can manage their affiliate users from their end.
Note: Magento 2 Marketplace Affiliate System extension is an add-on to the Multi-Vendor Marketplace. To make use of this extension, you must have first installed the Webkul’s Magento 2 Multi Vendor Module.
Also you have checkout our Magento 2 Affiliate extension.
Moreover, watch the below video tutorial to understand the extension workflow:
Features
Affiliates:
- Separate registration and user panel for Affiliate Users.
- Send blog link approval requests to sellers.
- After approval from the seller, all products link will be available for the banner.
- Also, text banners created by sellers will appear in the affiliate panel.
- On clicks or sales of a product, the affiliate will get the commission.
- Can see the summary of clicks and sales.
- Can see the commission rate of each seller.
- Can see the sold product detail.
- Preferred Payment method filled by the affiliate.
- Able to see the Paid summary from the seller.
- Affiliate users can send emails to friends with product links to increase sales of products.
Sellers:
- Manage the affiliate request, the seller can approve, unapproved, and delete the request.
- Manage the commission rate for Affiliates.
- The seller can Create/Edit/Delete the text banners, need to approve text banners.
- The seller can see the summary of Affiliate users.
- The seller can see the sales history.
- The seller can pay to Affiliate.
- The seller can send the email to the approved Affiliate.
Admin:
- Admin can approve/unapproved affiliates.
- Admin can set the payment method for affiliates.
- Admin can control the Affiliate registration.
Installation of Magento 2 Marketplace Affiliate System
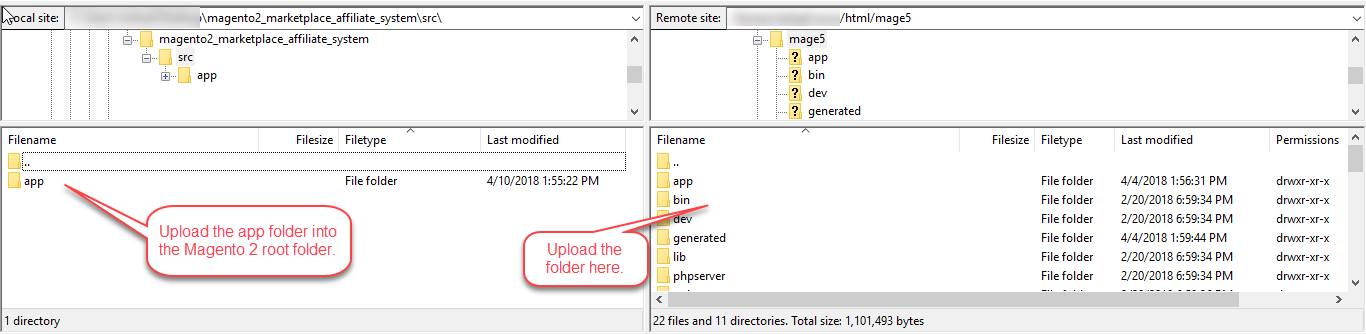
First, customers will get a zip folder and they have to extract the contents of this zip folder on their system. The extracted folder has an src folder, inside the src folder you have the app folder.
Further, you need to transfer this app folder into the Magento 2 root directory on the server as shown below in the snapshot.
After the successful installation, you have to run the below commands in the Magento 2 root directory.
First command – php bin/magento setup:upgrade

Second Command – php bin/magento setup:di:compile

Third Command – php bin/magento setup:static-content:deploy

After running the commands, you have to flush the cache from the Magento admin panel by navigating through System->Cache management as shown below.

Translation in Magento 2 Marketplace Affiliate System
For translating the module language, please go to app>code>Webkul>MpAffiliate>i18n and edit the en_US.csv file. Now, translate the words on the right and upload the modified file to the same location.
The filename of the translated file should be according to the language and region code like de_DE.csv.

Module Configurationx
After the successful installation of the extension, login to the admin panel and navigate to Stores->Configuration->Webkul->Marketplace Affiliate System.
Subsequently, here, we have 4 configuration settings –
- General
- Payment Information
- Manage Affiliate General Commission Rates
- Affiliate Program Terms
General


Here, the admin will –
Enable – Enable/Disable the module for use.
Display blog link on registration – Enable to display the field for blog link where the affiliate needs to enter his blog link.
Allow affiliate registrations – Select Yes to enable the affiliate registrations else select No.
Automatically approve affiliates – Select Yes to approve the affiliates automatically else select No to manually approve the affiliates.
Minimum payout balance – Set the minimum payout balance that
Payment day of the month – You can set it to any day 1 to 31 of a month.
Blog URL Hint – Enter the hint for the blog URL that is visible to the affiliate users at the time of registration.
Affiliate Manage E-mail – Enter the Affiliates email address.
Affiliate User:-
- Account update by Seller email template – Select the email template to notify the affiliate when his account is updated.
- Notification by seller email template – Select the email template that will be used when the seller sends any notification to the user.
E-mail campaign template – Select the template for the email campaign.
Manager email template – Select the email template for notifying the admin when affiliate sales order approve
Payment credit notification email template – Select the email template for notifying the affiliate when the affiliate user payment is credited into his bank.
Affiliate user email template on order complete – Select the email template for notifying the affiliate of sales order completed notification.
Seller email template on order complete – Select the email template for notifying the seller when a sales order is completed.
Seller notification on request email template – Select the email template for notifying the seller when the affiliate user sends a request.
Payment Information

Here, the admin will –
- Sandbox – Select the mode as Sandbox(testing) or not.
- Assign Payment Methods – Select the payment methods that will be available to the affiliates.
Manage Affiliate General Commission Rates

The admin will –
- Pay Per Click – Set the payment for pay per click.
- Per Unique Click – Set the payment for per unique click.
- Set Commission Type For Sale – Select percentage or fixed as the commission type for the sales.
- Set Commission -Set the commission in USD in case of fixed or in percentage %.
Affiliate Program Terms

Under this section, the admin can –
- Must agree to Affiliate Program Terms? – Enter the affiliate program terms which will be visible to the affiliates while registering after they click on the Affiliate Terms link before creating an affiliate customer account. The affiliate program terms need to be accepted before a user can register himself as an affiliate.
Workflow – Affiliate User
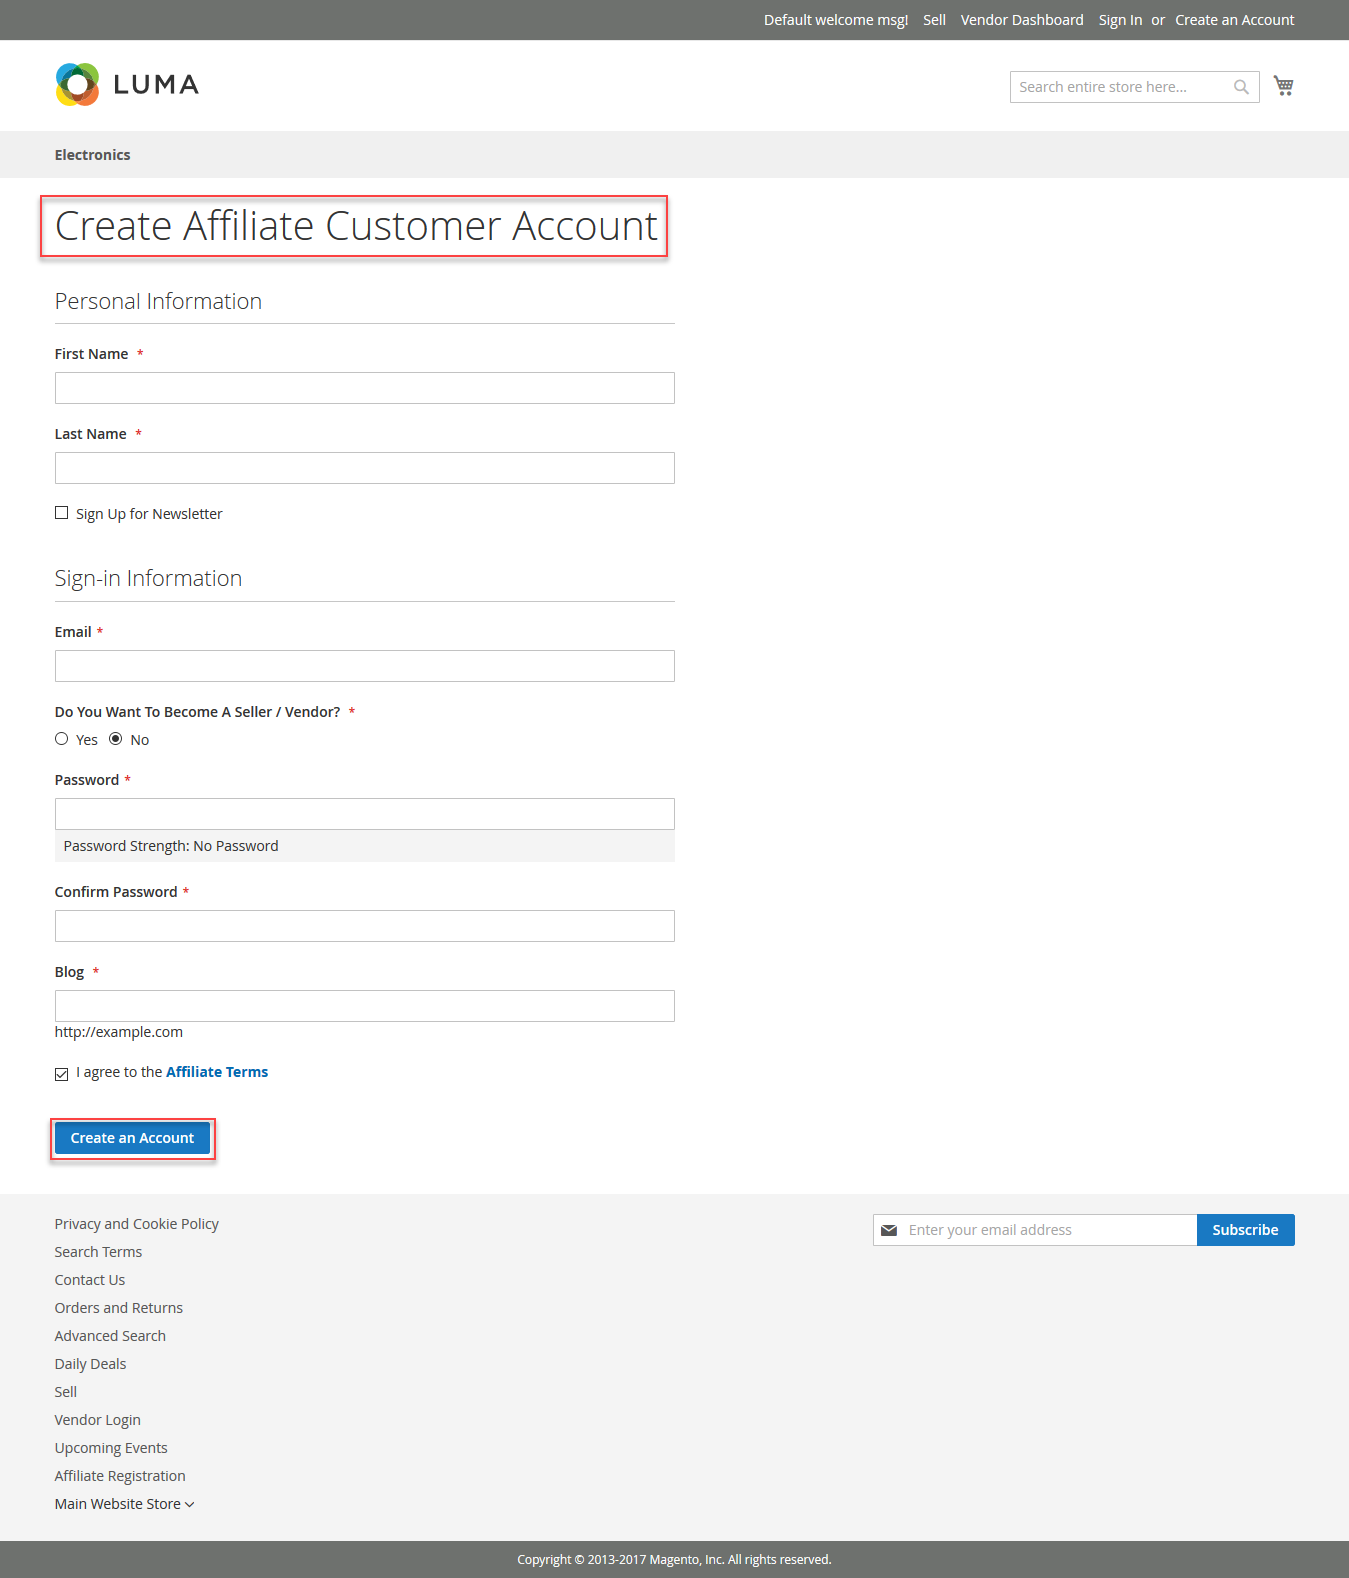
At the front end, there is an Affiliate Registration link visible for the affiliate registrations as shown below in the snapshot.

Clicking the Affiliate Registration link brings the page to create an Affiliate Customer account. Here, the affiliate customer needs to fill in the required details, select the checkbox to agree to the affiliate terms and conditions.
Lastly, click the Create an Account button to create the Affiliate Customer Account.
Clicking the Affiliate Terms link brings up the Terms, clicking the Ok button takes back to the previous page.

If the user has been approved(auto or manual) as an Affiliate User then Affiliate Panel block will display in the account section of the user.

Also, if a user registers as a customer using the default Create Account button at the top right corner then those users will have a Become Affiliate User menu option within their account panel.
To become an affiliate, click the Become Affiliate User menu option, and depending on the selected approval method(via admin) you will have your affiliate user menu options available.

Thereafter, tapping the menu option brings up the section to add the blog URL. Enter the blog URL of your blog post, check the I agree to the Affiliate Terms and click the save button to register as an affiliate after which the affiliate account options will be visible.

Options under the Affiliate Account panel –
Summary:
Here, all the details of the seller will display under the Summary section. Like the – Seller Name, Seller Email, Click, Unique Click, Total Sale, Sale Commission, Received, and Balance amount.

Commission Rate:
Here, the affiliate can check the commission rate of each seller. Also, you can search the sellers using their email address.
The affiliate user can search the seller by typing in the seller email address in the Seller Email field and clicking the Submit button after that.

Banners & Ads:
Here, the affiliate can find all the banners and ads pertaining to the seller.
The affiliate user will be able to make use of the banners by copying the HTML code and pasting it on to a website where the affiliate wants to display the ads.
So, when any user/customer clicks or purchases these products then the affiliate user will be rewarded for the clicks as well as for the purchases.
For the product purchases made by the customer, only after the order gets complete the affiliate gets the commission.
Product Ads –
Product ads are auto-created using the respective seller products. You just need to copy the HTML and paste it into the website where you want to post the product ads.

Clicking on the preview button brings up the banner preview. Click the Ok button to go back to the Banners & Ads section.

Text Ads –
Tapping on the Text Ads links the affiliate will find the text banners available from the respective seller. Apply the banner by copying the HTML code and paste it onto the website where you want to display the text ad.

Clicking the Preview button displays the text banner preview as shown below in the snapshot.

E-mail Campaign:
Under this section, the affiliate users can send emails campaigns to their customers.
They can send email to the multiple email addresses at the same time separating each by a comma separator. The affiliate user will now enter the subject and the message to send.

Also, the affiliate user can add product links within the message body of the email. To do so, click on the Add Product Links button.
This brings up a pop-up where you can search for the product that you want to attach. Select single or multiple products whose link is to be attached and click Ok on the pop-up.
Lastly, click on the Send Mail button to send in the email campaign.

Traffic:
Under this section, the affiliate user can check the traffic summary displaying the IP Address, Referring URL, and the View Date as shown below in the snapshot.

Sales:
In this section, the affiliate can check all of the sales details. Here, the affiliate can see the details of the products that have been purchased.

Payment Records:
Moreover, in the Payment Records section, the affiliate can check all of the payment records.

Statistics:
Additionally, the affiliate can check the statistics for the traffic on their account on a Daily or Monthly basis as shown below in the snapshot.
Daily:

Monthly: 
Request to Seller:
After creating an affiliate account, the affiliate user needs to select a seller and add a blog link where he wanna post ads and banners. After that, click on the Send Request button to send the request to the respective seller.

Subsequently, the status of the request will be visible under the List of Seller as shown below in the snapshot.

After the approval from the seller, the status gets changed to Accept as shown below in the snapshot.

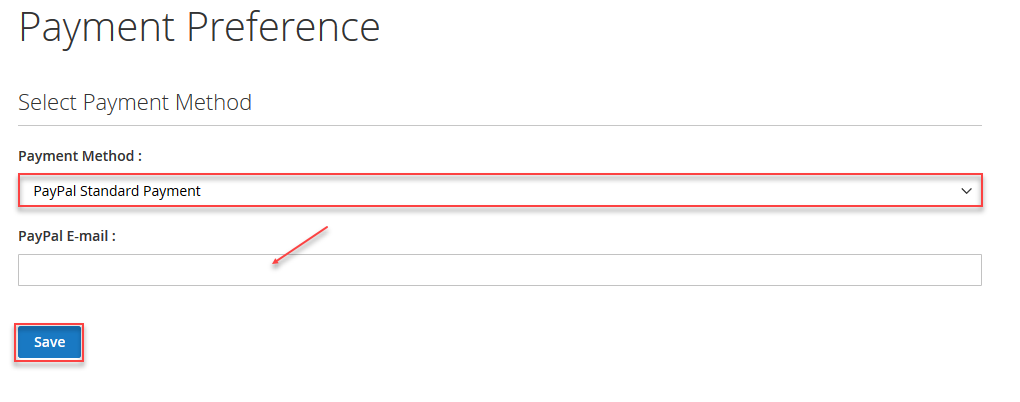
Payment Preference:
Here, the affiliate user can set his payment preference. The affiliate user can select from three preferences – Check/Money order, Bank Transfer Payment, and PayPal Standard Payment.
After selecting a payment method the affiliate user can set up the details for the respective method.

First, you just need to fill in the detail to them and hit the save button, for using the Check/Money Order.

Second, for using the Bank Transfer Payment, you just need to fill in the required details like the – Account Holder Name, Bank Name, Account Number, Bank Address, and SWIFT Code hit the save button.

Third, for using the PayPal Standard Payment, you just need to fill in the required details and hit the save button.
Blog URL:
Here, enter the Blog URL wherein the affiliate user can add his product and text ads.

Workflow – Seller – Magento 2 Marketplace Affiliate System
After the successful installation of the extension, the seller will have the Manage Affiliate menu option visible under the marketplace block as shown below in the snapshot.

Under the Manage Affiliate menu option, there are Six more sub-menu options for managing the Affiliate users which include –
1. Affiliate Request –
Here, the seller will be able to manage the affiliate user requests.
The seller can approve, unapprove, or delete as required. Also, the seller can search for the affiliates using their email id, their blog URL, or using the affiliate status(approved, unapproved).

To approve, unapprove, or delete an affiliate user, just check the affiliate user and tap on the drop-down option wherein you can choose to approve, unapprove, or delete the affiliate users.
Lastly, click the Submit button to make the changes.

2. Affiliate Configuration –
 Here, the seller will make the affiliate configuration which includes configurations for –
- Per Click – Set the payment amount for per click.
- Per Unique Click – Set the payment amount for per unique click.
- Set Commission type – Set the commission type as Fixed or Percentage.
- Set Commission Rate – Set the applicable commission rate which would be applied as fixed or percentage.
- Minimum Payout Balance – Set the minimum payout button reaching which the affiliates can withdraw the balance.
- Payment Day of the Month – Set the payment day of the month on which the affiliates should get their payout.
3. Category Commission –
Here, the seller can set the commission category wise as shown below-

Further, the seller can view the saved category commissions and can:
- Select Category: Select category on which the seller wants to set the commission.
- Commission Type: Set either “Fixed Commission” or “Percentage Commission”.
- Commission: Define the commission value.
4. Mail to Affiliate –
The seller can send the email to the affiliate user using this field. Just select the option to send the email to all affiliates users or to the selected affiliate user, enter the subject, message.
Lastly, the seller has to click the send button to send the mail to the affiliates.

5. Text Banner –
Here, the seller will be able to create the text banners and can edit, delete, approve or unapprove any of the created text banners.

To add a new banner –
Enter the:-
- Title for the banner.
- Text for the banner.
- Link(select the respective product from the drop-down).
Then, select the Size as – Fluid, Microbar, Skyscraper, Vertical Banner, Wide Skyscraper, Half Banner, Half page Ad, Full Banner, Leaderboard.
The seller can easily check the text banner preview by clicking the Preview button and gets visible as shown below in the snapshot.

Further, to edit a text banner click the edit button.
Now, you can make the changes as per need wherein you can – Update the title, text, link, and size and just save the changes by clicking the Update Banner button.

6. Affiliate Summary –
The seller can see the affiliate user’s details in this field.
Here, seller can see the – Affiliate Name, Affiliate Email, Click, Unique click, Total Sales, Sale Commission, Paid, Balance, Payment method.

Thereafter, on clicking the Payment Method button brings up a popup. Now, as per the selection made by the affiliate user, the selected payment method will be visible.
On clicking the Save Transaction Details button updates the payment details. Now, you can see the success message that the transaction details saved successfully.

7. Affiliate Payment –
Furthermore, the seller can find Affiliate Payment History under this section having the details like – Affiliate Name, Affiliate Email, Paid By, Transaction Id, IPN Transaction ID, Transaction amount, and the Transaction Amount.
Here, the seller will also be able to search the Affiliate using the affiliate name or the affiliate email id.

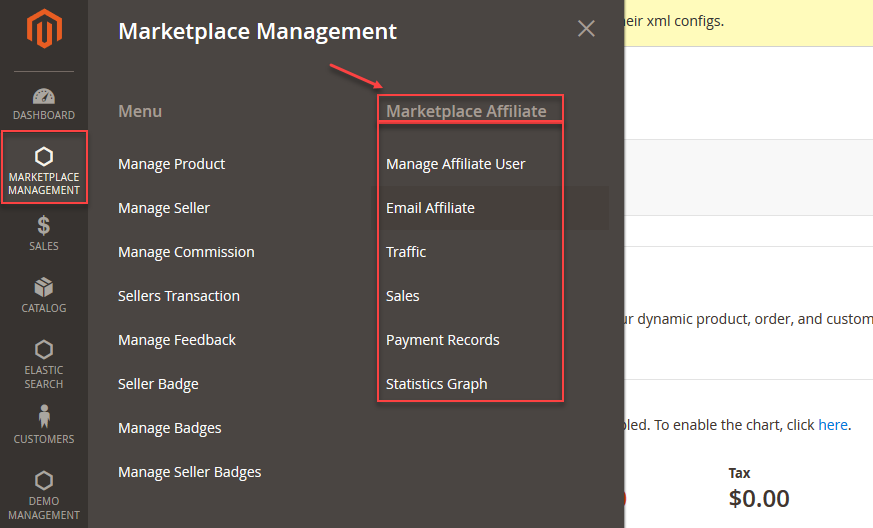
Admin – Management
Moreover, the admin will find a new menu option under the Marketplace Management> Marketplace Affiliate as shown below in the snapshot.
Manage Affiliate User –
The admin can approve or unapprove the affiliate users as shown below in the snapshot, under this section.

Email Affiliate –
Here, the admin will be able to send in the emails to the affiliate users. The admin can select to send the mail to all affiliate users or can select a single affiliate user to send to.

Traffic –
In this section, the admin will be able to check the traffic records with details like the – Customer IP, Referring URL, Affiliate User Name, and the View date.

Sales –
Here, the admin will be able to see all the sales that have been made with the details related to the sales record like the – Order Id, Referring URL, Purchased On, Affiliate User Name, Total Order, and the Order Status. The sales grid will show the data once there is a sale from the affiliate user’s ads link.

Payment Records –
Under the payment records section, the admin will be able to see the records for the payments made to the affiliate.

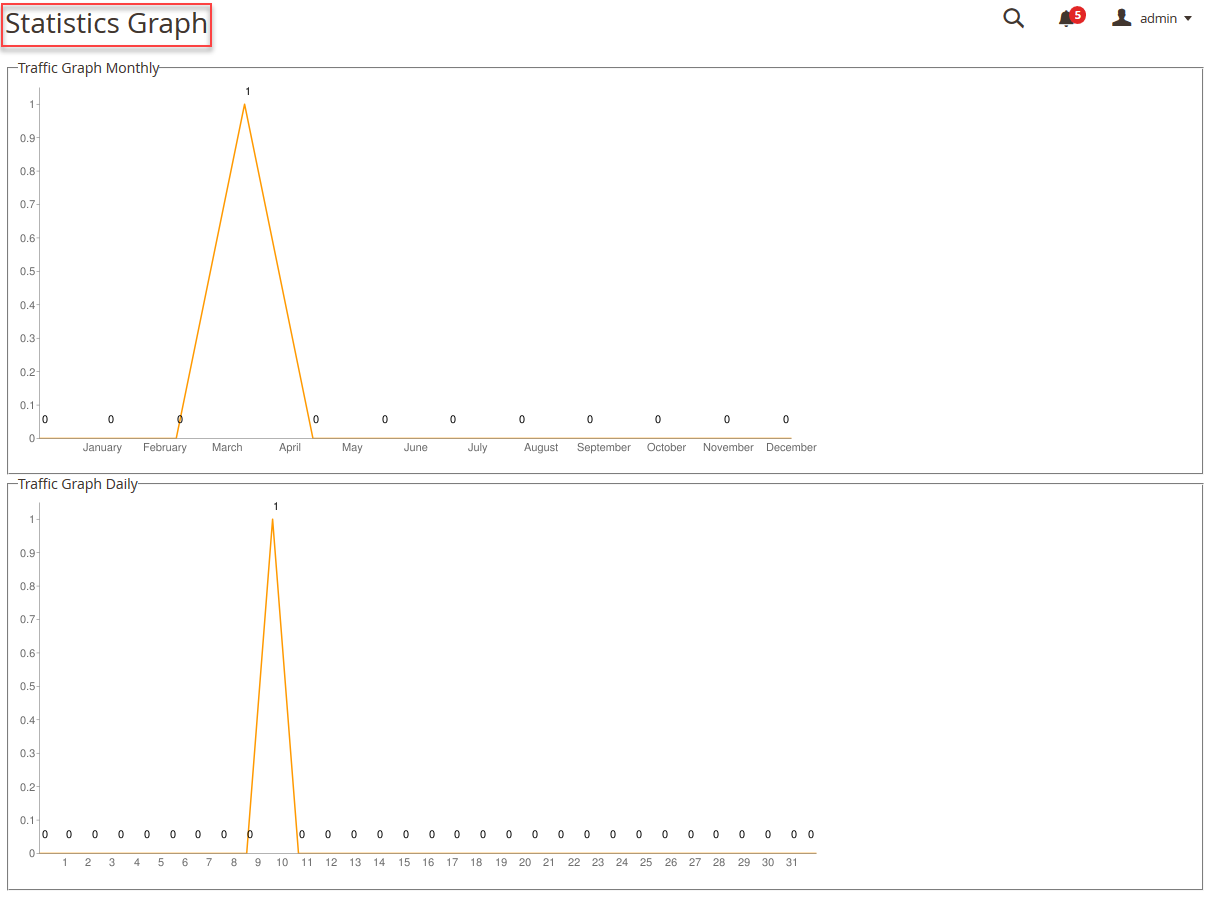
Statistic Graph –
Here, the admin can see the statistics related to the traffic that includes – Traffic Graph Monthly and Traffic Graph Daily using the Magento 2 Marketplace Affiliate System.
Support
So, that’s all about the Magento 2 Marketplace Affiliate System. Further, if you have any query, doubt or a customization request get back to us at [email protected] or raise a ticket at our HelpDesk System. You may also browse other Magento 2 marketplace addons and our quality Magento 2 extensions.
Current Product Version - 5.0.1
Supported Framework Version - Magento 2.0.x, 2.1.x, 2.2.x,2.3.x, 2.4.x

Be the first to comment.