Magento 2 A/B Testing Extension allows the store owners to create multiple variants of their websites that will be accessible to the customers. This will help the admin to understand the criteria of conversion rates and more customer visits to the website.
Further, the admin can create multiple variants by providing them an exuberant view and feel and the customer will get to see the exciting views whenever they visit the store or website.
The variations can be created from the particular Product Page, Category Page, or the CMS Pages.
Further, Magento 2 A/B Testing will help in reducing the cart abandonment as we can check that in which view the cart abandonment is at maximum and we can remove those variations for future benefits.
Similarly, we can make those variants permanent which are providing us good benefits and conversion rates. The admin can change the design and format, fonts, navigation, and content of the website.
Features
- Run numerous a/b tests simultaneously.
- Test particular attributes for a group of products at a time.
- Test product page design.
- Get informative stats reports.
- The admin can manage the test duration.
- Admin can select options on how variants will be displayed to customers.
- Display test variants to customers according to conversion rates.
- The admin can also have a review of the new variant.
- The admin will also create the goals for the test cases.
- Compatible with Magento 2.3.x and 2.4.x.
Installation
Customers will get a zip folder and they have to extract the contents of this zip folder on their system. The extracted folder has an src folder, inside the src folder you have the app folder.
Further, the admin need to transfer this app folder into the Magento2 root directory on the server as shown below.

After the successful installation of Magento 2 A/B Testing module, you have to run these commands in the Magento2 root directory:
First command –
| 1 | php bin/magento setup:upgrade |
Second Command –
| 2 | php bin/magento setup:di:compile |
Third Command –
| 3 | php bin/magento setup:static-content:deploy |
Fourth Command –
| 4 | php bin/magento indexer:reindex |
After running the commands, you have to flush the cache from Magento admin panel by navigating through->System->Cache management as shown below.

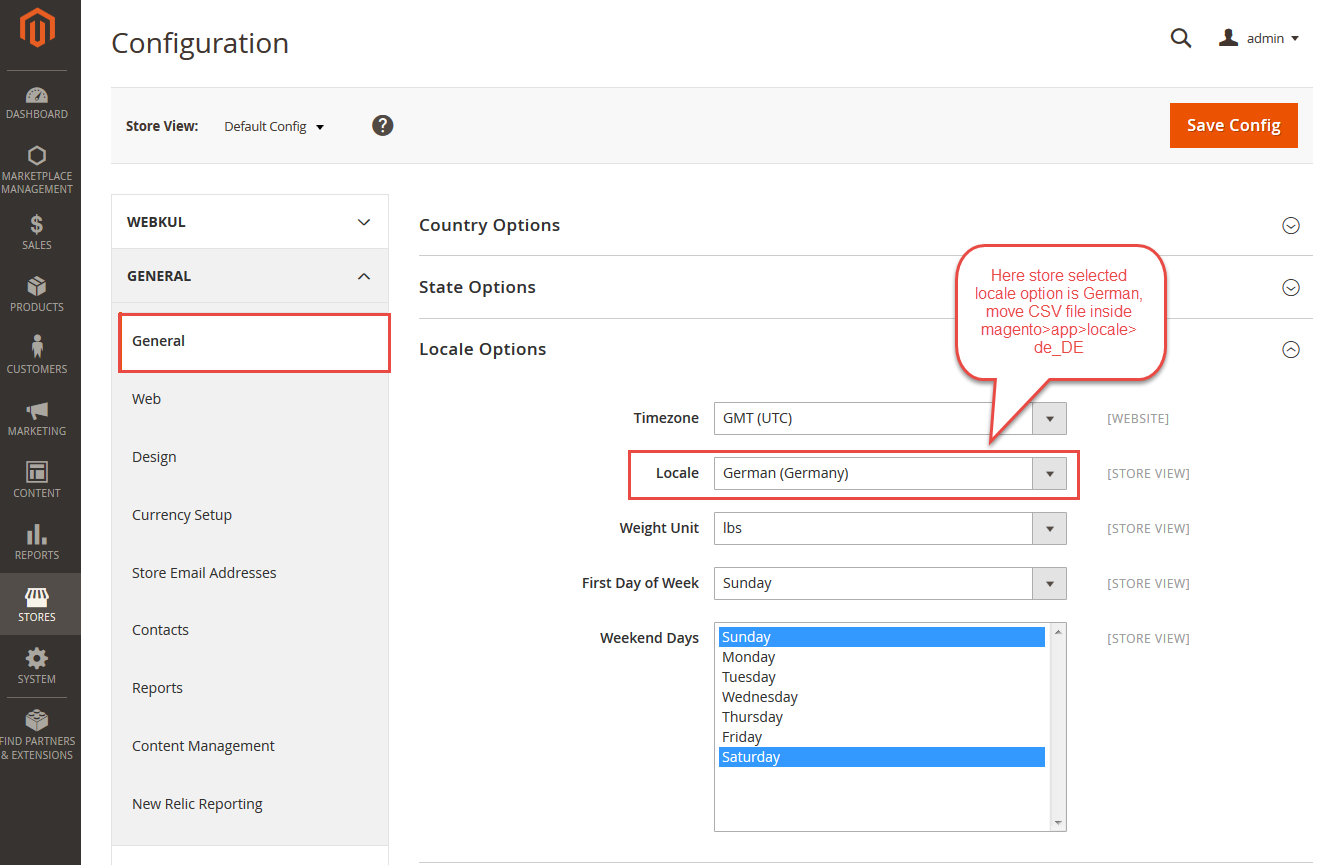
Configuration of Multi-Lingual
For the multilingual support, the admin will navigate through Store > Configuration > General ->Locale Options and select the locale as German (the language into which admin wants to translate his store content).
Language Translation
If you need to do the module translation, please navigate the following path in your system. app/code/Webkul/A/B Testing/i18n. Open the file named en_US.CSV for editing as shown in below screenshot.

Once you have opened the file for editing. Replace the words after the comma(,) on the right with your translated words.
After editing the CSV file, save it and then upload it to the same folder. Now your Magento 2 A/B Testing module translation is complete.

Admin Permissions
After the successful installation of the Magento 2 A/B Testing module, the admin can now manage the configuration by navigating to Stores > Configuration > AB Testing. There the admin will fiend the following fields to manage:

Enable: By setting this to Yes, the admin can enable the module functionalities.
Select Your Pattern: The admin can select the patterns among Show different variants to customers or show the same variant to customers.
Manage Selectors
After configuring the account from the backend, the admin will now manage the selectors. For this, the admin will navigate to AB Testing > Manage Selectors and then the View selectors page will be visible under the Upload Selectors CSV Tab as shown in the image below:

Further, the admin will upload the CSV file to inherit the classes. The reference CSV is available that can be downloaded and the admin can also add some new classes to it.
Once the CSV file is added successfully the admin will check it under the View Selectors tab as shown in the image below:

The list of classes will appear to the admin that are available in the CSV file.
Note:
- For editing any existing class or adding the new one, the admin requires to edit the CSV file and then upload the fresh CSV again.
- Without uploading CSV file, the test scenario will not work.
Test Analysis
Further, the admin will manage the test analysis by creating multiple test cases. For this the admin will navigate to AB Testing > Test Analysis. There the list of cases will appear as shown in the image below:

The admin can add the new test case by clicking on the Add Test button as marked in the image above.
After that, a form will appear as shown in the image below, mentioning the information of the test case. The admin needs to provide information about the Test Information Details and Control Url Information as shown in the image below:

Test Information Details
- Start Test: The admin will set the toggle to Yes for starting the test.
- Test Case: The admin will enter the name of the test case.
- Assumptions: The admin will enter assumption for the test case.
- Run From: The admin will select starting date and timing of test.
- Run To: The admin will select end date and timing of test.
Control Url Information
- URL Type: The admin can select the URL Type among Specific URL and Default Pages. The specific URL is selected and shown in the image above. In this, the admin needs to enter the specific URL for which the test case will function.
URL Type – Default Pages
Whereas, if the URL Type is selected as Default pages then the admin will have to select the default pages and its associated details as mentioned below for multiple pages.
Category Page: If the default page is selected as a category page, then the admin will select the category on which the test cases will be applied.

Product Page: If the admin selects the default page as product page, then the admin will select the product on which the test will be applicable.

CMS Page: If the admin selects the default page as CMS page, then the admin will select the CMS page on which the test will be applicable.

Create New Test Case
Once the test case is created, the admin will be able to see the success message as shown in the image below:

Meanwhile, the admin will check the information under the Info tab.

Also, admin will check the Control Page URL details as shown in the image below :

Add Variants
Further, the admin will add new variants under the Variants tab, By clicking on the Add Variant button as shown in the image below:

Further, the admin will add new variants as per the requirement. The admin can add as many variants as needed. After that, the admin will click on the Save button to see the new variants.

Once the variants are successfully created, the admin will see the success message as shown in the image below:

Further, the admin needs to create the variants for the frontend. For this, the admin will click on the view button for each variant specifically to create their variants. This will direct the admin to the page shown in the image below:

The dotted box will appear around the content that is editable on the page. The admin will click on the desired box and the editor will appear as shown in the image below:

After making the changes the admin needs to click on the save button for the editor and the page also. Otherwise the changes will not get saved. Once t\he changes are saved, the popup will appear with the success message.

After that, the admin can preview the changes by clicking on the Preview Page button available on the top right corner.

The preview will be visible to the admin as shown in the image below:

Below is the preview shown for the Italic variant:

Like this, the admin will change the look and feel of multiple variants.
Add Goals
After creating the variants, the admin will now create the goals for the test case under the Goals tab. For this, the admin will click on the Add Goals button.

After that, a form will appear in which the admin needs to enter the goal information.

Field Description of Goals Information:
Goal Name: The admin will add the name of the goal.
Goal Description: The description of the goal is also required.
Track Types: The admin will then select the track type among Magento Defaults and Custom Type. Both the options have different results and functionalities.
- Magento Defaults: When the option is selected then the admin will select the tracks available in the dropdown as shown in the image below:

- Custom Type: When this option is selected, then the admin can select custom pages or products.
- Tracks: The options available under this section are Track Pages Visit On and Click On Element.
- Track Pages Visit On: If this option is selected then the admin needs to provide the Condition and URL as shown in the image below. The condition will be either Matches or Likes:

- Click On Element: For this, the admin needs to enter the CSS selector as added in the selector list.

Finally, after clicking on the save button the success message for goal creation will be visible as shown in the image below:

Reports
Once the variants and goals are added, the admin will now check the reports depending on the customer visits on the frontend. The track will be visible in the graphs as shown in the image below

Customer Frontend View
Once the variants are created the test case will start working with the goals. The customer can see the variants on the frontend. The view will show all the changes done by the admin.
Some variants are shown in the image below:

The review form is also looking amazing with the variants shown in the image below:

The customer needs to clear the site storage to get better results. For this the customer needs to inspect the screen. Inspect the screen by right click then select the Inspect option.

After that the customer will navigate to Application > Clear Storage, and then tap on the Clear Site Data button as shown in the image below:

That’s all for the Magento 2 A/B Testing. Still, have any issues please email us at [email protected] else you can generate a ticket at https//webkul.uvdesk.com/en/
Current Product Version - 3.0.0
Supported Framework Version - Magento, 2.0.x , 2.1.x, 2.2.x, 2.3.x

2 comments
If you have specific requirements for A/B testing based on the device type it will be done through customization. Please email us your complete requirements at [email protected] and we will get back to you accordingly.
Thank You
Webkul Team