Blog Manager for Magento – This module allows the customers to create blog posts in the store. The customers can edit and delete the post. The admin can approve or disapprove the request from the customer to be a blogger. The admin can view or delete the post from the backend. It can also approve, disapprove or delete comments on the posts. This module will enhance the feature of adding blogs to your store. It will help to create a strong relationship between store and customers.
This Module is also Available for Magento2
Features
- The admin can specify the word limit for a blog post.
- Any logged in customer can request for becoming a blogger.
- The admin can auto approve or manually approve the blogger request as per the requirement.
- The admin can set which customers are permitted or not permitted to create a blog.
- An email is sent to the customer when the admin approves/disapproves the blog user.
- The admin can create blog categories from the backend.
- The blog users can add meta keyword, meta description, tags, images, links to a post.
- The blog users can edit or delete the submitted posts.
- Anybody can view the blogs without even logging into the store.
- The admin can delete the blog post from the backend.
- An email is sent to the bloggers when admin approves/disapproves bloggers posts.
- A guest user can also add a comment on the blog post.
- An email is sent to bloggers when any user posts any comment on their blog.
- The admin can approve, disapprove or delete the post comments.
Installation
Installation of the module is super easy you need to move the app and skin folder into Magento root directory.

After moving both the folder flush the cache from Magento admin module. Under System > Cache management.

Blog Manager Module Configuration
Blog Manager Module Configuration
Navigate through System>Configuration>Webkul Blog.
The admin can fix the maximum number of words allowed in a blog via Set Limit For Blog option.
The admin can set the configuration for the approval of Comment Display(comments on the blog), blogger and blogs. The configuration can be set to Manual or Auto(for automatic approval)
Enter the word limit value and click Save Config.

Admin Management
Webkul Blog
After the module installation, the admin will find the blog manager menu in the backend admin panel. From Webkul Blog menu, the admin will find Mange Blog, Manage Bloggers, and Manage Categories.

Manage Bloggers
If the admin has set the configuration to manually approve the blog user request then to allow customers to add the blog posts, the admin needs to change the blogger status of its customers first.
Navigate through Webkul Blog>Manage Bloggers. From here, the admin can view the all the list of customers with their name, email, blogger status, contact and address details.
Actions – Use this option to change the blogger status – Is Permitted or Not Permitted.
Search a blogger from the list using a name, email, blogger status or contact details.

Manage Categories
The admin can manage the categories of the blogs. Navigate to Webkul Blog>Categories. The following page will open. From here the admin can view all the blog categories created with the category name, ID, created at, and status.
Add New Category – To create a new blog category for the customers, click Add New Category.
Actions – Use this option to change blog category status or to delete a blog category.
Search a blog category using category name and click Submit.

Add New Category
After clicking the Add New Category button, following page will open. Enter the new blog Category Name and set the status as Enable. Click Save to apply your changes.

Manage Blogs
To manage all the blogs of the store navigate through Webkul Blog>Manage Blog. From here the admin can view all the blog posts submitted by the customers. The admin can view the blog ID, blogger name, email, post title, and created date & time.
Actions – To delete a blog from the list, use this actions menu and select Delete option.
Search – To find any specific blog from the list, use the blogger name, email, or title.

View Comments
When someone comments on a blog, the admin needs to approve it first to make it visible on the front-end. To manage blog posts comments navigate through Webkul Blog>Manage Blog>View. The following page will open. From here the admin can view all the comments. It can approve, disapprove or delete the comments.

Customer panel
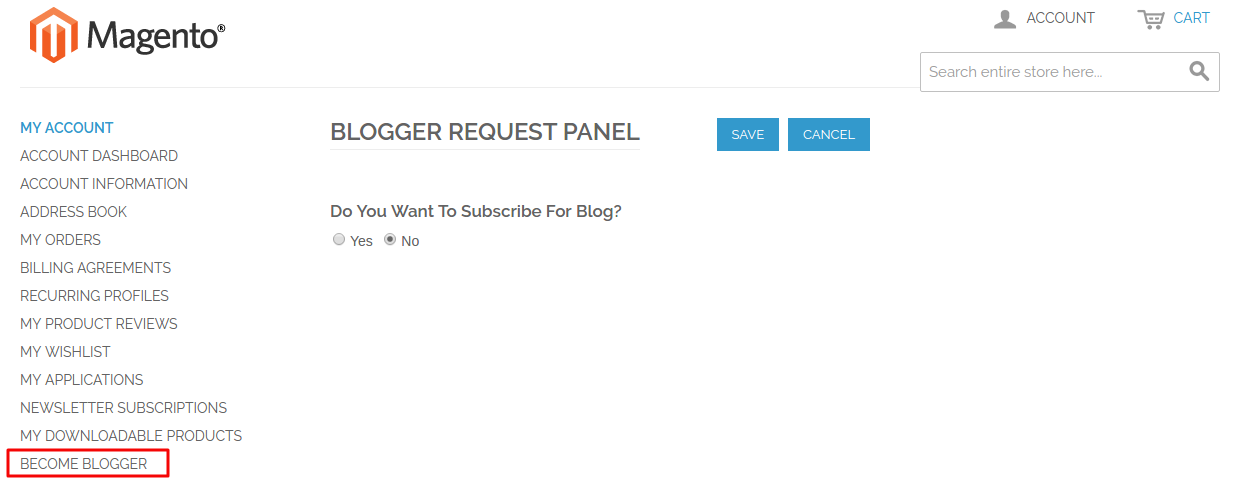
If any registered customer wants to be a blogger then he/she can subscribe to adding blogs. The blogger request can be generated by navigating through My Account > Become Blogger. The user can set the request to Yes and save for requesting to become a blogger.
In the customer panel, the permitted customer from the admin can see a field on the left side menu “BLOG”. On mouse hover the submenus will be open, you can see it in this screenshot. Add New and View All Post.

Add New Post
The customers can create a blog post using two ways. The first option is to navigate through My Account>Blog>Add New. The second option is to navigate through My Account>Blog>View Post>Add Post. The customer needs to fill in the following details:
Category – Select the blog category of the post.
Title – Enter the title of the post.
Meta Keywords – Enter the meta keywords separated by commas for search engine optimization.
Meta Description – Enter the meta description for search engine optimization.
Content – Enter the content/body of the post. Please enter the words according to the limit specified.
Tag – Enter the tags for searching this post.
Click the Save button, after entering all the required information.

View Post
The customer can view their own blogs from “View post”. The customer can manage the blogs i.e they edit or delete the post also.

Front end view
From the front-end, the users can view the blogs of the store by navigating through Account>Blog. Any user can see the blog posts without even logging into the store.

Blog Page
All the blogs of the store can be seen here. To view a post simply click on the title, a new page will open.
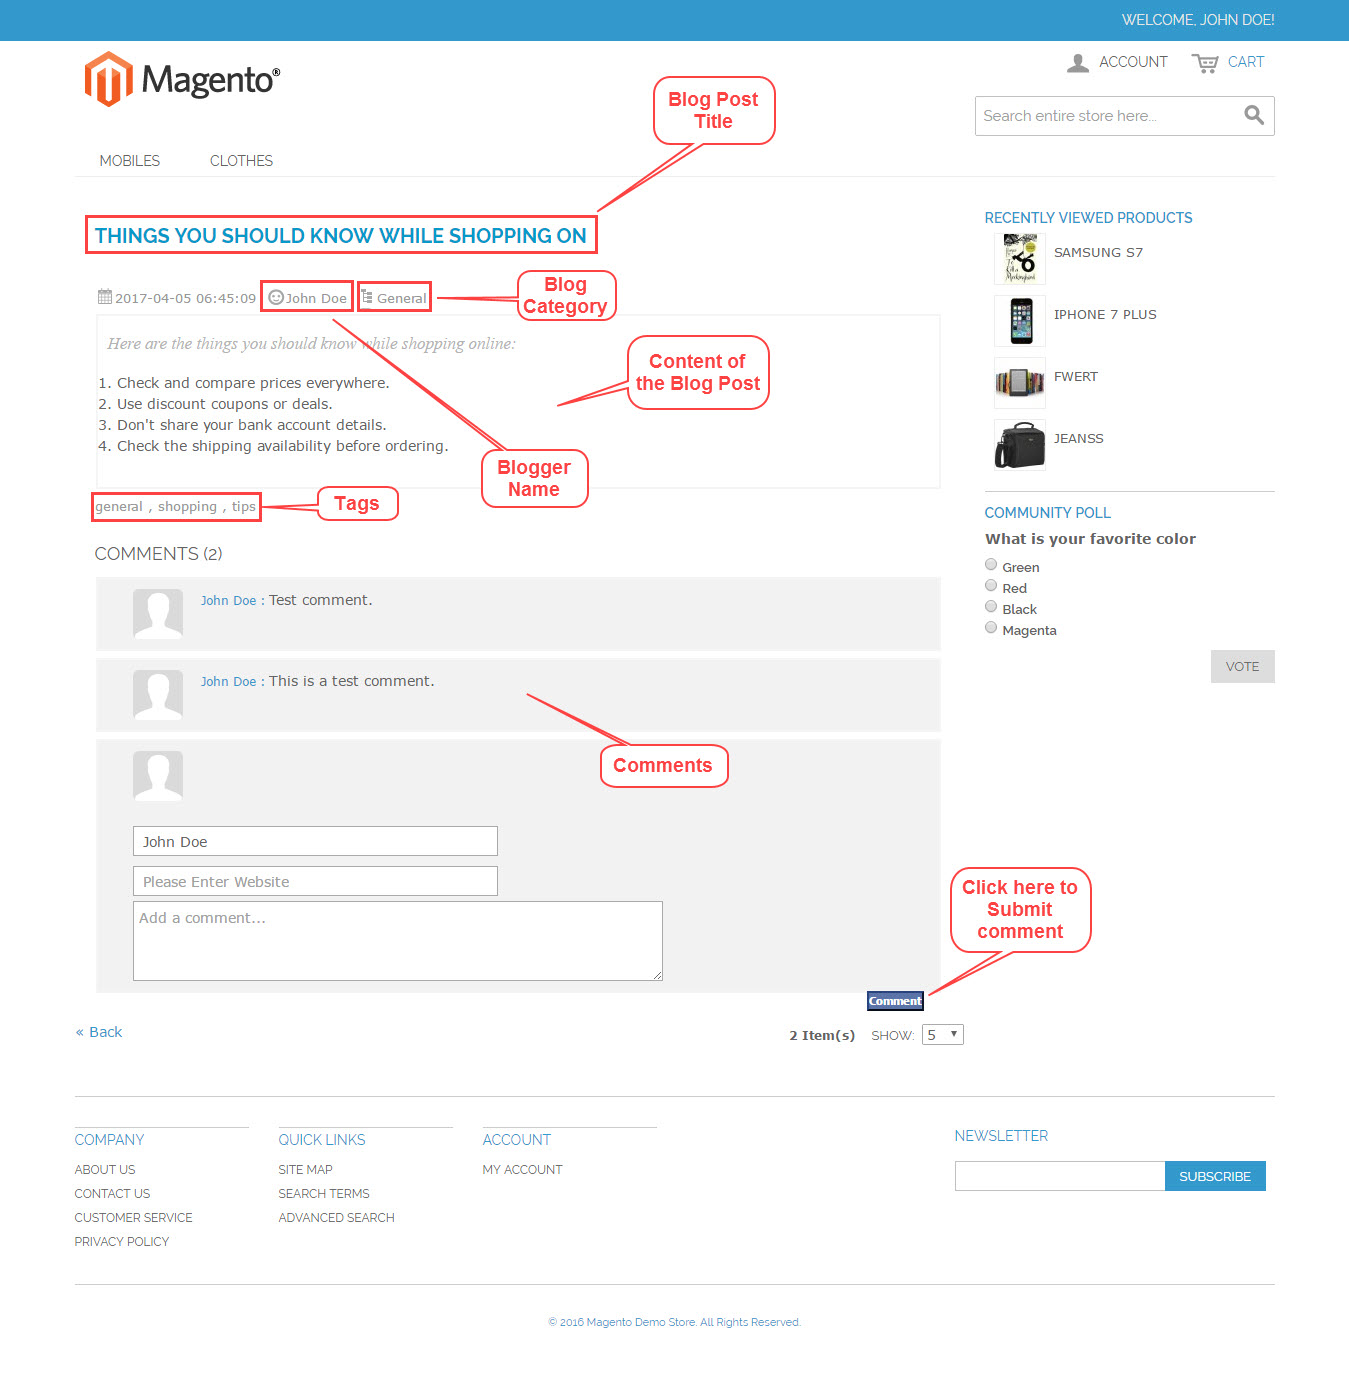
 Post Page
When a user clicks the blog title, it will go to the blog post page. From here the user can view the complete post. The user can view the blogger name, blog category, tags, and comments.
To add a comment on the blog post, simply enter your name and write anything in the comment section. Click Comment button to submit the comment for approval. Guest users can also add the comments on the blog posts.
That’s all for the Blog Manager For Magento Still have any issue feel free to add a ticket and let us know your views to make the module better webkul.uvdesk.com
Current Product Version - 1.0.1
Supported Framework Version - 1.6.x.x , 1.7.x.x , 1.8.x.x , 1.9.x.x

Be the first to comment.