Laravel SaaS USPS Shipping allows the super admin to enable the USPS shipping method. It automatically calculates the cost of shipment from the tenant’s origin address to the delivery location.
The tenant can enable the USPS shipping method for his products and select the allowed USPS shipping method along with the container type as well.
Note – This is a SaaS add-on, so you need to install Laravel eCommerce Multi Company SAAS Module.
If you’re looking to enable booking type products in your multi tenant saas laravel store, then you can check the Multi Tenant Saas Booking Product extension.
Features of Laravel SaaS USPS Shipping
- The tenant can enable/disable this shipping method.
- The tenant can choose the title and description for the storefront for this method.
- Allows tenants to choose shipping methods under USPS shipping services.
- The tenant also can define the allowed methods.
- Tenants can define the container type as well.
- Bagisto v2.4.1
- Laravel SAAS v2.4.1
- Laravel USPS Shipping v2.4.1
How to install the module Laravel SaaS USPS Shipping?
- Unzip the respective extension zip and then merge “packages” folders into the project root directory.
- Add the following PSR-4 autoload entries to the root
composer.jsonunder theautoload.psr-4section:
"Webkul\\UspsShipping\\": "packages/Webkul/UspsShipping/src",
"Webkul\\UspsShippingSaas\\": "packages/Webkul/UspsShippingSaas/src"
- Run the following command to refresh the autoload files:
composer dump-autoload
- Add the following service providers to
bootstrap/providers.php:
use Webkul\UspsShipping\Providers\UspsShippingServiceProvider;
use Webkul\UspsShippingSaas\Providers\UspsShippingSaasServiceProvider;
return [
    UspsShippingServiceProvider::class,
    UspsShippingSaasServiceProvider::class,
];
Now execute the project on your specified domain.
Laravel SaaS USPS Shipping:- Super Admin Management
After the successful installation, the super admin can log in and then navigate to Configure>>Sales>>Shipping Methods>>USPS Shipping. In the SaaS environment, the super admin area shows an informational notice about the USPS integration. The actual operational settings Client ID, Client Secret, Sandbox mode, container type, dimensions, and allowed services are configured by each tenant individually through their own administration panel under Configure>>Sales>>Shipping Methods.
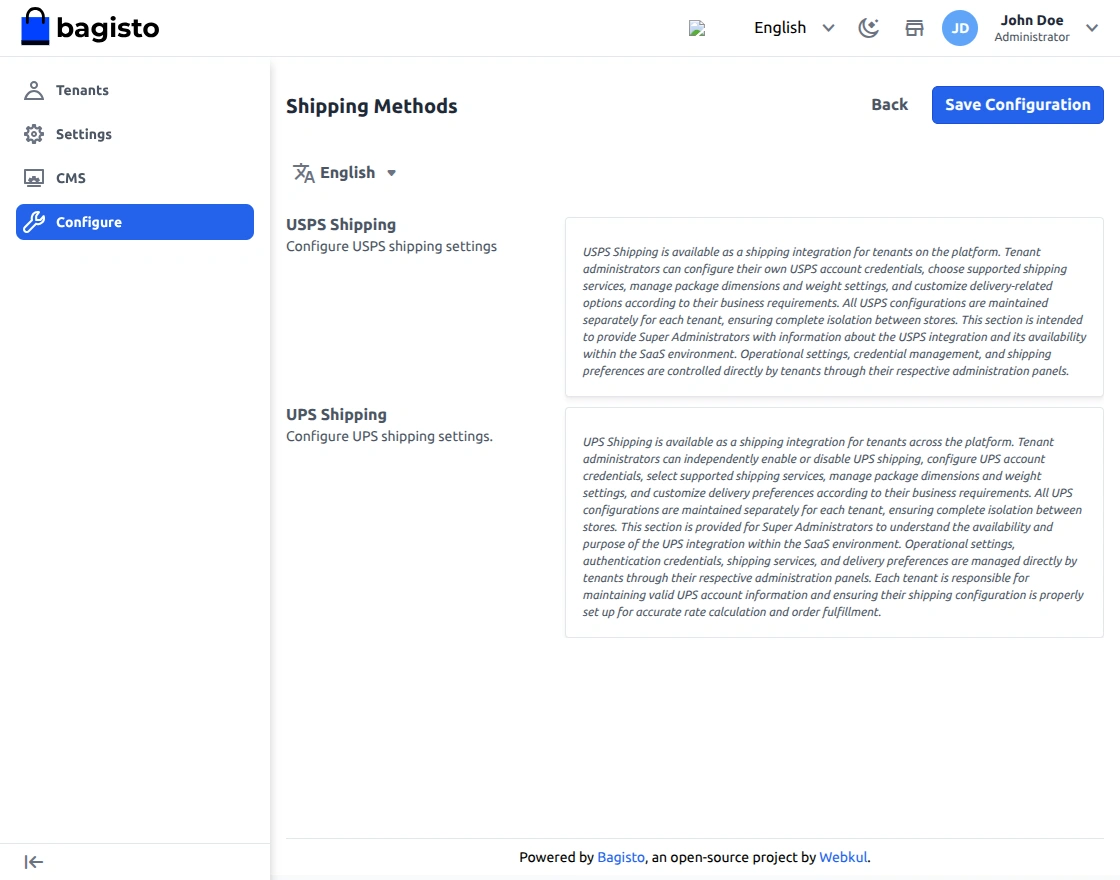
Note: The USPS module now uses OAuth 2.0 authentication. You will need a USPS Client ID and USPS Client Secret instead of the legacy User ID and Password. The Mode field has been replaced with a Sandbox toggle (boolean) to switch between test and live environments.
Laravel SaaS USPS Shipping:- Tenant Management
After the successful installation of the module, the tenant needs to set the origin address, for this, the tenant needs to navigate to Configure>>Sales>>Shipping meathods
Under the Shipping methods, all the shipping methods are visible in the tenant panel including the USPS shipping.
On the above page, the tenant needs to fill in all the details for the origin address as shown above.
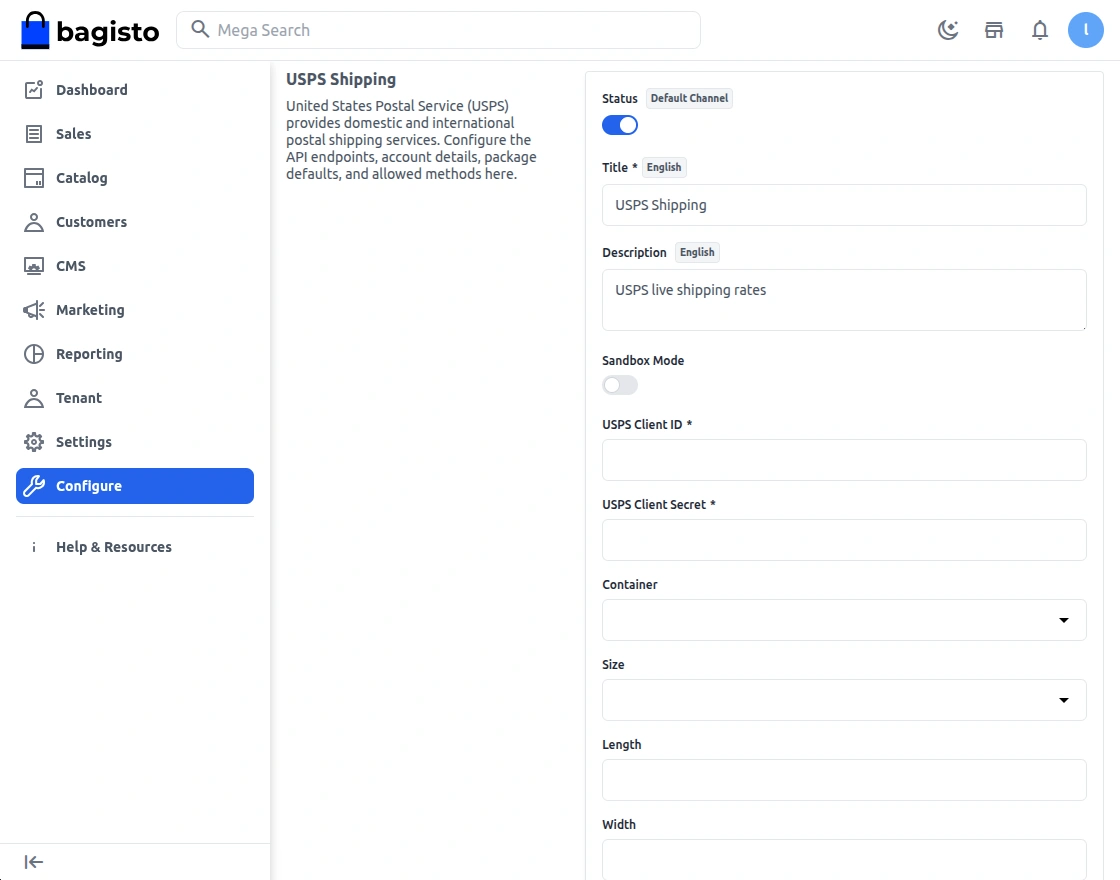
Under the USPS method, there are several fields:-
Status: Enable or disable the USPS Shipping method from this field. When enabled, USPS shipping options will be available for eligible orders during checkout.
Title: Enter the title that will be displayed to customers as the shipping method name during checkout.
Description: Provide a short description of the USPS Shipping method. This information is shown to help customers understand the shipping service.
Sandbox Mode: Enable this option to test USPS shipping integration using USPS sandbox credentials without affecting live shipments.
USPS Client ID: Enter the Client ID provided by USPS. This credential is required to authenticate API requests.
USPS Client Secret: Enter the Client Secret associated with your USPS account. It is used together with the Client ID for secure API authentication.
Container: Specify the package container type that will be used when calculating USPS shipping rates.
Size: Select the package size that best matches your shipment. USPS uses this information when determining shipping costs.
Length: Enter the package length in the configured unit of measurement. This value is used for shipping rate calculations.
Width: Enter the package width in the configured unit of measurement. This value helps USPS calculate accurate shipping rates.
Height: Enter the package height in the configured unit of measurement. USPS considers this dimension when generating shipping quotes.
Machinable: Enable this option if your packages meet USPS machinable standards. Machinable packages may qualify for different shipping rates.
Allowed Methods: Select the USPS shipping services that should be offered to customers during checkout. Only the selected methods will be available for shipping.
Error Message: Enter the message that will be displayed to customers if USPS shipping rates cannot be retrieved or the shipping method becomes unavailable.
Customer Checkout Process
After successfully configuring the USPS shipping by the tenants, the customers can use the shipping method for the delivery of their products at the checkout page.
The customer can select from the allowed services according to the requirements.

Once the order has been placed, the customer can see all the details regarding the order on the order summary page by tapping the respective order number.

The customer can check the details including the shipping method and cost for the delivery of the package as shown below:-

Order Management
The tenant can see all the orders that have been placed under the tenant panel by navigating to Sales>>Orders as shown in the image below:-

The tenant can view the details of any particular order.

Also, tenant can generate order invoice by click on invoice and set the invoice quantity as per below image :

After creating the invoice, tenant can check the order status which will show processing and generated invoice as per below image:

Now the invoice page will be redirected when tenant clicks on view section in order page.

After the invoice is generated, the tenant can to create a new shipment by click on ship as per below image:

After creating shipment, order status will turned as completed as per below image :

Now the shipment page will be redirected when tenant clicks on view section in shipment. Tenant can check complete information in shipment as per below image :

The tenants can refund the respective order by click on refund then create refund request as per below image :

After creating refund request successfully , the tenant can check request in refund section .

The tenant can view order refund successfully as per below image:

The tenant can view the details of any particular order after closing the order.

Support
So, that was much about the User Guide of Laravel SaaS USPS Shipping module for any queries or doubts reach out to us at [email protected]. Also, you can raise a ticket at our HelpDesk System.
Please explore our Laravel Development Services and Quality Bagisto Extensions.
Current Product Version - 2.4.1
Supported Framework Version - 2.4.1

Be the first to comment.