Laravel eCommerce Delivery Time Slot lets customers pick the exact date and time window they want their order delivered in.
Moreover, the admin can create several windows per day and cap each one with an order quota, so a busy afternoon never gets oversold.
This release of the Delivery Time Slot module for Bagisto runs on Bagisto 2.4.9 and adds a rebuilt slot planner, zip-code coverage and a compact checkout picker.
Features
- Allowed delivery days: the admin chooses which weekdays accept deliveries.
- Display window: the admin decides how many upcoming days the storefront lists.
- Processing buffer: a minimum number of days must pass before a slot becomes usable.
- Per-slot quota: each window closes automatically once its booking limit fills.
- Slot Generator: one dialog builds a date’s window from a start time and an end time.
- Month, year and status filters: the planner opens on the current month by default.
- Bulk actions: activate, deactivate or delete several slots in a single step.
- Copy a day: every window on one date can be duplicated onto another date.
- Past-date lock: dates that have already passed reject edits and deletes.
- Booking safety: a slot with live bookings cannot be deleted, only deactivated.
- Zip code ranges: serviceable areas are defined as numeric from-to ranges.
- Product page check: shoppers test their pincode before they ever reach the cart.
- Delivery Orders grid: every booked slot is traceable back to its order.
- Everywhere it matters: the chosen slot prints on the order view, the invoice and the confirmation e-mail.
Installation
First, unzip the extension archive and merge its packages folder into the project root directory.
Next, open bootstrap/providers.php and add the following line inside the array.
Webkul\DeliveryTimeSlot\Providers\DeliveryTimeSlotServiceProvider::class,
Then open composer.json and register the namespace under the psr-4 key.
"Webkul\\DeliveryTimeSlot\\": "packages/Webkul/DeliveryTimeSlot/src"
Finally, run the two commands below to rebuild the autoloader and install the module.
composer dump-autoload
php artisan delivery-time-slot:install
That is it. Consequently, the module is ready and the project can be served on your domain.
Initial Configuration
To configure the module, navigate to Configure >> Delivery Time Slot. The Delivery Time Setting section holds every field.
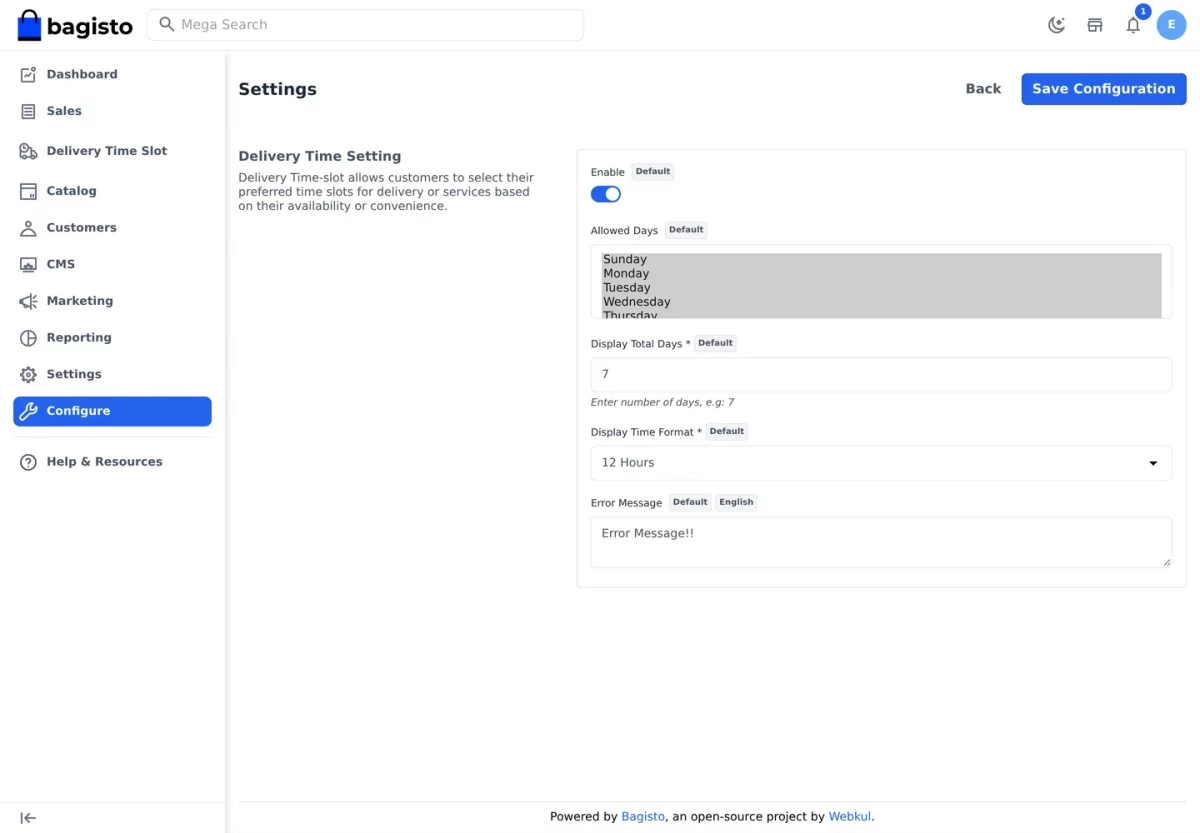
Enable – This switch turns the module on or off across the storefront.
Allowed Days – Select the weekdays that accept deliveries. Consequently, the checkout only offers dates falling on those days.
Display Total Days – Enter how many upcoming delivery dates the storefront should list, for example seven.
Display Time Format – Choose between a 12-hour and a 24-hour clock for every time window shown to shoppers.
Error Message – Type the message shoppers see when no delivery slot is available.
Step-by-Step: Configure the Module
- Log in to the admin panel and open Configure from the sidebar.
- Select Delivery Time Slot in the settings tree.
- Turn Enable on.
- Pick your Allowed Days, then set Display Total Days.
- Choose a Display Time Format and write an Error Message.
- Click Save Configuration.
Afterwards, a Delivery Time Slot entry appears in the sidebar with three screens: Default Delivery Time Slots, Zip Codes and Delivery Orders.
Default Delivery Time Slots
This screen is the planner. At the top, Minimum days required in order processing for shipment sets the buffer between an order and its earliest delivery date.
Below it, the Month, Year and Status filters narrow the list. By default, the planner opens on the current month with the newest dates first.
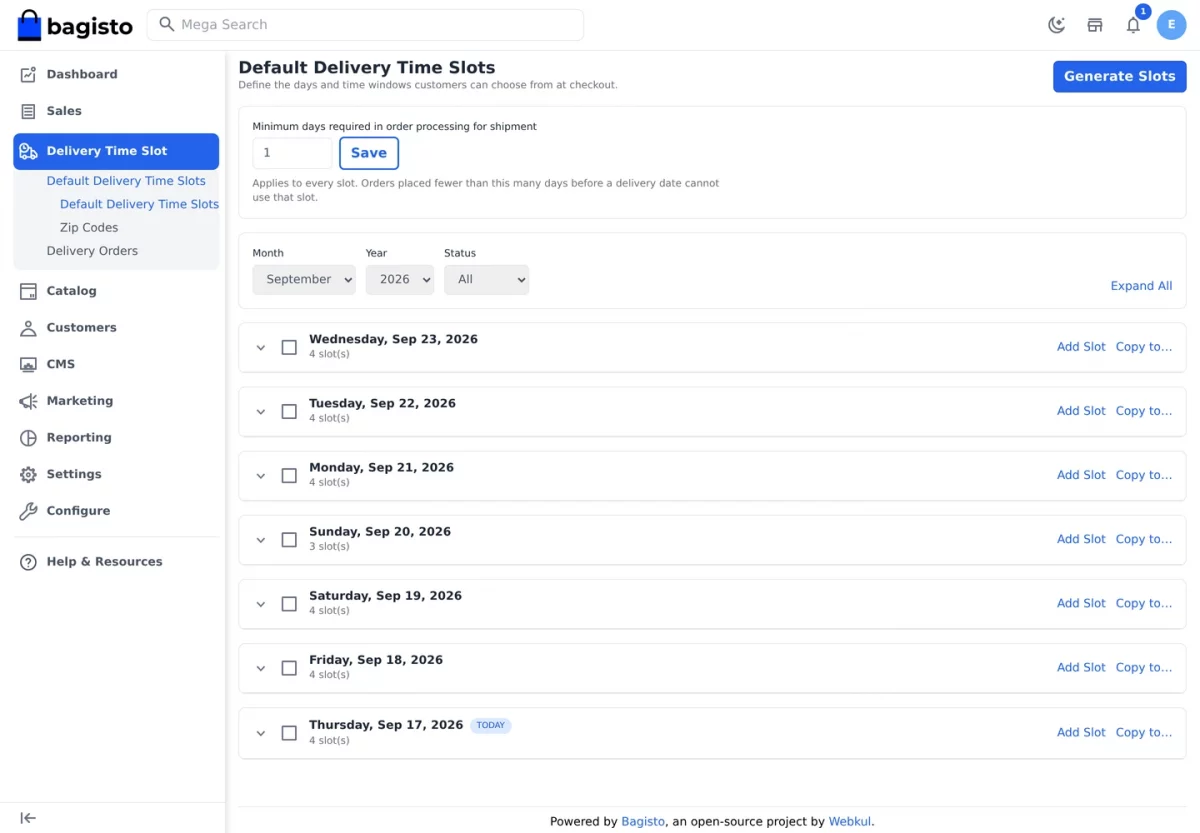
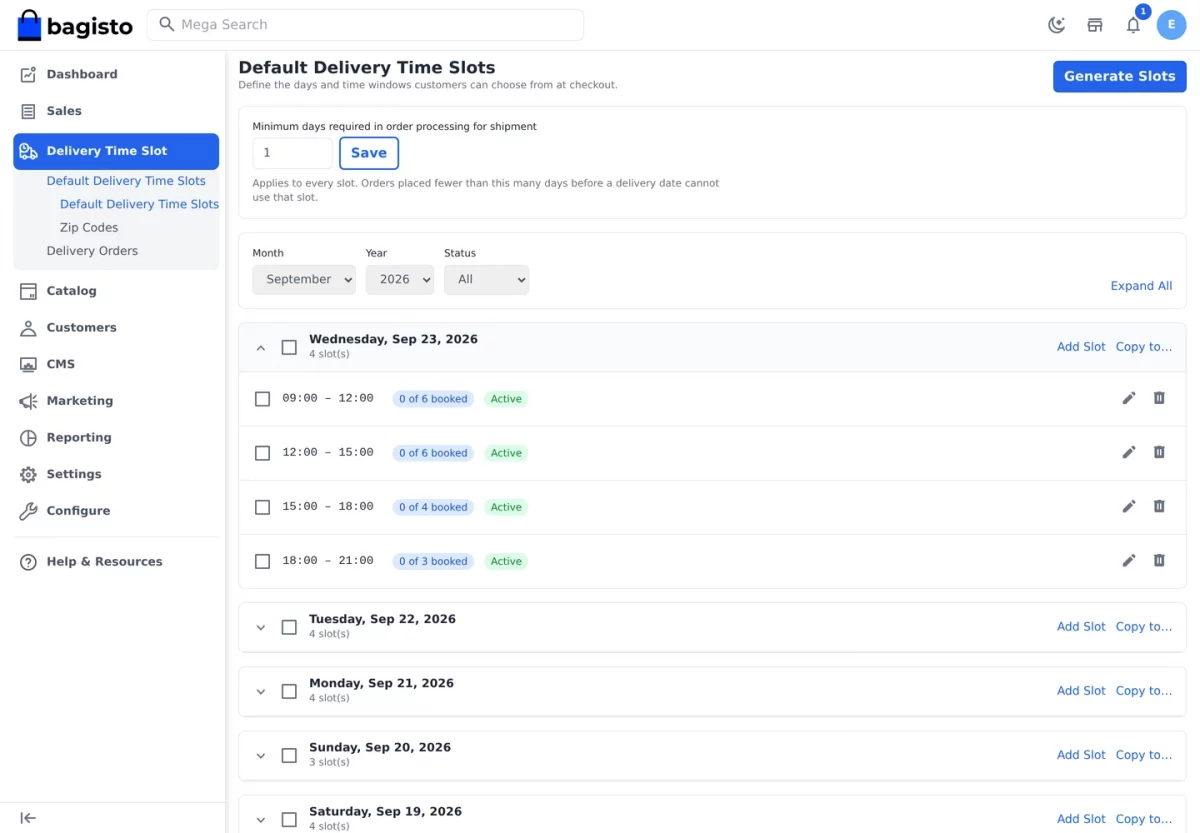
Each date is a collapsed accordion. Clicking a date header expands it and reveals every window on that day.
Furthermore, every row carries a booking badge such as 0 of 6 booked, so remaining capacity is visible at a glance.
Editing happens in place. Clicking the pencil icon turns the row into a small form for start time, end time, quota and status.
Notably, a blank quota means unlimited bookings, while overlapping windows on the same date are rejected before they are saved.
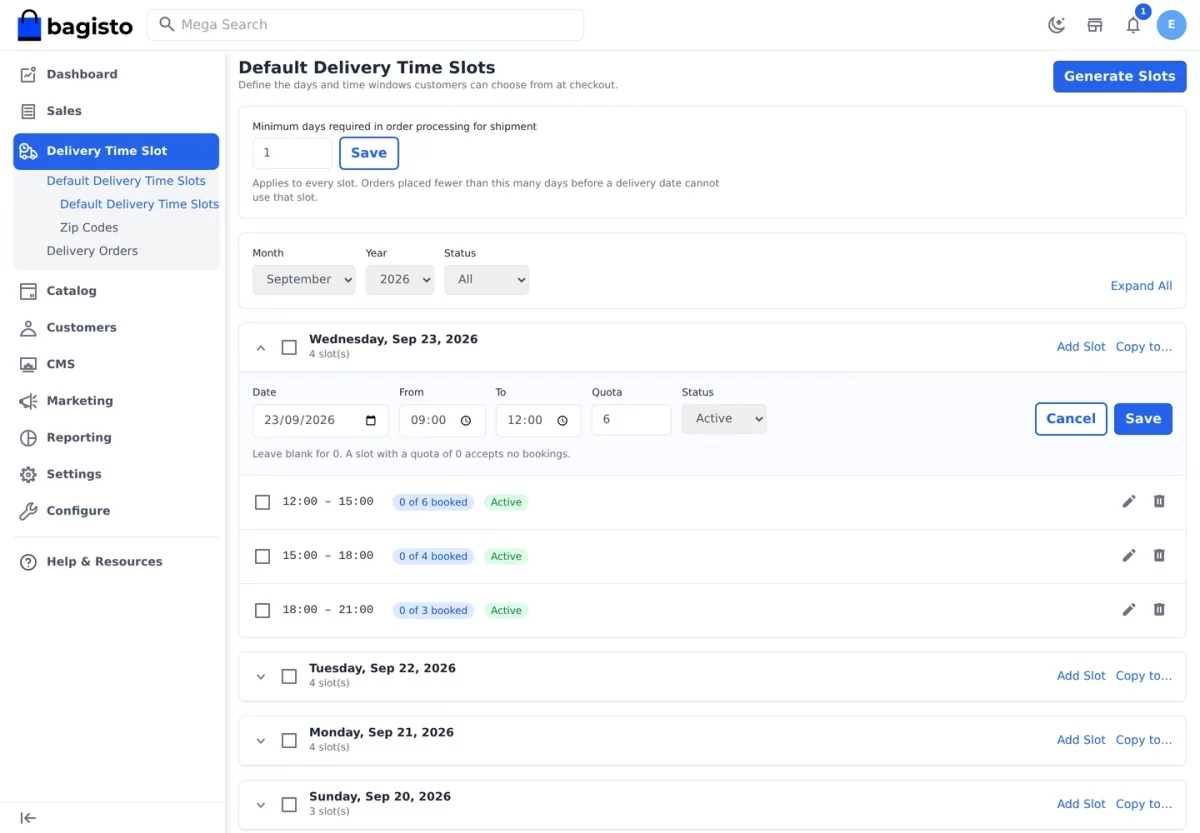
Step-by-Step: Add and Edit a Slot
- Open Delivery Time Slot >> Default Delivery Time Slots.
- Choose the Month and Year you want to plan.
- Click Add Slot on the date you are working on.
- Fill the start time, the end time and an optional quota.
- Save the row. To change it later, expand the date and click the pencil icon.
- Use Copy to… on a date header to duplicate the whole day elsewhere.
Slot Generator
Building a schedule row by row is slow. Therefore, the Generate Slots button opens a dialog that creates a window for one date in a single step.
The dialog asks for a Delivery Date, a Day Starts At time, a Day Ends At time, a Quota and a Status.
Additionally, a live Preview panel shows exactly what will be created before anything is written.
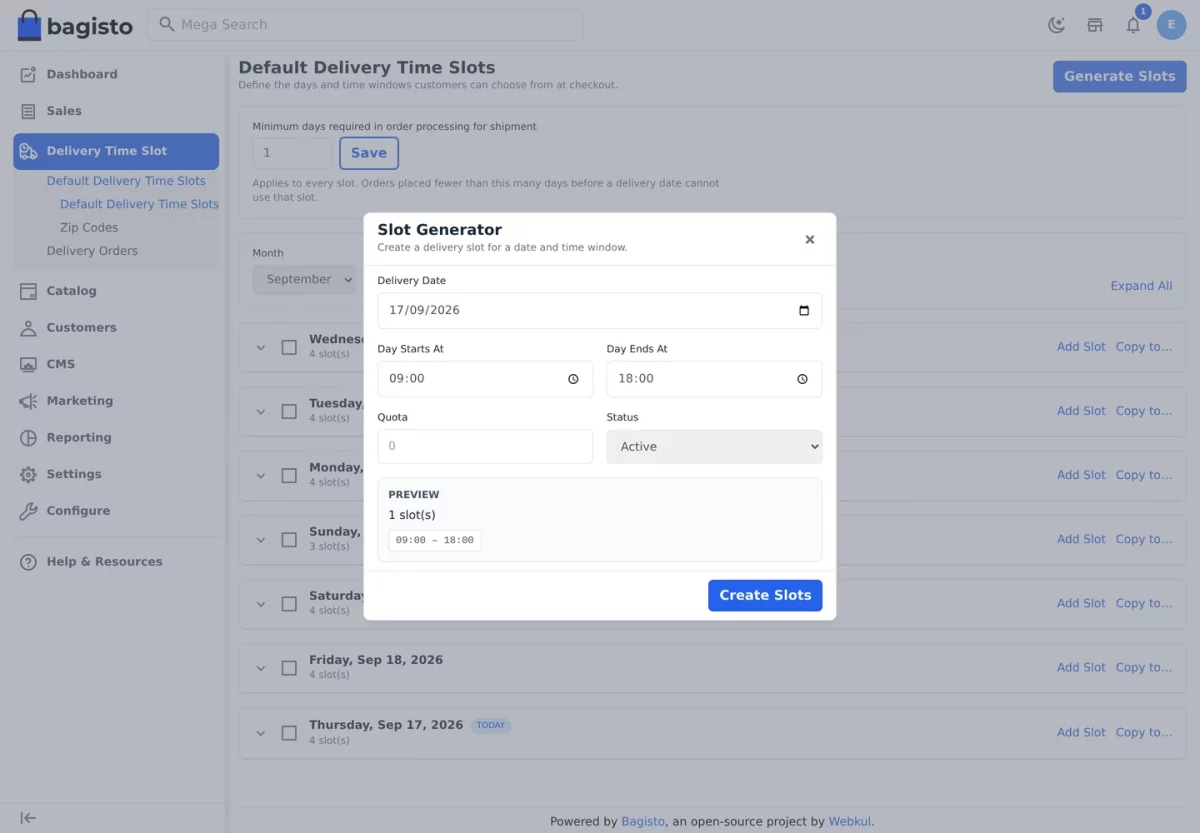
Step-by-Step: Generate Slots
- Click Generate Slots at the top right of the planner.
- Pick the Delivery Date you want to open up.
- Set Day Starts At and Day Ends At.
- Enter a Quota, or leave it blank for unlimited bookings.
- Check the Preview, then click Create Slots.
Zip Codes
The Zip Codes screen defines where you actually deliver. Each record is a numeric range with a Zip From and a Zip To value.
As a result, one row can cover a whole city, and several rows together describe the full delivery footprint.
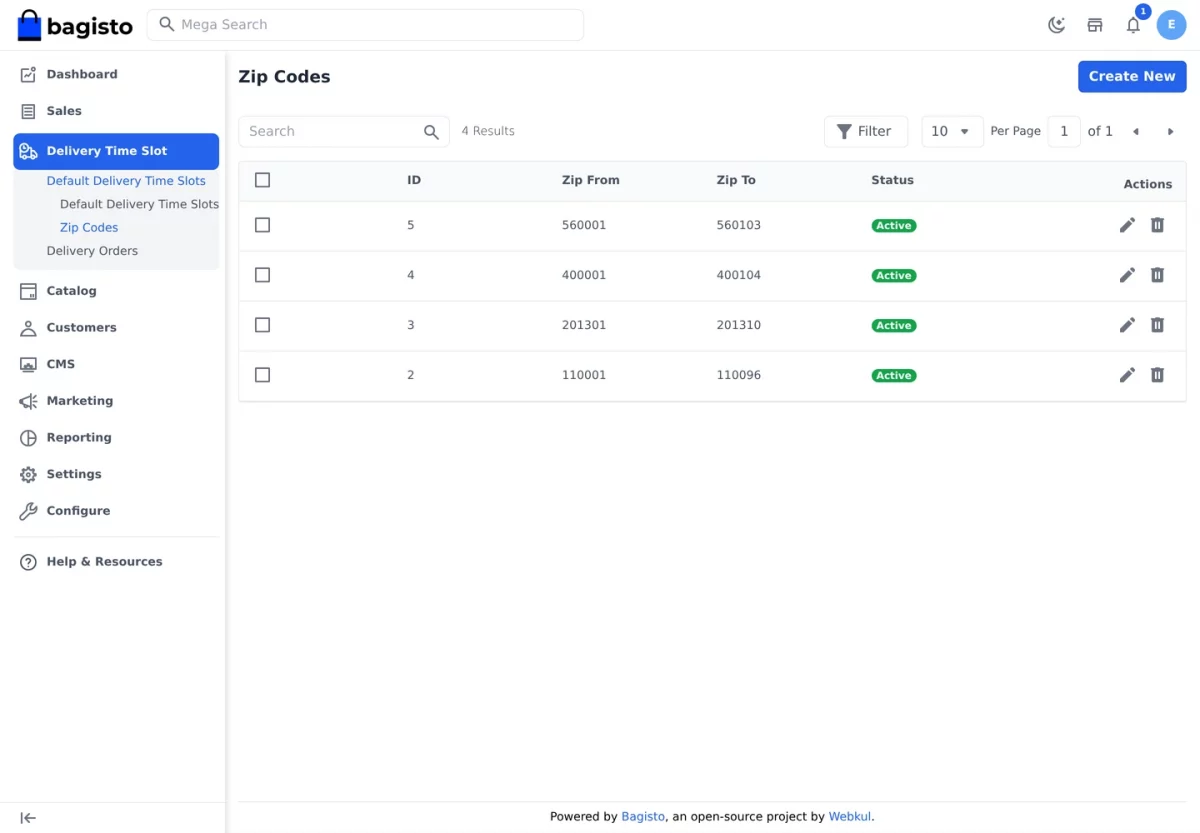
Creating a range is a three-field form. Moreover, a Status toggle lets you retire an area without deleting its history.
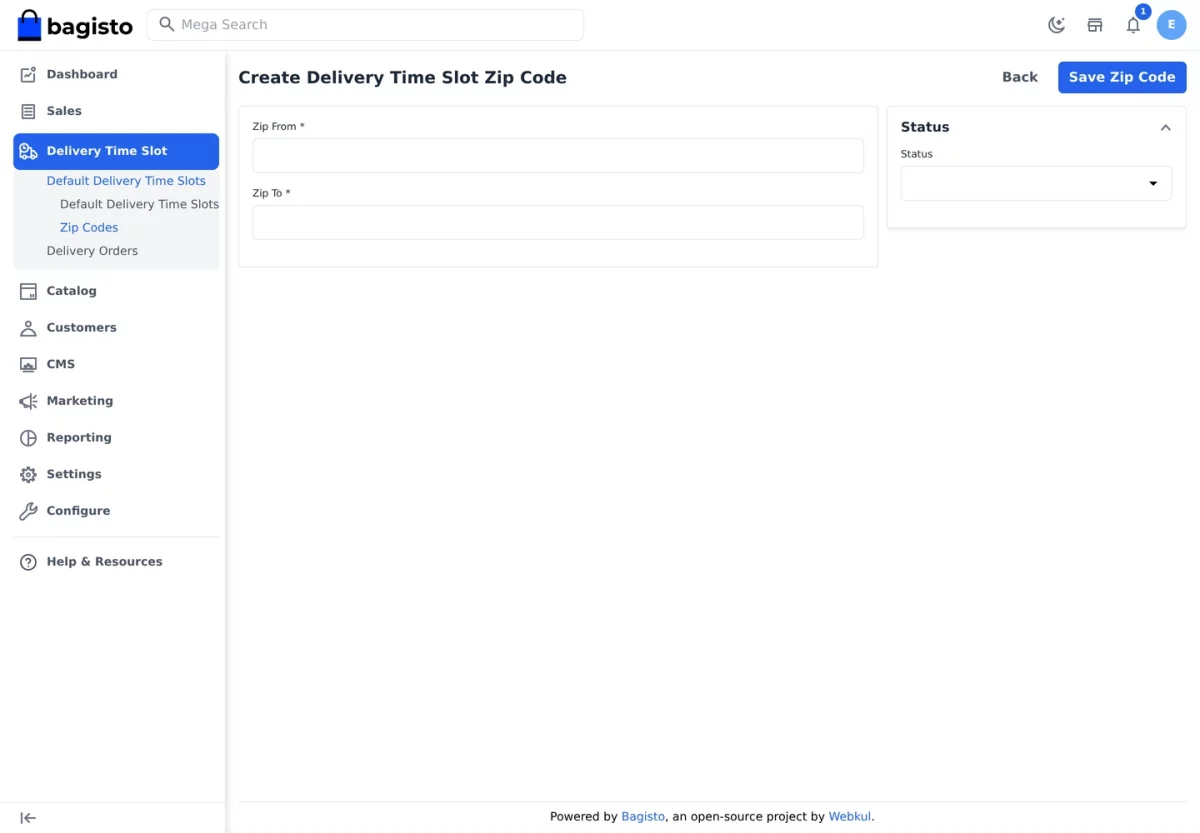
Step-by-Step: Add a Serviceable Area
- Open Delivery Time Slot >> Zip Codes.
- Click Create Zip Code.
- Enter the lowest pincode in Zip From.
- Enter the highest pincode in Zip To.
- Set Status to active, then click Save.
Delivery Orders
Under Delivery Orders, the admin finds every order that booked a slot, together with its date and time window.
Additionally, the grid filters by customer, order status and delivery date, which makes planning a day’s dispatch straightforward.
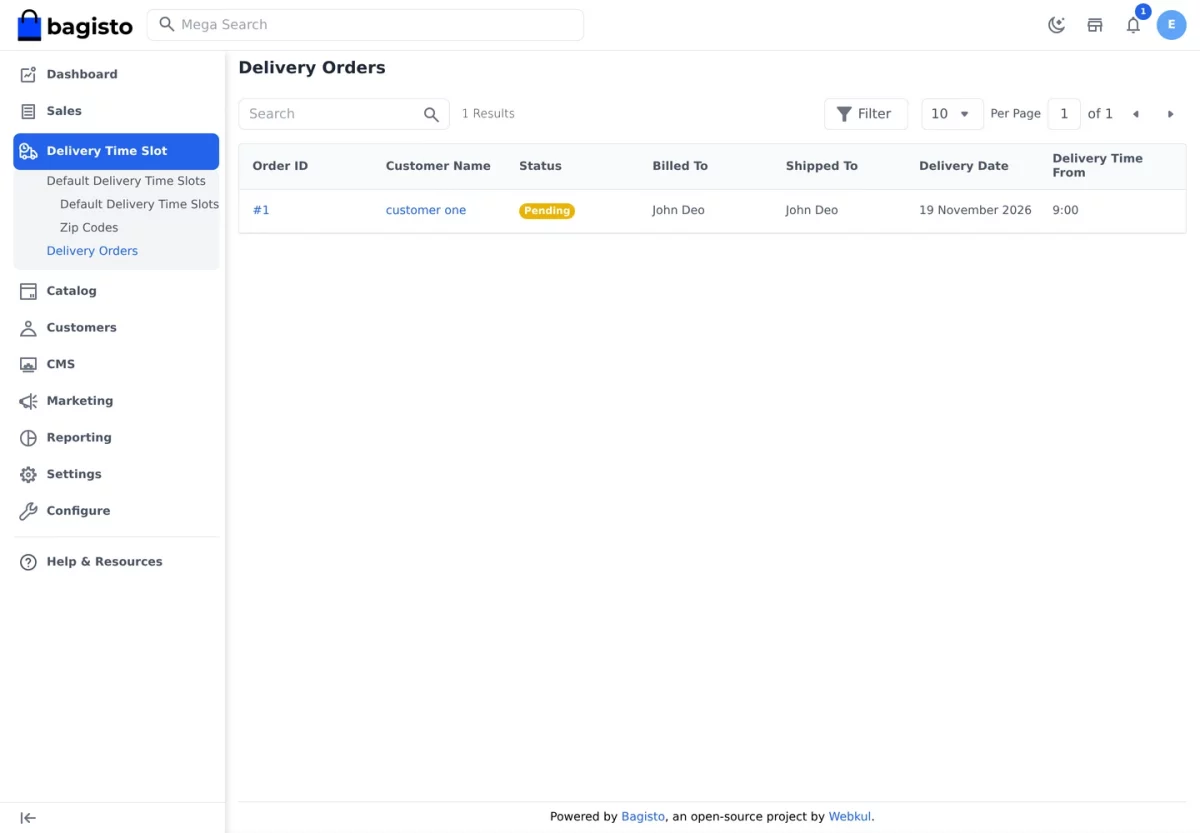
Step-by-Step: Track a Delivery Order
- Open Delivery Time Slot >> Delivery Orders.
- Filter the grid by delivery date or order status.
- Read the booked window directly in the row.
- Click the order ID to open the full order view.
- Alternatively, click a booking badge in the planner to jump straight to that slot’s orders.
Frontend – Workflow
Delivery Availability on the Product Page
Shoppers meet the module long before checkout. On every product page, a Check Delivery Availability widget asks for a pincode.
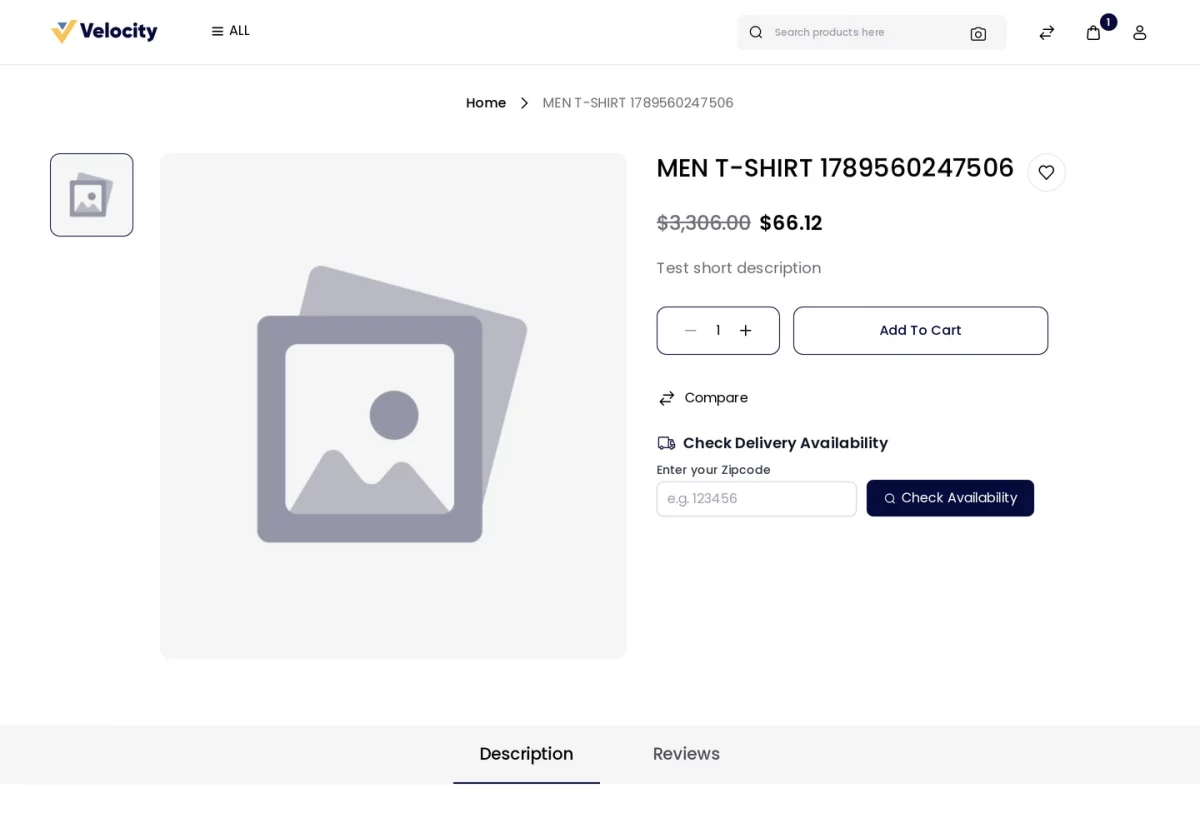
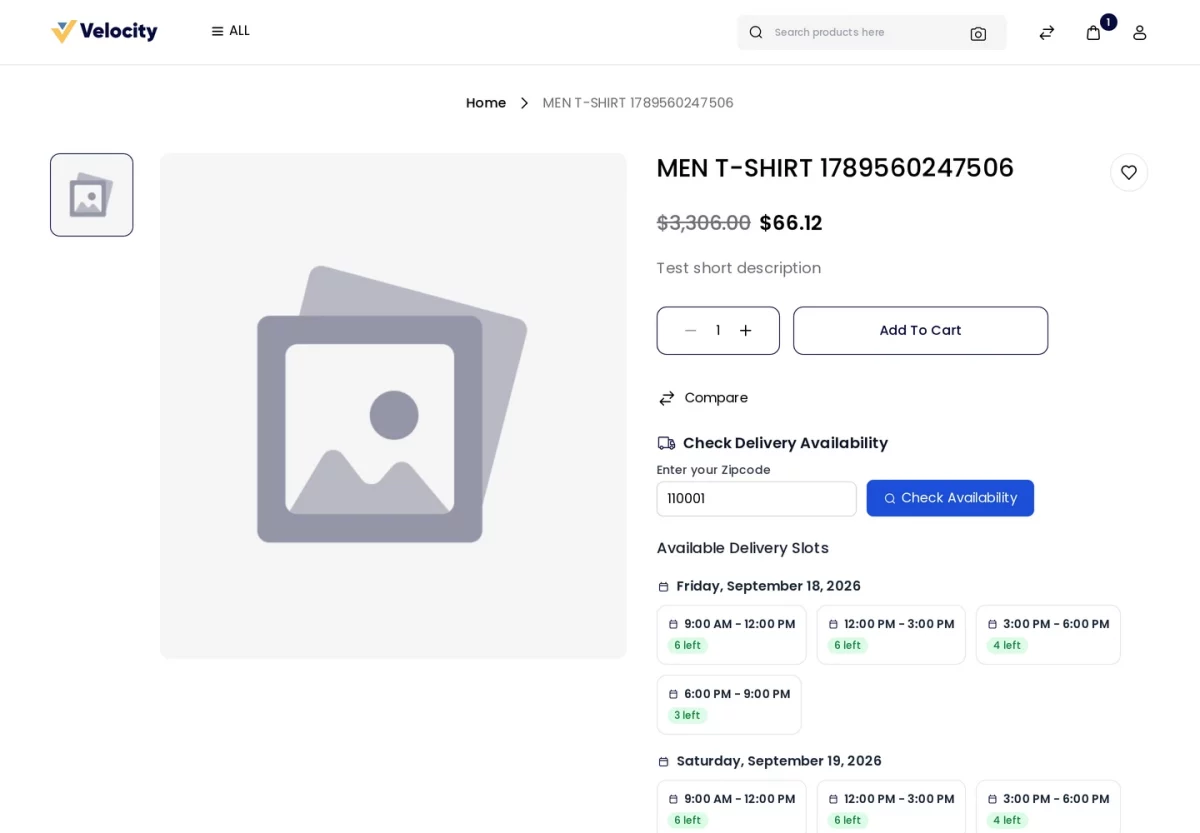
When the pincode falls inside a serviceable range, the widget lists Available Delivery Slots grouped by date.
Each window also shows how much capacity is left, for example 6 left. Consequently, shoppers know the promise is real before adding to cart.
Step-by-Step: Check a Pincode
- Open any product page on the storefront.
- Scroll to Check Delivery Availability.
- Type a pincode into Enter your Zipcode.
- Click Check Availability and review the dates returned.
Choosing a Slot at Checkout
At checkout, the Delivery Time Slot section now sits above Shipping Method. Customers therefore decide when they want the parcel before they decide how it ships.
Dates render as a compact left-to-right row of pills, ordered chronologically and limited by the Display Total Days setting.
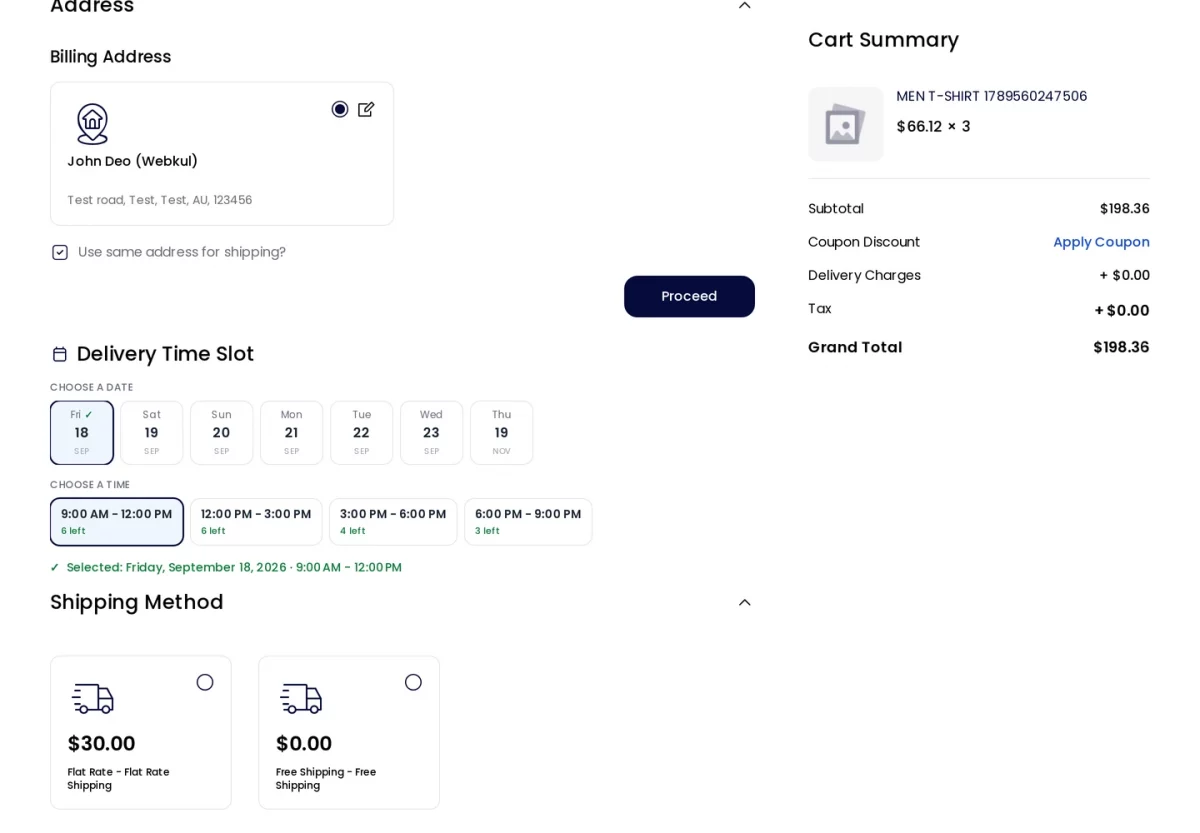
Picking a date reveals only that day’s windows. After a window is chosen, a green confirmation line repeats the full date and time.
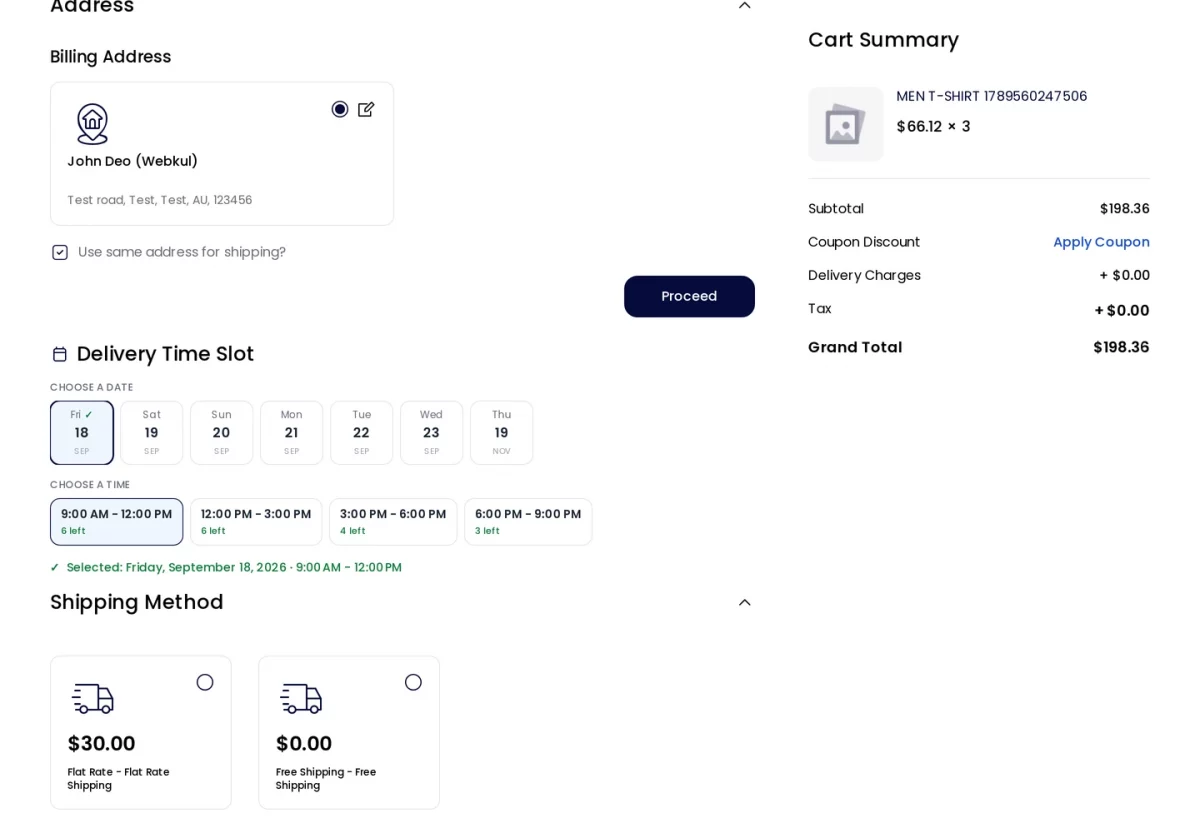
**Note: a time slot becomes unavailable in two conditions –
- Orders are full, meaning the quota set for that window has been reached.
- The window has passed, or the date falls inside the minimum order processing buffer.
Step-by-Step: Book a Delivery Window
- Add a product to the cart, then click Continue to Checkout.
- Confirm the billing address and click Proceed.
- Under Choose a Date, scroll the pill row and select a date.
- Under Choose a Time, select an available window.
- Pick a shipping method and a payment method, then place the order.
Slot Details in My Account
Once the order is placed, the booked window travels with it. Customers see a Delivery Time Slot block beside the shipping method in their order view.
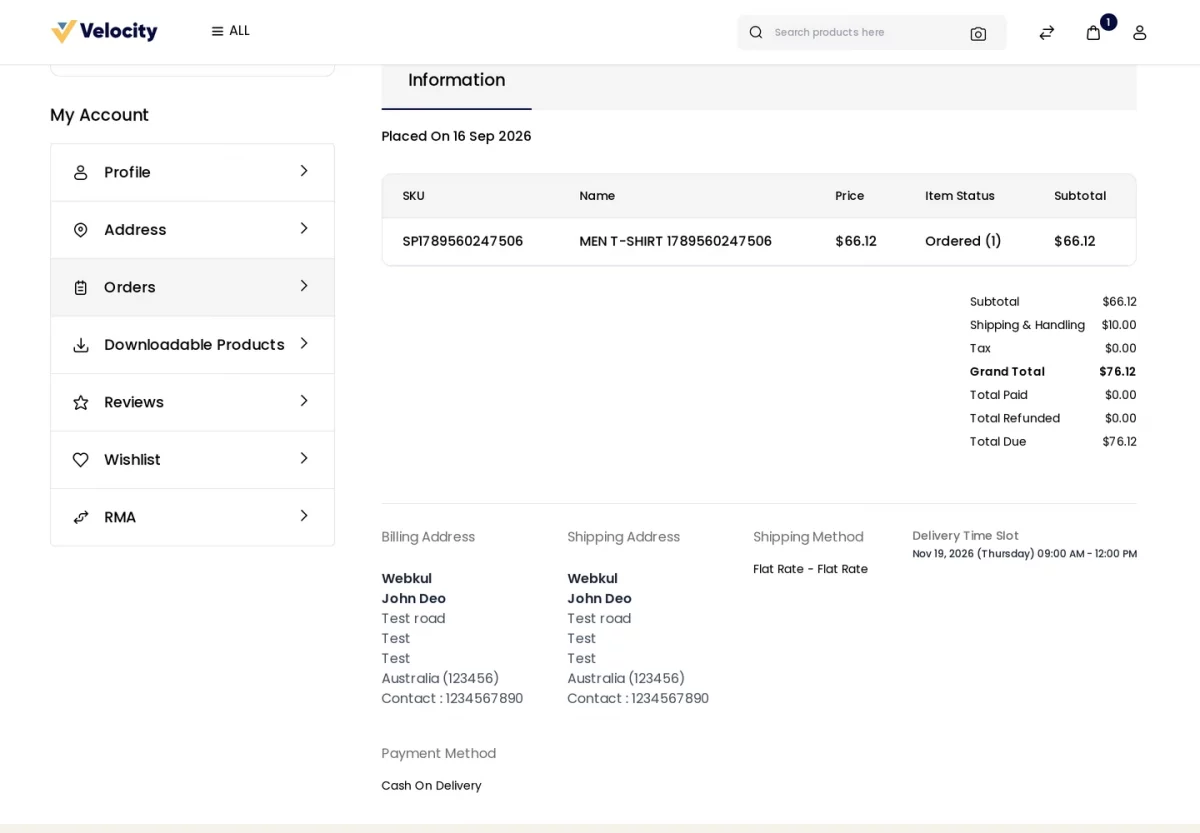
Likewise, the same detail appears on the admin order view, on the invoice and inside the order confirmation e-mail.
Step-by-Step: Review a Booked Slot
- Sign in to the storefront and open My Account.
- Click Orders and choose an order.
- Scroll to the address block at the bottom of the Information tab.
- Read the booked window under Delivery Time Slot.
Support
That was the user guide for the Bagisto Delivery Time Slot module. For any queries, reach out at [email protected].
You can also raise a ticket at our HelpDesk System, or read the official Bagisto developer documentation.
Finally, explore our Laravel Development Services and our quality Bagisto Extensions.
Current Product Version - v2.4.9
Supported Framework Version - Bagisto v2.4.9

Be the first to comment.