In Magento 2 Marketplace Reverse Auction, To retain the customers, it is necessary to integrate tools and methodologies that make the purchase process better and strategic at the same time.
Having said that, Reverse auctions are one of the most powerful tools that make the purchase process entirely strategic resulting in the best outcomes in terms of favorable pricing.
This module proposes a platform for the customers where they can negotiate with the sellers of the marketplace for the feasible pricing of a product(s).
The customer has the leverage to place product requests and in turn, the more than sellers can place a bid for the customer’s product request.
The sellers of the marketplace and the customer can have a one-to-one conversation for the pricing and they can put forth their feasible product prices.
As the customer finds the seller’s bid price satisfactory, it can be approved by the customer. Further, the customer can Add the product to the cart and proceed to buy the product(s) as per the bid price.
Where on one hand this extension will help you increase your sales and revenue, it would also ensure the customer retention of your store as well.
Note:
- This module is an add-on to the Webkul’s Multi Vendor Marketplace Module.
- To use this module, you must have installed Webkul’s Magento 2 Multi Vendor Module first.
Note –
- Geolocation and Google Map services are used in our module. To have these services you must have the Google API Key to make use of this extension.
- You need to enable billing for your google account project under which the API Key is created.
Features
- The customers can place a product request for a product(s).
- Images of the product while creating a request can be added by the customers.
- Requested products can be either approved or disapproved by the admin.
- The admin can allow auto-approval for products and even approve them manually.
- The sellers of the marketplace can propose a bid price for the customer’s product request.
- If need be, the customers can even cancel the product request.
- The customer can change the status of the sellers’ bid response to Approved.
- Other statuses include pending, lost, ordered, canceled, sold.
- Along with placing the bid requests and responses, the seller and the customer can exchange messages as well.
- The admin can view all the bids that sellers place and conversation over each bid.
- Mails notifications as per the status of the product requests are sent to the sellers and customers.
- The extension Supports Graphql API.
- The extension is also compatible with the Hyva theme.
Installation
The installation is as simple as installing other Magento 2 Extensions.
Customers will get a zip folder. Then they have to extract the contents of this zip folder on their system. The extracted folder has an src folder, inside the src folder you have the app folder.
You need to transfer this app folder into the Magento 2 root directory on the server as shown below.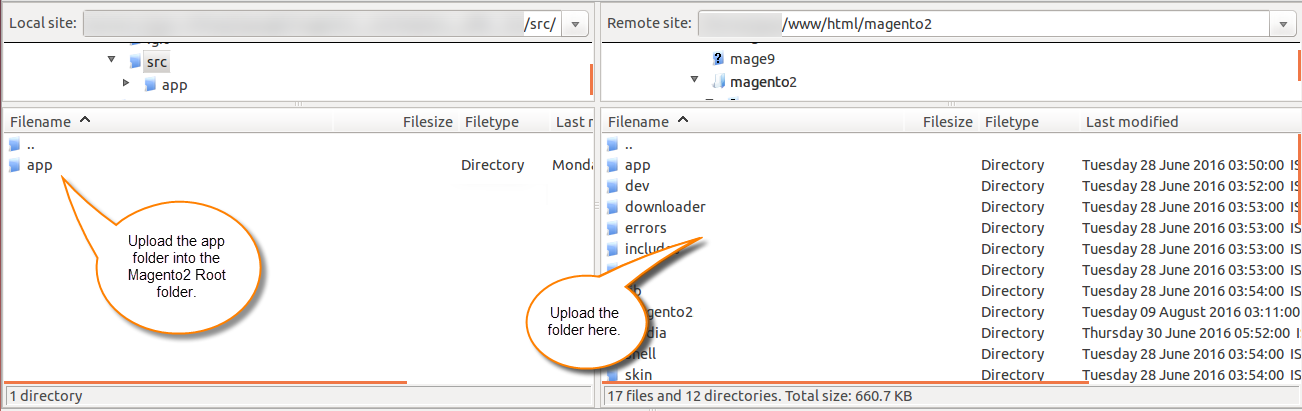
On successfully installing the module, you have to run these commands in the Magento 2 root directory.
First command –
php bin/magento setup:upgrade
Second Command –
php bin/magento setup:di:compile
Third Command –
php bin/magento setup:static-content:deploy
Fourth command –
php bin/magento queue:consumers:start notifysellers.requestapproval
Fifth command –
php bin/magento cron:run --group consumers
After running the commands, you have to flush the cache from the Magento 2 admin panel by navigating through->System->Cache management as shown below.
Language Translation: Freelancer Marketplace Builder
For translating the module language, navigate through src/app/code/Webkul/MpReverseAuction/i18n, and edit the en_US.csv file.
Thereafter, rename the CSV as “en_SA.csv” and translate all right side content after the comma in the Arabic language. After editing the CSV, save it.
Then upload it to the path src/app/code/Webkul/MpReverseAuction/i18n, where the Magento 2 is installed on the server.
The module gets translated into the Arabic Language. It supports both RTL and LTR languages.
Admin Permissions: Freelancer Marketplace Builder
On installing the module successfully, the admin must navigate to Stores > Configurations > Reverse Auction tab to set the basic settings of this module. 
The admin can set the basic configurations under Reverse Auction tab as follows-
Admin Settings:
- Enable Reverse Auction Module: The admin can enable the status of the module.
- Customer Request Auto Approval: The admin can allow auto-approval for the customer’s request.
- Google Map API Key: The admin needs to get the Google Maps API key to addressing auto-complete to work. Which the admin can retrieve from Google’s website.
Transactional Emails:-
Product Request:-
- Notification to Admin: The admin receives email notifications for product requests.
- Notification to Sellers: The sellers receive product requests notification mails when auto-approval is set as Yes. When auto-approval is set as No, the admin has to approve it first.
- Cancellation Notification to Customer: The customers shall receive notification Mails on product request cancellation.
- Approval Notification to Customer: The customers shall receive notification Mails on product request approval.
Bid Place Notification to Customer: The customers would receive notification mails when the bid is placed.
Send Bid Communication Notification: Both the seller and the customer shall receive mail notification for the ongoing communication over the bid.
Bid Approval Notification to Seller: The sellers would receive notification mails on bid approval.
How to process the request queue: Freelancer Marketplace Builder
Meanwhile, the admin can run the given commands in the Magento 2 root directory to process it as the request is added to the queue.
First command –
This command is used to check the topic of the consumer list.
php bin/magento queue:consumers:list
Second Command –
php bin/magento queue:consumers:start notifysellers.requestapproval
If the admin wants to run the queue process command in the background, then the below command can be run:
Third Command –
php bin/magento cron:run --group consumers
Admin End: Customer Requests Listing
In the admin panel, the admin must navigate to Marketplace Management > Reverse Auction > Customer Requests as shown in the image below.

On clicking the Customer Requests under Reverse Auction sub-menu option, as shown in the above image, it redirects to the Customer Requests page as shown in the image below.

The admin can Approve or Disapprove the customer requests as well.
For that, the admin needs to select the request(s) and click on either Approve or Disapprove options present under the Actions dropdown list.
Note:
- The admin cannot change the status of canceled and complete product requests.

Further on clicking the View Bids link, it redirects to the Bid List page, where the admin can view the details such as Seller Name, Bid Price, Status, Bid Time as shown below.

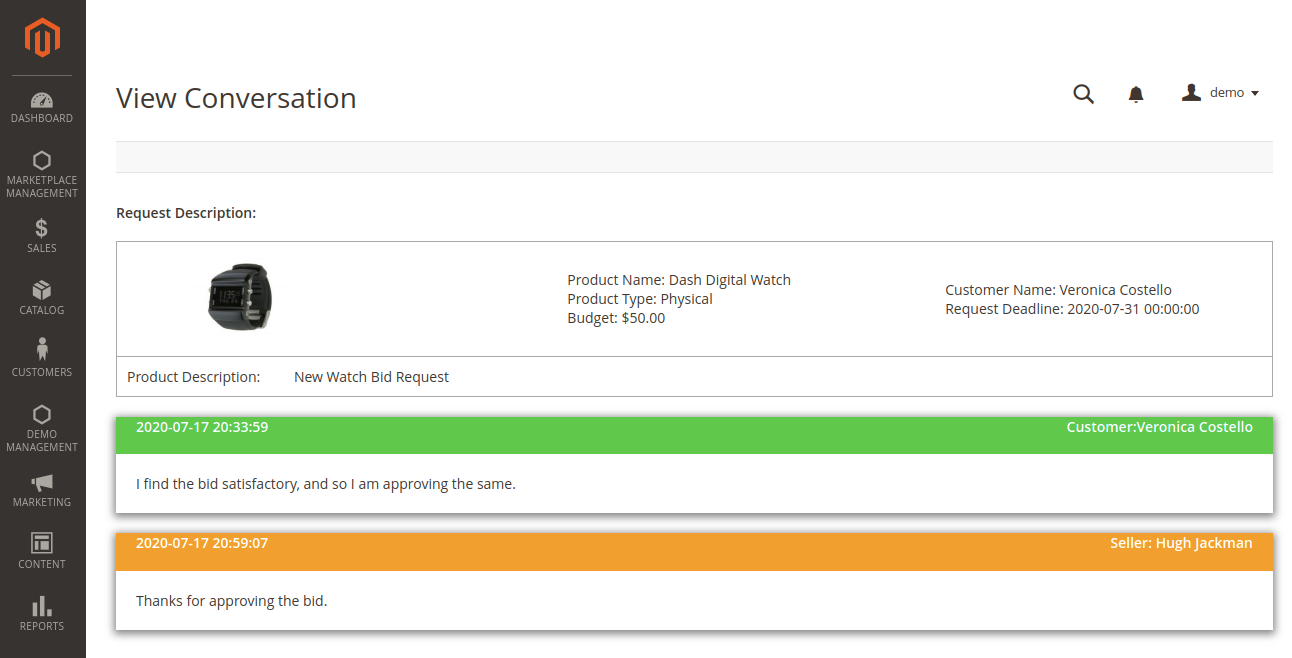
On clicking the View Conversation link, it redirects to the View Conversation page, where the admin will find the Request Description and the Conversation Details between the Seller and the Customer regarding the bid request.
Seller/ Customer End Workflow: Freelancer Marketplace Builder
Meanwhile, in the frontend, the customers will find a Search Filter section, where one can look for any requests by adding the Product Name, Start and End Date, Customer.
The customer can then click on the Apply Filter button and search the product request.
Please Note:
- A guest user cannot place a product request and cannot place a bid for the requested product.
Workflow: for Logged In Customers
On logging in to a store, the customer can create a new request. For that, the customer must click on the Create New Request button in the Auction List page.

On clicking the Create New Request button, it redirects to the Customer Request page as shown in the image below.

To place a new request the customer need to add the following details-
- Category: Choose a Category from the given dropdown list.
- Product: Choose a Product for placing the Bid.
- Product Images: Add an image for the respective product. A maximum of 5 images can be added.
- Your Budget: Provide the Budget for the product’s bid request.
- Request Deadline: Add a Deadline until which the bid can last.
- Product Condition: Choose either New or Used against this field.
- Description: Add a Description against this field.
- Product Type: Choose the Product type, i.e. Service or Physical against this field.
- Street Address: Enter the Address of the Street.
- Country: Enter the country against this field.
- Region: Add the Region against this field.
- City: Add the City against this field.
- Zip: Enter the Zip code.
As the customer fills in the Address Details, it will display on the Google Map as well.
Note:
- The Google API key eases the location search process for the customers.
- As the customer enters the location, it displays the search suggestions before the customer by creating their directories for the location purpose.
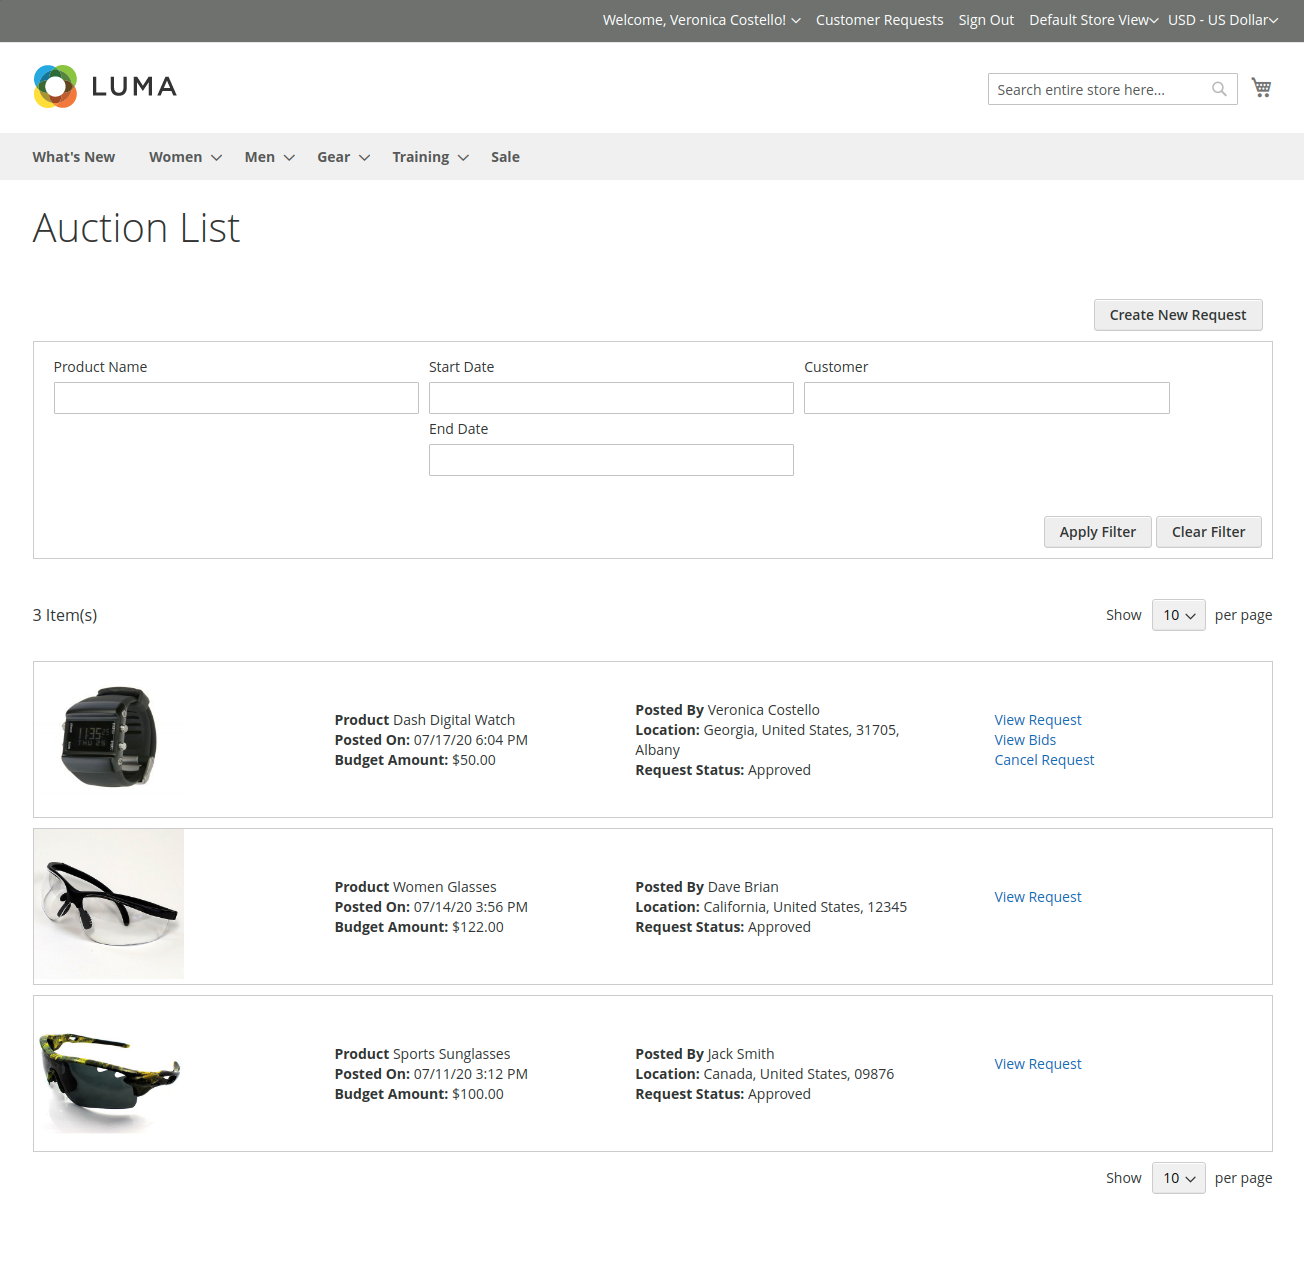
On saving the details, this request shall be visible to the customer under My Account > Auction Requests as shown in the image below.

The customer can also find the product requests under the Customer Requests option present on the menu bar.
Actions Description: on the Customer’s Product Request (at both customer and seller-end simultaneously)
Let us take a deep dive and study the workflow describing the actions at the customer and seller end, simultaneously.
View Request
Firstly, the customer can click on the View Request link present against the respective product request to go through the requested product details such as Product Name, My Budget, Product Type, My Deadline, By, Location, etc. as shown below.
The sellers that place a bid request for the customer’s product request will display along with the details such as Seller Name, Location, and Bid Amount as shown in the image below.

View Bids
On clicking the View Bids link present against the respective product request, it redirects to the Customer Bid List page as shown in the image below.

When a Seller Places a Bid for the Customer’s Request
In the seller panel, the sellers can view the product requests that the customer places under Manage Reverse Auction Request > Product Request’s Lists as shown in the image below.

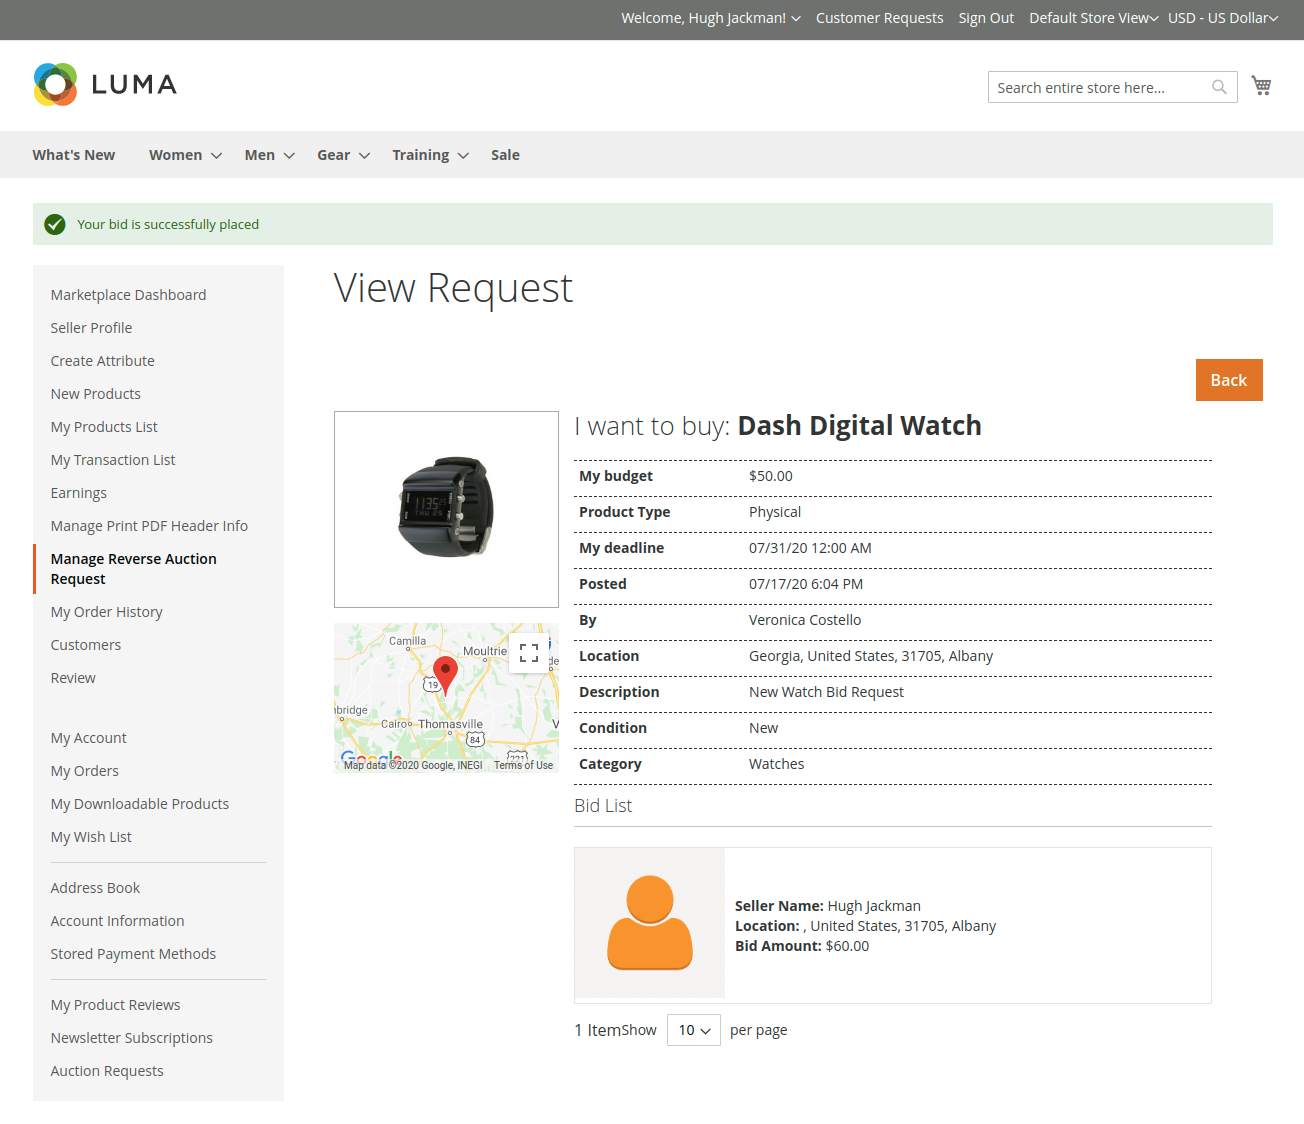
Moving on, the seller can click on the View Request link present against the product bid, which redirects the seller to the View Request page as shown below.
The seller will find the request details and also a Place Bid button underneath the product images as shown in the image below.

Furthermore, the seller can go forth and place a bid for a respective request by clicking the Place Bid button.
This opens up a Place a Bid form as shown in the image below.

The seller will have to fill in the following details on the Place a Bid form:
Product: The name of the product for which the customer requests a bid, is auto-filled.
Budget Amount: The budget of the product as well is auto-filled.
Bid Price: The seller needs to enter the bid price for the customer’s bid.
Comment: The seller can even add a comment, if any, in the comment box.
A success message will display as soon as the seller places the bid against the customer’s product request.
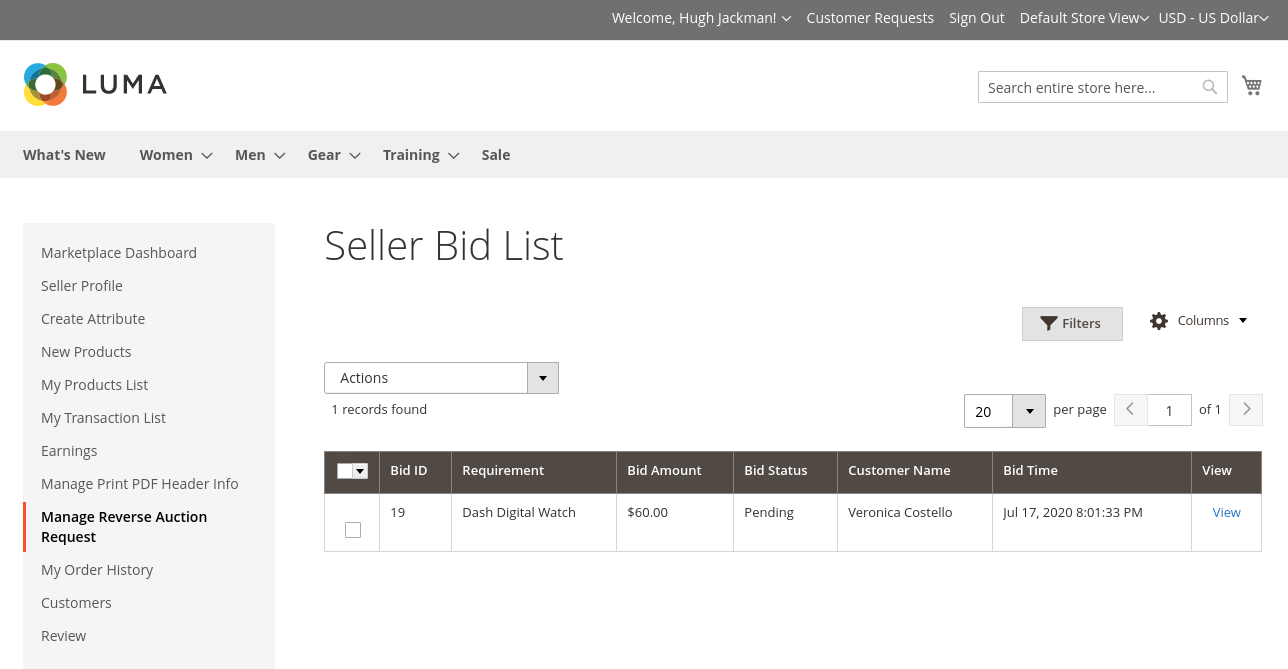
The sellers will find their bid requests under Manage Reverse Auction Request > Seller Request’s Bid.
On clicking the Seller Request’s Bid, it redirects to the Seller Bid List page as shown in the image below.
The sellers will find the list of bids that they place against the product requests. The table displays details such as the Bid ID, Requirement, Bid Amount, Bid Status, Customer Name, Bid Time.
The seller can click on the View link, to go through the details of the respective bid.
The seller can click on the View link and go through the details as shown in the image below.

Further, the seller can even delete a request if need be by simply choosing the Delete option under the Actions tab.

Customer’s Response to the Seller’s Bid Request
Consequently, the customer will find the seller’s bid response under My Account > Auction Requests.

The customer can even Cancel product requests. For that, the customer must click on the Cancel Request link, for a particular request.

Further, the customer can further click on the View Bids link, that redirects to the Customer Bid List page as shown in the image below.
The customer will find the seller’s bid response details such as Requirement, Seller Name, Bid Price, Created At, Status.

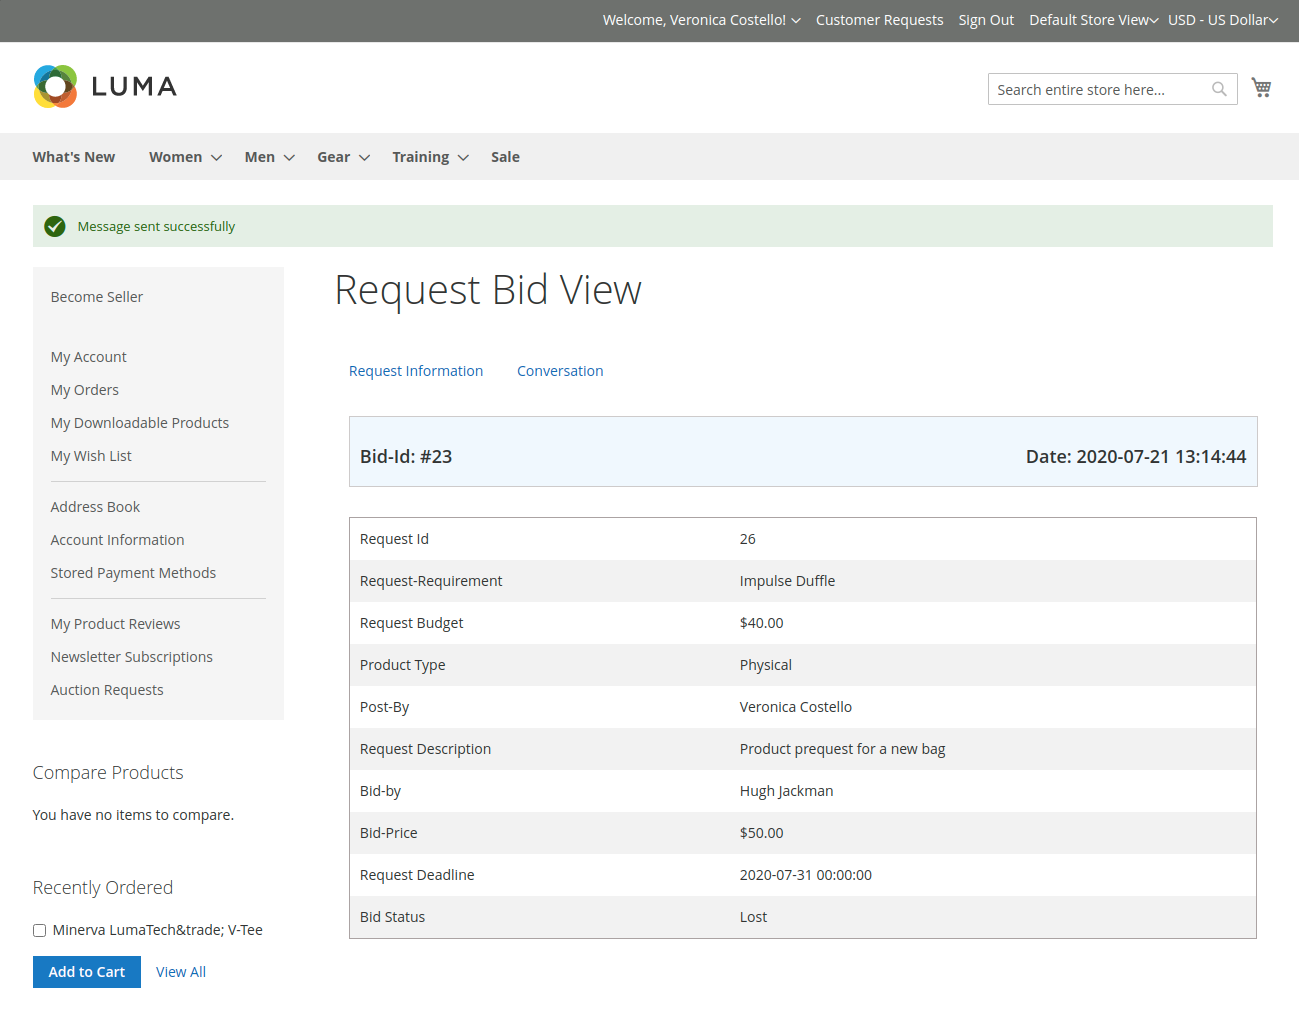
On clicking the View link, it redirects to the Request Bid View page, which displays the complete information of the product request’s response under Request Information.

The customer has the leverage to change the status of the Bid under the Status tab under the Conversation link.
If the customer finds the seller’s bid satisfactory, the status must be set to Approved.
Also, the customer can add a message under the Message tab for the seller as shown in the image below.

A success message, “Message Sent Successfully” shall display as the customer clicks on the Send button.
After this process, under the Request Information link, the bid response status changes to Approved.
Most importantly, the Add to Cart button also becomes visible as the customer approves a seller’s bid and is visible on both the Request Information and Conversation pages.
Request Information Page:

Conversation Page:
The customer will find the Status as Approved and even the message is visible as shown in the image below.

Seller End View: When customer Approves the bid
Meanwhile, the seller would receive an email regarding the bid approval as shown in the image below.

Moving on, in the seller panel, the respective seller can navigate to Manage Reverse Auction > Seller Request’s Bid to find the customer’s response on the bid.
It redirects to the Seller Bid List page where the seller will find the details such as Bid ID, Requirement, Bid Amount, Bid Status, Customer Name, Bid Time.
The seller will find the Bid Status as Approved as shown in the image.

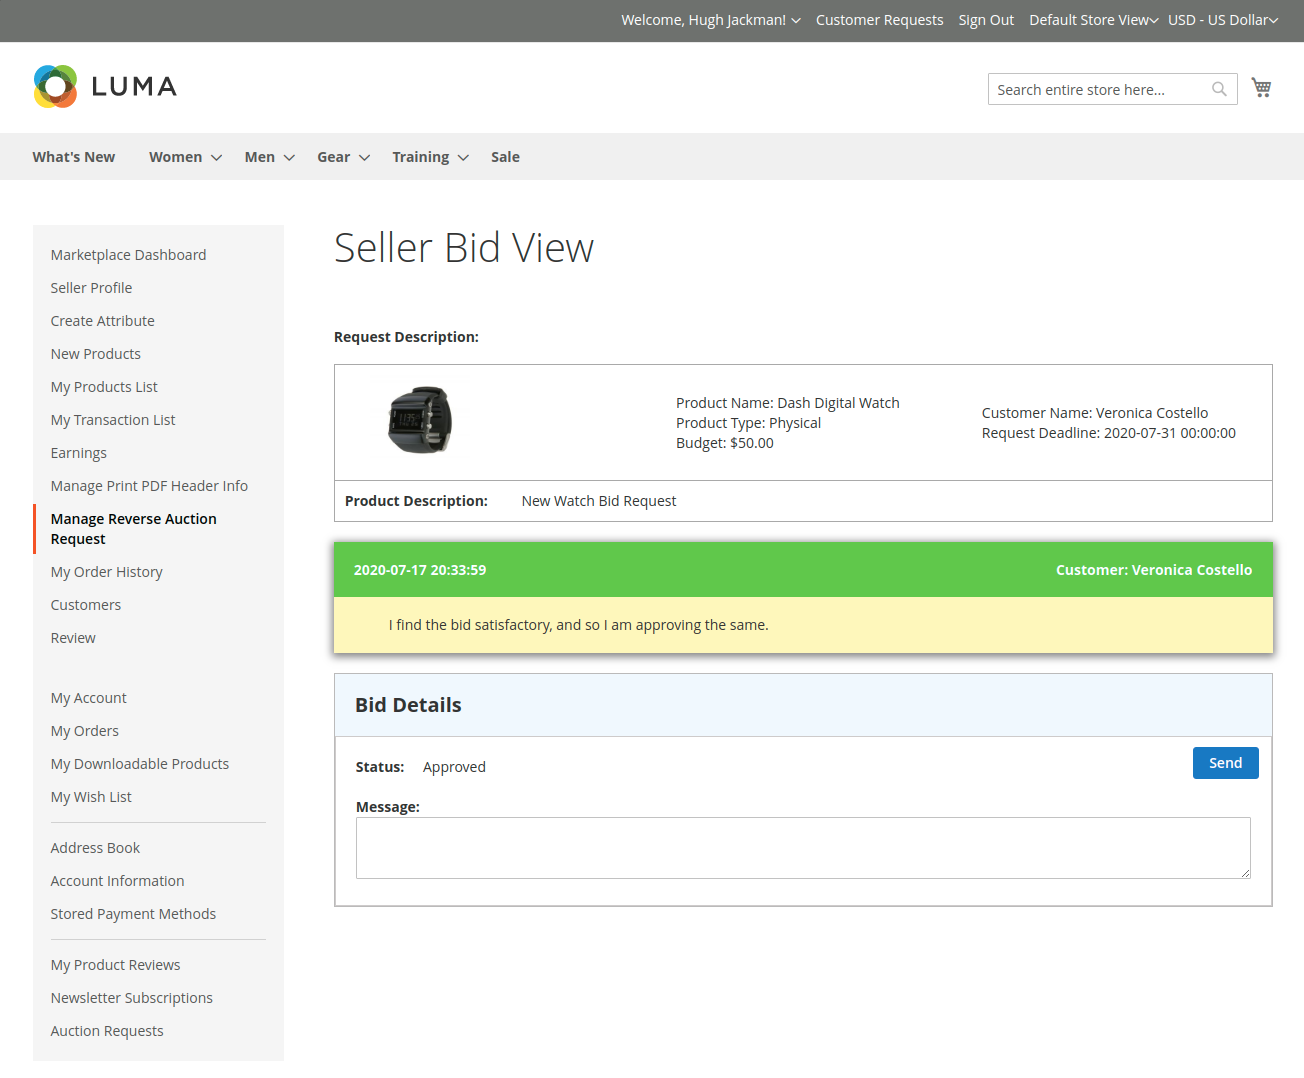
On clicking the View link, it redirects the customer to the Seller Bid View page.
The seller will find the Request Description details, along with the customer’s message, as shown in the image below.
Once the customer approves the seller’s bid, the seller can drop a message to a customer if need be; no other action can be after bid approval.
When Customer Sets the Status as Lost or Ordered/ Canceled and Sold
The customer will place a product request in the usual manner. Further, the seller can place a bid for the customer’s product request as shown in the image.
Note:
- The workflow in the images is explained for Lost status. The scenario will be the same for rest statuses i.e. Ordered, Canceled, and Sold.

In the frontend, under Auction Requests > View request, the customer sets the status as Lost for the seller’s bid.
In the case, when the customer sets the status as Lost/ Ordered/ Canceled/ Sold for a seller’s bid request, under the Conversation link, the message is visible, but the Send message button will not be visible, at both the seller and customer end.
This also means that no further conversation can take place between the customer and the seller.
Customer End:

Seller End:

Support
That’s all for the How to Start a Freelancer Marketplace Website (Freelancer Marketplace Builder).
If you still face any issue, feel free to add a ticket and let us know your views to make the module better at our HelpDesk system.
You may also browse other Magento 2 marketplace addons and our quality Magento 2 extensions.
Current Product Version - 5.0.4
Supported Framework Version - Magento 2.0.x, 2.1.x, 2.2.x,2.3.x, 2.4.x

Be the first to comment.