Image Recognition Based Products Tags for Magento 2 allows creating certain tags for the products in the store automatically by using product image recognition. Meanwhile, tags the related product of the store.
These auto tags will help the owners to increase the productivity of their stores.
The system will generate the tags by analyzing the nature of the image and then gather all the information. This will include all the information visible in the image like it is the product is the shoe, sports shoes, or formal shoes, etc.
For instance, a customer is seeking for a product and types the keyword for that product in the search bar, then it displays the search result related to that keyword. Smart tags do the same when the particular tag is clicked.
Besides, this feature will generate various tags related to that keyword and display all those tags on the product page.
This module will help to link specific products with their related products and all will be done automatically.
Note: For using this module, the user must have an active AWS account. For creating the account they can go to aws.amazon.com and generate the security credentials.
Video Tutorial of Magento 2 Image Recognition Based Products Tags
Check the demonstration to add smart product tags –
Features
- The admin can add tags for the product manually.
- AWS rekognize used to fetch tags from product images.
- The tags can also be generated automatically for a specific product or all at once.
- The tags will be clickable and visible in the front end.
- Popular tags will be visible on all the pages in the front end.
- The sorting order of popular tags will be in decreasing order of the number of times they have been searched.
- Image Recognition Based Product tags for Magento 2 extension support the Hyva theme.
- The extension also supports GraphQL APIs.
- Magento 2 Smart Product Tag extension is compatible with the Hyva Theme.
Installation
The installation is quite simple just like the standard Magento 2 extensions.
Customers will get a zip folder. Then they have to extract the contents of this zip folder on their system.
It includes an src folder, inside the src folder you have the app folder.
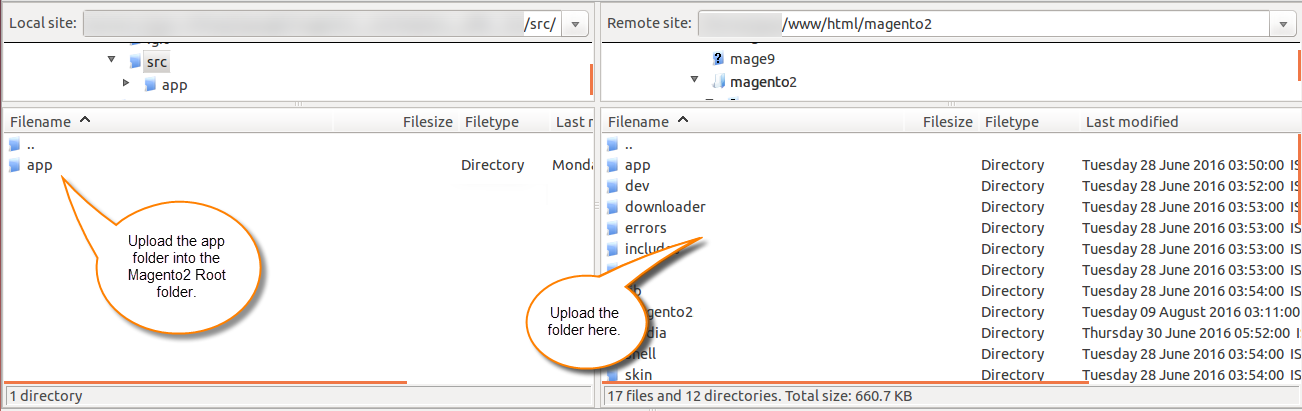
You need to transfer this app folder into the Magento2 root directory on the server as shown below.
On successfully installing the module, you have to run these commands in the Magento2 root directory.
First command –
php bin/magento setup:upgrade
Second Command –
php bin/magento setup:di:compile
Third Command –
php bin/magento setup:static-content:deploy
After running the commands, you have to flush the cache from the Magento admin panel by navigating through System > Cache management as shown below.

Language Translation
For translating the module language, navigate through src/app/code/Webkul/Smart Tags/i18n and edit the en_US.csv file.
Thereafter, rename the CSV as “en_SA.csv” and translate all right side content after the comma in the Arabic language. After editing the CSV, save it.
Further, after installing Magento 2 on the server, upload it to the path src/app/code/Webkul/Smart Tags/i18n.

This translates the module into the Arabic Language. It supports both RTL and LTR languages.
How To get AWS Rekognition API Credentials?
For using this module the admin requires to have AWS Rekognition API Credentials. To generate the credentials admin will go to the link: https://aws.amazon.com/console/
After that under the AWS dashboard, the admin will Sign in the account. In case the account has not created the admin can create it by clicking on the Create a Free Account button.

Further, the admin will enter the registered email ID and click on the Next button.

The admin will then navigate to the Password window, where the admin will enter the password of the AWS account as shown in the image below:

After that the admin will navigate to AWS Management Console Page, and choose the AWS Service as Amazon Rekognition.

After that, the admin will move to the AWS Rekognition dashboard page. The admin will click on the registered name visible on the header of dashboard and click on the My Security Credentials from the dropdown.

Under Your Security Credentials Page, the admin will select the Access Keys(access key ID and secret access key). Once the dropdown in open, the admin can see the existing API keys.
To generate the new one, admin will click on Create New Access Key as shown below:

After that, Create Access Key popup will appear including the Access Key ID and Secret Key ID. Further, the admin will click on Download Key File button and save the file.

Once the file is downloaded the admin can see the generated key will get added to the existing list of API keys.

Eventually, the credentials are generated, the admin will further use this in the backend configurations.
Admin Configuration
After installing the module, the admin will have to navigate to Stores > Configuration > Product Tags Settings for managing the module configurations.

Under the section, the admin will manage the following configurations:
Product Tags: The admin will select “Yes” to Enable the module, and “No” to Disable it. Also, the admin can create tags for all products at once by clicking on the Add Product Tags button.
AWS Rekognition API Keys: The admin will enter the API Key and API Secret Key received at the time of creating the account in AWS. After that, the admin will select the respective AWS Region.
Product Tags Visibility
“Product Tags” is the default attribute that comes up with the module installation. The admin will add the attribute to any particular attribute set for which this field will be visible on the product edit page.
For this the admin will navigate to Stores > Configurations > Attributes Sets. After that, the admin will view the respective attribute set.
The attribute set must include the Product tags field, otherwise, the field will not be visible on the product edit page. The admin can easily do this via the drag and drop method.

The attribute set will be visible to the admin on the product edit page as shown below:

This means while creating the new product or editing the existing products, the admin can manage the product tags by showing them only for the required products.
Generate Product Tags In Image Recognition Based Products Tags
The admin will view the product in the edit mode, for which the tags will be generated. Meanwhile, a Product Tags field will be visible to the admin if the feature is enabled from the backend configuration.
There are two possible ways to create the tags which are Manual and Automatic. Further, let’s see how exactly the system generates product tags in both cases.
Note: It is mandatory for the product to have at least one product image saved. Otherwise, this feature will not work. Also, if the admin changes the image for any product then the tags for the same will also get change.
Manual Tag Generation In Image Recognition Based Products Tags
In some cases, it may happen that the admin has some specific set of tags and needs to add those tags manually.
For this, the admin will view the product in edit mode and type the desired keywords under the Product Tags field as shown in the below image:

After that, the admin will press enter key by which the keywords will be added to the list of product tags, after which the admin needs to Save the product by clicking on the Save button.
Below is the image which shows some manually added tags:

Automatic Tag Generation For Specific Product
Moreover, if the admin wants to generate the automatic tags for any product then the following process will be used:
First, the admin will view the product in edit mode and then click on the “Read Tags From Product Images” button.
By this, the Image Recognition Based Product tag feature will create all the related tags by analyzing the product image saved for that particular product as shown in the image below:

The automatic tags will get appended to the manual tags for that product if any manual tag is present previously. Some automatically added tags are shown in the image below:

Automatic Tag Generation For All Products
The admin can also create the tags for all products at once. For this, the admin will navigate to Stores > Configuration > Product Tags Settings. After that, the admin will click on the Add Product Tags button.

Eventually, a popup slider will be visible to the admin which will represent the tag progress. The process behind this is, the system automatically searches the products to analyze their images, and then generate the tags for the same.
The system does this for five products at once then another five products and so on. The tags progress is shown below:

The admin can also download the .json file to check the report of the generated tags by clicking the Download Log button shown in the above image. The file will view the list of product IDs including their respective product tags.

The admin can also save the .json file.
Image Recognition Based Tags Front End View
Once the tag creation is done by the admin, all the tags will be visible to the customers while they are scrolling through the store.
The tags for the specific products will be visible to the customers on the product page as shown in the image below:

Popular Tags In Image Recognition-Based Products Tags
The popular tags or most searched tags will be visible in all the left layout pages like catalog page, search page, category page, etc.
The sorting order of the popular tags will be in decreasing order of the number of times they have been searched.

This module will surely provide ease to the customer to reach the maximum products of the stores. And as the Image Recognition Based tags trigger the relevant data, the customer will find genuine products for them.
That’s all for the Image Recognition Based Products Tags for Magento 2. If you face any issue, feel free to add a ticket at webkul.uvdesk.com
Current Product Version - 5.0.0-p1
Supported Framework Version - 2.0.x , 2.1.x, 2.2.x, 2.3.x

Be the first to comment.