Introduction
Magento 2 Marketplace Vendor Badge System allows the admin to add badges for different sellers according to their performance.
This badge will appear on the seller profile page so that buyers can know about the performance of the particular seller and the admin can manage the seller badge.
Note: The Marketplace Seller Badge System for Magento 2 is an add-on to the Magento 2 Marketplace Multi-Vendor module.
So before using this add-on, you have to install the Magento 2 Multi Vendor Module first.
You can also go through the below video to get to know the functionality,
Feature List
- The admin can create multiple badges.
- The admin can assign multiple badges to multiple sellers.
- The buyer can see badges on the seller’s profile page.
- The admin can delete or change the status of badges.
- The admin can manage the seller’s badge.
- Admin can set the rank of each badge from the admin panel.
- This extension is compatible with the Hyva theme.
- GraphQl has been implemented for the extension.
Installation
Marketplace Vendor Badge System for Magento 2 installation is super easy.
You need to move the app folder in the Magento 2 root directory as per the screenshot.
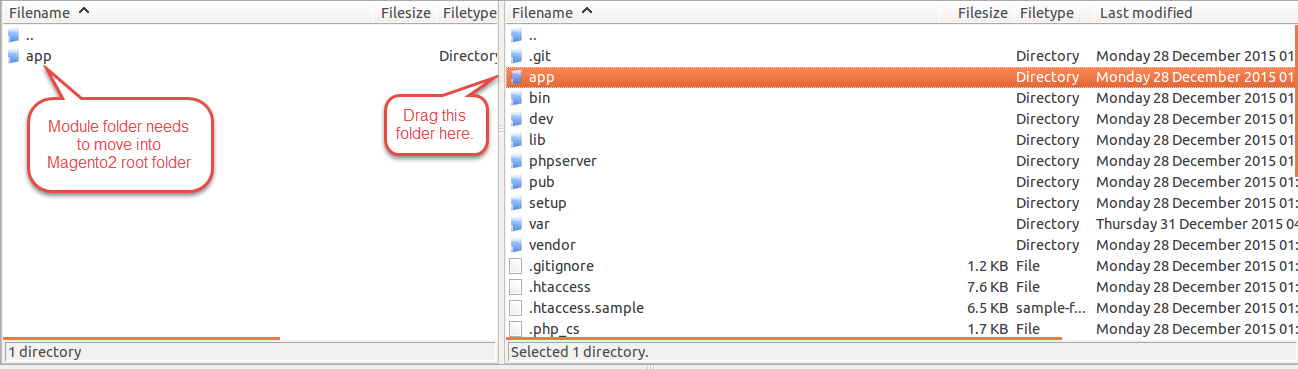
If you have downloaded the module from Magento Connect then unzip the respective extension zip.
Create Webkul(vendor) then MpSellerBadge(module) name folder inside your Magento root directory as app/code/Webkul/MpSellerBadge.
Now, move all module files inside the/app/code/Webkul/MpSellerBadge/ folder in Magento root directory.

After the upload, you can see the folders in your Magento 2 Root Directory.

Now, After the successful installation, you have to run these commands in the Magento 2 root directory.
php bin/magento setup:upgrade
php bin/magento setup:di:compile
php bin/magento setup:static-content:deploy
After running the commands, you have to log into the admin panel and you have to clear the Cache. You can refer to the below screenshot.

Thus, in this way, the installation of the module completes.
Configuration of Multi-Lingual Support
For multilingual support, the admin will navigate through Store->Configuration->General ->Locale Options.
Select the locale as English (the language into which the admin wants to translate his store content).

Thus the multi-lingual translation is done.
Language Translation Of The Module
If a user wants to translate their module from English to German then they need to follow the path app/code/Webkul/MpSellerBadge/i18n.
After that, unzip the Magento Marketplace folder and will get a CSV file with the name “en_US.csv”.
Now they will rename that CSV as “de_DE.csv” and translate all right side content after the comma in the German language.
After editing the CSV, save it and then upload it to the path app/code/Webkul/MpSellerBadge/i18n where they have installed Magento 2 on their server.
The module will be translated into the German Language.
It supports both the LTR and RTL languages.
![]()
Thus, the module language translation is done in this way.
Admin Configuration
After the module installation, the admin can enable the seller badges from the back end.
For that, they need to navigate through Store > Configuration >Marketplace > Seller Badge Settings as per the below image:
![]()
And, the admin can also manage the seller profile page.
To set up the profile admin navigates through Marketplace > Seller Profile Page Settings as shown in the below screenshots.

- Enable and disable the seller profile page.
- Admin can add a banner image for the seller page which can be viewed by the customer on the store.
- The seller profile layout can be changed by the admin. Admin can choose Layout 1 or Layout 2 for the seller profile page.
- The seller Information display card type can be changed by the admin. Admin can choose Type 1 or Type 2 for the seller profile page.
- The admin can enable the color picker to allow sellers to change their profile page background color.
- The admin can enable and disable the seller policies at front end.
- The admin can allow sellers to manage the shop URL by selecting Rewrite Seller’s shop URL.
- Admin can allow to automatically create seller public URL on seller registration.
- Admin can allow to show the featured sellers on frontend.
The admin can see the Seller Badges menu under the Marketplace Management section as per the below image:

Manage Badge
From here, the admin can Add New Badge, Edit the existing badges under the Action button, and Delete and change the existing badge Status.
The admin can see the list of badges under Manage Badges with Badge Name, Description, Thumbnail image, Rank, and Status.
![]()
After clicking on Add New Badge, the below page will open, and from here the admin can add a new badge:

Manage Seller Badge
From here, the admin can assign badges to the sellers or remove badges from the seller and also find the seller list with their badges.
For the reference, check the below snapshot:

Admin can also add and remove multiple badges to any seller at one time.

Seller End
The seller can find the badge added by the admin under the edit seller profile page as per the below image:

Customer End for Layout 1
The customer can see the Seller Badge on the Seller Profile page. Please check the below image for a better understanding:

The customer can click on the View More button to see all badges assigned to the seller.
For the reference, check the below snapshot:

Customer End for Layout 2
If the admin can set Layout 2 for the seller profile page, then the seller profile will be displayed like to the customer as shown in the below snapshots.

Thus, that’s all for the Marketplace Seller Badge System for the Magento 2 module still have any issues feel free to add a ticket
Let us know your views to make the module better at the helpdesk System.
Current Product Version - 5.0.6
Supported Framework Version - Magento 2.0.x, 2.1.x, 2.2.x,2.3.x, 2.4.x

Be the first to comment.