Magento 2 Custom Registration Fields extension allows the admin to create custom fields for customers. Henceforth, using this module you can extend your customer sign-up form.
As in the default system, the custom registration form is not extendable, Custom Registration Field for Adobe Commerce extension is a perfect choice.
Thus, with Magento 2 Custom Registration Fields extension in the website, the store owners can extend the custom fields for the sign-up of customers.
Check the plugin working & Setup below –
Features of Custom Registration Field For Magento 2
- The admin can easily extend the signup form.
- Enable/disable the Address Fields for use on the customer registration page.
- Add, edit, or delete multiple custom fields.
- Set default label for the custom field & Manage Label for various store views
- Input types available – text, text-area, date of birth, drop-down, multi-select, radio-button, media image, and file upload.
- Set values required – yes/no.
- Input validation – decimal number, integer number, email, URL, letters, letters, or numbers.
- Set the sorting order of the custom registration fields.
- Set the custom field status as – enabled or disabled.
- Show or hide custom field information in the sales email.
- Show or hide custom field information in sales orders and invoices.
- Display the terms & conditions and privacy policy checkbox on the registration page.
- Customize the terms & conditions and privacy policy sections using color, background color, header text, animation, etc.
- Multi-Lingual support / All language working including RTL.
- The module gives full support to the multi-store, website, and store view.
- The admin can use Has Parent functionality for dependent files.
- The admin can also enable the terms and conditions from their end so the registered customer must choose the option.
- The extension is compatible with the Hyva Theme.
- Magento 2 Custom registration fields extension supports GraphQL.
Installation
Customers will get a zip folder and they have to extract the contents of this zip folder on their system.
The extracted folder has the src folder, inside the src folder you have the app folder.
Hence, there is a need to transfer this app folder into the Adobe Commerce root directory on the server as shown below.

Now, if you have downloaded the module from Magento Connect then unzip the respective extension zip.
Then create Webkul(vendor) then CustomRegistration (module) name folder inside your Adobe Commerce root directory as app/code/Webkul/CustomRegistration.
Henceforth, move all module’s files inside /app/code/Webkul/CustomRegistration/ folder in magento root directory.

After the upload, you can see the folders in your Adobe Commerce Root Directory.

After the successful installation, you have to run these commands in the Adobe Commerce root directory.
# Run Commands
You need to run the following commands:
php bin/magento setup:upgrade
php bin/magento setup:di:compile
php bin/magento setup:static-content:deploy
php bin/magento indexer:reindex
php bin/magento cache:flush
Multilingual Support
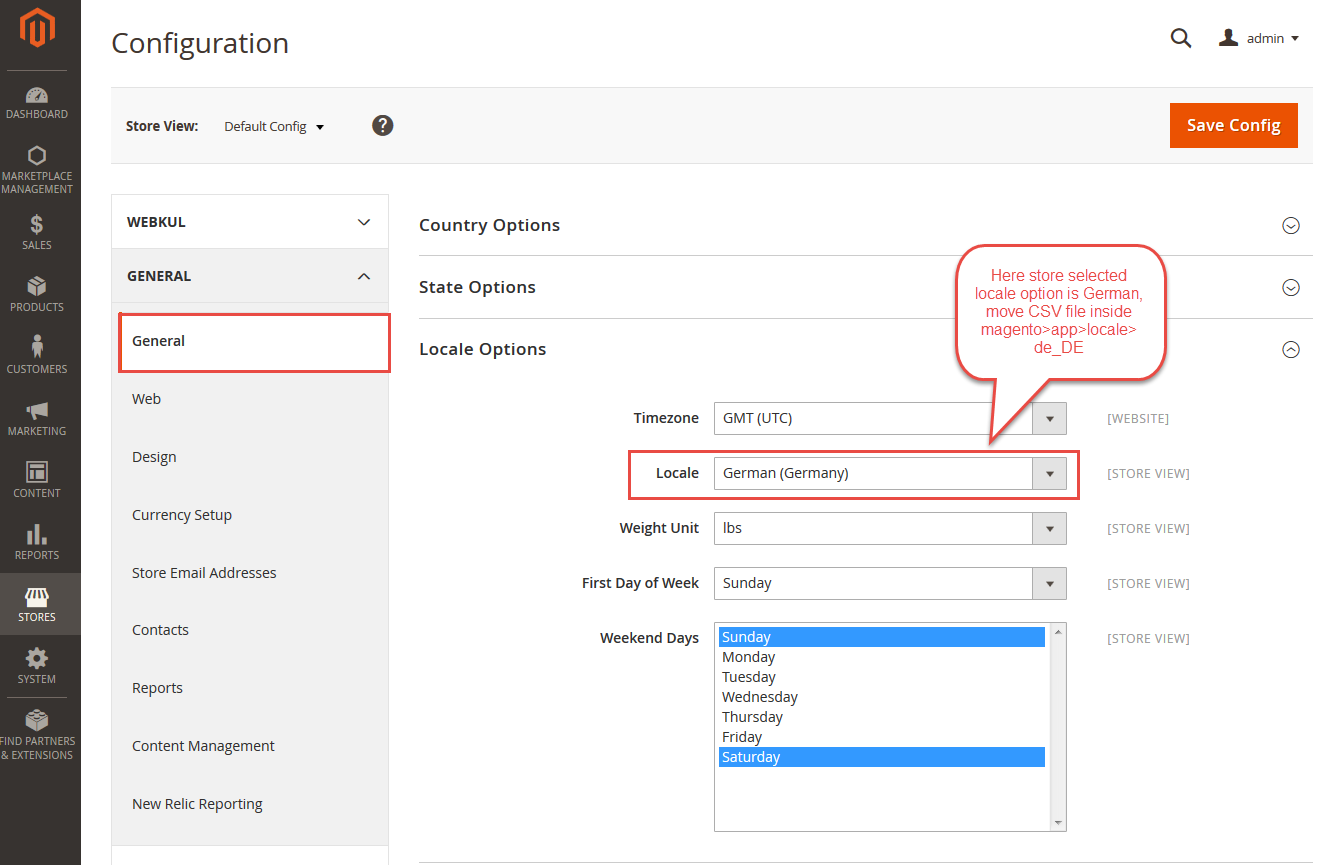
For multilingual support, the admin will navigate through Store->Configuration->General ->Locale Options.
Now, select the locale as German (the language into which the admin wants to translate his store content).
Translation
For translating the module language, please go to app>code>Webkul>CustomRegistration>i18n and edit the en_US.csv file.
Now, translate the words on the right and upload the modified file to the same location.
The filename of the translated file should be according to the language and region code like de_DE.csv in which you want to translate. Thus, it supports both RTL and LTR languages.

Custom Registration Field For Adobe Commerce- Workflow
After the successful installation of the module, you will see a menu in the Magento admin’s side panel for the custom registration field.

After that click on Manage Custom Fields.

New Custom Attribute
Thus, after clicking on Add New Field, a New Custom Attribute page will open.
Here, the admin will have two sub-menu options for Attribute Information – Properties and Manage Labels.

Here, we also have a Manage labels menu option wherein the admin can easily manage the title(for different store views) for the label per store view.

There are many parameters available for the custom registration field. Hence, let’s discuss each one by one.
Default Label – In the default Label, you need to give the name of the custom field which will be shown on the Sign Up Page.
Attribute Code – Here, the admin will enter the attribute code.
Select Website – The admin can add the Website for which the attribute is valid.
Input types for the owner are as under
Text field – to enable the user to type a small amount of text.
Text Area– If Admin needs to obtain more than one line of input from the user, then use a text area.
Date – Using this field the customers will be able to select a date using a calendar.

The calendar appears on the sign-up page on the front end for selecting a date.

Yes/No– This will provide a yes/no selection type for the store owner.

Multiple Select
Using Multiple Select more than one option in the list can be selected.

Dropdown
Using the drop-down at the footer new options will come up where the admin can add value for the admin and default store view.

Media Image
The admin can create Media image attributes. So, the user can add their image while signup.
For example, this field can be helpful if the admin wants to see a customer’s profile picture during the signup.

File Type
The admin can create File type attributes. So, the admin will be able to set the allowed extension types for the File type attribute.
So the user can choose the required file to upload the image file in the given format. They can also add allowed file extensions with commas.

Radio Button
The admin can use the radio button to allow the customer to choose an option from the available options on the registration page.

Hence, after creating the radio options(and enabling them) get visible at the front end on the registration page.

Values Required
The admin can make this field mandatory and hence the values are required.
Input Validation For Store Owner – The admin can set the type of validation for the store owner.
Input Field Sort Order – The admin can set the input field sort order from here.
Display Field In Form – However, the admin can display the fields on different forms.
Status – Herein, the admin can enable or disable the custom option.
Has Parent – When the admin enables the has parent option it will display on the customer’s end where the admin can choose the parent attribute.

Order and Invoice
Custom Fields will also appear in the Sale’s Order and Invoice.


Custom fields will be displayed in the emails after enabling from the back end as per the below screenshot –

Admin can find Custom Registration Field under Custom Registration->Manage Custom Fields. The admin can delete or change the status of the Custom Registration field.

Also, here the admin can manage the display field’s visibility on the Orders and in the emails by clicking the menu option Manage Display Fields as shown below.

Admin can display in order or hide from the order the custom attributes as well as the show in emails or hide from emails as shown below in the snapshot.
Customer Information Backend
Admin can view additional information about the customer by going to Customer > All customers.
Wherein, all the customers of the store will be displayed.
Henceforth, the admin has to click on the edit button of any particular customer whom the admin wants to view or manage the additional information.
Now, the admin needs to navigate to the menu option Custom Registration Fields.

Terms & Conditions and Privacy and Cookie Policy Configuration
Admin can configure Terms & Conditions and Privacy and Cookie Policy under-
Stores > Configuration > Webkul > Custom Registration Settings->Terms & Conditions and Privacy Settings.
Here admin can configure the front-end view and enter his Terms & Conditions and Privacy and cookie policy. Thus, these policies will be visible on the customer registration page.

Here, the admin can also Enable the Address Field.
If enabled then the customer will have the option to enter the address fields on the registration page itself
Else if selected as No then the customer will have to navigate to his account panel to add his address.
Enable Terms and Conditions on the Registration Page :
Admin can select whether these policies will be visible on the customer registration page or not.
Privacy Popup Model Heading :
Here admin enters the heading of the privacy popup model.
Term and Condition Popup Model Heading :
Here admin enters the heading of the Terms & Conditions popup model.
Model Button Text :
Admin enters the text of the button which will appear on the model.
Button Text Color :
Can provide hex color code for color or leave blank for default color.
Model Button Color :
Can provide hex color code for the color of the button or leave blank for default color.
Model Header Background Color :
Can provide hex color code for the color of the model header background or leave blank for default color.
Model Background Color :
Can provide hex color code for the color of the model background or leave blank for default color.
Model Animation Type :
Admin can select model animation type as “Popup” or “Slide“.

Front-end view of the model when animation type is selected as “Popup”.

Front-end view of the model when animation type is selected as “Slide”.
Show Content as :
Admin can show content as “HTML” or “Text”.
Terms & Conditions :
Here admin enters Terms & Conditions.
Privacy & Cookie Policy :
Here admin enters Privacy & Cookie Policy.
Front-end
Custom Registration Fields will appear on the customer sign-up form as per the screenshot.

The customer can also view and manage the additional information from their account.

Similarly, if you are running a jewellery online store and looking for a feature where your customers can build their custom rings and then add to their cart them, you can check Magento 2 Custom Ring Building.
That’s all for the Adobe Commerce Custom Registration Field module still have any issues feel free to add a ticket and let us know your views to make the module better at Webkul Support System.
You may also browse many other top-quality Adobe Commerce Extensions for your online store.
Current Product Version - 5.0.5
Supported Framework Version - Magento 2.0.x, 2.1.x, 2.2.x,2.3.x, 2.4.x

6 comments
Thanks for your feedback.
It is not possible for Registration fields to get displayed on one store & hide it from the second store. But this functionality can be achieved through customization that is a paid service.
For further information regarding this module, you can contact us at [email protected].