CS-Cart Zoho Inventory Integration supports Inventory management from CS-Cart to Zoho.
It will allow the importing of products from multiple Zoho accounts. Also, synchronize Zoho Inventory products with CS-Cart.
The admin can import/export and sync the orders from Zoho Inventory to CS-Cart and vice versa.
Store owners can also import/export customers from CS-Cart to Zoho and Zoho to CS-Cart.
All new data will sync automatically if the permission is on from the CS-Cart end.
You can also check the OpenCart Zoho Inventory Connector which allows the syncing of data between the OpenCart store and Zoho Inventory.
Features
- The admin can manage multiple Zoho Inventory accounts.
- The vendor and admin can import products from Zoho Inventory to CS-Cart.
- Sellers and admins can easily export products from CS-Cart to the Zoho Inventory.
- The store owner can easily import customers from Zoho Inventory to CS-Cart.
- The admin can easily export customers from CS-Cart to Zoho Inventory.
- The admin and vendor can also import orders from Zoho Inventory to CS-Cart.
- The admin and vendor can easily export orders from CS-Cart to the Zoho Inventory.
- The admin can sync newly created orders.
- The admin can sync newly created customers.
- The admin and vendor can handle queue processing to sync products or orders.
Installation of CS-Cart Zoho Inventory Connector
To install CS-Cart Zoho Inventory Connector, follow these steps:
Go to Manage Add-ons, click on the gear drop-down, and select Manual Installation.
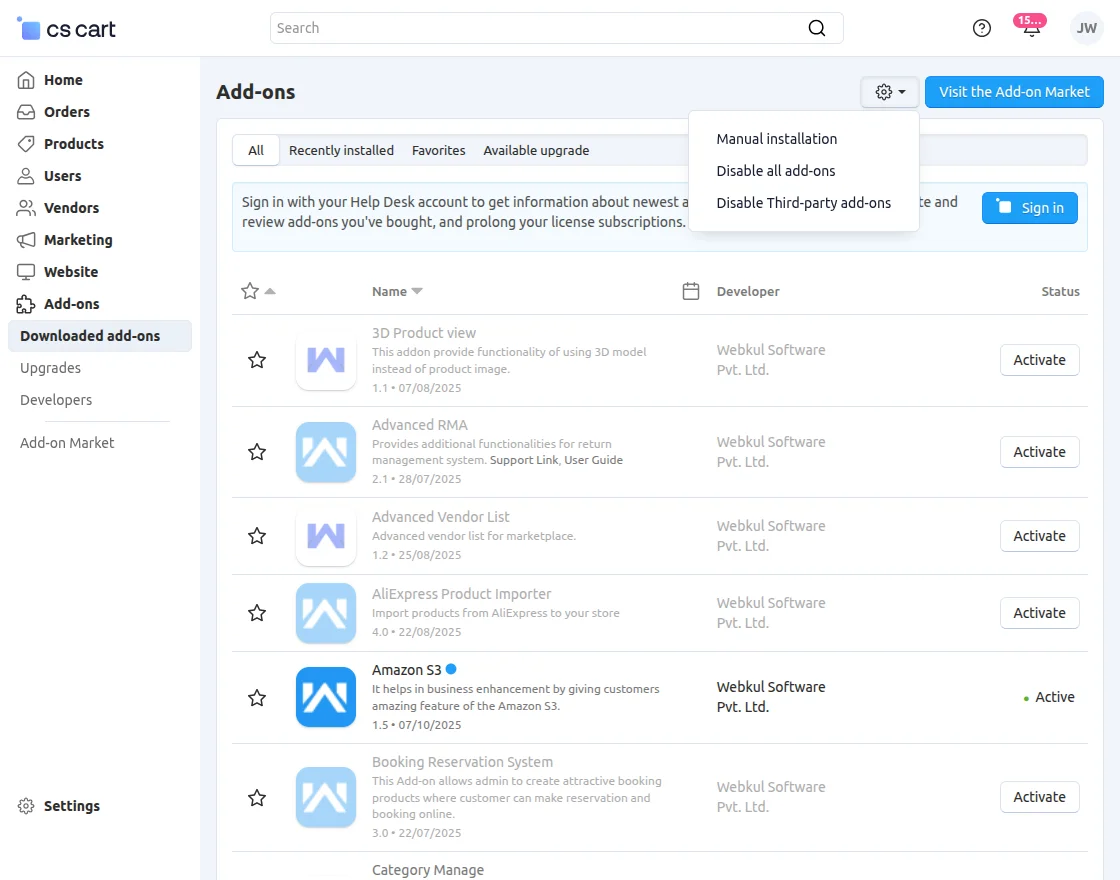
Select the zip File and click on Upload&install.

After installation of the add-on, you will find the “Zoho Inventory” in the list of available add-ons.
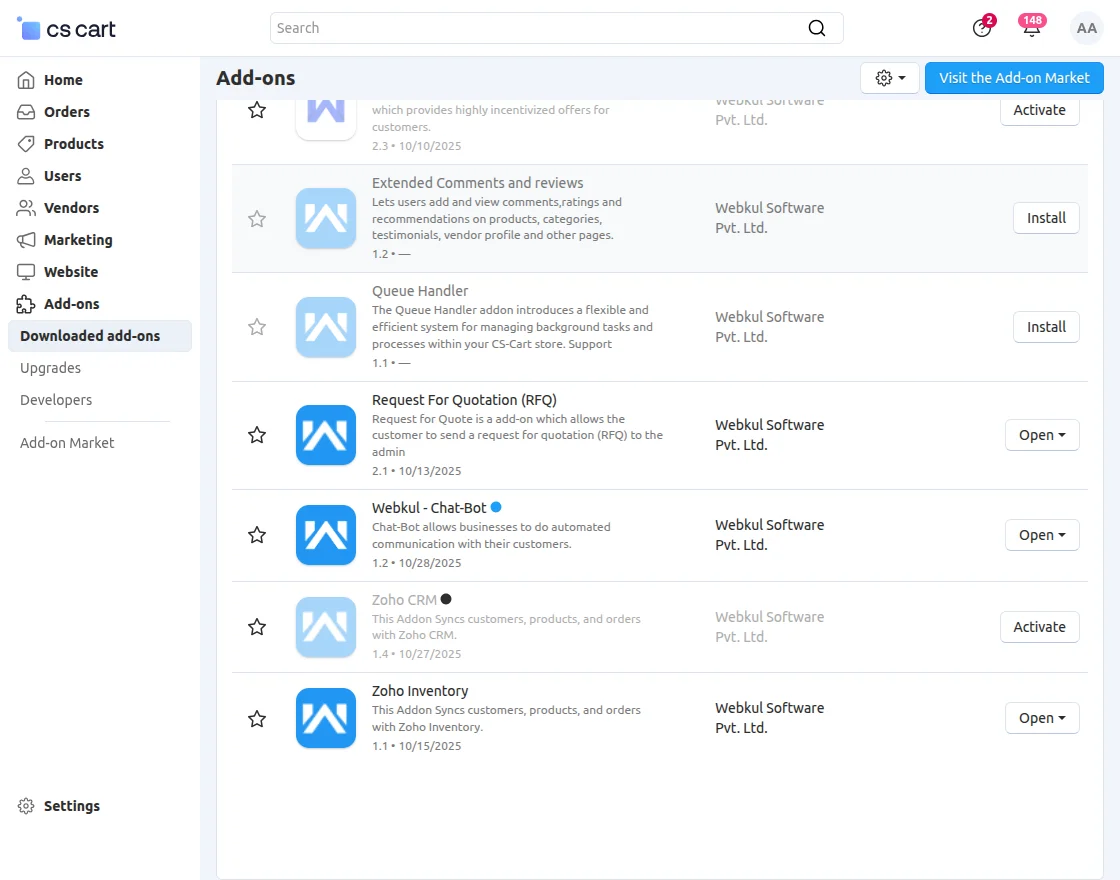
Note: For bulk import or export operations, ensure that the Queue Handler add-on is installed and activated for smooth processing.
Create Zoho Inventory Account
Go to the Zoho API console and sign in using your email ID. Once you log in, a new page will open.

After that, click on the Add Client button and create a client.

Here, the user needs to choose the client type.

Once it’s selected as Server based application, then click on the Create Now option.
It will navigate you to another page to enter the client details.

Once the details are entered, your Zoho API client credentials will be created.
Note:
In the given scenario, we need to determine the appropriate URL based on whether the SEO (Search Engine Optimization) Add-on is activated or not.
If the SEO Add-on is activated, we will utilize the URL “baseurl/zoho-inventory-authenticate“.
On the other hand, if the SEO Add-on is not activated.
We will use the URL “baseurl/index.php?dispatch=wk_zoho_inventory.authenticate”.

Here you can check client credentials, client secret keys, and settings.

In the settings tab, the admin can enable or disable the permission for multiple stores/local.

How to get an organization ID?
Once the admin gets the API credentials, they need to create an organization on Zoho Inventory.

To create an organization, the admin needs to sign in to Zoho Inventory. After that, it will navigate you to the dashboard of the Zoho inventory.

Click on the organization tab to create an organization.

Here, click on the manage button, and it will redirect you to another page.

Here, the admin can create a new organization and check the previously created organization with the organization ID.

Once the organization is created admin will get the organization ID, which will be used in CS-Cart Zoho integration.
CS-Cart Zoho Inventory Configuration
After successful installation, configure the Zoho Inventory account with the CS-Cart store.
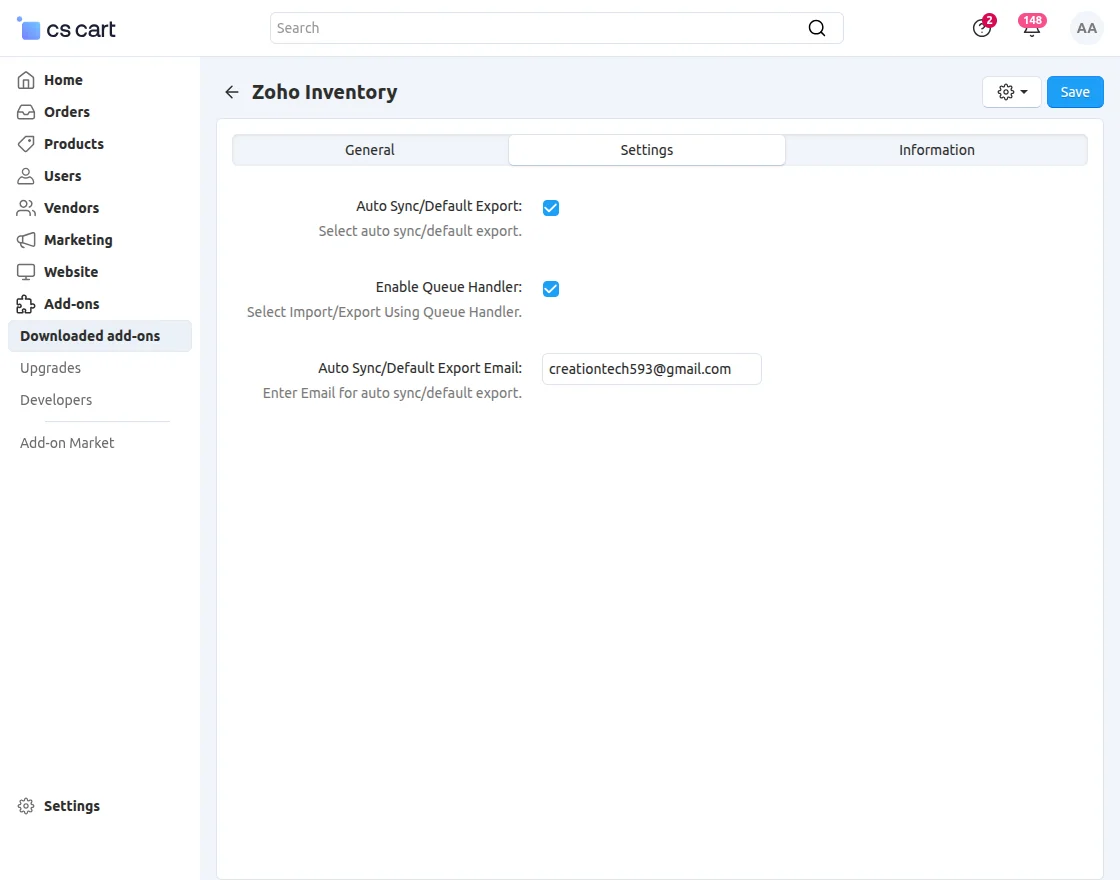
Click on the Zoho Inventory, and it will navigate to the settings page of the Zoho Inventory configuration.
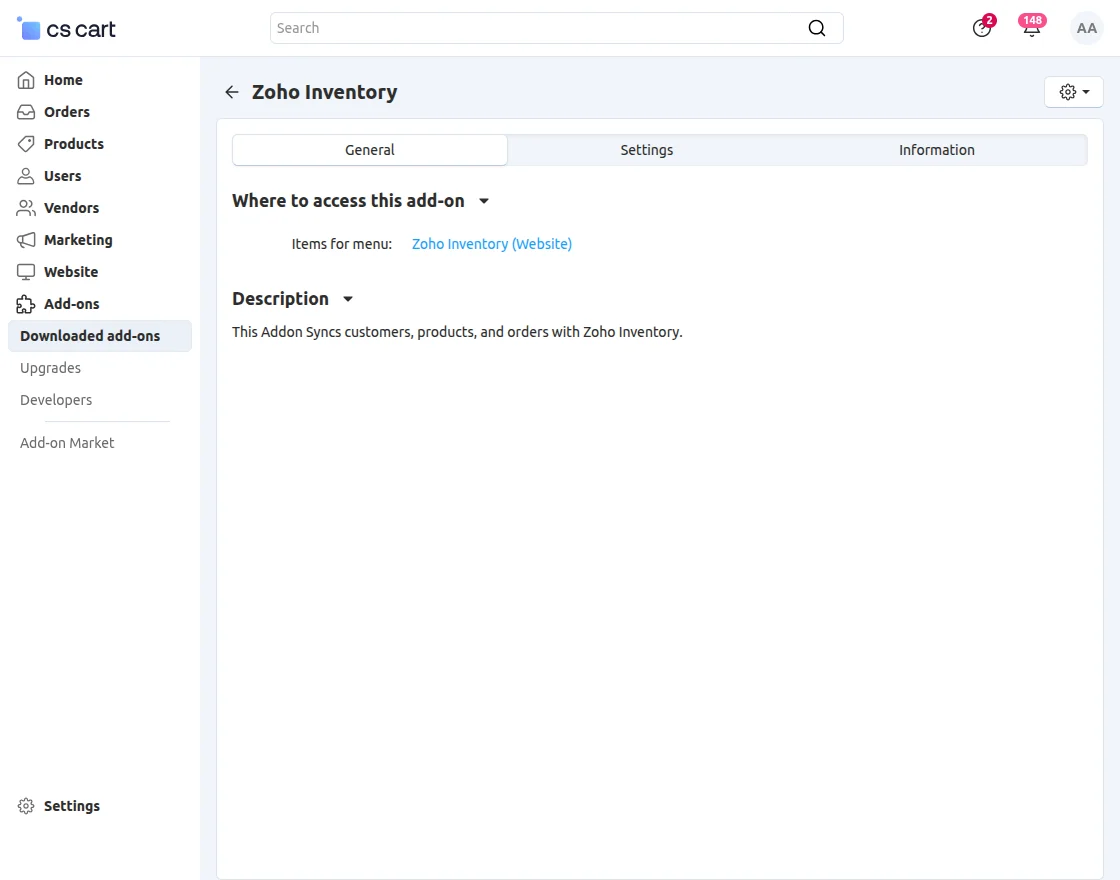
In the settings tab, the admin can allow the permission for synchronization.
Zoho Inventory Integration
The admin needs to navigate to the website > Zoho Inventory.
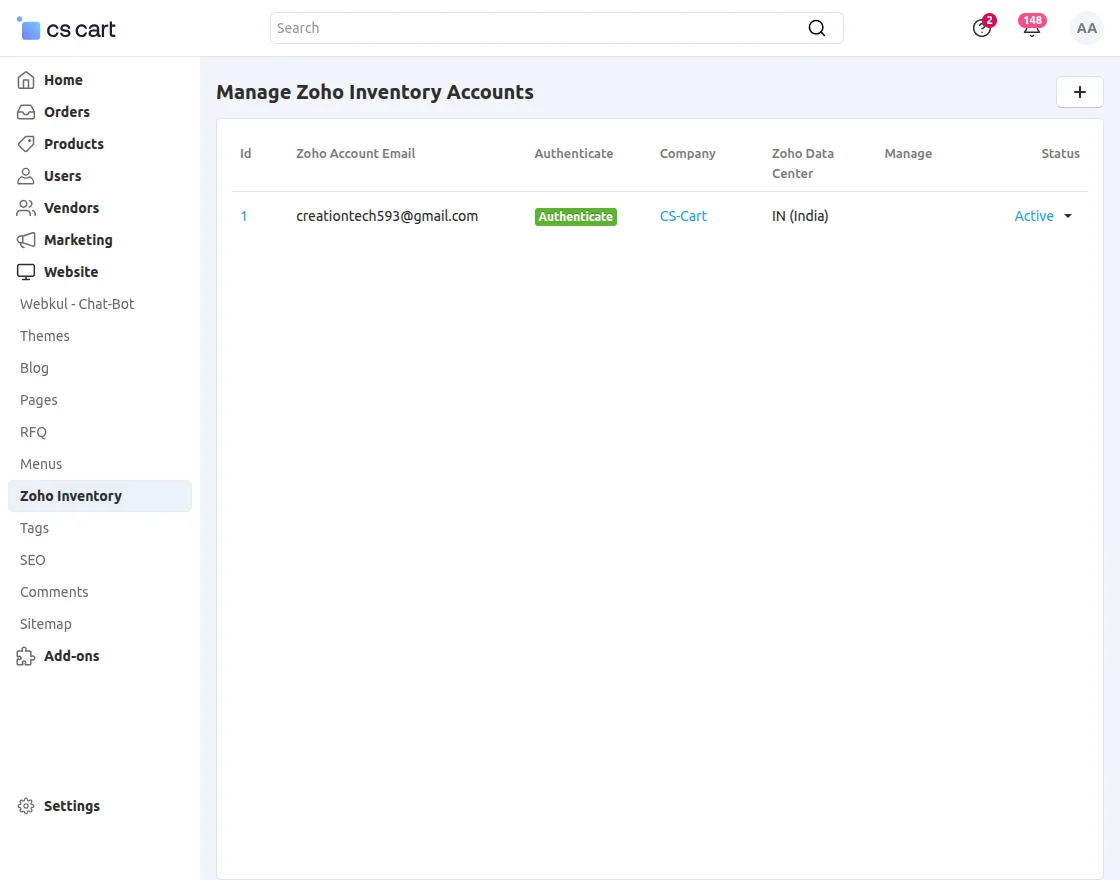
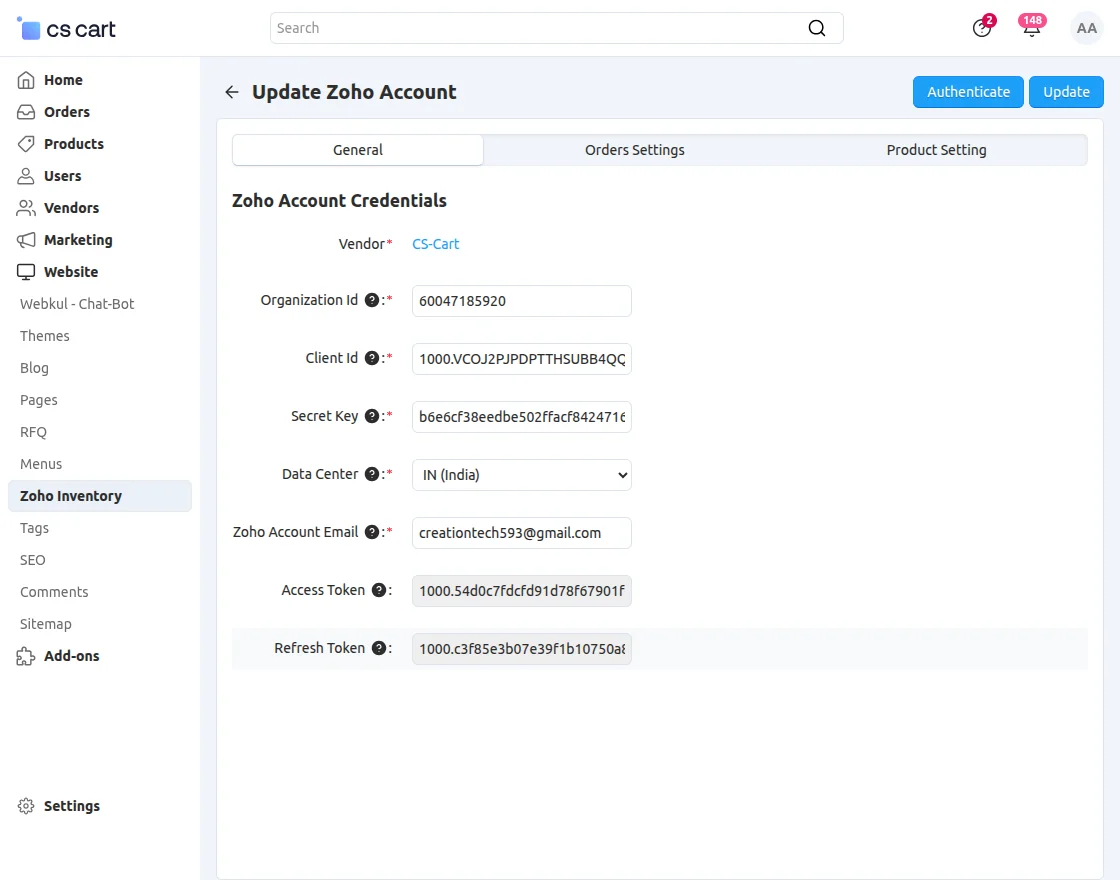
Click the ‘+’ icon to add Zoho account details and fill in the fields: Organization ID, Client ID, Secret Key, and Data Center.
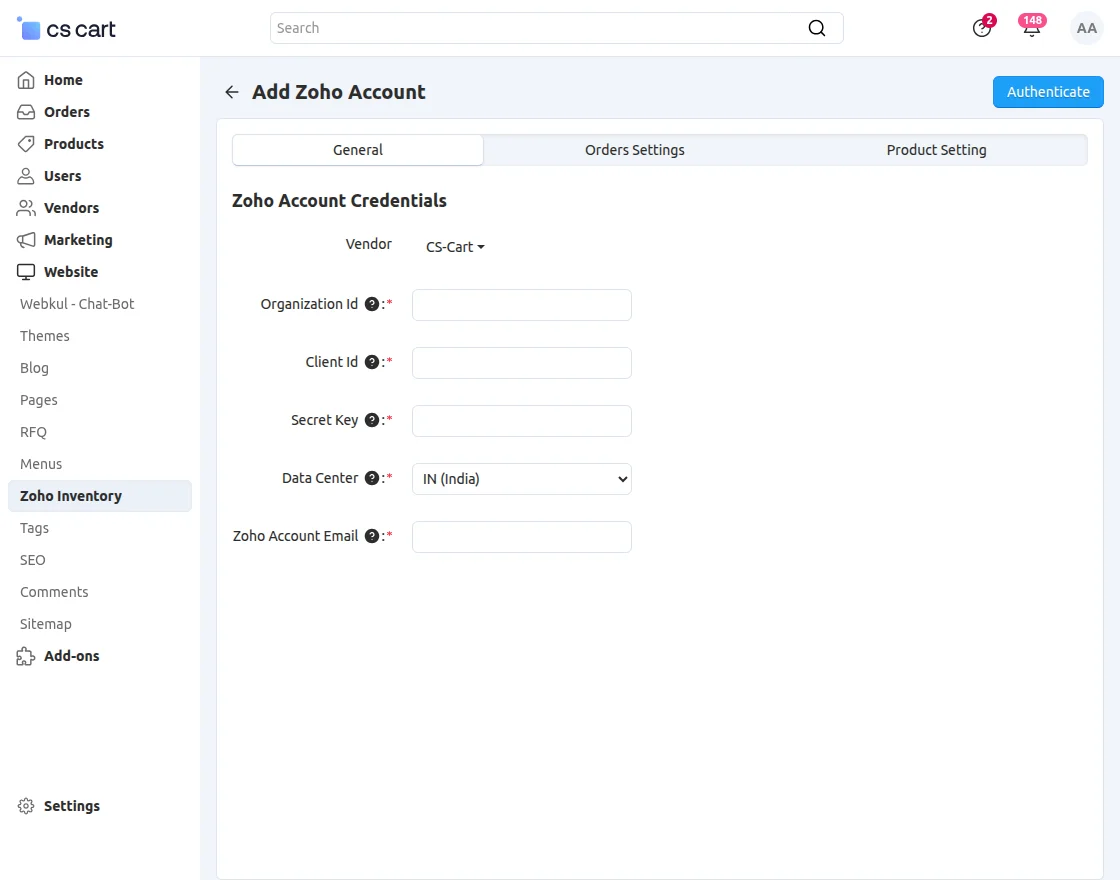
Once the account is created, access and refresh tokens will be generated for the Zoho account credentials.
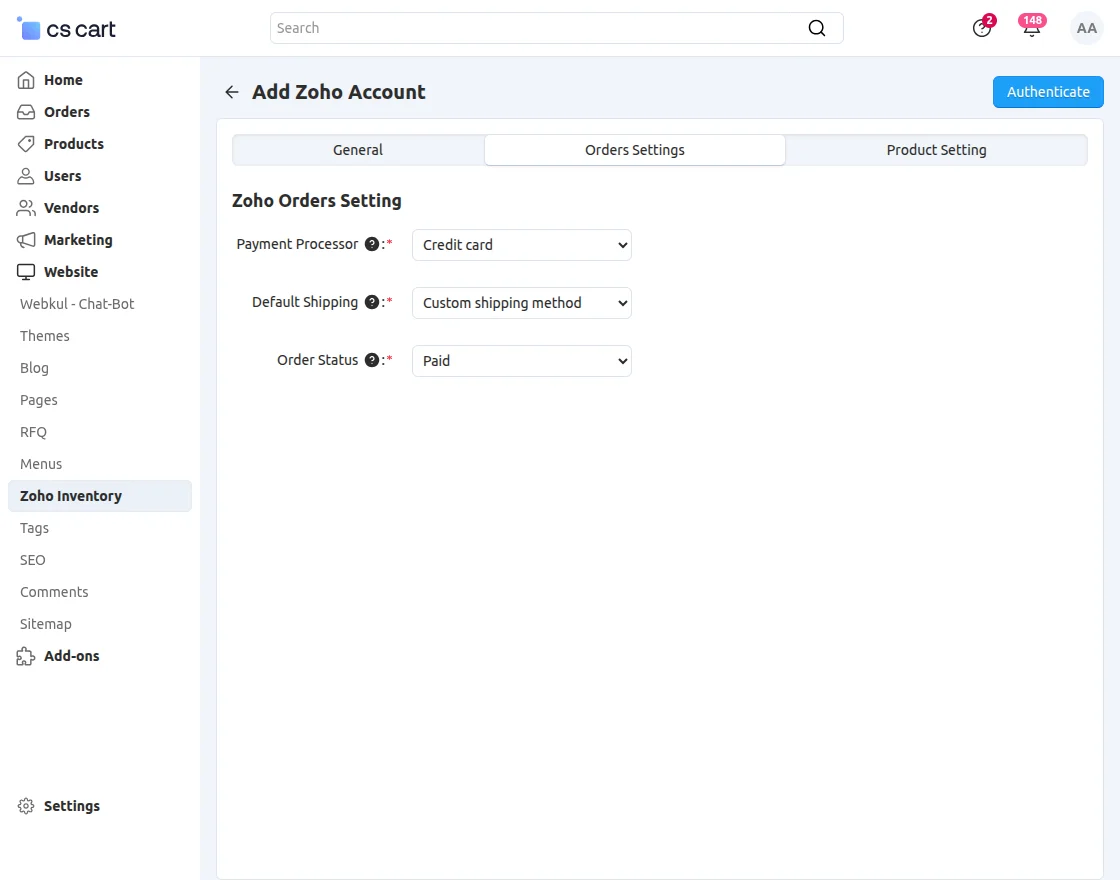
Afterward, the admin will add the order settings.
Here, the admin needs to enter the payment processor method and the default shipping method.
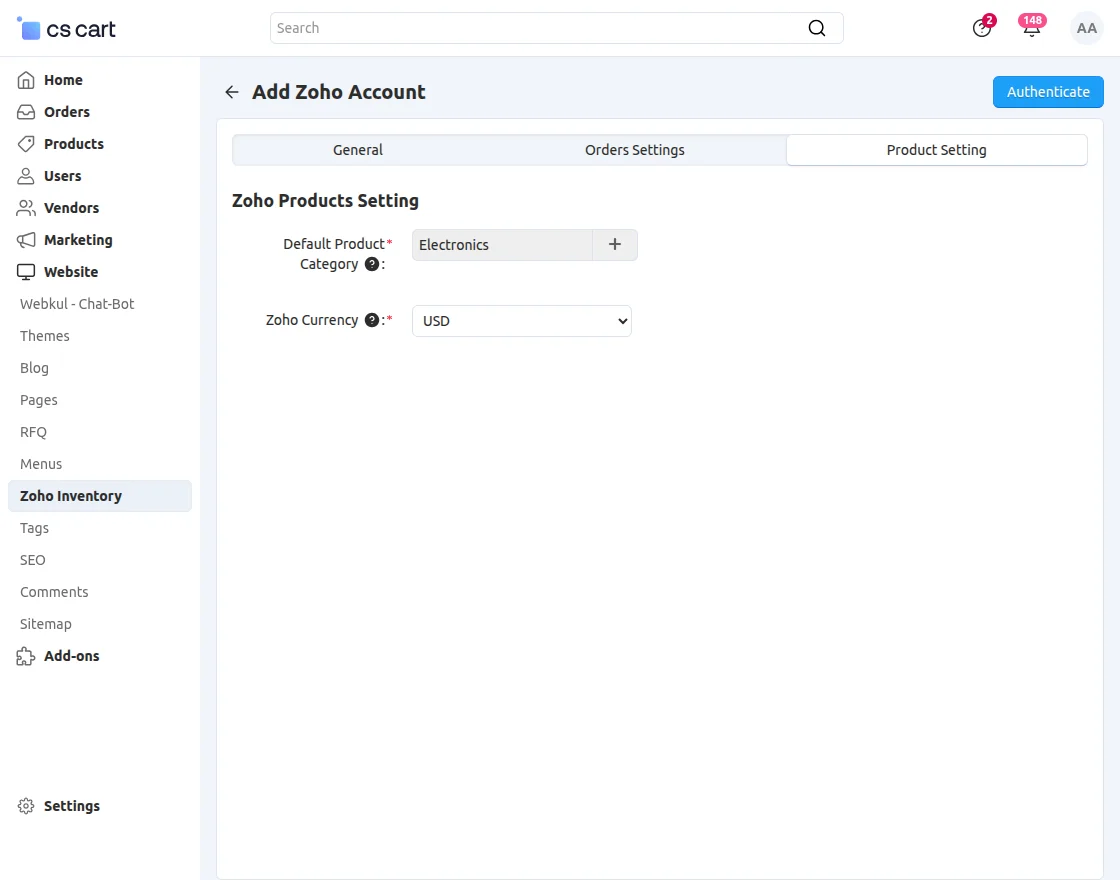
After the order setting admin needs to add product settings like the default category of imported/exported products and Zoho currency.
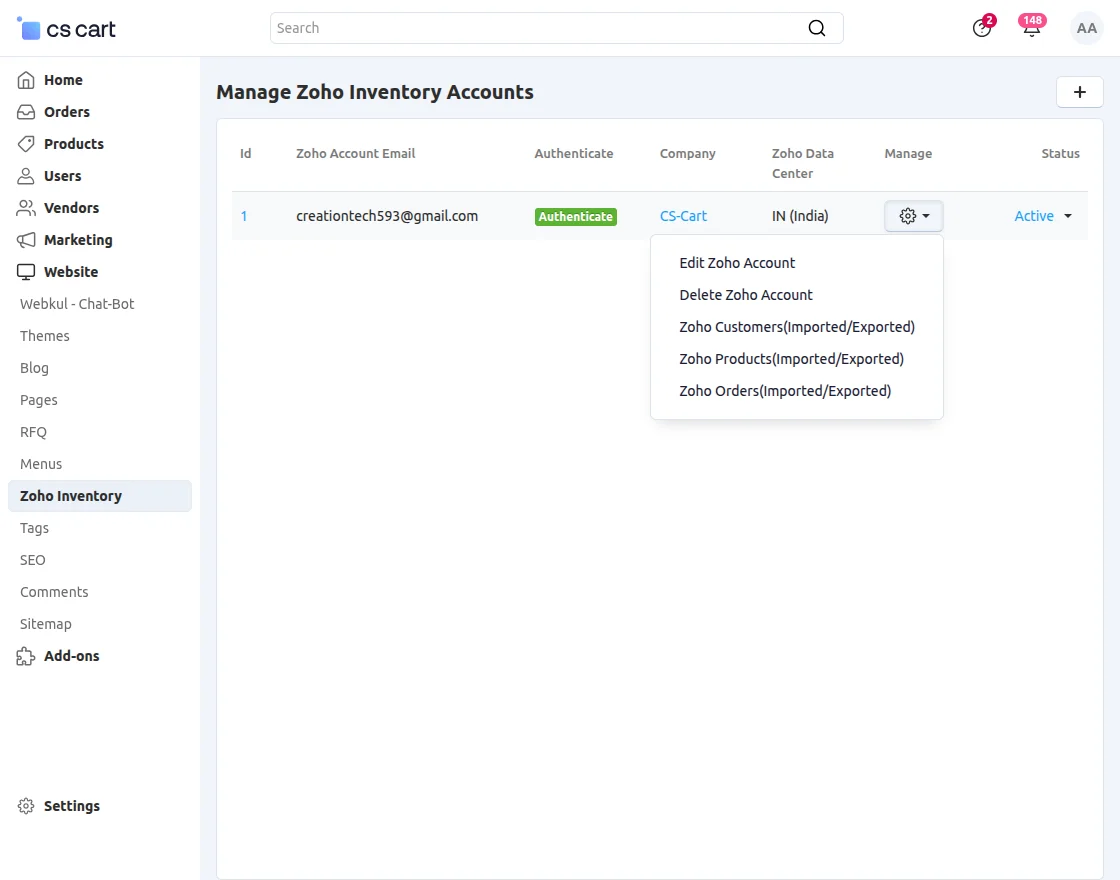
Note: The admin can edit and delete any Zoho account from CS-Cart.
Import/Export Customers
Once the account is created, the admin can import and export customers between CS-Cart and Zoho Inventory.

When the admin chooses to import customers, it redirects to the following page displaying the list of customers fetched from Zoho Inventory.
Where the admin needs to select the customers and can import them either in bulk or one by one into the CS-Cart store.

Note: The admin can import customers one by one, and they can perform bulk actions.
The checkbox will be available only for non-synchronized customers.
When you click on the export customers tab new page will open for exporting the customers.
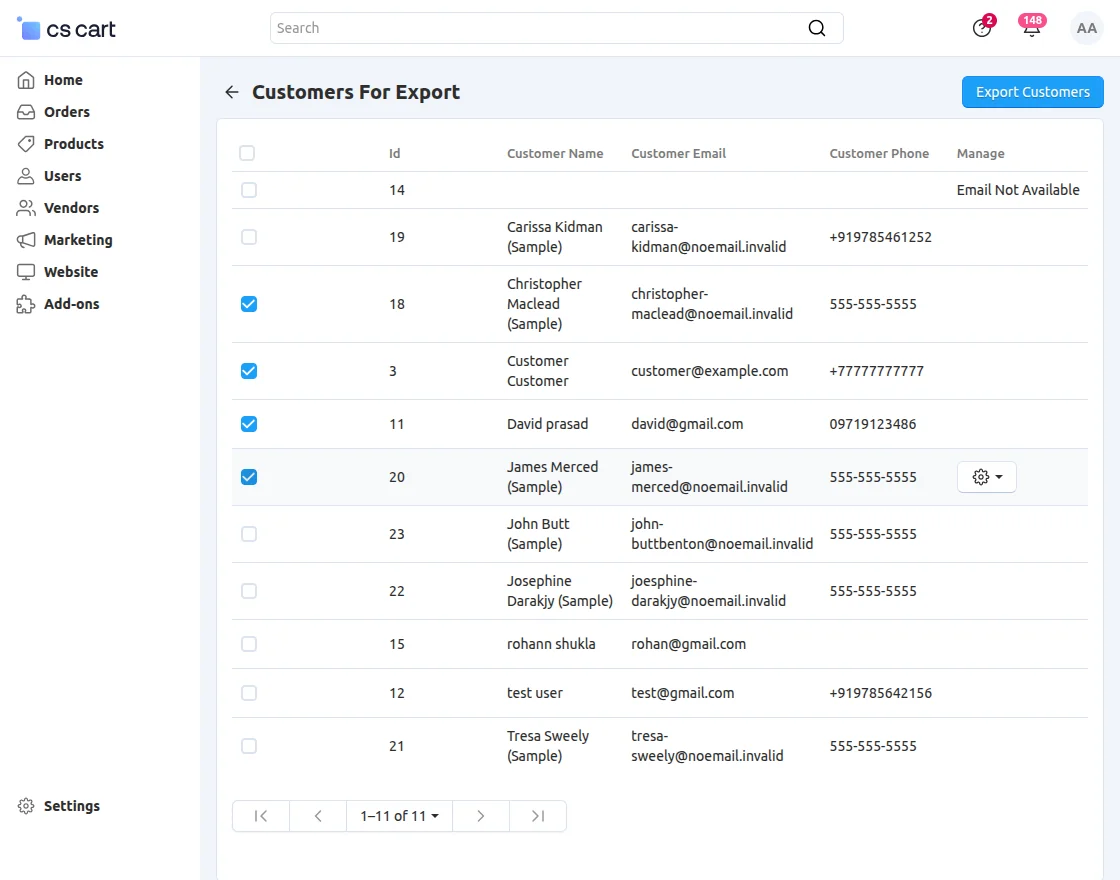
The bulk and single options work similarly for exported customers as well.
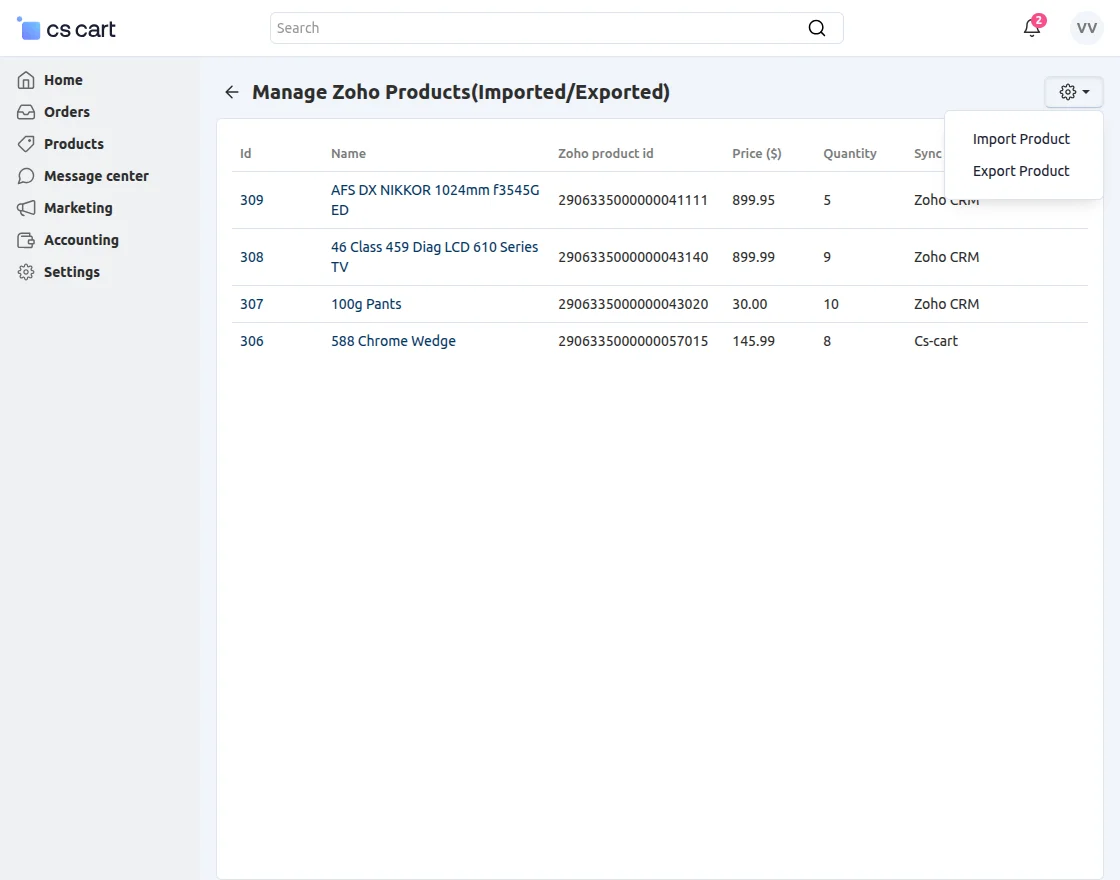
Import/Export Products
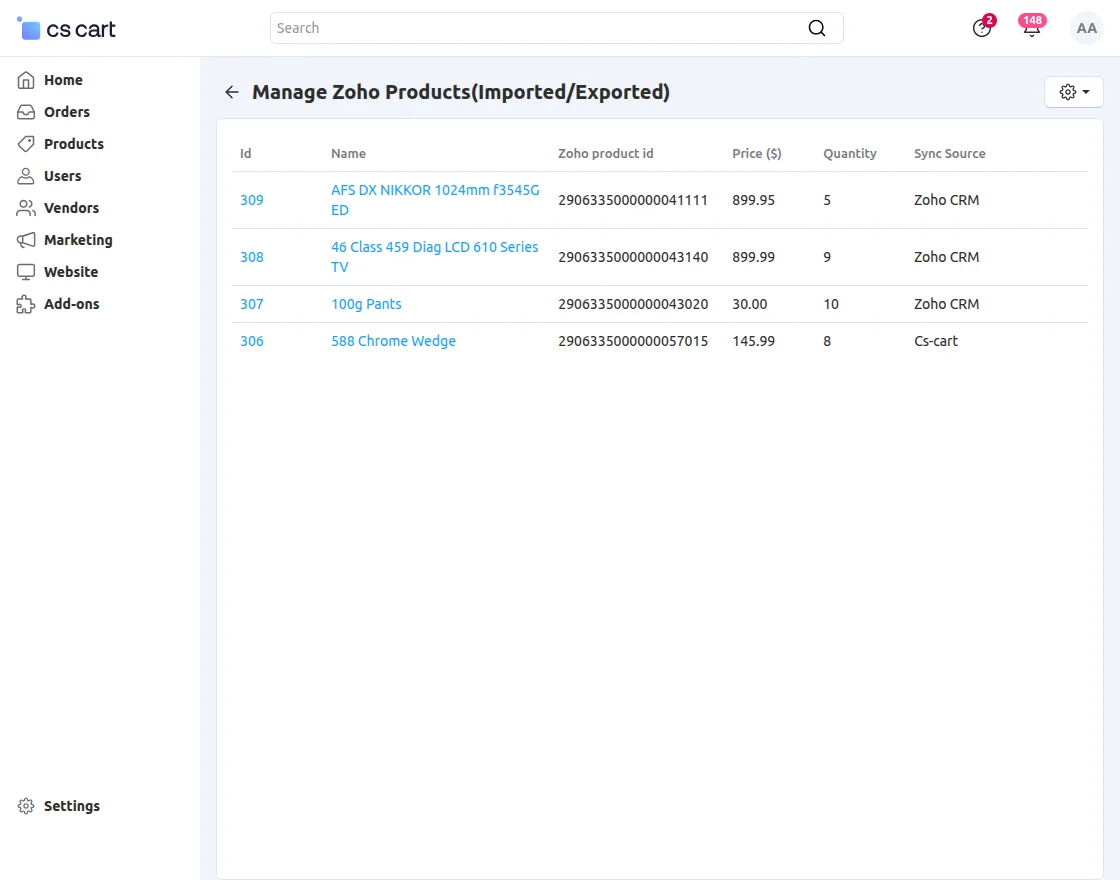
Similar to customers, the admin can sync the products.
After choosing the option, it will navigate to the product import/export list page.
Import Products:
When you choose to import products, you will be redirected to a page where you can select products and import them into the CS-Cart store.
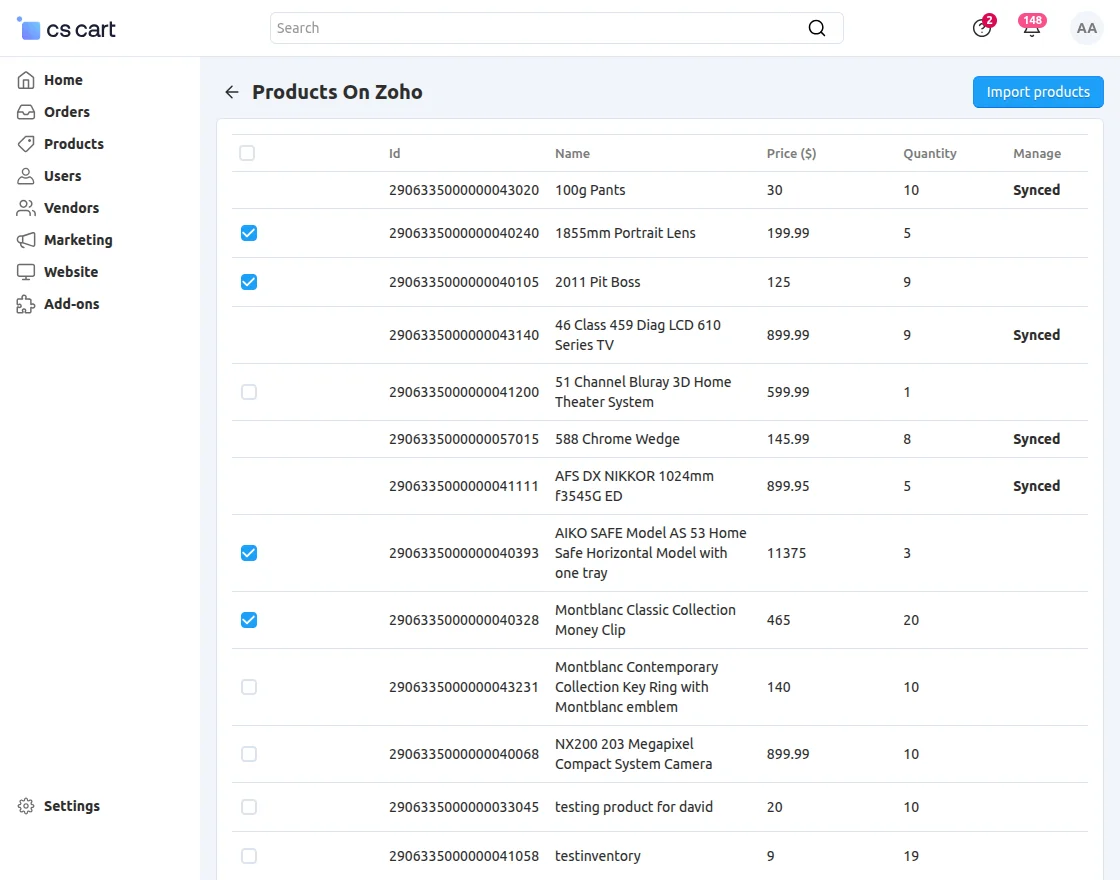
Import products one by one or perform a bulk action to mass import.
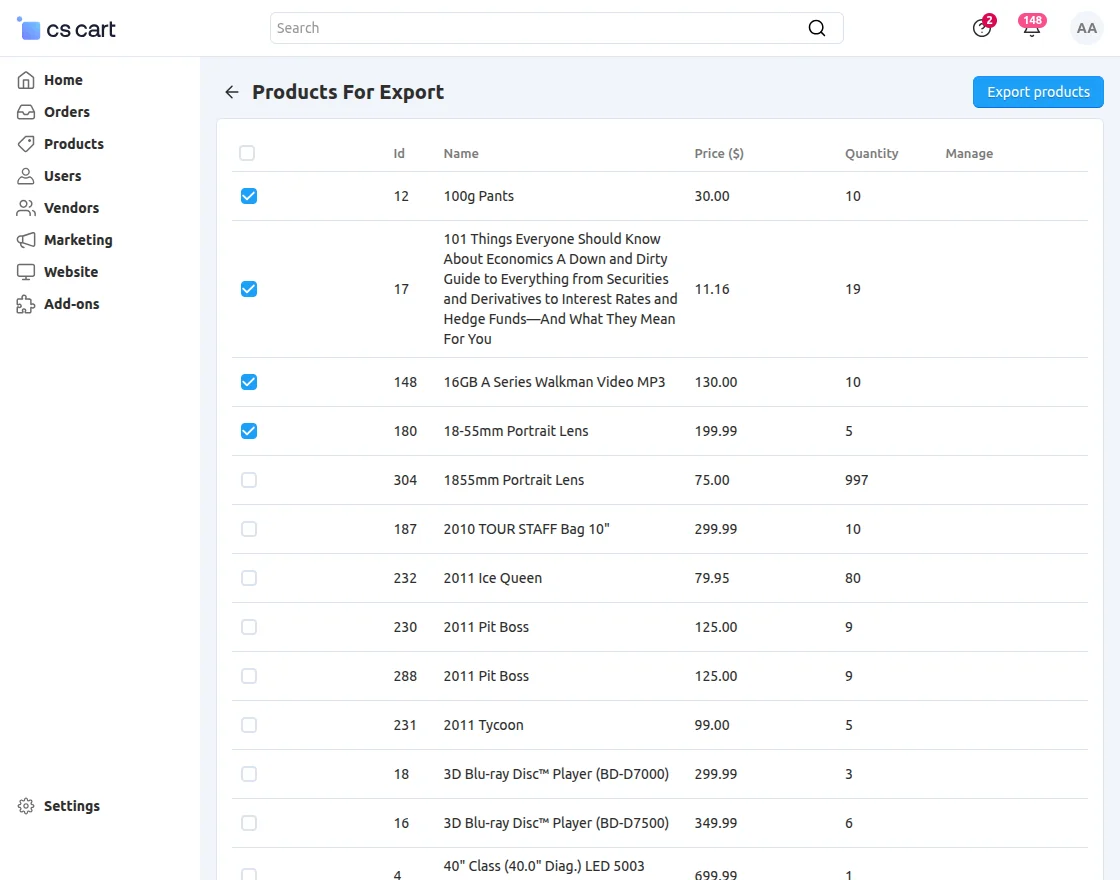
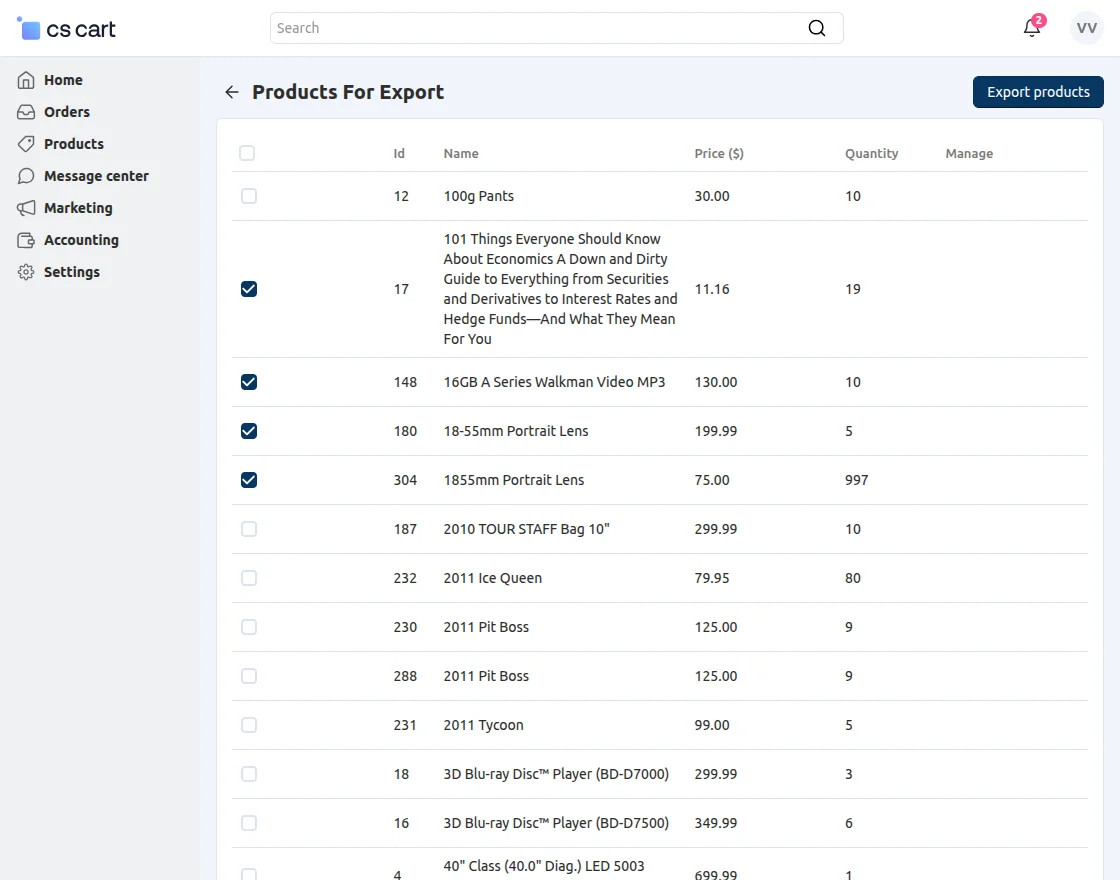
Export Products:
Unlike import, you can also export the products from CS-Cart to Zoho Inventory.
Import/Export Orders
The admin can also sync orders from Zoho to CS-Cart and vice versa.

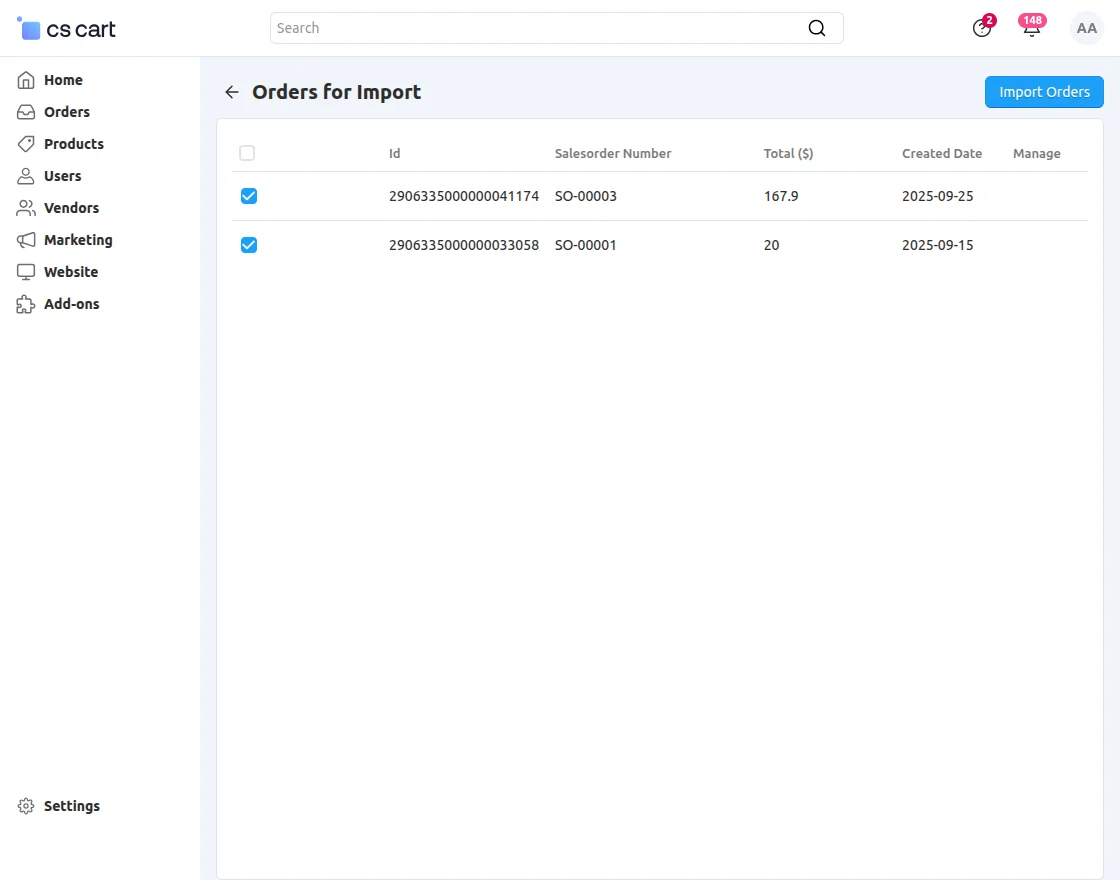
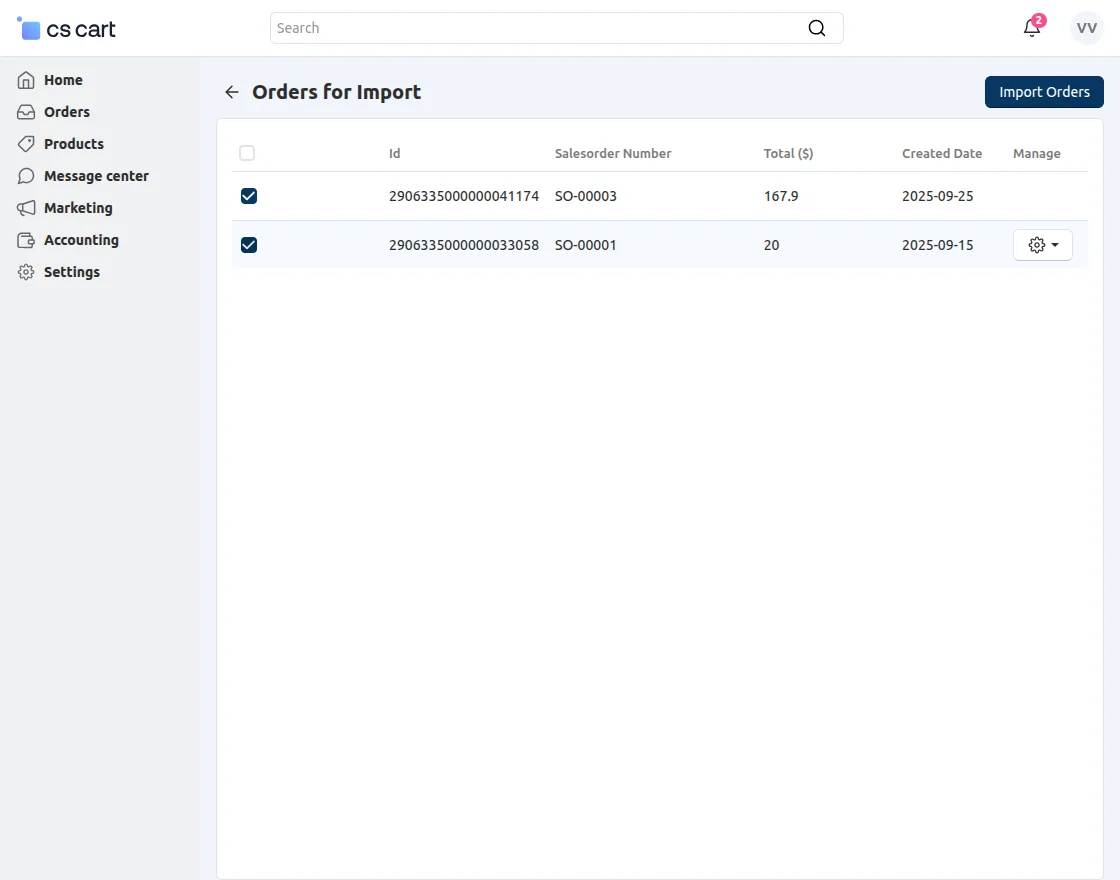
Import orders:
When you choose to import orders, it redirects to the following page, where you can view and import orders from Zoho Inventory into the CS-Cart store.
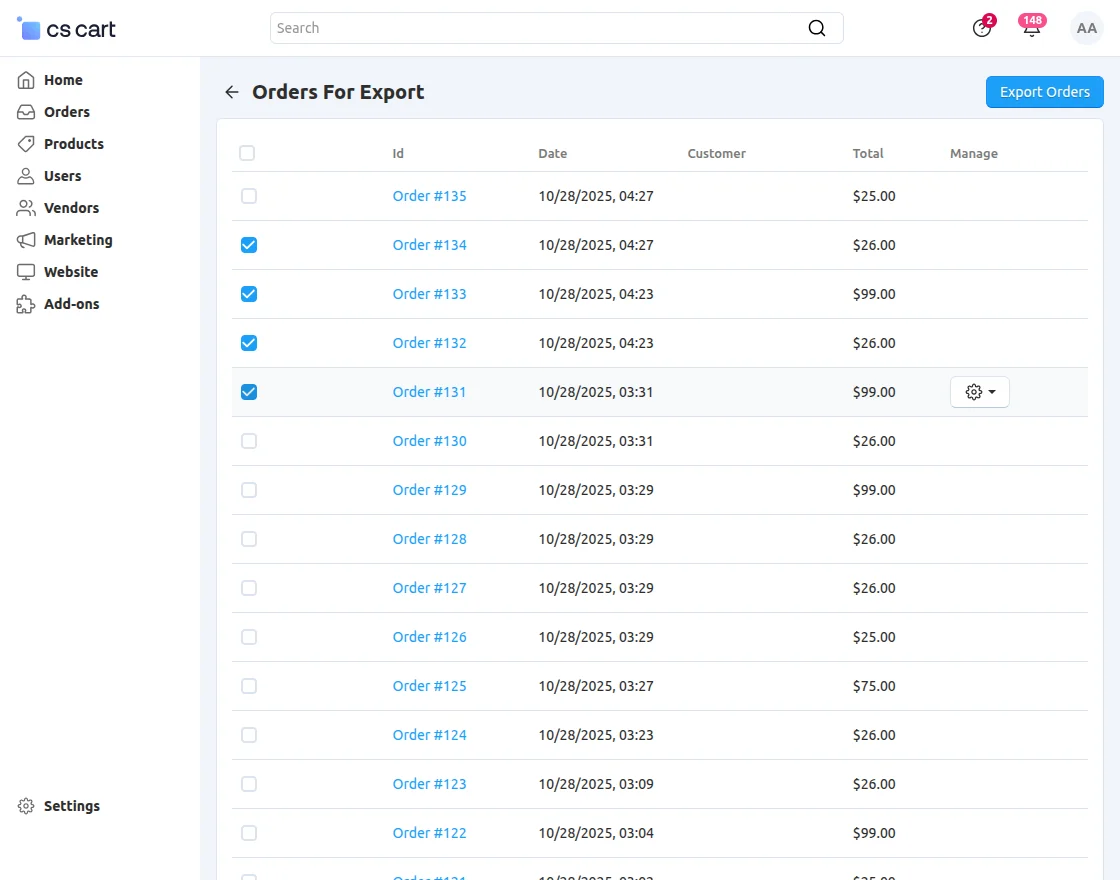
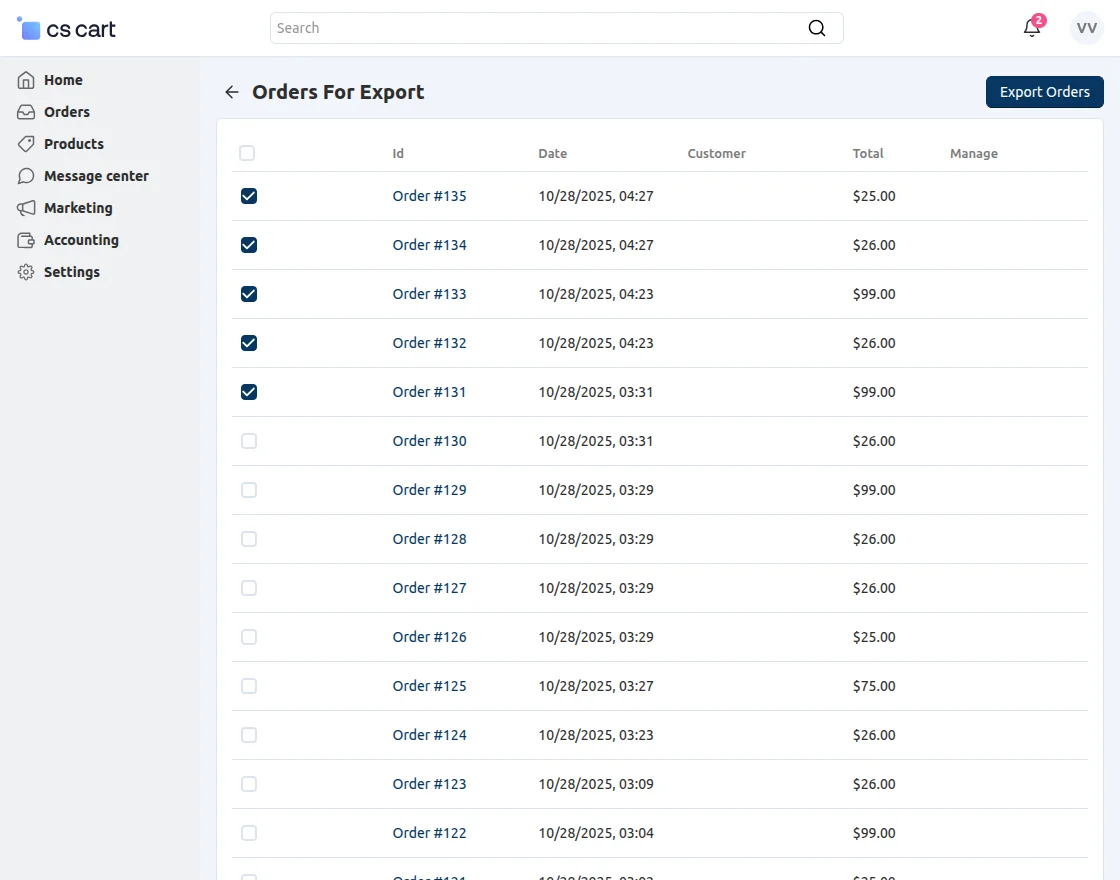
Export Order:
Like import, you can also export orders from CS-Cart to Zoho Inventory.
Note: If the admin deleted any synced order from CS-Cart then CS-Cart order cancellation will not work.
Zoho Inventory Synchronization – Webhook
In web development, a webhook is a method used to customize or extend the behavior of a web page or application using user-defined HTTP callbacks.
These callbacks are triggered by specific events, such as form submissions, new user registrations, or order placements.
In this case, a webhook is used to send data from Zoho (likely customers, orders, and items) into-
CS-Cart (an e-commerce platform), making the data synchronization process automatic and real-time.
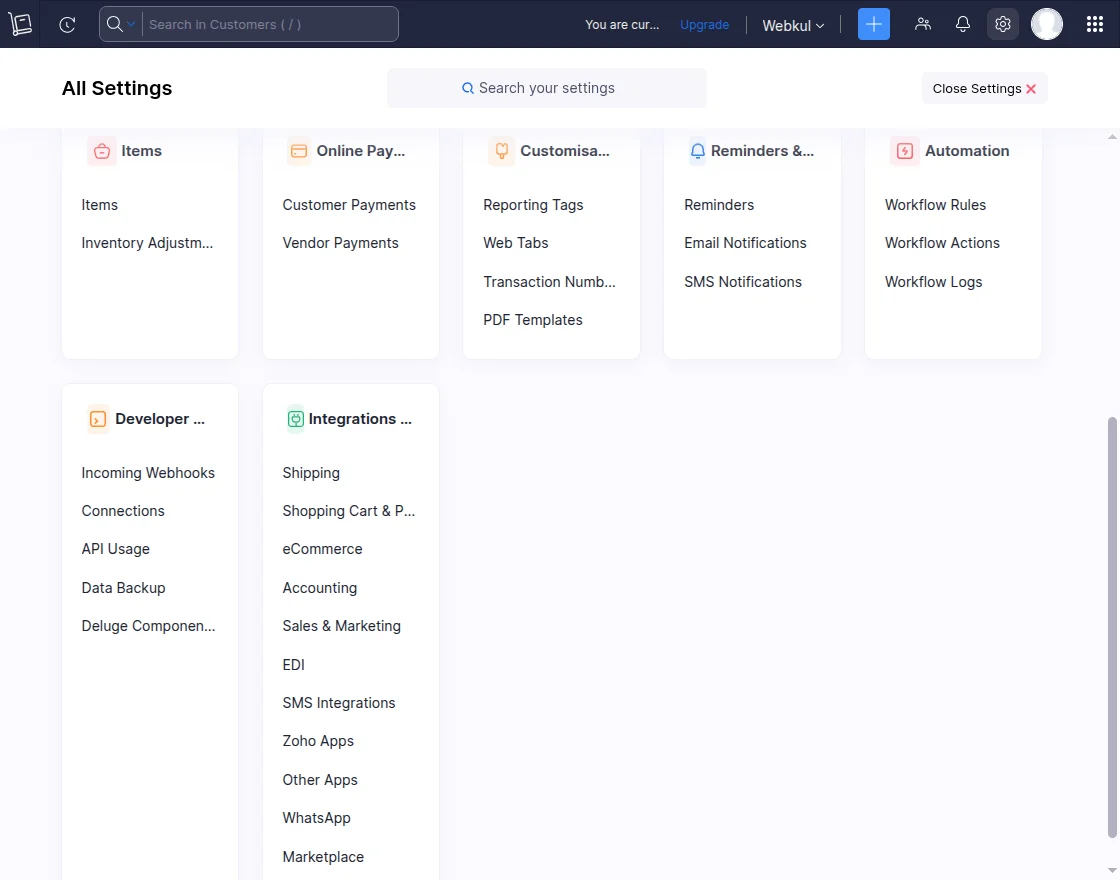
As we log in from Zoho and then click on Settings >> Automation, we see the list which includes –
Workflow Rules, Workflow Actions, and Workflow Logs, as shown in the snapshot below.
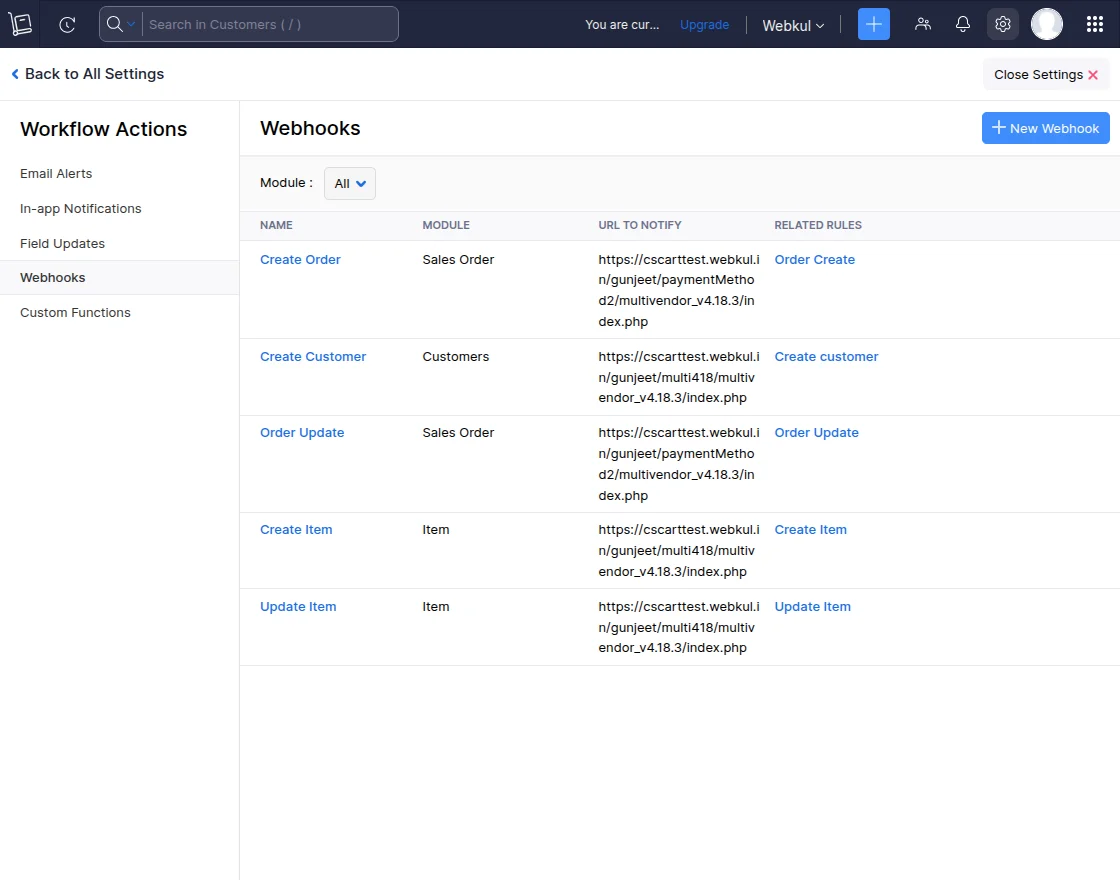
The vendor needs to click on the Settings >> Automation >> Workflow Actions >> + New Webhook, as shown in the snapshot below.
Workflow actions for customers can be created here, as demonstrated in the snapshot below.
- Name – fill in the name as per the requirement.
- Module – specify the module that is for customers, orders, or items.
- Description – fill in the description information.
- URL – it has 3 methods POST, PUT, DELETE, we need to select POST from the dropdown.
- Parameters – it has 2 parts: dispatch and account_id
- dispatch – we need to fill in the dispatch url
- account_id – we need to fill in the account id details generated at the CS-Cart
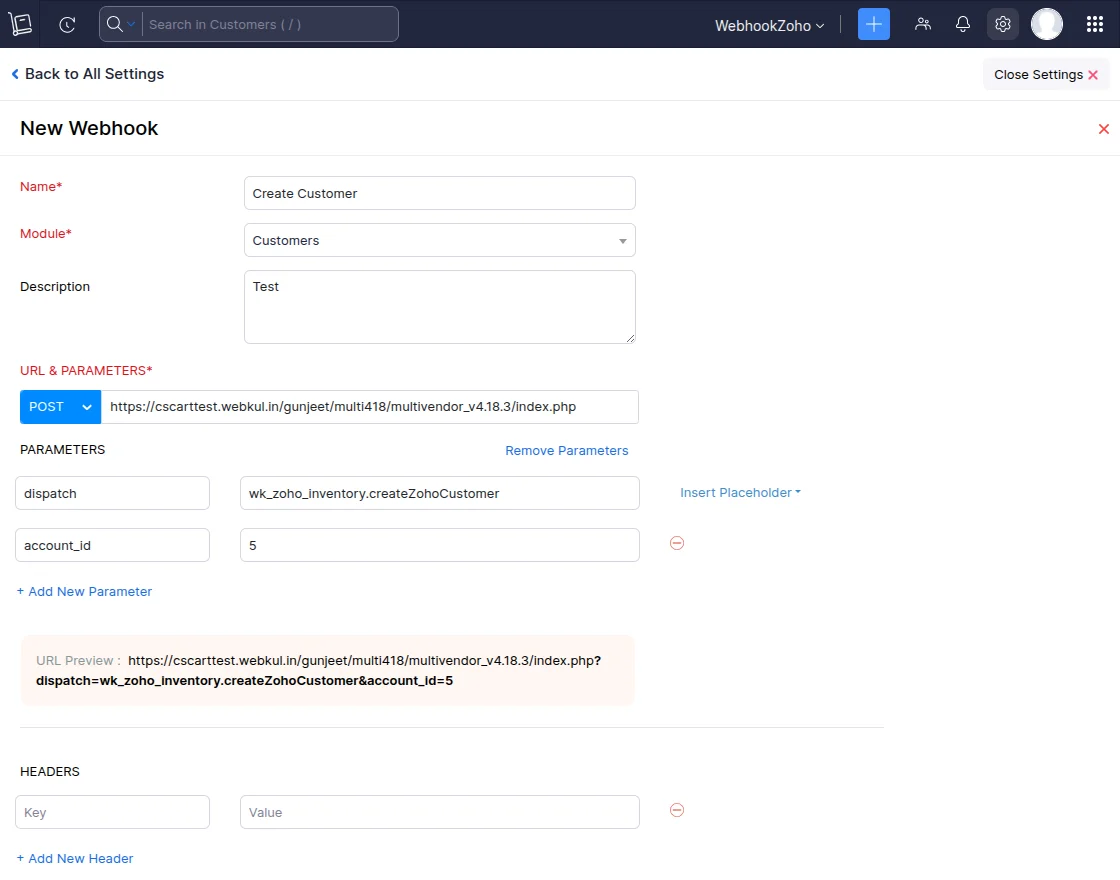
You can also edit and save the webhook configured for the customer.
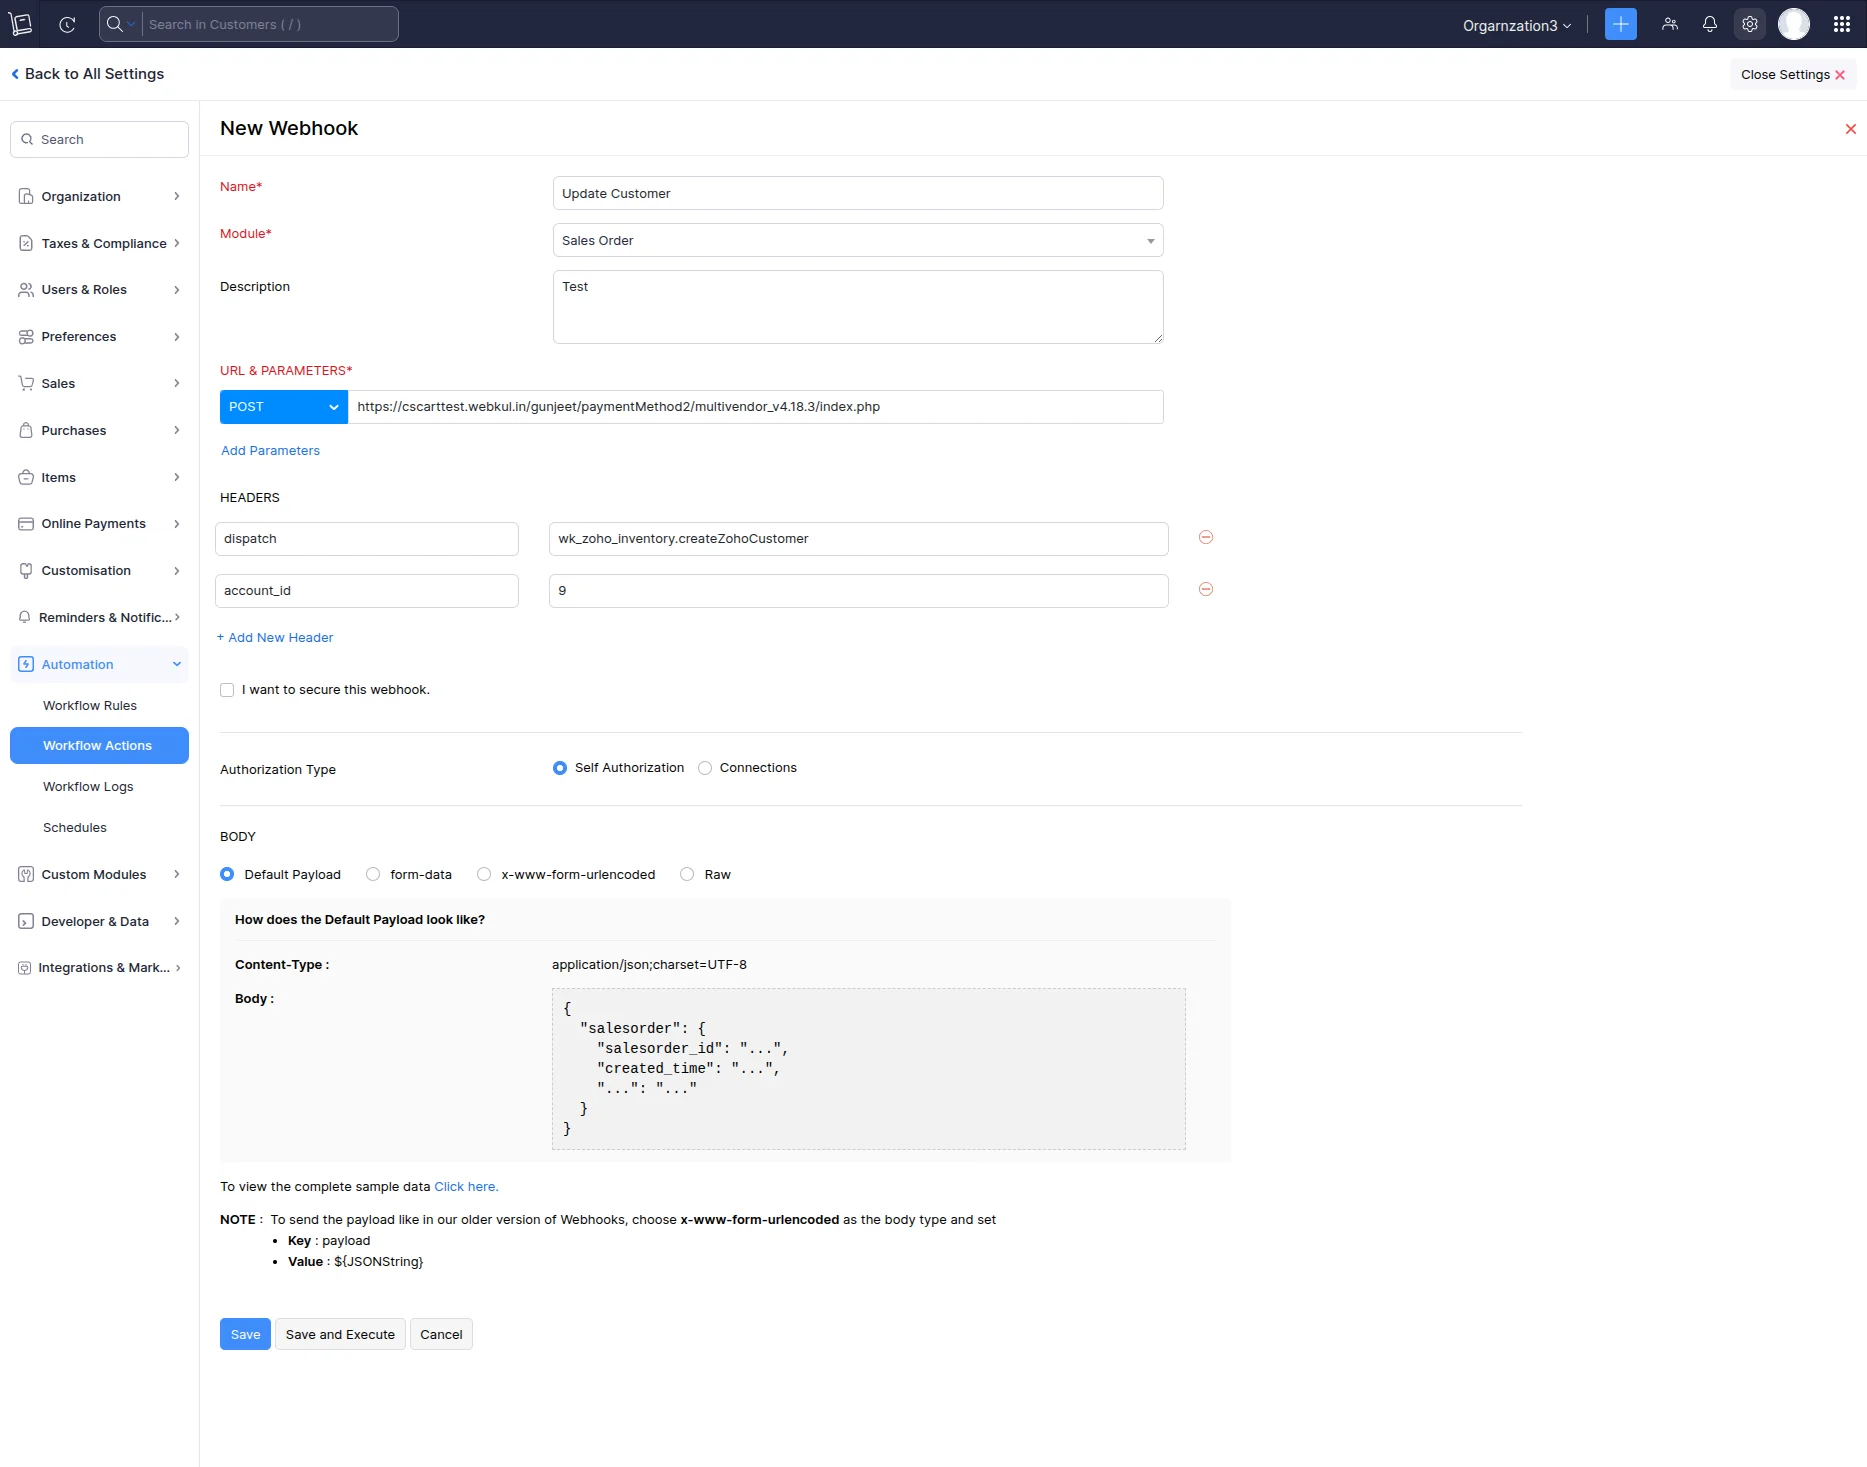
Here, the same steps go for updating customers, as shown in the snapshot below.
To create the Workflow Actions for the items, as shown in the snapshot below.
- Name – Fill in the name as per the requirement.
- Module – Specify the module that is for customers, orders, or items.
- Description – Fill in the description information.
- URL – It has 3 methods POST, PUT and DELETE, we need to select POST from the dropdown.
- Parameters -It has 2 parts: dispatch and account_id
- dispatch – We need to fill in the dispatch url
- account_id – We need to fill in the account id details generated at the CS-Cart
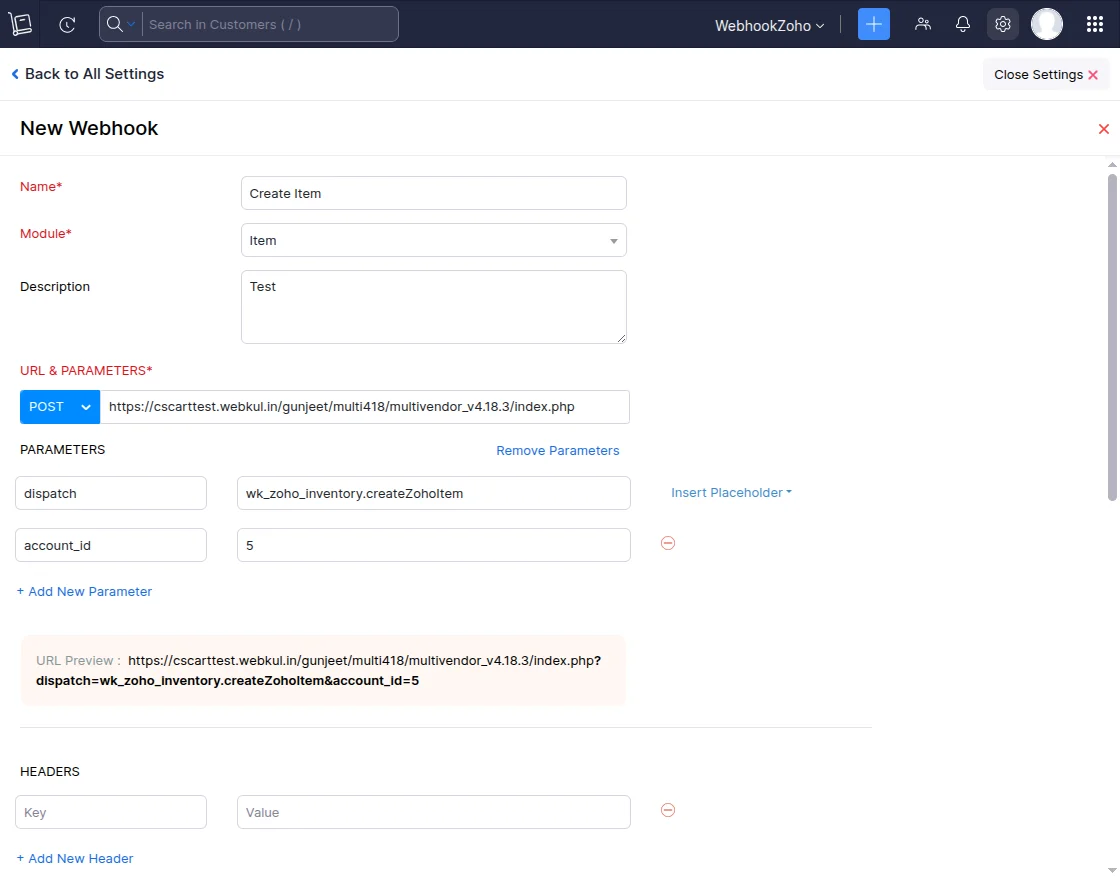
You can also edit and save the webhook configured for the items.
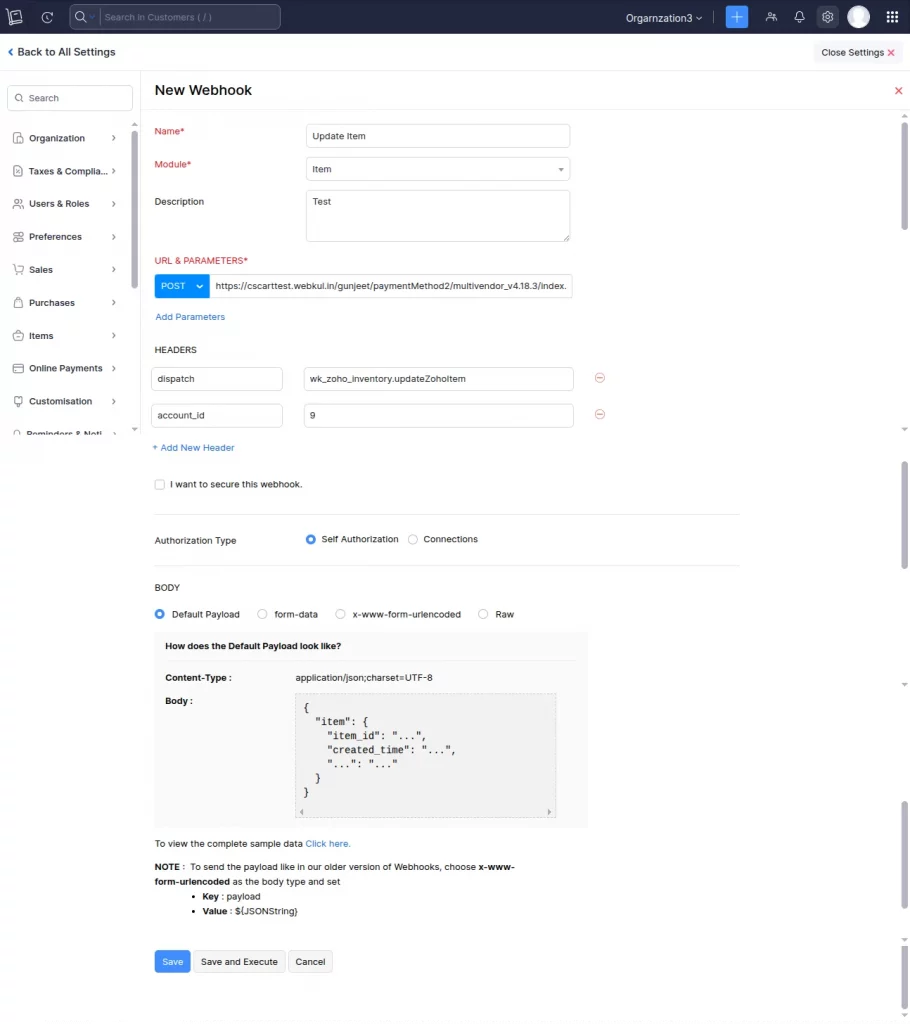
Similarly, the same steps go for updating items, as shown in the snapshot below.
Create the Workflow Actions for the orders, as shown in the snapshot below.
- Name – fill in the name as per the requirement.
- Module – specify the module that is for customers, orders, or items.
- Description – fill in the description information.
- URL – it has 3 methods ko POST, PUT, DELETE, we need to select POST from the dropdown.
- Parameters – it has 2 parts: dispatch and account_id
- dispatch – we need to fill in the dispatch url
- account_id – we need to fill in the account id details generated at the CS-Cart
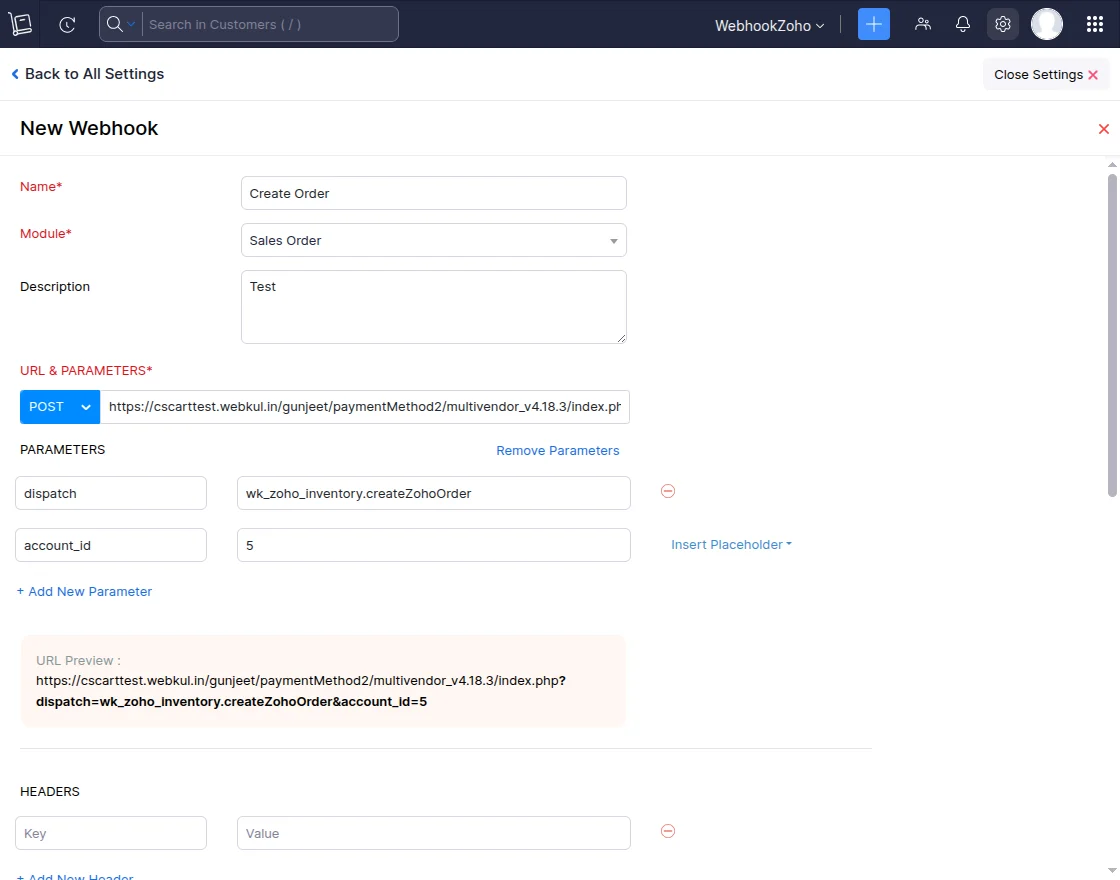
You can also edit and save the webhook configured for the orders.
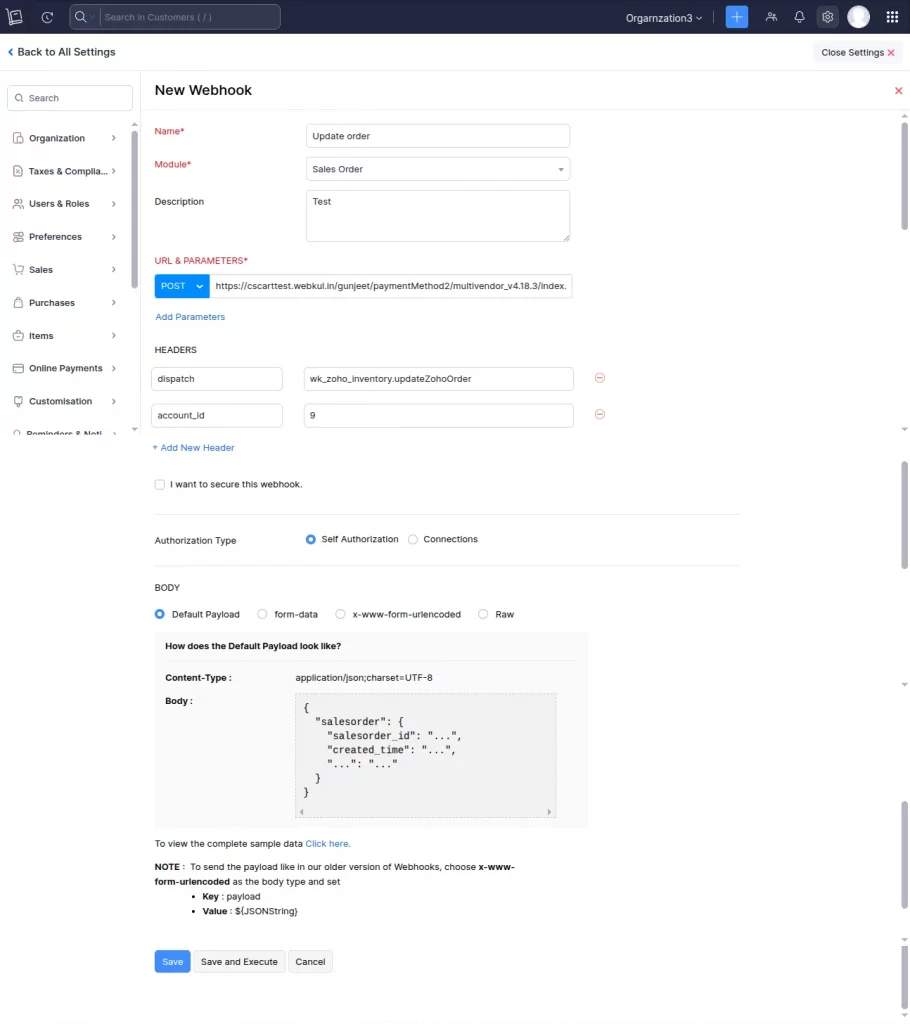
Here, the same steps go for updating orders, as shown in the snapshot below.
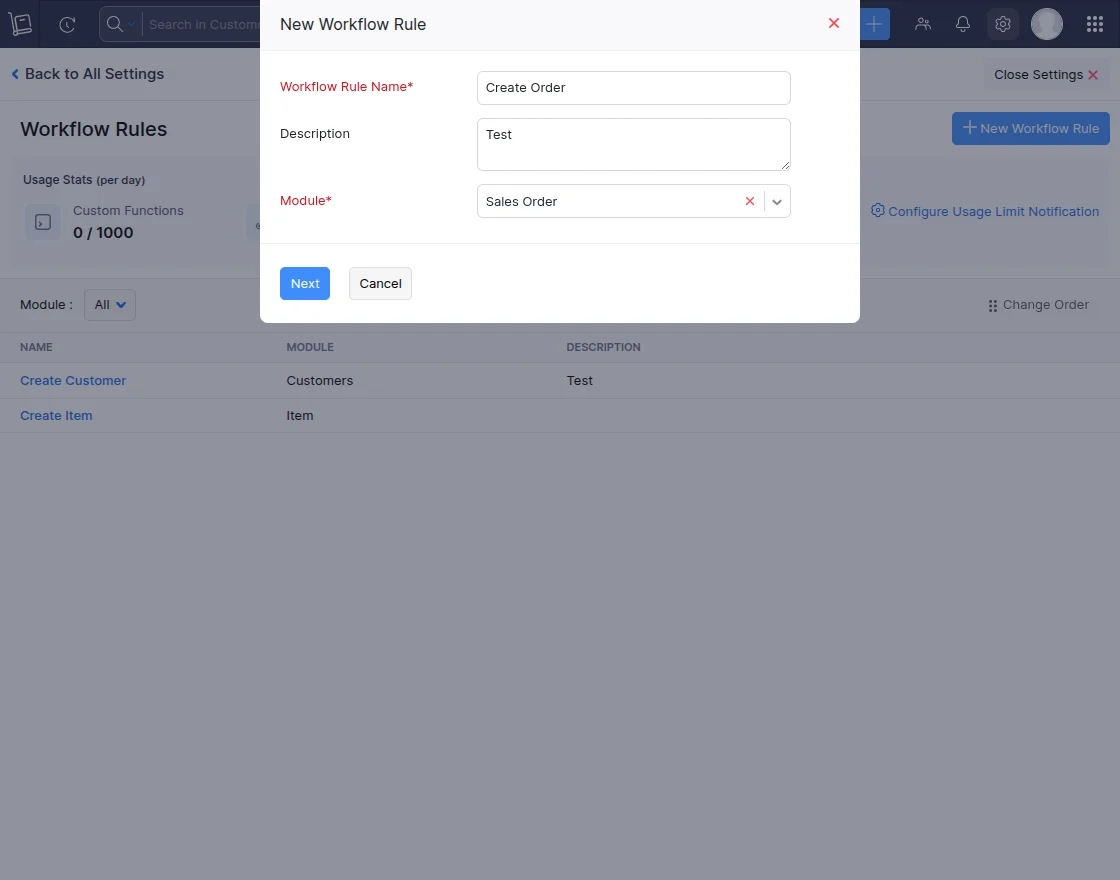
The vendor needs to click on the Settings >> Automation >> Workflow Rules >> + New Webhook, as shown in the snapshot below.
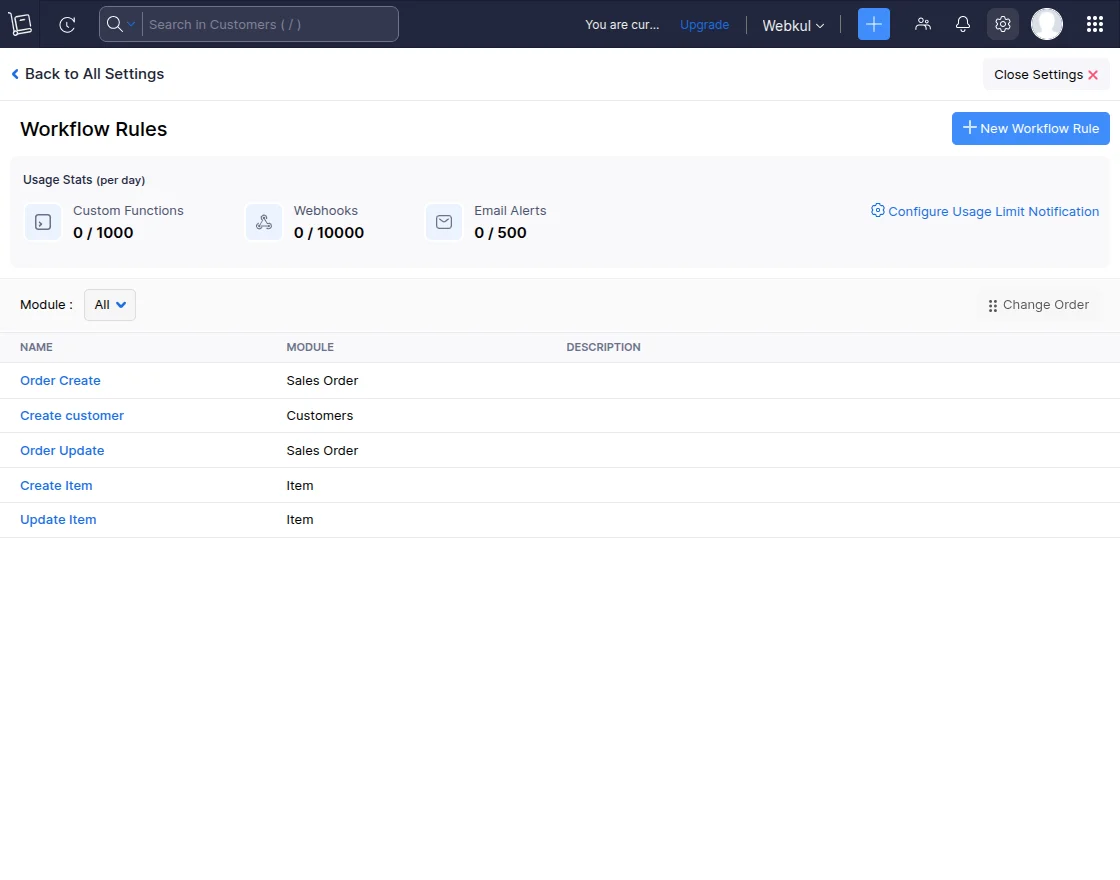
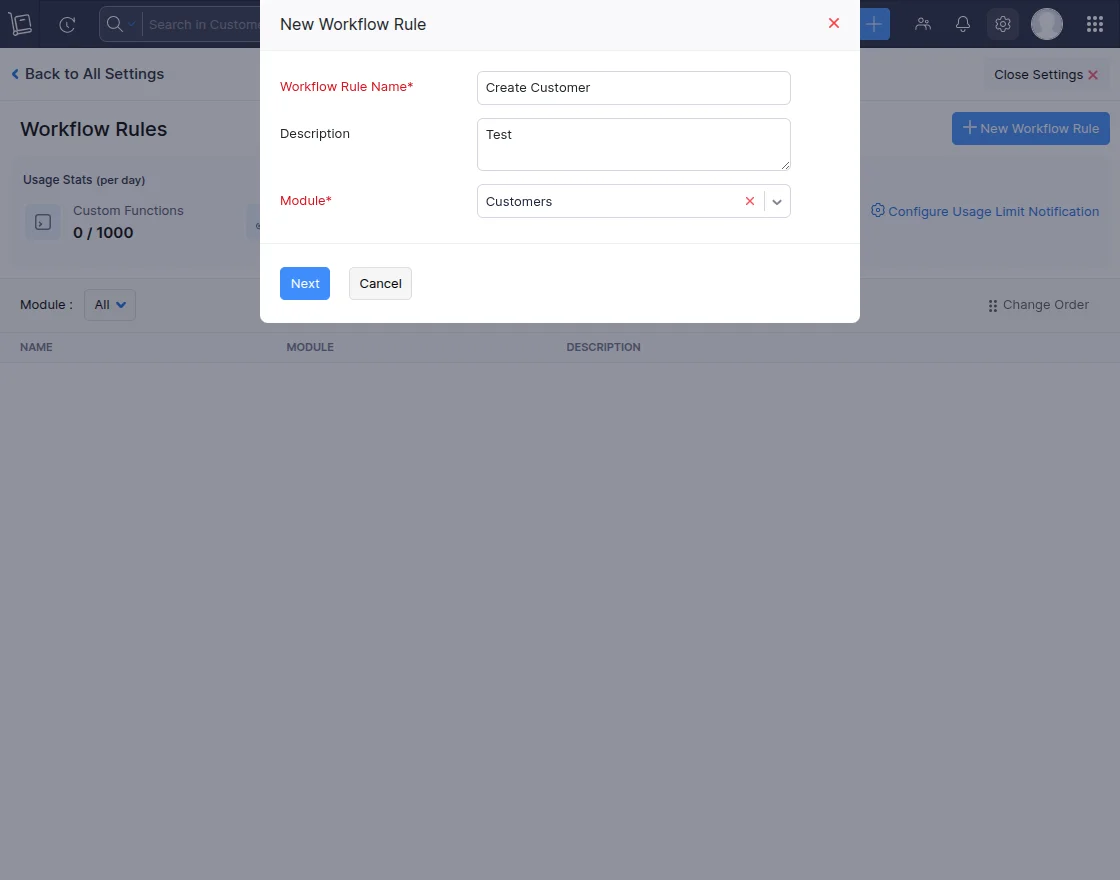
Here, we can create the Workflow Rules for the Customer, as shown in the snapshot below.
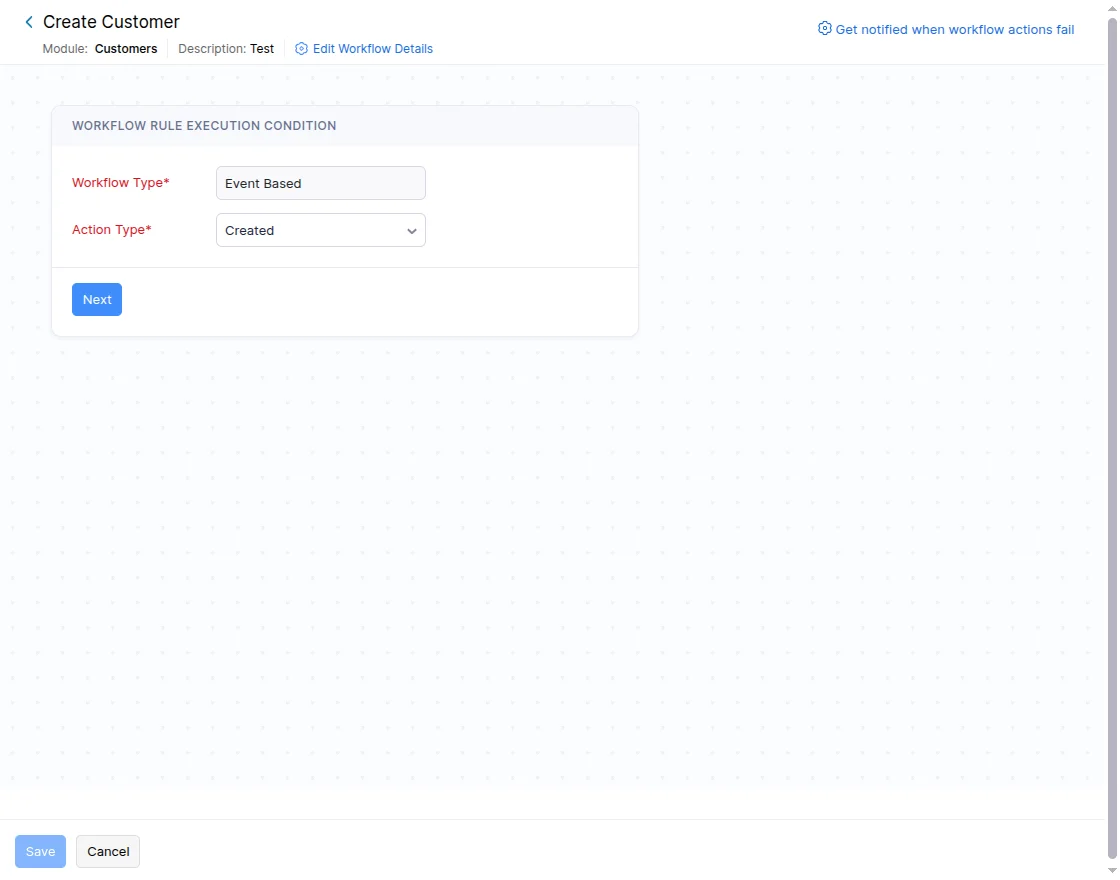
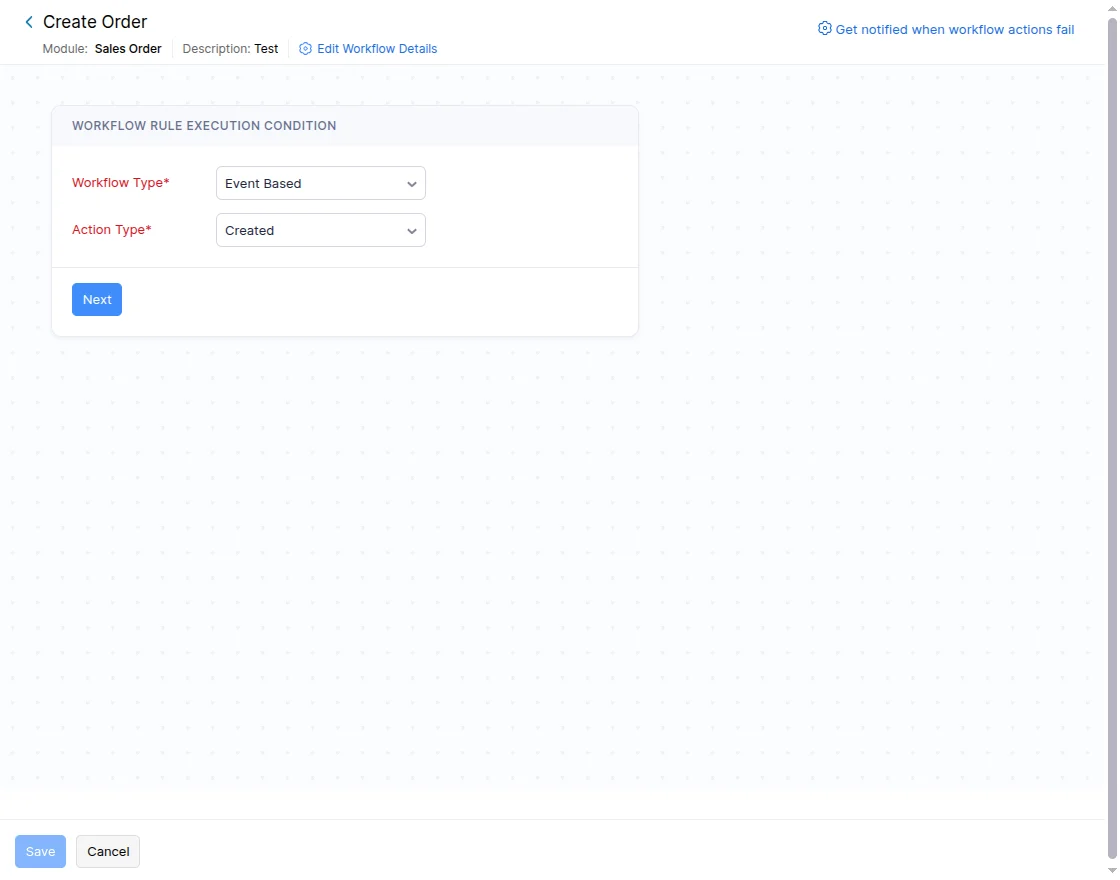
Here, we can see the Workflow Rule Execution Condition and fill in the type and action as shown in the snapshot below.
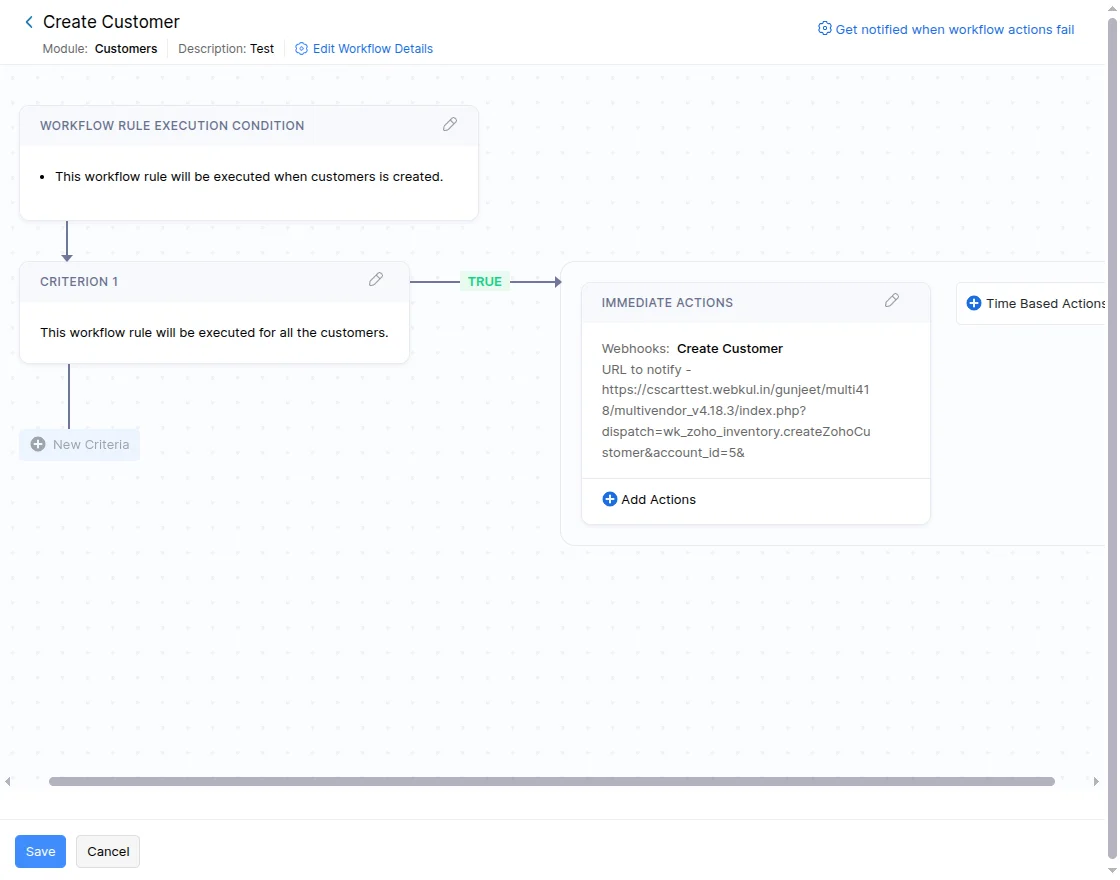
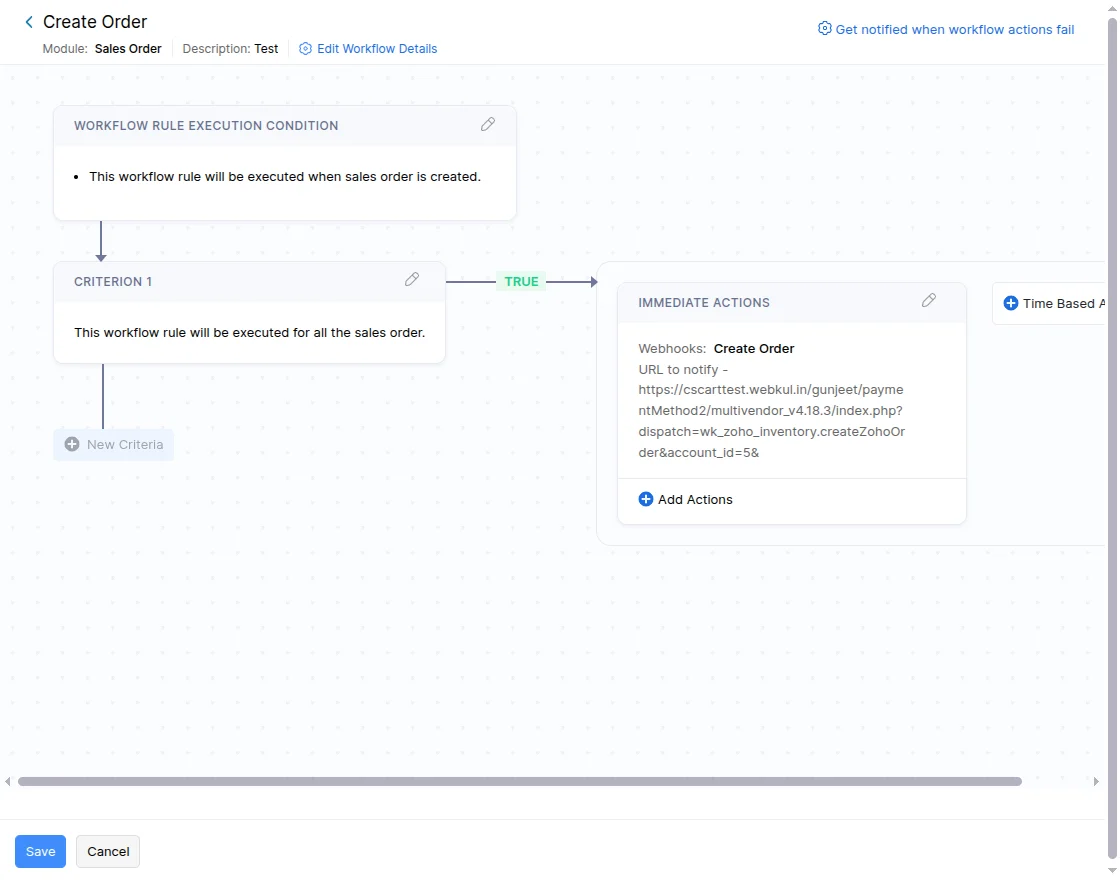
Fill in the required details of the Associate Immediate Actions, such as Type and Name as required, and then lastly associate, as illustrated below.

Now, we can see the Webhook – Workflow Rule Execution Condition for Customers as shown below.
You can create workflow rules for items here, as shown in the snapshot below.
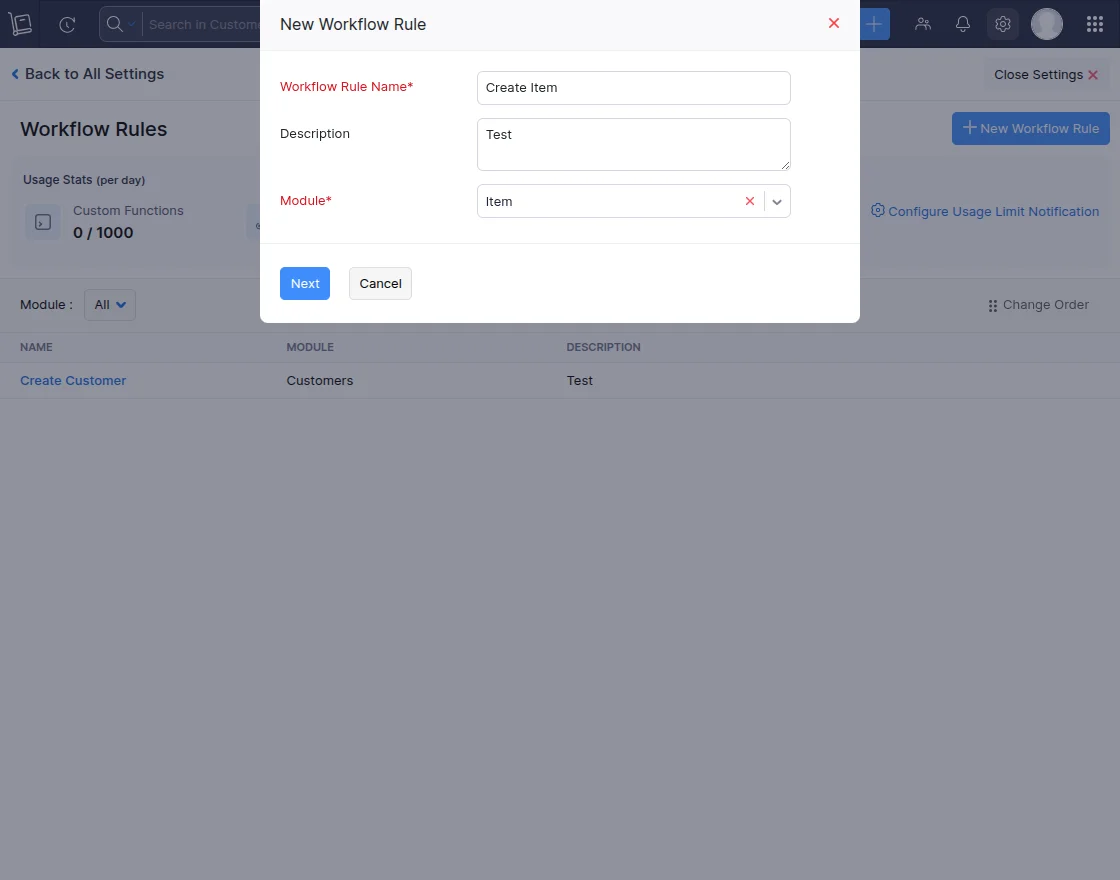
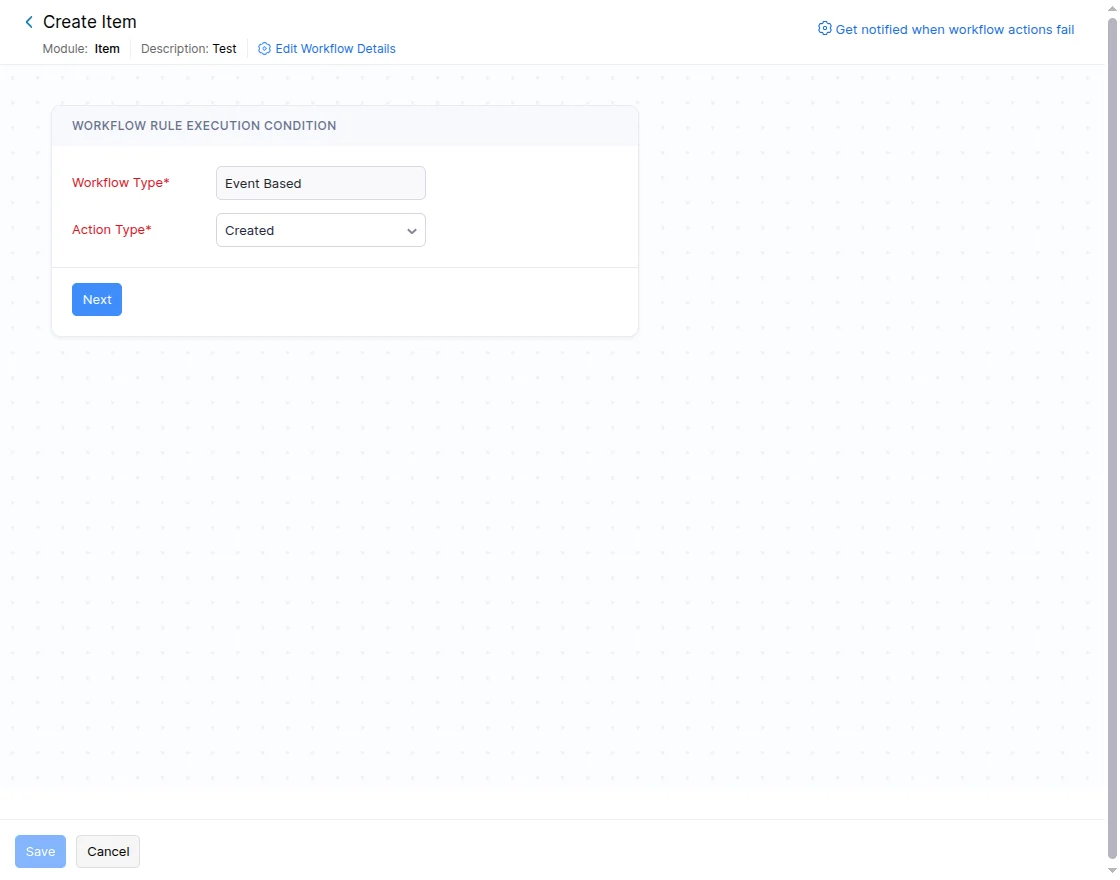
Fill in the Workflow Type and Action Type for the create item, as shown in the snapshot below.
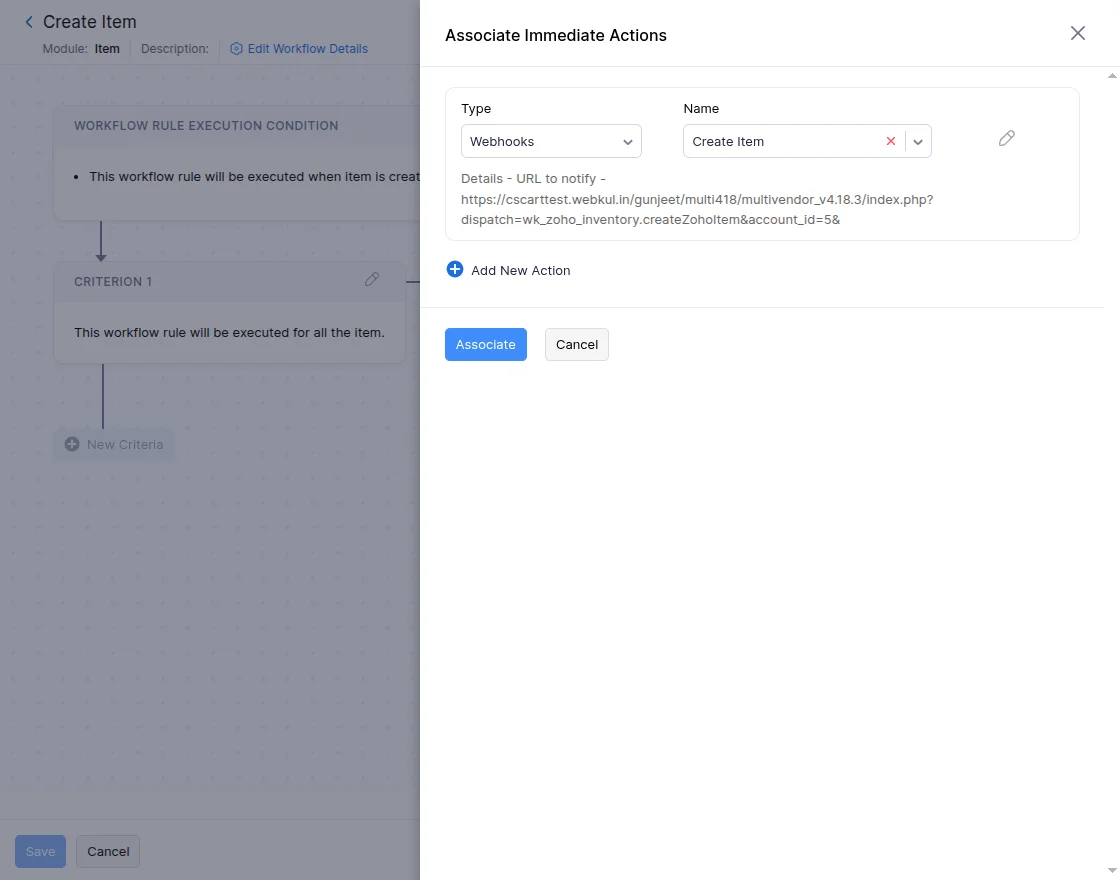
Fill in the required details of the Associate Immediate Actions, such as Type and Name as required, and then lastly associate, as illustrated below.
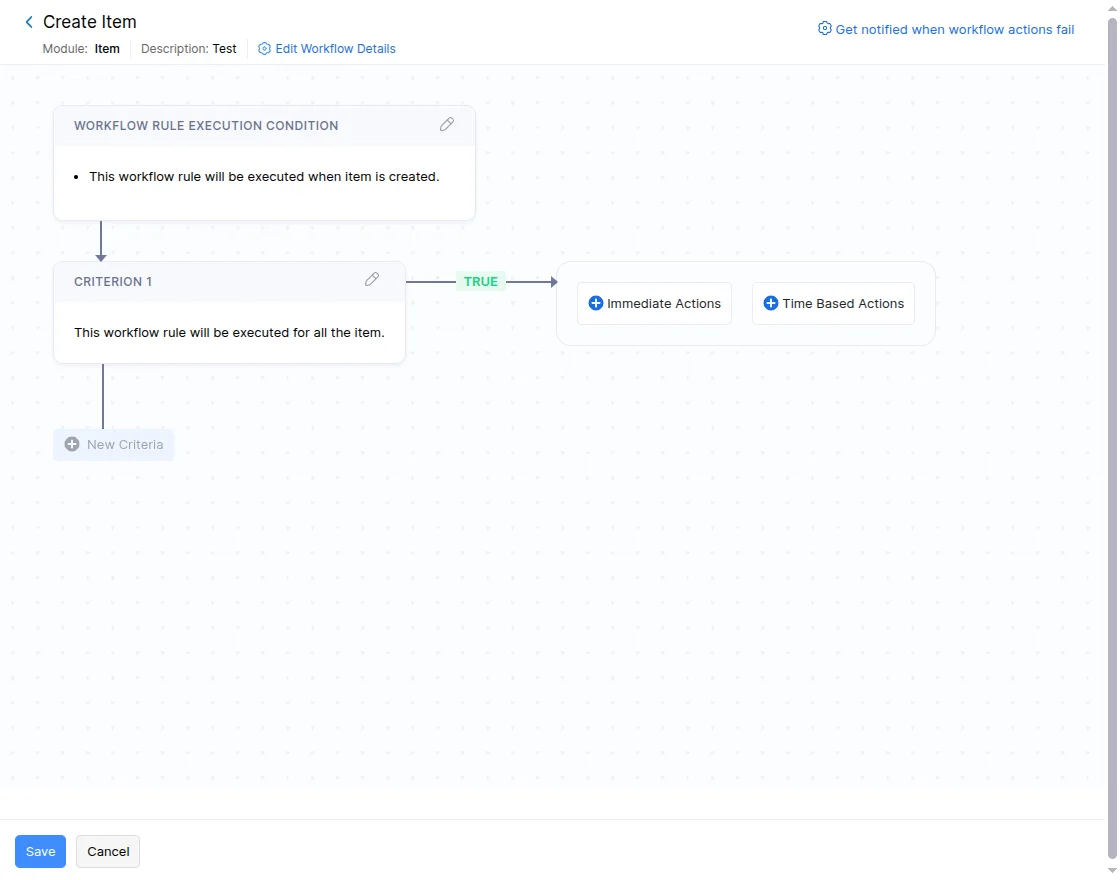
Now, we can see the Webhook – Workflow Rule Execution Condition for Item as shown below.
Create the Workflow Rules for the orders, as shown in the snapshot below.
Here, we can see the Workflow Rule Execution Condition and fill in the type and action as shown in the snapshot below.
Fill in the required details of the Associate Immediate Actions, such as Type and Name as required, and then lastly associate, as illustrated below.

Now, we can see the Webhook – Workflow Rule Execution Condition for orders as shown below.
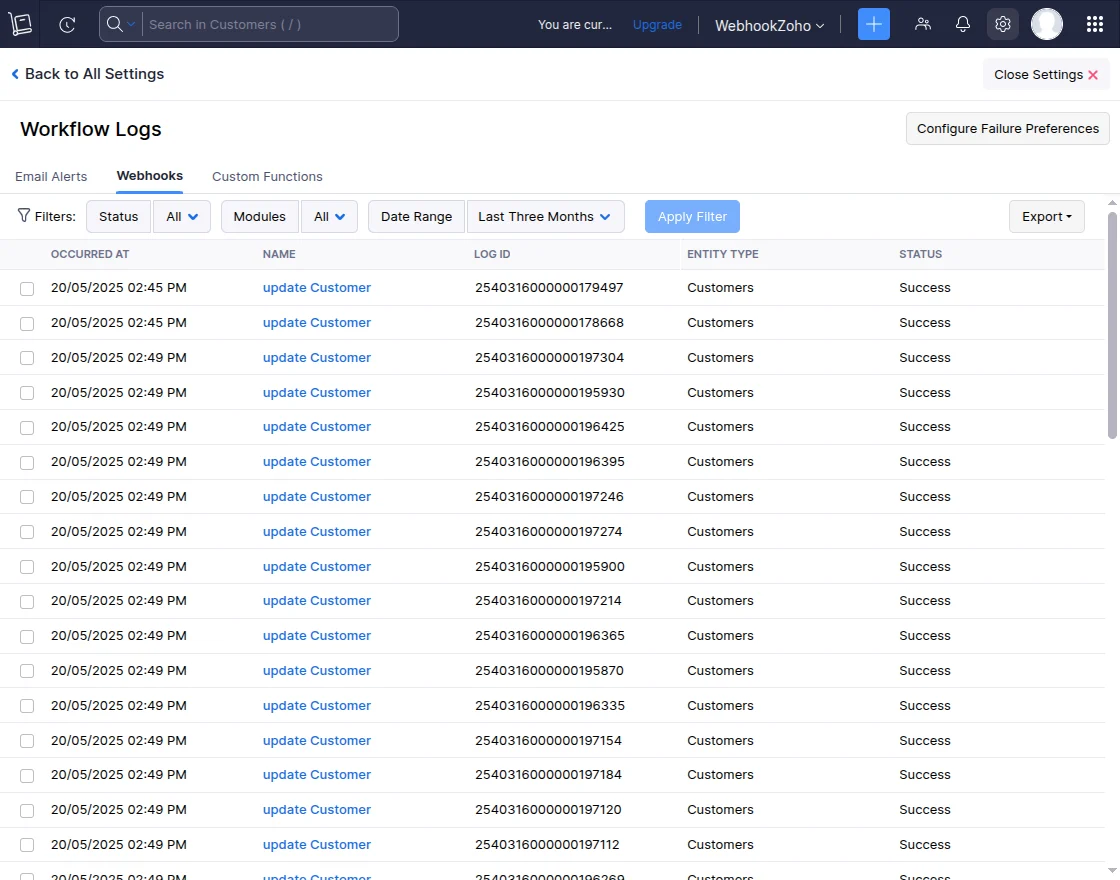
To access webhook details, the vendor should navigate to Settings >> Automation >> Workflow Logs >> Webhooks.
This section provides a comprehensive view of all webhook activities, allowing vendors to monitor and manage automated workflows effectively.
The interface, as shown in the snapshot below, helps track webhook triggers, status updates, and any issues encountered during execution.
Zoho Inventory Synchronization – Webhook Function
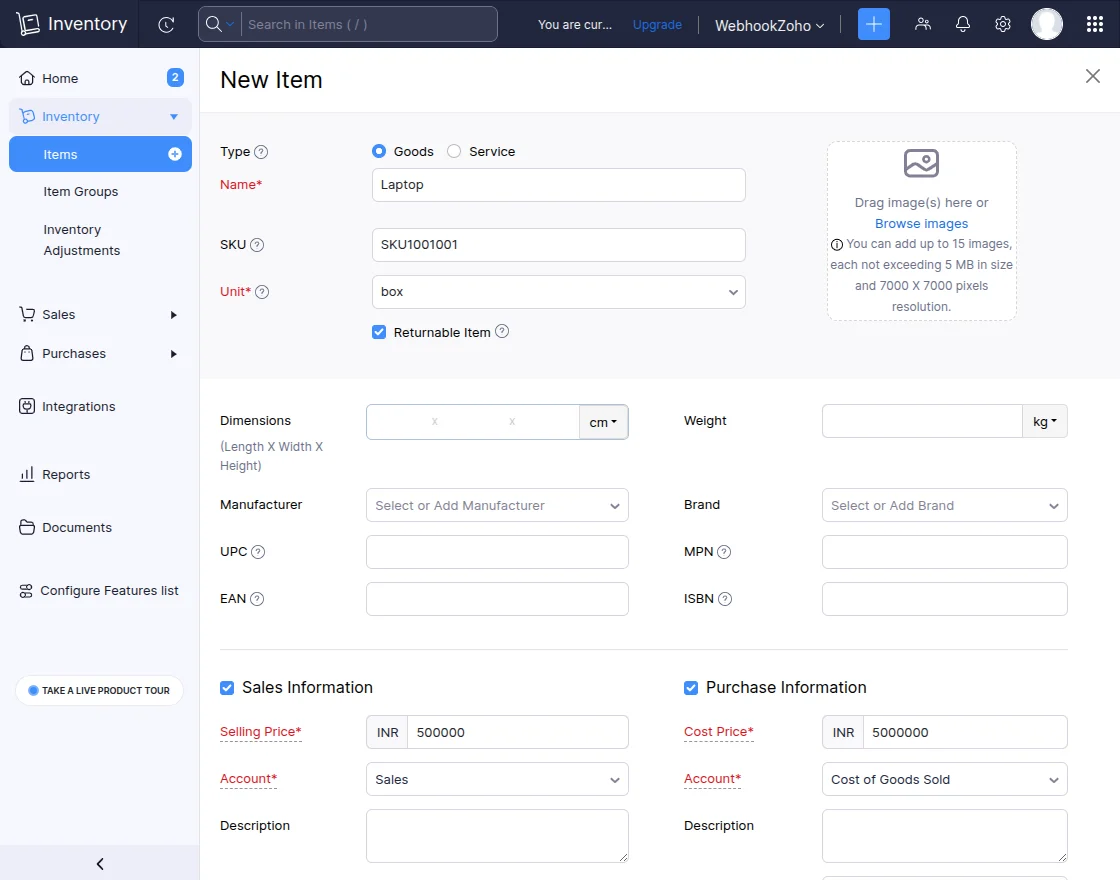
The admin creates a new item in Zoho Inventory and saves all the relevant details, as illustrated in the snapshot below.
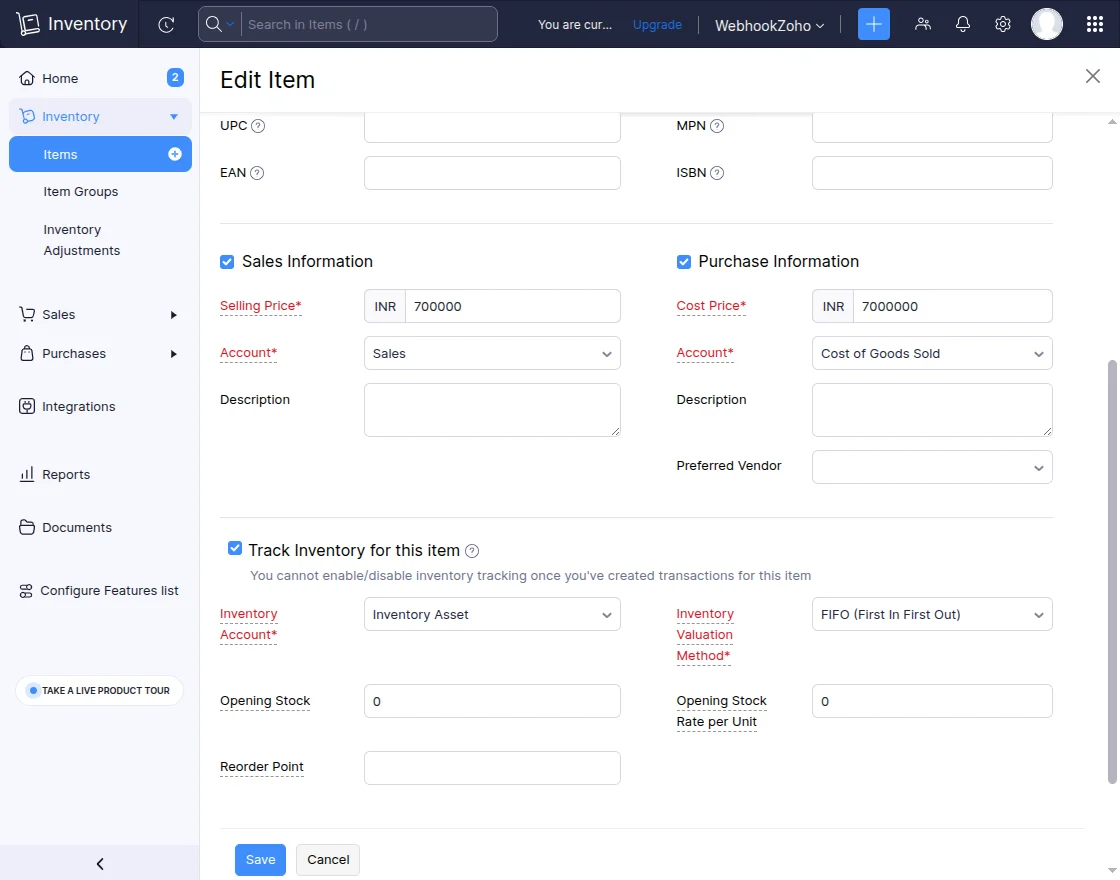
The item can also be edited by updating the selling and cost prices to the same value, then saving the changes, as shown in the snapshot below.
An overview of the item changes, including the cost price and selling price, can now be seen, as shown in the snapshot below.
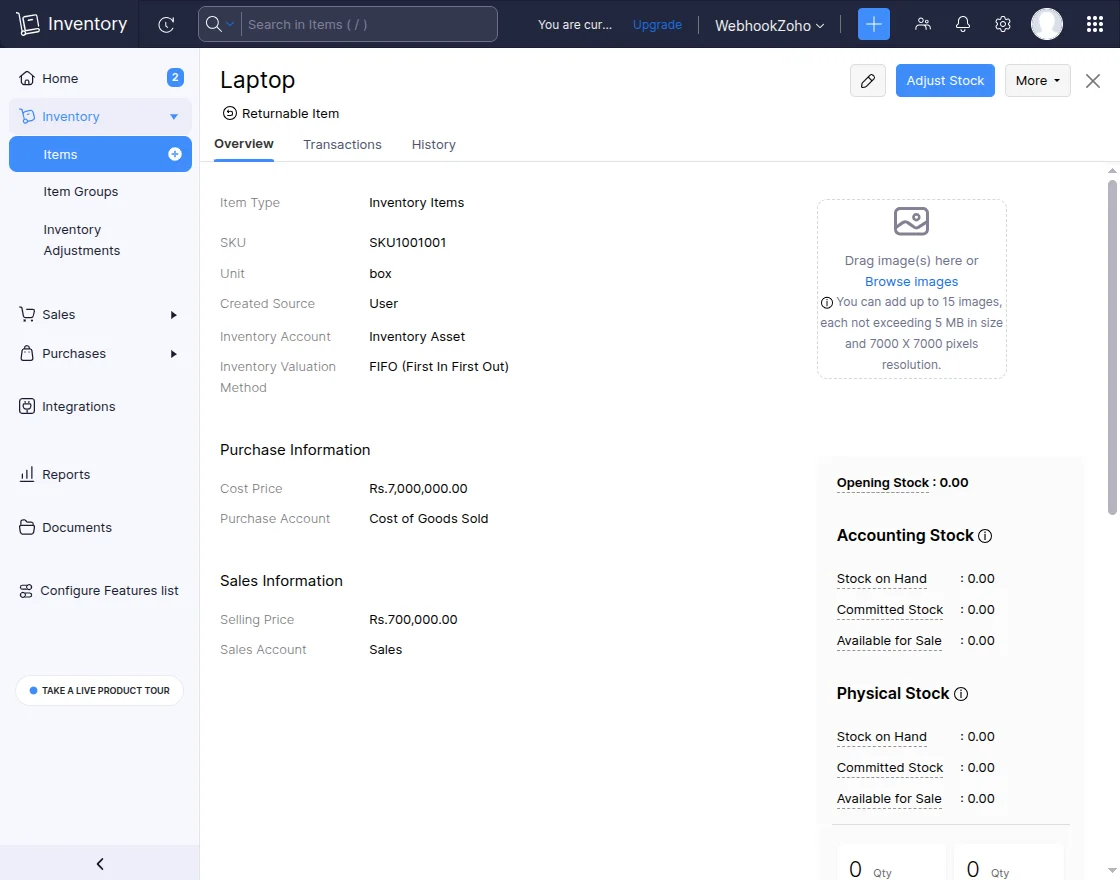
Zoho Inventory automatically synchronizes and updates the item’s cost price and selling price in the CS-Cart store.
Similarly, the same synchronization process applies to both Customers and Sales Orders.
Zoho Inventory automatically syncs and reflects all changes made to customers or sales orders in the CS-Cart store.
This ensures that both platforms remain up to date with consistent and accurate information.
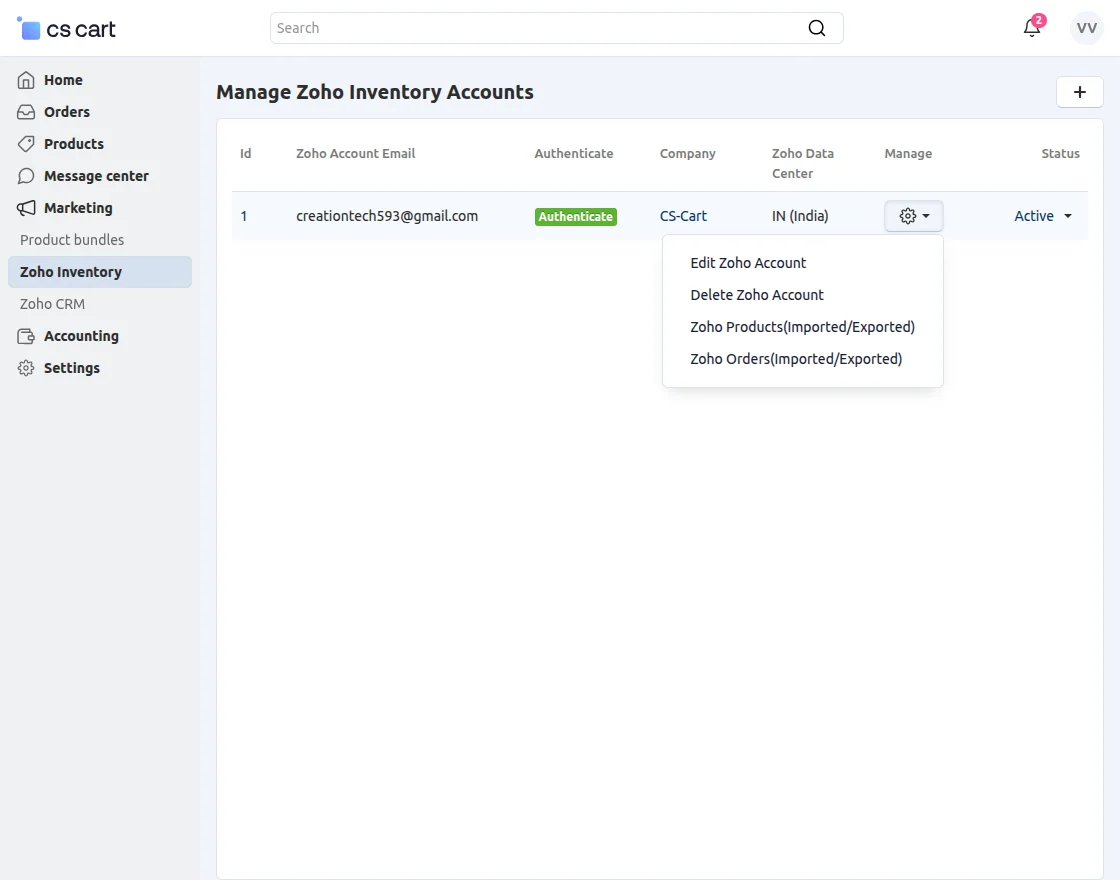
Vendor Zoho Inventory Synchronization
They can add the Zoho account similarly to the admin.
The vendor can also sync their product and orders with Zoho Inventory from the seller panel.
When the seller clicks on the product import/export tab, a new page will open.
Where they can sync the products.
Import Products:
When The Seller choose to import products, you will be redirected to a page where you can select products and import them into the CS-Cart store.

Export Products:
Unlike import, you can also export the products from CS-Cart to Zoho Inventory.
Import Orders:
When you choose to import orders, it redirects to the following page where you can select and import orders from Zoho Inventory into the CS-Cart store.
Export orders:
Unlike import, you can also export the orders from CS-Cart to Zoho Inventory.
That’s all about the “CS-Cart Zoho Inventory Connector“.
However, if you still have any questions regarding the CS-Cart extensions.
Please create a support ticket by clicking Webkul Support System or send an email to [email protected].
Current Product Version - 1.1
Supported Framework Version - (4.16.x, 4.17.x , 4.18.x)

Be the first to comment.