CS-Cart Wallet System add-on adds a built-in wallet system to your store where customers/users get their own digital wallet.
Customers can easily add money to their wallet and use wallet balance during checkout.
They can also transfer wallet balance, manage BNPL payments, and track wallet transactions from their account panel.
The add-on supports KYC verification, QR wallet transfer, PDF wallet statements, Twilio SMS notifications, and quick recharge options.
Customers can manage wallet balance, QR payments, transfers, statements, and KYC status from the advanced wallet dashboard.
The admin can also refund order amounts directly to the customer wallet and manage all wallet-related transactions from the backend.
Note: Before installing the add-on, extract the downloaded package.
- Install the License Manager add-on first.
- Then install the required add-on.
- Follow the license activation steps to generate your license key.
Features
- Fully compatible with CS-Cart, CS-Cart Multi-Vendor, and CS-Cart Multi-Vendor Ultimate.
- Built-in wallet system that allows customers to securely store, manage, and use wallet balance within the store.
- Customers can recharge their wallets anytime using supported online and offline payment methods.
- Admin can define minimum and maximum limits for wallet recharge, refund, and money transfer.
- Wallet balance can be used as a payment method during checkout for purchasing products.
- Supports partial wallet payment, allowing customers to pay part of the order amount using wallet balance and the remaining amount using other payment methods.
- Admin can refund full or partial order amounts directly to the customer wallet.
- Compatible with CS-Cart RMA refund workflow for smooth wallet-based refunds.
- Admin can manually credit or debit wallet balance for customers from the backend.
- Secure wallet-to-wallet transfer functionality with OTP-based verification.
- Customers can transfer wallet balance directly to linked bank accounts.
- Customers can add, edit, and manage multiple bank accounts from the wallet dashboard.
- Admin can configure cashback and reward points functionality for customers.
- Customers can transfer reward points into wallet balance.
- Detailed wallet transaction history is available for both admin and customers.
- Admin can send monthly wallet transaction reports directly to customers via email.
- Separate email notification templates can be configured for admin and customers.
- Admin can manage wallet notification templates for recharge, refund, debit, credit, cashback, and money transfer events.
- User-friendly and responsive wallet management interface.
- KYC verification system allows customers to upload identity verification documents for wallet verification.
- Customers can download wallet transaction history in PDF statement format.
- Quick recharge amount buttons allow customers to recharge wallets faster.
- QR-based wallet transfer functionality enables instant wallet-to-wallet payment using QR code scanning.
- Twilio SMS notification integration for wallet recharge, transfer, and KYC status updates.
- Buy Now Pay Later (BNPL) functionality allows eligible customers to place orders using deferred wallet payment.
- Advanced wallet dashboard UI provides better wallet management experience with responsive design and real-time wallet information.
Installation
After downloading the CS-Cart Wallet System add-on, you’ll get one zip file, one install.txt file, and a relevant User Guide manual doc.
Read it carefully for proper configuration.
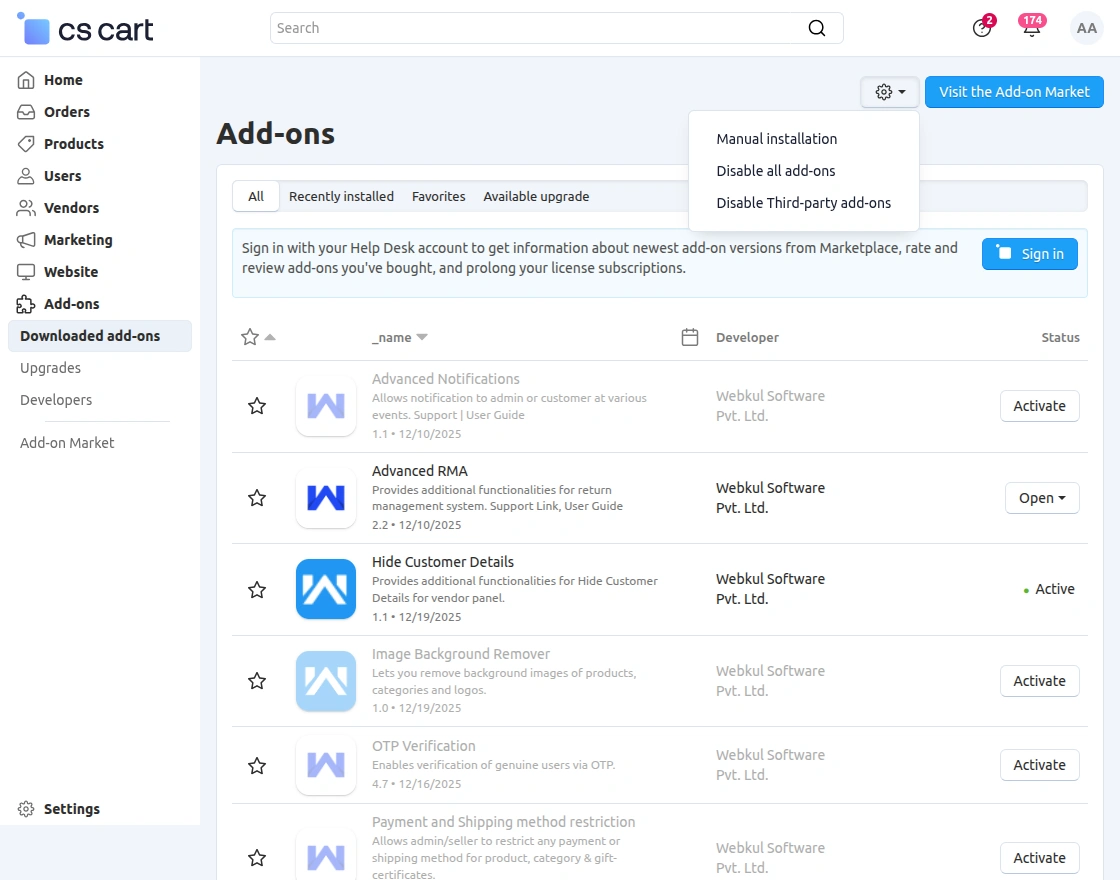
Go to Manage Add-ons, and click on “Manual Installation” as shown below in the snapshot.
Click on “Local” to browse the zip file and then click on “Upload & Install” as shown below in the snapshot.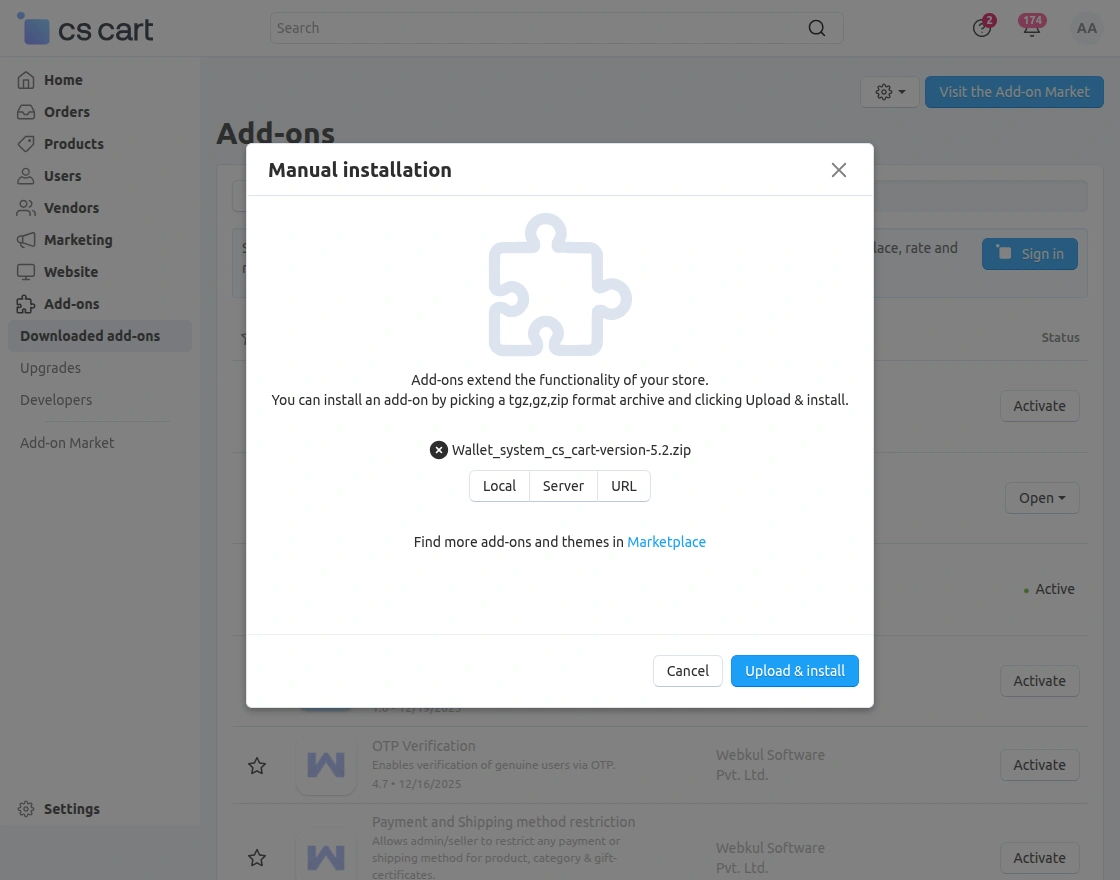
Please Note: In order to make the add-on compatible with Paypal payment, please copy the paypal.php file to the path app/payments of your root directory manually.
You can get this paypal.php file in a folder viz; Paypal-payment-cs-cart-(version)* by extracting the installer zip file (corresponding to your CS-Cart edition).
Add-On Configuration
After installing the add-on, you will find CS-Cart Wallet System in the list of available add-ons. We will then configure the settings.
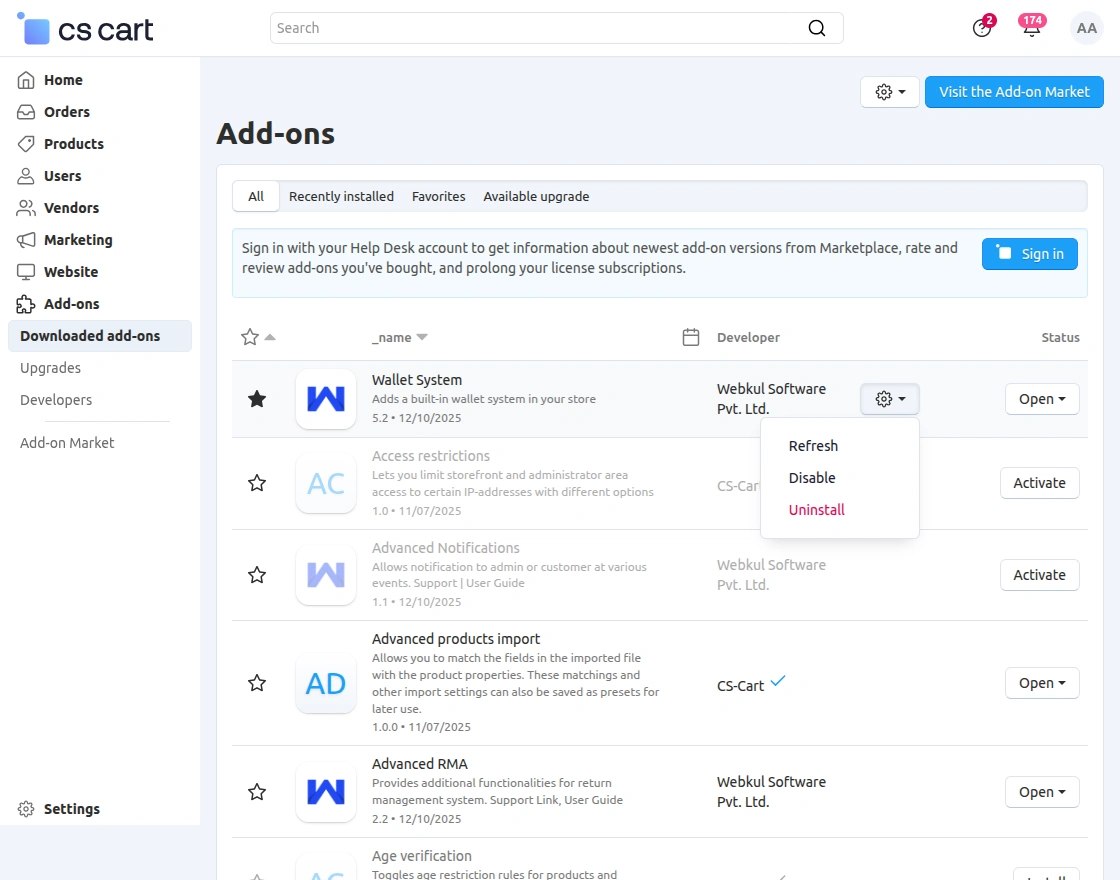
Click on “settings” to enable, disable, install, or refresh.
Make sure the add-on is activated, as shown in the snapshot below.
Once the add-on gets installed admin needs to do some wallet settings from the setting tab.
General Settings
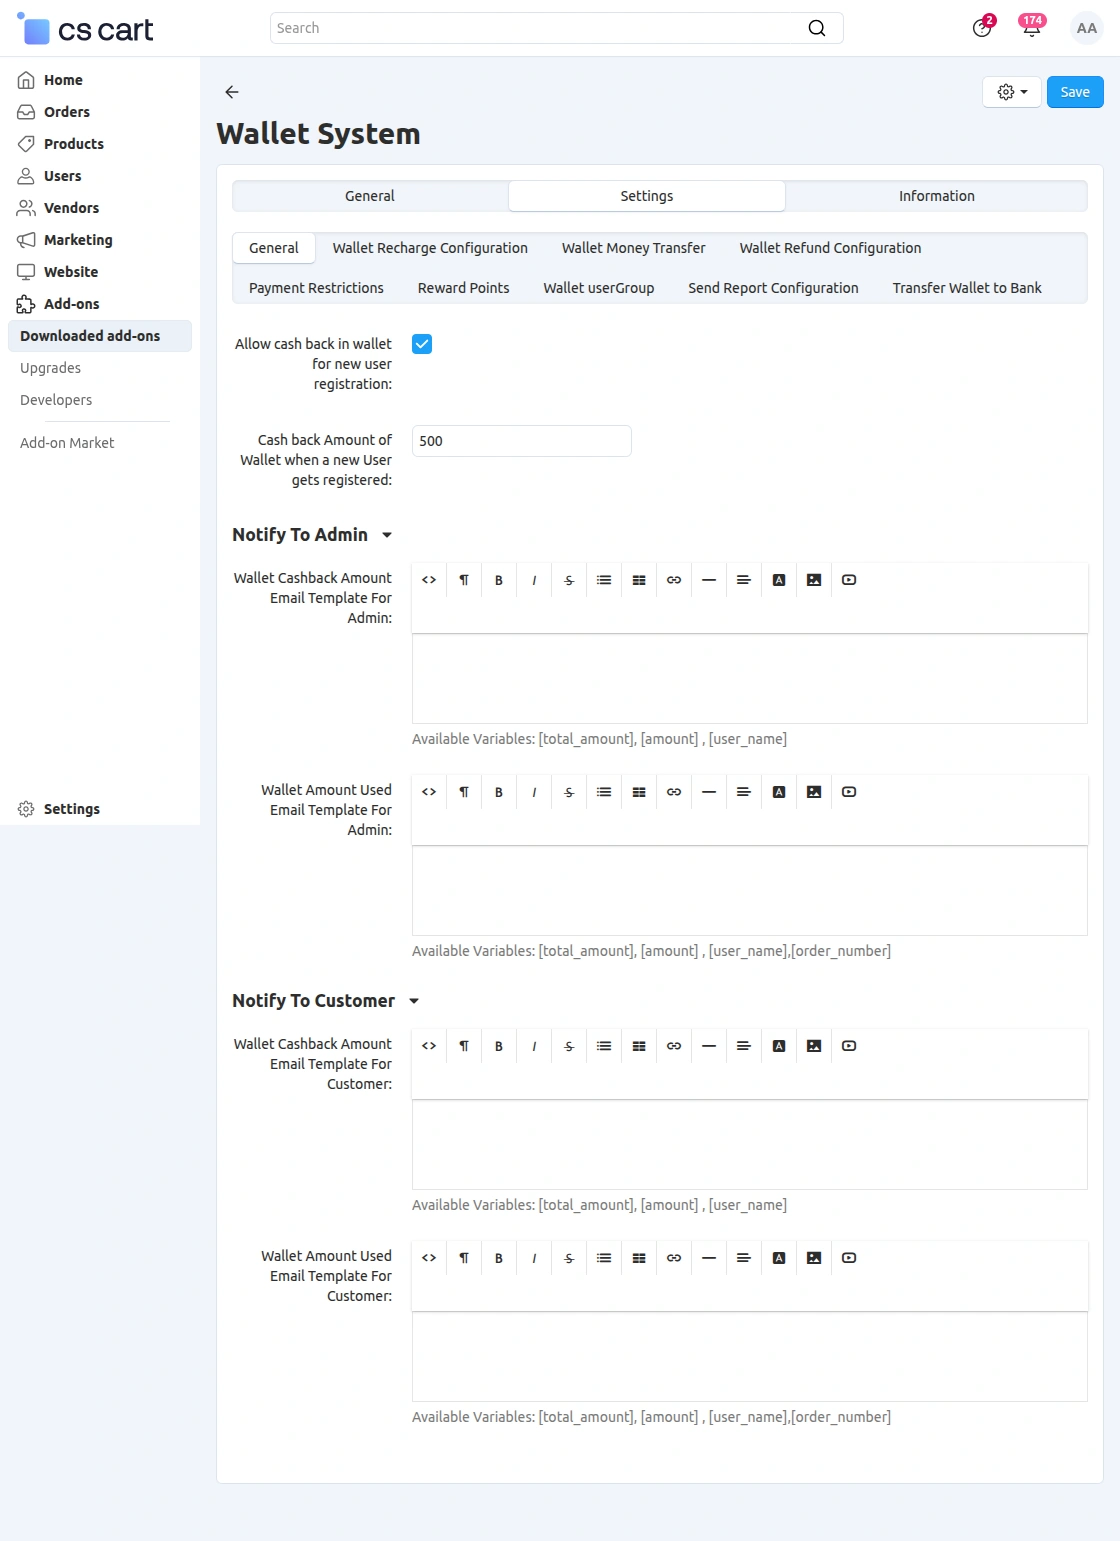
Click to enable the cashback/discount option for newly registered users. Set the cashback amount as shown below.
KYC System
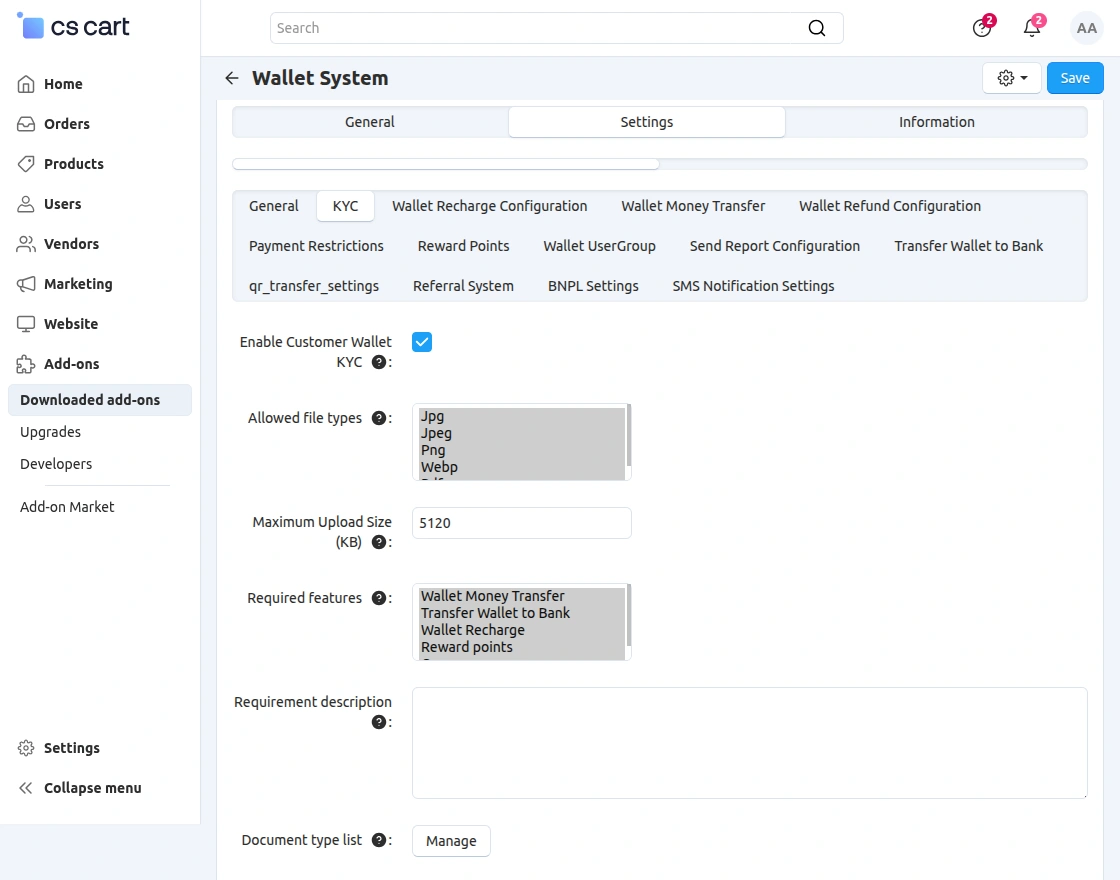
The admin can enable customer wallet KYC verification from the KYC settings section and manage KYC-related configurations for wallet users.
Here, the admin can configure multiple KYC settings for customer verification.
-
Allowed file types: Admin can select the supported file formats for KYC document uploads.
-
Maximum upload size: Admin can define the maximum allowed file upload size for KYC documents.
-
Required features: Admin can select wallet features like Wallet Money Transfer, Transfer Wallet to Bank, Wallet Recharge, and Reward Points for KYC verification.
-
Requirement description: Admin can add KYC-related instructions or verification requirements for customers.
-
Document type list: Admin can manage the list of required document types for customer verification.
Wallet Recharge Configuration
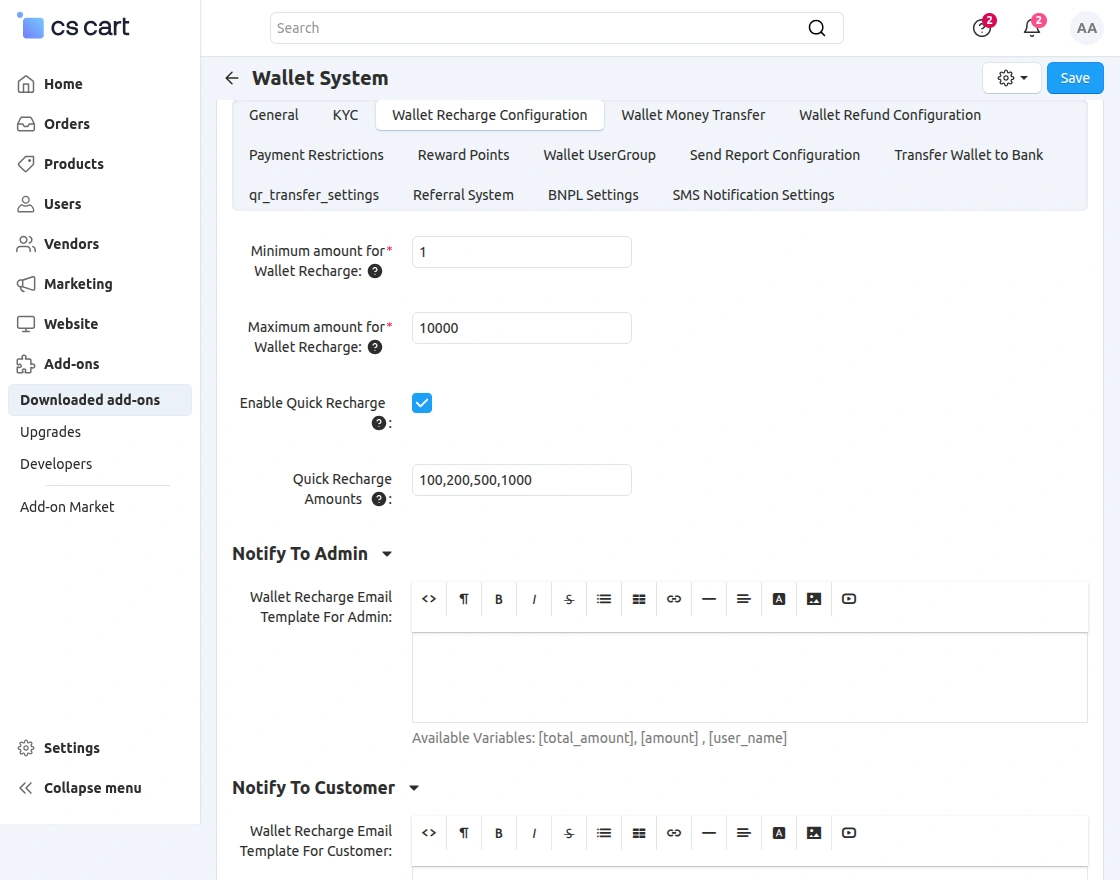
The admin can configure wallet recharge settings from the Wallet Recharge Configuration section.
Here, the admin can manage recharge amount limits, quick recharge options, and wallet recharge email notifications for both admin and customers.
-
Minimum amount for wallet recharge: Admin can define the minimum amount required for wallet recharge.
-
Maximum amount for wallet recharge: Admin can define the maximum wallet recharge limit.
-
Enable quick recharge: Admin can enable predefined quick recharge amount options for customers.
-
Quick recharge amounts: Admin can add multiple predefined recharge amounts like 100, 200, 500, and 1000.
-
Wallet recharge email template for admin: Admin can configure wallet recharge notification email templates for admin users.
-
Wallet recharge email template for customer: Admin can configure wallet recharge notification email templates for customers.
Wallet Money Transfer
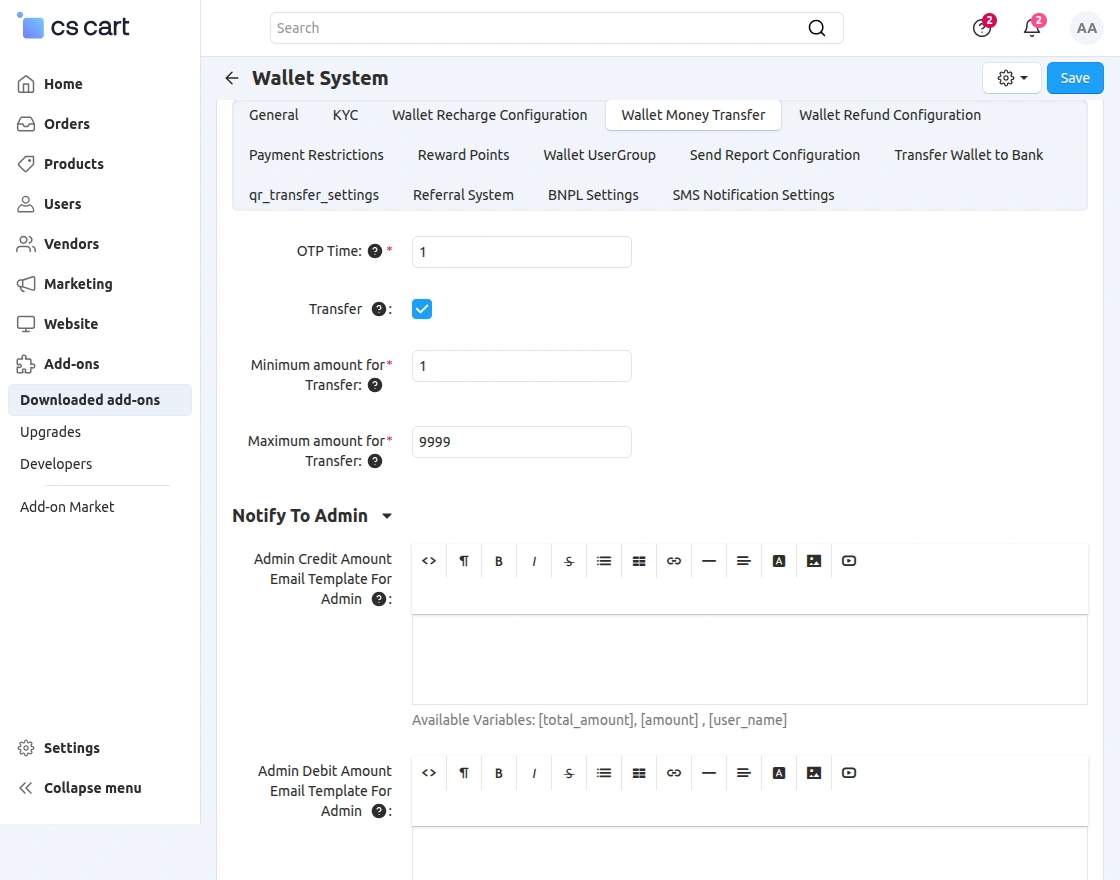
The admin can configure wallet money transfer settings from the Wallet Money Transfer section.
Here, the admin can manage OTP settings, transfer limits, and wallet transfer email notification templates for admin users.
-
OTP time: Admin can define the OTP validity duration for wallet money transfer verification.
-
Transfer: Admin can enable or disable wallet money transfer functionality for customers.
-
Minimum amount for transfer: Admin can define the minimum wallet transfer amount.
-
Maximum amount for transfer: Admin can define the maximum wallet transfer limit.
-
Admin credit amount email template: Admin can configure email templates for wallet credit transaction notifications.
-
Admin debit amount email template: Admin can configure email templates for wallet debit transaction notifications.
When customers transfer wallet balance, an OTP is sent to the registered email address for verification.
Only a four-digit OTP is supported and remains valid for the configured duration.
Wallet Refund Configuration
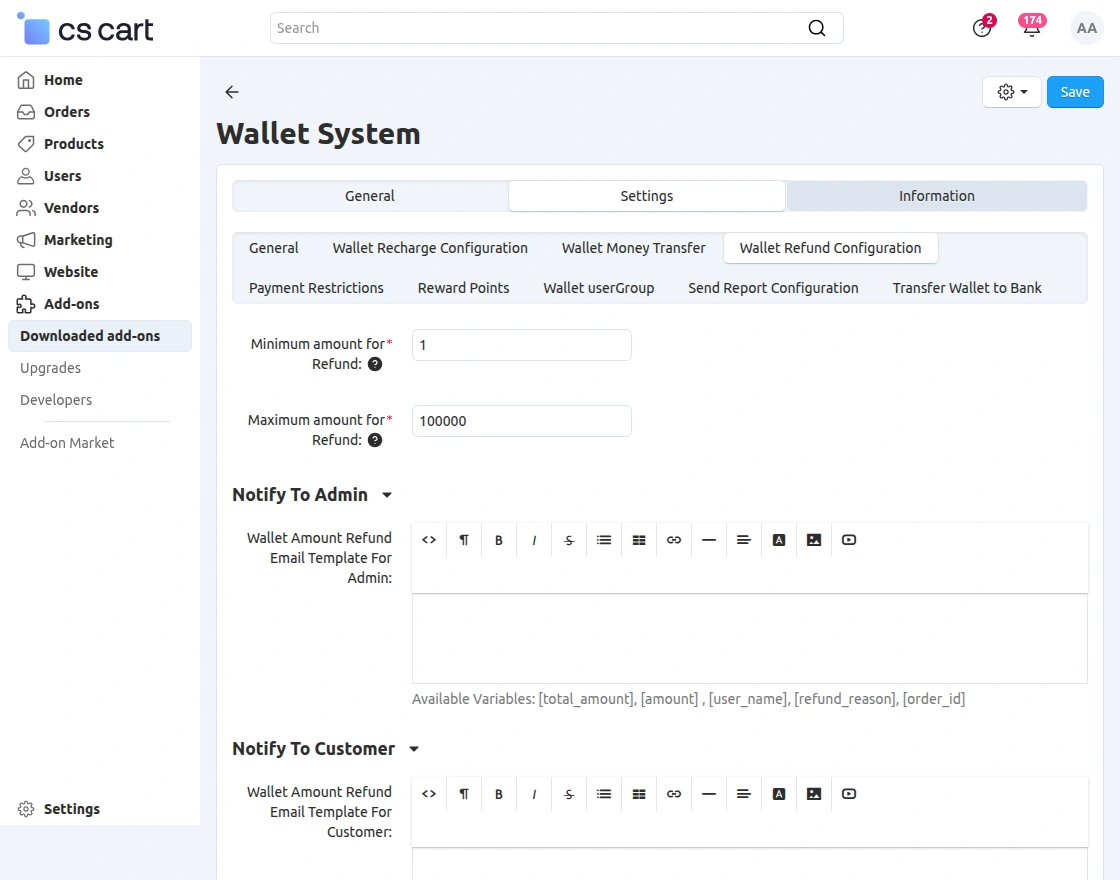
The admin can configure wallet refund settings from the Wallet Refund Configuration section.
Here, the admin can manage refund amount limits and configure wallet refund email notification templates for both admin and customers.
-
Minimum amount for refund: Admin can define the minimum refund amount allowed for wallet refunds.
-
Maximum amount for refund: Admin can define the maximum wallet refund limit.
-
Wallet amount refund email template for admin: Admin can configure refund notification email templates for admin users.
-
Wallet amount refund email template for customer: Admin can configure refund notification email templates for customers.
Note: The shipping cost is not refundable.
Payment Restrictions
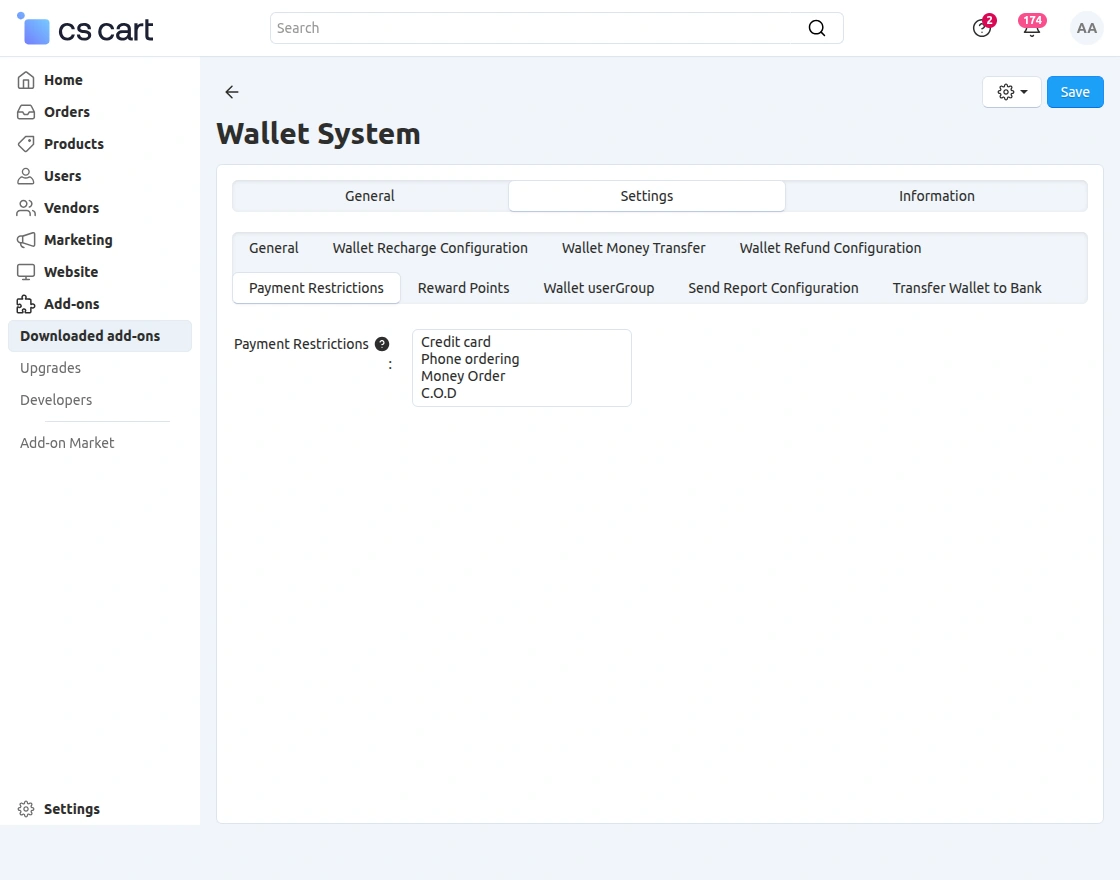
The admin can configure payment restriction settings from the Payment Restrictions section.
Here, the admin can restrict selected payment methods for wallet transactions and wallet-related activities.
-
Payment restrictions: Admin can select payment methods that should be restricted for wallet usage.
The admin can restrict payment methods like Credit Card, Phone Ordering, and other available payment options.
Reward Points
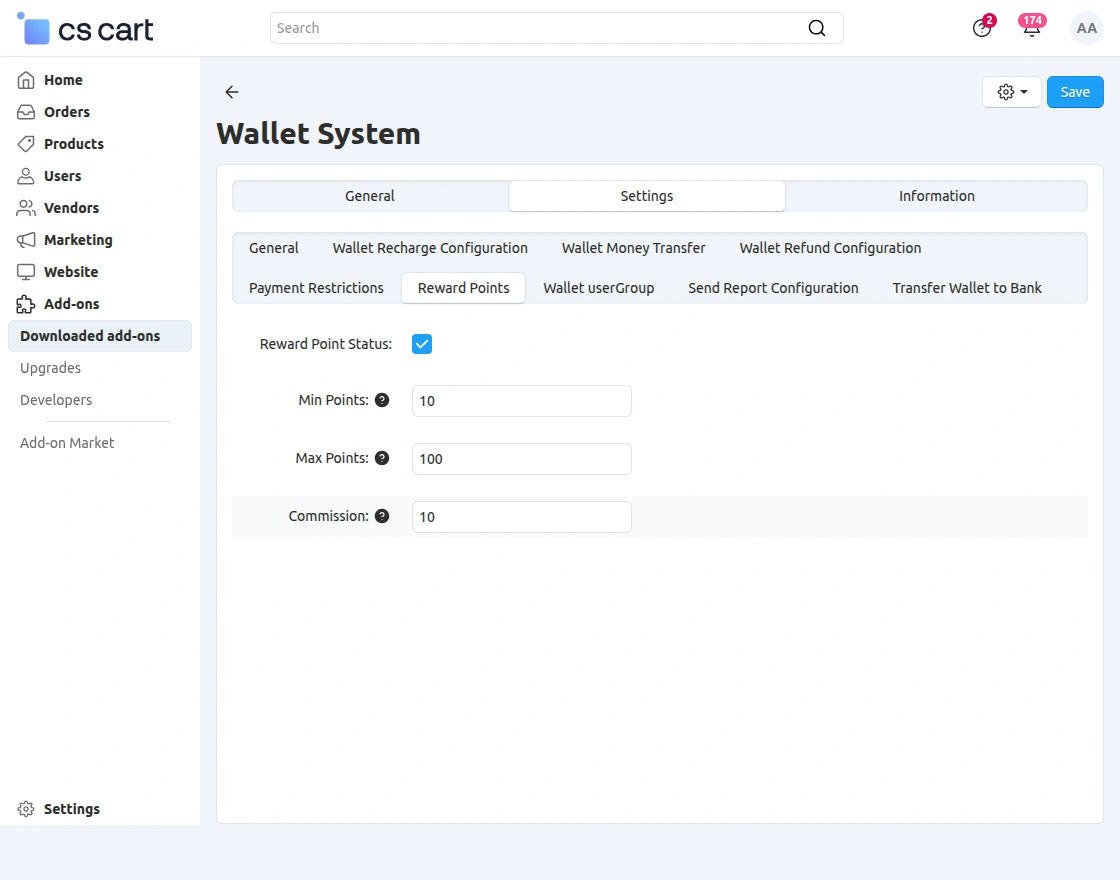
The admin can configure reward point settings from the Reward Points section.
Here, the admin can enable reward point functionality and manage minimum points, maximum points, and commission values for wallet reward transactions.
-
Reward point status: Admin can enable or disable the reward points feature.
-
Minimum points: Admin can define the minimum reward points required for wallet transactions.
-
Maximum points: Admin can define the maximum reward points limit.
-
Commission: Admin can configure the commission value for reward point transactions.
Customers can later transfer reward points into their wallet balance.
QR Transfer Settings
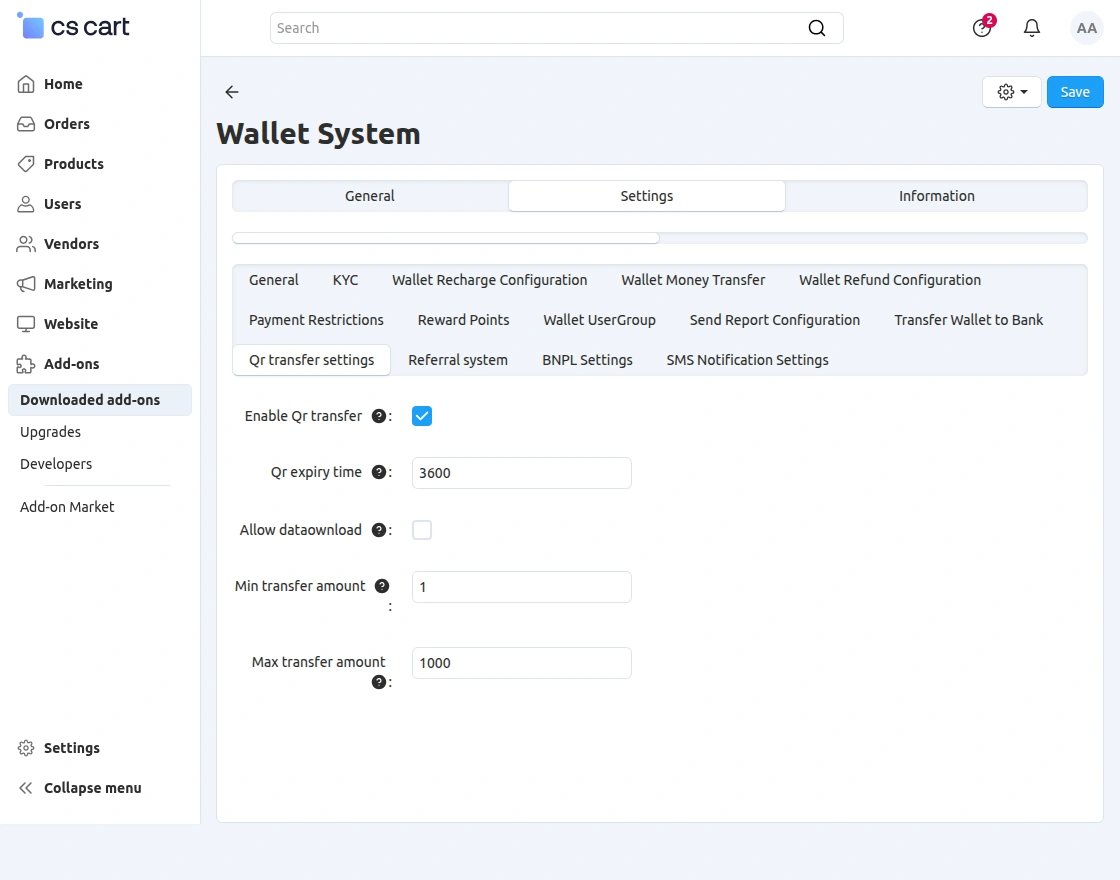
The admin can configure QR-based wallet transfer settings from the QR Transfer Settings section.
Here, the admin can manage QR transfer functionality, QR expiry time, download permissions, and wallet transfer limits.
-
Enable QR transfer: Admin can enable or disable QR-based wallet transfer functionality.
-
QR expiry time: Admin can define the QR code expiry duration for wallet transfers.
-
Allow data download: Admin can allow or restrict QR data download functionality.
-
Minimum transfer amount: Admin can define the minimum amount allowed for QR wallet transfer.
-
Maximum transfer amount: Admin can define the maximum QR wallet transfer limit.
Referral System
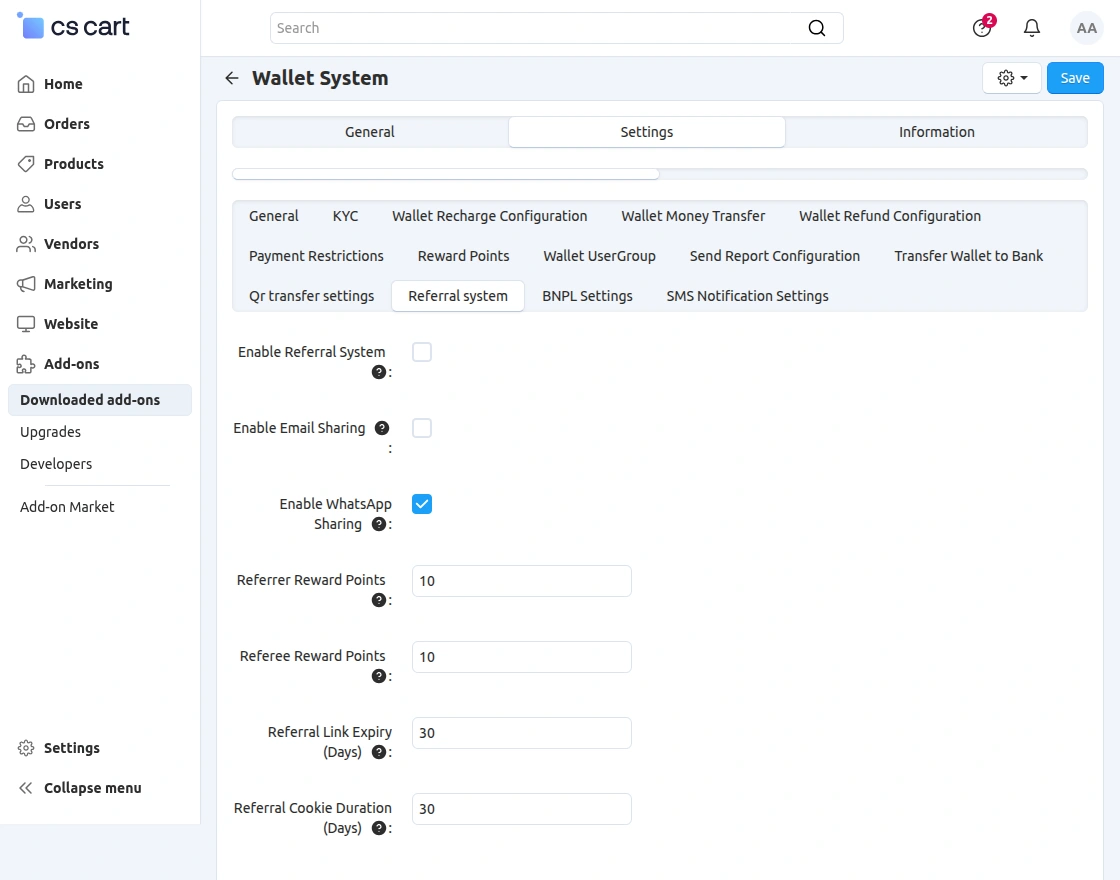
The admin can configure referral system settings from the Referral System section.
Here, the admin can manage referral rewards, sharing options, referral link expiry duration, and cookie duration settings.
-
Enable referral system: Admin can enable or disable the referral reward system for customers.
-
Enable email sharing: Admin can allow customers to share referral links through email.
-
Enable WhatsApp sharing: Admin can allow customers to share referral links through WhatsApp.
-
Referrer reward points: Admin can define reward points for the customer who shares the referral link.
-
Referee reward points: Admin can define reward points for the newly referred customer.
-
Referral link expiry: Admin can define the validity duration for referral links.
-
Referral cookie duration: Admin can configure referral tracking cookie duration.
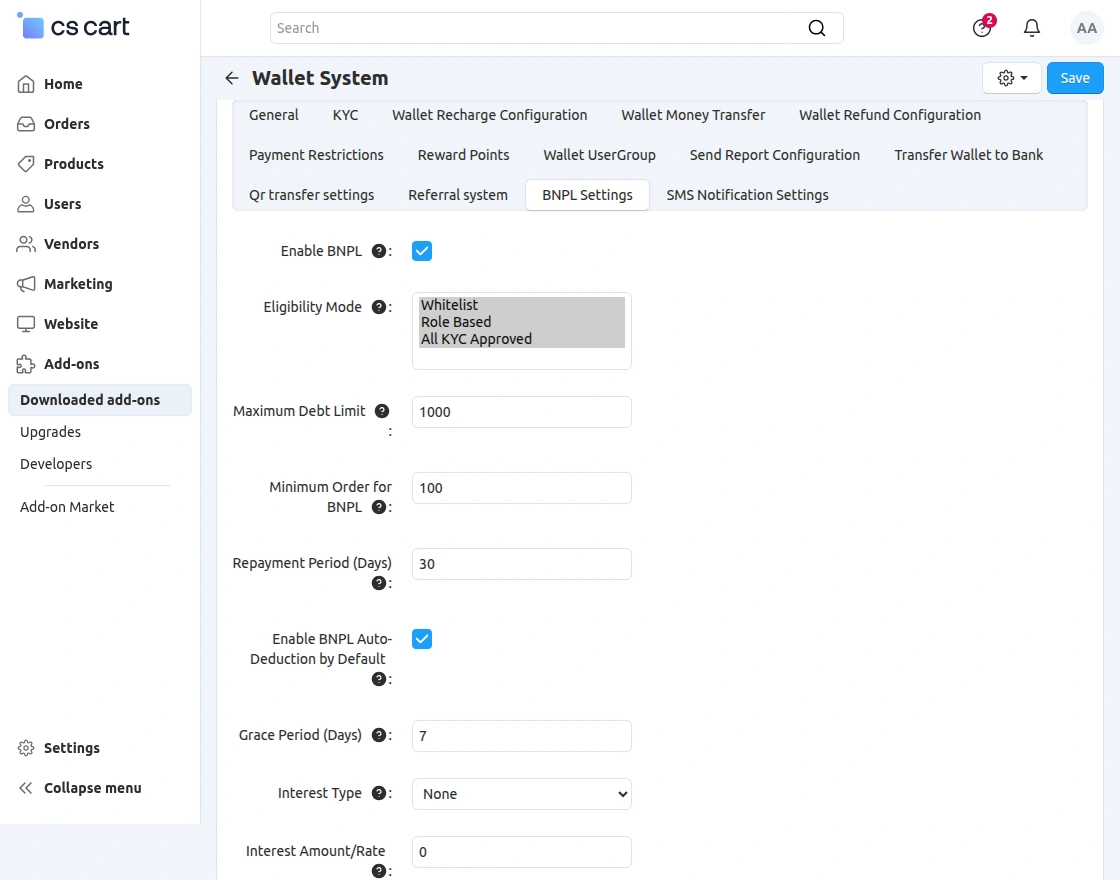
BNPL Settings
The admin can configure Buy Now Pay Later (BNPL) settings from the BNPL Settings section.
Here, the admin can manage BNPL eligibility settings, debt limits, repayment duration, auto deduction settings, and interest configurations.
-
Enable BNPL: Admin can enable or disable BNPL functionality for customers.
-
Eligibility mode: Admin can configure BNPL eligibility based on whitelist users, role-based customers, or all KYC-approved customers.
-
Maximum debt limit: Admin can define the maximum BNPL debt amount allowed for customers.
-
Minimum order for BNPL: Admin can define the minimum order amount required for BNPL usage.
-
Repayment period: Admin can configure the repayment duration for BNPL orders.
-
Enable BNPL auto-deduction by default: Admin can enable automatic wallet deduction for pending BNPL dues.
-
Grace period: Admin can define the additional grace duration before repayment actions.
-
Interest type: Admin can configure the interest type for BNPL repayments.
-
Interest amount/rate: Admin can define the applicable interest amount or percentage for BNPL transactions.
SMS Notification Settings
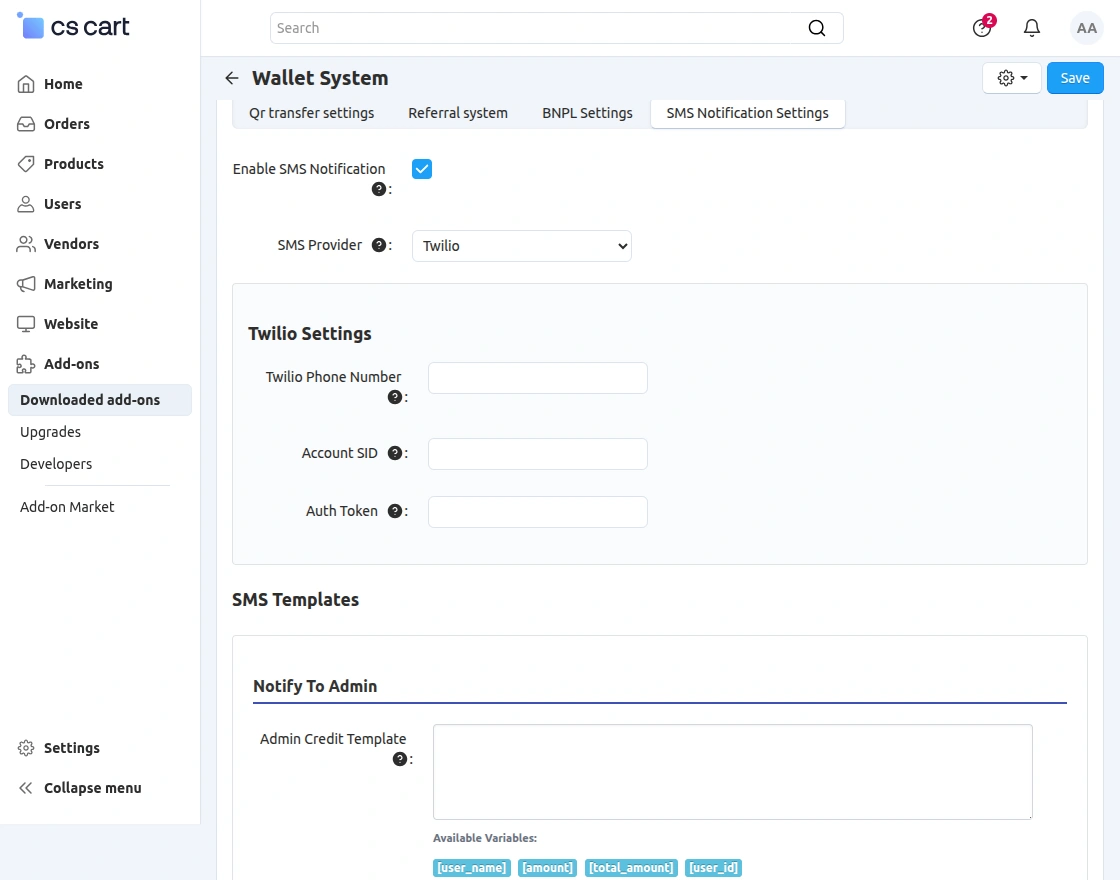
The admin can configure SMS notification settings from the SMS Notification Settings section.
Here, the admin can enable SMS notifications, configure the SMS provider, manage Twilio credentials, and customize SMS templates for wallet transactions.
-
Enable SMS notification: Admin can enable or disable SMS notifications for wallet activities.
-
SMS provider: Admin can select the preferred SMS service provider for sending notifications.
-
Twilio phone number: Admin can configure the Twilio phone number for SMS notifications.
-
Account SID: Admin can add the Twilio Account SID for API authentication.
-
Auth token: Admin can configure the Twilio authentication token.
-
SMS templates: Admin can customize SMS notification templates for admin and customer wallet transactions.
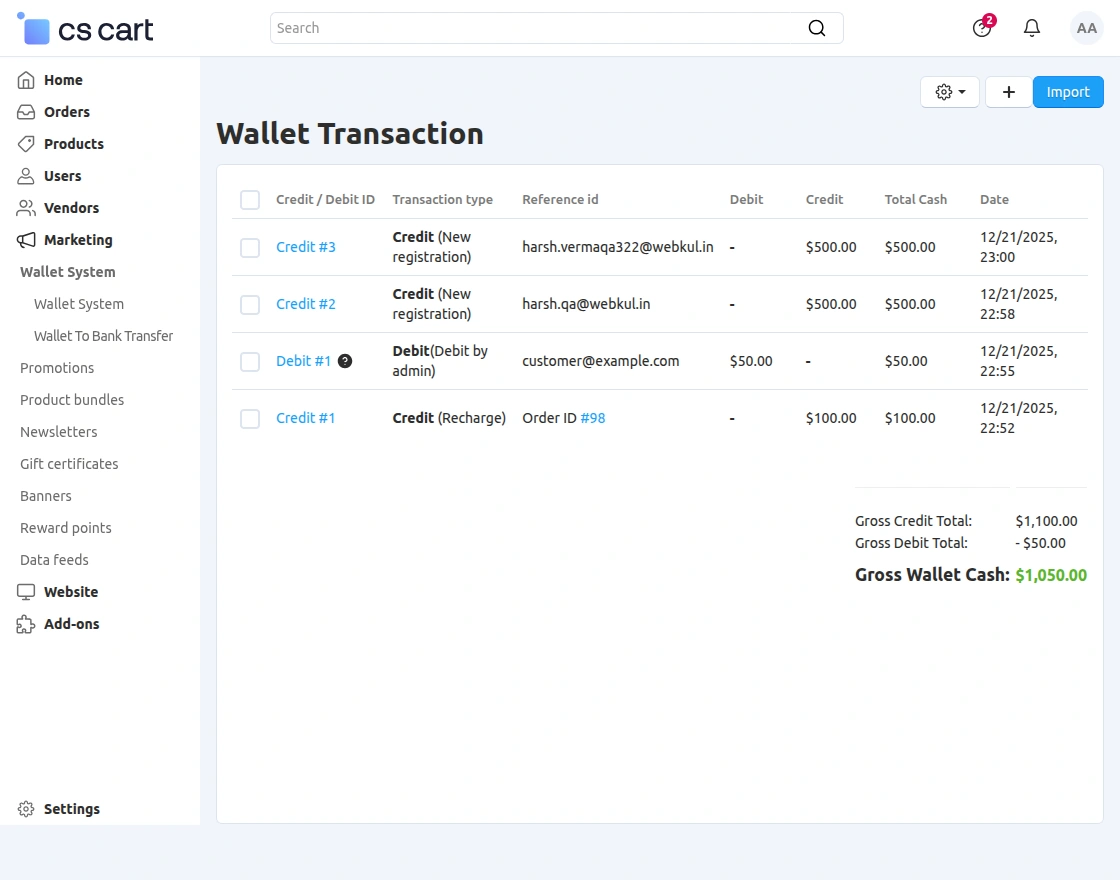
Maintaining the Wallet System from the Backend
Admin can also view the transaction details of individual users, on the basis of credit type and period
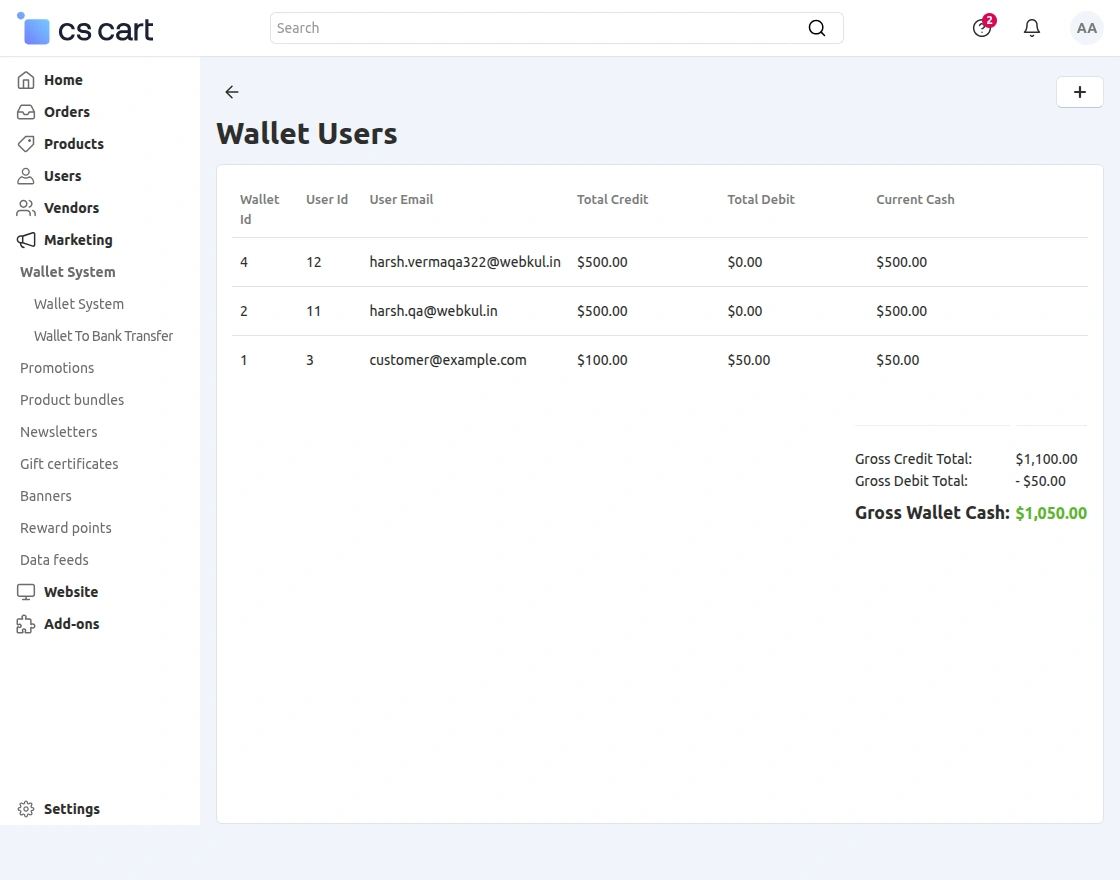
List of Wallet users as shown in the snapshot below-
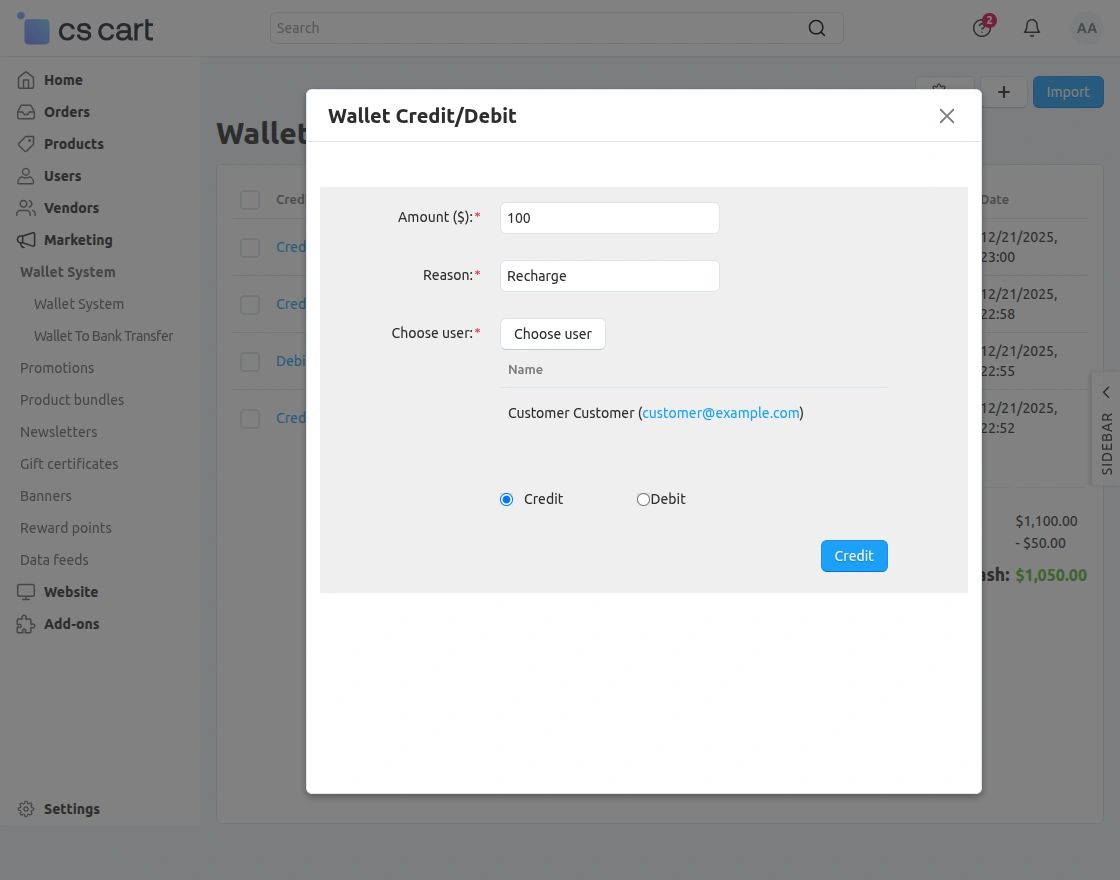
Enter the amount to be Credit/Debited and select the customers of the site. Select the option of transaction and click on “credit” to proceed.
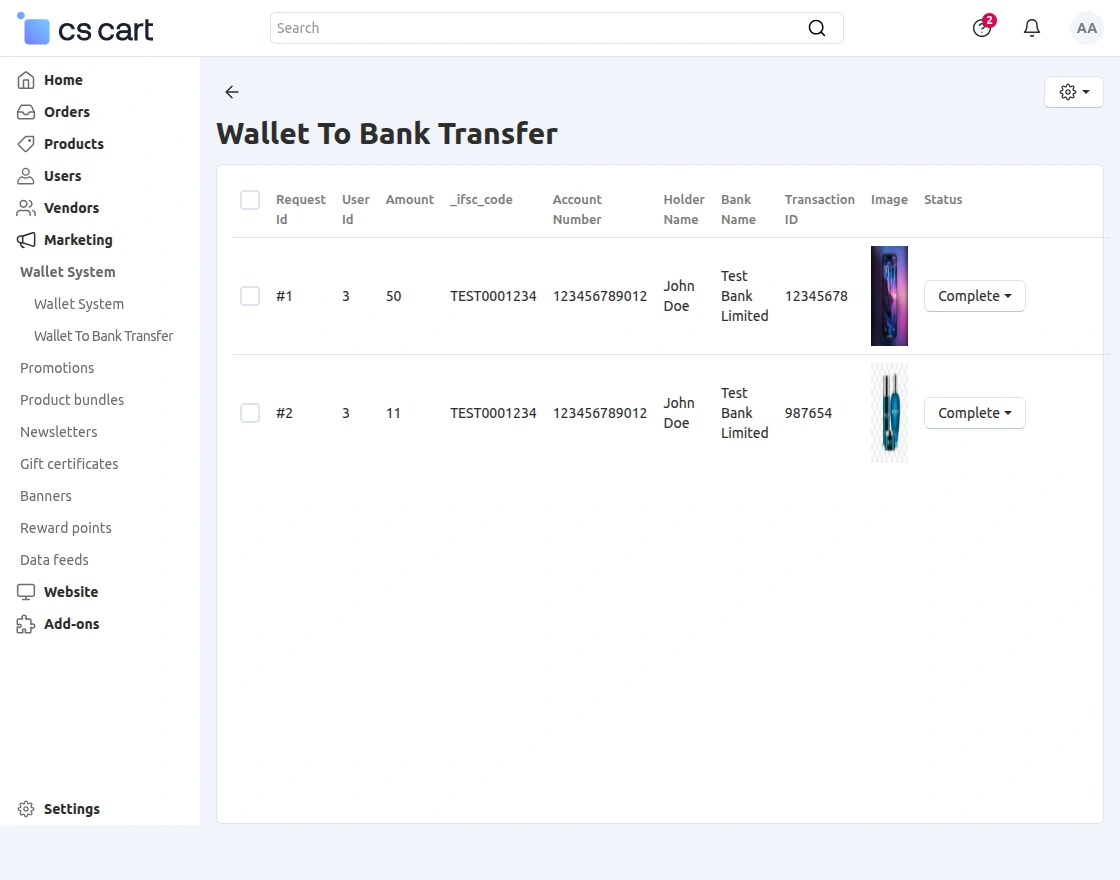
Under the “Wallet System,” there is an option for “Wallet to Bank Transfer”.
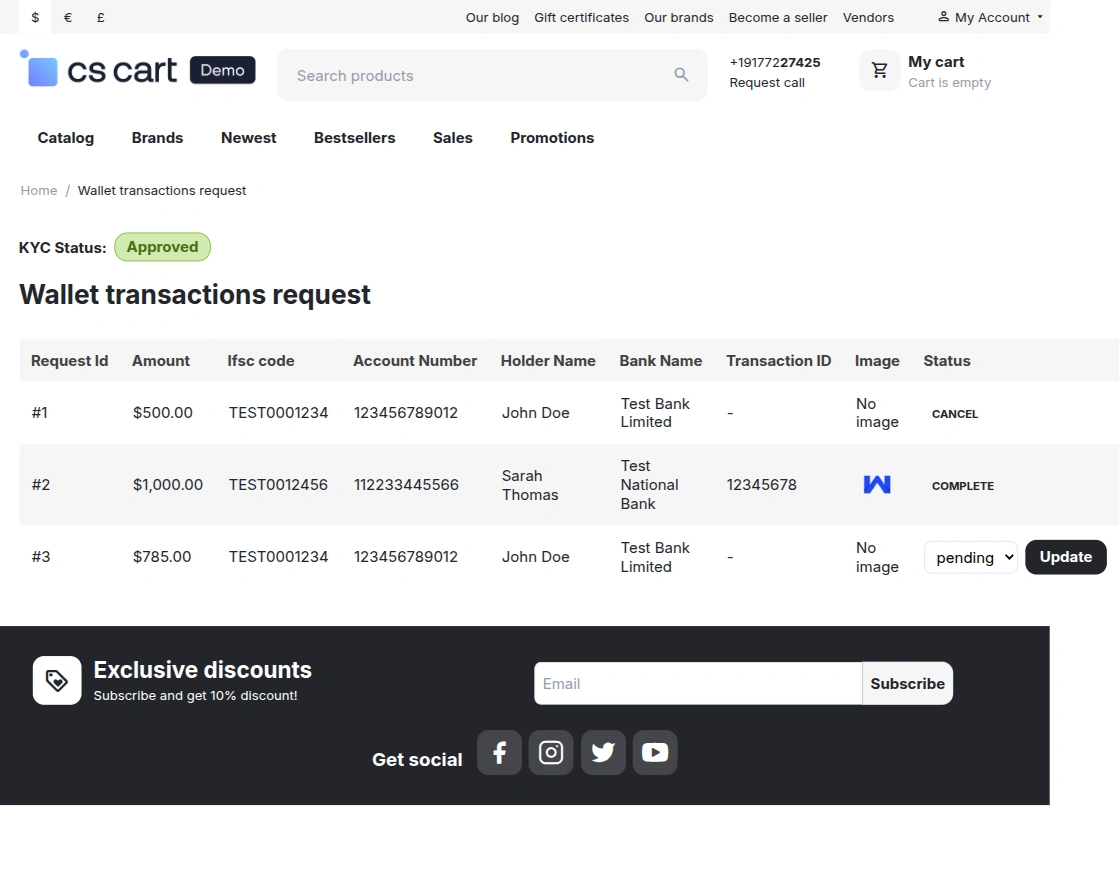
Here the admin can view bank details added for wallet-to-bank transfers, including Request ID, User ID, amount, IFSC code, account number, bank holder name, and bank name.
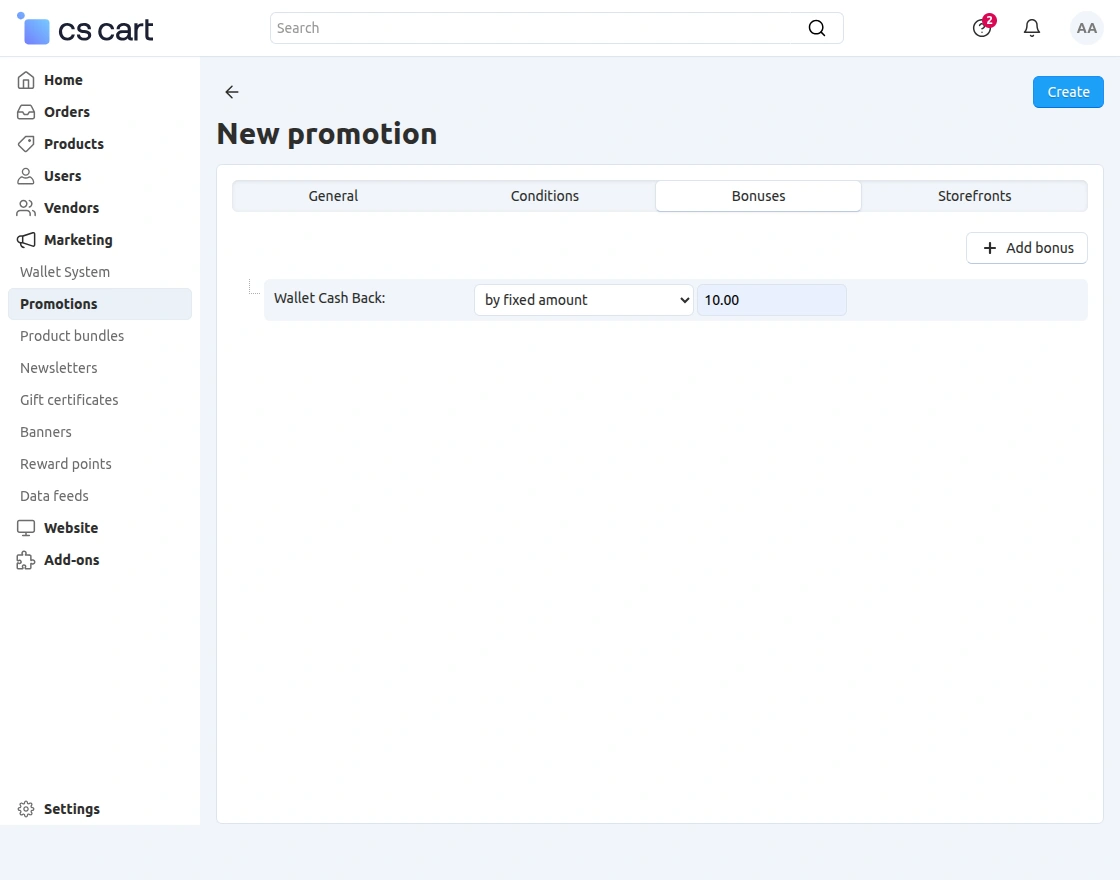
For promotions, go to Marketing → Promotions and add a new promotion.
In the Bonus tab, create a bonus, select Wallet Cash Back, then set the bonus as a percentage or a fixed amount and enter the value as shown below.
Create KYC Form
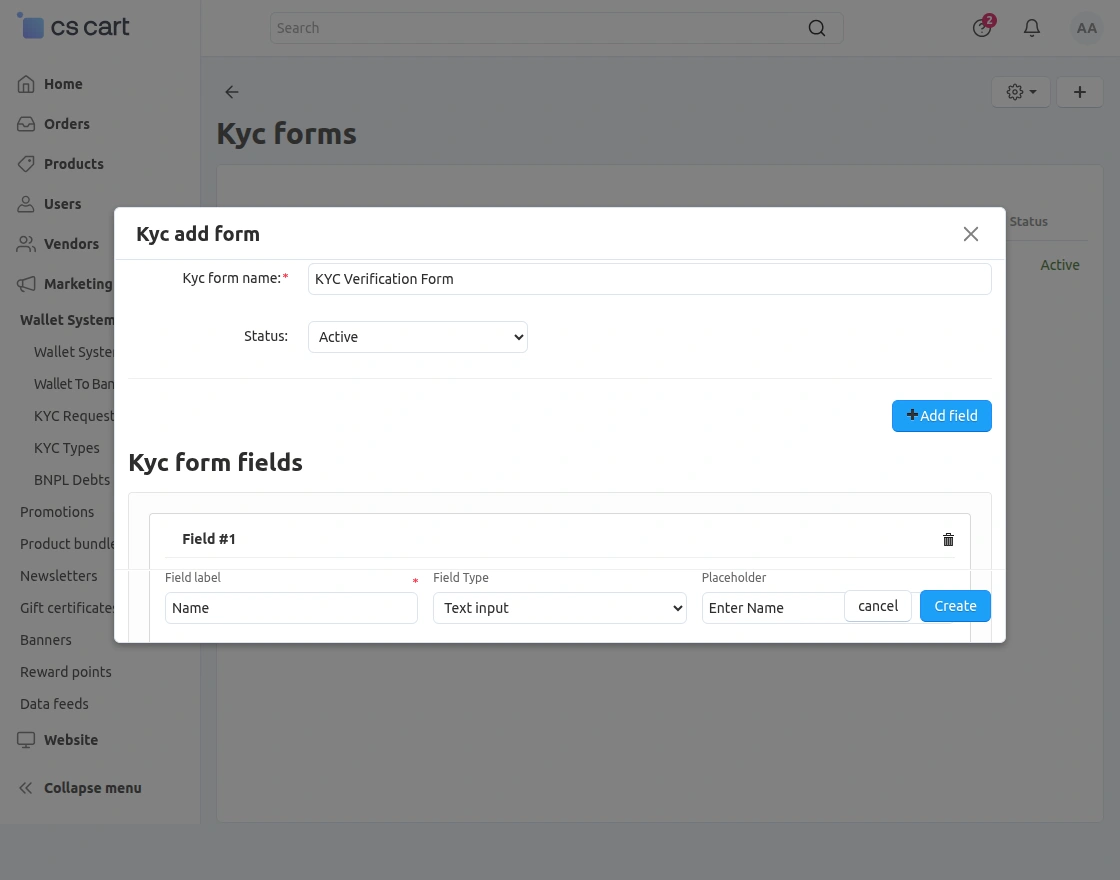
The admin can create and manage KYC verification forms from the KYC Forms section.
To create a new KYC form, the admin needs to navigate to:
Marketing > Wallet System > KYC Types
Here, the admin can view all created KYC forms along with KYC form ID, form name, created date, and status.
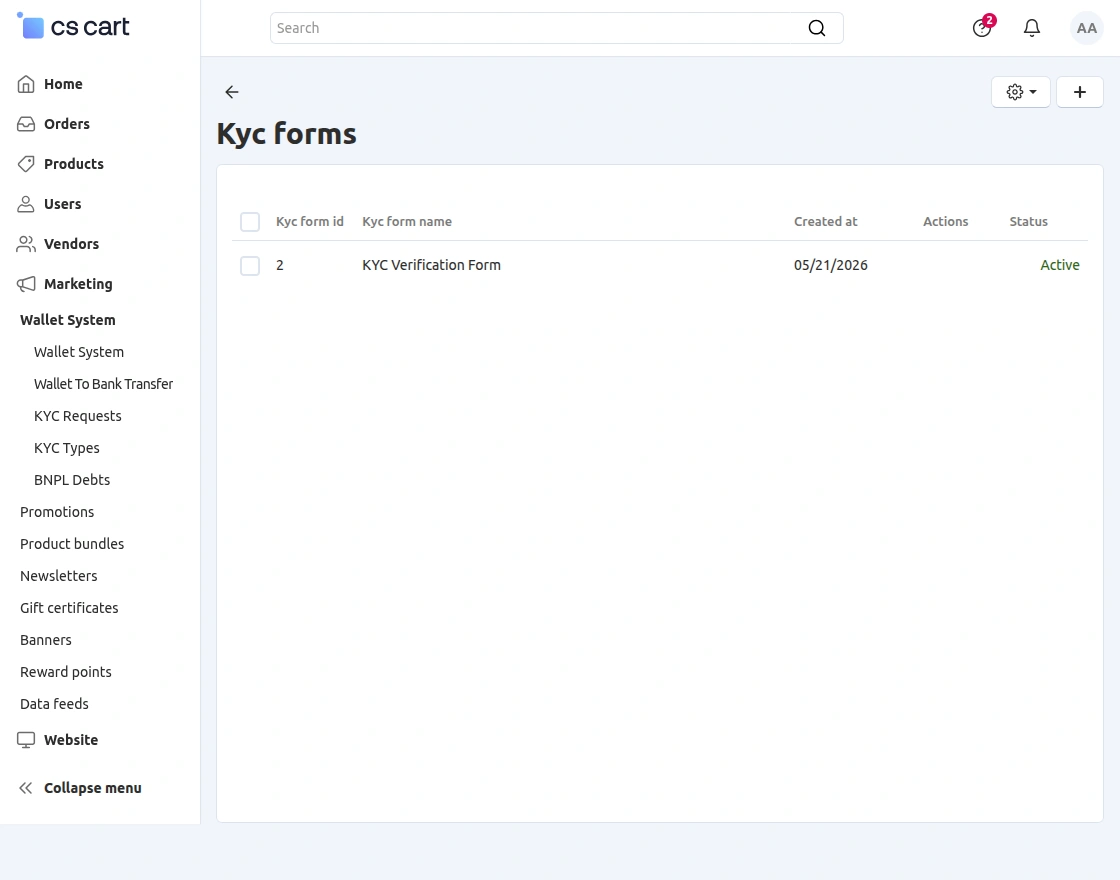
The admin can click on the add icon to create a new KYC verification form.
While creating the KYC form, the admin can configure:
-
KYC form name: Admin can enter the name of the KYC verification form.
-
Status: Admin can enable or disable the KYC form.
-
KYC form fields: Admin can add multiple verification fields for customer KYC forms.
-
Field label: Admin can define the label name for the KYC form field.
-
Field type: Admin can select the input type for the KYC field.
-
Placeholder: Admin can add placeholder text for customer guidance.
The admin can also add multiple fields dynamically using the Add Field option.
KYC Requests
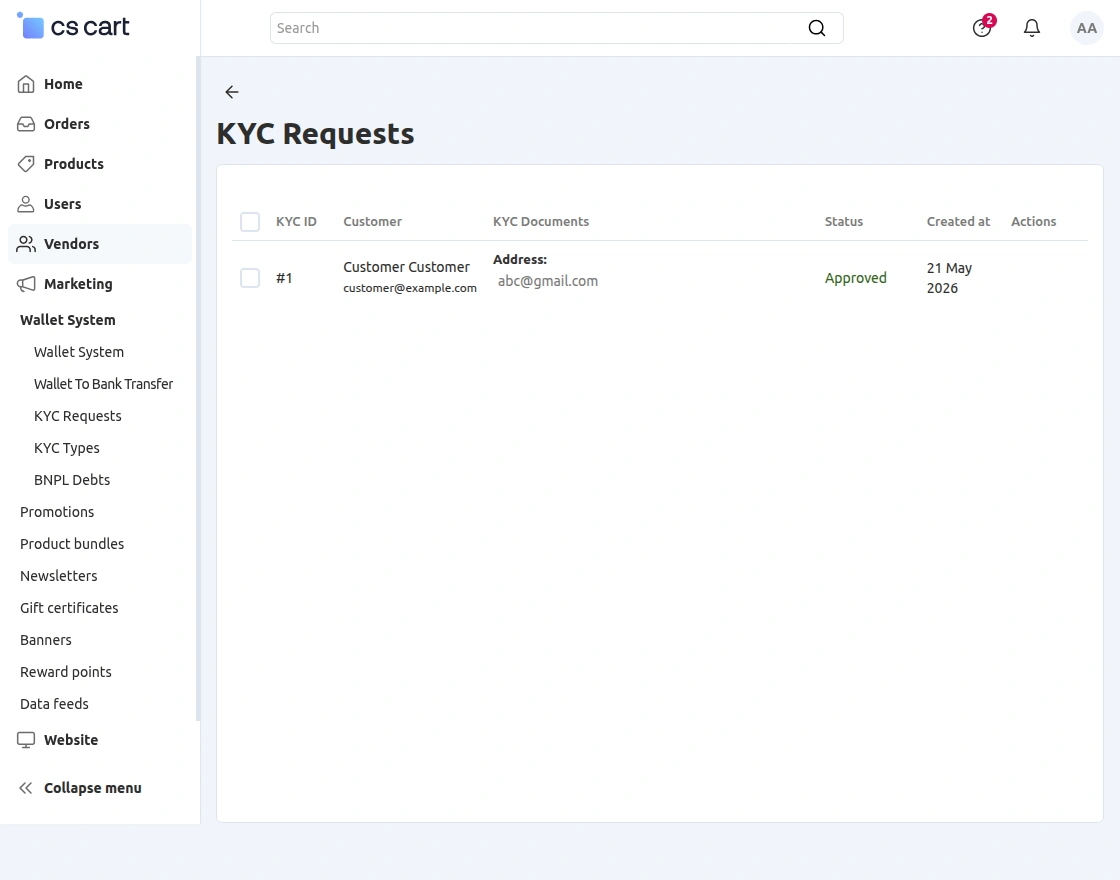
The admin can manage all customer KYC verification requests from the KYC Requests section.
To view KYC requests, the admin needs to navigate to:
Marketing > Wallet System > KYC Requests
Here, the admin can view customer KYC details including customer information, uploaded KYC documents, request status, and request creation date.
The admin can review submitted KYC documents and approve or reject customer verification requests directly from the backend.
Manage BNPL Debts
The admin can manage all customer BNPL transactions and pending dues from the BNPL Debts section.
To view BNPL debts, the admin needs to navigate to:
Marketing > Wallet System > BNPL Debts
Here, the admin can view BNPL debt details including debt ID, customer information, order ID, amount, interest amount, due date, and repayment status.
The admin can also manage pending BNPL transactions and mark debts as written off directly from the backend.
Adding Frontend Wallet Layout From Backend
To add the Wallet option on the front end, the admin needs to add the Wallet block in the checkout page layout settings.
Once added, the Wallet option will be available on the checkout page, as shown in the snapshots below.
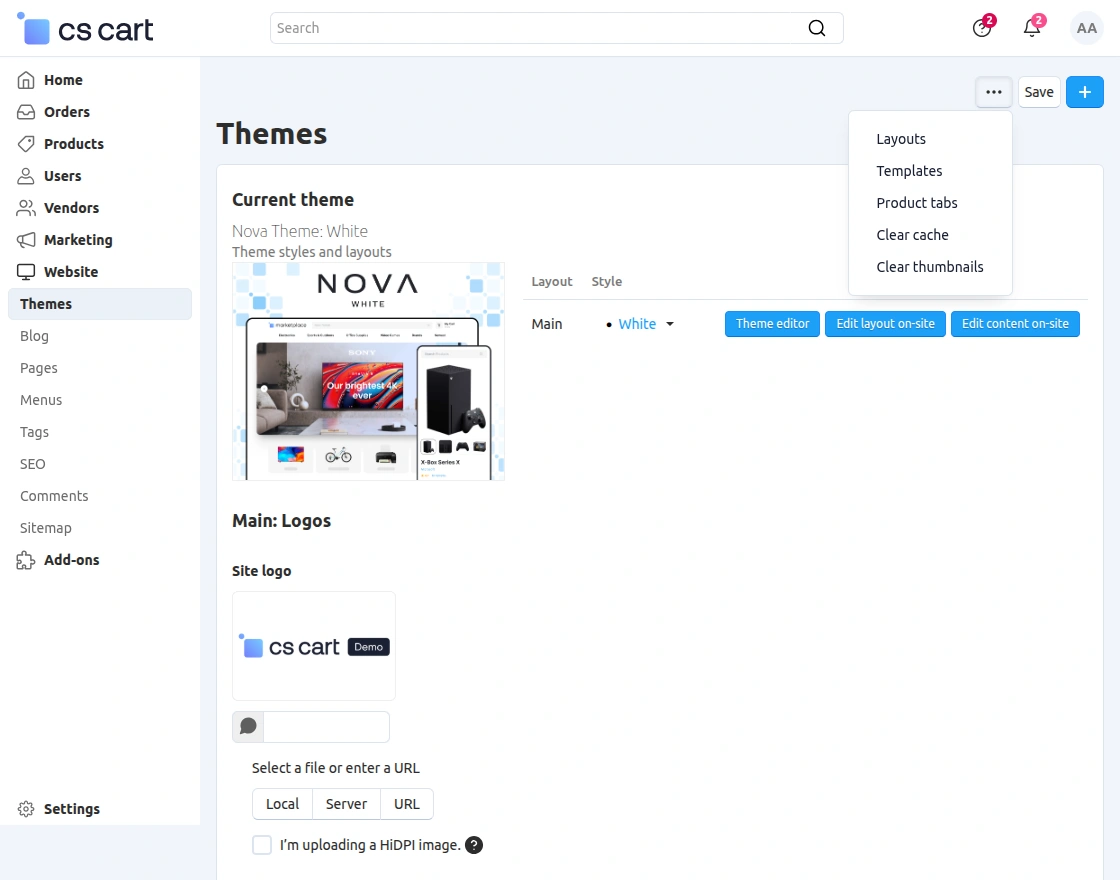
Now from the Header section you need to add a block as shown in the below snapshots –
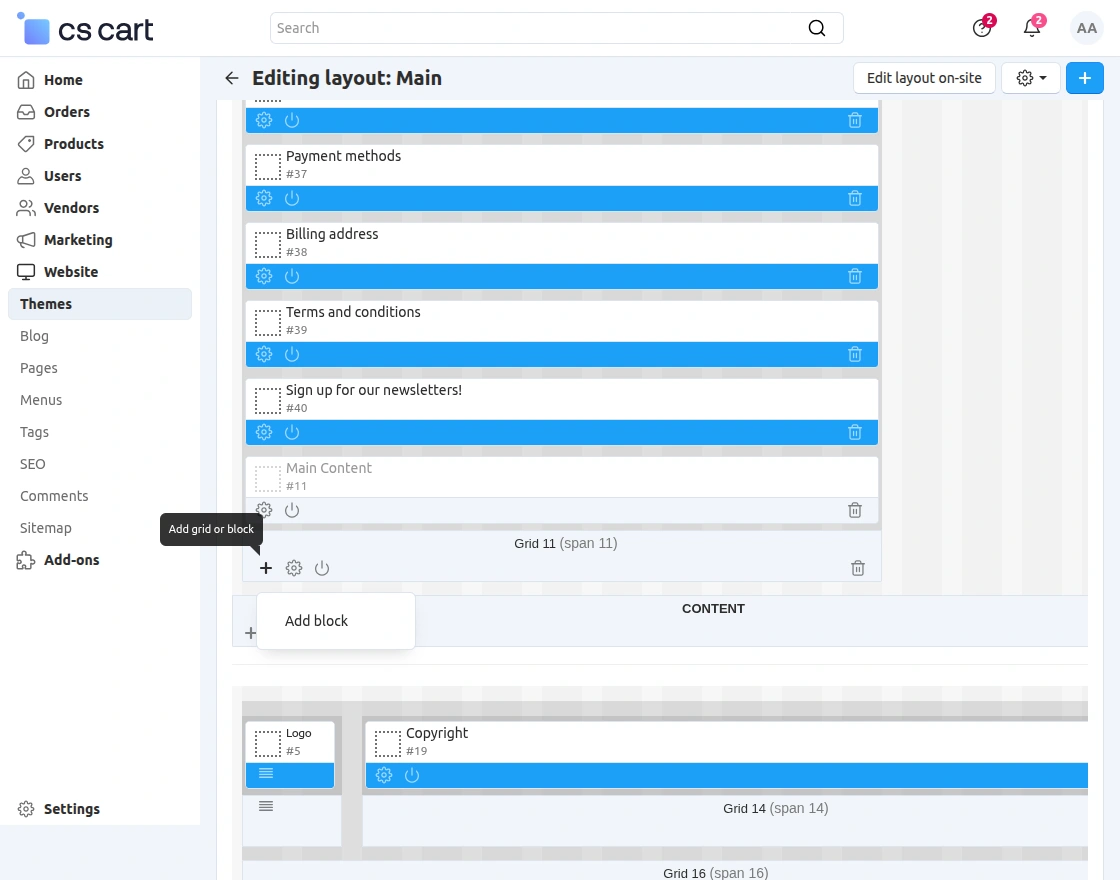
After Clicking on Add Blockoption you need to click on Create New Block option –
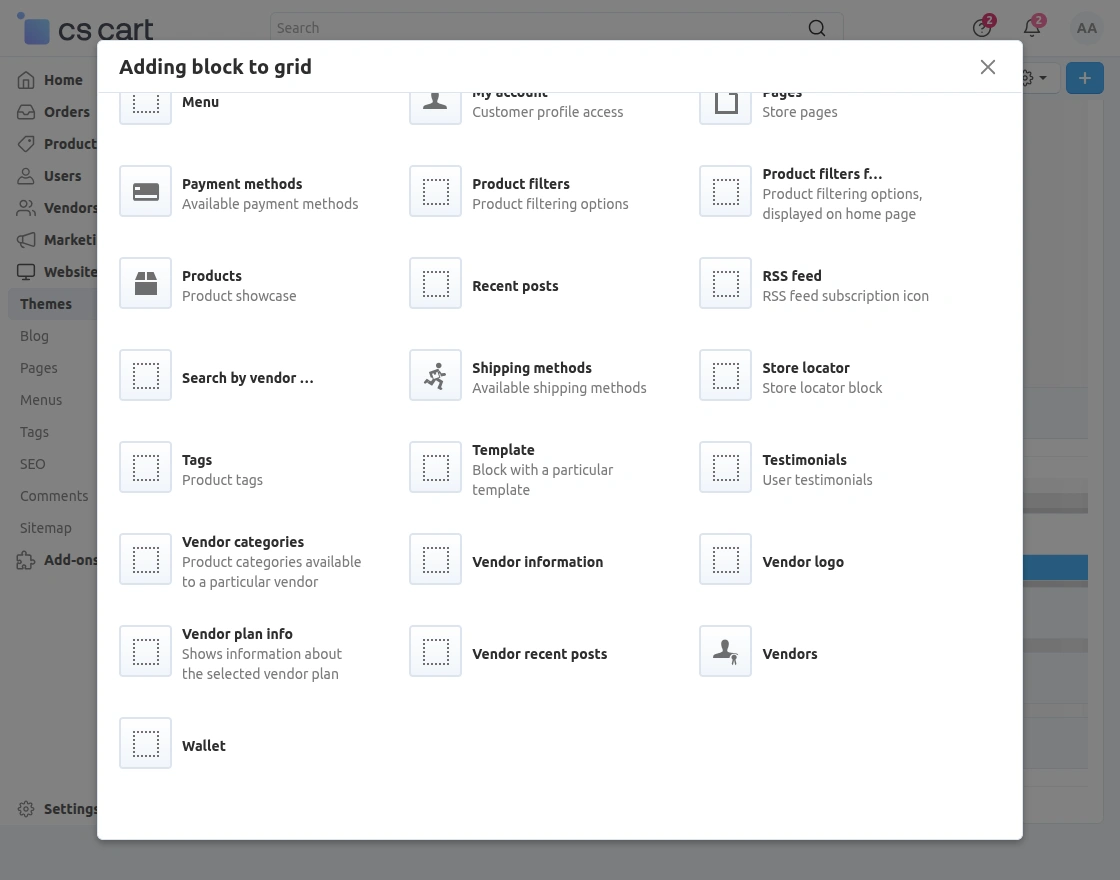 Enter the “Name” and select the “Template” –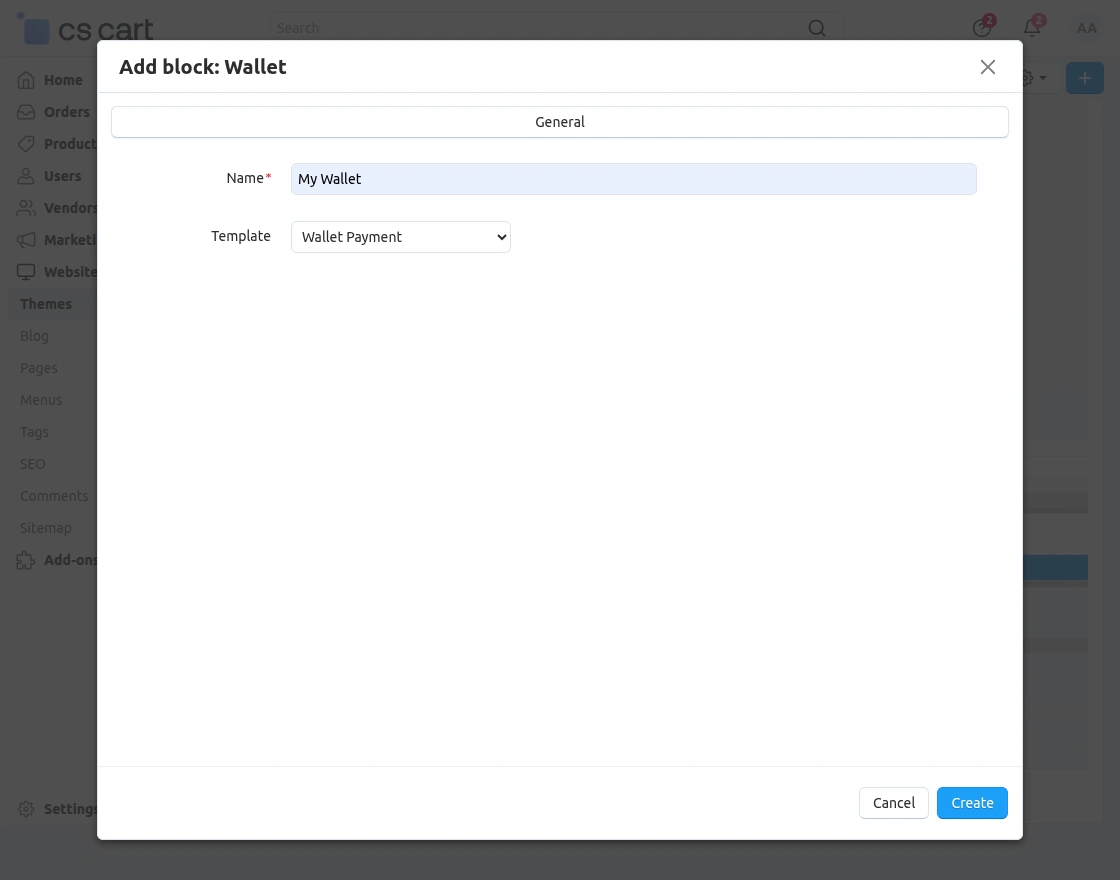
CS-Cart Wallet System | Front-End
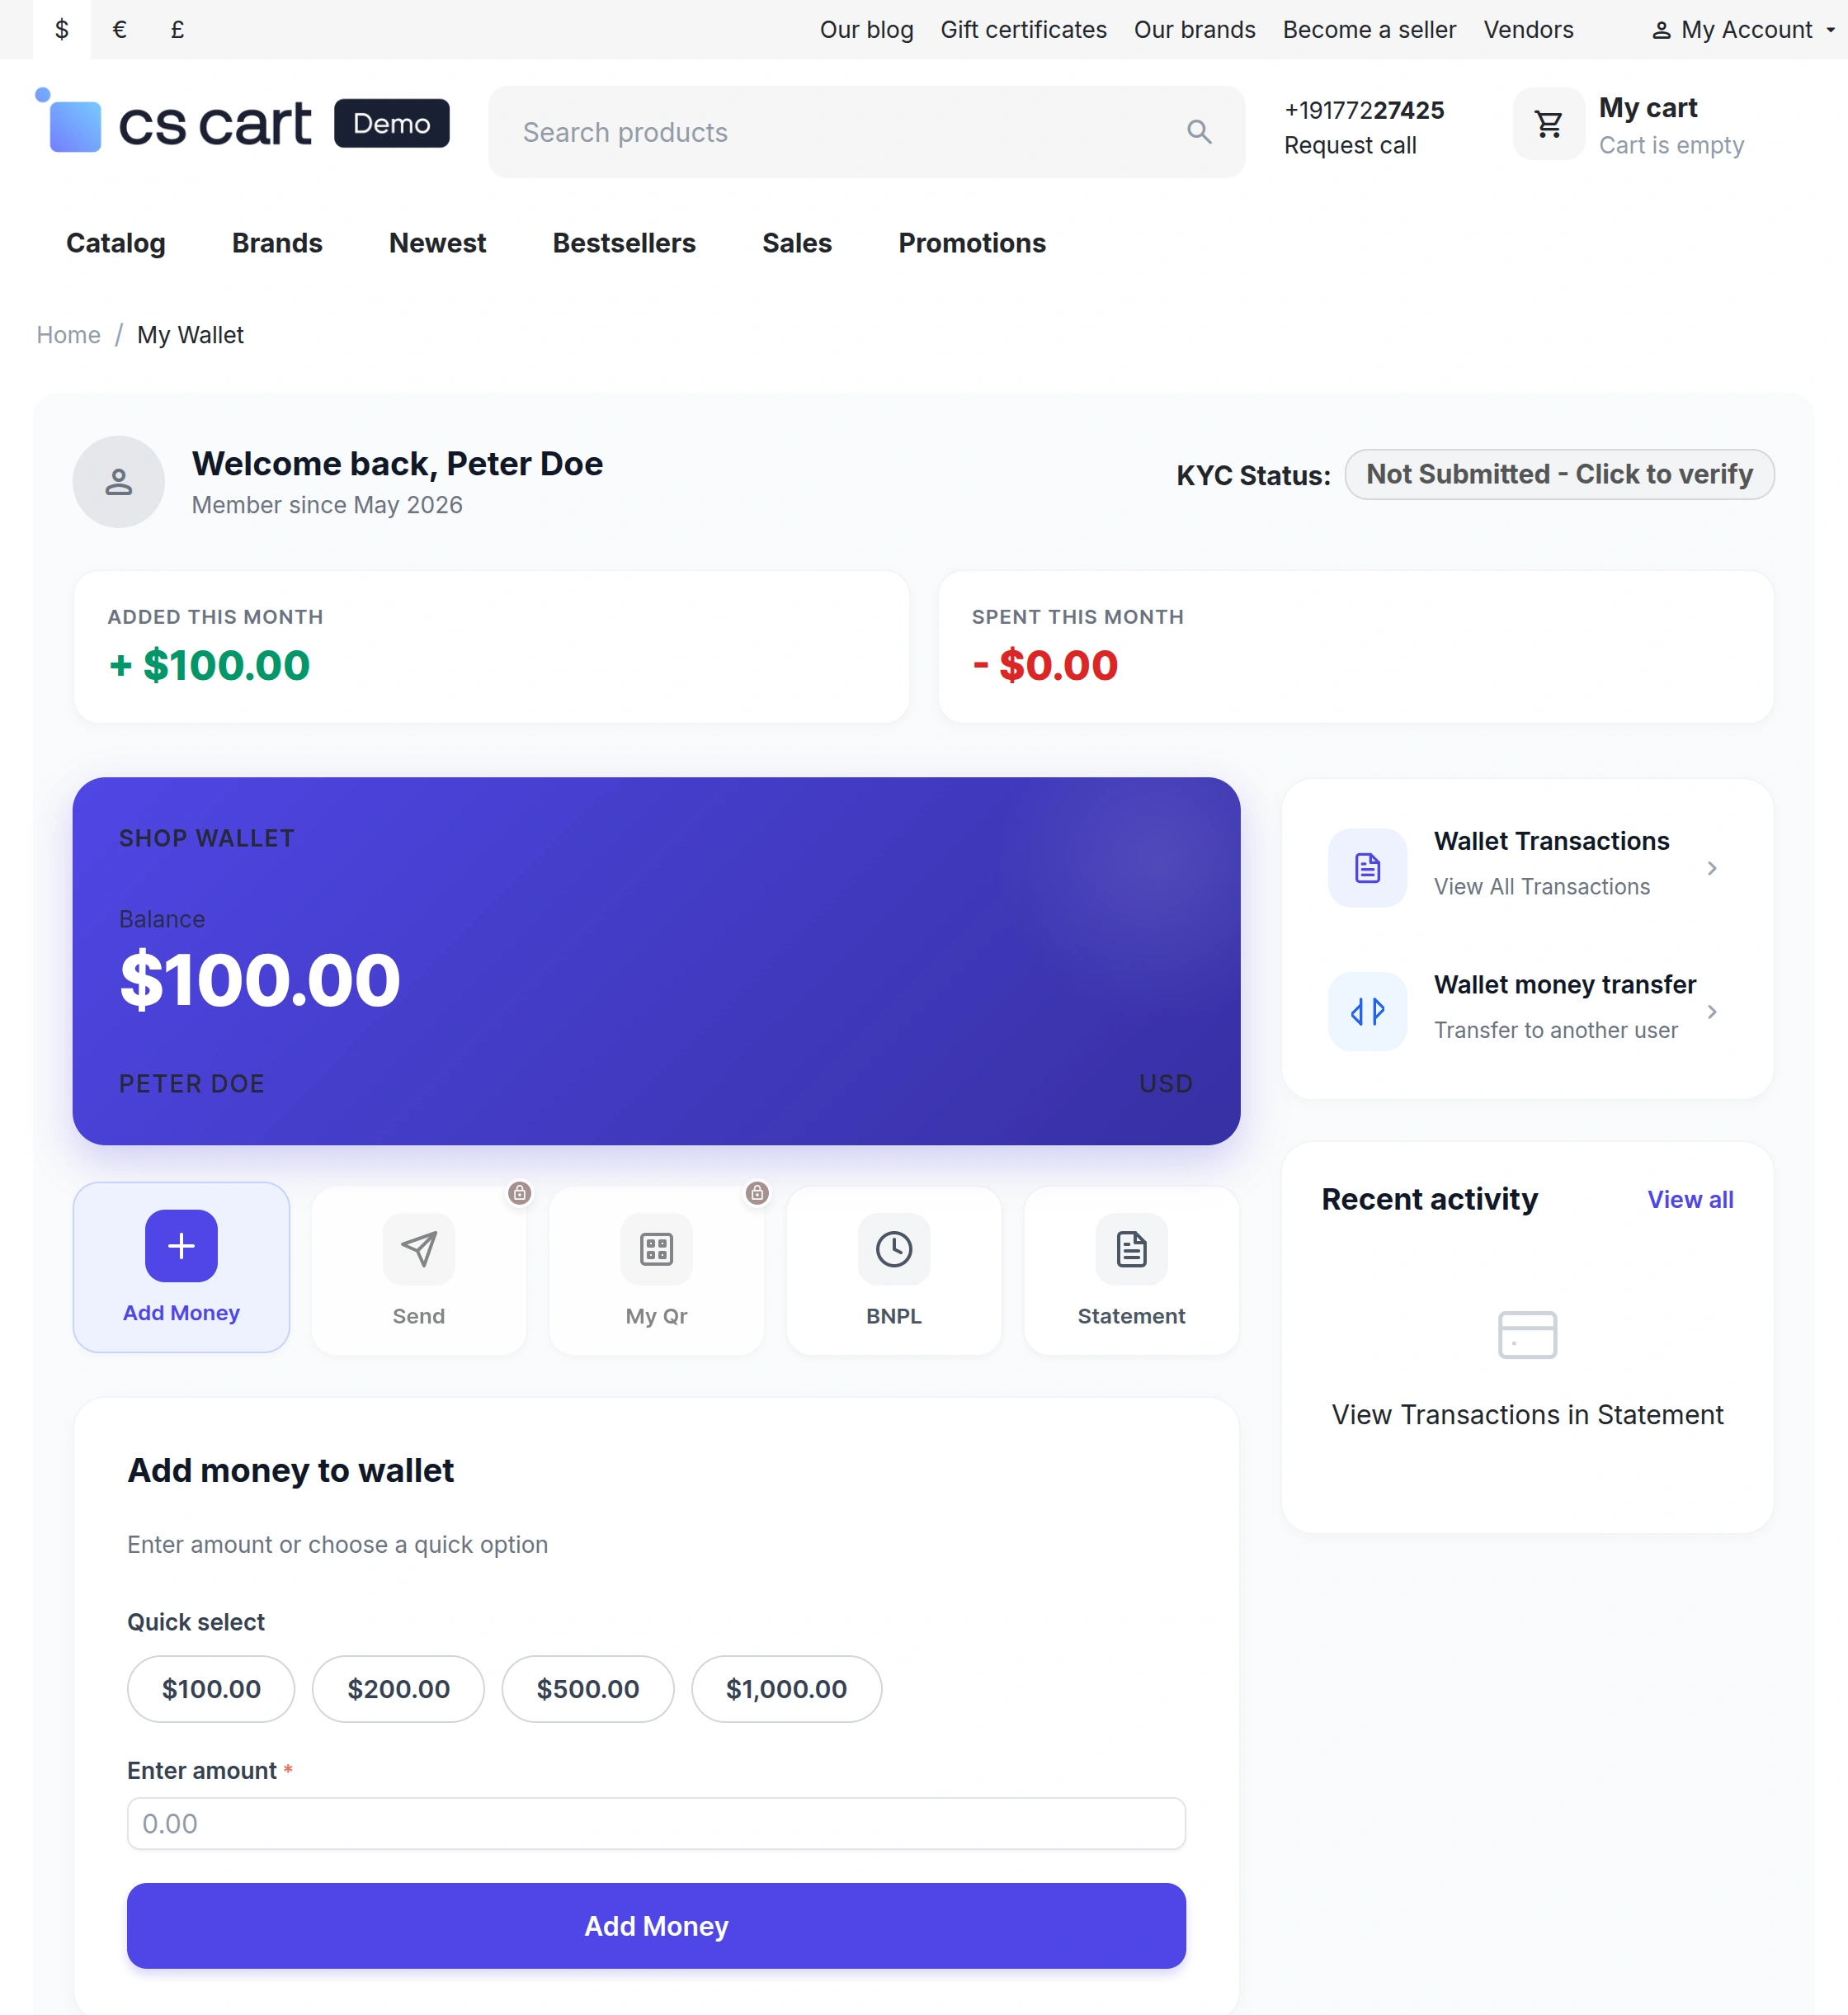
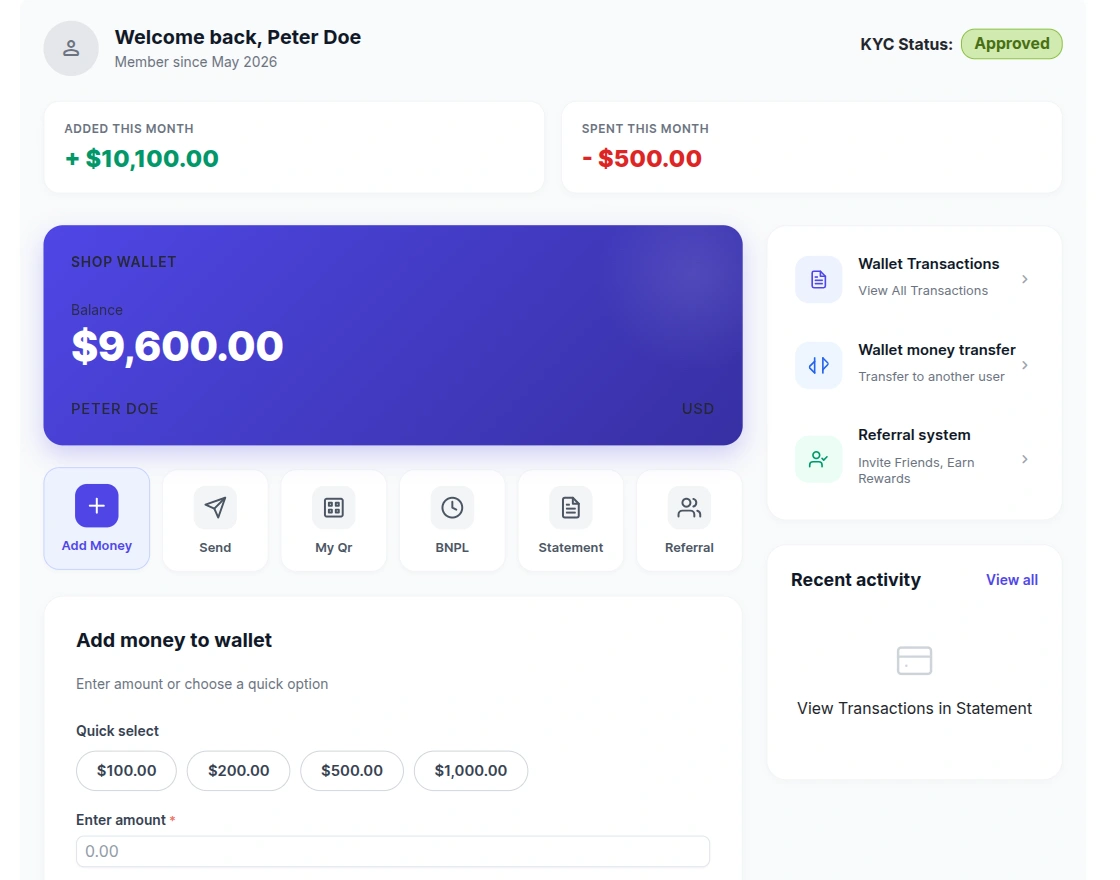
Customers can access the wallet dashboard by navigating to the My Account section and clicking on the My Wallet option.
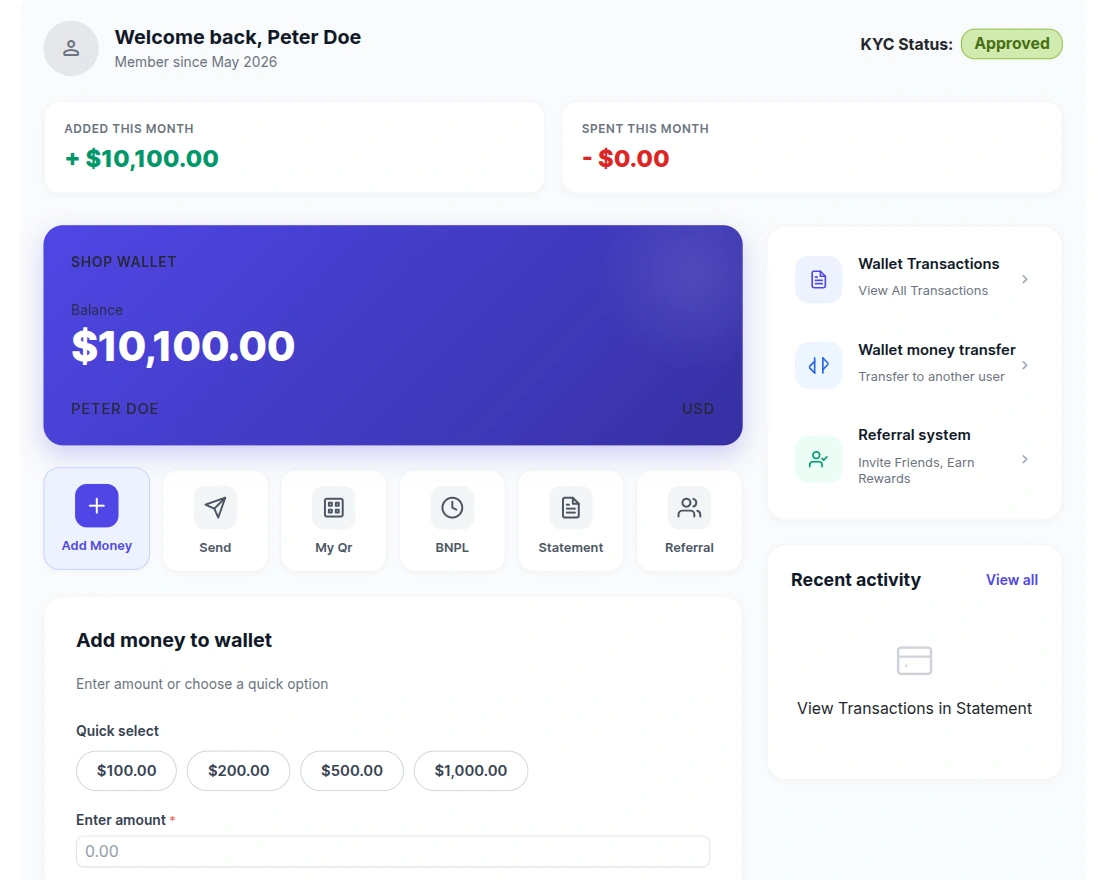
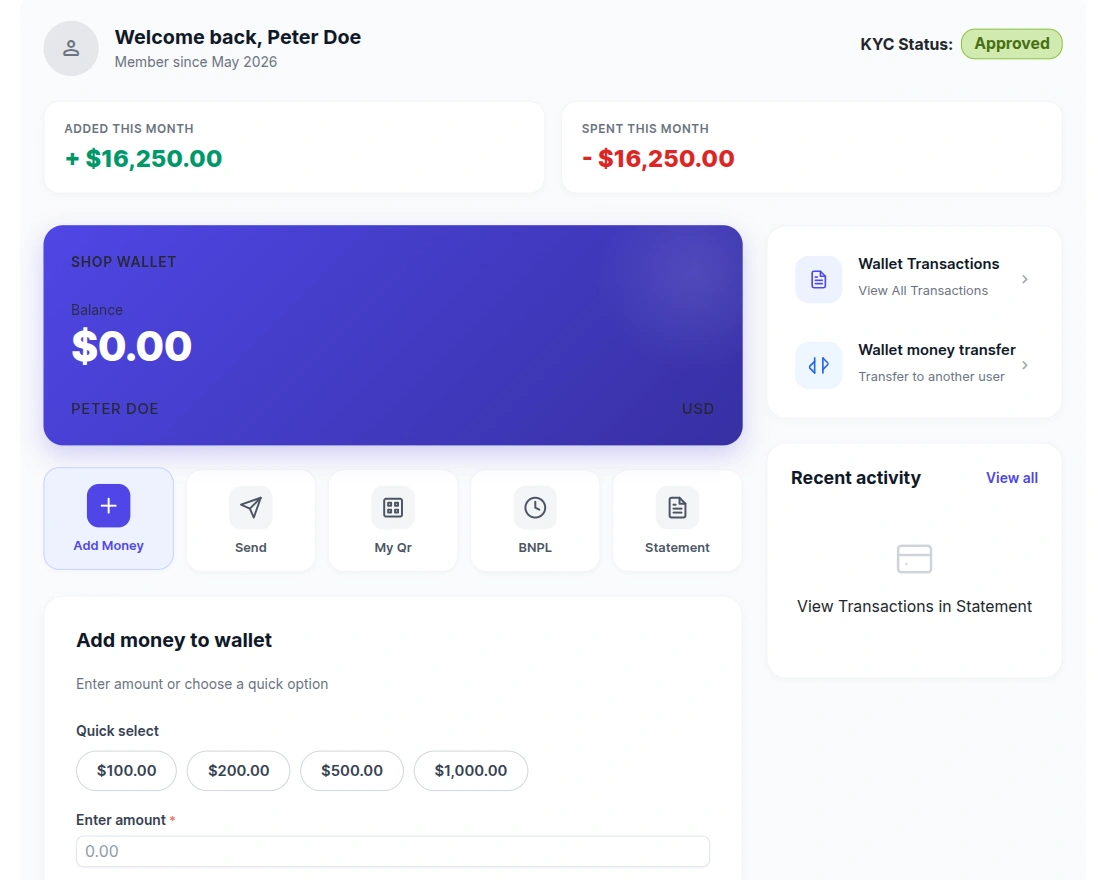
From the My Wallet section, customers can easily manage wallet activities, view wallet balance, track monthly transactions, and access multiple wallet features from a single dashboard.
Customers can also quickly recharge their wallet using predefined quick recharge amount options or manually enter the recharge amount.
Wallet KYC Verification
Customers can verify their wallet account directly from the wallet dashboard.
If KYC verification is not completed, the customer can click on the Click to verify option available in the KYC Status section.
After clicking on the verification option, the KYC verification page will open where customers can submit the required verification details and documents.
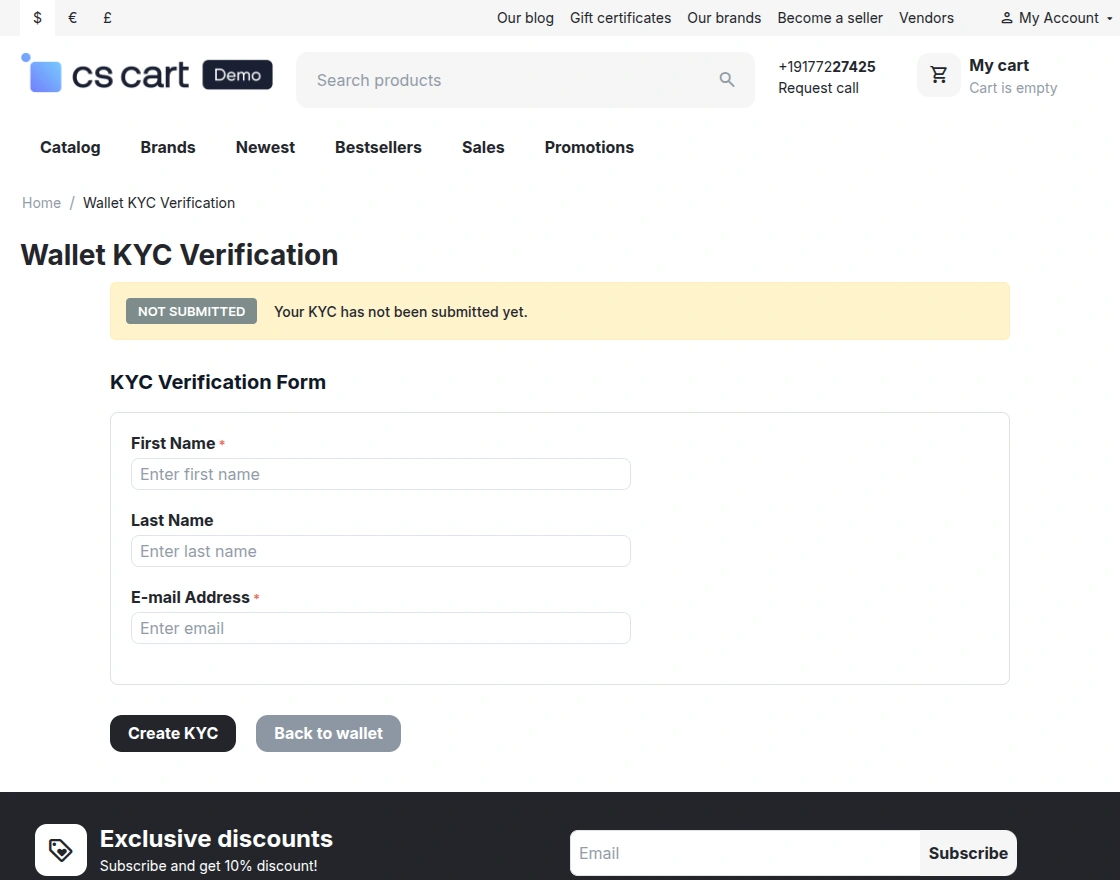
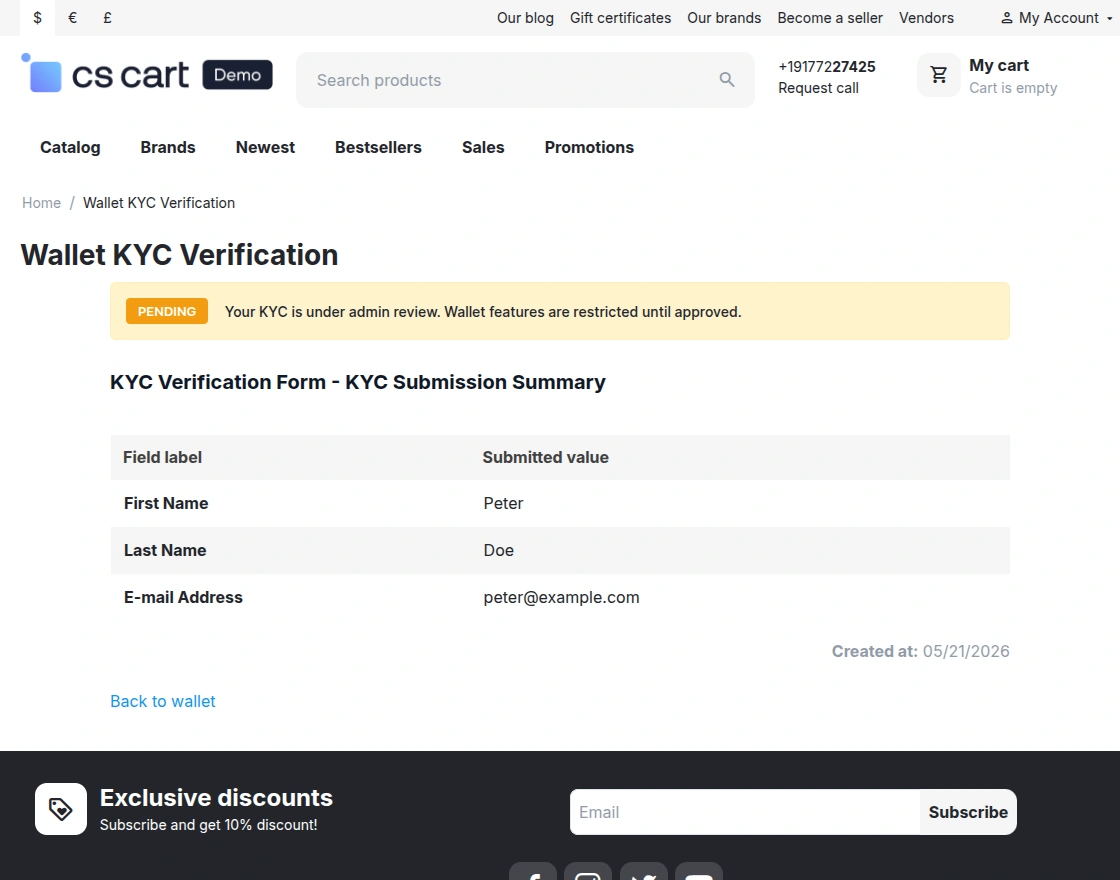
After submitting the KYC verification details, customers can view the submitted KYC information and verification status directly from the KYC verification page.
Until admin approval, wallet features remain restricted for the customer.
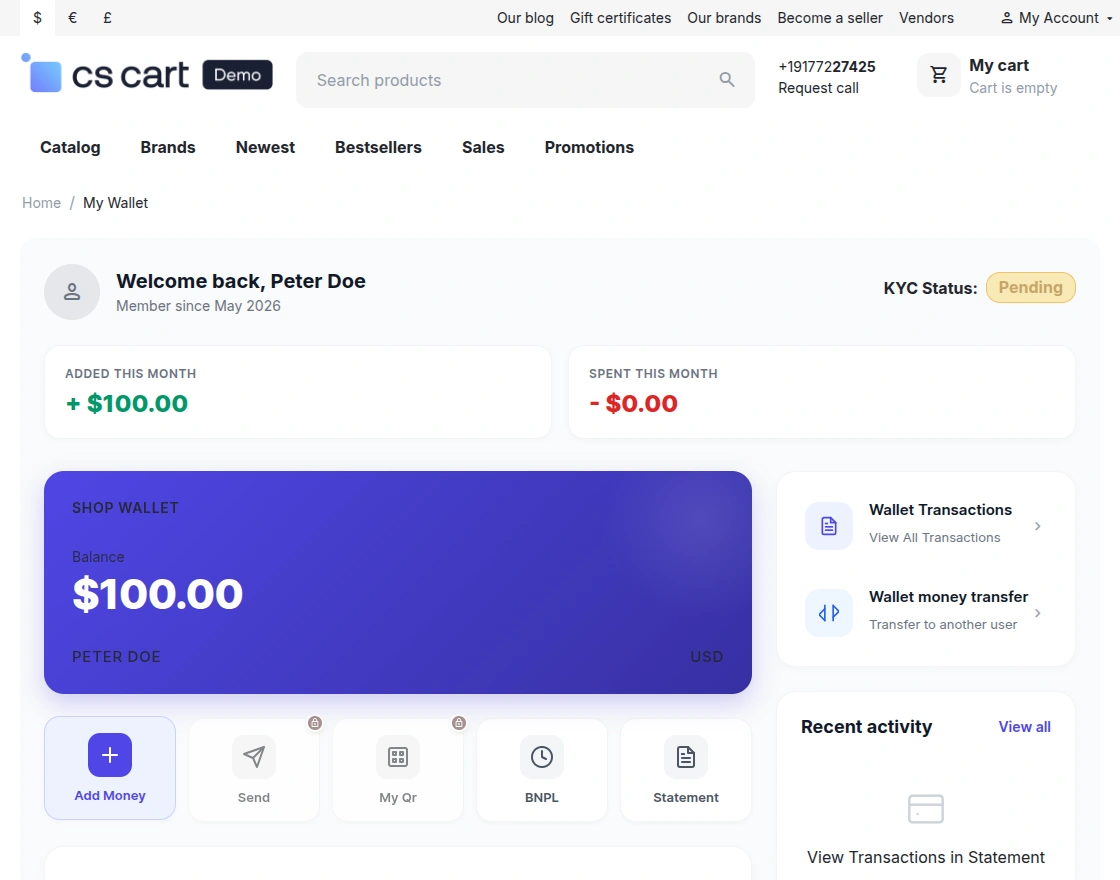
After submitting the KYC request, the customer is redirected back to the wallet dashboard where the KYC status is displayed as Pending.
Until the KYC request is approved by the admin, restricted wallet features like Wallet Money Transfer, My QR, and BNPL remain locked for the customer.
Adding Wallet Cash
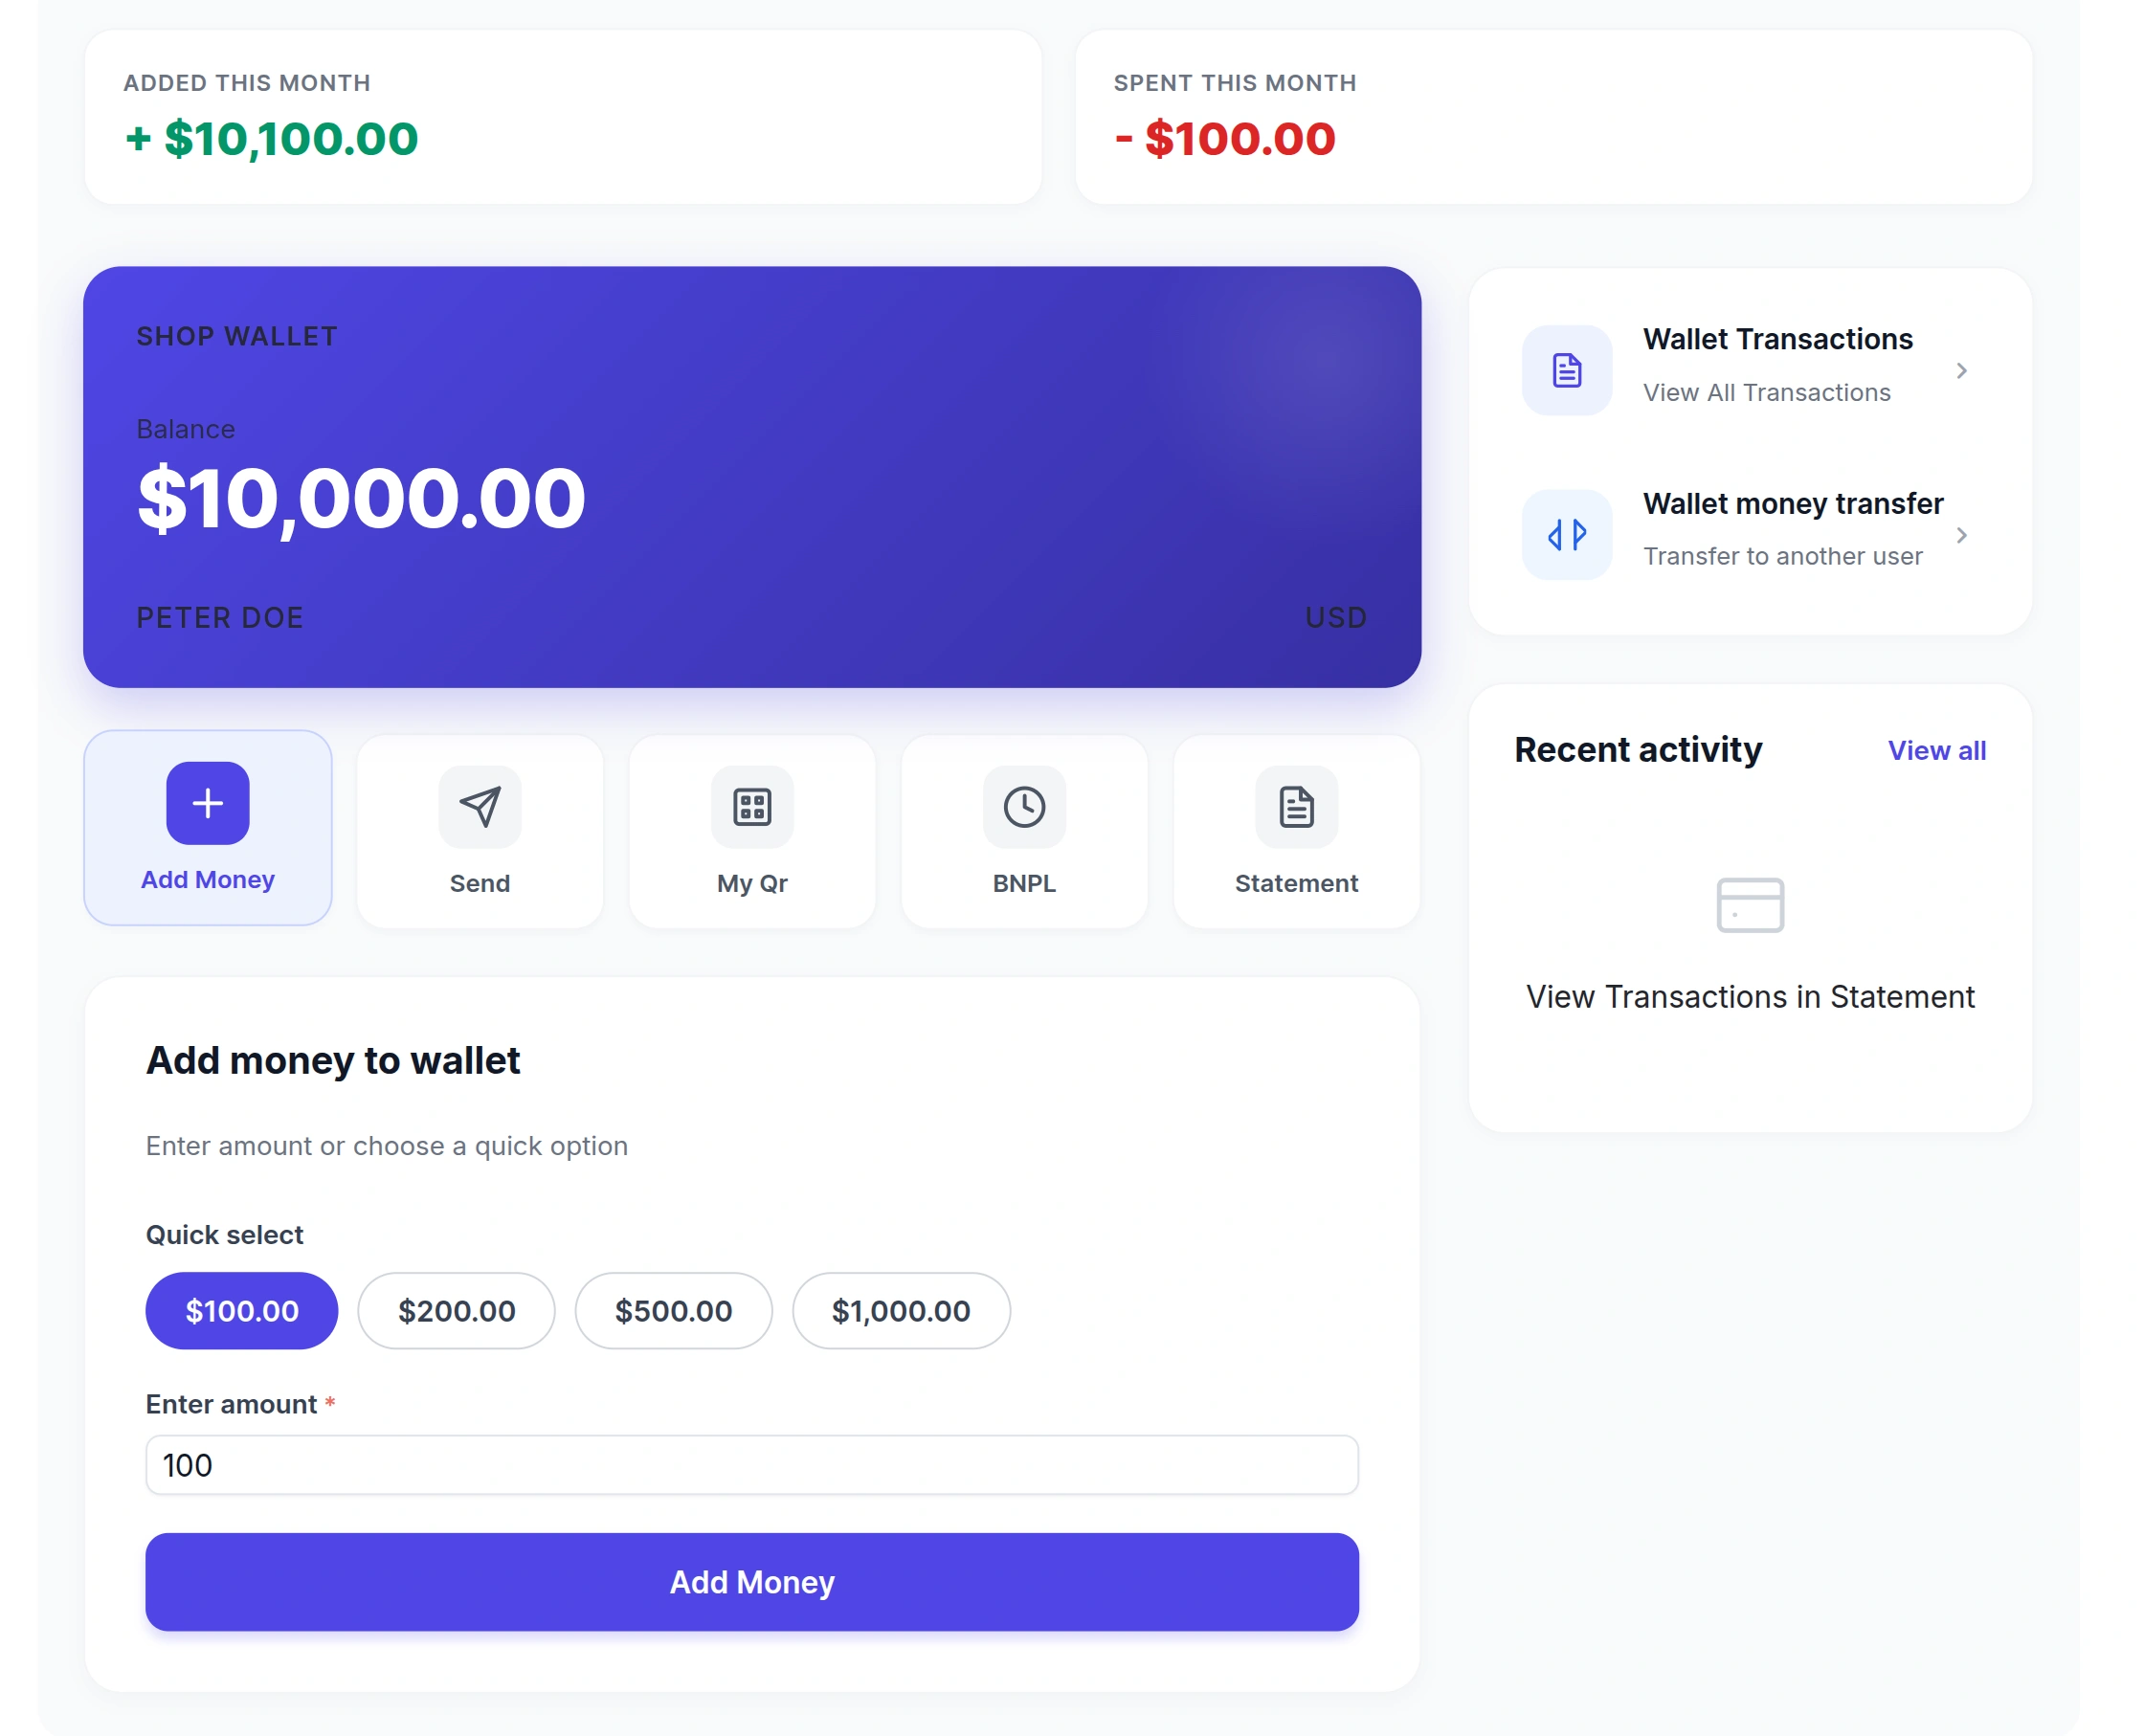
Customers can easily add wallet balance directly from the My Wallet dashboard.
The customer needs to click on the Add Money option available in the wallet dashboard to recharge the wallet balance.
Customers can either select predefined quick recharge amounts or manually enter the preferred recharge amount before proceeding.
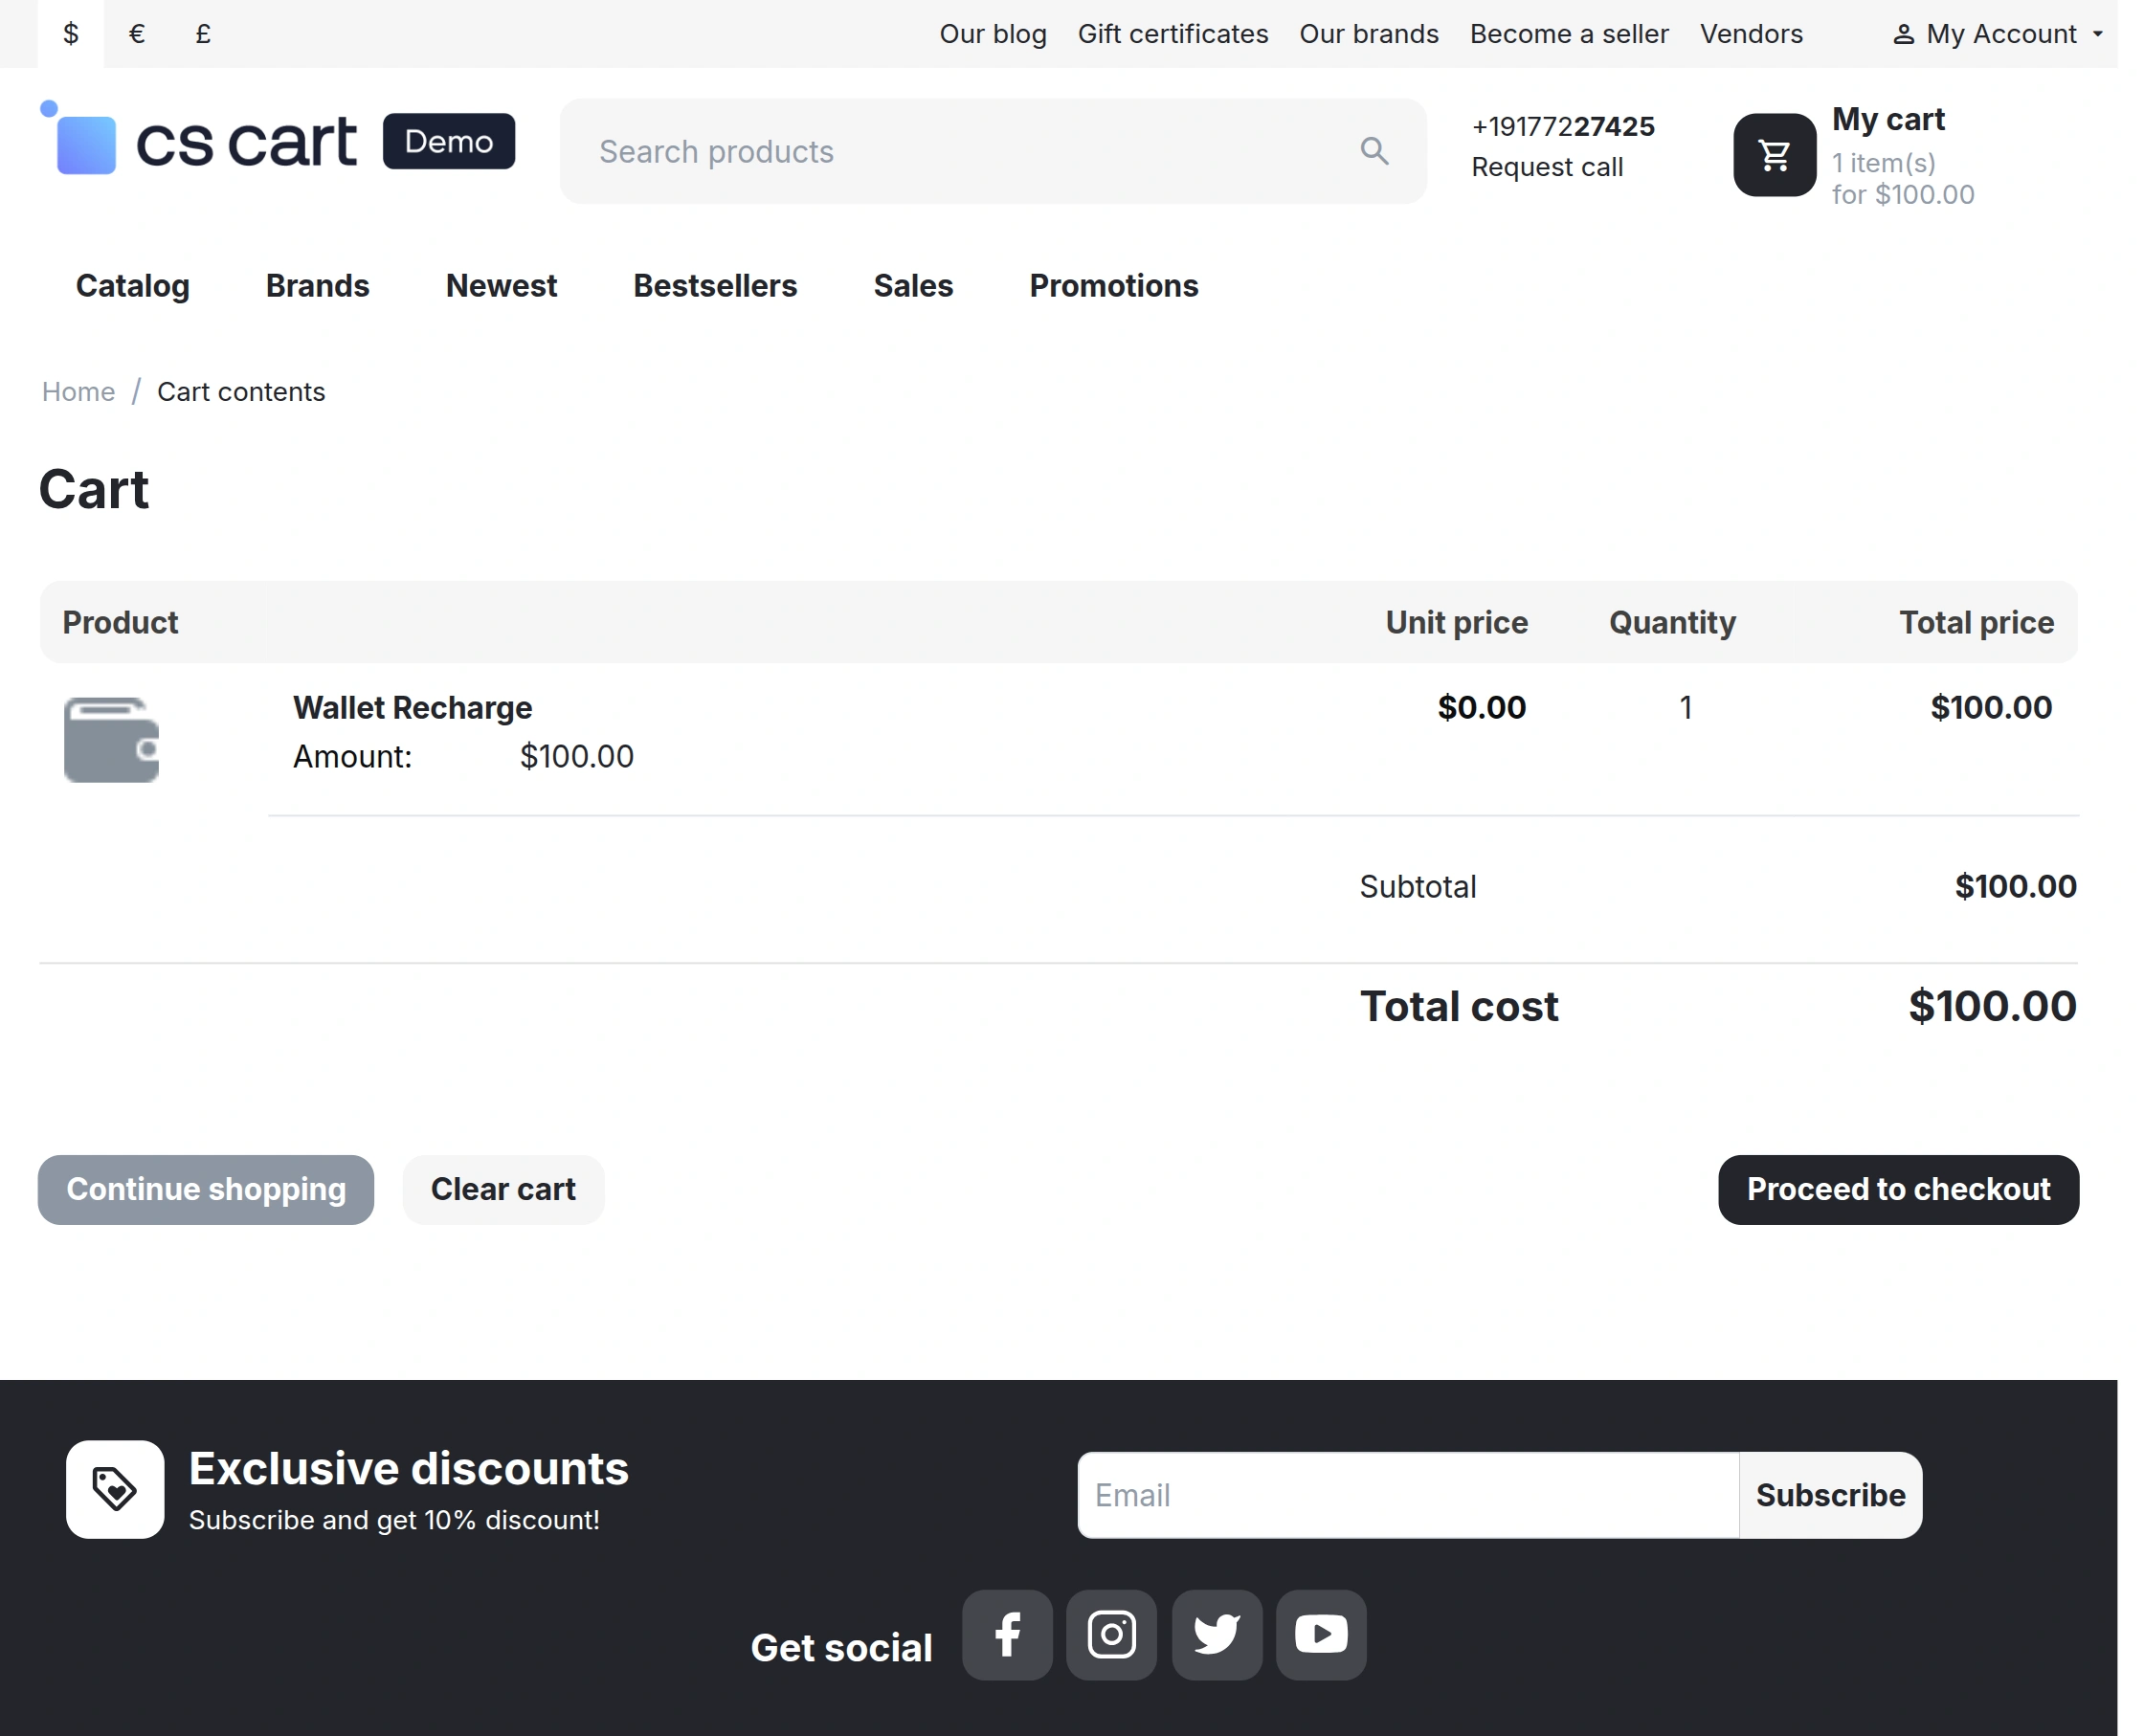
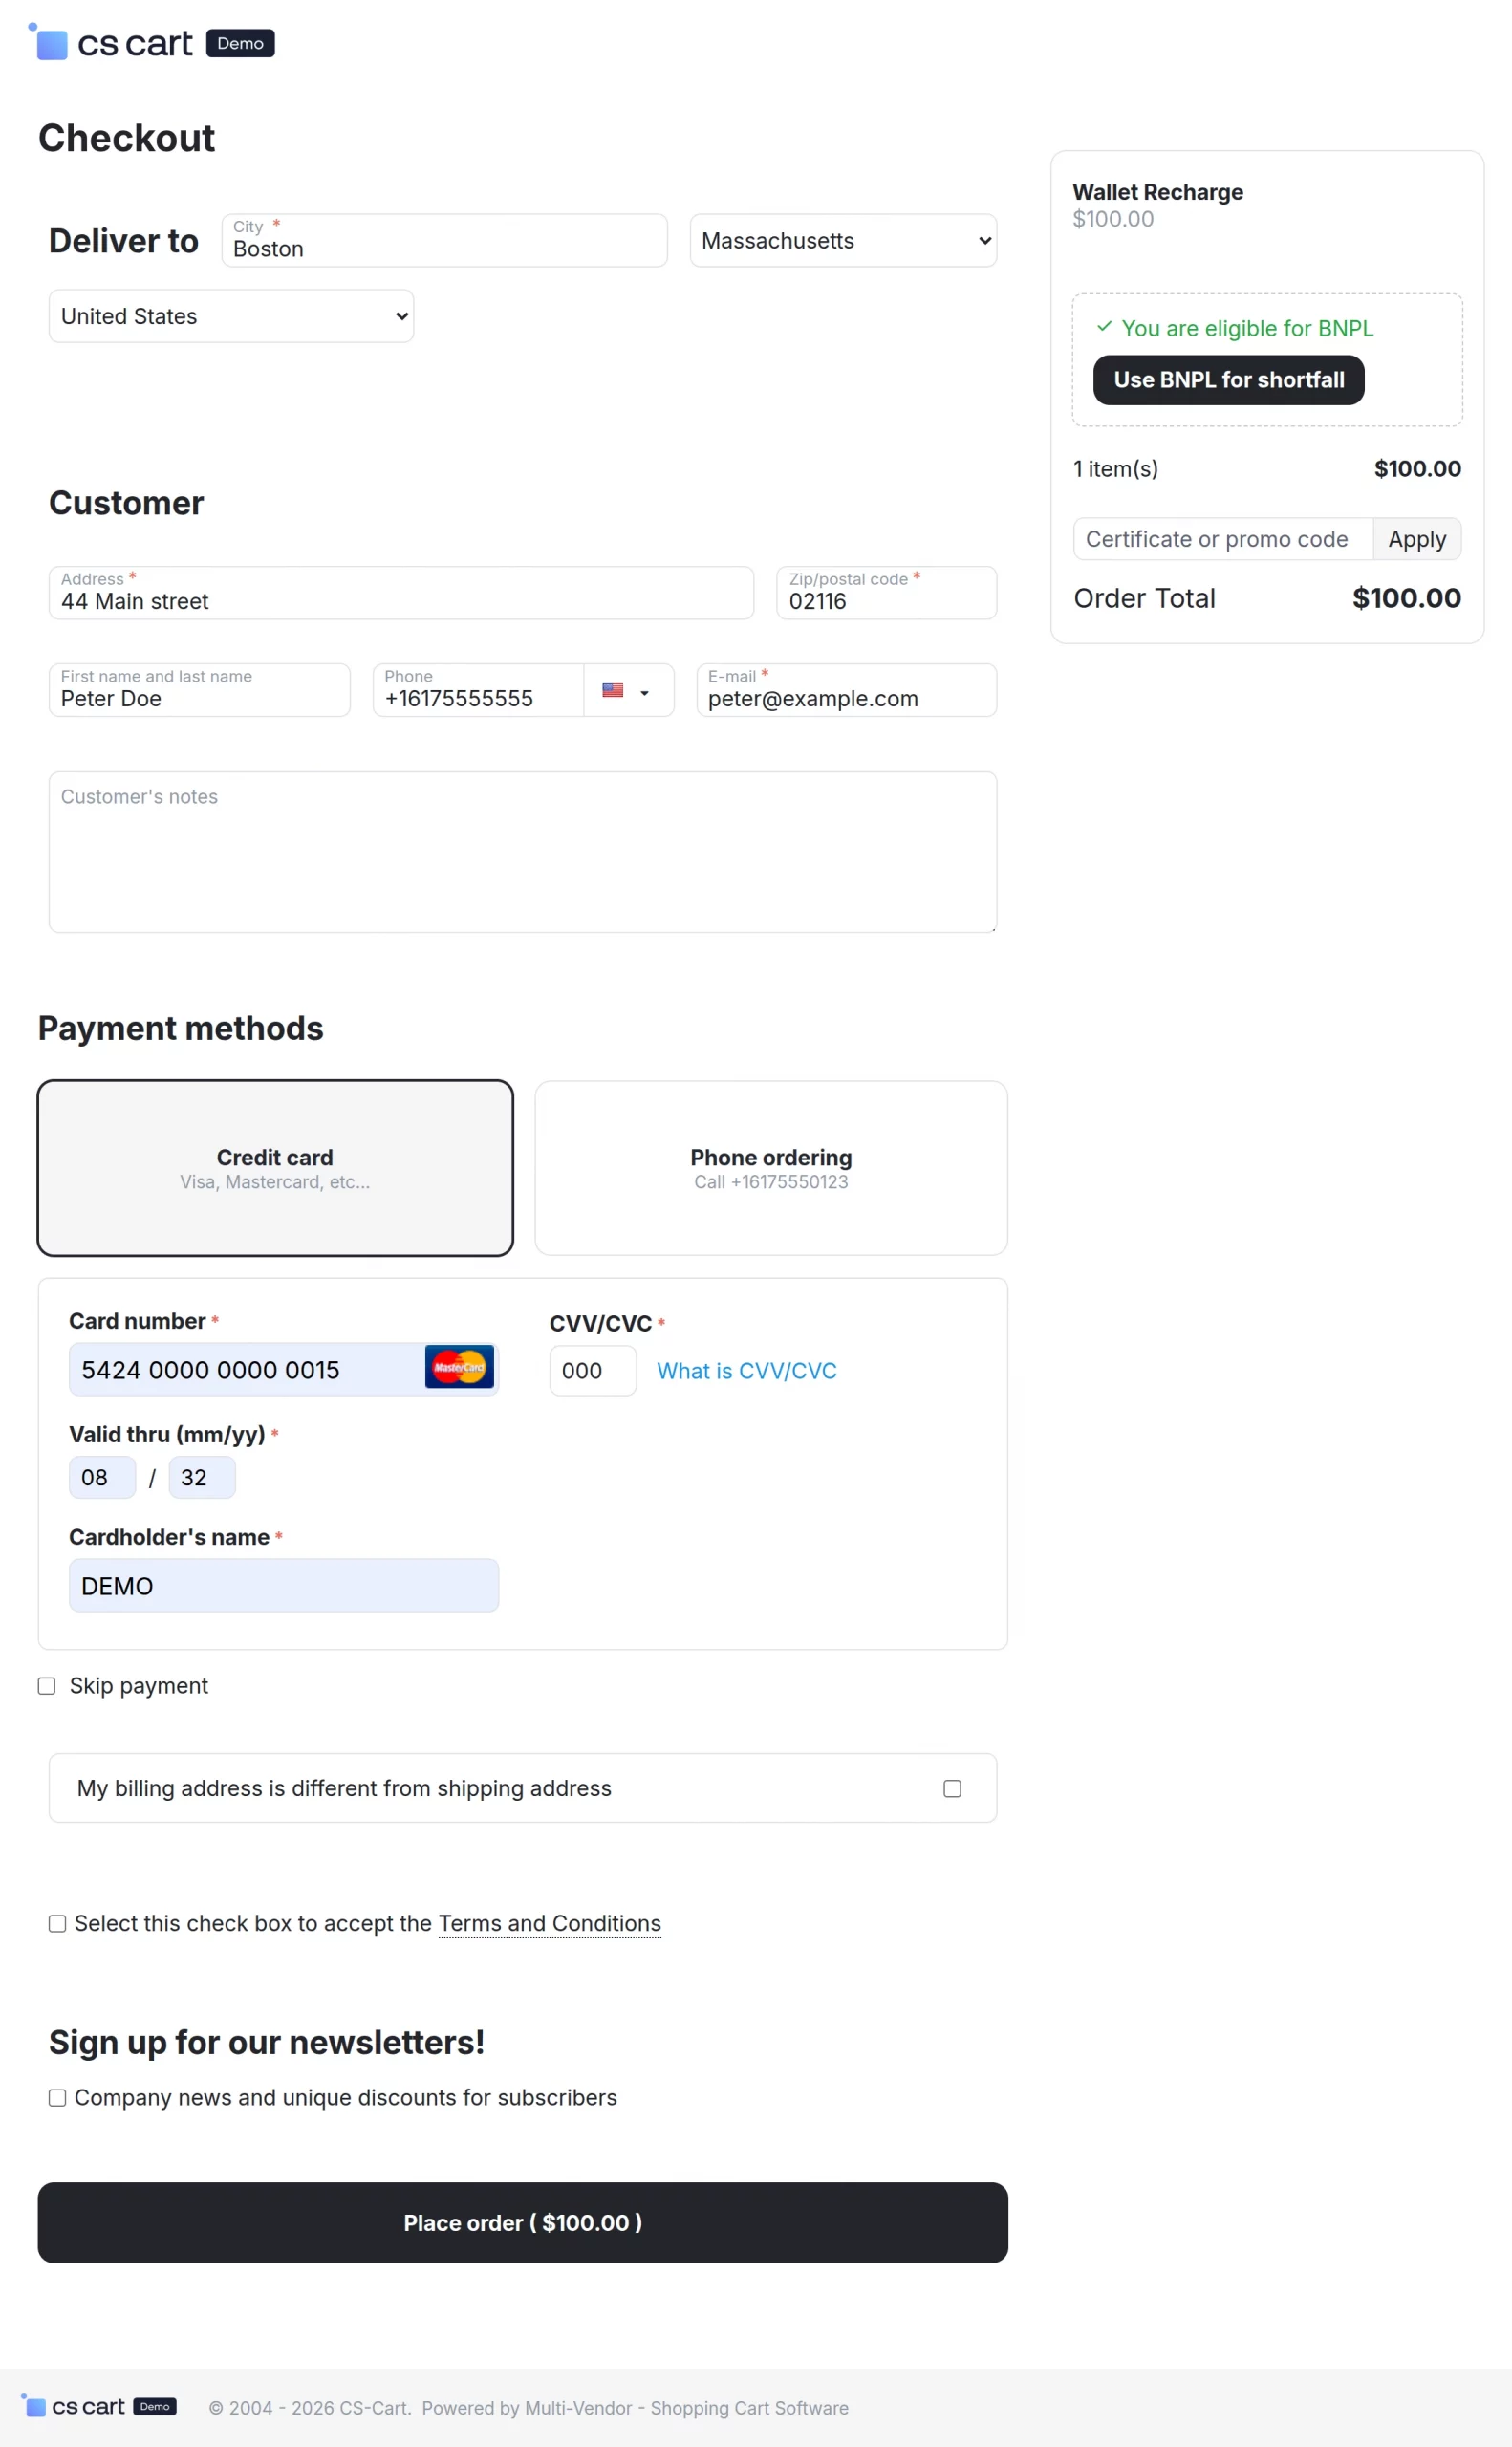
After clicking on the Add Money button, the selected wallet recharge amount is automatically added to the cart page for checkout.
Customers can then proceed with the checkout process to successfully add money to their wallet balance.
Customers can complete the wallet recharge process using the available payment methods and place the order successfully.
If the customer is eligible for BNPL, the BNPL option is also displayed during checkout for wallet recharge orders.
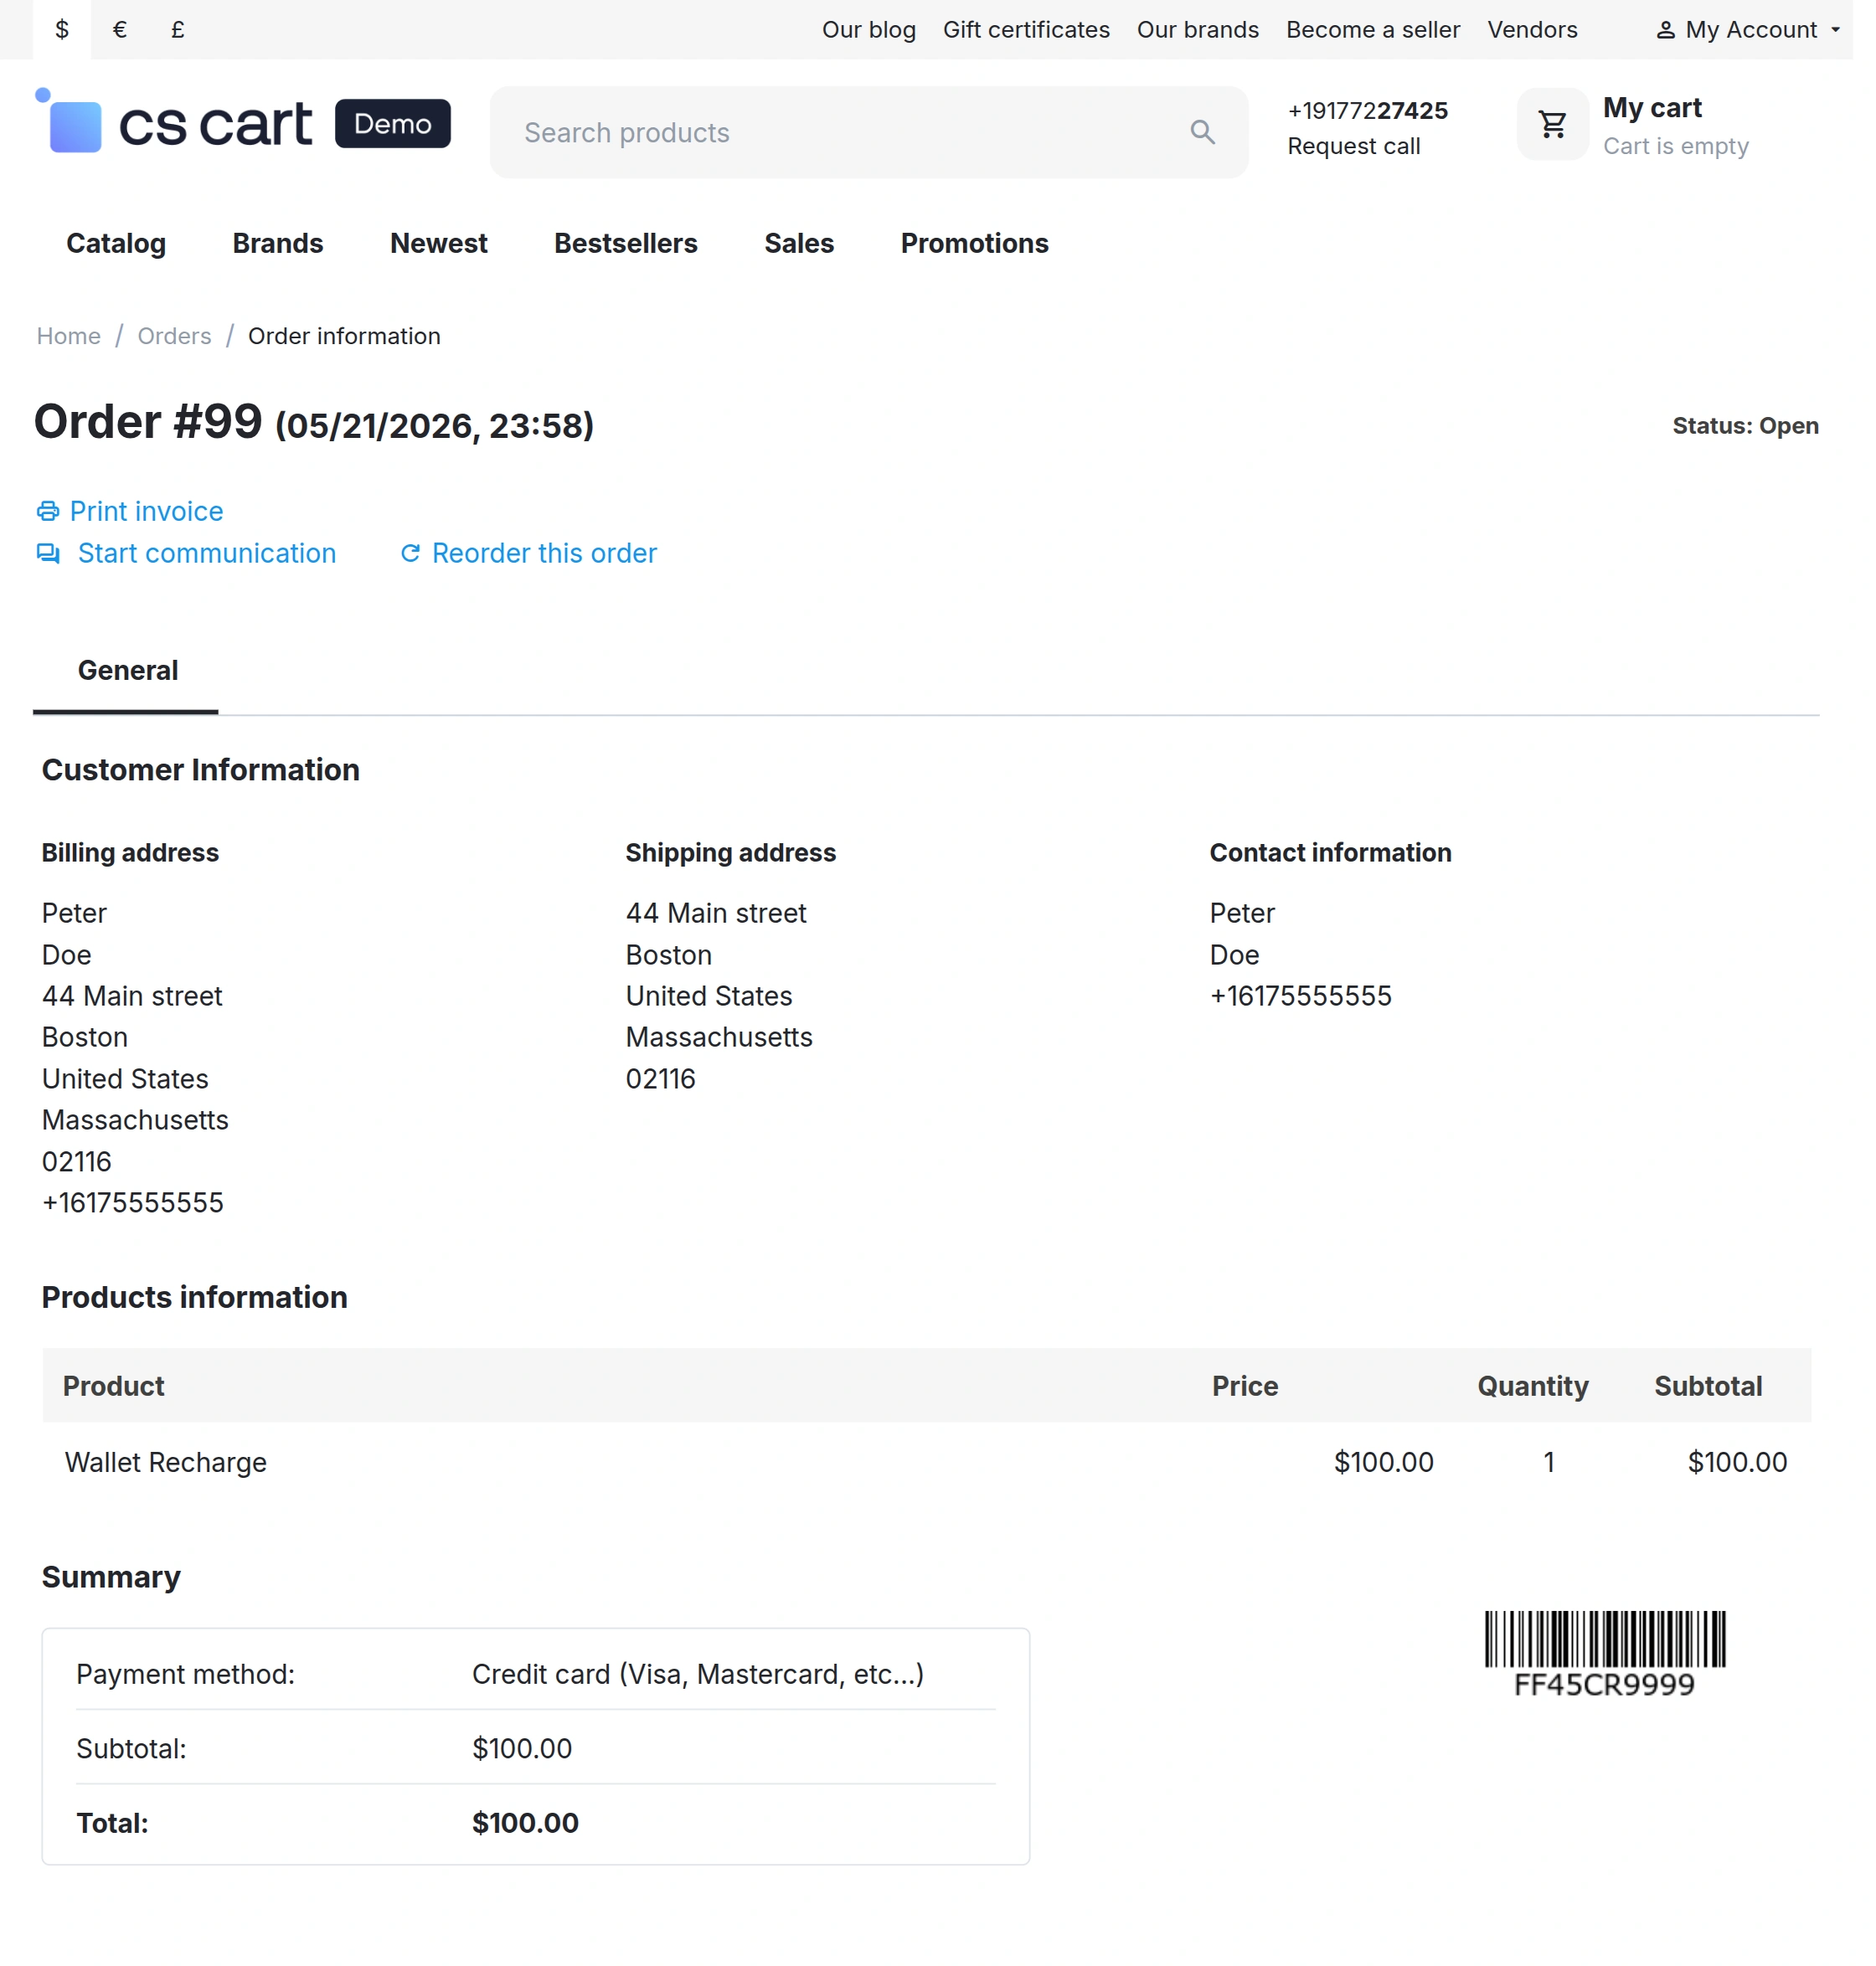
After successfully placing the wallet recharge order, customers can view complete wallet recharge order details from the Order Information page.
View Wallet Transaction
Customers can view wallet recharge transaction details directly from the order information page.
The page displays recharge details like payment method, recharge amount, customer information, and order status.
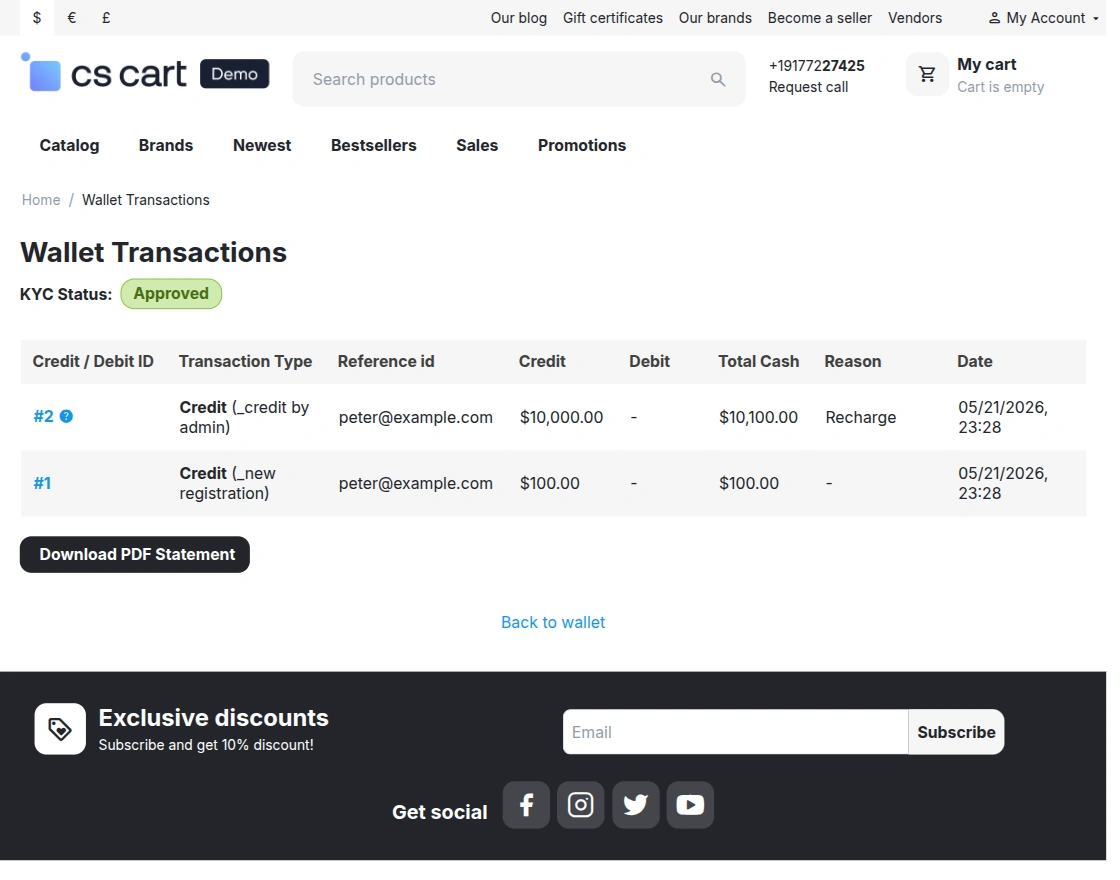
Customers can also view complete wallet transaction history including credit, debit, recharge, and transfer transactions.
The transaction history section also allows customers to download wallet transaction statements in PDF format.
Wallet Money Transfer
After KYC approval, customers can use the Wallet Money Transfer feature from the wallet dashboard.
Customers need to click on the Send option or the Wallet money transfer section available on the wallet dashboard to transfer wallet balance to another registered user.
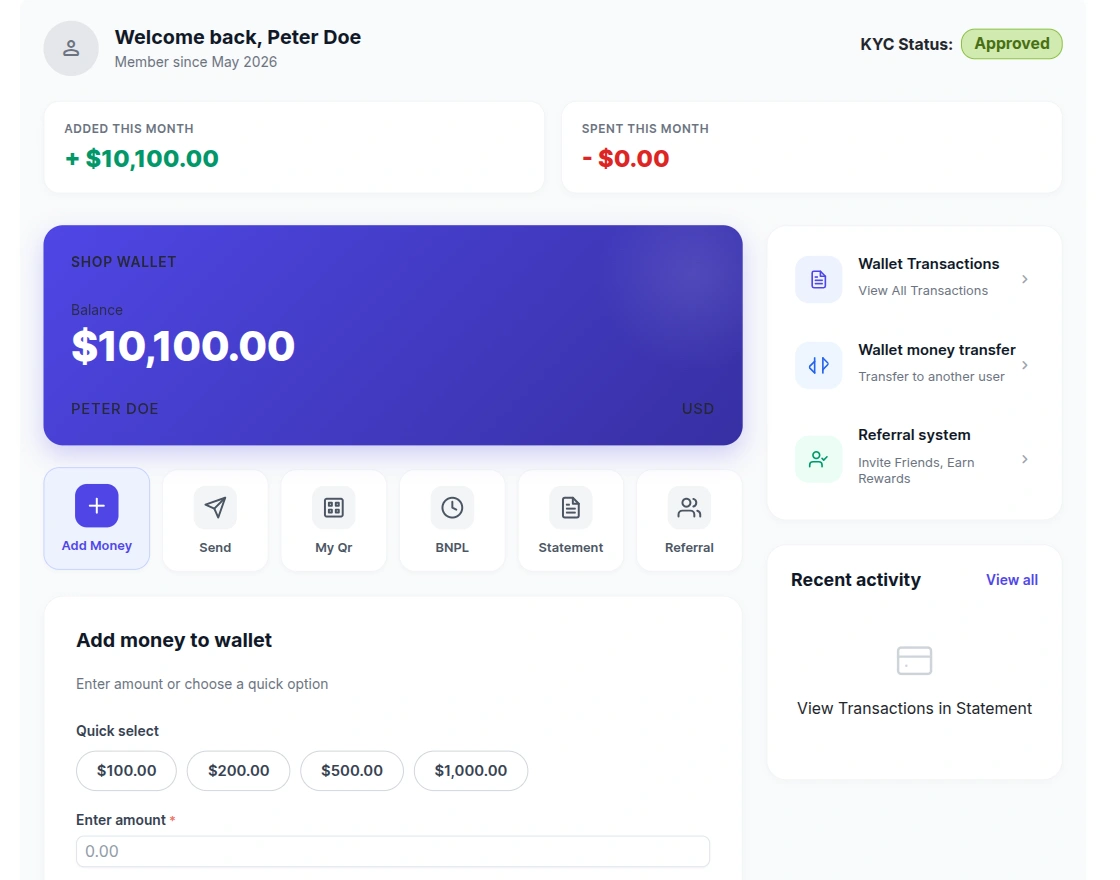
The customer needs to enter the recipient’s email address and the transfer amount.
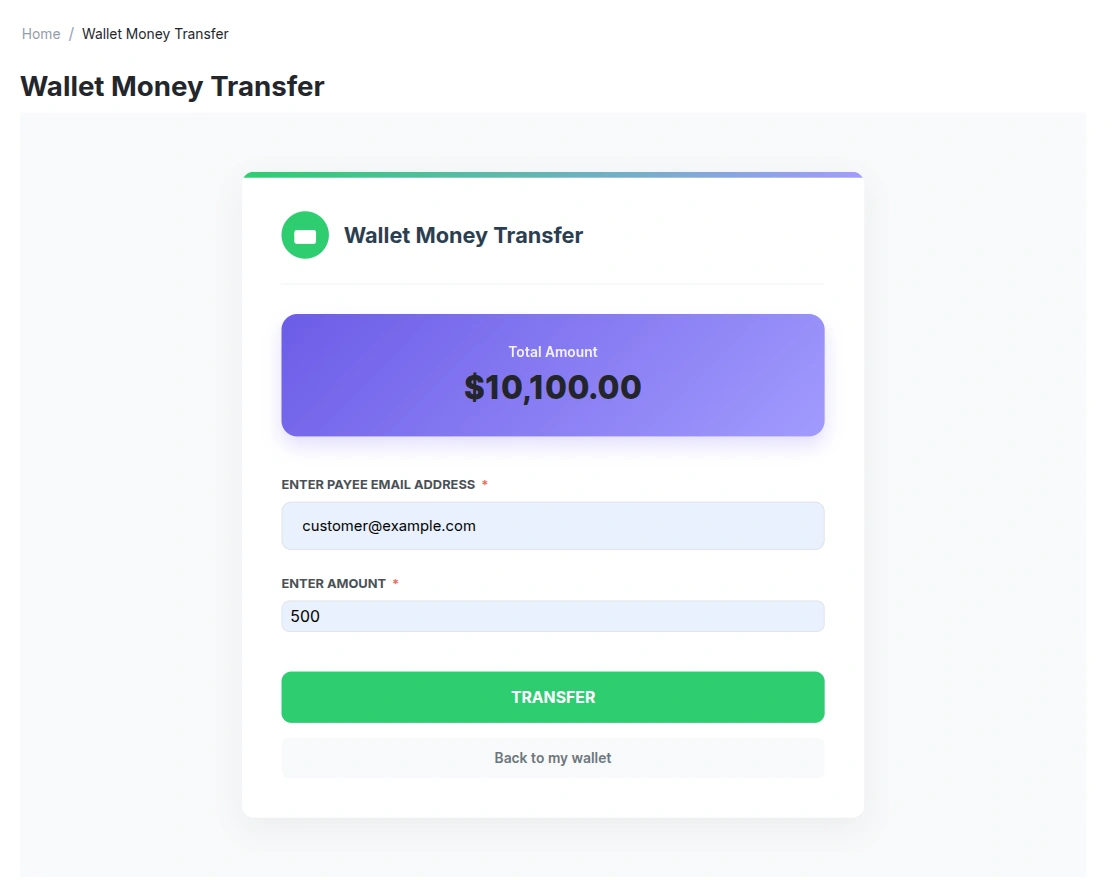
After submitting the transfer request, an OTP verification page appears for secure confirmation.
Customers need to enter the received OTP to verify the wallet transfer.
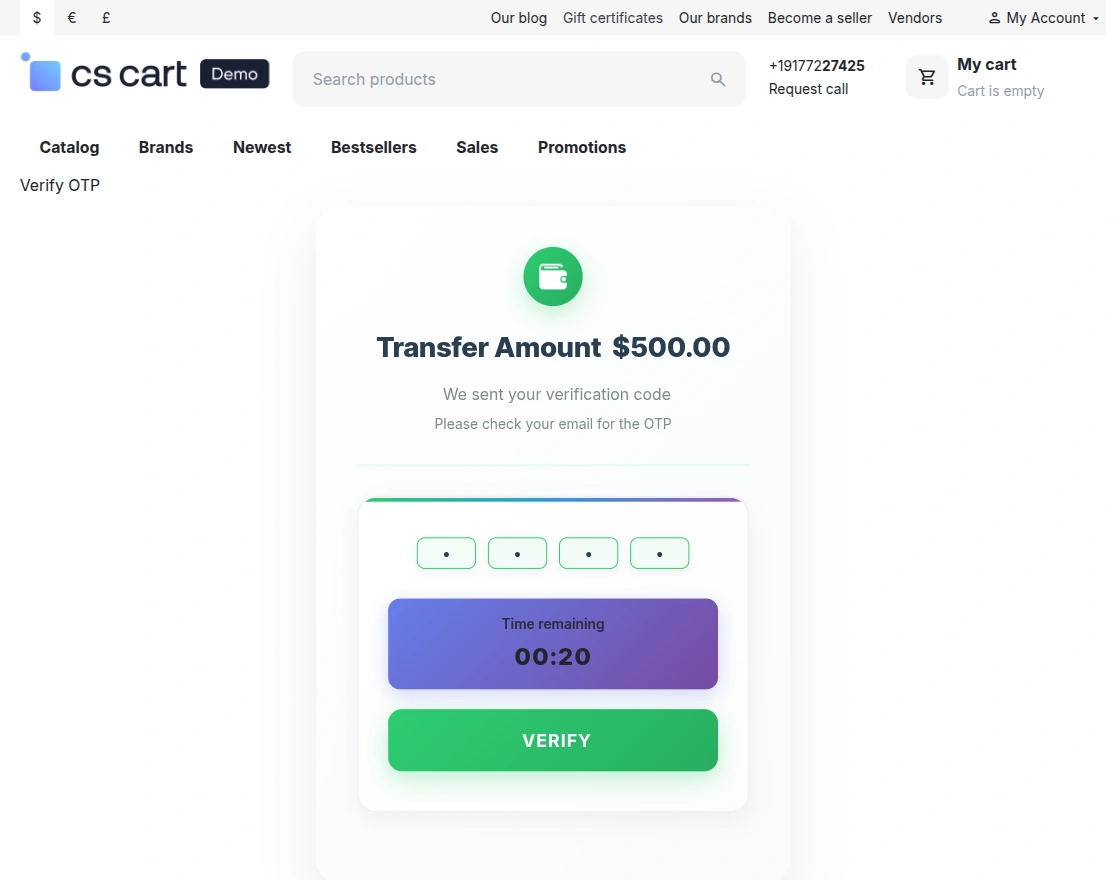
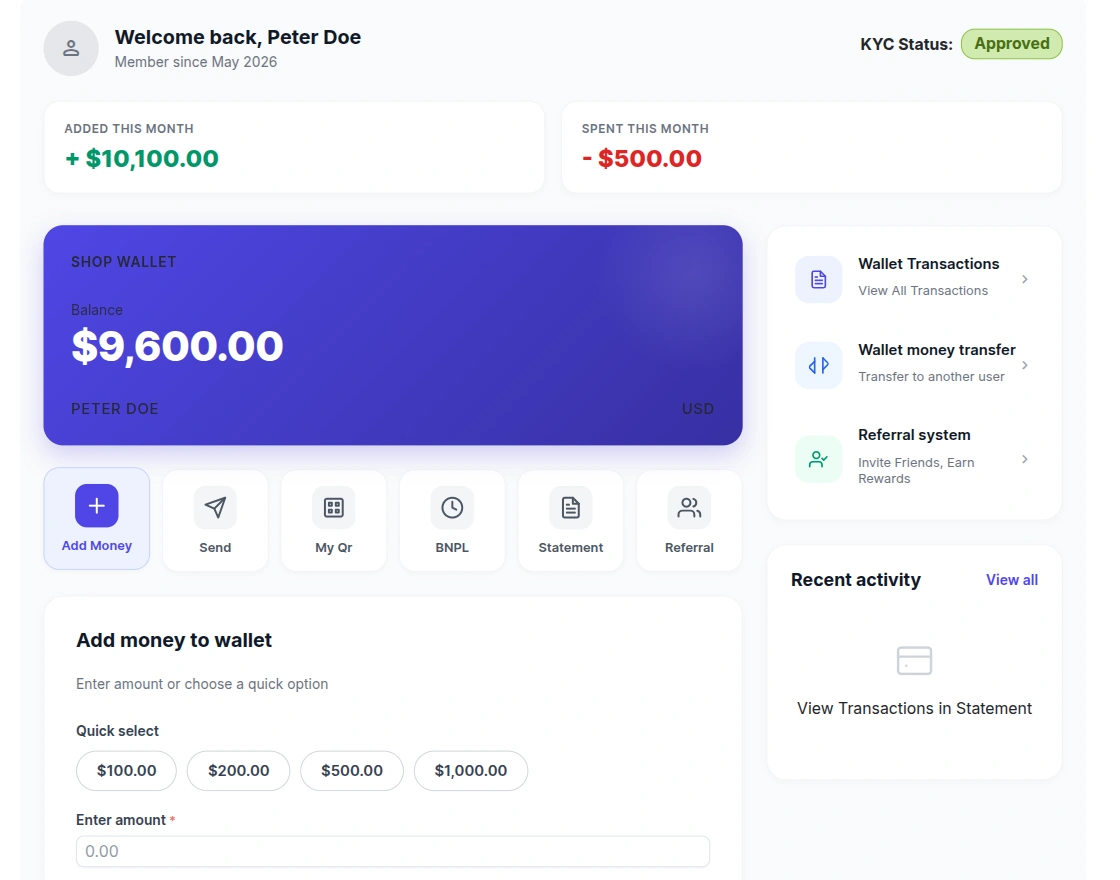
Once the OTP is verified successfully, the transferred amount is deducted from the wallet balance and updated on the wallet dashboard.
Wallet QR Management
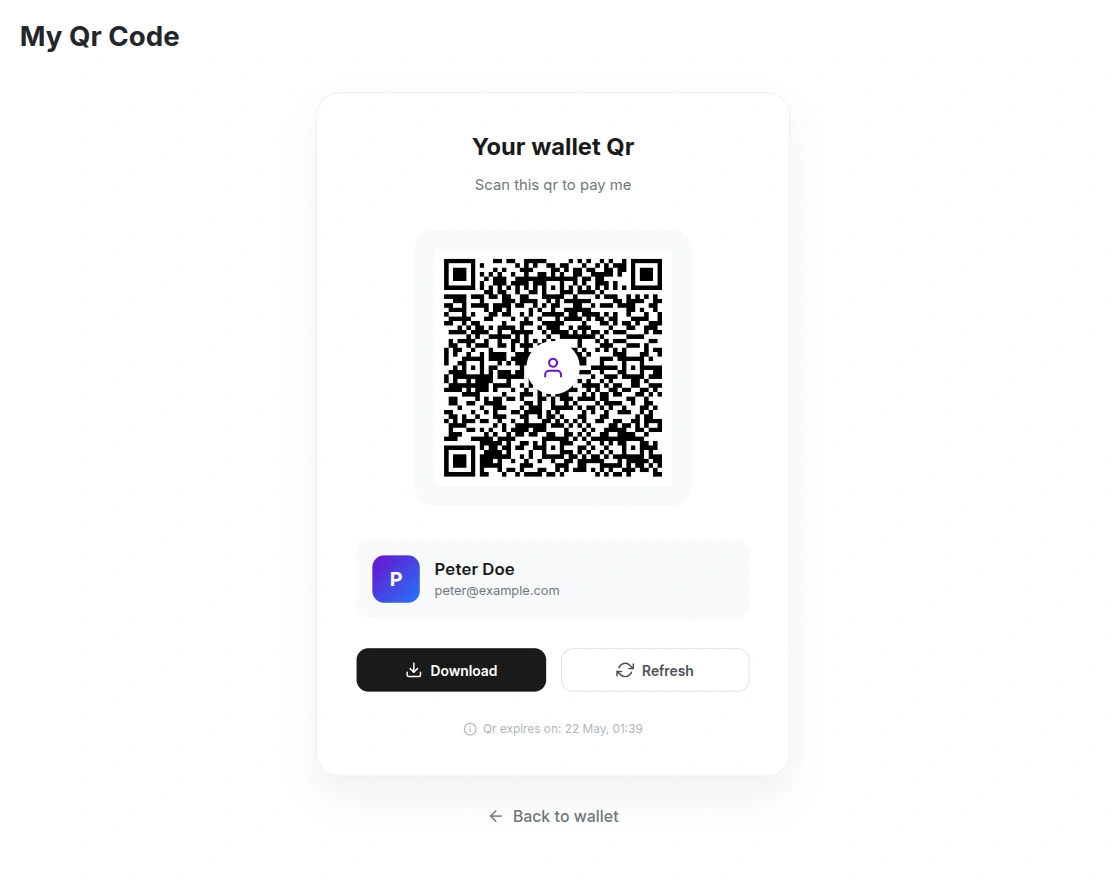
Customers can generate and manage wallet QR codes directly from the wallet dashboard by clicking on the My QR option.
The generated QR code can be scanned for quick wallet payments and transfers.
Customers can also download or refresh the QR code directly from the QR page.
BNPL Management
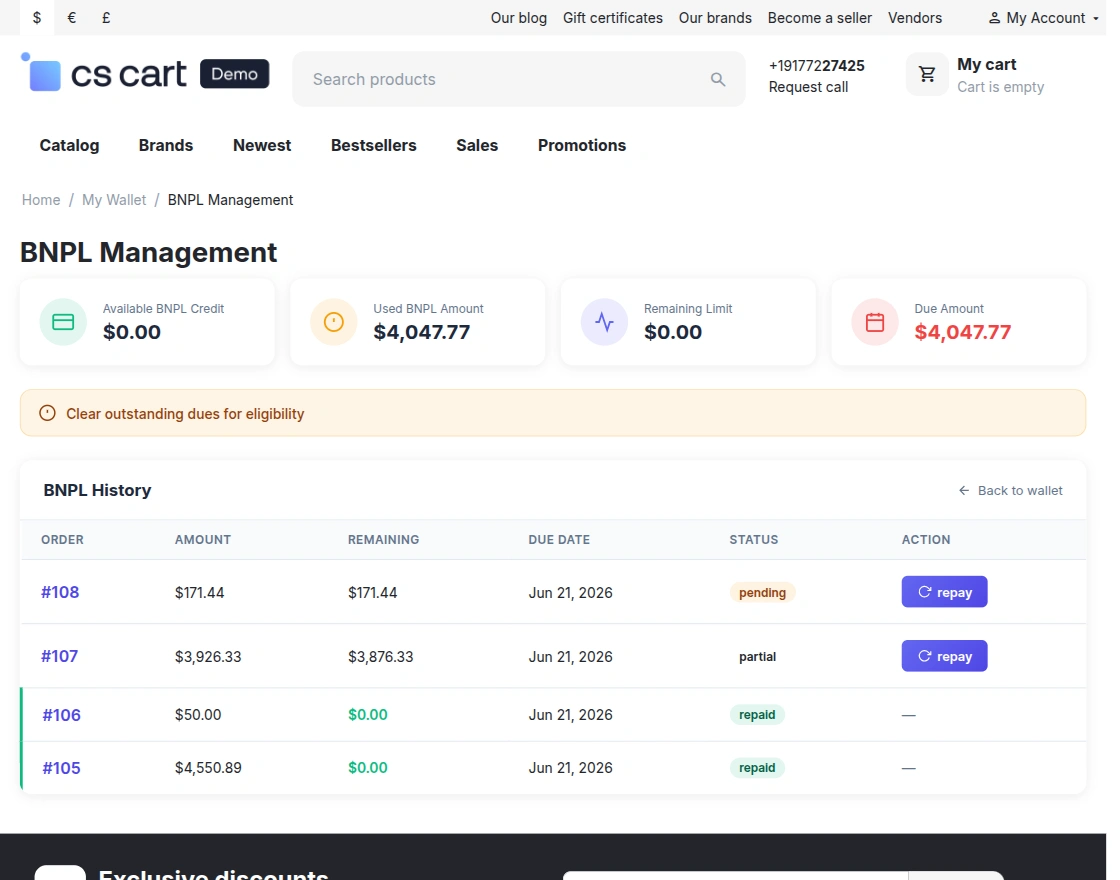
Customers can access the BNPL section directly from the wallet dashboard by clicking on the BNPL option.
The BNPL Management section displays available BNPL credit, used amount, remaining limit, due amount, and complete BNPL order history.
Customers can also repay pending BNPL dues directly from the BNPL management page.
Wallet to Bank Transfer Management
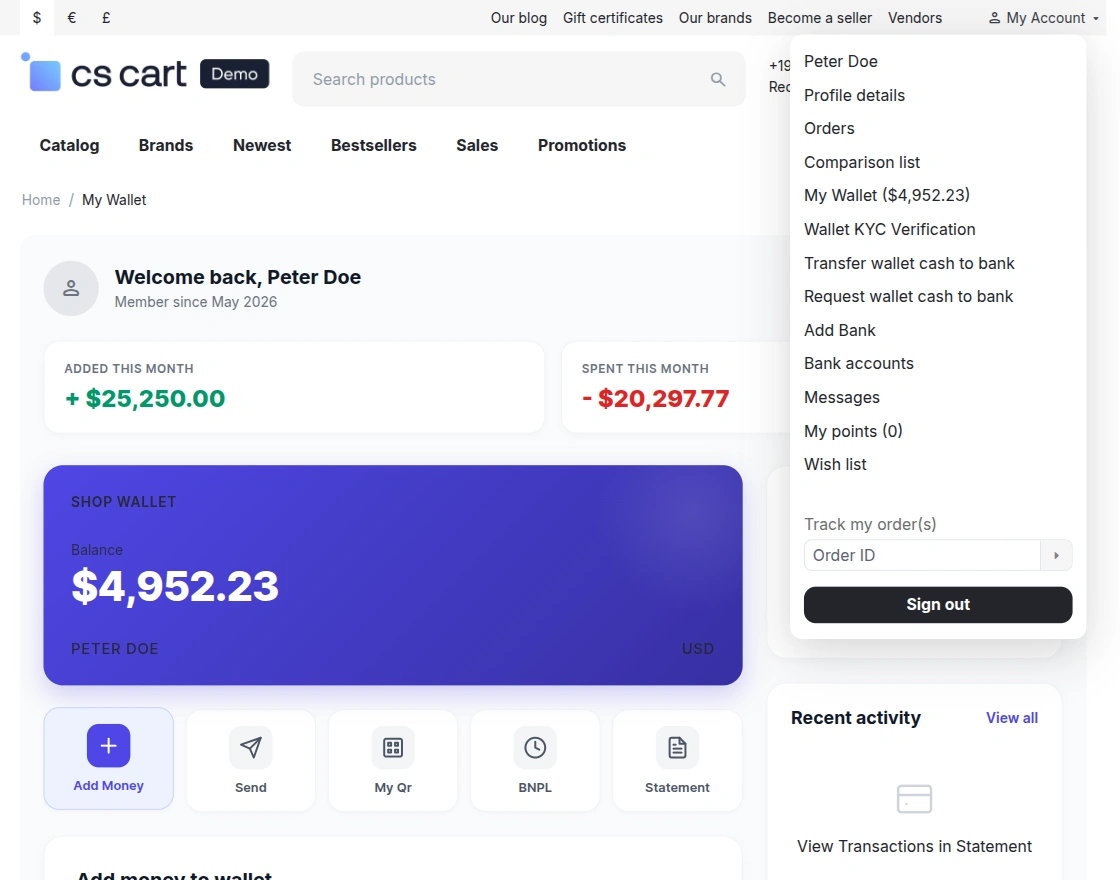
Customers can manage wallet-to-bank transfer activities directly from the My Account section.
Customers can access options like Add Bank, Bank Accounts, Transfer wallet cash to bank, and Request wallet cash to bank from the wallet menu.
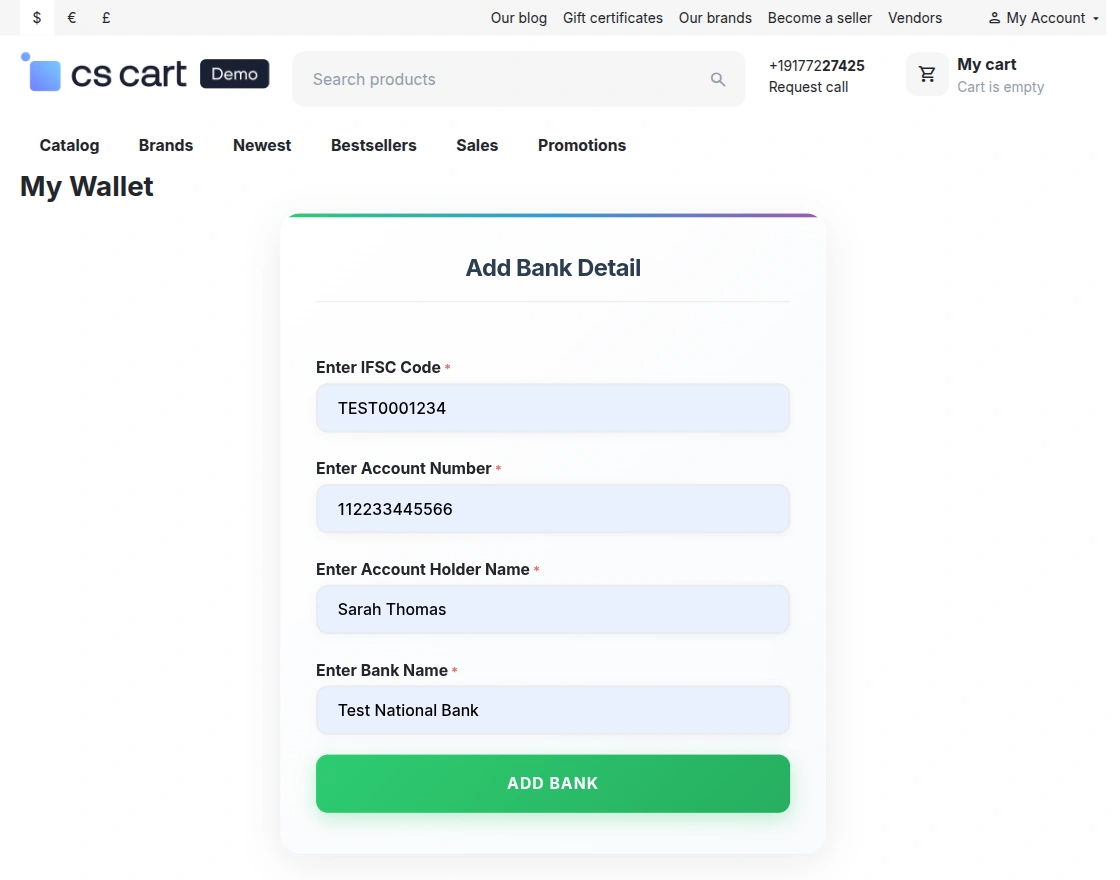
Add Bank Account
Customers can add bank details by clicking on the Add Bank option available in the wallet menu.
Customers need to enter bank details like IFSC code, account number, account holder name, and bank name before submitting the form.
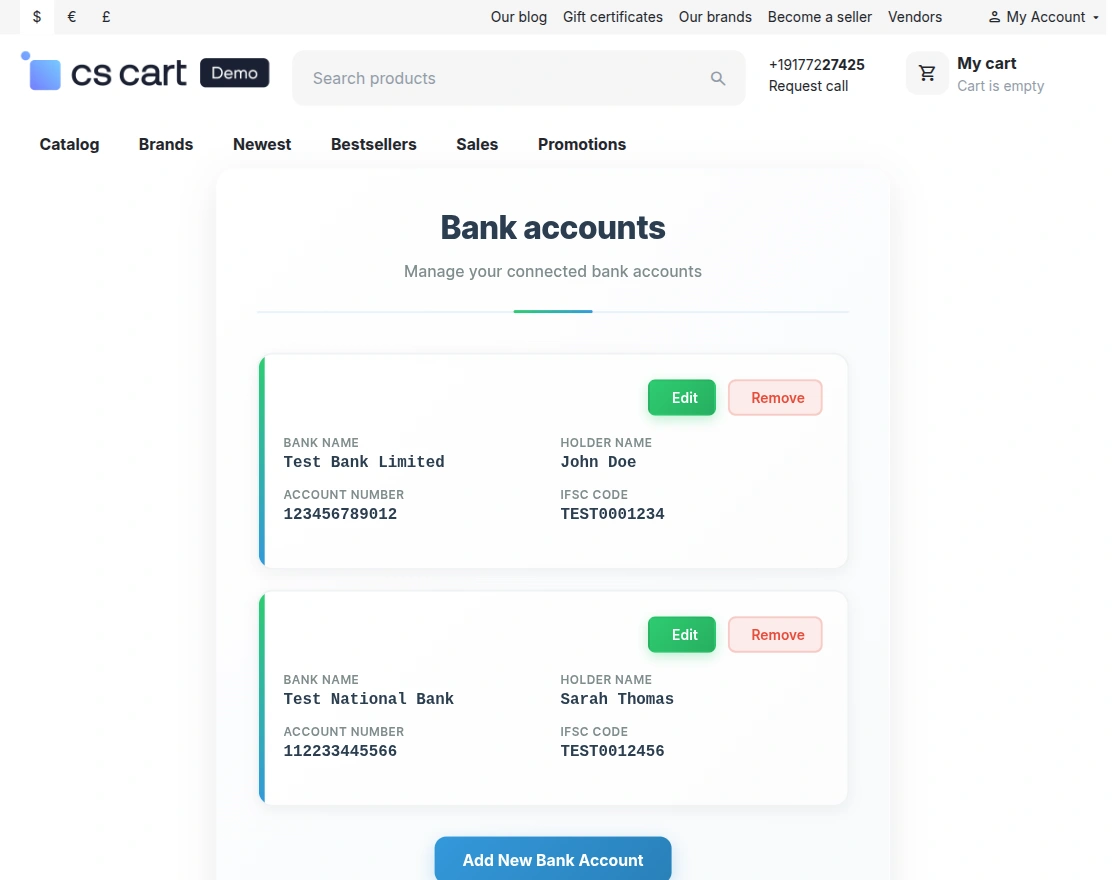
Bank Accounts
Customers can view all saved bank accounts from the Bank accounts section available in the wallet menu.
The section displays bank name, account number, IFSC code, and account holder details.
Customers can also edit or remove saved bank accounts directly from this page.
Transfer Wallet to Bank
Customers can transfer wallet balance directly to their saved bank accounts from the Transfer wallet cash to bank section.
Customers need to select the preferred bank account and enter the transfer amount before proceeding.
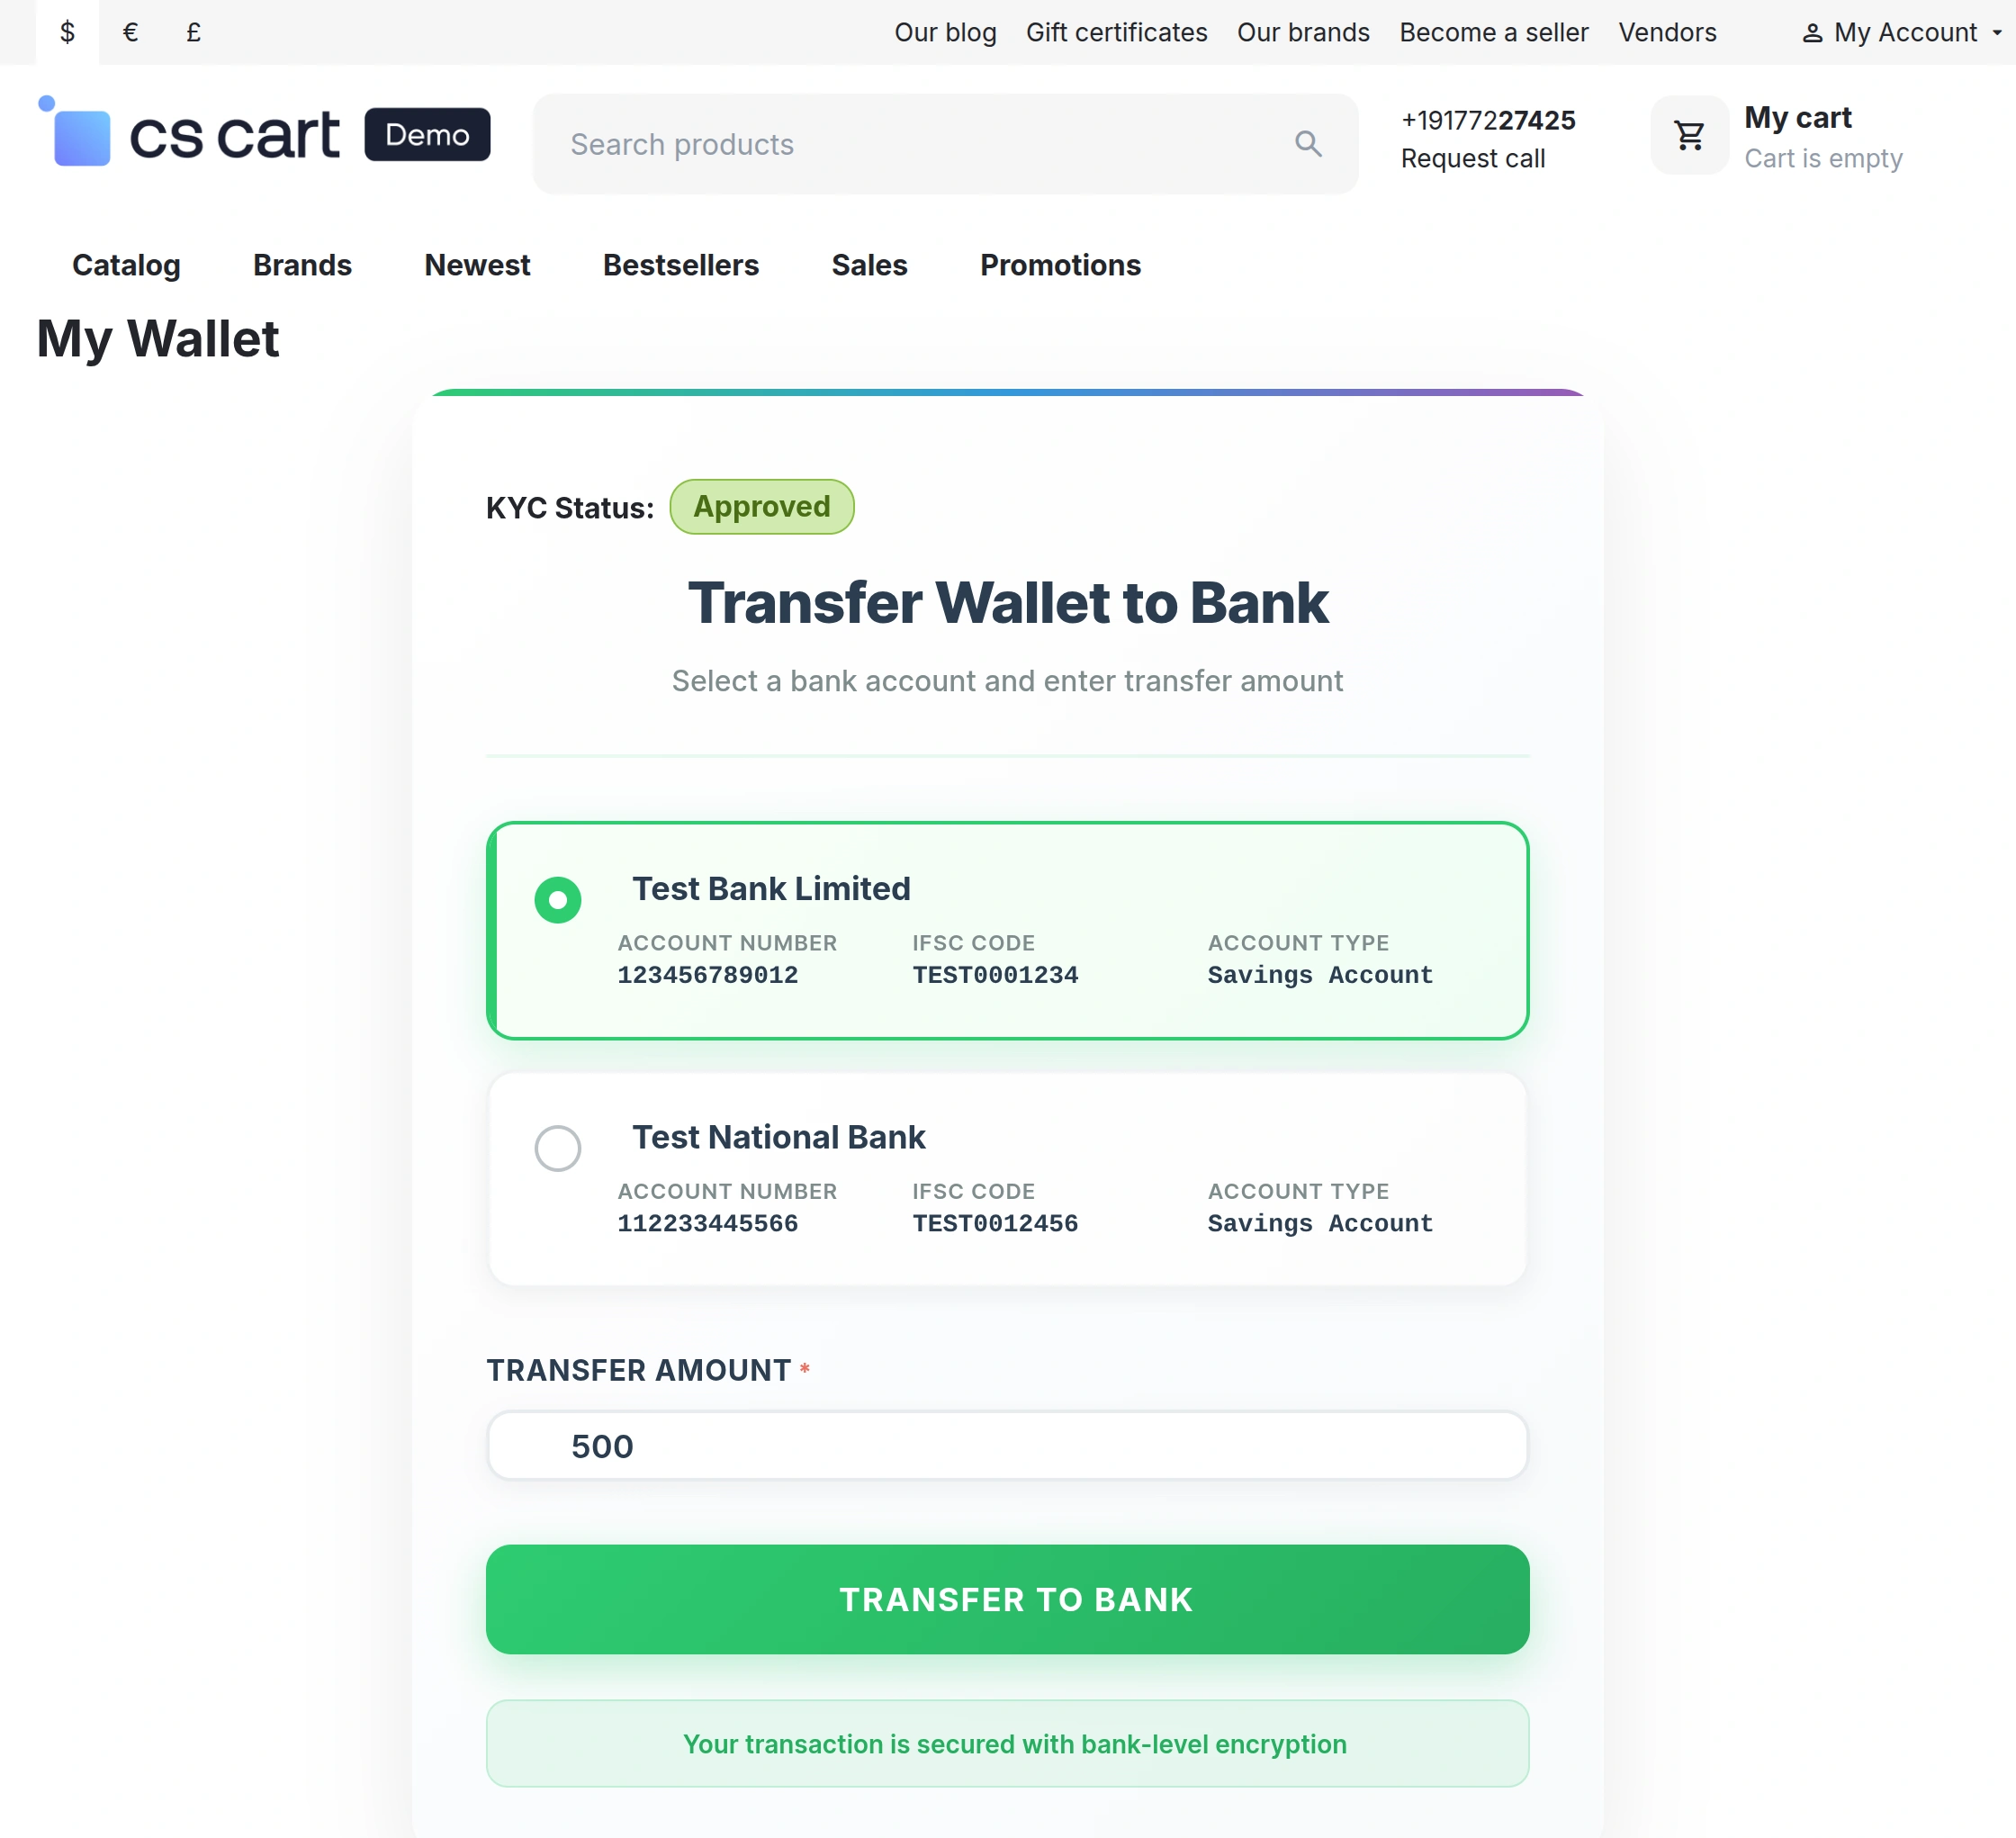
Transfer Wallet to Bank
Customers can transfer wallet balance directly to their saved bank accounts from the Transfer wallet cash to bank section.
Customers need to select the preferred bank account and enter the transfer amount before proceeding.
Frontend View of Reward Points Features
To Transfer the Reward points to the wallet customers need to log in from their individual accounts.Then click on My points as shown below.
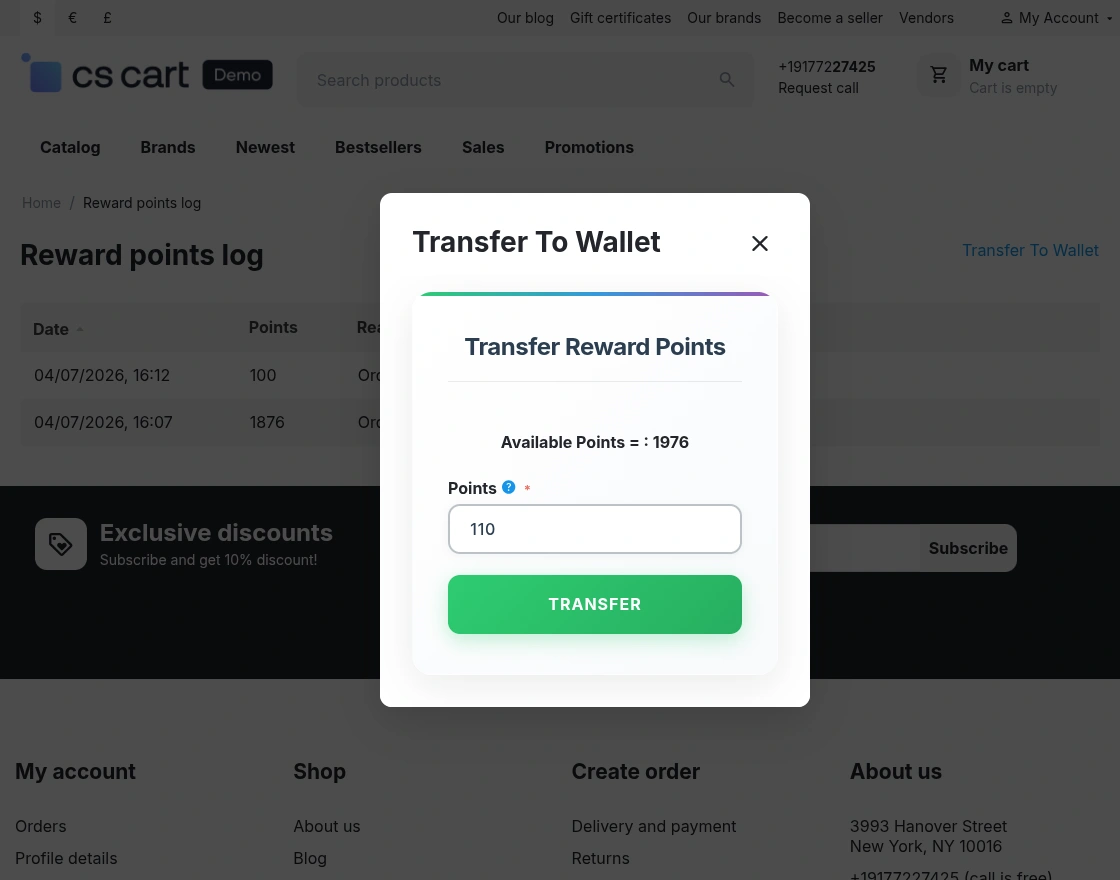
After Clicking on my points, the reward points log will open and here user/customer have an option to transfer to the wallet.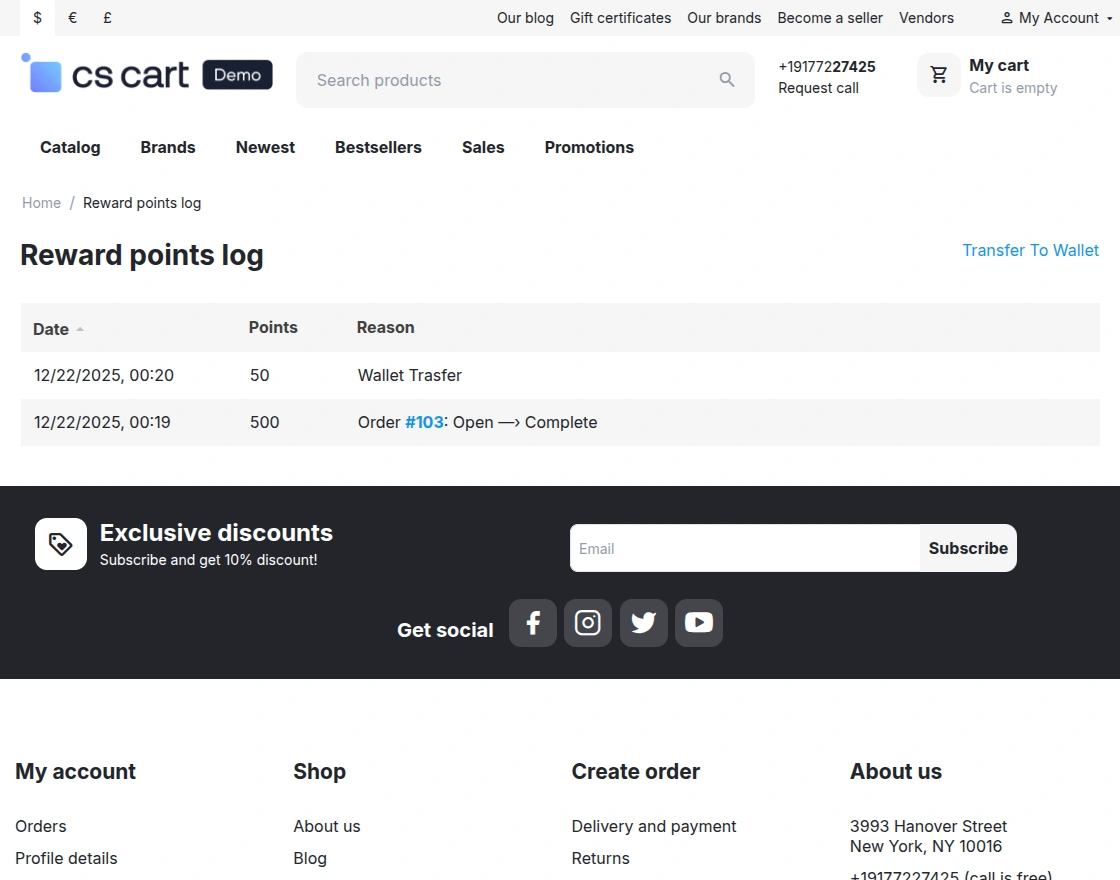 Here, the customer needs to enter the amount they want to transfer from the available balance.
Simply enter the amount and click Transfer. For better understanding, please refer to the snapshot.
Checkout Using Wallet and BNPL
Customers can use wallet balance directly during checkout for faster and secure payments.
Customers can also use the BNPL option for shortfall amounts if the wallet balance is lower than the total order amount.
After applying wallet balance and BNPL credit, the order total is automatically updated on the checkout page.
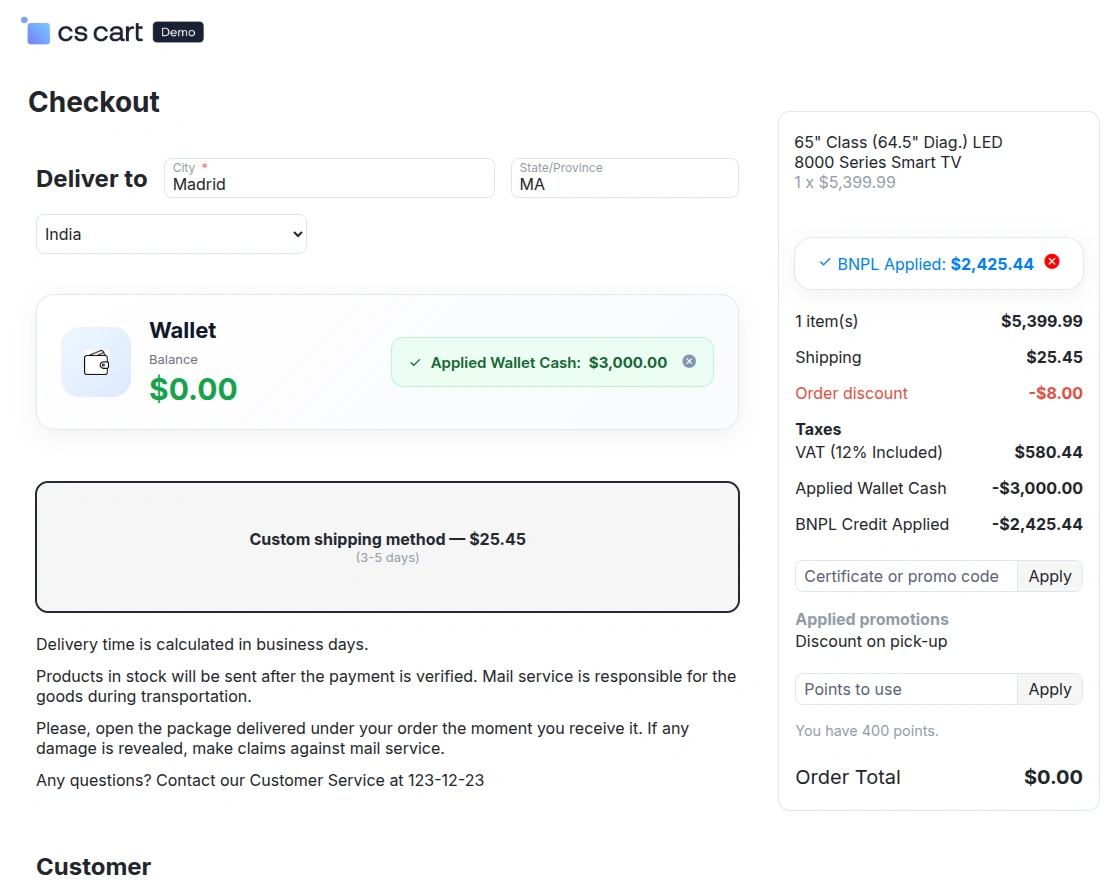
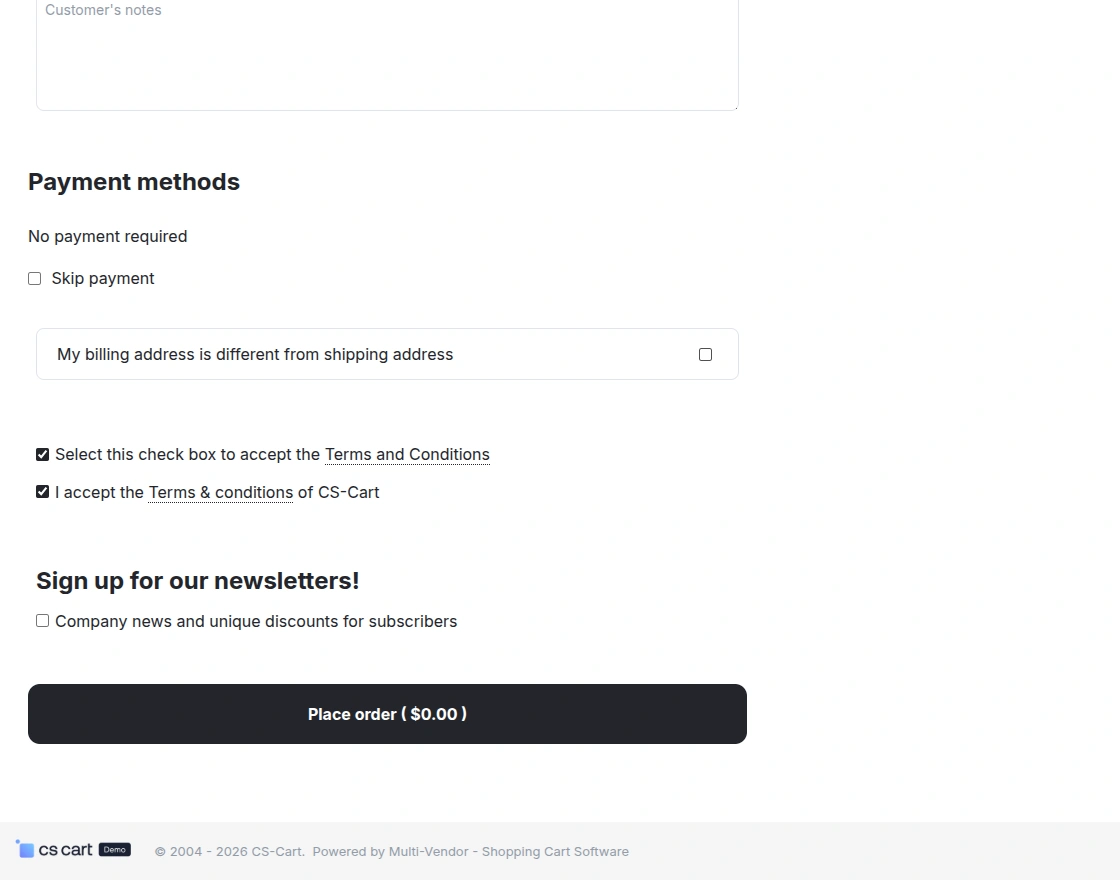
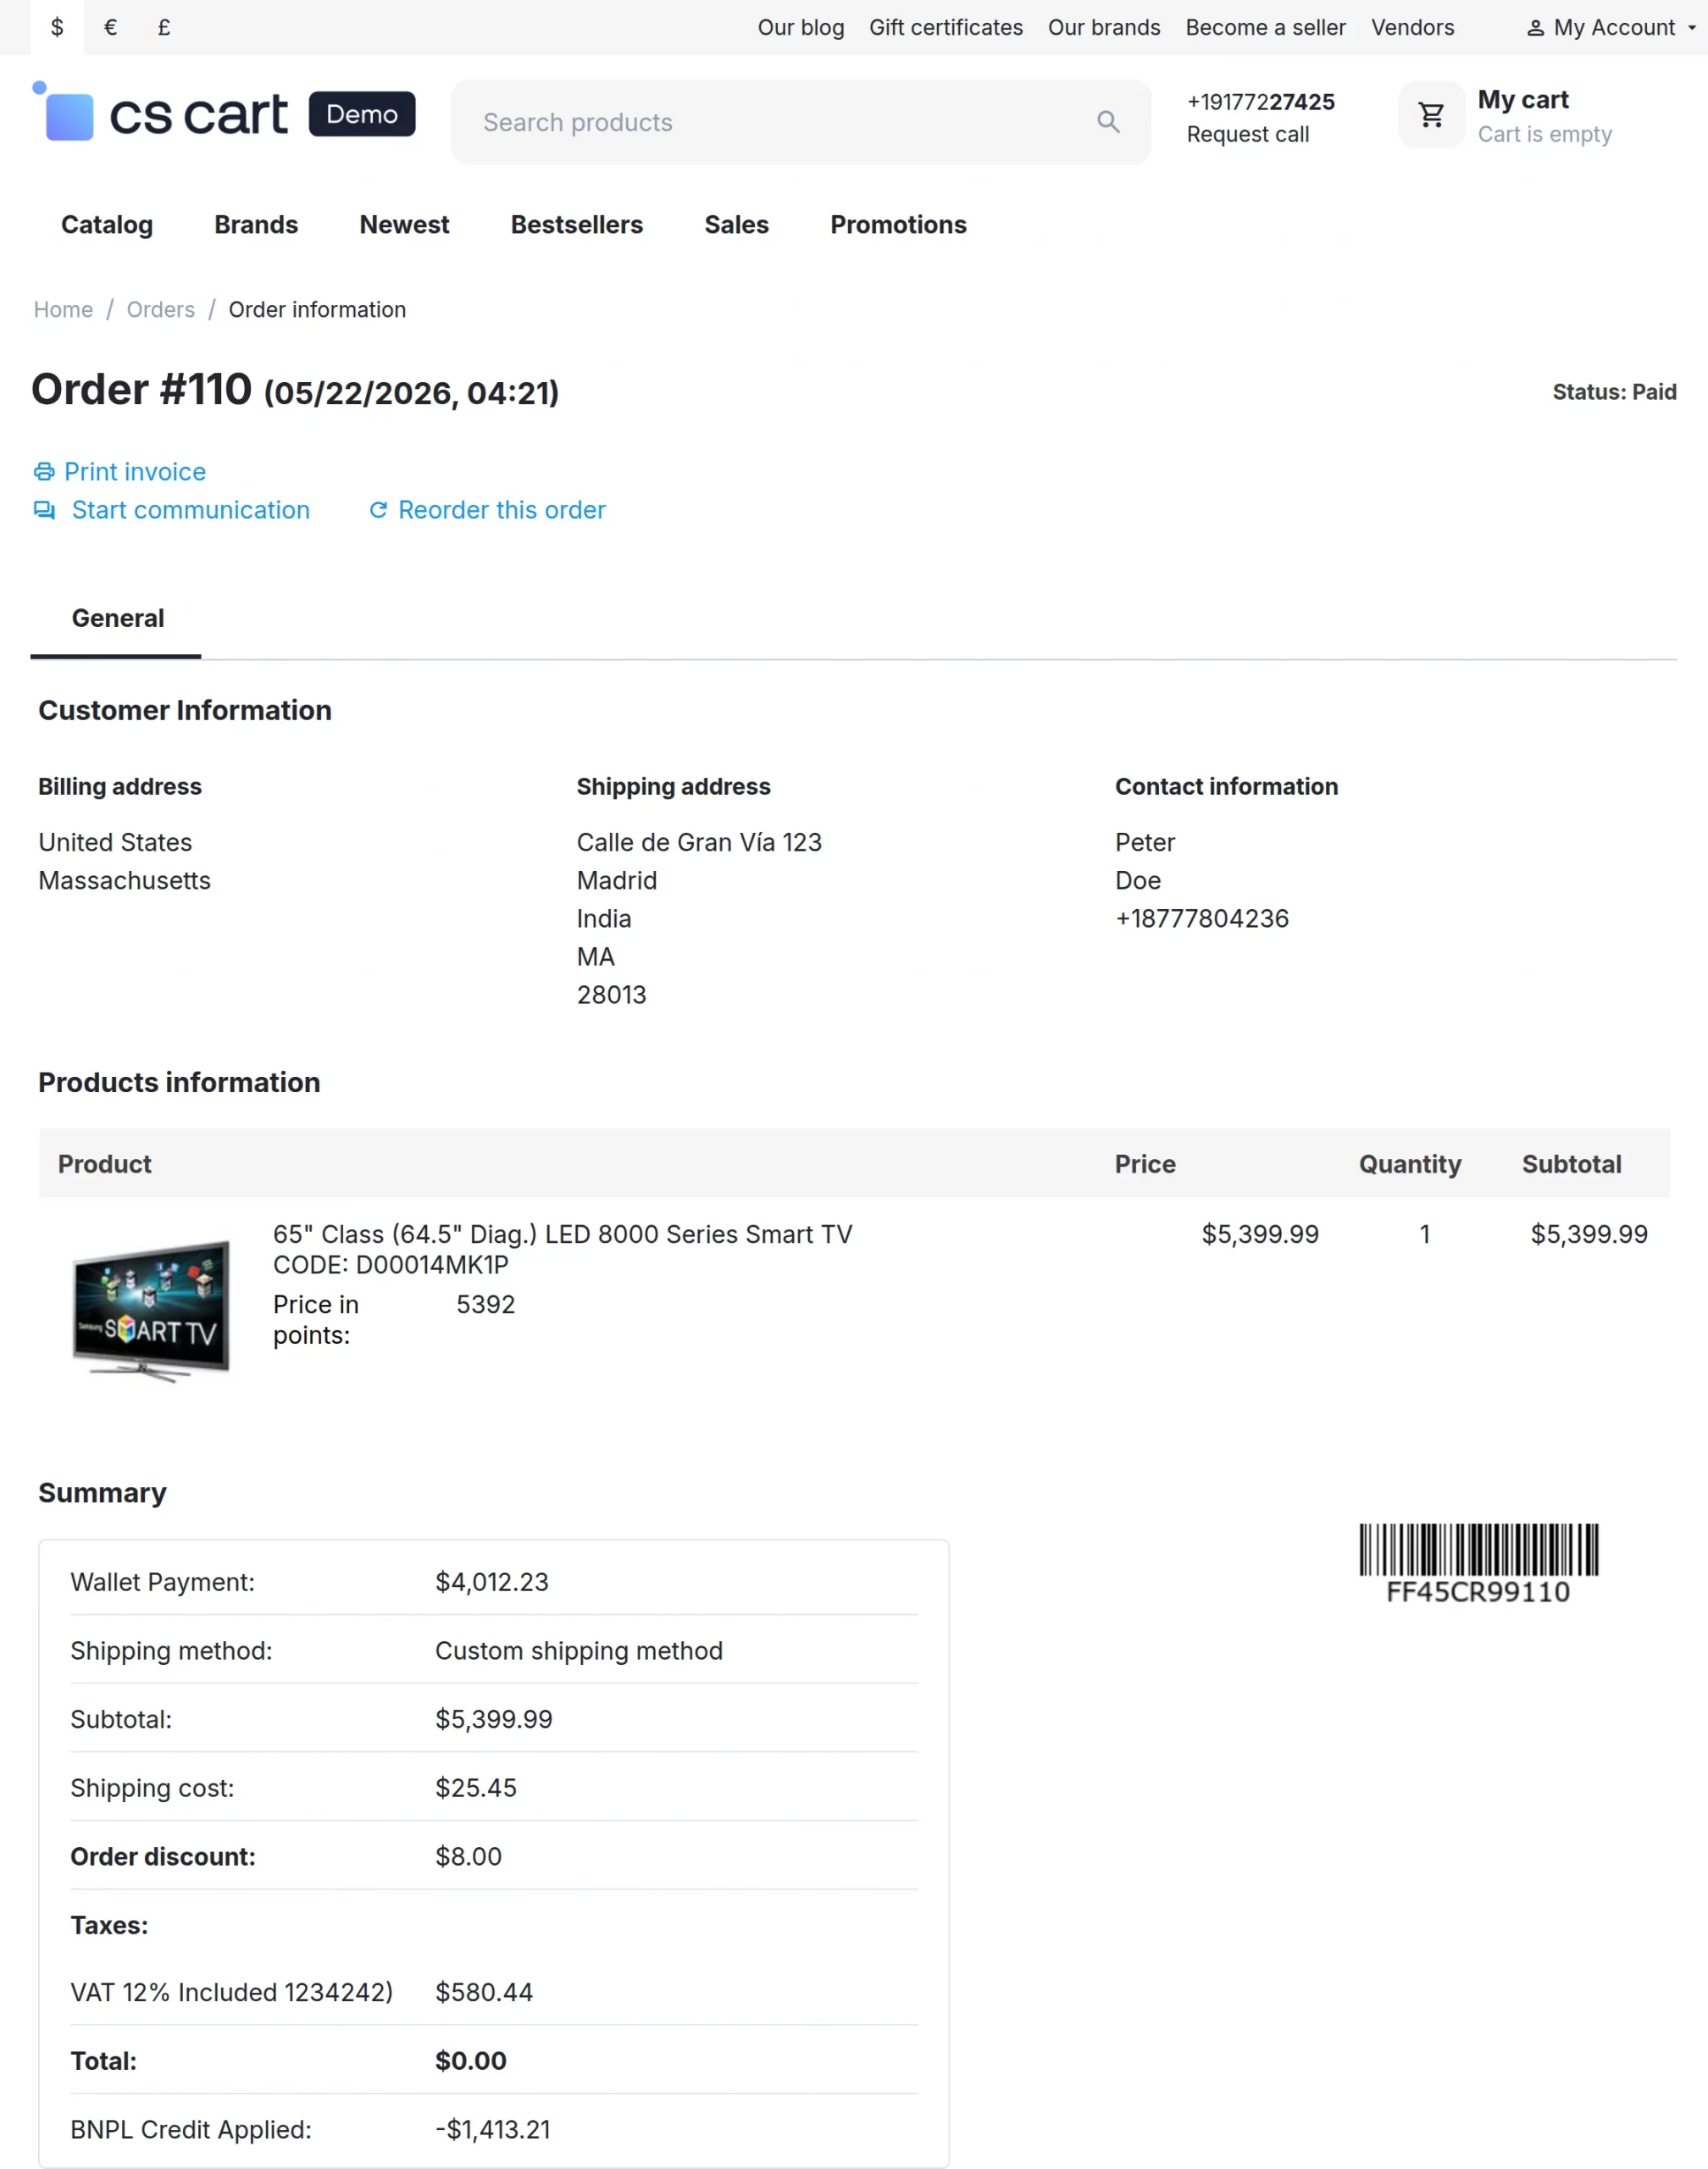
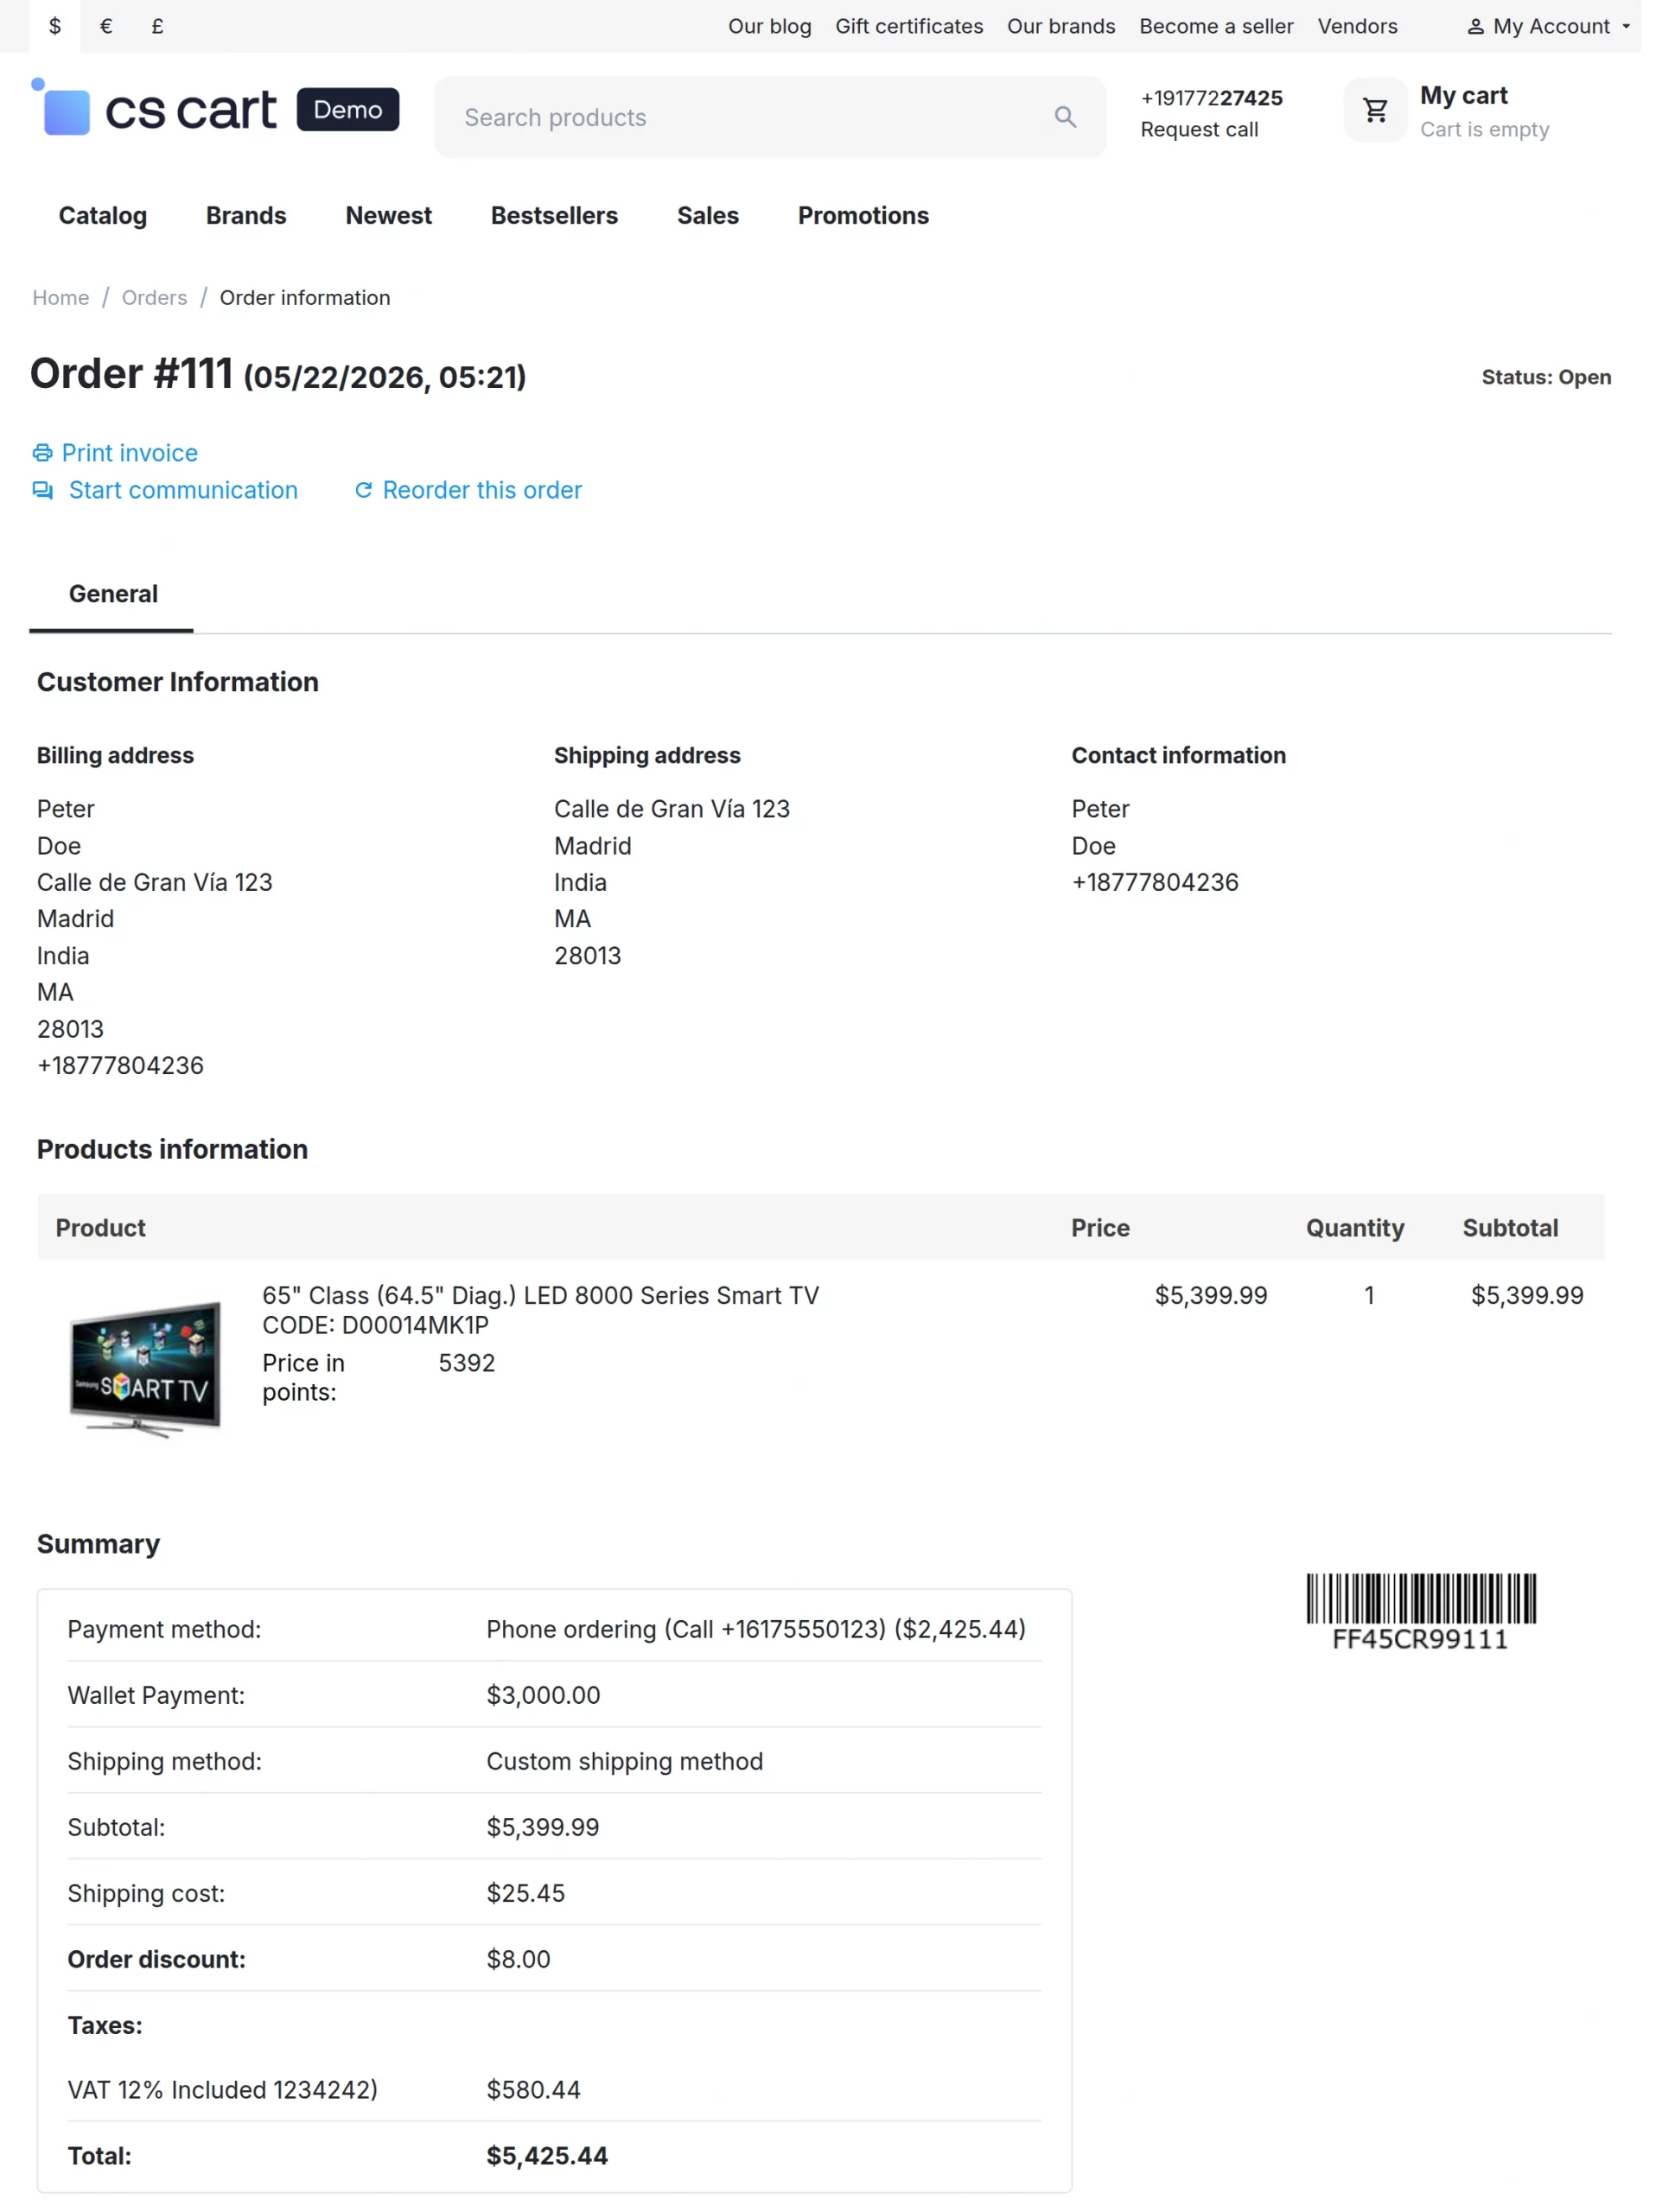
After successfully placing the order, customers can view complete order details including wallet payment, BNPL applied amount, taxes, shipping details, and order status.
Partial Wallet Payment
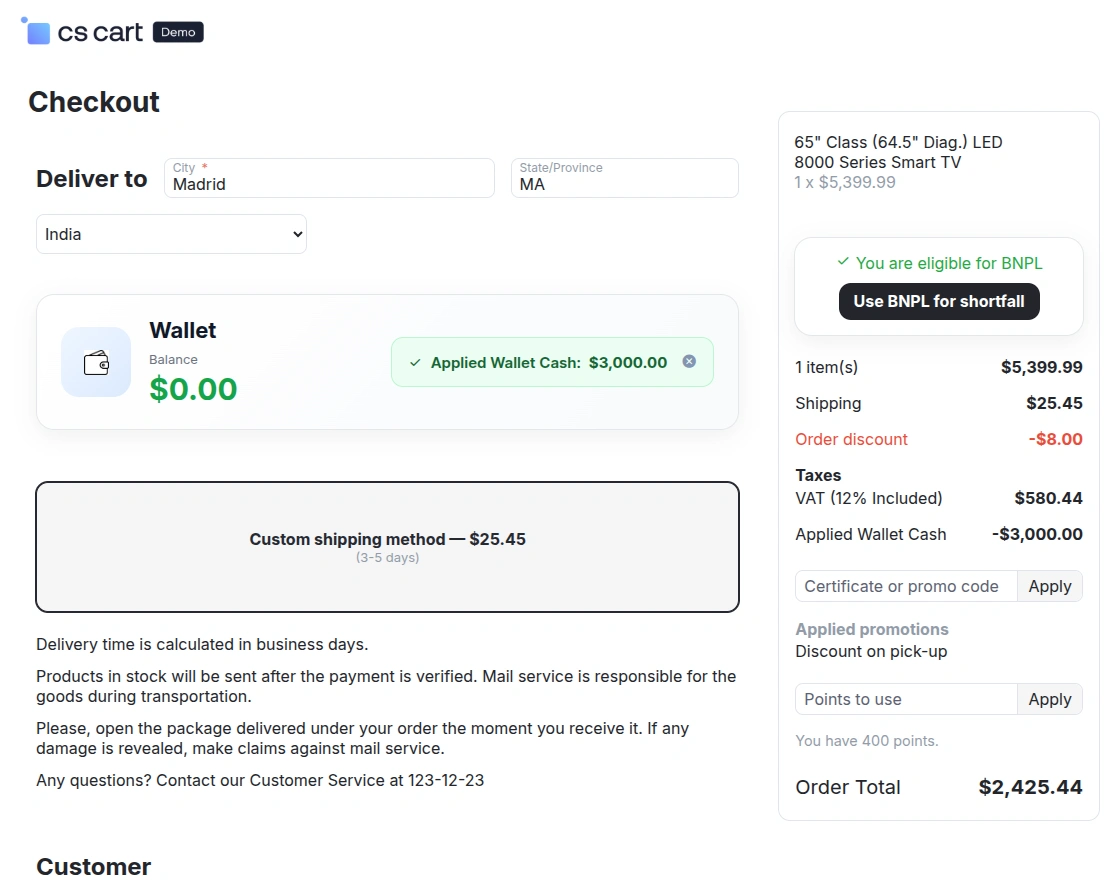
Customers can use wallet balance partially during checkout and pay the remaining amount using another payment method.
The checkout page automatically applies the available wallet balance and updates the remaining payable amount.
Customers can then select another payment method like Phone Ordering to complete the remaining payment amount.
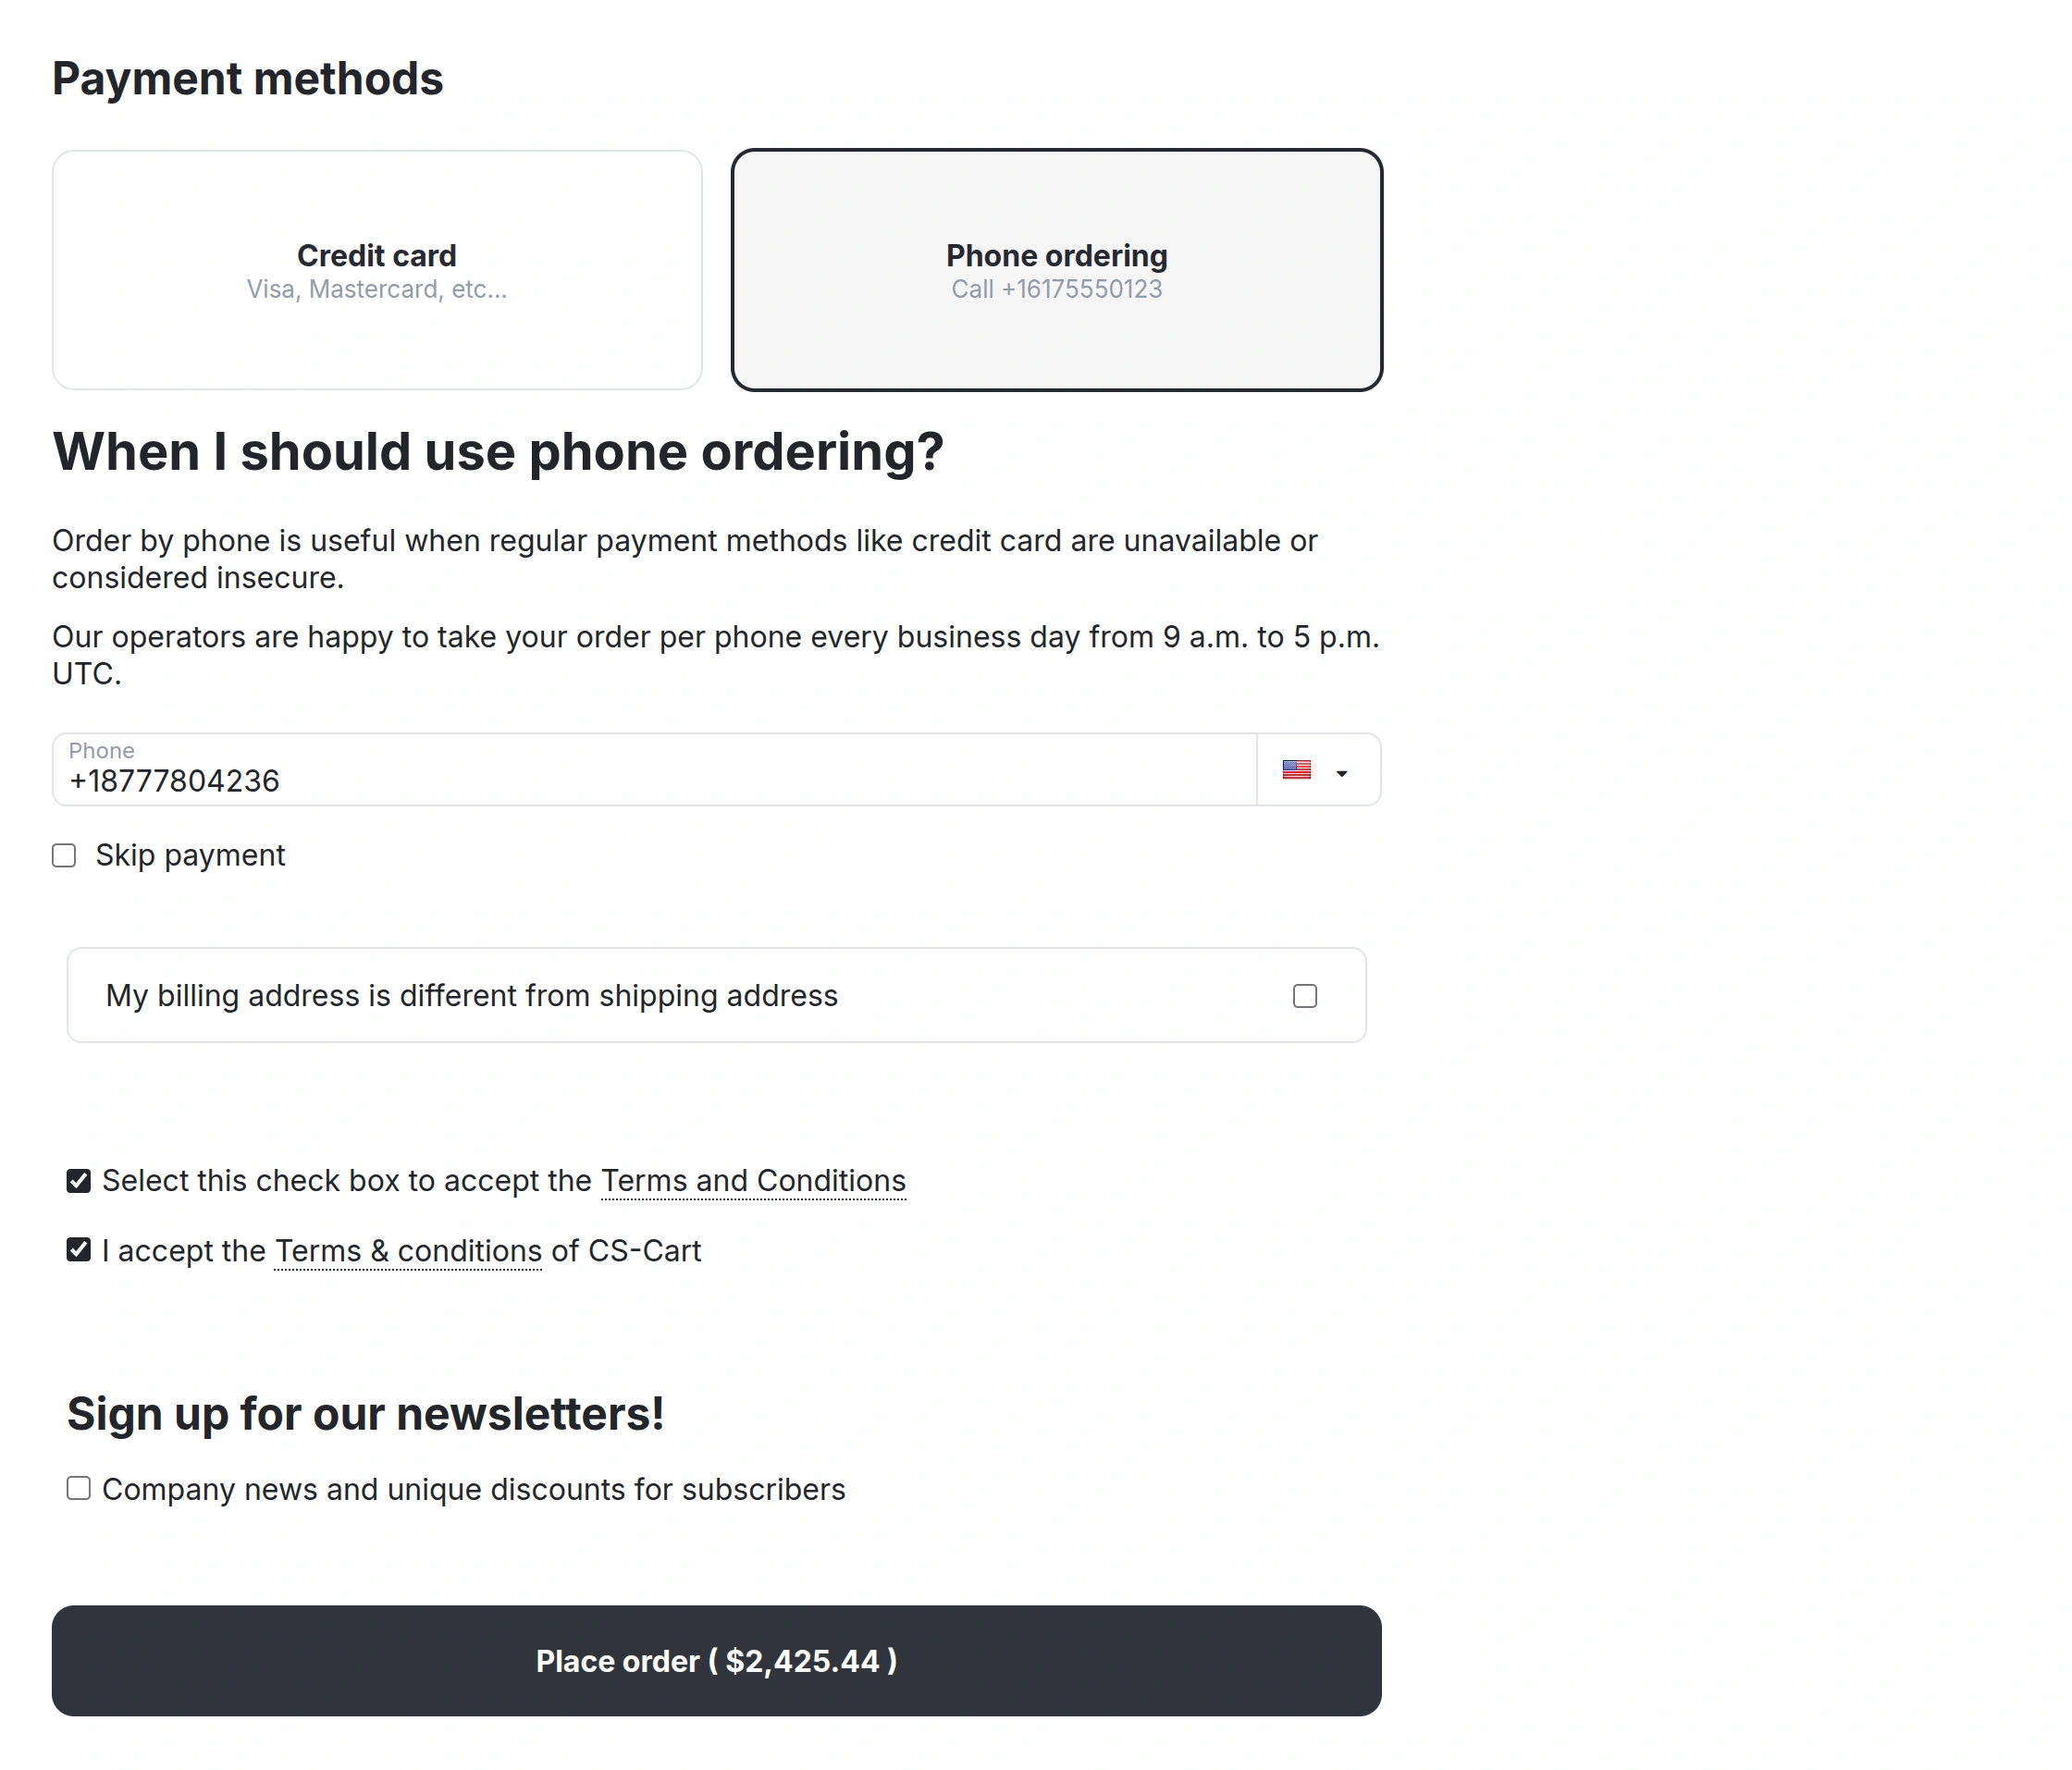
After placing the order, customers can view complete order details including wallet payment amount, selected payment method, shipping details, taxes, and final payable amount.
 Offline Recharge
When a wallet recharge is made using an offline payment method, an order is automatically created for the transaction.
Once the admin marks the order status as Completed, the recharge amount is credited to the customer’s wallet balance.
SUPPORT
If you have any questions, suggestions, or customization requests, feel free to contact us at [email protected] or submit a ticket at webkul.uvdesk.com.
Explore our premium-quality CS Cart Extensions to enhance your store functionality.
You can also explore our CS-Cart Development Services and Quality CS-Cart add-ons.
Current Product Version - 5.4
Supported Framework Version - 4.16.x, 4.17.x, 4.18.x, 4.19.x,4.20.x

2 comments