Introduction
CS-Cart Odoo Bridge(COB): Organize your store efficiently!!!
CS-Cart is a Platform that streamlines the creation and management of eCommerce, enabling users to manage tasks like setting up, marketing, selling, and maintaining inventories.
It is a growing platform for selling your goods and services online. If you are selling your goods and services online, then it’s not enough to ensure the smooth operation of your website.
You must also maintain all data in an organized manner; otherwise, assets can turn into losses. And if we talk about the Odoo then it is a complete all-in-one business solution that handles the backend work and is well-known for its inventory management, accounting, ERP, and other features.
Therefore, we have brought the Odoo Multichannel CS-Cart Connector which connects CS-Cart and Odoo. It will manage your data and set it in a well-organized manner.
You can harness e-commerce capabilities and inventory management by using our CS-Cart Odoo Bridge.
It Integrates your CS-Cart store with Odoo using the CS-Cart Odoo Bridge (COB) to focus only on your business and eliminate unwanted issues.
Features
- The admin can Import CS-Cart Products, Orders, Categories, Partners, and Delivery Methods in Odoo.
- It allows the admin to import data via the cron scheduler.
- Import Product details (like category, attributes, and attribute values) along with the products.
- You can import order details and order statuses alongside the orders.
- This module also imports customer details along with the Customers.
- You can export selected or bulk products or categories From the Odoo app.
- Fill in the corresponding Order status of CS-Cart and Odoo in the Order Status table to map them.
- You can sync order statuses, shipments, invoices, and Inventory from Odoo to CS-Cart.
- Add the real-time order, customer, and product sync from CS-Cart to Odoo through a separate patch. Avail the free copy from Our Support Team.
- You can use the enhanced Dynamic Dashboard to track the data from the Odoo app and CS-Cart.
Prerequisites for using Odoo Multichannel CS-Cart Connector
Odoo Multichannel CS-Cart Connector works in conjunction with the following module:
Install the base module first for Odoo Multichannel CS-Cart Connector to work properly.
For Odoo online(SAAS) users, you first need to migrate to Odoo.sh or self-hosted before installing this module because Odoo restricts third-party software installations on Odoo online(SAAS).
Installation
- Once you purchase the App from the Webkul store, you will receive the link to download the zip file of the module.
- Extract the file on your system after the download finishes. You will be able to see a folder named- ‘cscart_odoo_bridge.’
- Copy and paste this folder inside your Odoo Add-Ons path.
- Now, open the Odoo App and click on the Settings menu. Here, click on Activate the Developer Mode.
- Then, open the Apps menu and click ‘Update Modules List.’
- In the search bar, remove all the filters and search ‘cscart_odoo_bridge.’
- You will be able to see the module in the search results. Click on ‘Activate’ to install it.
Before moving further, explore our Odoo development services & an extensive range of quality Odoo Apps.
Workflow
- Log in to your Odoo database and go to the multichannel module

- Now, click on the connect button to connect CS-Cart with the Odoo instance

3. First, Fill in the details like the Channel name and select Channel type; then add the CS-Cart credentials which include URL, E-mail, and API Key. To get the CS-Cart credentials, you need to go to CS-Cart.

Configuration at CS-Cart end
- Go to the CS-Cart Configuration>> User Administration

5. Now, you can see the ‘API’ access option; from here, you can copy the API Key

Configuration at Odoo end
- Now, save the changes and then click on the ‘Test Connection‘ button.

7. Go to the “Product Setting” tab and configure the CS-Cart connection as per your requirements

Order Status Configuration
- You can also map order states from the Odoo State Mapping; Fill in the corresponding Order state of CS-Cart and Odoo in the Order State table. You can define states like default state, create an invoice, Set invoice state, and create a shipment.
- You can only set one order state as default at a time (if enabled then the order state will be as mentioned by default).
- If ‘Create Invoice’ is enabled then it generates an order invoice at the same time.
- You can set the invoice state to open or paid as per your requirement
- If ‘Create Shipment’ is enabled then it creates a shipment at the mentioned state.

Base Configuration
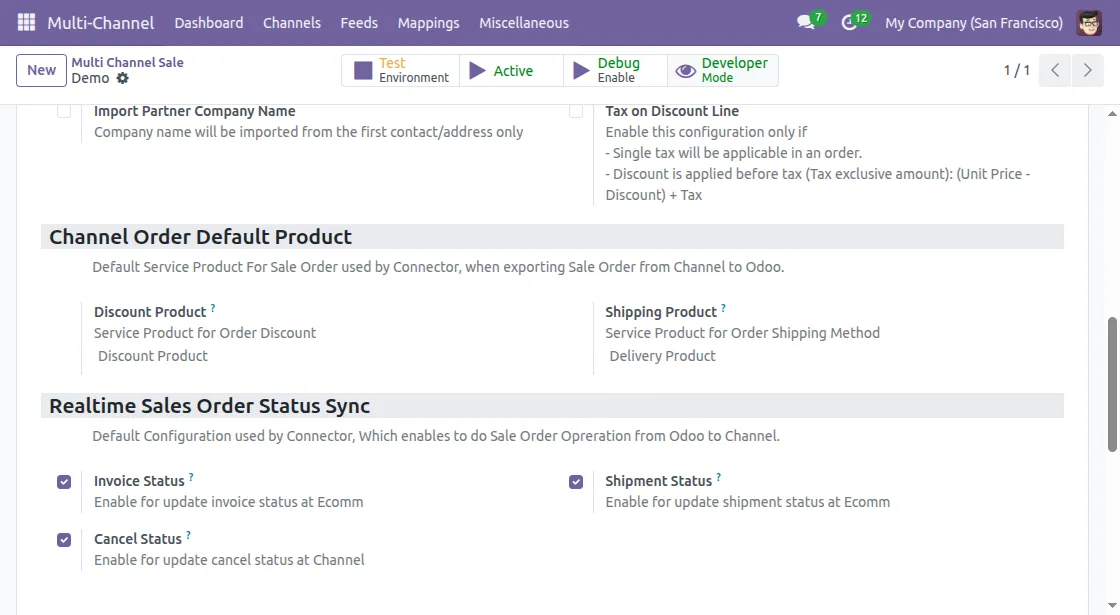
- Also, set the default sales team, discount, and delivery products for the CS-Cart orders to manage discount and delivery charges.
- Moreover, set the default pricelist for the price of the CS-Cart products; set the sequence SKU for the CS-Cart products that do not have SKU.
- If you want to set the CS-Cart products in a default category then you can do so from the same page. Also, set the default warehouse/location to manage CS-Cart stock
- If you will enable ‘Auto Evaluate Feed’ then all the feeds will be evaluated automatically while importing data.
- If you enable ‘Auto Sync Stock’ then there will be real-time synchronization of stocks from Odoo to CS-Cart.
- You can enable/disable checkbox fields like Cancel, Invoice, and Shipment Status to update these order statuses from Odoo to CS-Cart in real-time.
- You can also check or set the last import and update date for orders, products, and customers.
- Set the total number of records per API hit and set the default color for the theme of CS-Cart.

Import functions
- Go to the CS-Cart Connector Dashboard in Odoo; from the dashboard, you can also analyze the data via line graphs, donut charts, and clickable data cards. Also, check the synchronization history and feeds from the dashboard.
- Then, click on the “Import” button to import the data from CS-Cart.

23. Select the object that you want to import and Filter Type to import the data. From here, you can import categories, customers, products, and orders in bulk.

24. Moreover, you can also import products, categories, customers, and orders along with order status to Odoo via the Cron scheduler in Odoo.

Export functions
- Click on the “Export” button to export the data; then, select the object which you want to export. You can export product templates and categories from Odoo.


26. If you want to export orders, customers, and products from CS-Cart in real-time to Odoo then you can contact us at [email protected] for patch
EXPORTED SELECTED PRODUCT FROM ODOO TO CS-CART
- To export selected products from Odoo to CS-Cart navigate to the Products and select the product that you want to export.
- Selected Export/Update Template. Moreover, you can update product data manually from the same form.

- To export the selected Category from Odoo to CS-Cart navigate to the Inventory and select the Category that you want to export.
- Select Export/Update Categories. Moreover, you can update Category data manually from the same form.

EXPORTED SELECTED CATEGORIES FROM ODOO TO CS-CART
- Order statuses like shipping, invoice, and cancellation are exported from Odoo to CS-Cart in real-time.
NEED HELP?
We hope you find the guide helpful! Please feel free to share your feedback in the comments below.
If you still have any issues/queries regarding the same, please raise a ticket at the UV Desk.
For any doubt, contact us at our support mail.
Thanks for paying attention!!
Current Product Version - 1.4.6
Supported Framework Version - Odoo 19, 18, 17 and CS Cart Upto 4.9.x' and 4.10.x Or Above

Be the first to comment.