Akeneo Image Importer: Importing photos is now simple because you can do so from both an FTP and a local directory.
When importing images from a local directory, you must specify the image’s path since the names of the images for products & product models will be used to determine which images to assign to which items.
You must specify the path and the FTP information for the FTP. The picture name will be used here as well to determine how the images are assigned.
Also, using Akeneo Multi Source Import Type allows importing products from multiple sources like – Google Sheets, URL, FTP, SFTP, File, and Dropbox into your Akeneo PIM.
Basic Requirements
Before you begin, please see the minimum requirements for using this module:
- This module is compatible with the Akeneo community and Enterprise(Flexibility) edition.
- If you want to use this extension on Akeneo EE Serenity mode, please contact us.
- For the Akeneo installation, your Akeneo server should meet these system requirements.
- This module works with Akeneo 3.0.x, 3.1.x, 3.2.x, 4.0.x, 5.0.x,6.0.x and 7.0.x. Download Akeneo from here
Features
- From the FTP, import the product images.
- Import product images from the Local Directory.
- For products, images assignment will be based on their SKU/image name.
- This module support image type jpeg, jpg, and png.
- You can connect FTP port and SSL.
- The product model uses the product model code for image naming and assignment.
- Product variants use the variant SKU for image naming and assignment.
- Import 2-level product variant images.
Composer Installation
Before beginning the composer installation
1: Get the ACCESS KEYS [Create a support ticket]
2: In Akeneo composer.json, add our repository as well as the installation script.
For Akeneo =6.x and 7.x
{
  "scripts": {
        "post-update-cmd": [
           "vendor/webkul/imageimporterconnector/src/Webkul/ImageImporterBundle/install/config.sh COMPOSER=true NO_DOCKER=true"
        ],
        "post-install-cmd": [
           "vendor/webkul/imageimporterconnector/src/Webkul/ImageImporterBundle/install/config.sh COMPOSER=true NO_DOCKER=true"
        ],
        "post-create-project-cmd": [
          "vendor/webkul/imageimporterconnector/src/Webkul/ImageImporterBundle/install/config.sh COMPOSER=true NO_DOCKER=true"
       ]
   },
  "repositories": [{
    "type": "composer",
    "url": "https://akeneorepo.webkul.com/"
  }]
}
For Akeneo =5.x
{
  "scripts": {
        "post-update-cmd": [

"vendor/webkul/imageimporterconnector/composer_install.sh"
        ],
        "post-install-cmd": [

"vendor/webkul/imageimporterconnector/composer_install.sh"
        ],
        "post-create-project-cmd": [

"vendor/webkul/imageimporterconnector/composer_install.sh"
       ]
   },
  "repositories": [{
    "type": "composer",
    "url": "https://akeneorepo.webkul.com/"
  }]
}
3: Use composer to install the extension.
For version 6.0.x and 7.0.x
composer require webkul/imageimporterconnector
For version 5.0.x-
composer require webkul/imageimporterconnector:1.0.0
4: Complete the authentication form.
5: Send a Message of Success
6: Delete your browser’s cache.
Manual Installation for Version 6.0.x and 7.0.x
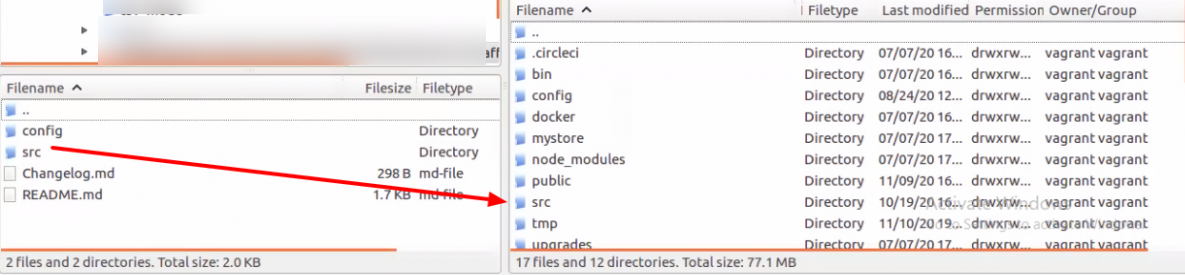
- After unzipping the respective extension zip and merging the “src” folder into the akeneo project.
- Run the below command over the NO-DOCKER Instance from the PIM directory.
./src/Webkul/ImageImporterBundle/install/config.sh COMPOSER=false NO_DOCKER=true
- Run the below command over the docker Instance from the PIM directory.
./src/Webkul/ImageImporterBundle/install/config.sh COMPOSER=false NO_DOCKER=false
Installing Module for Version 4.0.x to 5.0.x
Please follow these steps for installing the Akeneo Image Importer module in your Akeneo PIM platform.
1 – Unzip the respective extension zip then merge the “src” folder into akeneo project root directory.
2 – Goto config/Bundles.php then add the line:
  Webkul\ImageImporterBundle\ImageImporterBundle::class => ['all' => true],
  Ijanki\Bundle\FtpBundle\IjankiFtpBundle::class => ['all' => true]
in the return array.
3 – Copy the “config” folder into the akeneo project root directory for routing.

4 – Run this command after ssh to your akeneo server by the terminal
php -d memory_limit=4G /usr/local/bin/composer require ijanki/ftp-bundle --no-scripts
rm -rf var/cache/ && php bin/console image:setup:install --env=prod;
5 – If you are using php-fpm. Then you need to restart the php-fpm services and apache web server.
For Akeneo 5
sudo service php-fpm7.4 restart
For Akeneo 4
sudo service php-fpm7.3 restart
Docker Installation Command :
For Akeneo 5
alias docker_php='docker-compose run -u www-data --rm php php';
alias docker_yarn='docker-compose run -u node --rm node yarn';
docker_php bin/console cache:clear --env=prod;
docker_php bin/console pim:installer:assets --symlink --clean --env=prod;
docker_php bin/console d:s:u --force;
docker_yarn run webpack;
docker_yarn run update-extensions;
docker_yarn run less;
For Akeneo 4
alias docker_php='docker-compose run -u www-data --rm php php';
alias docker_yarn='docker-compose run -u node --rm node yarn';
docker_php bin/console cache:clear --env=prod;
docker_php bin/console pim:installer:assets --symlink --clean --env=prod;
docker_php bin/console d:s:u --force;
docker_yarn run webpack;
docker_yarn run less;
Installing Module For Version 3.x
Please follow these steps for installing the Akeneo SEO Manager module in your Akeneo PIM platform.
1 – Unzip the respective extension zip then merge the “src” folder into akeneo project root directory.

2 – After that, go to app/AppKernel.php then add the line.
new Webkul\ImageImporterBundle\ImageImporterBundle(),
new Ijanki\Bundle\FtpBundle\IjankiFtpBundle(),
3 – Goto app/config/routing.yml then add these lines at top of file.
images_import_bundle:
      resource: "@ImageImporterBundle/Resources/config/routing.yml"
      prefix:   /
4 – Then run this command after ssh to your akeneo server by the terminal.
php -d memory_limit=4G /usr/local/bin/composer --no-scripts require ijanki/ftp-bundle --ignore-platform-reqs
rm -rf var/cache/ && php bin/console image:setup:install --env=prod;
5 – If you are using php-fpm. Then you need to restart the php-fpm services and apache web server.
sudo service php-fpm7.2 restart
Common Issues After Installation
It might happen that even after proper installation, upon opening your Akeneo admin dashboard, you see a loading screen. In that case, do check for the following solution:
- Webpack Installation: If you get the below error

It means that web pack is not installed in your system. Run the following command.
npm install --save-prod webpack
npm install
- Module routing.yml is not configured properly. Re-check the routing.yml file as mentioned in the 3rd step of Module Installation
- Clear your browser cache.
Uninstall Module: For Akeneo 6.0.x and 7.0.x
- Run the below command over the NO-DOCKER Instance from the PIM directory.
./src/Webkul/ImageImporterBundle/uninstall/uninstall.sh COMPOSER=false NO_DOCKER=true
- Run the below command over the docker Instance from the PIM directory.
./src/Webkul/ImageImporterBundle/uninstall/uninstall.sh COMPOSER=false NO_DOCKER=false
How to add images to a folder
To begin, create a folder named product/model image inside of another folder with the same name as the product/model SKU. This folder should be created inside the FTP directory path.
In the directory, you must create an image folder. Add images in the Product image folder. For example, image/ProductskuImageFolder/Productsku.jpg

A product image’s naming convention is as follows:
- If the SKU is 1234
- Accordingly, the filename for the image should be 1234.jpg. Image names must not contain an underscore but rather a hyphen.
- The image names will be 1234-1.jpg and 1234-2.jpg if more than one image is available.
Product/model SKU is always the sole information that appears in the main image, never with a hyphen.
Example: 1234.jpg

To import Product Variant image:
- Create a variant image inside the product model image folder.
- Don’t create a folder for the variant image
- Start the name of the various image with the name of the variant product SKU.
- For example- image/ProductModelskuImageFolder/VariantProductsku.jpg
Workflow – Akeneo Image Importer
After the successful installation of the module, you will see the Akeneo Image Importer icon on the left side of the dashboard, as shown below:

Using this module, you can import the product images through FTP and Local Directory.
Import Images Using Local Directory:
To import images from your local directory to Akeneo, you have to navigate to Import>>Create Import Profile.

Then, to create an import job, select the job Image Importer via Local Directory and enter the job code and label.

After clicking the save button, add the file path in the global settings tab and then go to the content tab to add the necessary data.

Then, after clicking the save button, you will see the import button. The images will be imported from the local directory when you click the import button.

Then click the Import Now button then wait for the product execution job to get completed.

Import Images Using FTP:
To import images from your local directory to Akeneo you have to navigate to Import>>Create Import Profile.

Then, to create an import job, select the job Image Importer via FTP and enter the job code and label.

After clicking the save button, add the file path in the FTP settings tab and enter the details like:
- Directory path
- Host Name
- Port
- Encryption(with or without SSL)
- User Name
- User Password
After that validate the credentials and click on the save button.

Once you click on the save button, you will see the import button. The images will be imported from the local directory when you click the import button.

Then click the Import Now button and then wait for the product execution job to get completed.

Support
Furthermore, for any issues related to this module, reach out to us at [email protected]. Also, you can raise a ticket at our HelpDesk System.
Please explore our Akeneo Development Services and Quality Akeneo Extensions.
Current Product Version - Akeneo 3,4,5||1.0.0, Akeneo 6 || 3.1.0 and Akeneo 7 || 3.2.0
Supported Framework Version - 3.x.x 4.x.x, 5.x.x, 6.x.x & 7.x.x

Be the first to comment.