Magento 2 Product Return RMA plugin allows to manage customers requests related to product returns, refunds, exchanges, and order cancellations.
Return Merchandise Authorization is the process of returning a product to receive a refund, replacement, or repair during the stipulated time period.
With the help of the Adobe Commerce Cloud Product Return RMA extension, even guest users can create an RMA request.
Add New Field
Check the overview of Magento 2 RMA extension in the video below –
Features of Product Return RMA
- Send and receive file attachments with the messages.
- Create customizable fields for the RMA Request Form.
- Guest Customers can generate RMA too.
- Buyer and Admin can communicate using the RMA system.
- The admin can create the RMA on behalf of the customer.
- RMA History with Filters and Pagination.
- Show the Return Policy Page to customers.
- Dynamic order selection with various options.
- Print RMA details and shipping labels easily.
- The customer can also enter the consignment number and upload images after RMA generation.
- The admin can manage RMA status as well as Reasons.
- The customer and the admin receive notification emails.
- The admin can set the RMA YES/No on a particular product.
- Using Return Quantity, the admin will return the RMA quantity to their store.
- The admin can select the allowed product types for RMA.
- The admin can restrict any required category for the RMA generation.
- Admin can update RMA status product-wise with a comment.
- RMA can be assigned to the RMA Manager (Admin User).
- The RMA reasons will be based on resolution types.
- The extension supports EU Withdrawal Button Compliance
- Custom RMA item status can be created.
- Now create RMA Rules with resolution time.
- RMA statuses will now be product-wise shown to the customer
- The return/Exchange window will be visible on the product page
- The return/Exchange window will be visible on the “New RMA” page while creating a new RMA
- Automate RMA approvals, routing, and alerts using conditional logical rules.
- Track performance with daily, weekly, monthly charts for refunds, pending value, declined value, return rates, and top returned products.
- Refund return amounts directly into the customer’s digital store credit wallet.
- Automatically score customer risk and track frequency of returns to prevent return abuse.
- Allow customers to initiate returns/cancellations directly from order lists and order details pages with an advanced popup.
- REST & GraphQL API Support for Headless Commerce and Mobile App Integration.
Note:
EU Withdrawal Button Compliance
RMA Extension supports EU Withdrawal Button Compliance with Directive (EU) 2023/2673 by allowing merchants to provide a clearly labeled electronic cancellation button.
Customers can use this button to exercise their statutory 14-day right of withdrawal for eligible purchases in a simple and transparent manner.
Installation of Product Return RMA
The installation is quite simple just like the standard Magento 2 extensions.
#1 Download Module
Firstly, you need to log in to the Webkul Store,
go to My Account>My Purchased Products section, verify, and then download and extract the contents of this zip folder on the system.
#2 Upload Folder
Once the module zip is extracted, follow path src>app and then transfer the app folder into the Adobe Commerce Cloud root directory on the server as shown below:

#3 Run Commands
After uploading the module folder, you need to run the following commands in the Magento 2 root directory:
php bin/magento setup:upgrade
php bin/magento setup:di:compile
php bin/magento setup:static-content:deploy
php bin/magento indexer:reindex
php bin/magento cache:flush
Multilingual Support
For multilingual support, the admin will navigate through Store > Configuration > General > Locale Options and select the locale as German.
(the language into which the admin wants to translate his store content).

Translation in Product Return RMA
If a user wants to translate their module from English to German then they need to follow the path
app/code/Webkul/Rmasystem/i18n in their unzipped Adobe Commerce RMA system folder and will get a CSV file with the name “en_US.csv”.
Now they will rename that CSV as “de_DE.csv” and translate all right side content after the comma in the German language.
After editing the CSV, save it and then upload it to the path app/code/Webkul/Rmasystem/i18n where they have installed Magento2 on the server.
The module will get translated into the German Language. It supports both RTL and LTR languages.


The user can edit the CSV like the image below.
Configuration of Product Return RMA
After the successful installation of Magento 2 RMA module admin will be able to view the RMA system configuration setting under RMA System > RMA Configuration
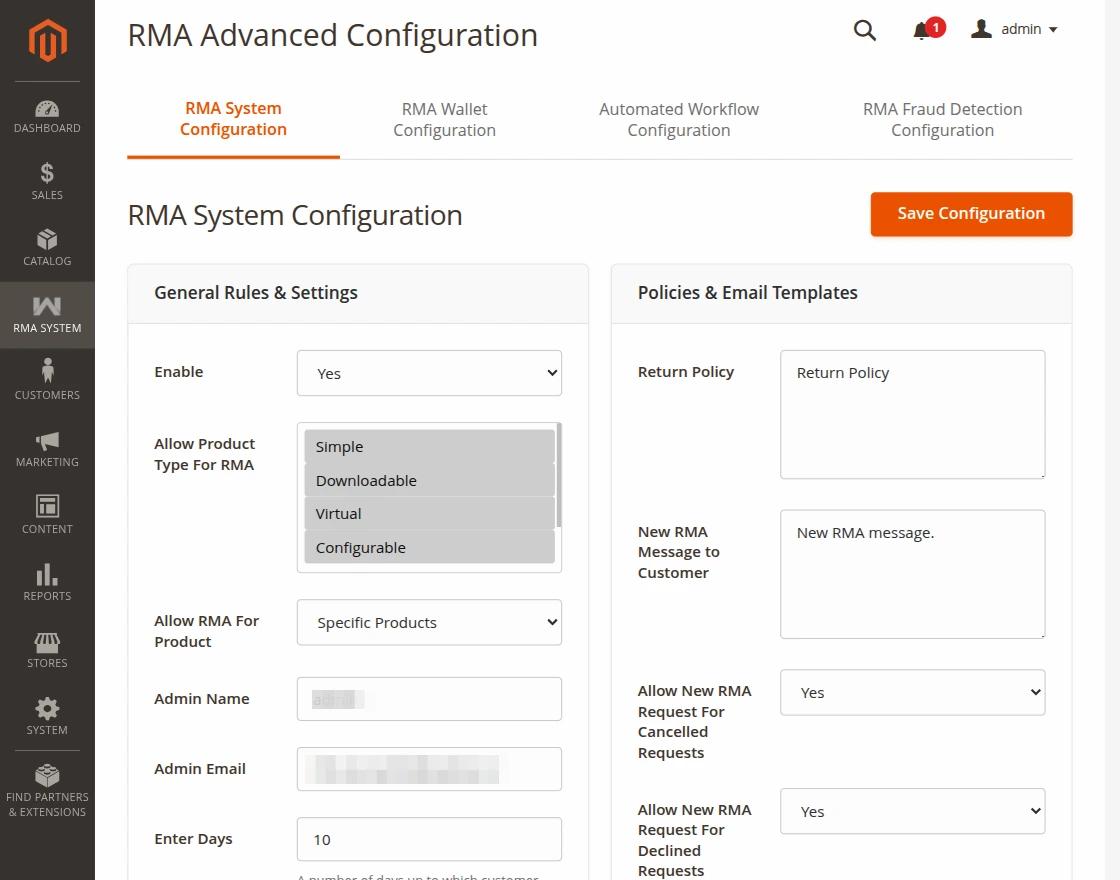
General Rules & Settings
Enable – Admin can enable or disable the RMA (Return Merchandise Authorization) system from the backend.
Allowed Product Types for RMA – The admin can select product types for RMA. The customers can then create RMA requests only for selected product types.
Allow RMA For Product – Admin can configure whether RMA requests are allowed for all products or only for selected products, providing better control over the return process.
Admin Name and email ID – The Admin can send or receive the notification message using this Email ID and name.
Enter Days – The admin can select or enter several days up to which the customer can request for RMA after placing the order.
If the number of days will exceed the order date to the RMA requesting date then the customer can not request the RMA of that order.
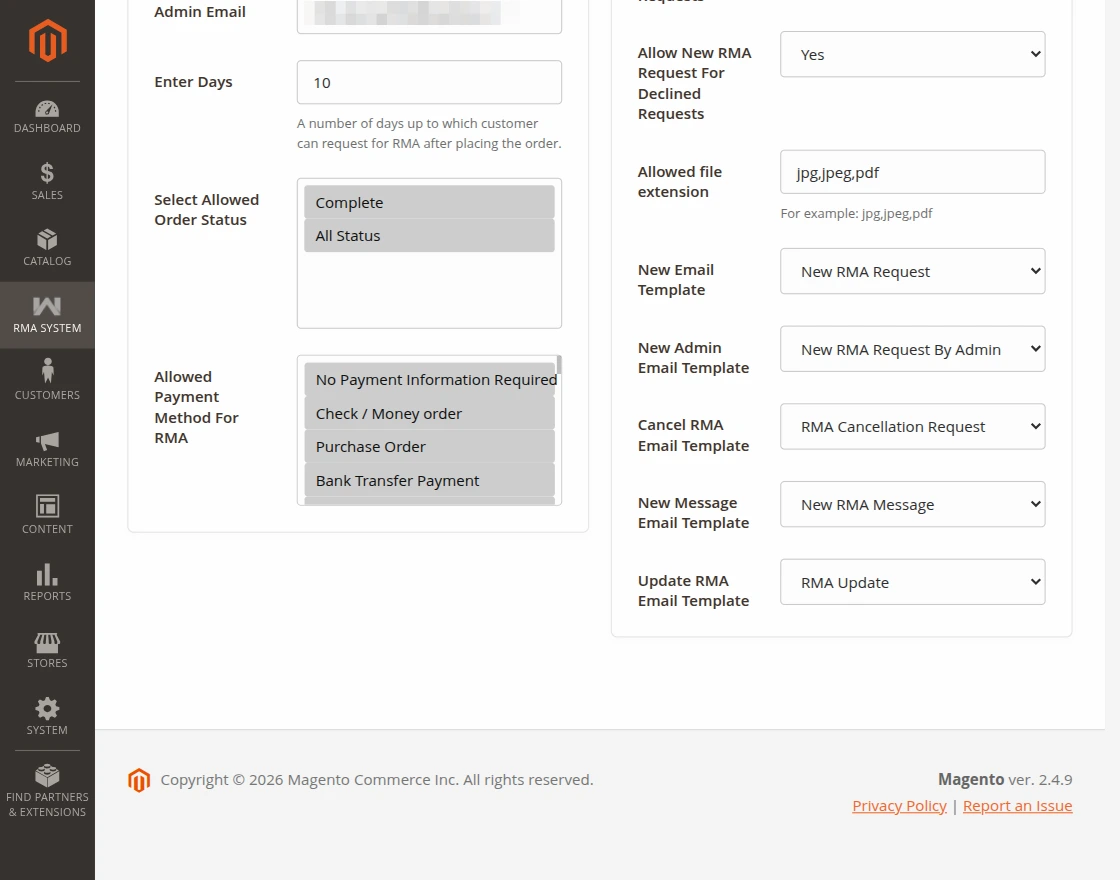
Select Allowed Order Status –
The customer can file RMA only for those statuses of the order that are selected by Admin.
If the admin selects “Complete” in “Select Allowed Order Status” then the customer can select only that item for RMA which is shipped from that order.
If the admin selects “All status” then the customer will able to register RMA with all statuses such as – processing, pending, complete, etc.
Allowed Payment Method For RMA – The admin will select the payment methods for which the customer can request RMA.
Only the selected payment methods will be visible on the front end.
Policies & Email Templates
Return Policy – Admin can easily set up terms and conditions for RMA requests and show them to customers/guests. Customers/guests will not be able to create a request without accepting the RMA policy.
New RMA Message to Customer – Enter the default message for the customer, when the RMA is generated successfully.
Allow New RMA Request For Cancelled Requests – If Yes is selected, the customer will be able to generate new RMA requests after canceling the previous one.
If No is selected, the customer will not be able to create a second RMA request for the same order after canceling the first one.
Allow New RMA Request For Declined Requests – If Yes is selected, the customer will be able to generate new RMA requests again even if the admin has declined the previous one.
If No is selected, the customer will not be able to generate another RMA request once it is declined by the admin.
Allowed File Extension – If the customer wants to add an attachment then the allowed file extensions are jpg, jpeg, and pdf.
New Email Template – The admin can select the email template for new RMA requests.
New Admin Email Template – The admin can select the email template to notify the admin about new RMA requests.
Cancel RMA Email Template – The admin can select the email template for cancelled RMA requests.
New Message Email Template – The admin can select the email template for new messages added to an RMA request.
Update RMA Email Template – The admin can select the email template for RMA updates and status changes.
RMA Wallet Configuration
Note: The RMA Wallet Configuration section is available only when the Magento 2 Wallet Extension is installed and enabled.
Since the RMA Wallet feature depends on the Wallet Extension, these configuration settings will automatically appear in the admin panel once the Wallet module is installed.
This integrates the RMA system with the digital store credit wallet. Admin can credit return amounts instantly to customer wallets.
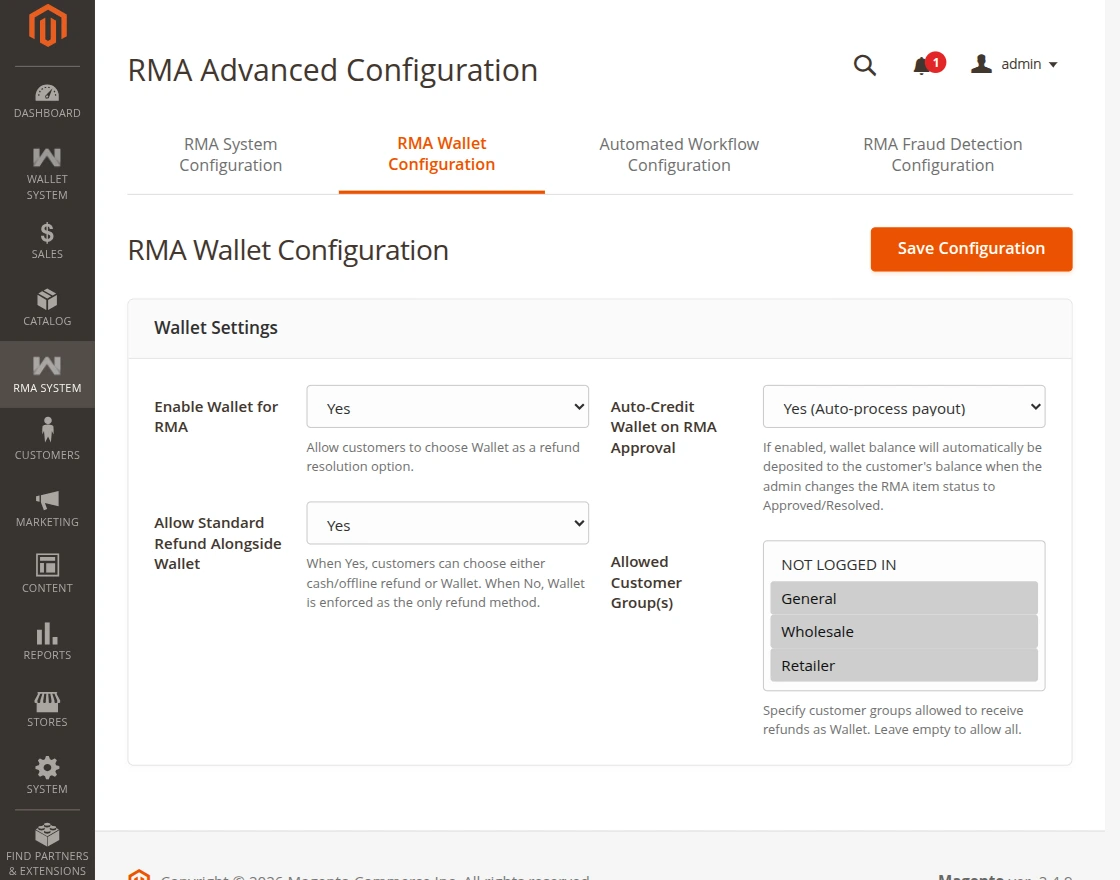
Enable Wallet for RMA – Allow customers to select wallet refund as a resolution type.
Allow Standard Refund Alongside Wallet – Allow both traditional offline refunds and digital credit refunds.
Auto-Credit Wallet on RMA Approval – Automatically credit the customer’s wallet instantly when an RMA request is marked approved
Allowed Customer Group(s) – Set customer groups that can use wallet credit returns.
Steps for Creating a Refund to Wallet
- Configure Wallet Settings:
- Ensure the digital wallet is active and Enable Wallet for RMA is set to Yes.
- If you want automatic processing on status update, set Auto-Credit Wallet on RMA Approval to Yes.
- Customer Submission:
- Customer creates an RMA request and selects Refund to Wallet as the resolution type.
- Admin Process (Automatic Refund):
- Go to RMA System > All RMA and open the RMA request.
- If Auto-Credit Wallet on RMA Approval is Yes, select the Refund checkbox and change the status of the item to Refund Initiated or Solved.
- Click Update Status. The system automatically creates a Credit Memo and credits the customer’s wallet.
- Admin Process (Manual Refund):
- If Auto-Credit Wallet on RMA Approval is No, go to Sales > Orders, select the order, and click Credit Memo.
- Scroll down to the Refund Totals section and click the orange Refund In Wallet button to manually process the wallet transfer.

Advanced Configuration of Product Return RMA
Under RMA System > RMA Advanced Configuration, the admin can configure newly introduced automation, wallet refund, and fraud detection features:
Automated Workflow Configuration – This setting allows the admin to set up automatic logic gates to authorize returns instantly, saving human verification time.
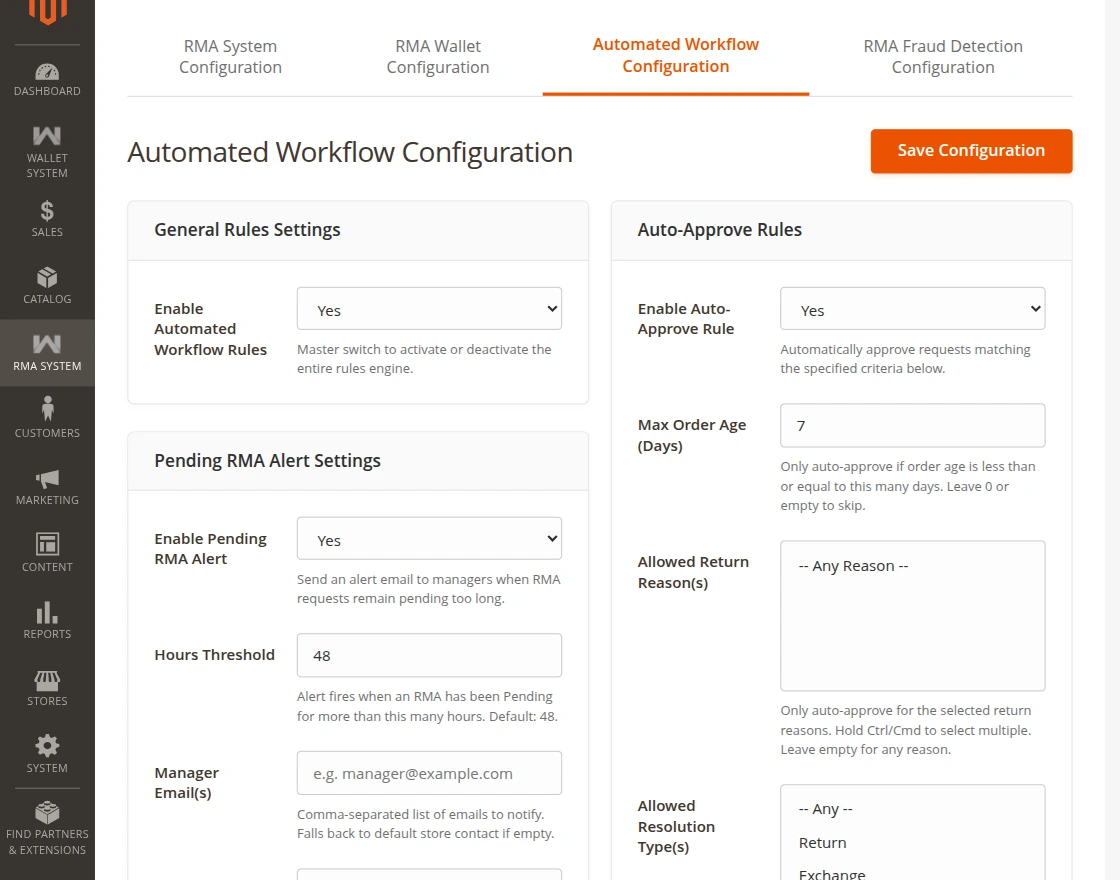
General Rules Settings
Enable Automated Workflow Rules – Master toggle to enable/disable automated processing.
Pending RMA Alert Settings
Enable Pending RMA Alert – Send alert reminders if an RMA remains pending.
Hours Threshold – Hours of wait before triggering alerts.
Manager Email(s)- Send notification alerts to listed administrative emails.
Alert Email Template – Select the template layout.
Auto-Approve Rules
Enable Auto-Approve Rule – Turn on automated approvals.
Max Order Age (Days) – Maximum order age to be eligible for auto-approval.
Return Reason(s) – Multi-select reasons that qualify for automatic approval.
Resolution Type(s) – Multi-select resolutions (Refund/Exchange) that qualify.
Customer Group(s) – Restrict auto-approvals to specific customer groups.
Minimum/Maximum Product Price – Specify item price limits for automated returns.
Auto-Refund Shipping Costs to Wallet – Allow automatic refund of shipping costs to the digital wallet.
Send Approval Email Notification – Turn on automatic email updates.
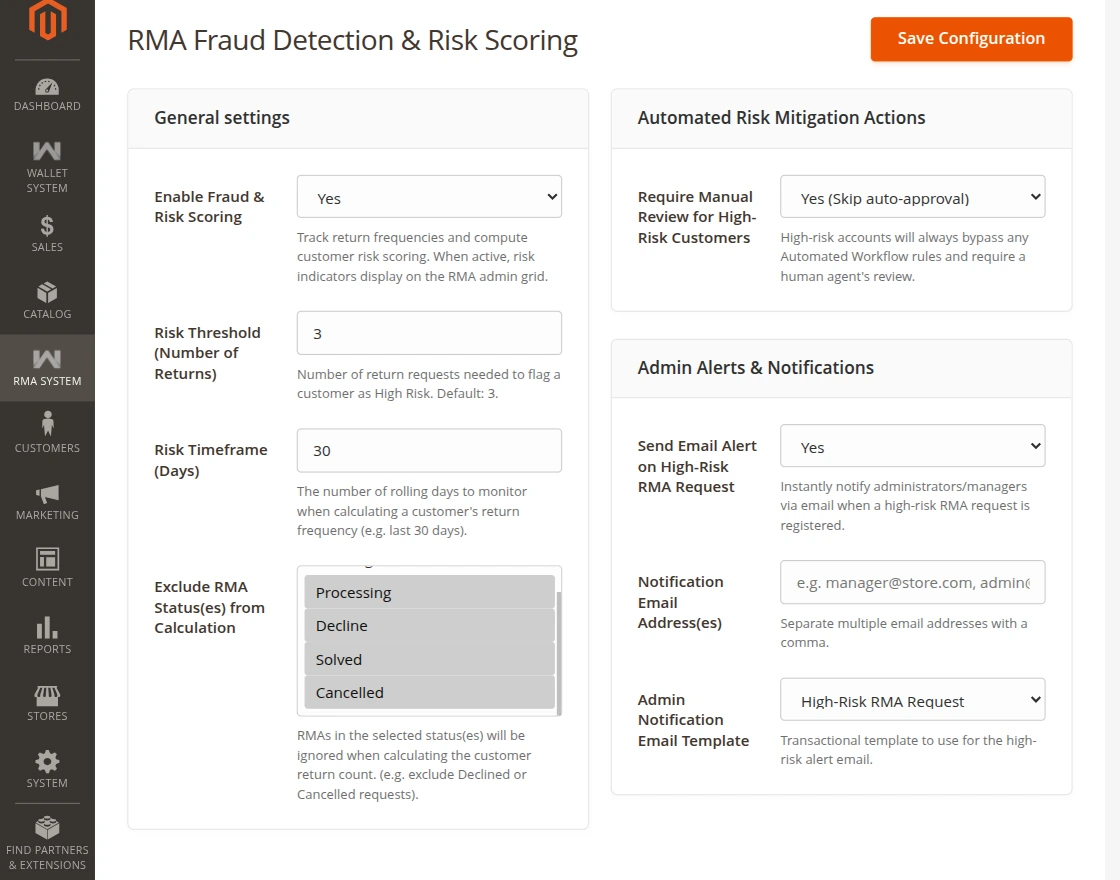
RMA Fraud Detection Configuration
Configure automated limits to block fraudulent returns and flag high-risk customers based on return behavior.
-
Enable Fraud & Risk Scoring: Turn on return monitoring and risk calculation.
-
Risk Threshold (Number of Returns): Set the maximum number of returns allowed within a timeframe before flagging.
-
Risk Timeframe (Days): Rolling period to evaluate return frequencies.
-
Exclude RMA Status(es) from Calculation: Ignore specific statuses (e.g., cancelled or declined requests).
-
Require Manual Review for High-Risk Customers: Instantly route requests from high-risk accounts to admin inspection, bypassing any auto-approval rules.
-
Send Email Alert on High-Risk RMA Request: Notify the store manager when high-risk customer files a return.
-
Notification Email Address(es): Target email list.
-
Admin Notification Email Template: Alert message style.

Category Restriction in Product Return RMA
Firstly go to Catalog > Categories.

Here, the admin can restrict the required categories for RMA generation.
Henceforth, the customers won’t be able to process an RMA request for the purchased product lying in that category.

The admin can set the field Allowed for RMA generation as Yes or No.
Note: If a parent category is set as not Allowed for the RMA generation.
As a result, its subcategory’s product will not be allowed for the RMA generation.
Product Return RMA System Management
Under the RMA System side panel menu option, the admin will find multiple sub-menu options for the RMA.

Create RMA
The admin on behalf of the customers can also create the RMA as required.
To do so, tap the Create RMA option, and that brings up the list of complete orders.

For a particular order for which the admin needs to create the RMA, tap the drop-down icon on the right.
This brings up the details of the products within the order.
Now, the admin will select the product for which the RMA needs to be generated.
Set the RMA quantity, choose the resolution type – Return or Exchange, and accordingly select the reason for the same.

After that, tap the Create RMA button to generate the RMA as required.
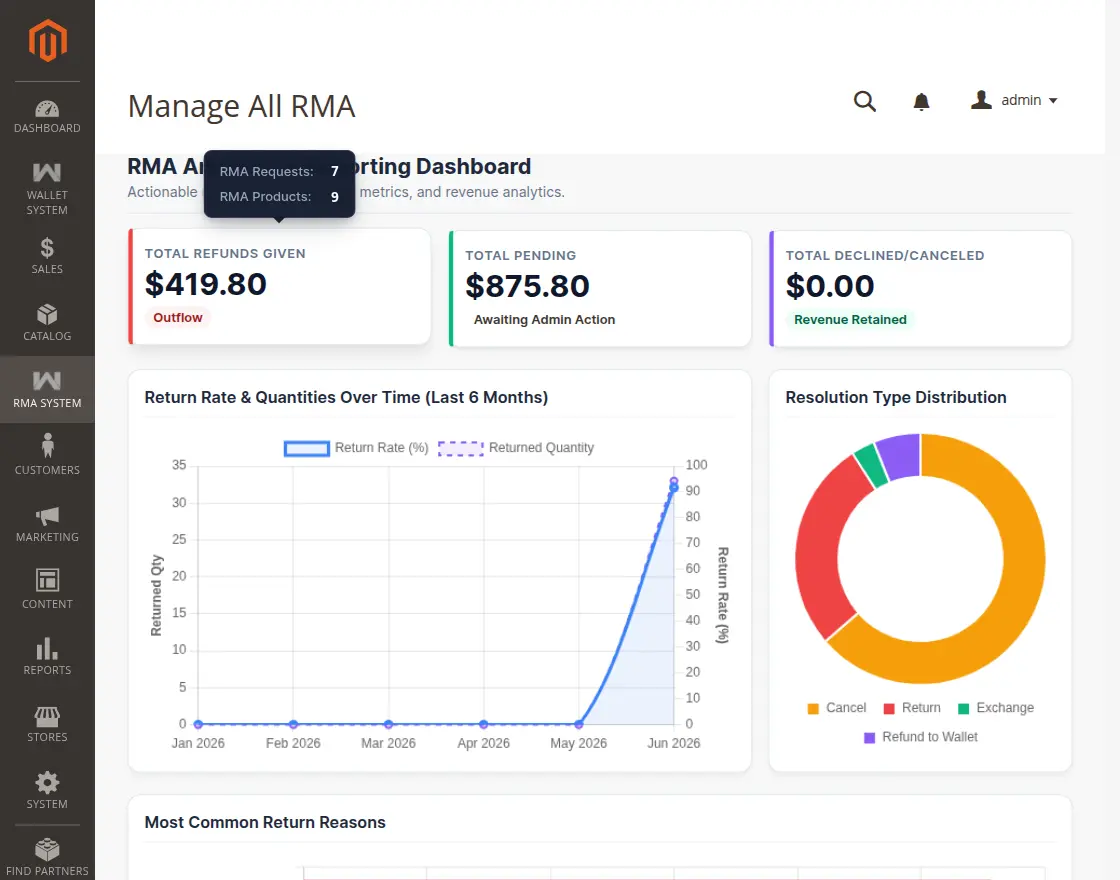
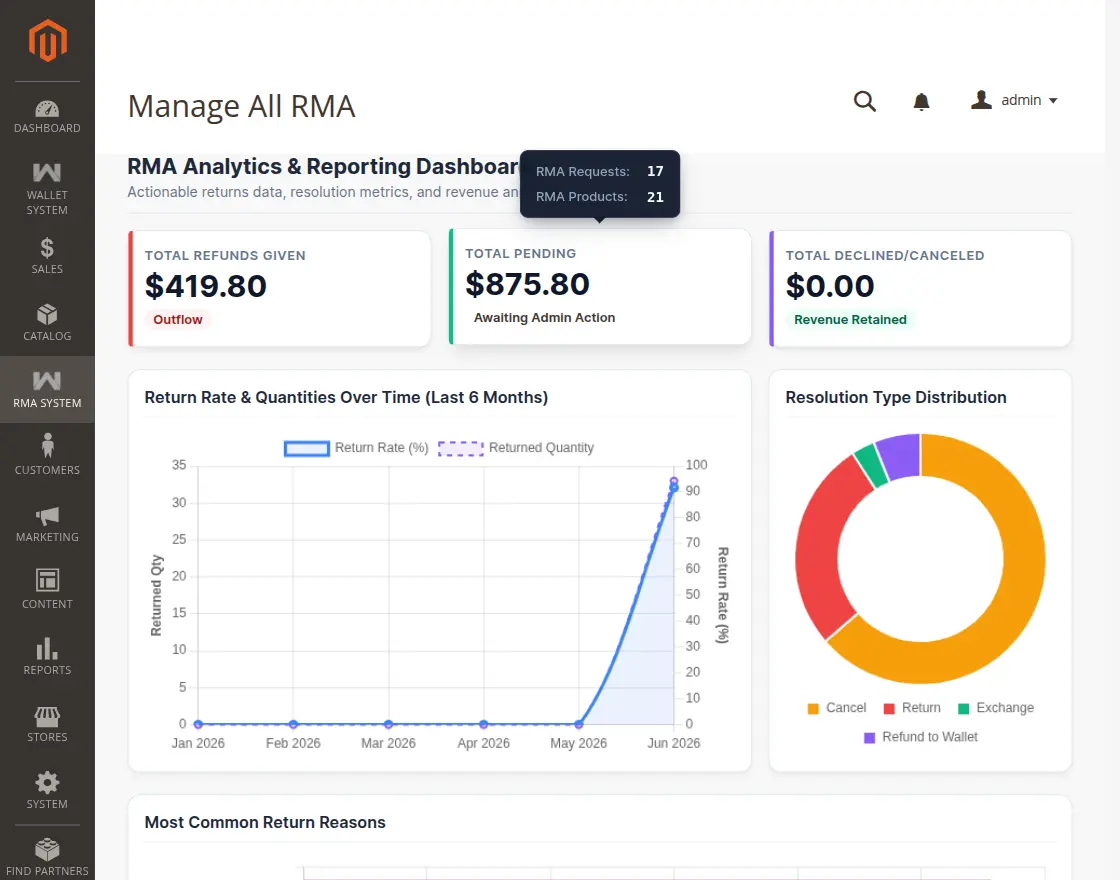
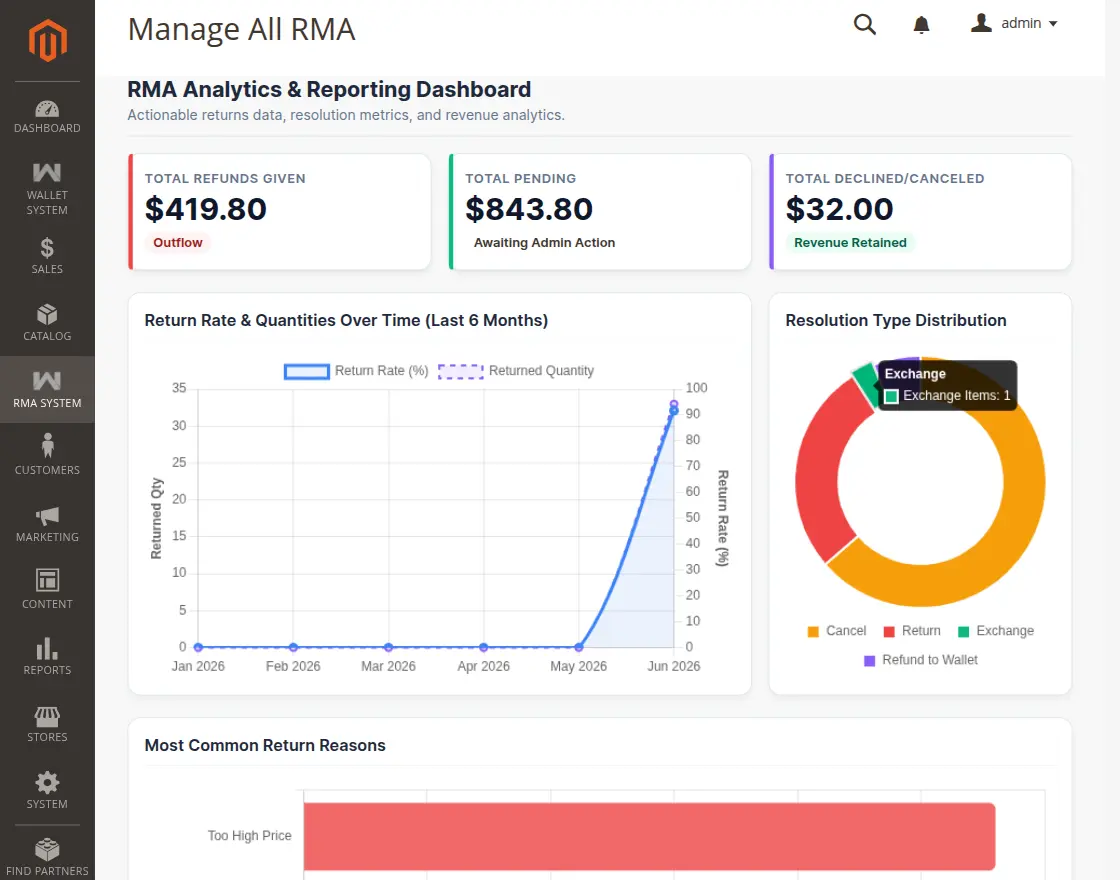
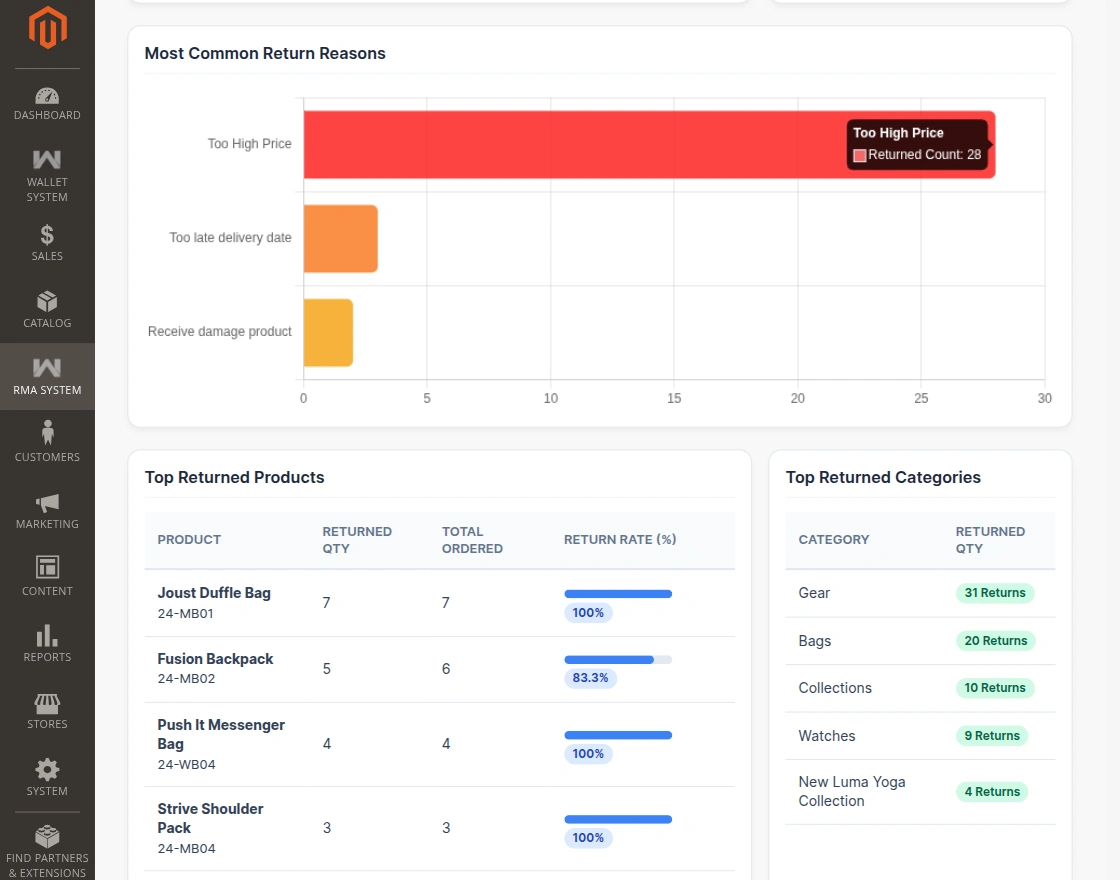
Manage All RMA & Analytics Dashboard
Now the admin can check the dashboard of the RMA with RMA analytics.
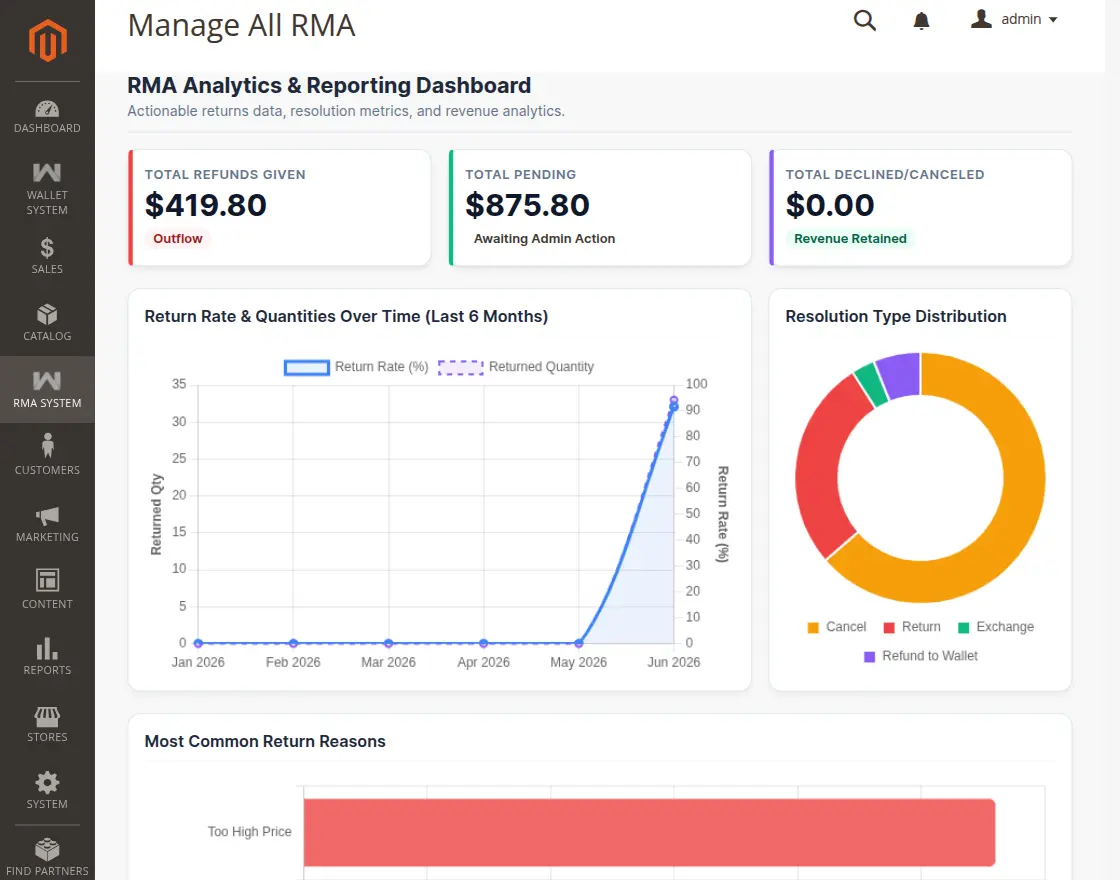
They can check the analytics on a daily, weekly, monthly, and other basis.
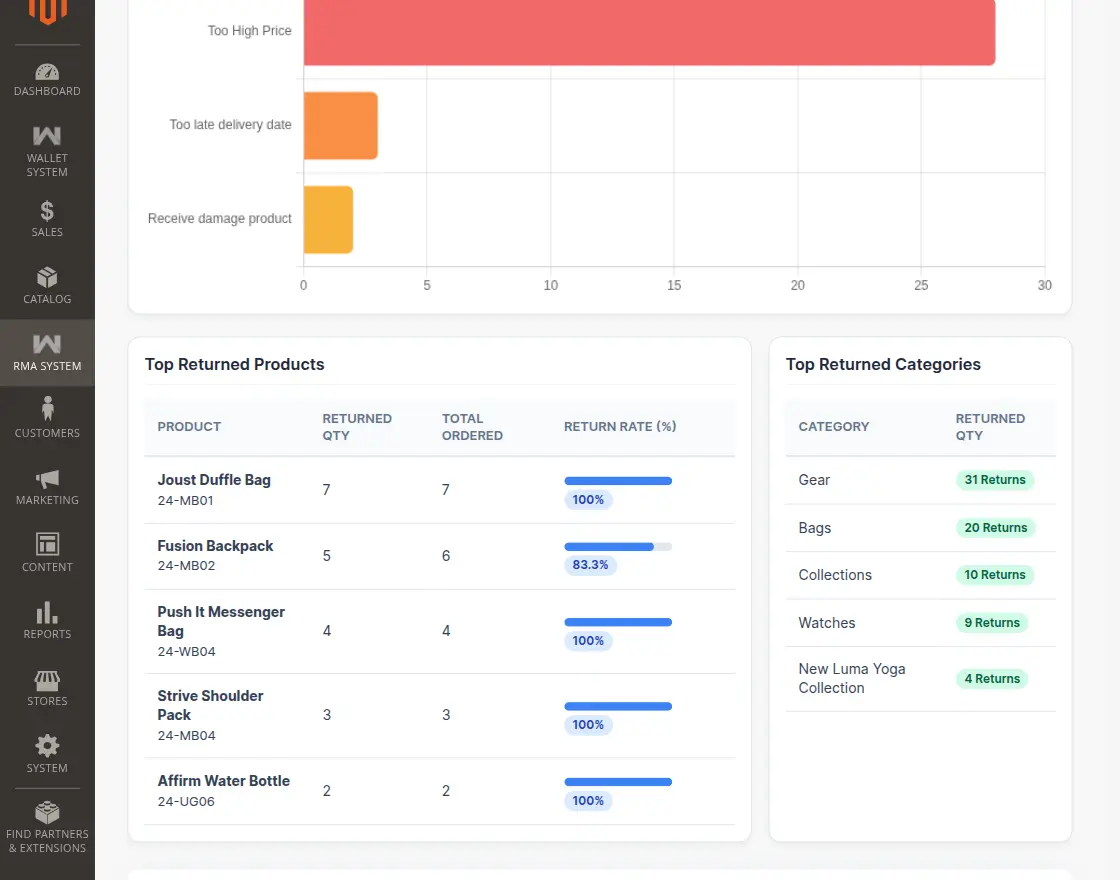
The dashboard includes detailed tracking grids for:
- Total refund given (amount, total RMA requests, and total RMA products)
- Total Pending RMAs Value (financial value and quantities)
- Total Declined/Canceled RMAs Value (financial value and quantities)
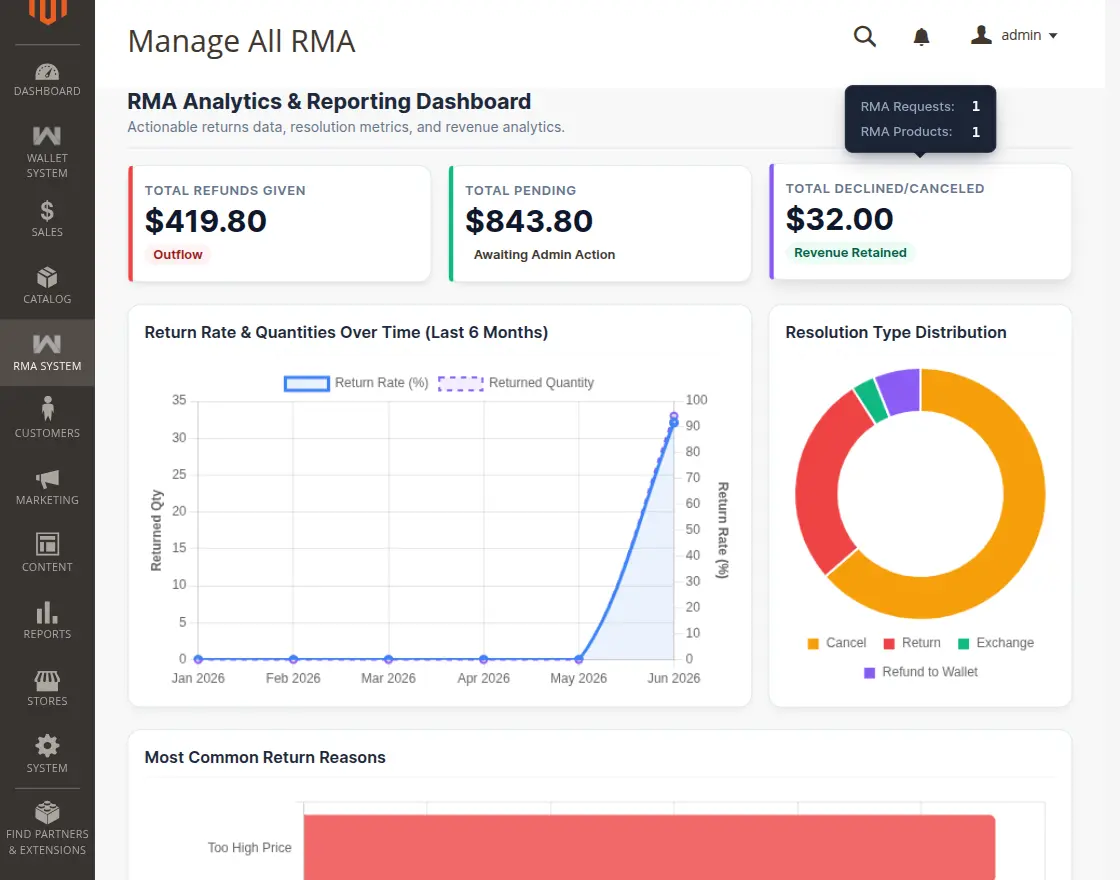
- Return Rate & Quantities Over Time (last 6 months trend analysis)
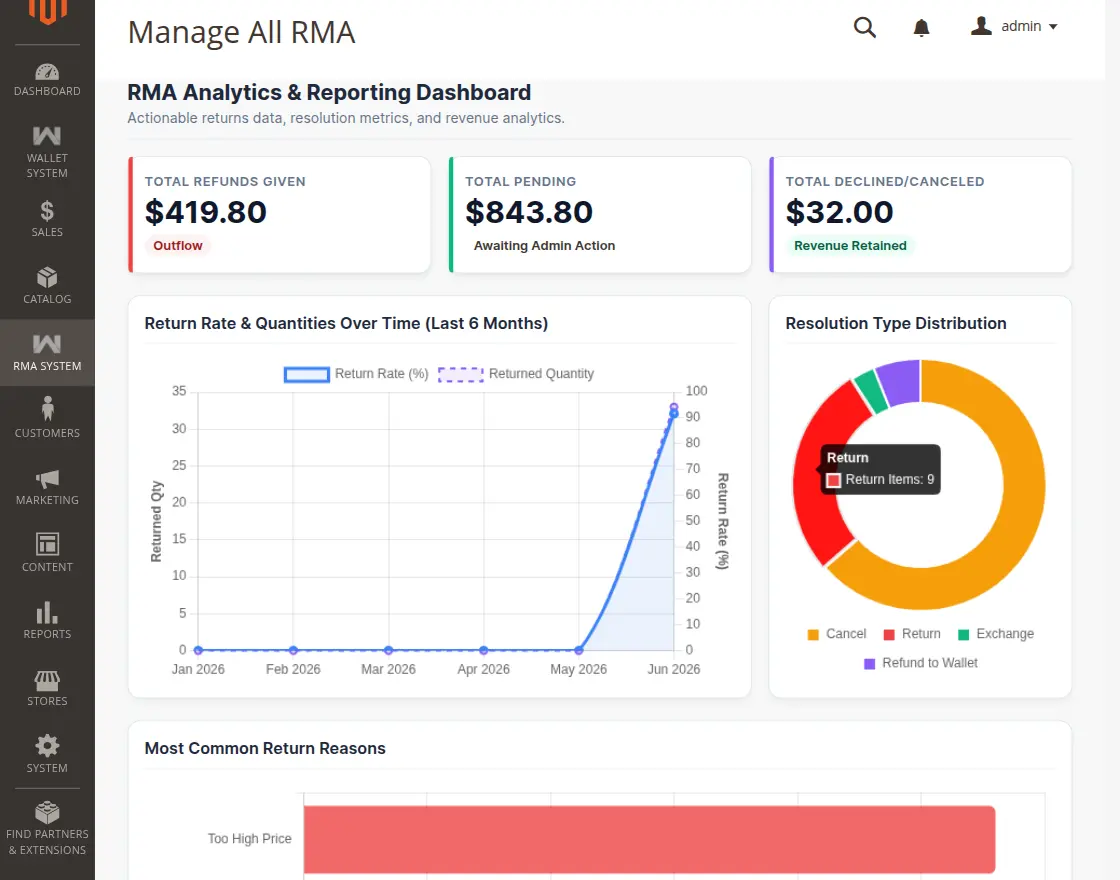
- Resolution Type Distribution (Breakdown of Refund vs Exchange vs Cancel)
- Resolution Type Distribution (Breakdown of Refund vs Exchange vs Cancel)
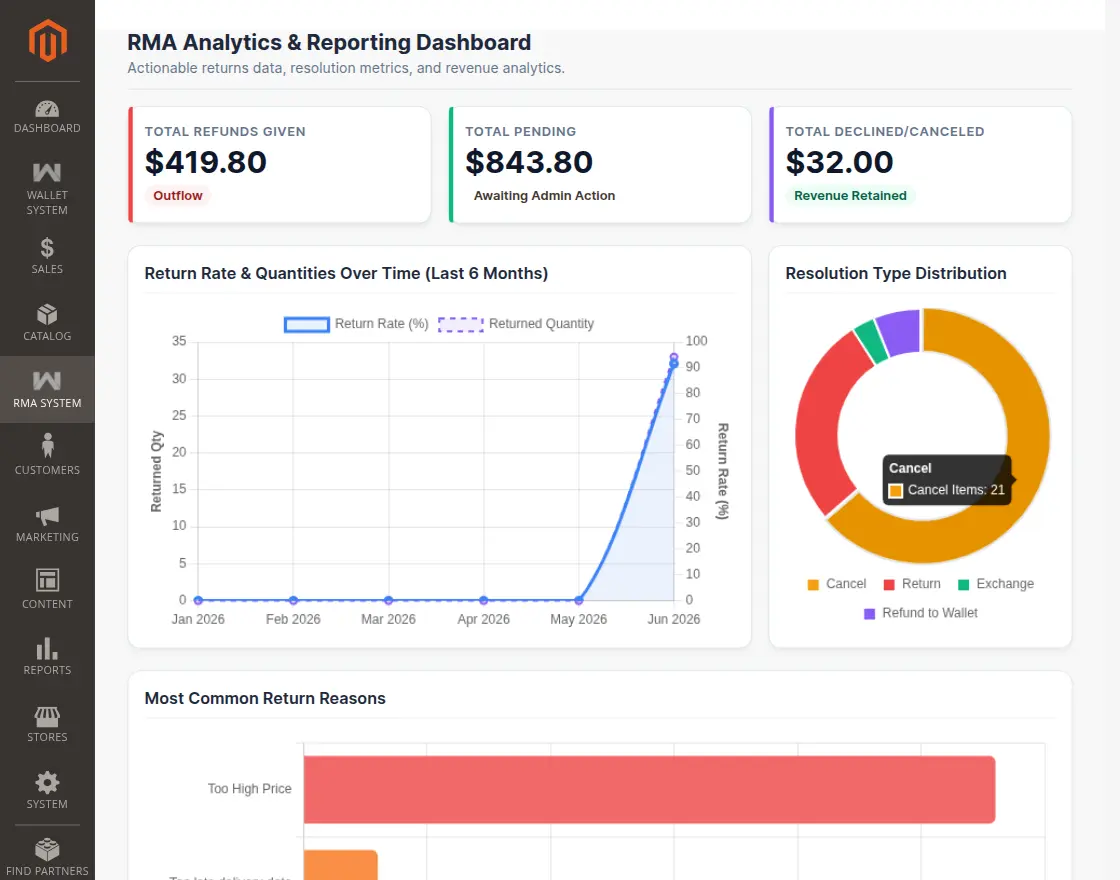
- Most Common Return Reasons (Bar charts showing main issue drivers)
- Return rate by product and category to quickly pinpoint defective inventory items.
Product Return RMA – Manage Payment History
The admin can check the payment history of RMA requests.

Manage Reasons
Admin can manage RMA reasons under RMA System>Manage Reason.
The admin can see all the RMA reasons in the list and edit the existing RMA reasons. These RMA reasons will be displayed while creating an RMA request.

Admin can delete or change the status of the RMA Reasons.

After clicking on the edit/add RMA reason below page will open in which the admin can enter the RMA reason title, and status, position, applicable to and save it.

RMA reason based on the resolution type.
Manage Shipping Label
Admin can easily create shipping labels for new and existing orders under RMA Systems>Manage Shipping Label.
Admin can delete the shipping labels or can change the status of the shipping label.

On clicking on Shipping Label, the admin can see the preview of that shipping label.

After clicking “Add New” a new page will open where Admin will enter the Title, label image, price, and status.

Manage RMA Custom Fields
The admin can create customizable fields for the Request New RMA form, please follow RMA System>Manage RMA Custom Fields.
Various types of fields can be created such as – radio button, checkbox, dropdown, text, text area, or multiple select.
The admin can show or hide the custom fields by changing the status to enabled/disabled from the Actions menu.
The RMA Custom Fields allow the admin to retrieve additional information from the customers.

To create a new field for the RMA Request Form, please click the ‘Add New Field‘ button. After that, the admin needs to provide the following information:
Field Label – Enter the name of the custom field that will appear on the front end.
Field Code – Give any code for the custom field, this will not appear on the frontend.
Type – The following types of fields are available:
- Text – A single-line input field for text.
- Text Area – A multiple-line input box for paragraphs of text.
- Dropdown – A drop-down list of options. Only one item can be selected at a time.
- Multiple Select – A drop-down list of options that accept multiple selections.
- Radio Button – A set of options that allows only one to be selected at a time.
- Check Box – A checkbox is a variation of a yes/no option. If the form has more than one checkbox, multiple selections can be made at the same time.
Input Validation for store owner – The Admin will set the Input Validation for store owner.
Sort Order – Set the sorting order of this field using 0,1,2,3 etc.
Value Required – Select Yes if you want to make this field the required field.
The customer will not be able to submit the RMA request unless they fill in this field information.
Status – To show this custom field on the front end, select Yes. Otherwise, select No to hide this field.

RMA Status
The admin can create and manage RMA status here.

Click on Create or edit to add or edit RMA status. Enter the title, status, and color accordingly it will be visible to the customers.

Product Return RMA – RMA Rules
Now the admin can create the rules for the RMA request for the customers.

Click on add a new rule and create the rule for RMA.

Enter the title of the rule, description, status, and default option.
The admin can also enter the resolution period time in days for return and exchange.
Product Return RMA – Create a New RMA Request
The customer can navigate the RMA section from My Account. Here the customer can create a new RMA by clicking the ‘Request New RMA‘ button.
The customer can also see all the RMA created and filter them using various options.
Cancel – If the customer wants to withdraw the RMA request, the customer can simply click the Cancel link and confirm.
The RMA request will be canceled.

- First, select the order for which the RMA request needs to be created.
- Then, the customer needs to select the product(s) with Return Quantity.
- Select the Reason type and Reason for creating the RMA request.
Resolution Type –
- Refund: If the buyer is not satisfied with a product, a refund will be made here.
- Exchange: If a buyer needs to exchange an item for a different size, color, etc, the buyer can exchange that item through this resolution-type option.
- Cancel Items: If the order status is in pending status, the buyer can request an RMA to cancel the items ordered.
Note: The reason will be based on the resolution type for canceled items the reason will be too late delivery or too high price.
Customers can choose separate resolution types for each product with different reasons.

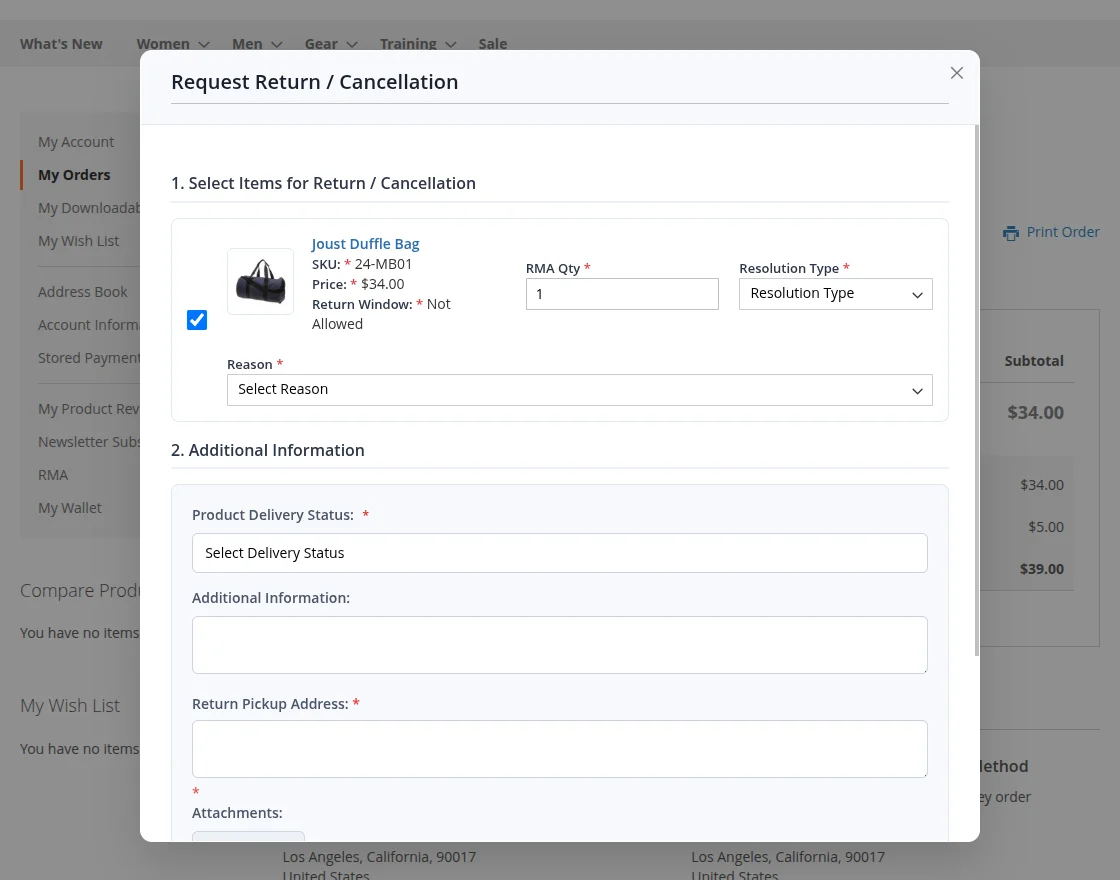
When clicking on the Create RMA it will open a pop-up where the customer needs to enter a few details.
Select Product Delivery Status as Delivered or Not Delivered. If the Delivered option is selected, the customer needs to choose the Package Condition as Open or Packed.

Additional Information – The customer can provide some additional information with the RMA request. The custom fields are also visible here.
Pickup Location – choose the pickup location in the city or outside the city.
Option to attach a file (Upload images) with the RMA request.
Product Return RMA – Quick Order Cancellation
Customers can navigate to the RMA section from My Account.
Module introduces a Quick Order Cancellation / Return feature that allows customers to manage cancellations and returns directly from their dashboard.

On the My Orders grid, a Cancel action button is displayed next to the traditional options. This action is also available on the Order Detail pages.
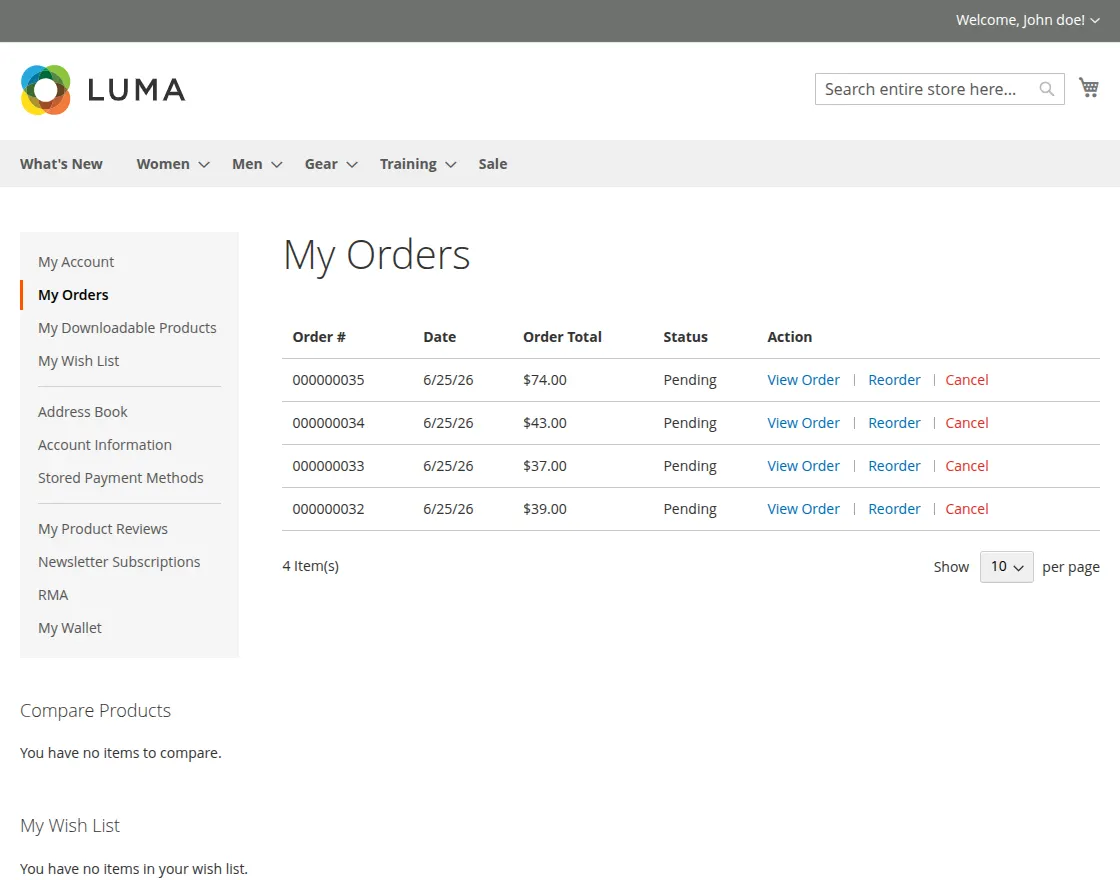
Now, the customer can select any order and navigate to the Order Details page successfully.
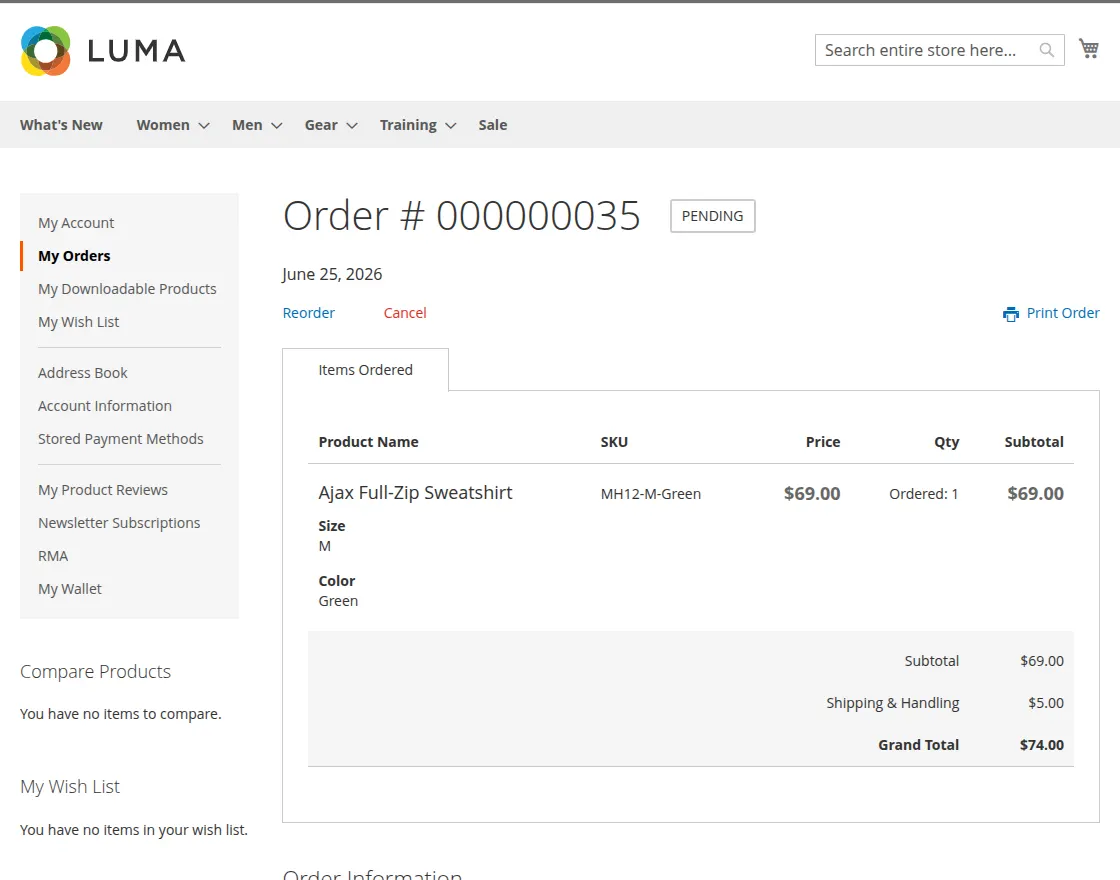
Clicking the Cancel button opens a modern, responsive RMA request and cancellation modal popup
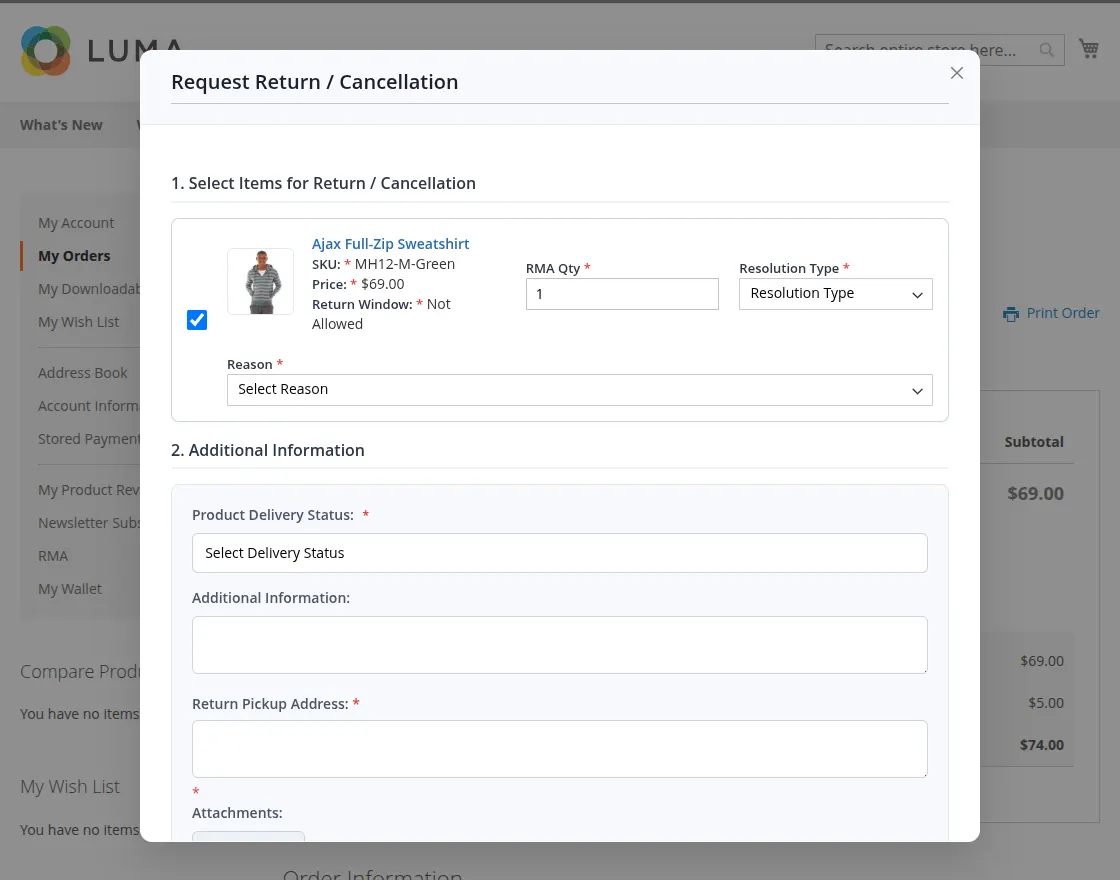
- Item selection: Choose which products, return quantities, resolution types, and reasons.
- Resolution types:
- Refund: Request payment refund (cash/offline or credited to store credit e-wallet).
- Exchange: Exchange the item for another variant.
- Cancel Items: Request item cancellation (for pending or unfulfilled orders).
View RMA
After clicking on the view option below page will be open with that particular RMA.
If RMA status is Processing or pending then there is an option for the customer to mark as solved.
If RMA status is solved then the customer can reopen that RMA.
Send Attachment – The customer can send and receive file attachments with the messages.
RMA History & Conversation – The customer can view the complete timeline related to the RMA request.

Customers can enter custom messages as well

Product Return RMA – Print Shipping Slip
The print Shipping Label button will be visible only after the admin approves the RMA request for exchange.
The customer can then print the shipping label for returning the item.
After clicking the Print shipping label, the customer will be redirected to the print page.

Product Return RMA – Guest Login for RMA
Magento 2 order Return extension provides RMA for the guest user also. You just need to click the RMA Guest Login link in the footer section.
After clicking on this link you just need to enter their correct Order ID and Email.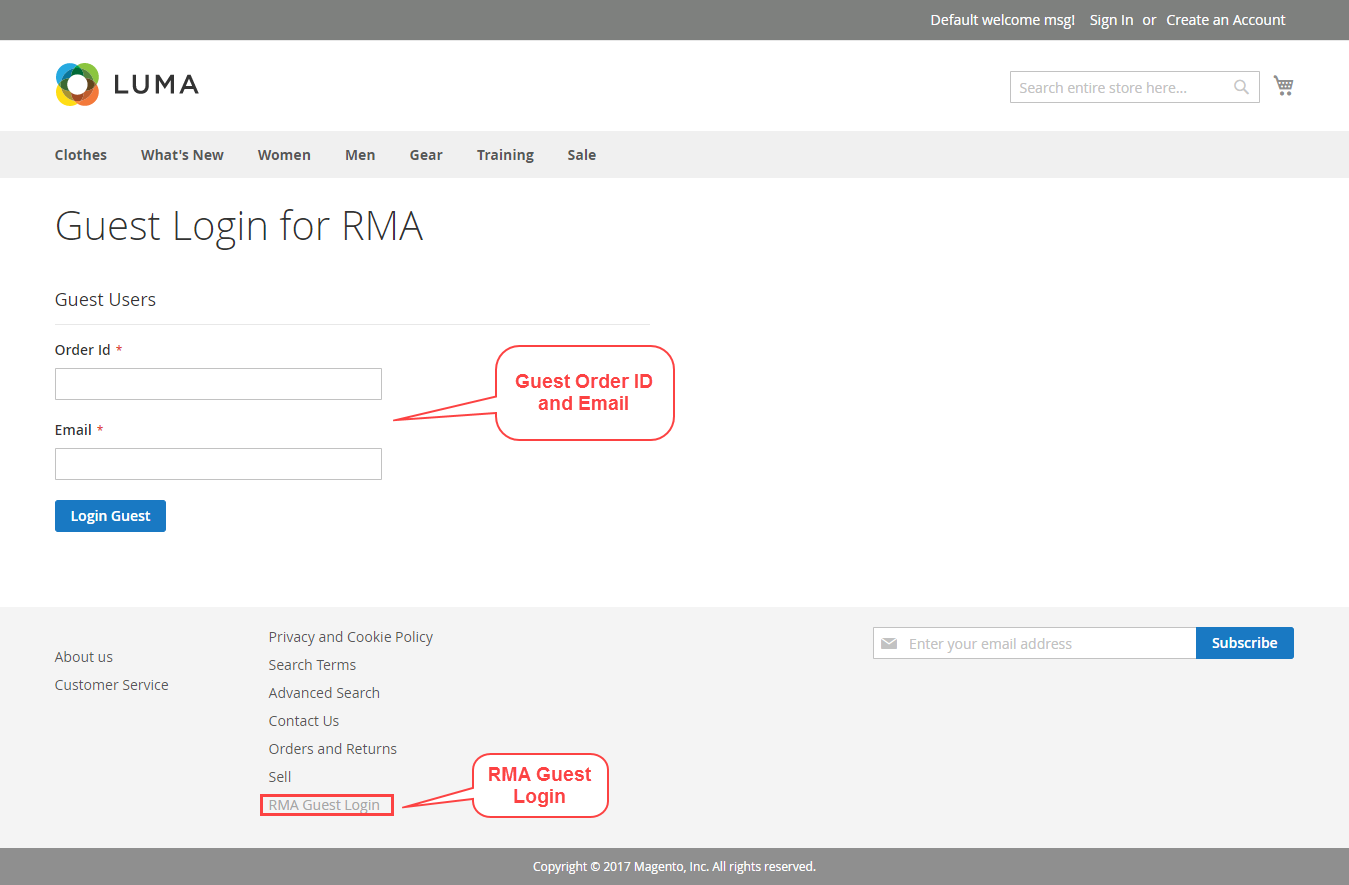
Once the guest user enters the detail, they can click the ‘Request New RMA‘ button. The rest of the workflow is the same as for the registered customers.
So, if guest users want to check the status of the RMA, they can use the same email address and order ID to log in.

Product Return RMA – New RMA Request
The guest user needs to provide the following information and submit the RMA request.

After the generation of the New RMA, the Customer/Guest will receive an Email.

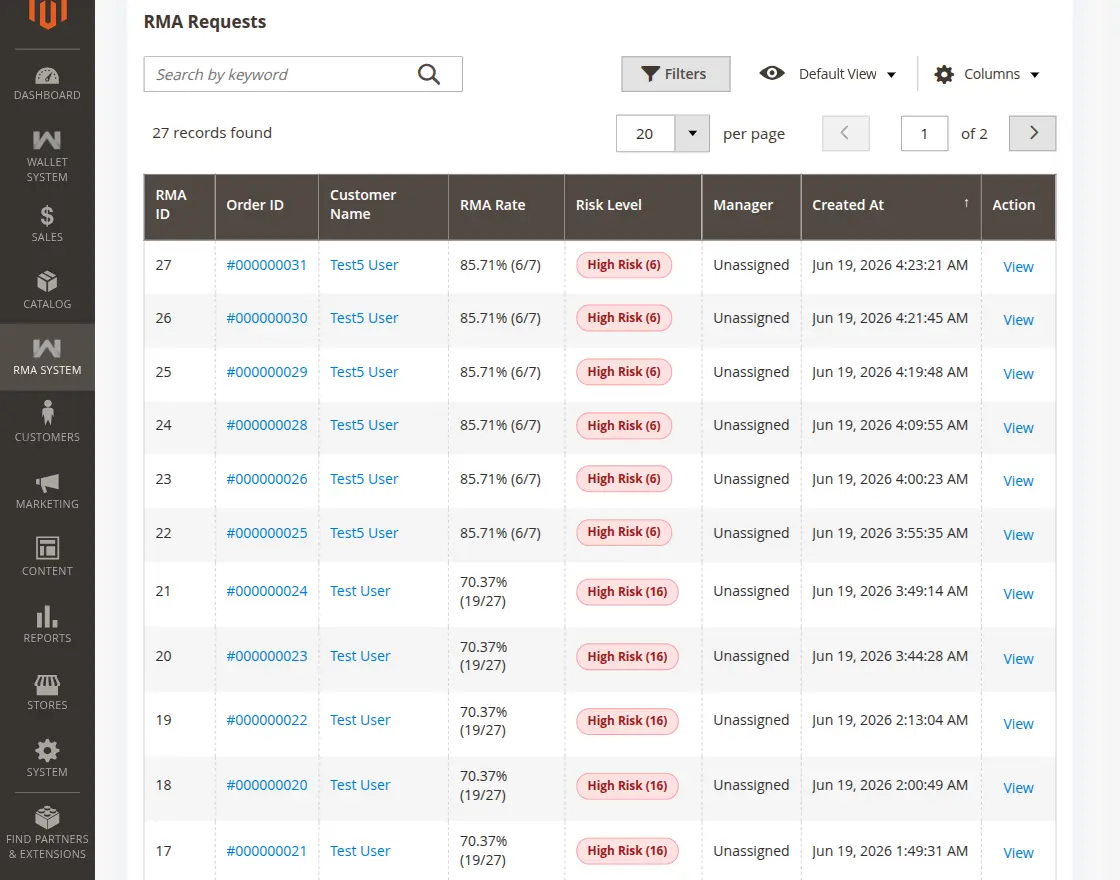
Product Return RMA – Manage All RMA Requests
The admin can view all RMA requests ( Registered Customer and Guest Users) under RMA System>Manage All RMA like the below image.

Product Return RMA – Manage RMA
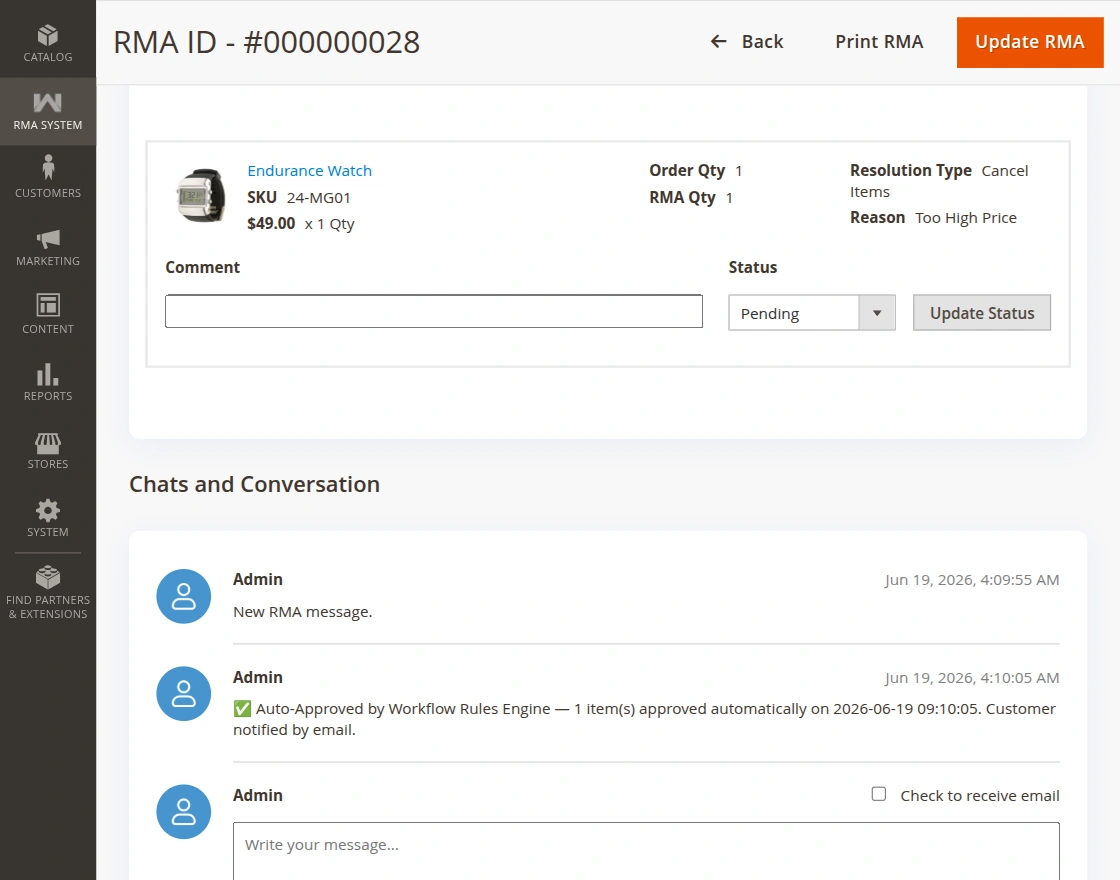
Product Return RMA: Admin can manage all RMA requests by navigating to RMA System>Manage All RMA>View.
After clicking on a particular RMA, the admin will be able to see the whole RMA details generated by the customer. Please view the below screenshot:
The admin can also assign the admin user or RMA Manager from the dropdown.

The store owner can add the comment for any individual product before proceeding with the RMA.

The admin will first select the refunded item. Then, select the Status as Refund Initiated, and select Payment Type as Full or Partial.
If you select Partial Payment, enter the partial refund amount. Also, select the add to stock option to return the product back in stock.

Send Attachment – The admin can send and receive file attachments with the messages
Click the Update button to save the changes in the RMA request.
RMA Status
Product Return RMA: When the customer creates a new RMA request, its status will be pending.
After viewing the RMA requests, the admin can select the RMA status according to the resolution type selected by the customers.
Refund
When the customer selects the resolution type as Refund, the admin can select the following RMA status:
RMA Approved – If the admin has accepted the RMA request of the customer, the admin can change the status to RMA Approved.
Package Received – If the admin has received the product from the customer, the admin can change the status to Received Package.
Refund Initiated – When the admin releases the payment to the customer, the admin can use this status to inform the customer.
Declined – If the admin rejects the request submitted by the customer, the admin can select this status.
Solved – When the customer receives the refund, the admin can use this status.
Cancel Items
When the customer selects the resolution type as Cancel, the admin can select the following RMA status:
Declined – If the admin rejects the request submitted by the customer, the admin can select this status.
Item Canceled – If the admin accepts the RMA request of the customer for canceling the ordered items, it can use this status.
Exchange
When the customer selects the resolution type as Exchange, the admin can select the following RMA status:
RMA Approved – If the admin accepts the RMA request of the customer, the admin can change the status to RMA Approved.
Package Received – If the admin has received the product from the customer, the admin can change the status to Received Package.
Package Dispatched – If the admin ships the new exchange product to the customer, the admin can use this status.
Declined – If the admin rejects the request submitted by the customer, the admin can select this status.
Solved – When the customer receives the exchanged product, the admin can use this status.
That’s all for the Magento 2 Return extension, If you still have any issues feel free to add a ticket and let us know your views to make the module better http://webkul.uvdesk.com/
Current Product Version - 4.1.0
Supported Framework Version - Magento 2.0.x, 2.1.x, 2.2.x,2.3.x, 2.4.x

2 comments
We have created a ticket on your behalf and our team will connect you soon regarding your queries.
Thanks and Regards,
Team Webkul