CS-Cart Point of Sale (POS) is a comprehensive solution that connects your physical retail store with your CS-Cart online store.
It helps you manage in-store and online sales from a single platform while synchronizing products, customers, inventory, and orders in real time.
The add-on includes advanced cashier management, smart drawer operations, and customizable invoice templates.
Additionally, it provides detailed sales reports, enhanced security, automated return management, and QR-based public invoice downloads.
These features simplify daily store operations, speed up the checkout process, and improve transaction accuracy.
Note: Before installing the add-on, extract the downloaded package.
- Install the License Manager add-on first.
- Then install the required add-on.
- Follow the license activation steps to generate your license key.
- Make sure the default RMA add-on is activated for order returns.
CS-Cart Point Of Sale Features
- Cashier Module allows cashiers to manage drawer sessions, view today’s transactions, and access session history.
- Close Counter provides cash drawer summaries, payment breakdowns, KPI cards, and downloadable Z-Reports.
- Today’s Transactions displays all daily transactions with search, filters, and Cash Drop management.
- Session History lets cashiers view previous sessions with date filters and financial details.
- Invoice Templates allow admins to create and customize invoices using a block-based editor.
- Order Success Page displays order details, payment status, receipts, and QR codes for invoice downloads.
- Account Settings enable POS agents to manage profiles, security settings, and receipt preferences.
- POS Settings allow admins to assign receipt and invoice templates to individual POS agents.
- Reports Dashboard provides sales analytics, payment insights, KPI cards, and top-selling product reports.
- Drawer ID & X/Z Reports help businesses track cash drawers and generate X-Reports and Z-Reports.
- PIN Lock secures the POS system with a 6-digit PIN with a self-lock-out system.
- Session & Drawer Persistence keeps drawer sessions active across logouts and automatically closes overdue sessions.
- RMA / Returns automatically approves POS returns and restores product inventory.
- Public Invoice Download via QR Code allows customers to download invoices securely without logging into their accounts.
CS-Cart Point Of Sale Installation
After downloading the CS-Cart POS add-on, you’ll get one zip file, one install.txt file, and a relevant User Guide manual doc.
Please read it carefully for proper configuration.
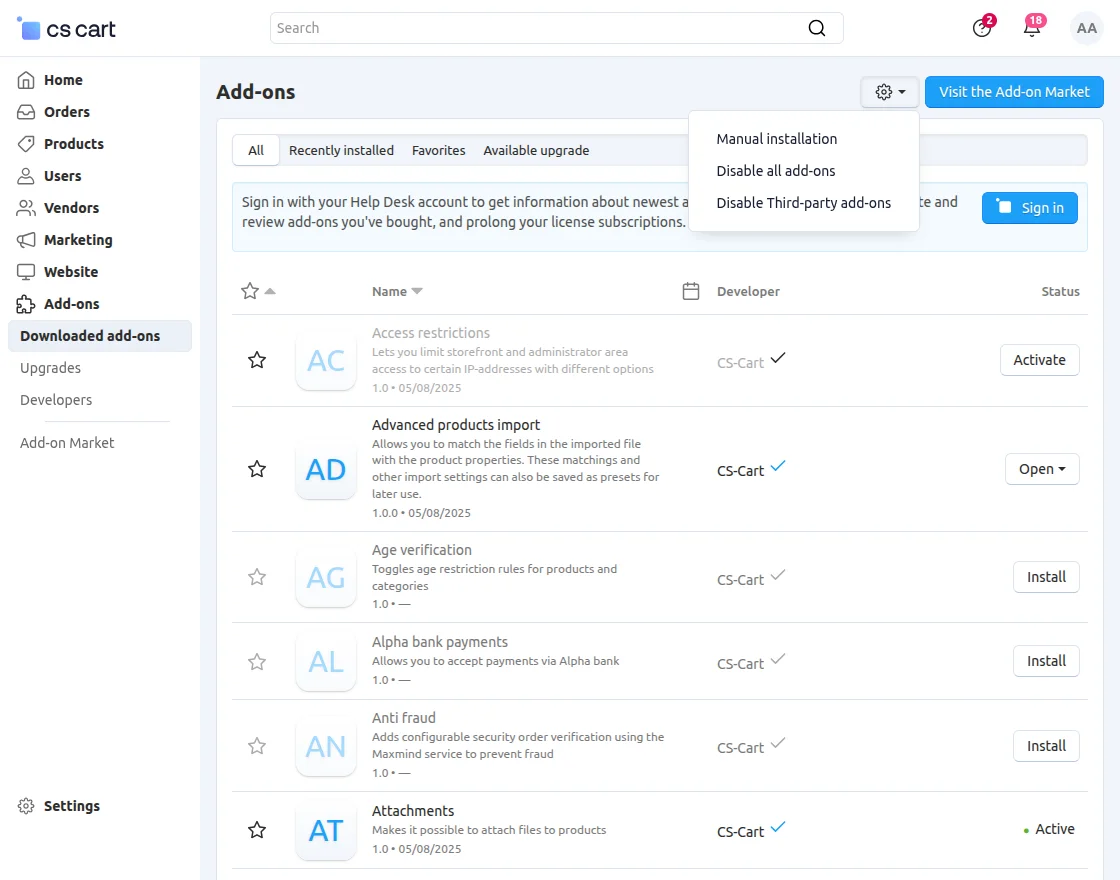
Go to Manage Add-ons, and click on “Manual Installation” as shown below in the snapshot.
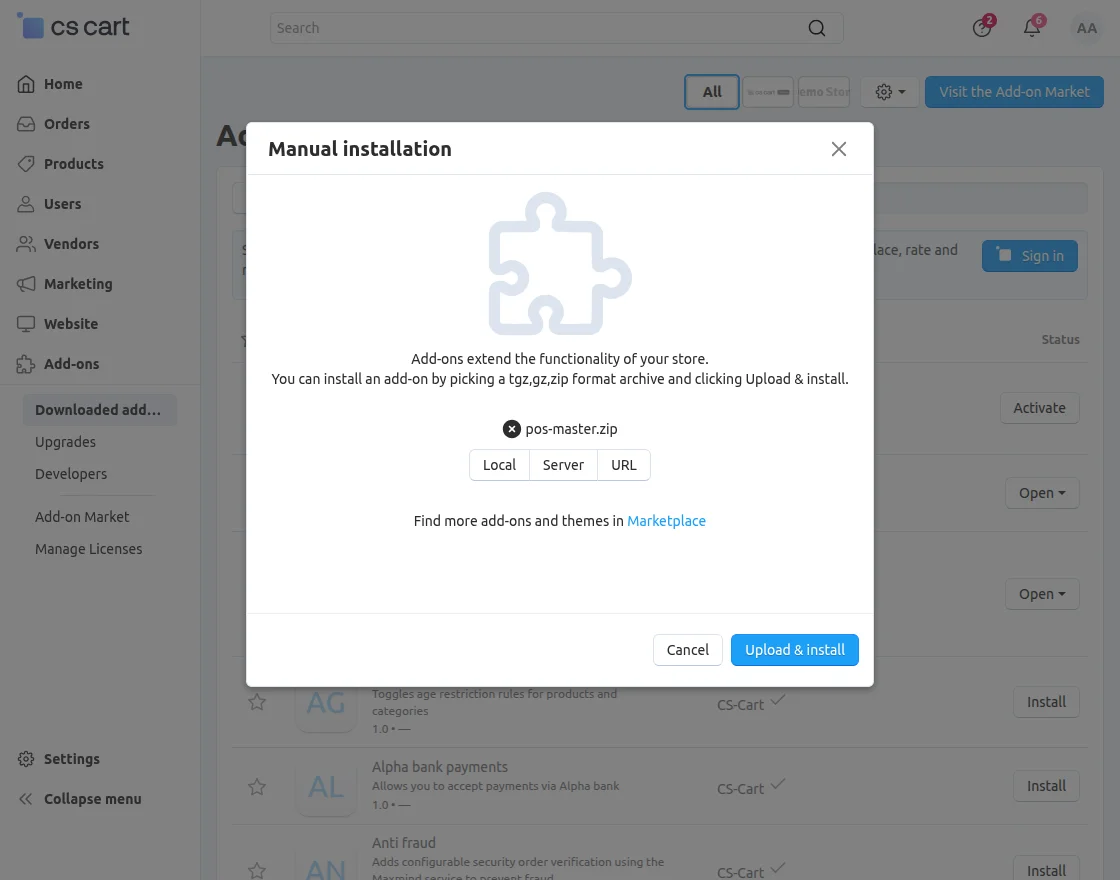
Click on “Local” to browse the zip file, and then click on “Upload & Install” as shown below in the snapshot.
CS-Cart Point Of Sale add-on Configuration
To configure the module, go to Add-Ons >> Developers >> Webkul Software Pvt Ltd. >> Point Of Sale (POS) >> Settings >> Configuration.
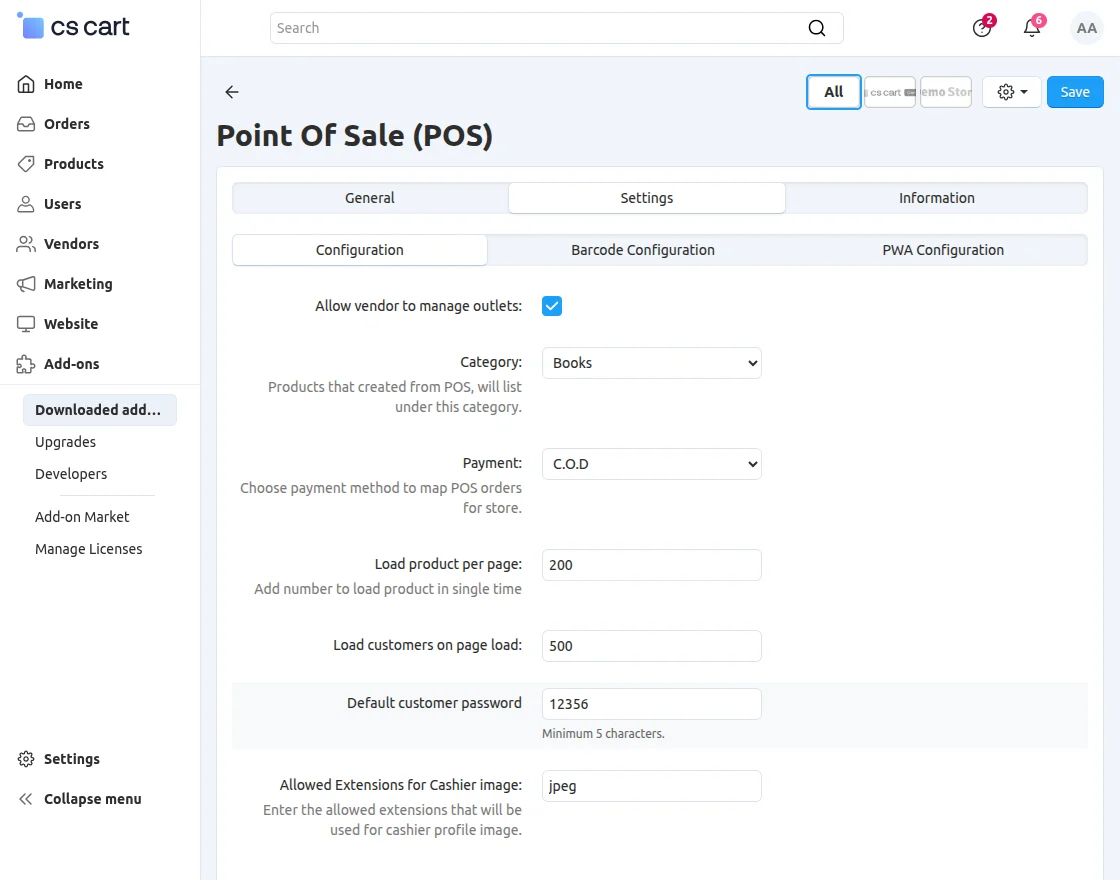
- Allow Vendor to Manage Outlets: Enable vendors to manage their POS outlets.
- Category Settings: Assign a default category for products created through the POS.
- Payment Mapping: Map POS orders with the preferred store payment method.
- Load Products Per Page: Set the number of products displayed on the POS screen at a time.
- Default Customer Password: Follow the minimum password length configured for the CS-Cart store.
- Cashier Image Extensions: Define supported image formats for cashier profile photos.
Barcode Configuration
Navigate to the Barcode tab to configure barcode settings.
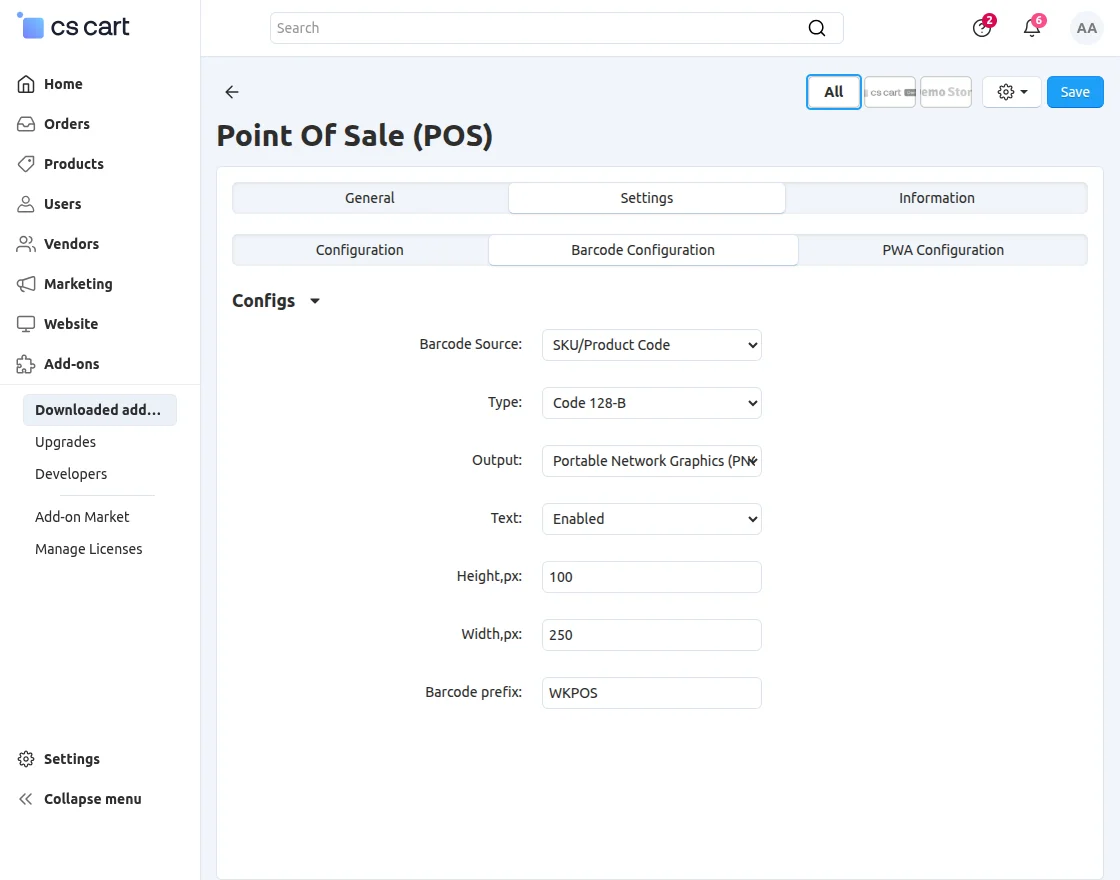
- Barcode Source: Select SKU or Product Code as the barcode source.
- Output: Choose the preferred barcode output format.
- Text: Enable or disable barcode text below the barcode image.
- Height (px): Set the barcode height in pixels.
- Width (px): Set the barcode width in pixels.
- Barcode Prefix: Add a custom prefix to barcode values before generation.
PWA Configuration
Navigate to the PWA Configuration tab to configure Progressive Web App (PWA) settings.
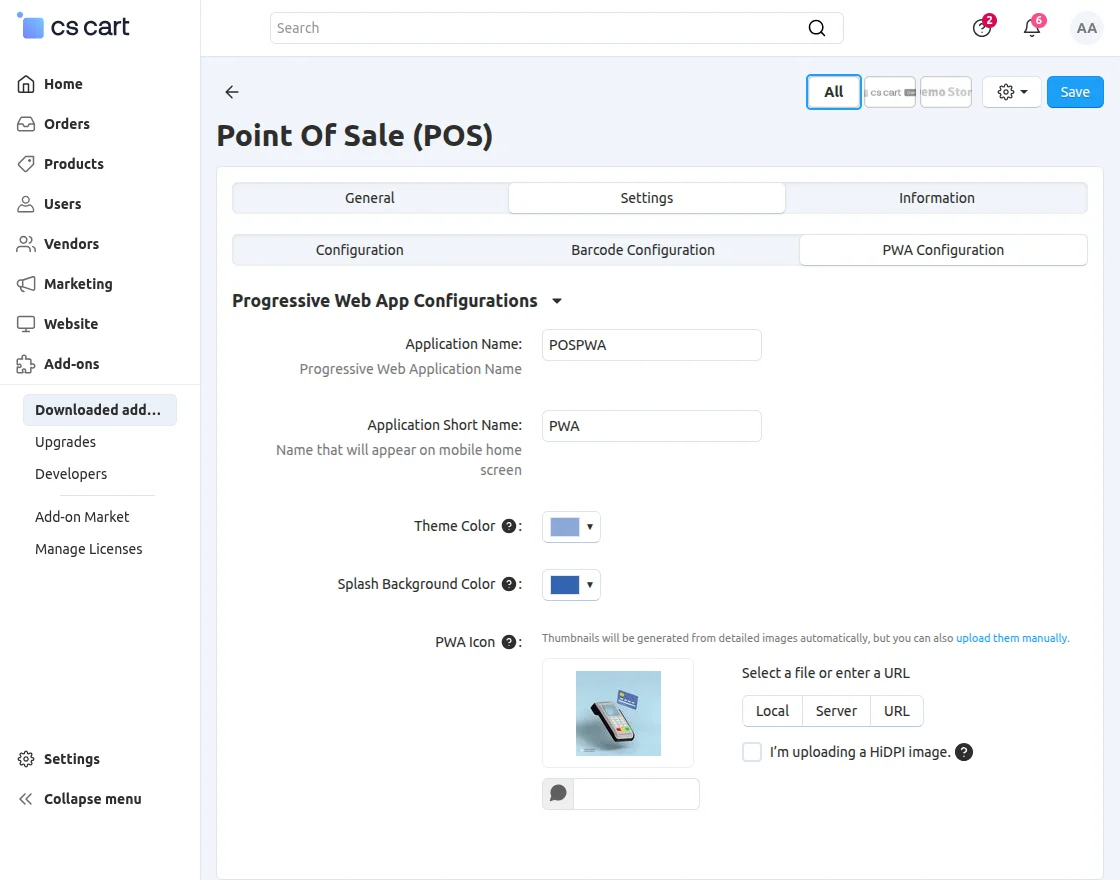
- Application Name: Enter the full name of the Progressive Web App.
- Application Short Name: Specify the short name displayed on the mobile home screen.
- Theme Color: Select the theme color for the Progressive Web App.
- Splash Background Color: Choose the background color for the PWA splash screen.
- PWA Icon: Upload the application icon used for the Progressive Web App.
POS Outlet
Navigate to Vendors >> POS Outlets to view the list of POS outlets. From here, the admin can add, edit, and manage products for each outlet.
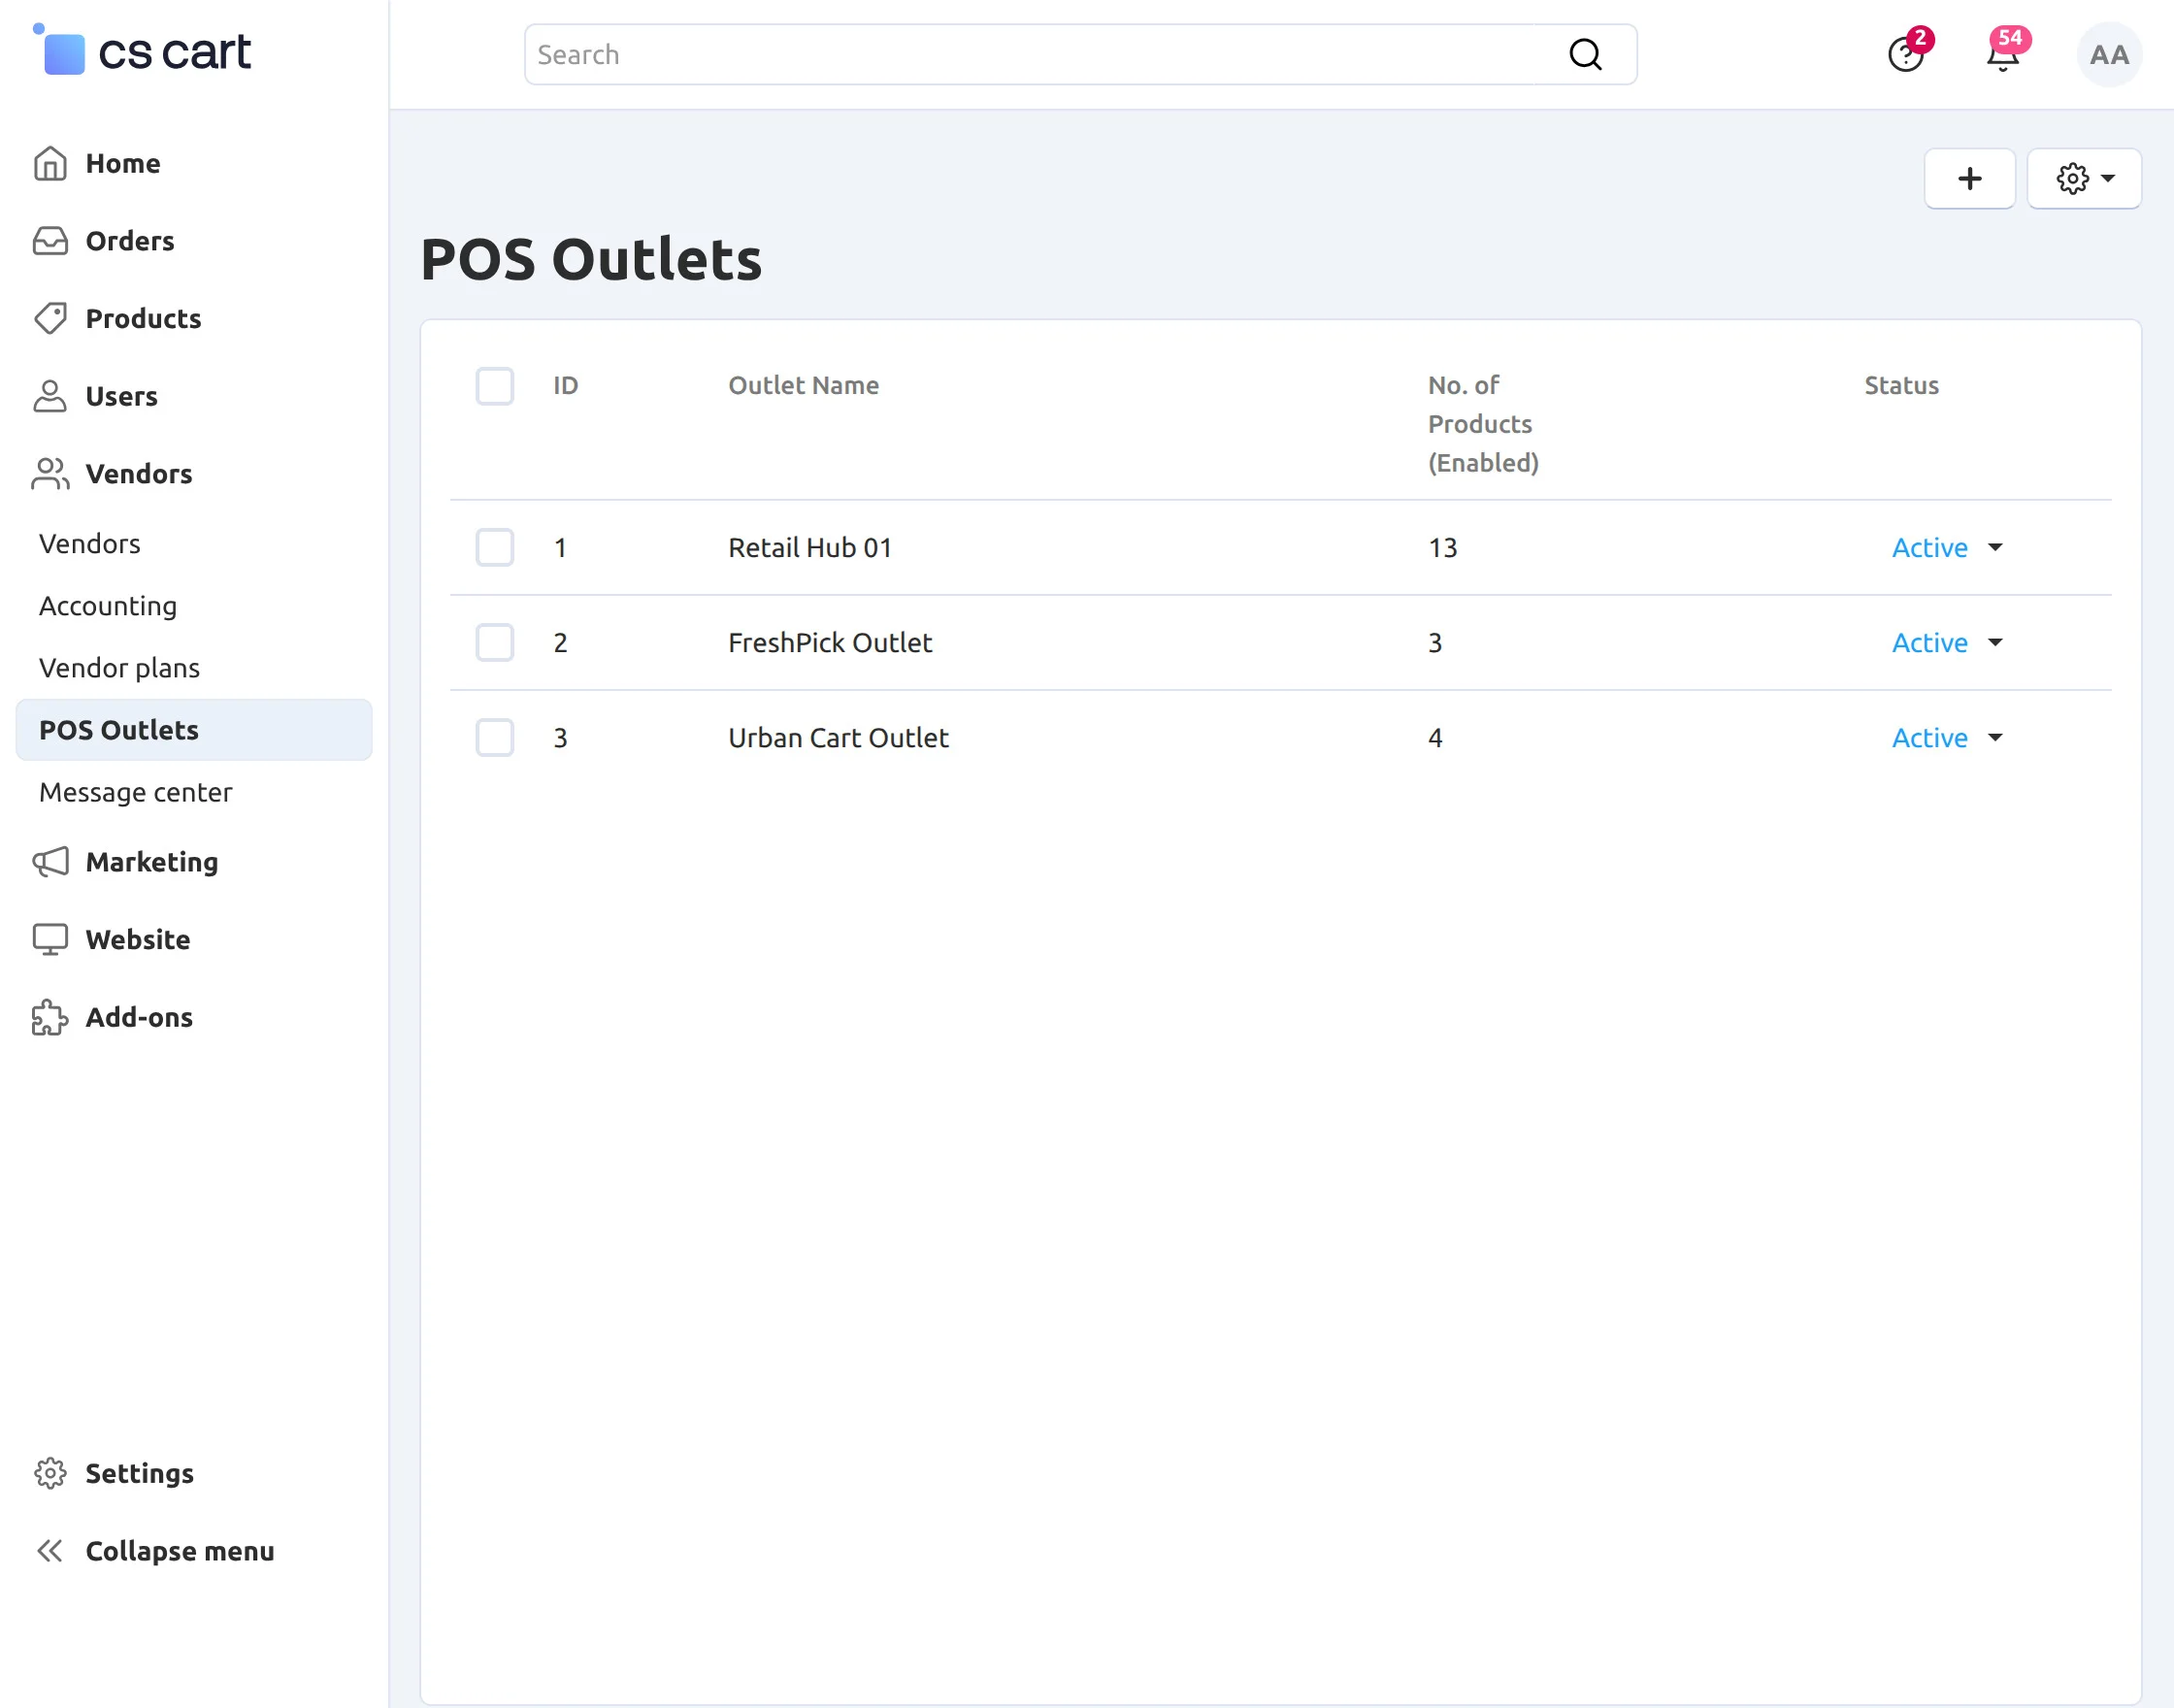
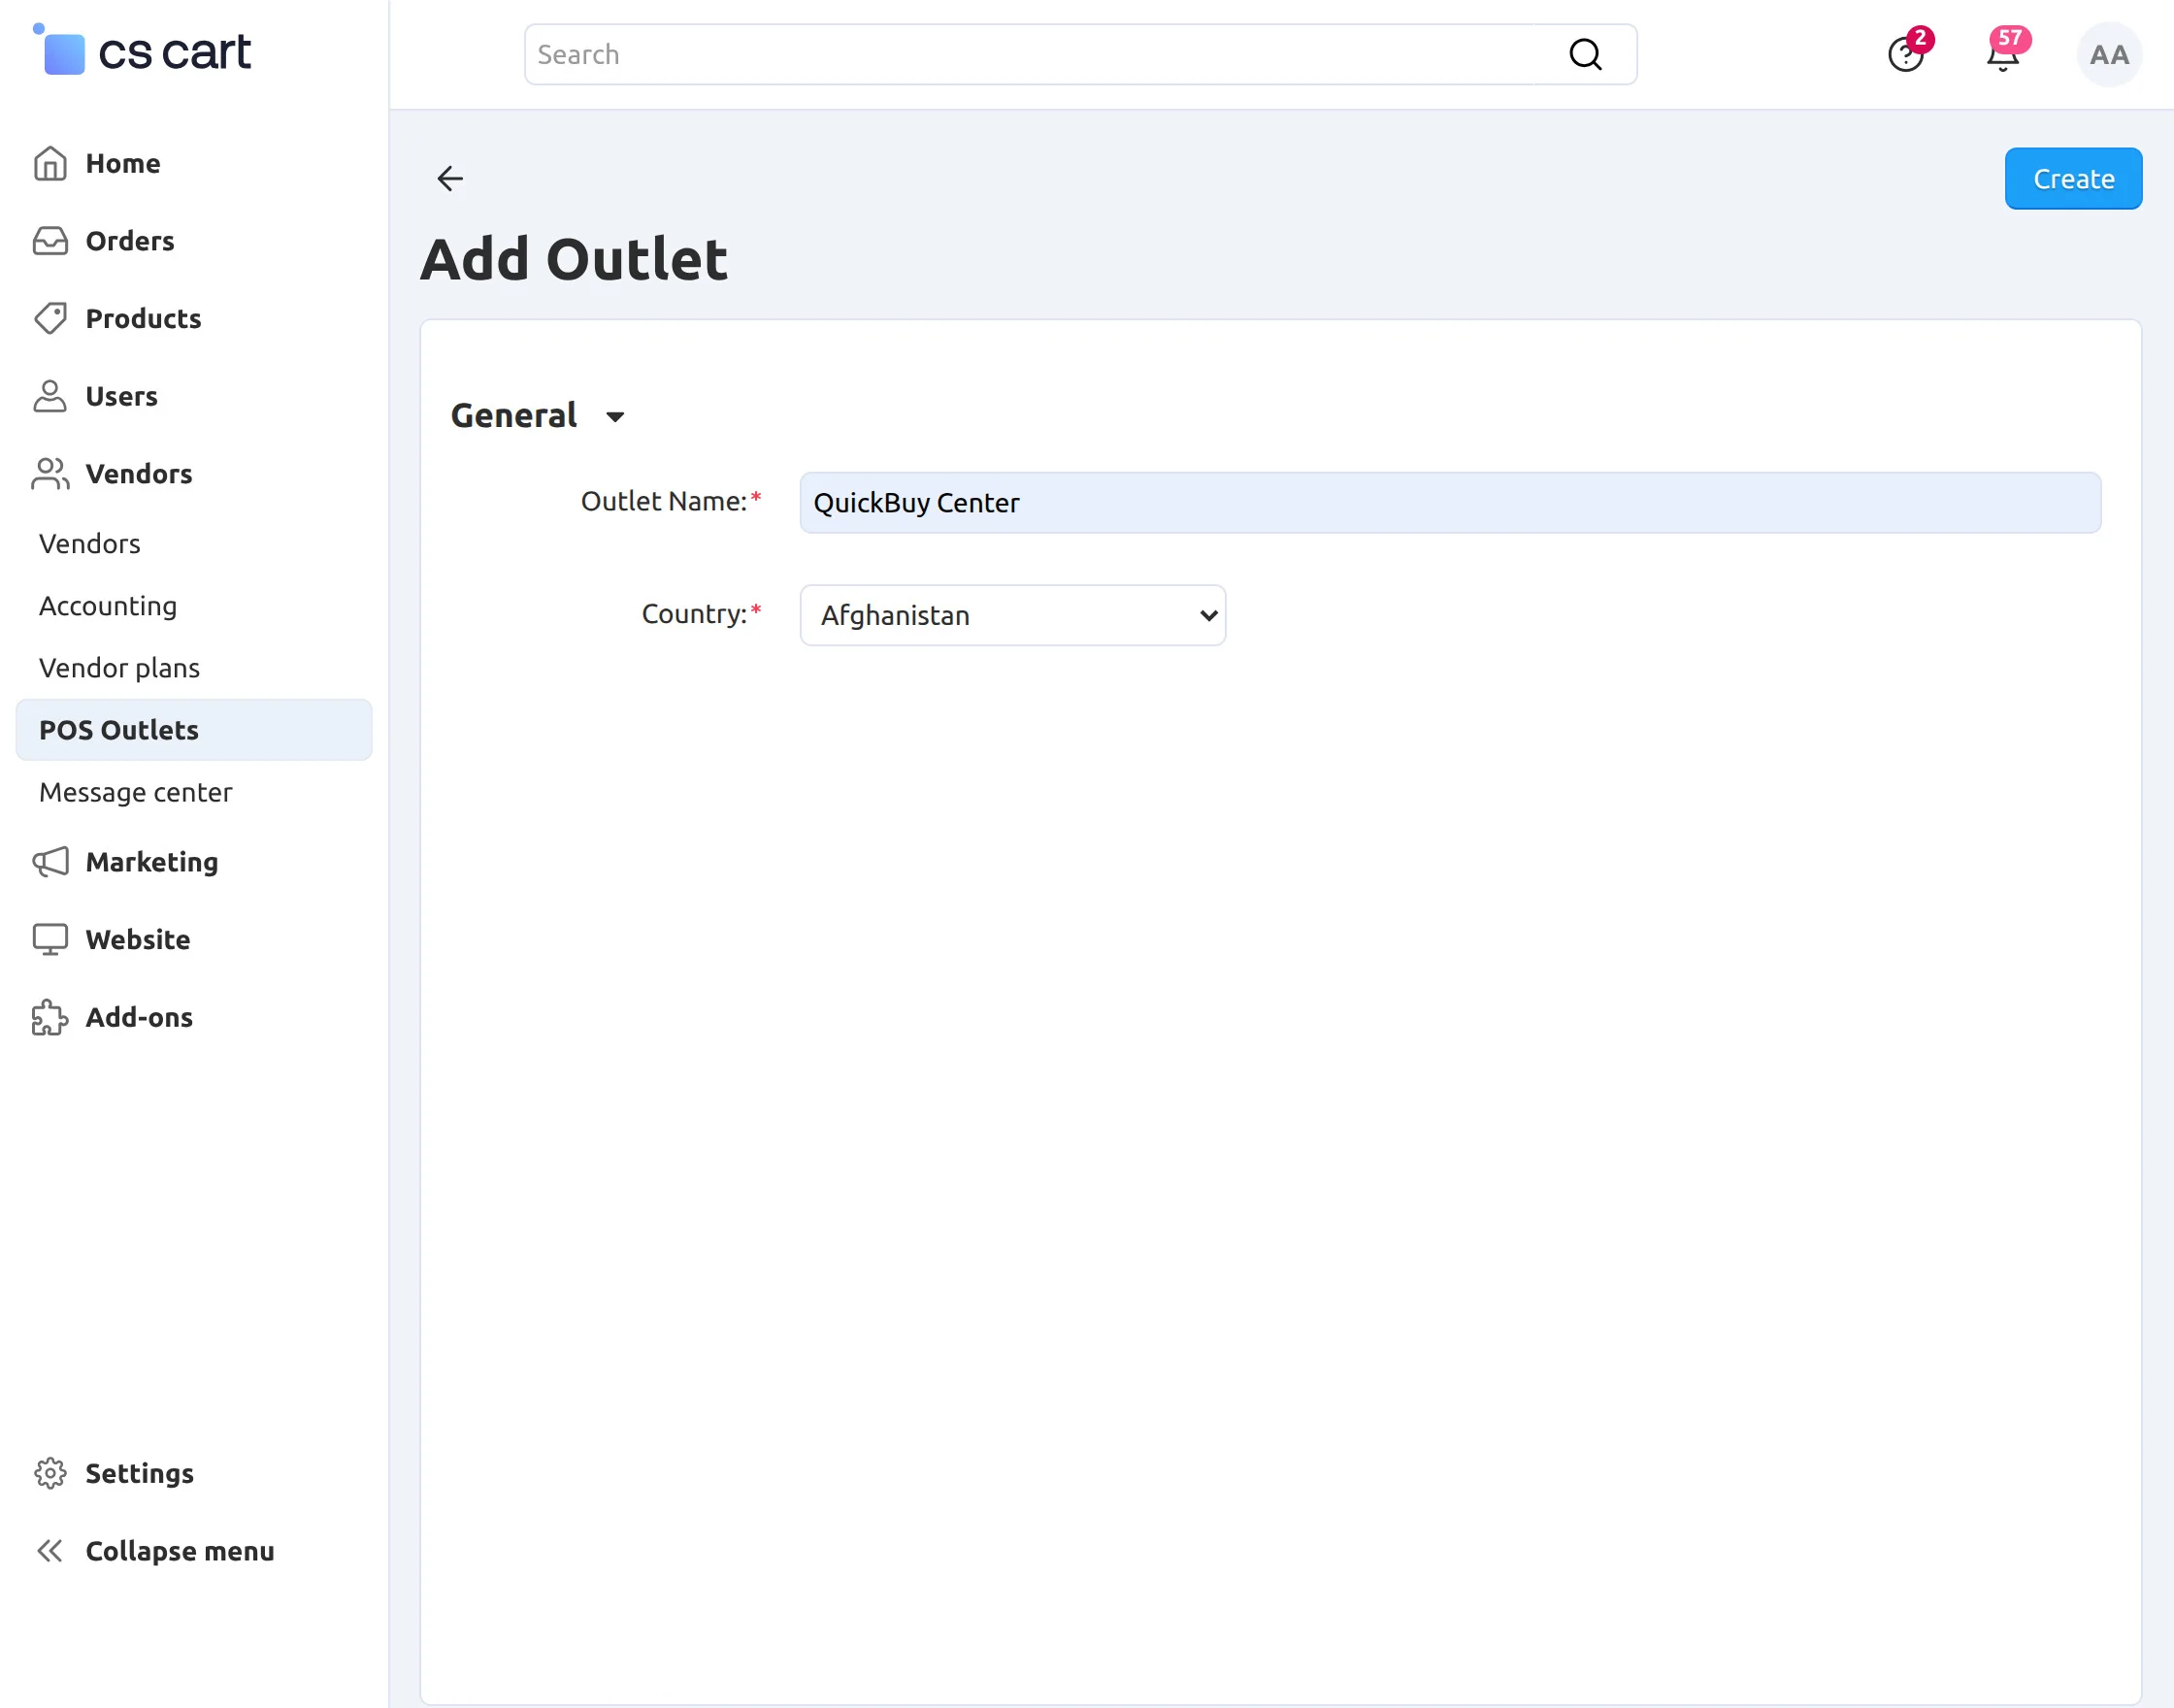
Click the “+” button to add a new POS outlet. Enter the outlet name, select the country, and then click the “Create” button to create the POS outlet.
How to Assign Outlets to a POS Agent?
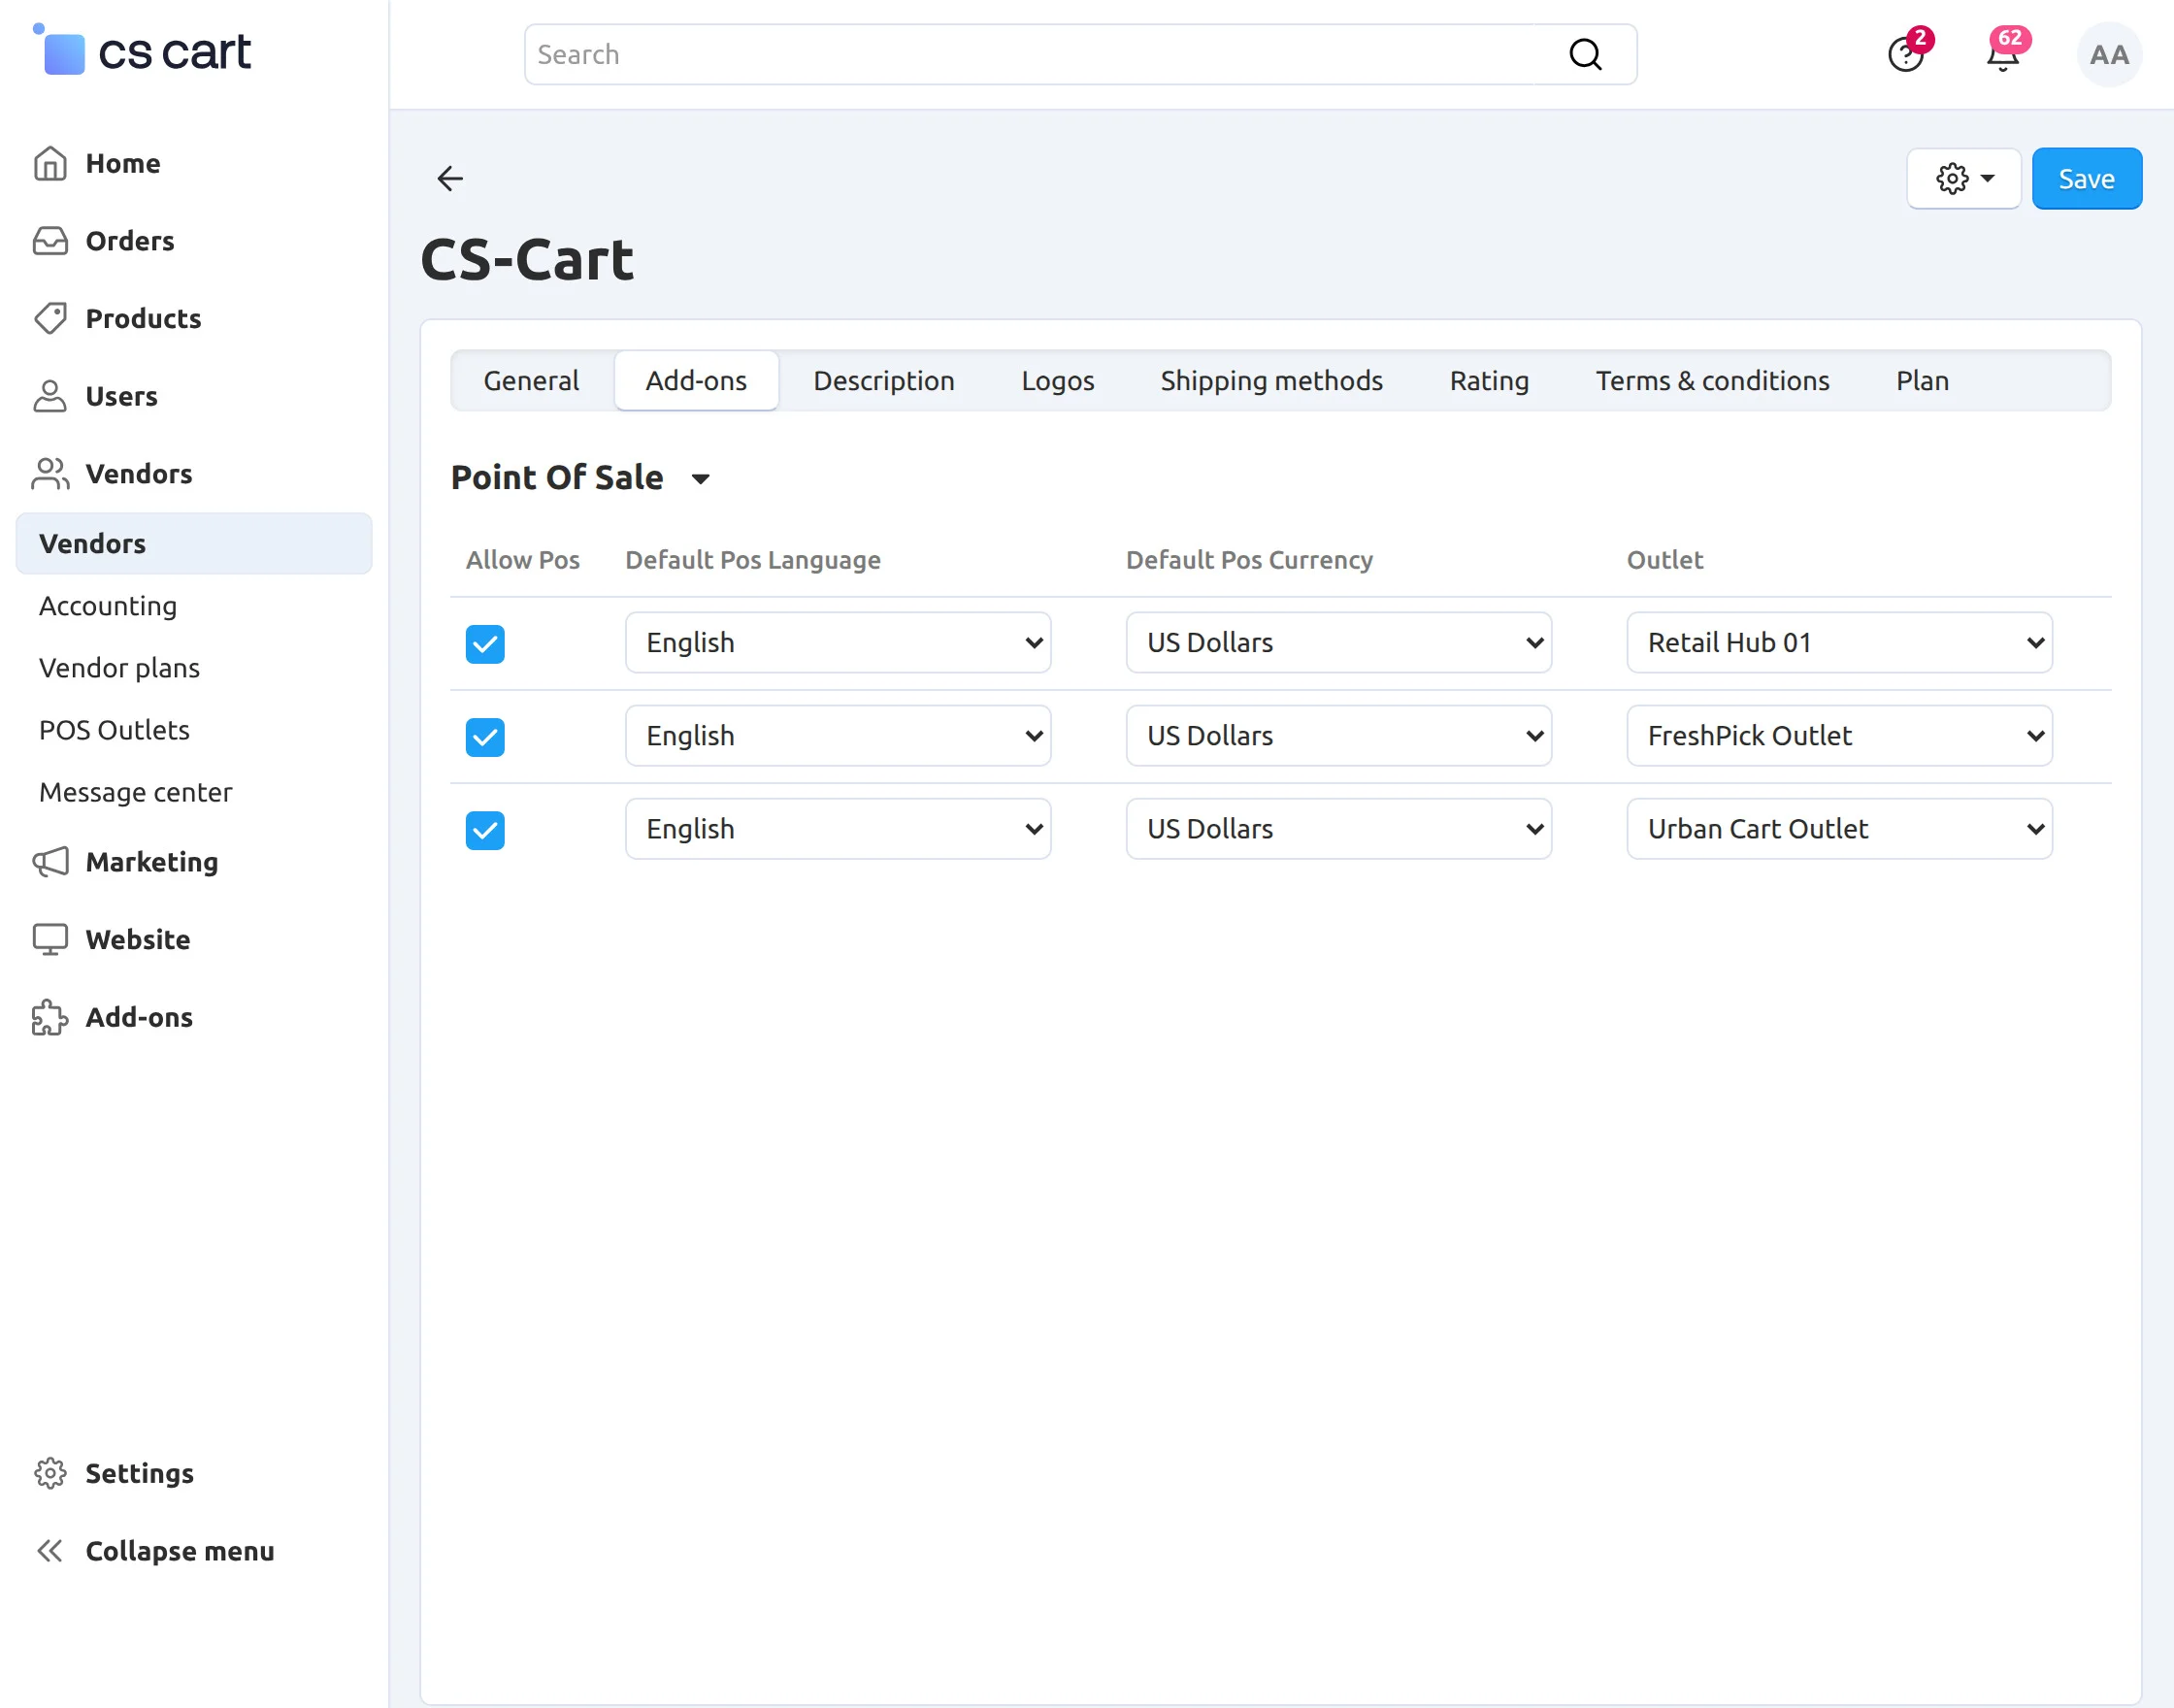
Go to Vendors >> Vendors, select the desired vendor, and open the Add-ons tab. From there, the admin can assign POS outlets to the vendor.
You can also navigate to Users → Customers → Vendor’s Administrators.
- Select the vendor admin and open their profile
- Navigate to the Edit page
- Click on the Add-ons tab
- Enable or disable the outlets as required
- Upload a user image (this will be displayed on the POS user profile panel)
- Click the Save button to apply the changes
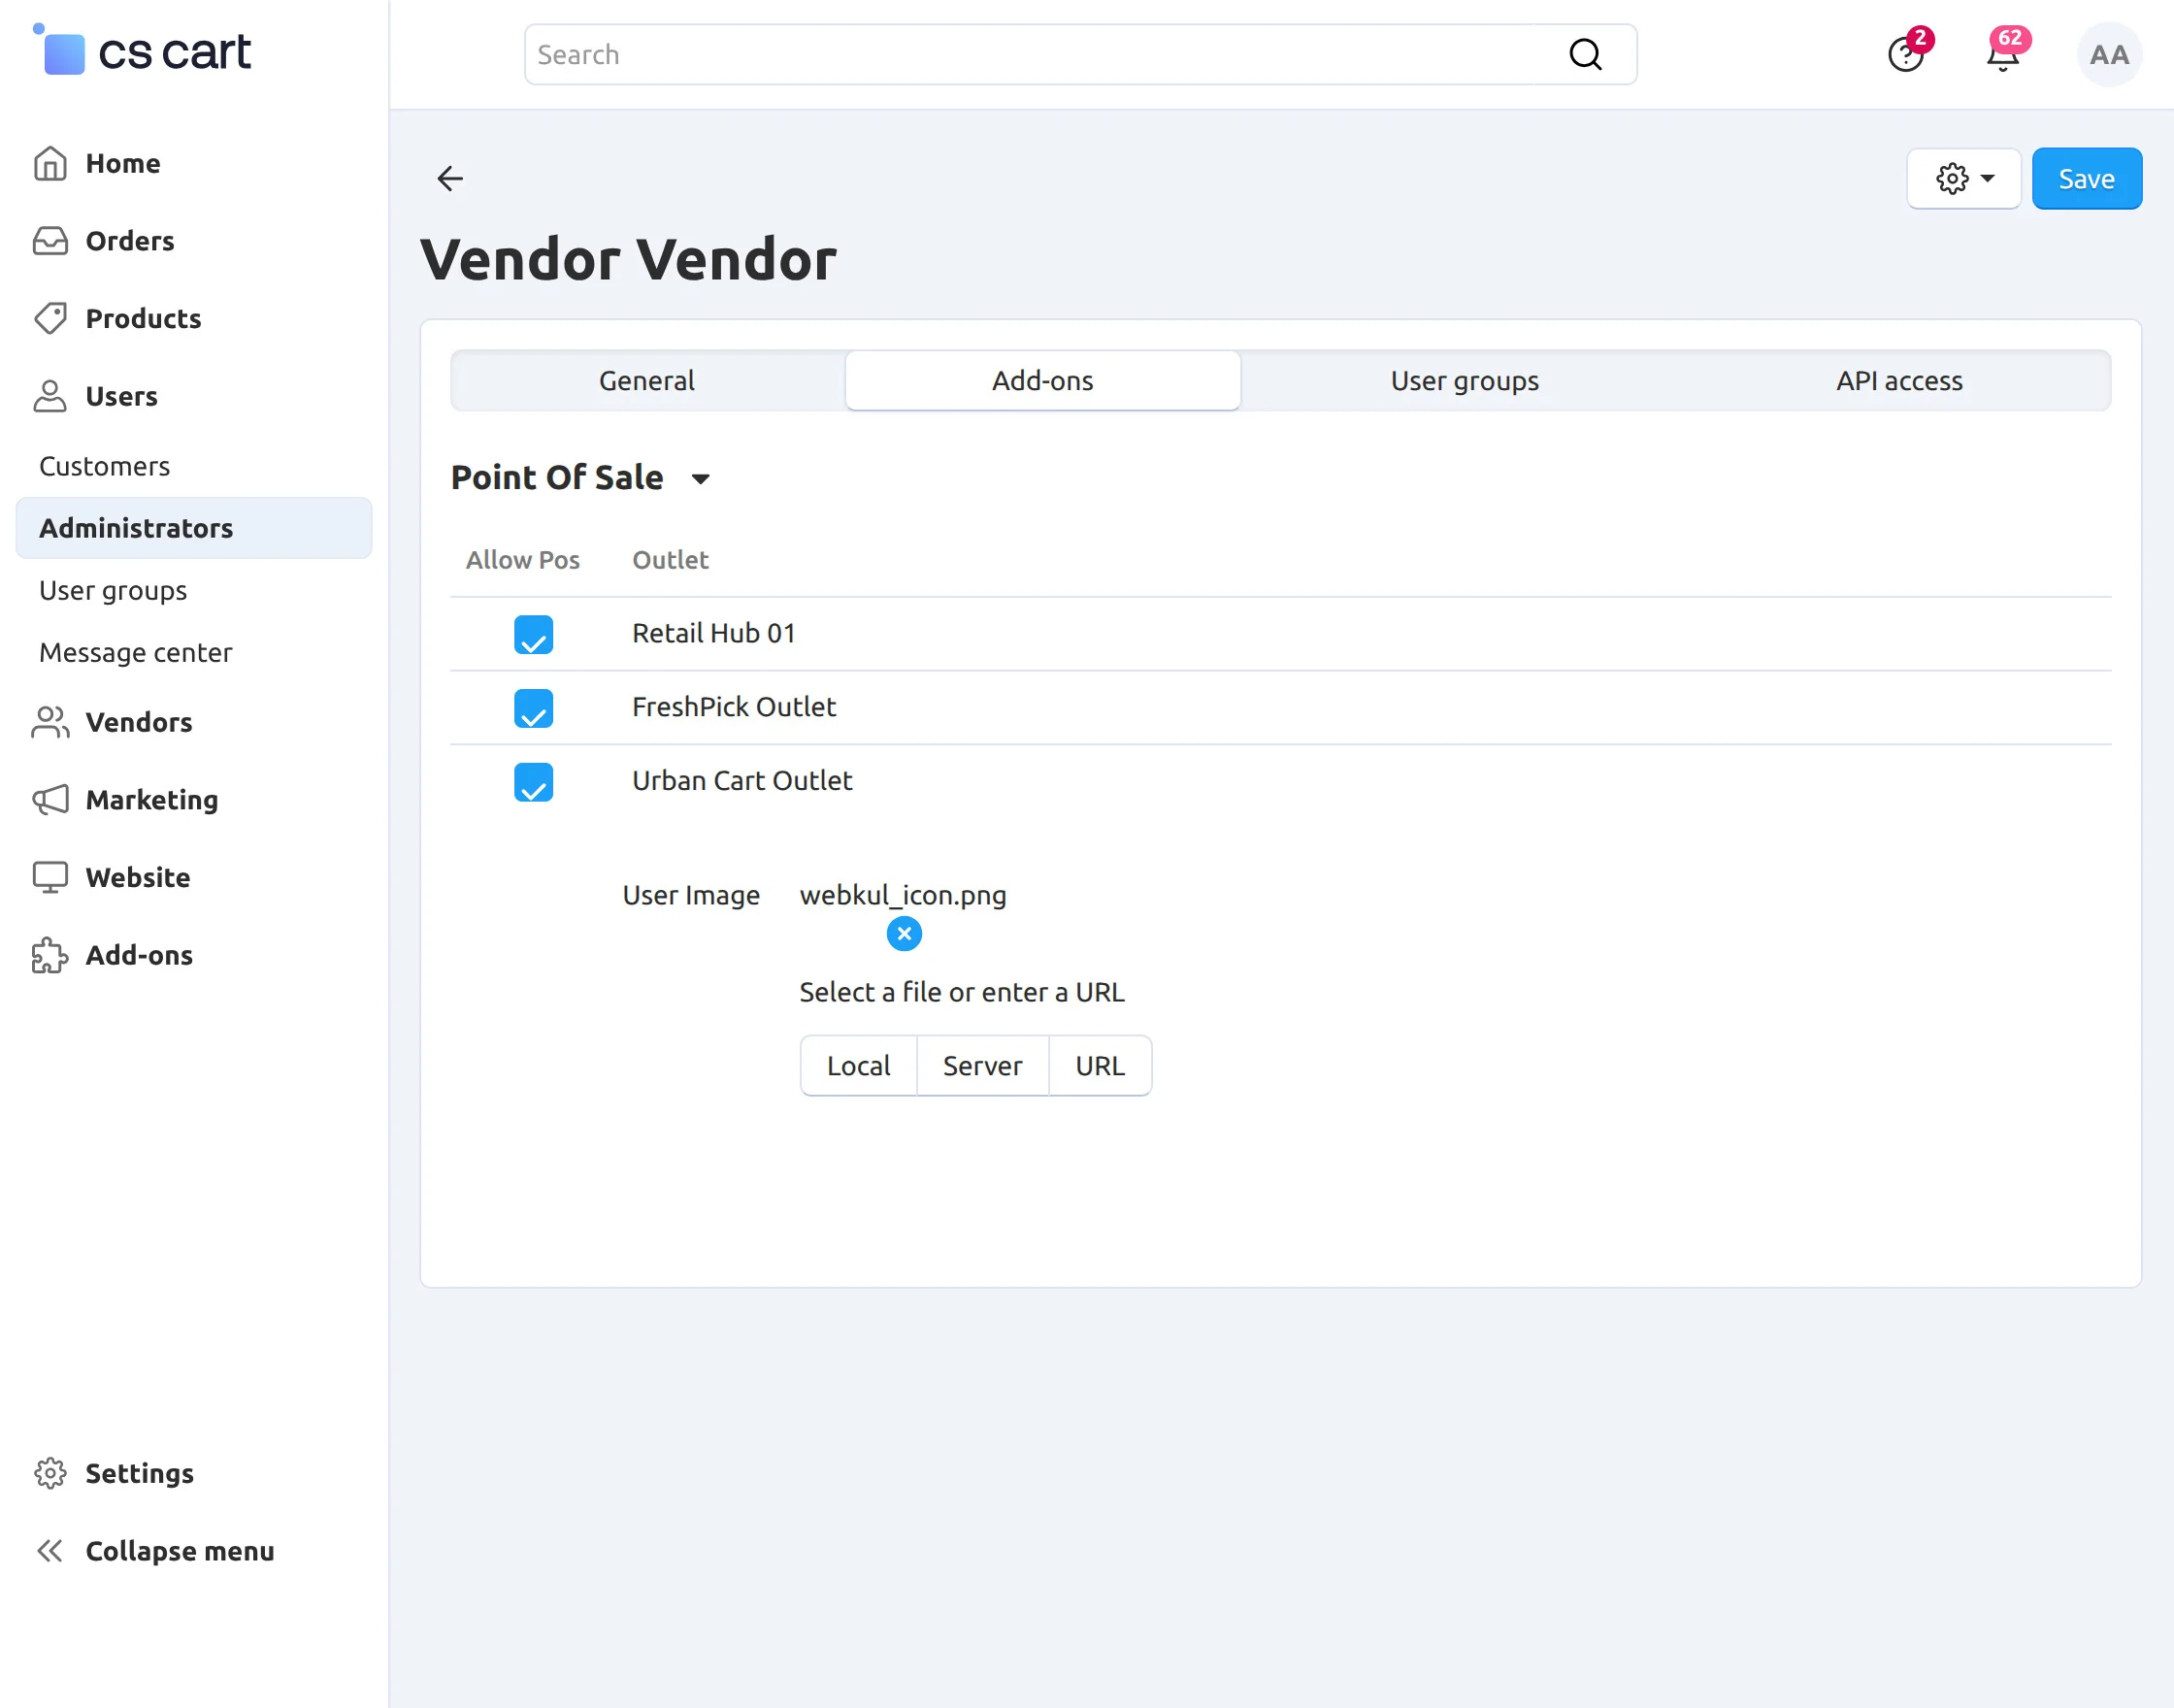
Let’s See How to Generate a Product Barcode.
CS-Cart Point of Sale (POS) provides a feature to generate multiple product barcodes. To do this:
- Go to Products >> Products
- Select the desired products
- Click the gear icon in the top-right corner
- Choose the Print Barcode option
- Once clicked, the system will generate barcodes for the selected products
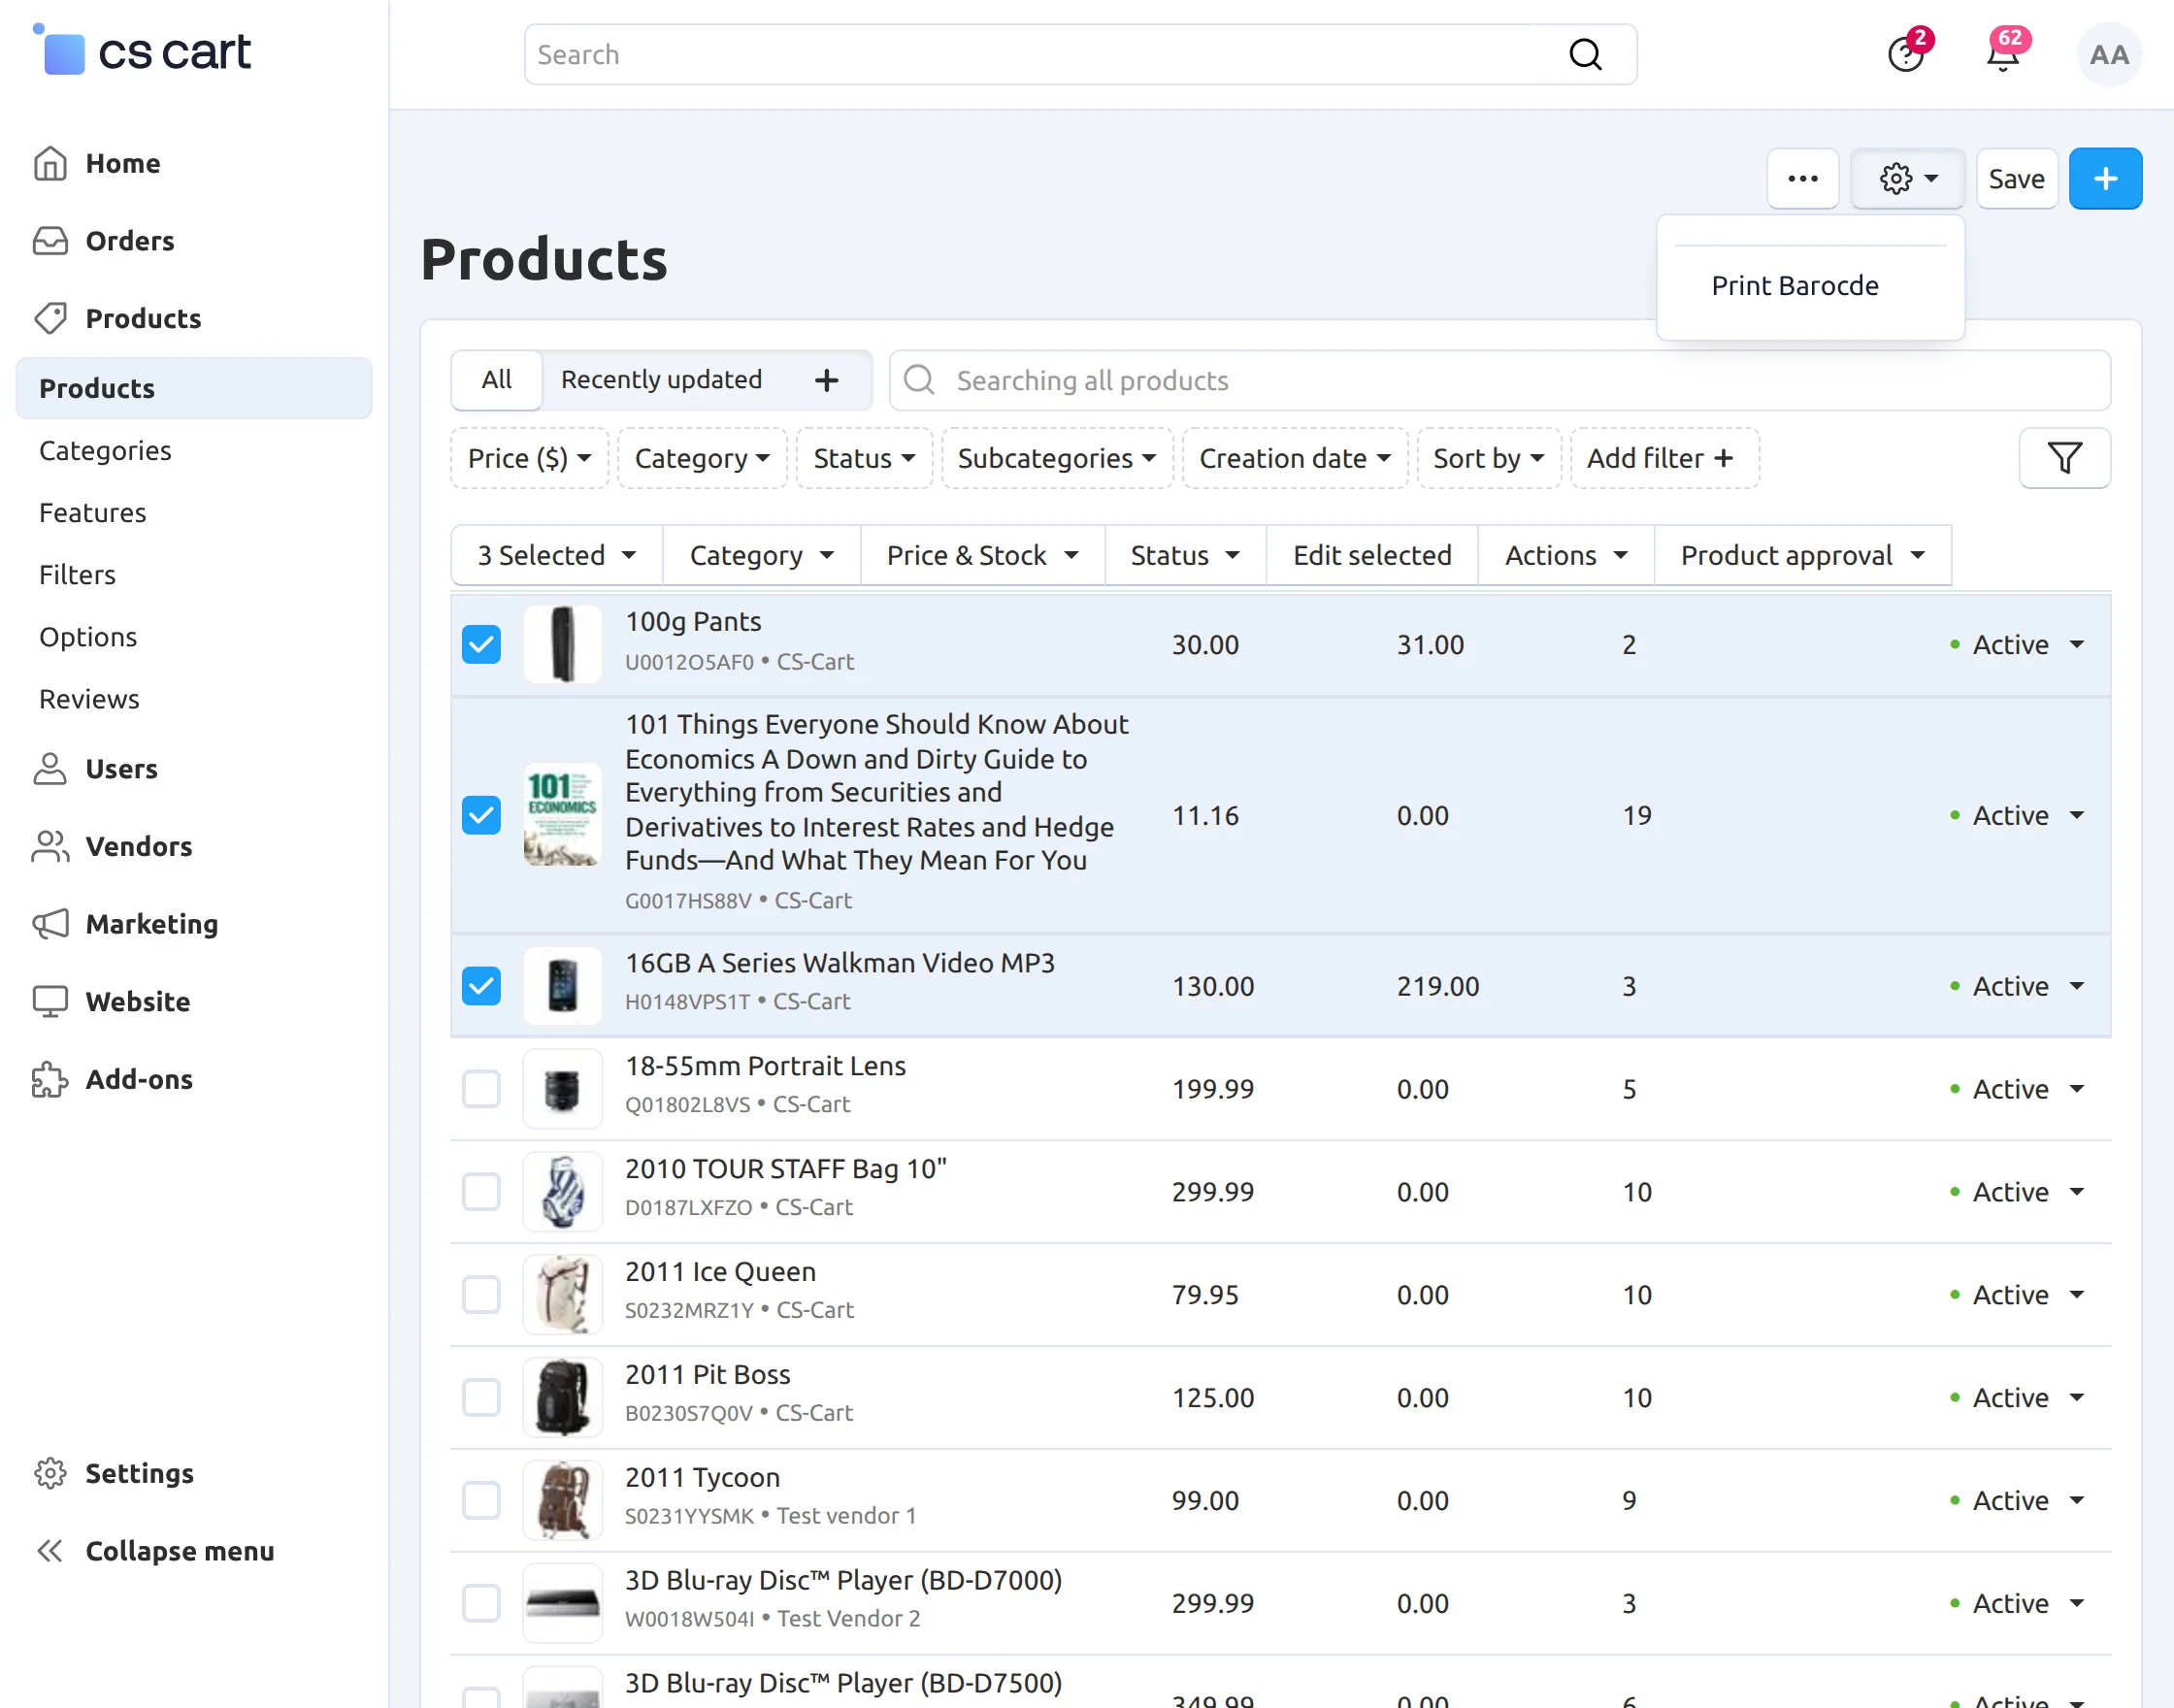
To print the barcode of the product individually, go to the Product detail page at the backend. Click the gear drop-down and print the barcode as shown below.
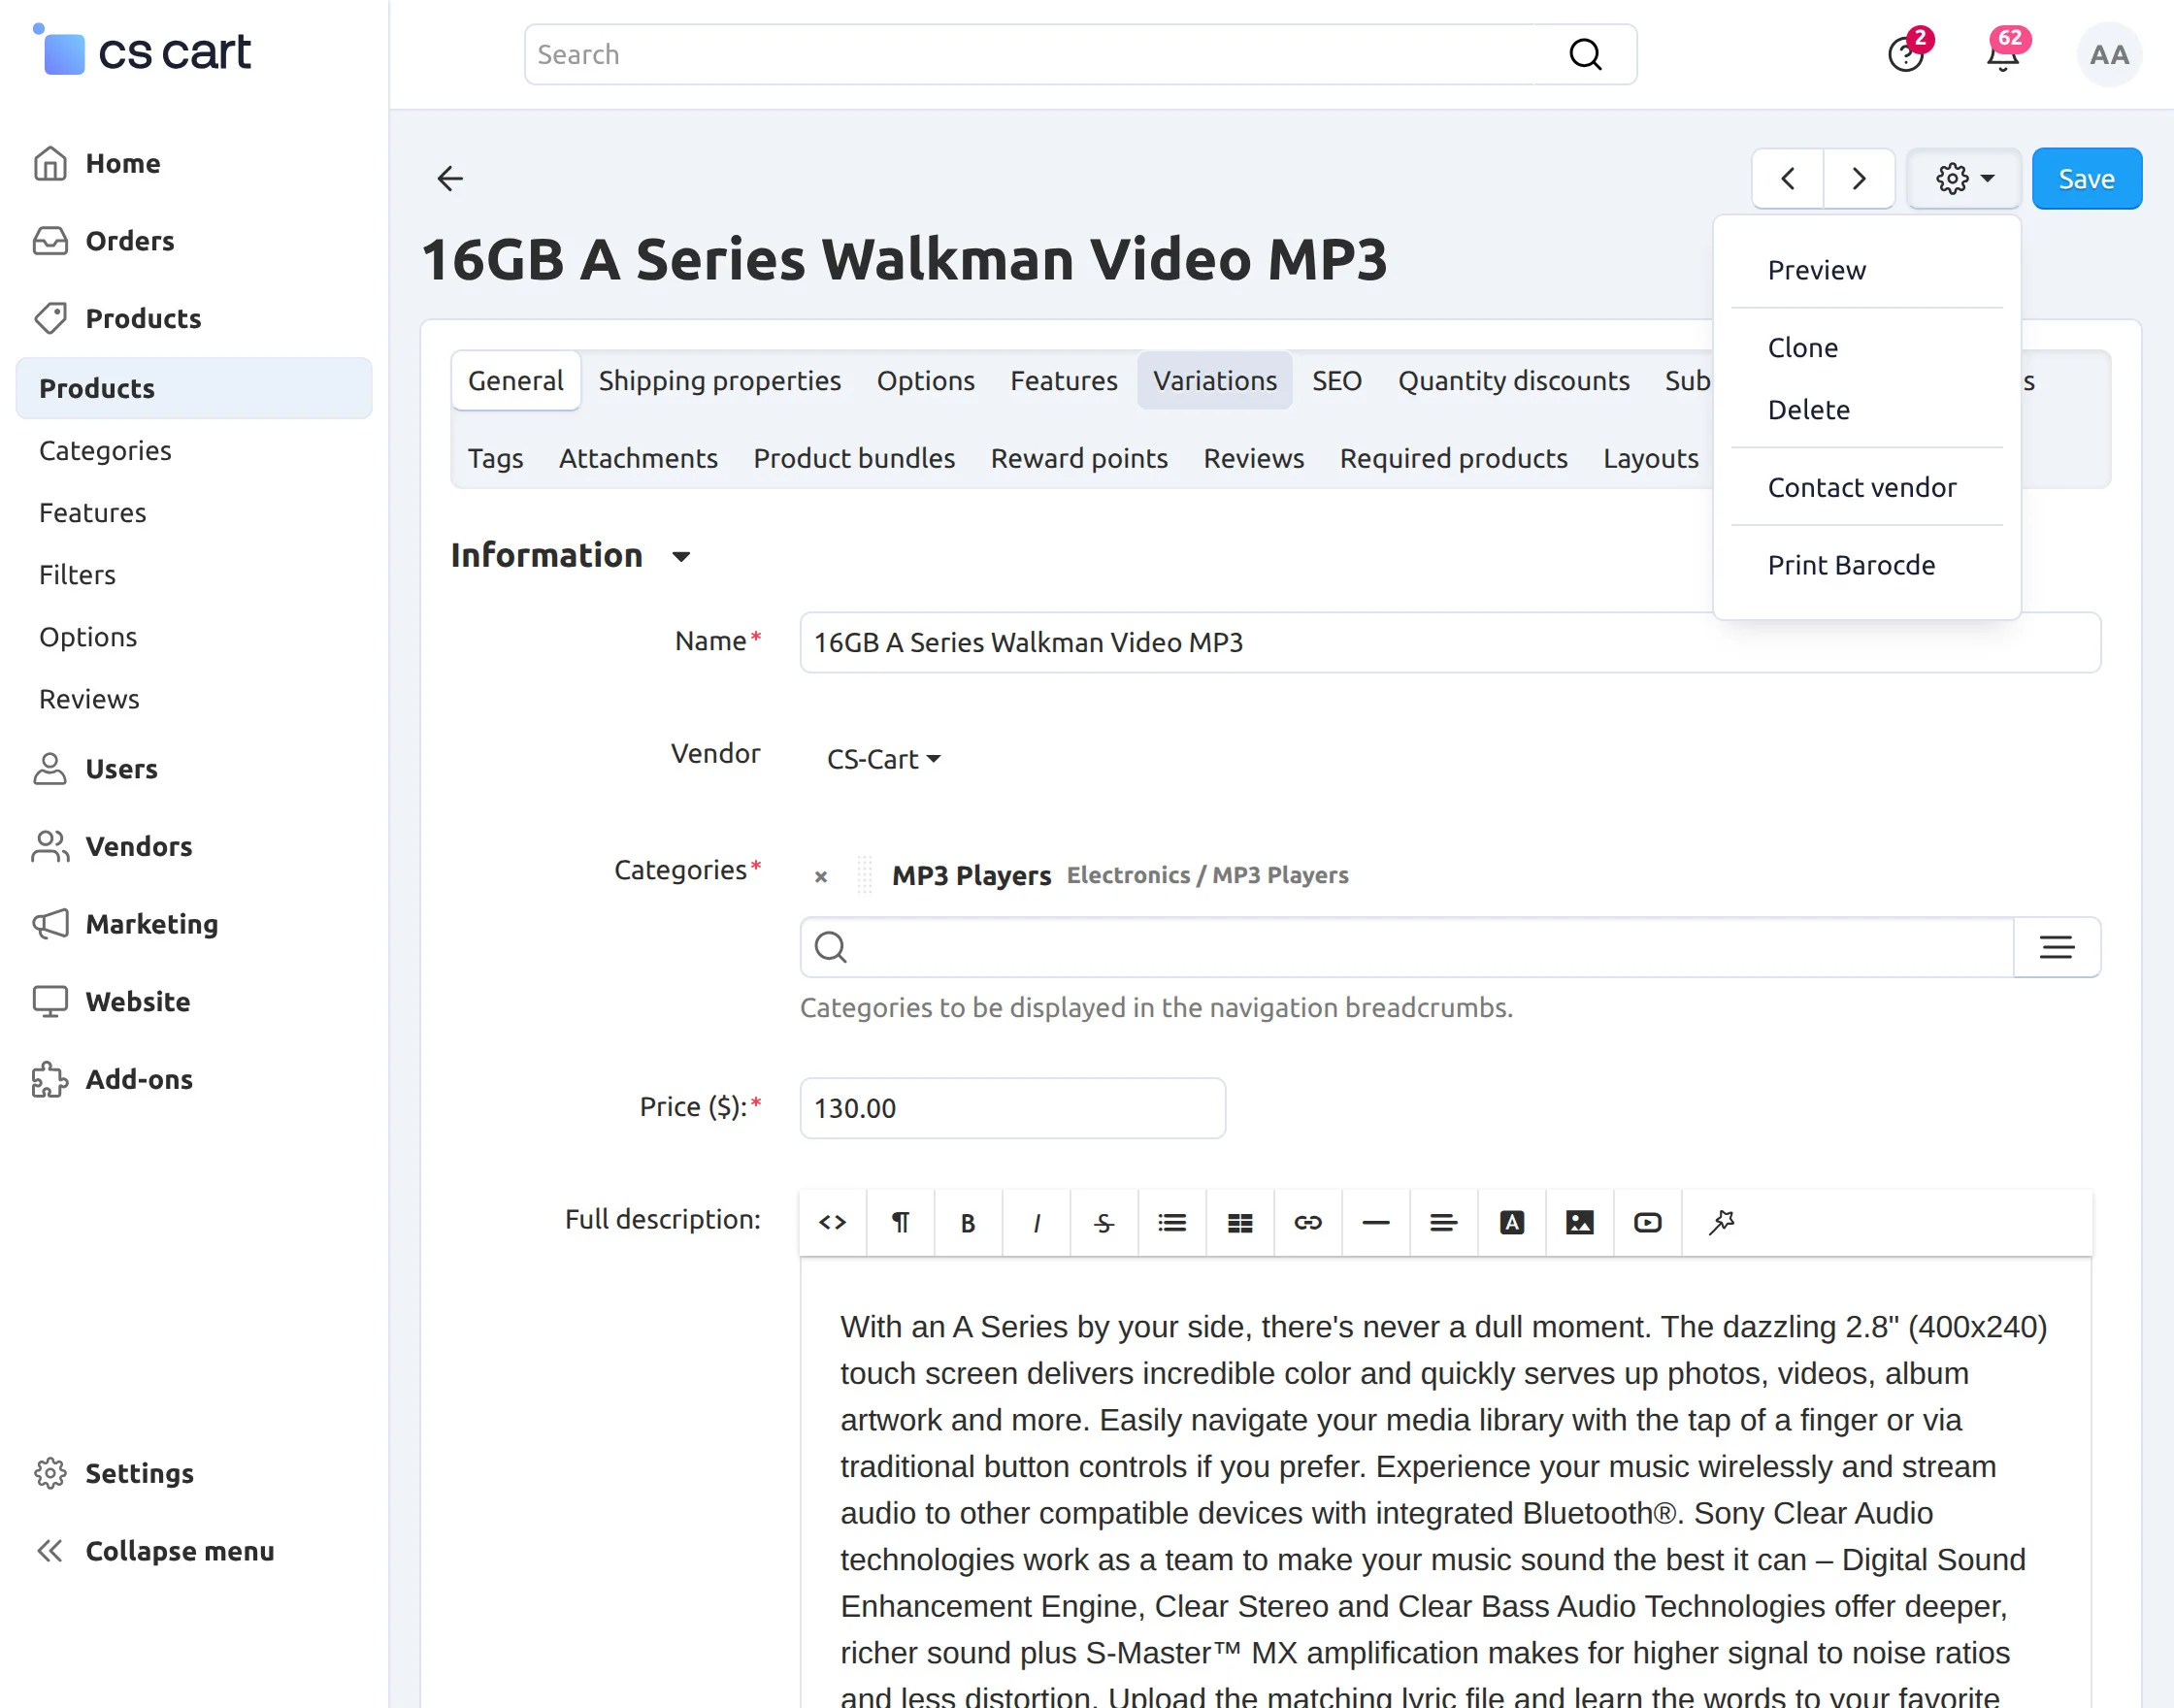
There is an option to list either only POS products or store products, or both on POS devices on the add-ons section on the product detail page at the backend.
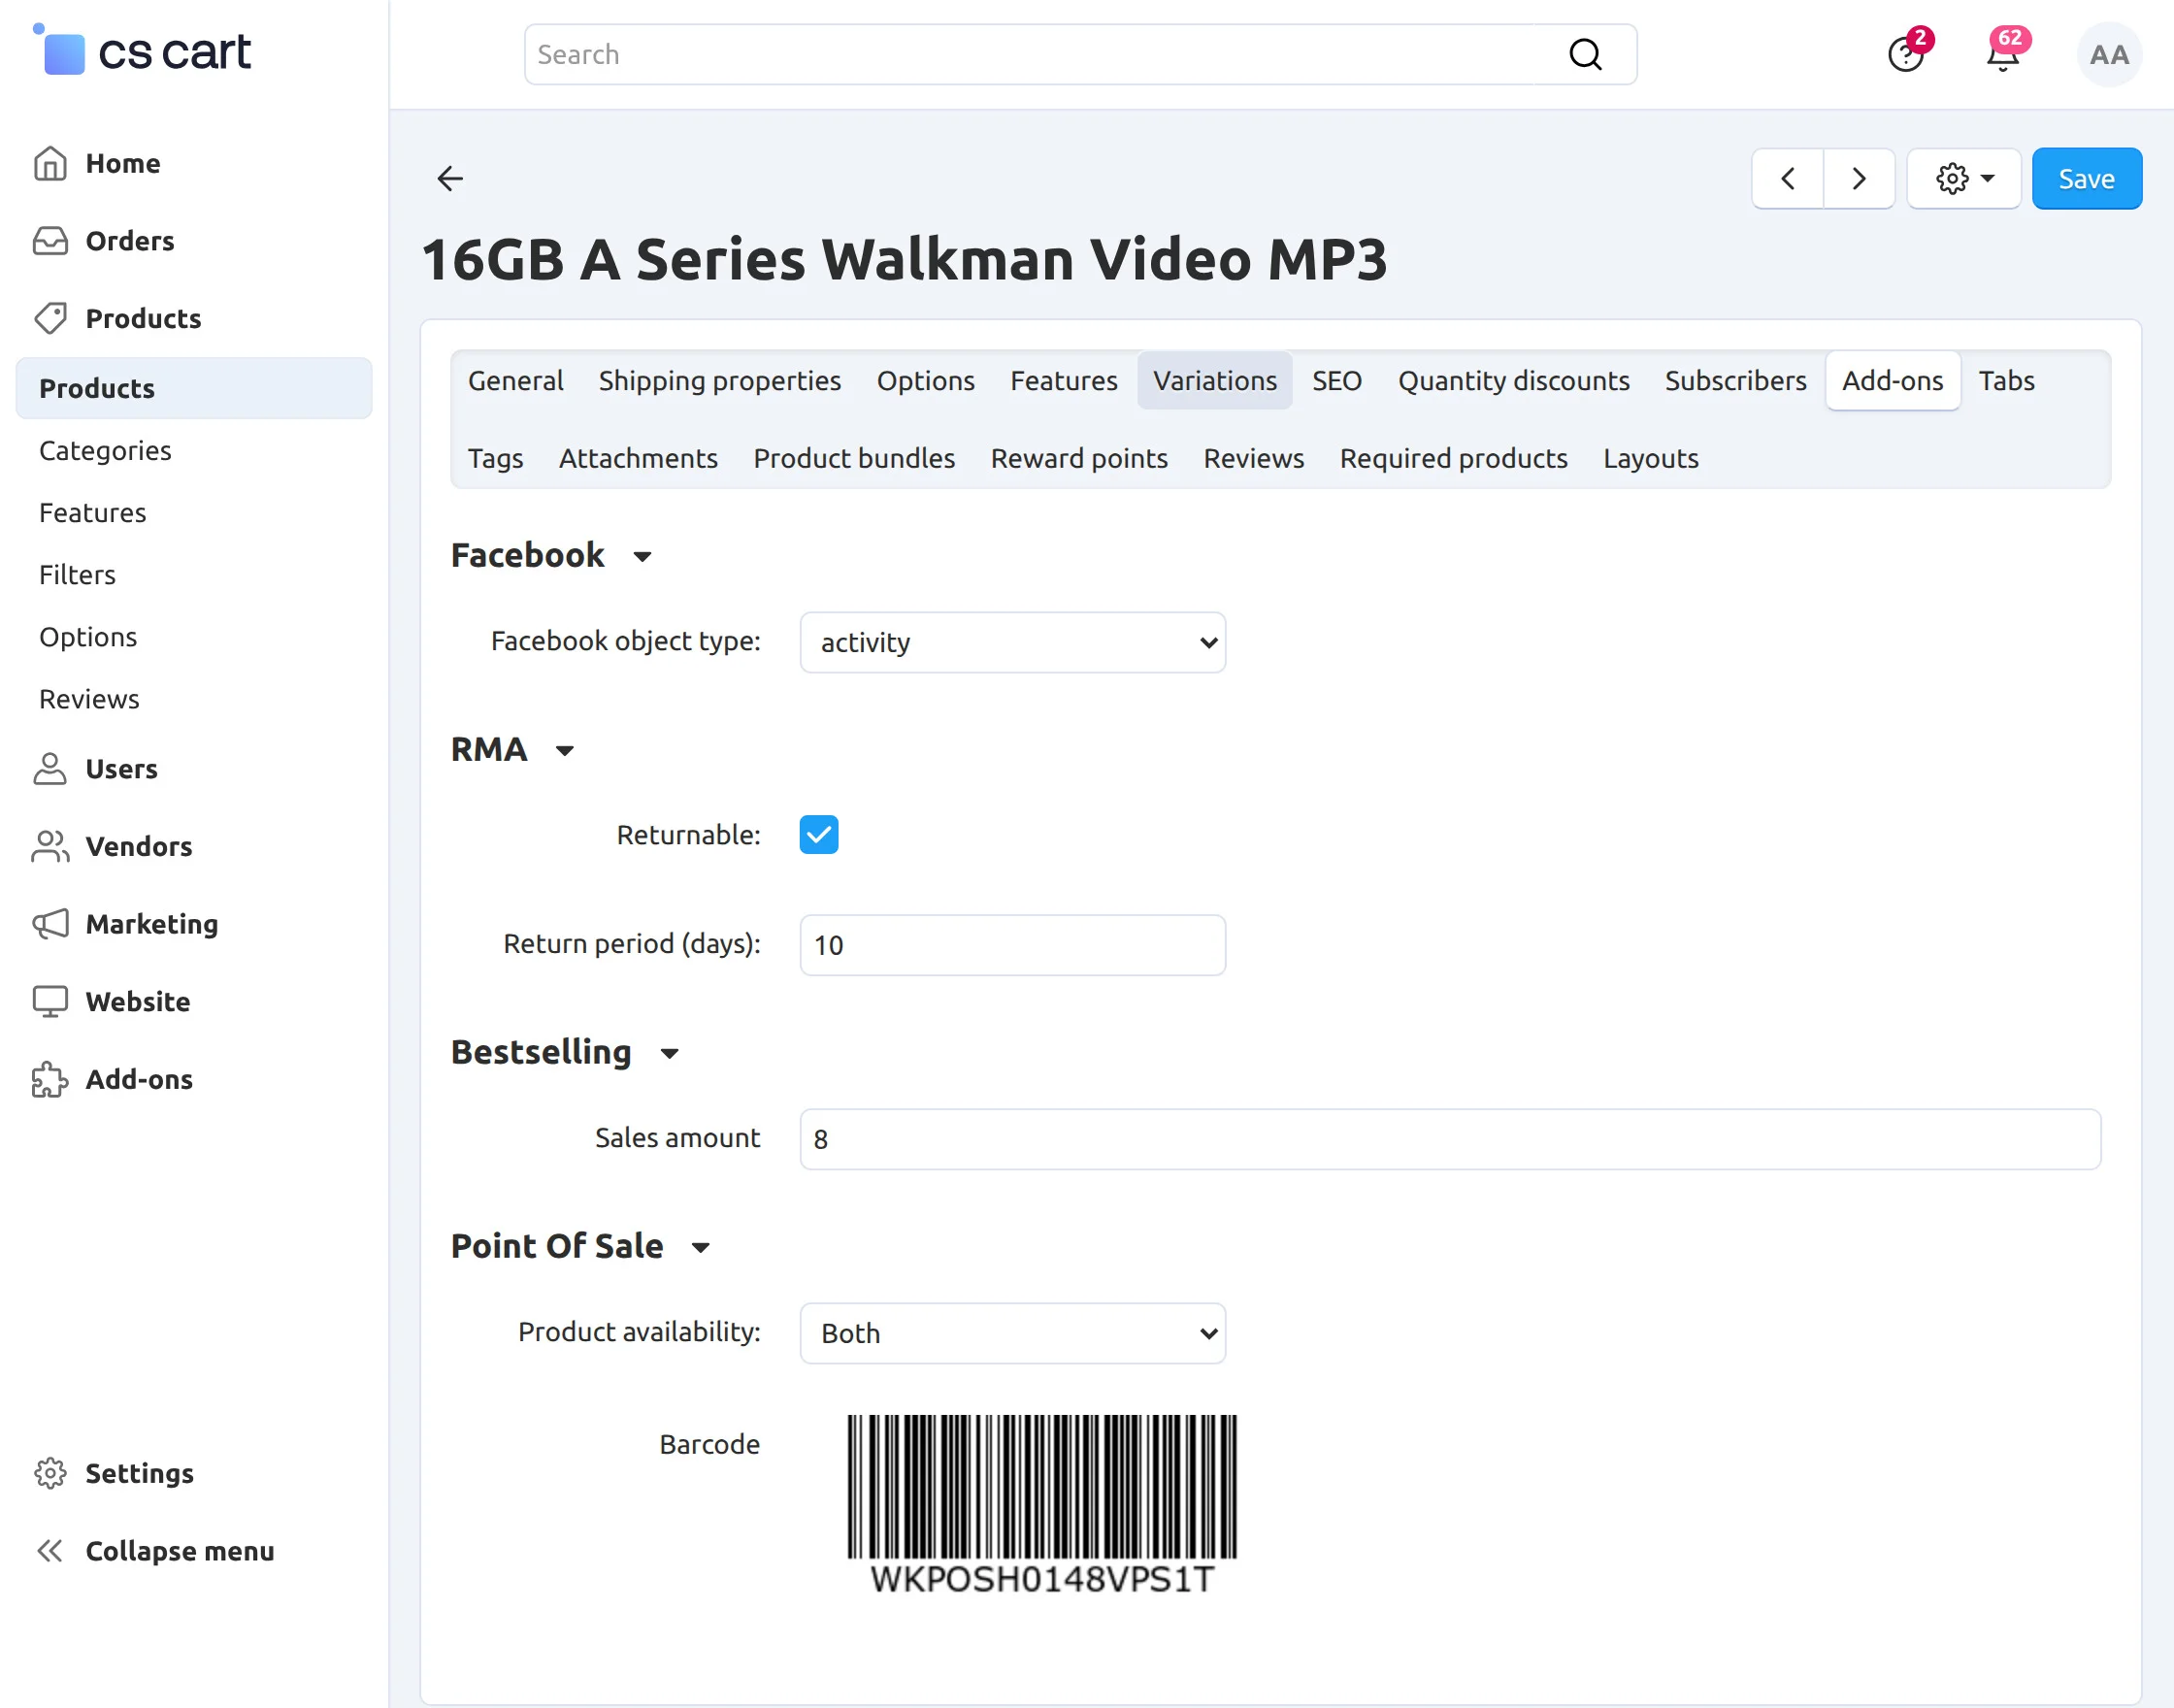
The admin can also check the product barcode here.
How Vendors Can Manage POS Outlets?
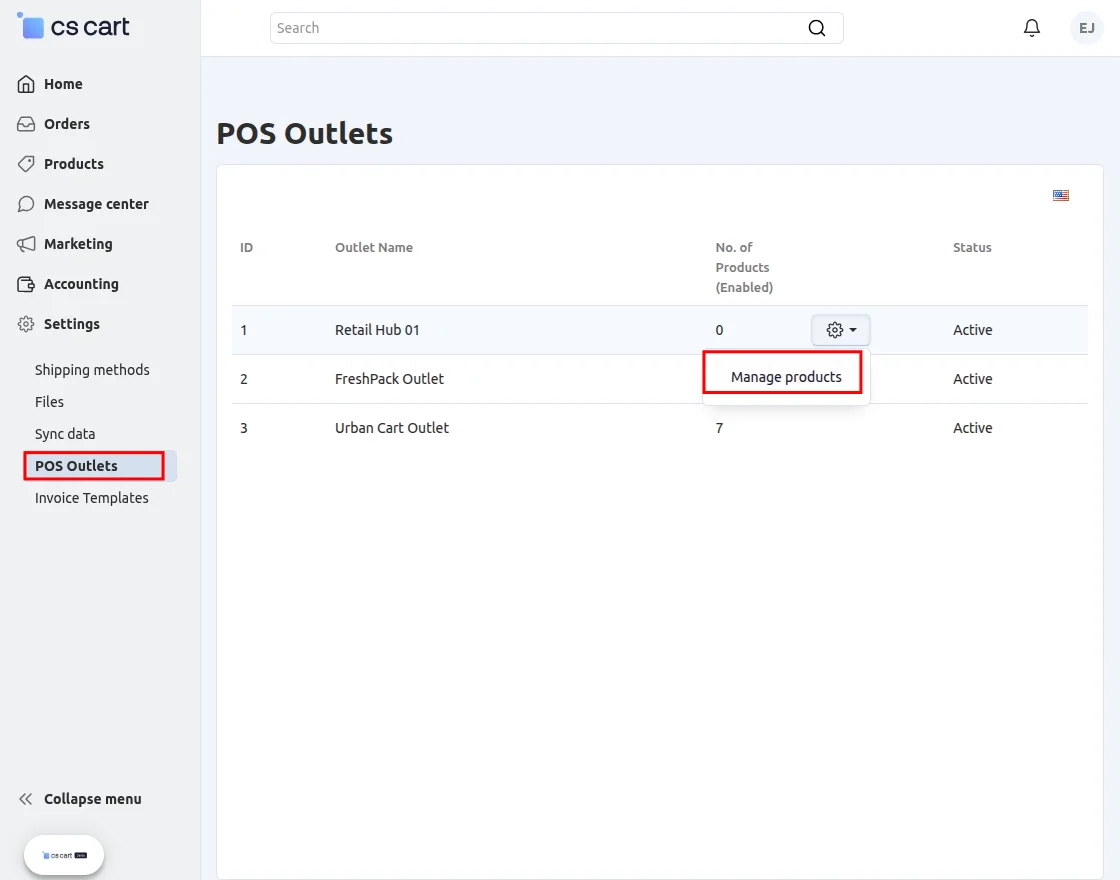
Log in as a vendor, go to Settings >> POS Outlets, and view the list of assigned POS outlets.
When the Vendor clicks on the manage product option, they can add the product in that particular outlet.
Note: Ensure that the admin assigns POS outlets to the vendor, after which the vendor can log in and manage the POS system from their end.
Here, the Vendor can assign all products to the POS outlet and assign or unassign the selected product from the outlet.
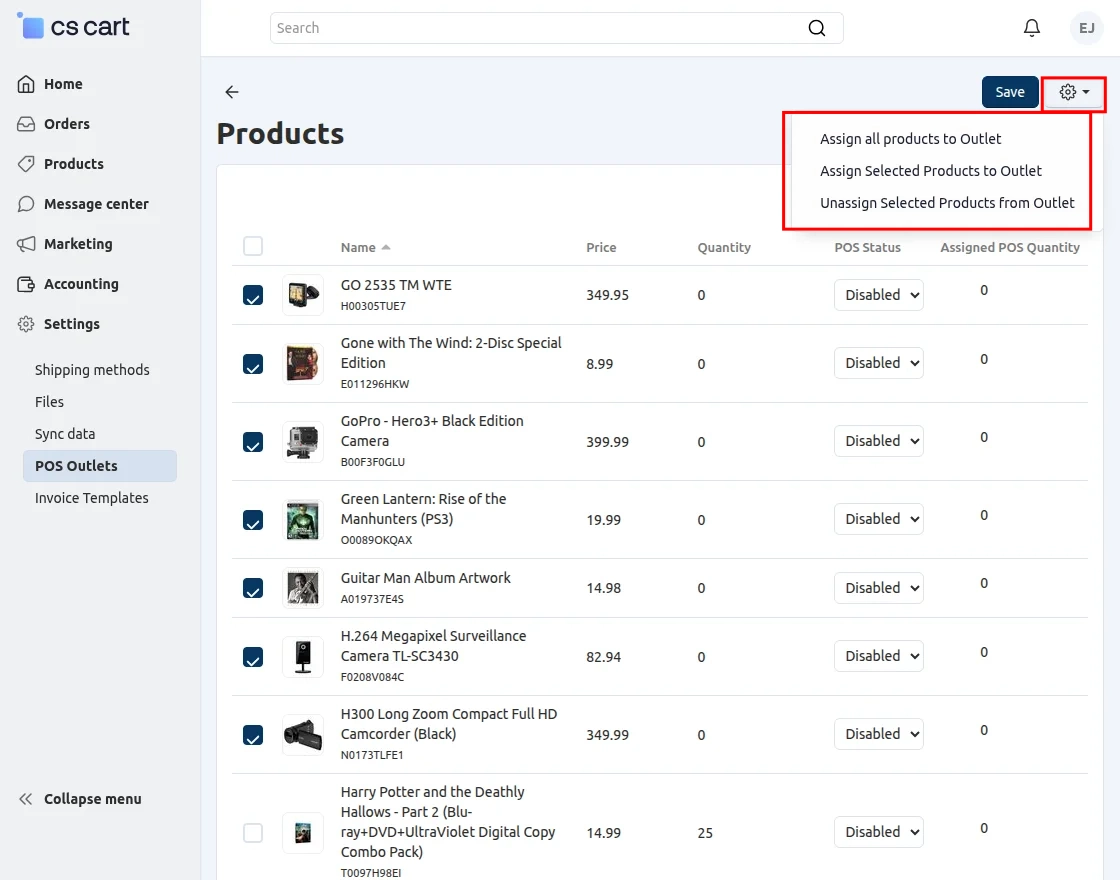
The vendor can also assign a POS quantity to the product and then click on the save button.
Invoice Template
Navigate to Settings >> Invoice Templates to create a new invoice template.
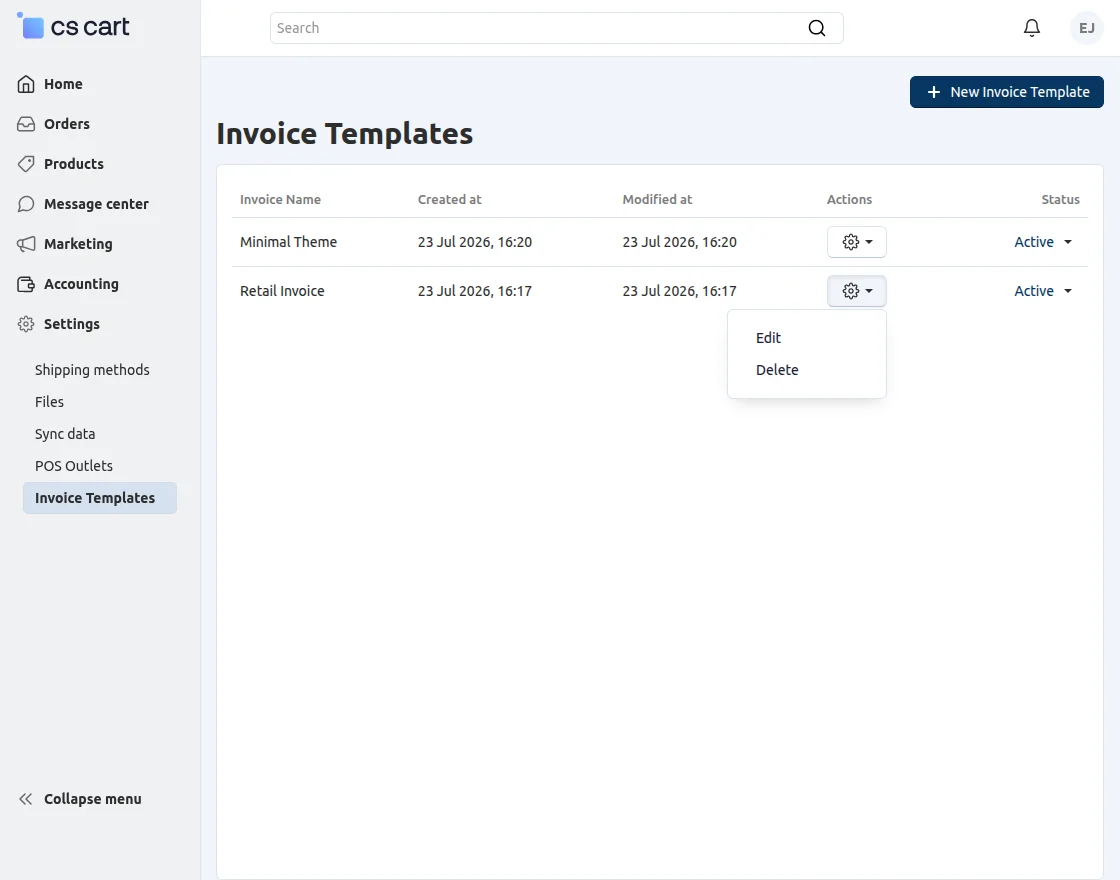
After creating the template, edit it to manage the invoice layout and content.
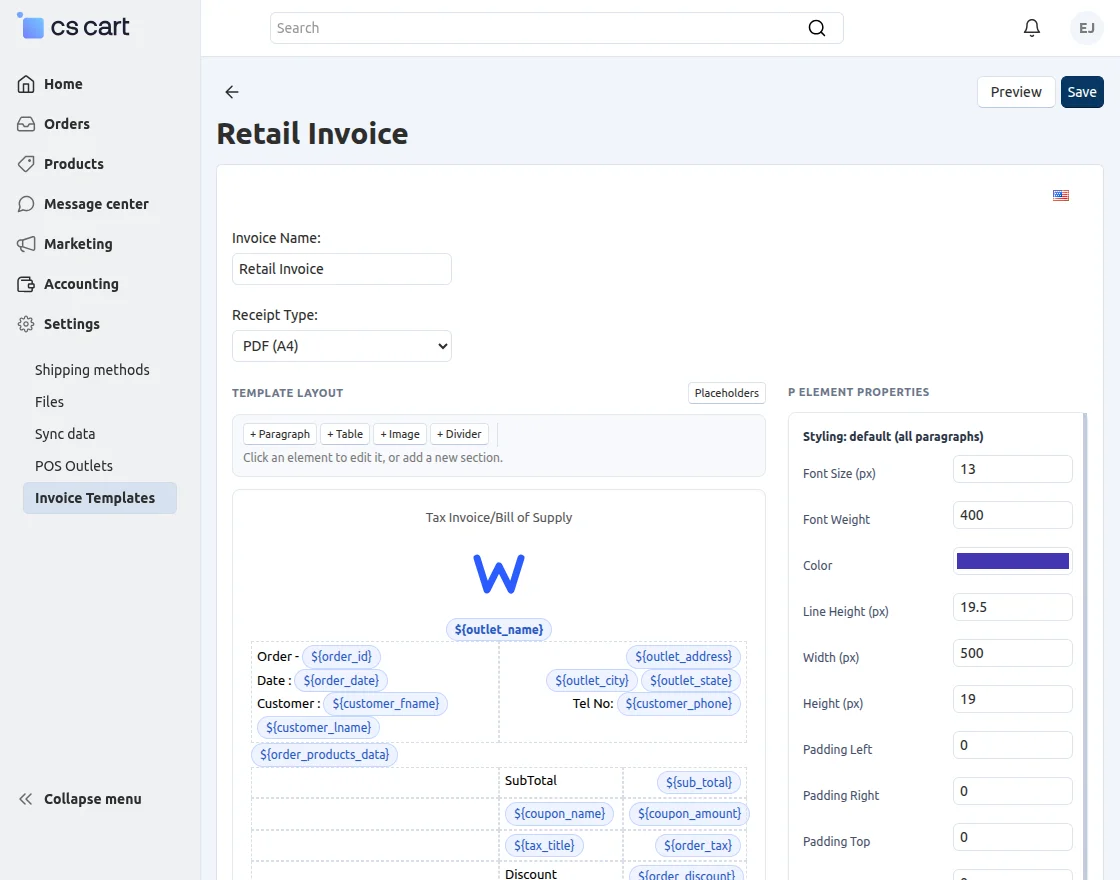
From here, vendors can manage placeholders, add new blocks, upload logos, edit borders, and customize the invoice layout.
POS Frontend
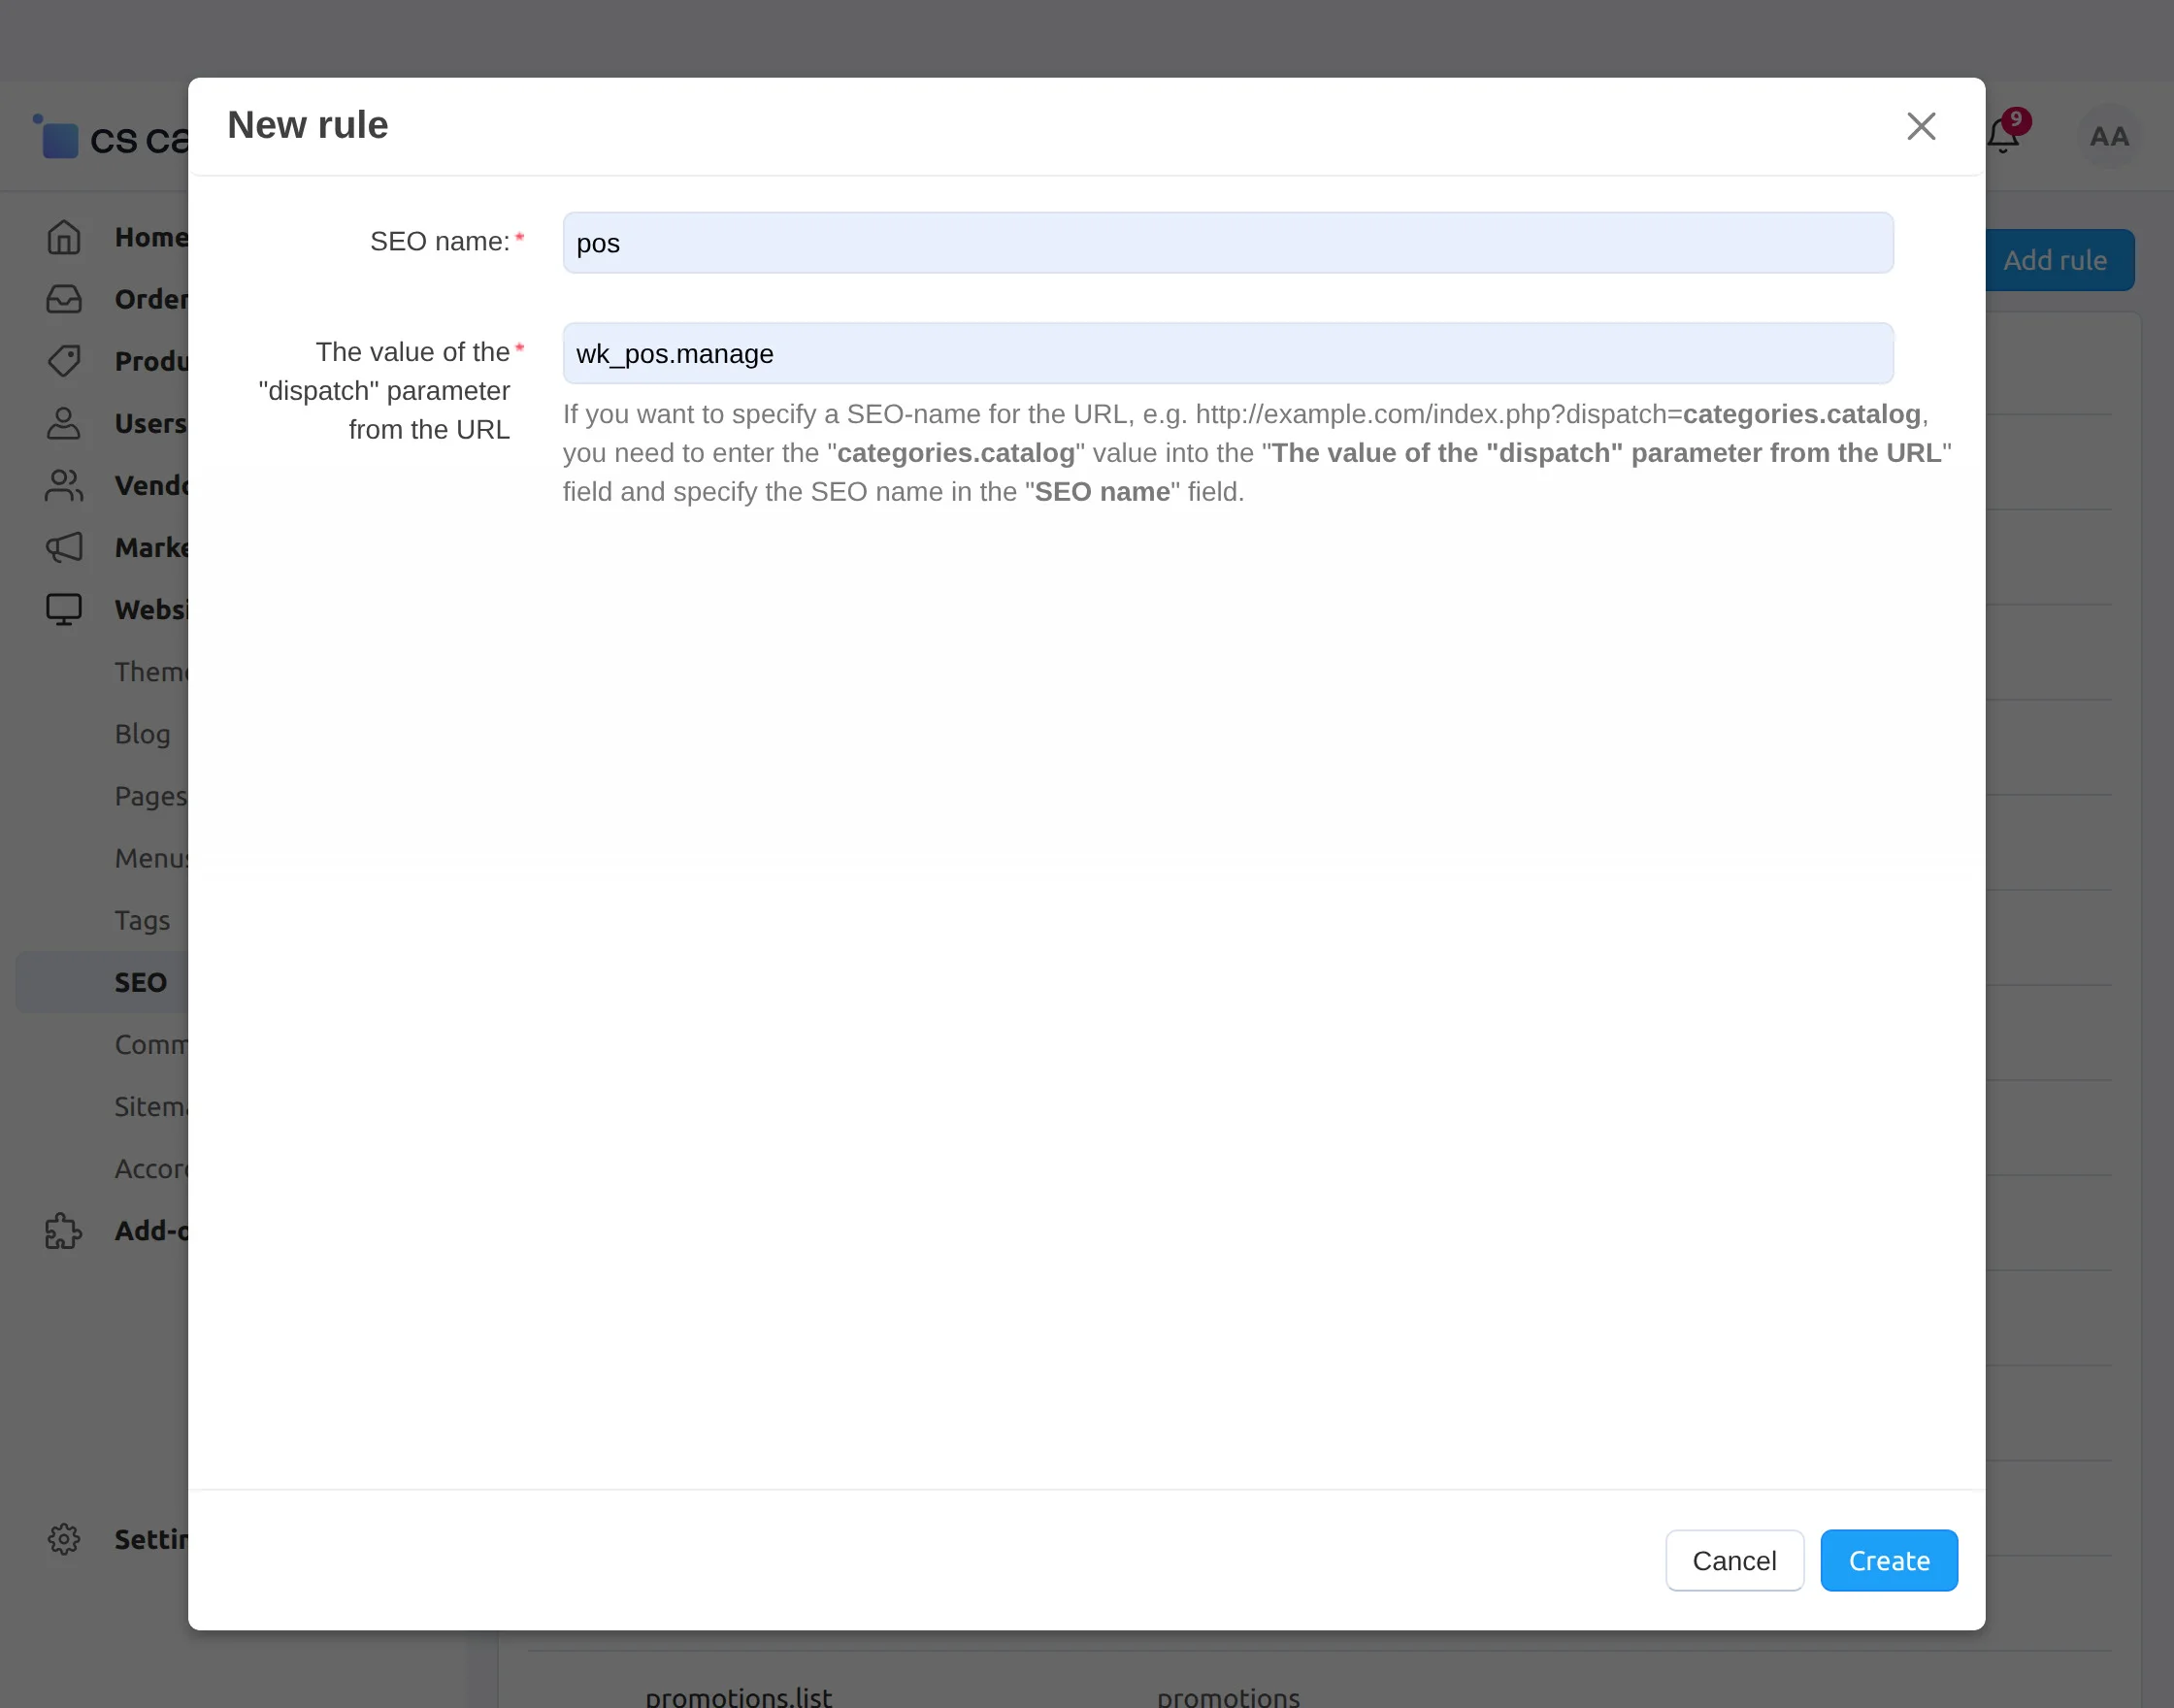
Create a new SEO rule with the desired name and set the dispatch value to wk_pos.manage to generate the POS frontend URL.
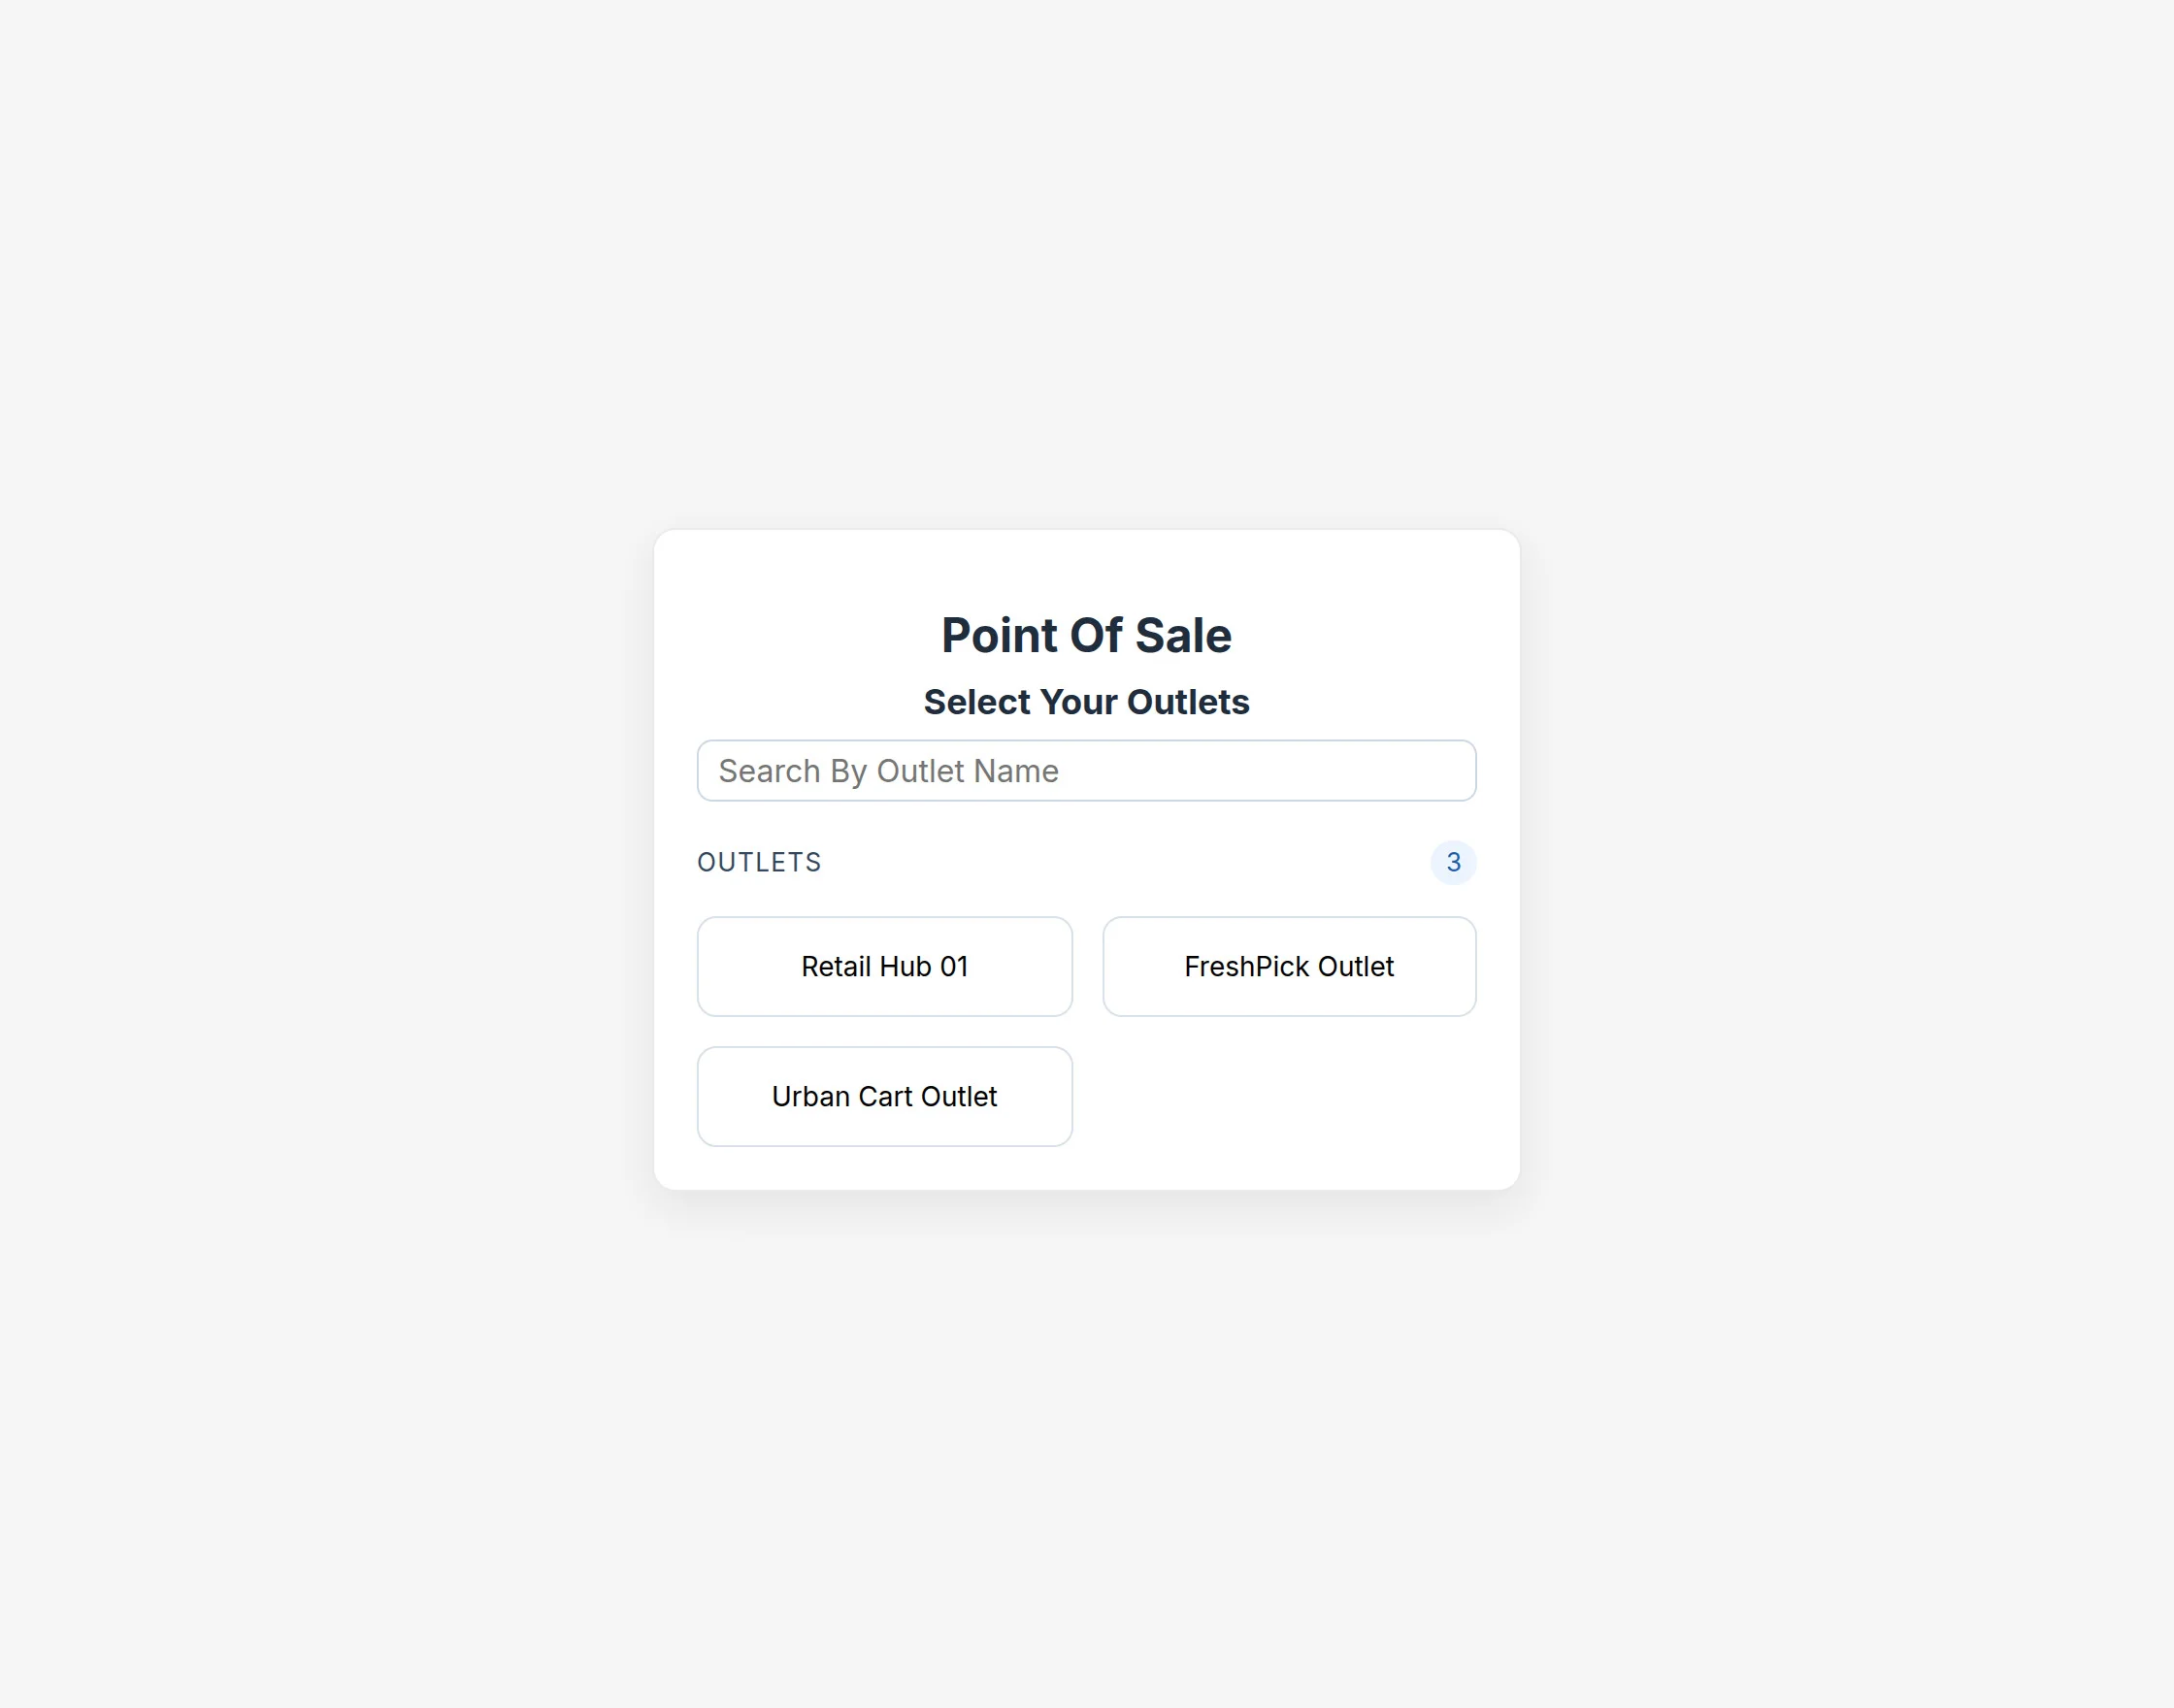
The POS Login Panel allows authorized users to log in to the POS system. Vendors can select their assigned outlet before accessing the POS.
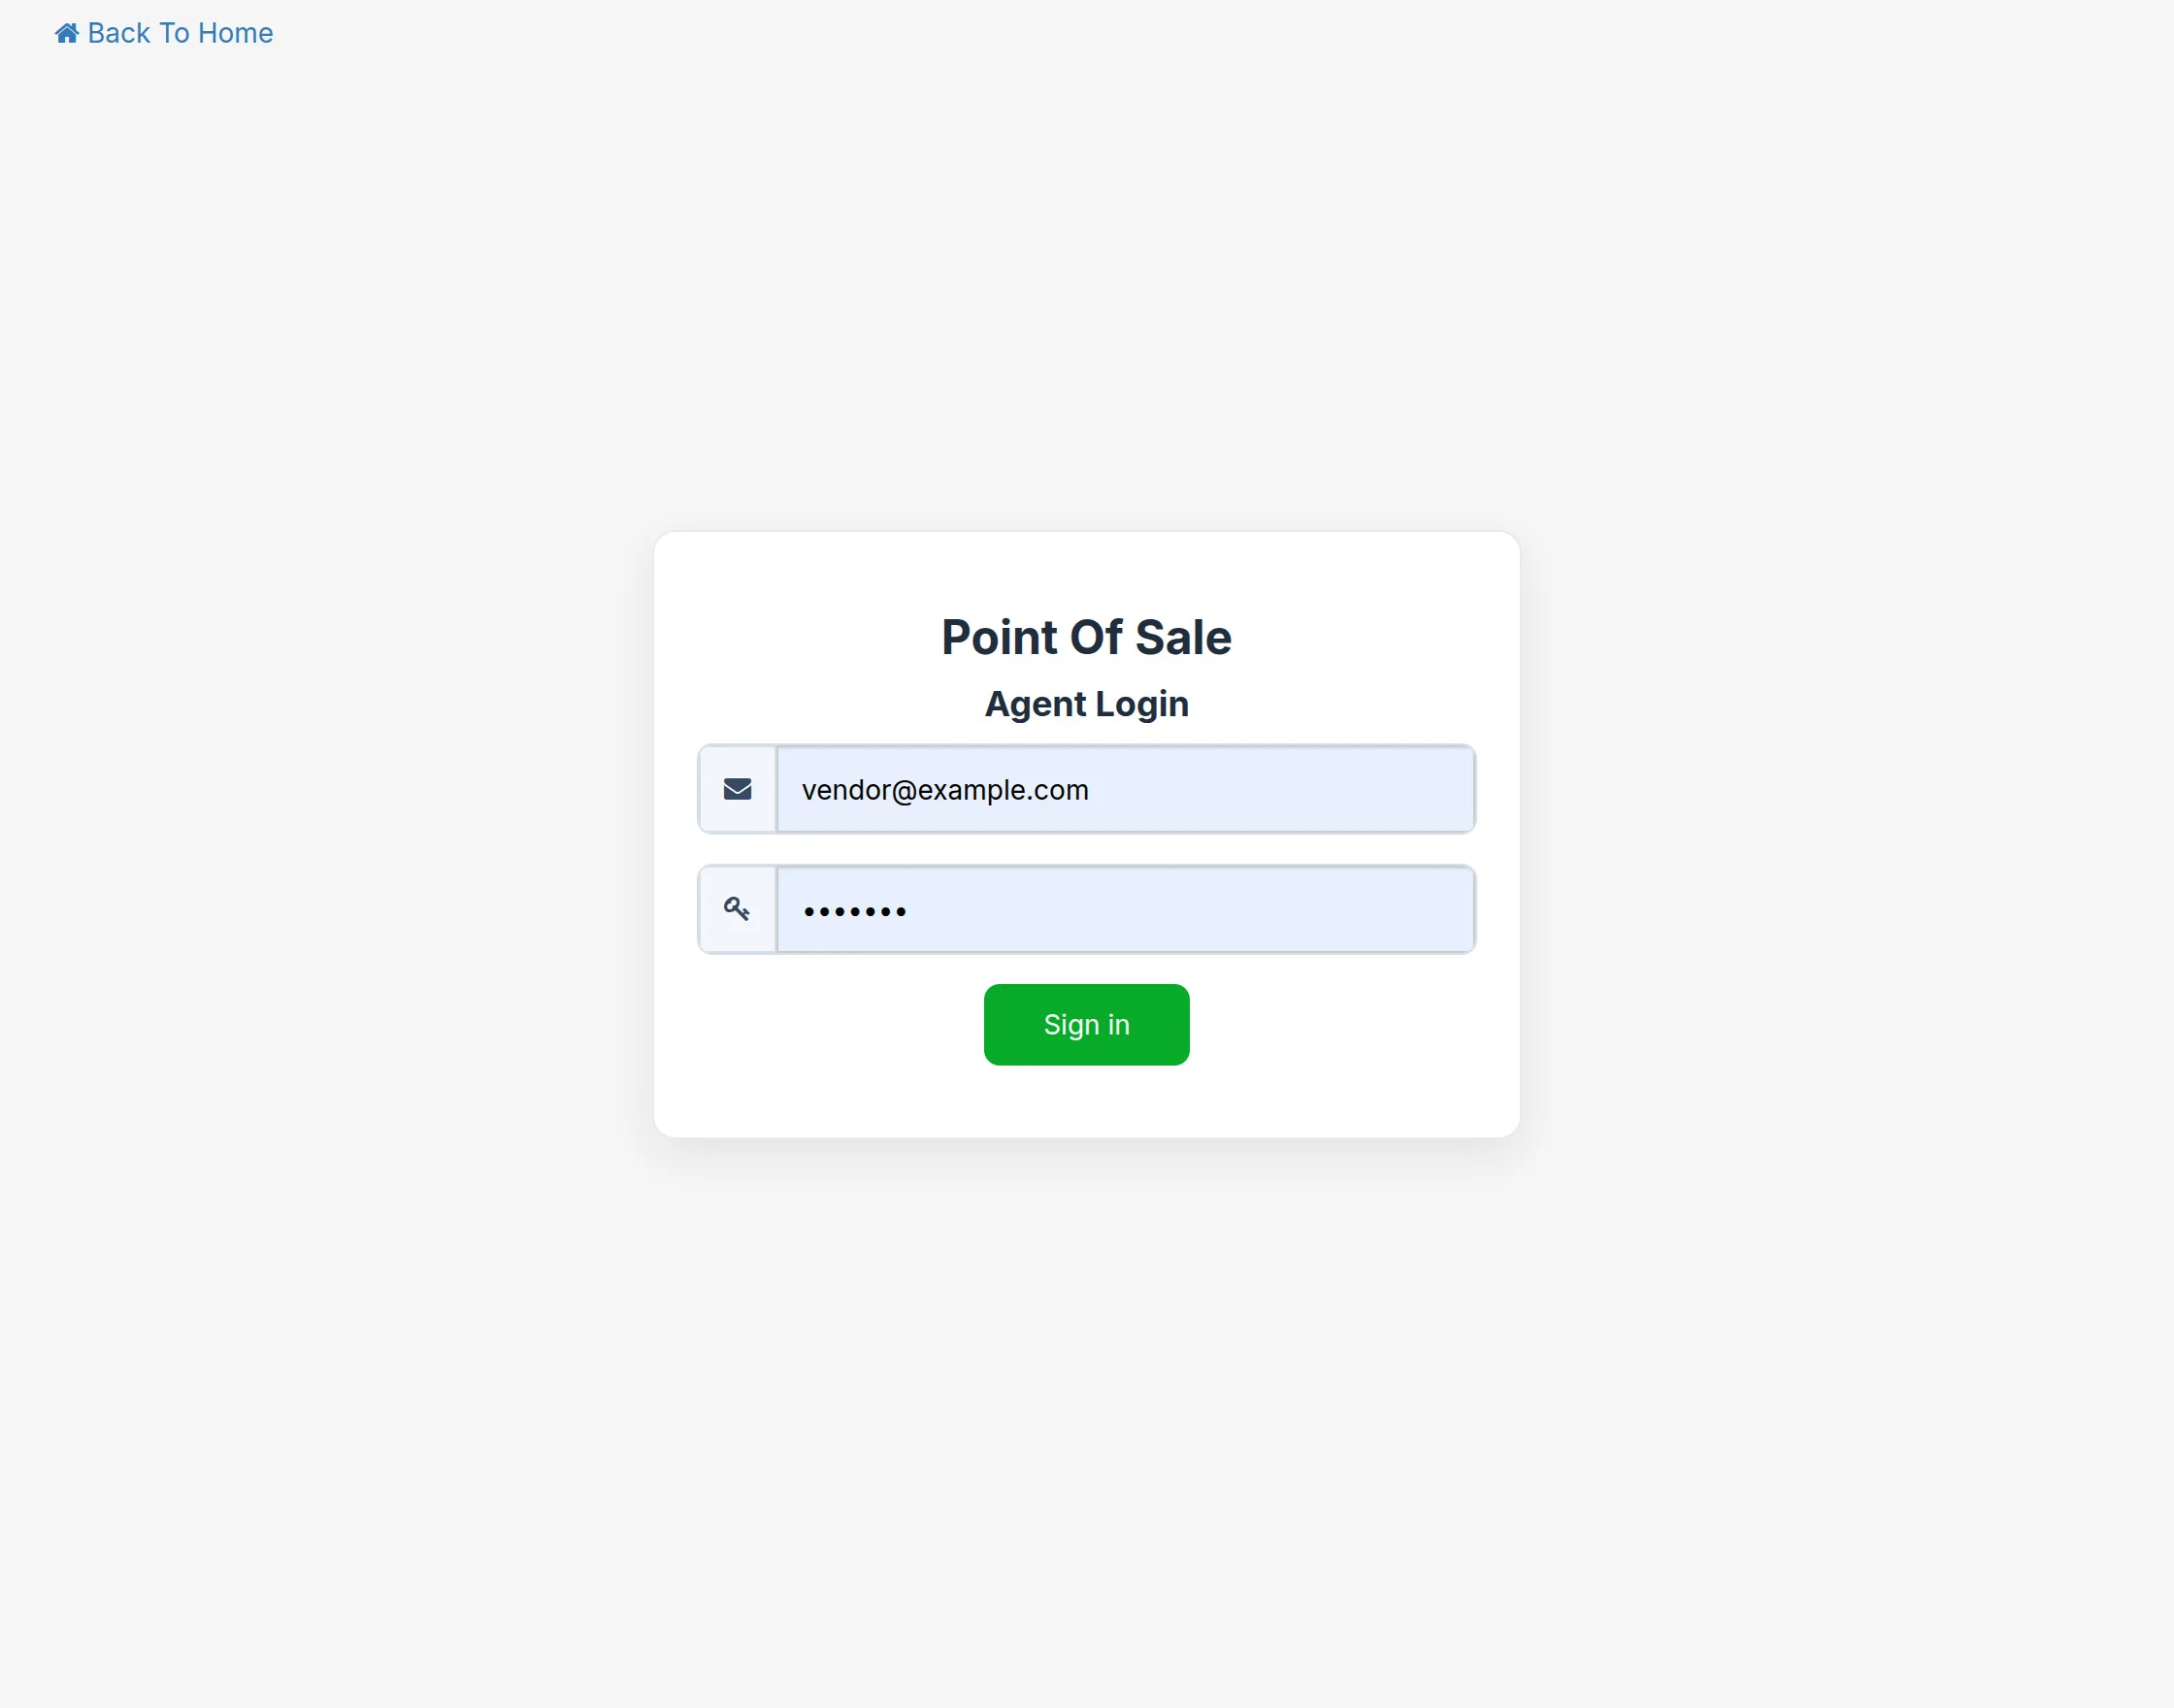
The authorized user can enter their email ID and password, then click on the Sign In button to log in to the POS system.
Settings
Go to Settings to manage POS configurations.
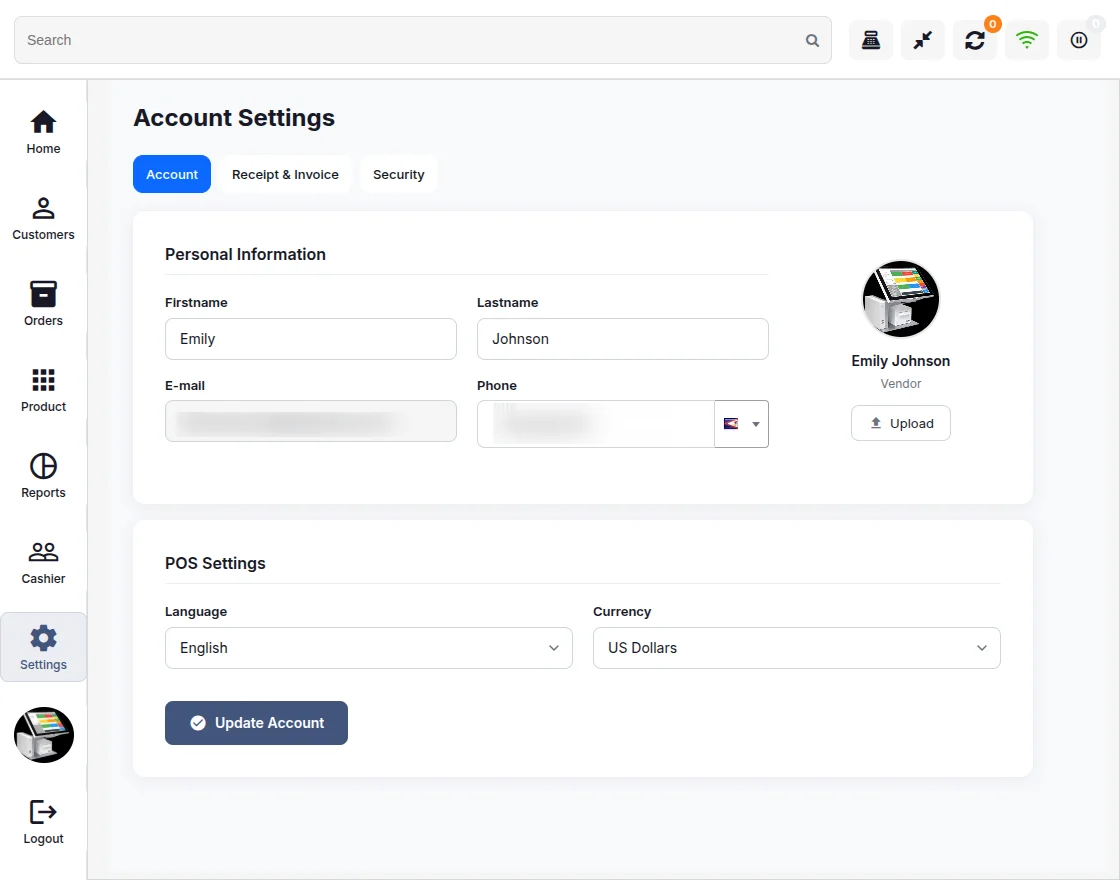
From here, agents can update their profile, change the language, select the currency, and manage account settings
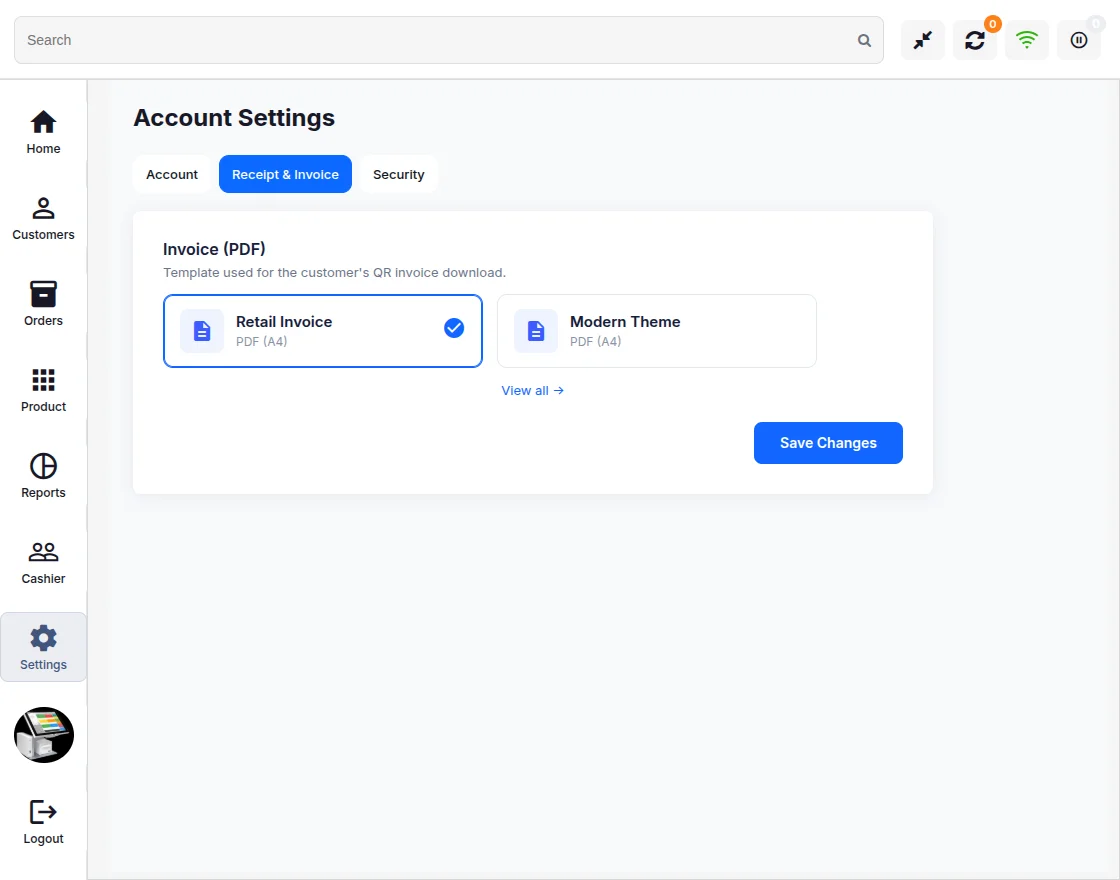
Receipt And Invoices
Navigate to the Receipt & Invoice tab to select an invoice template.
Security
Navigate to the Security tab to configure secure logout settings.
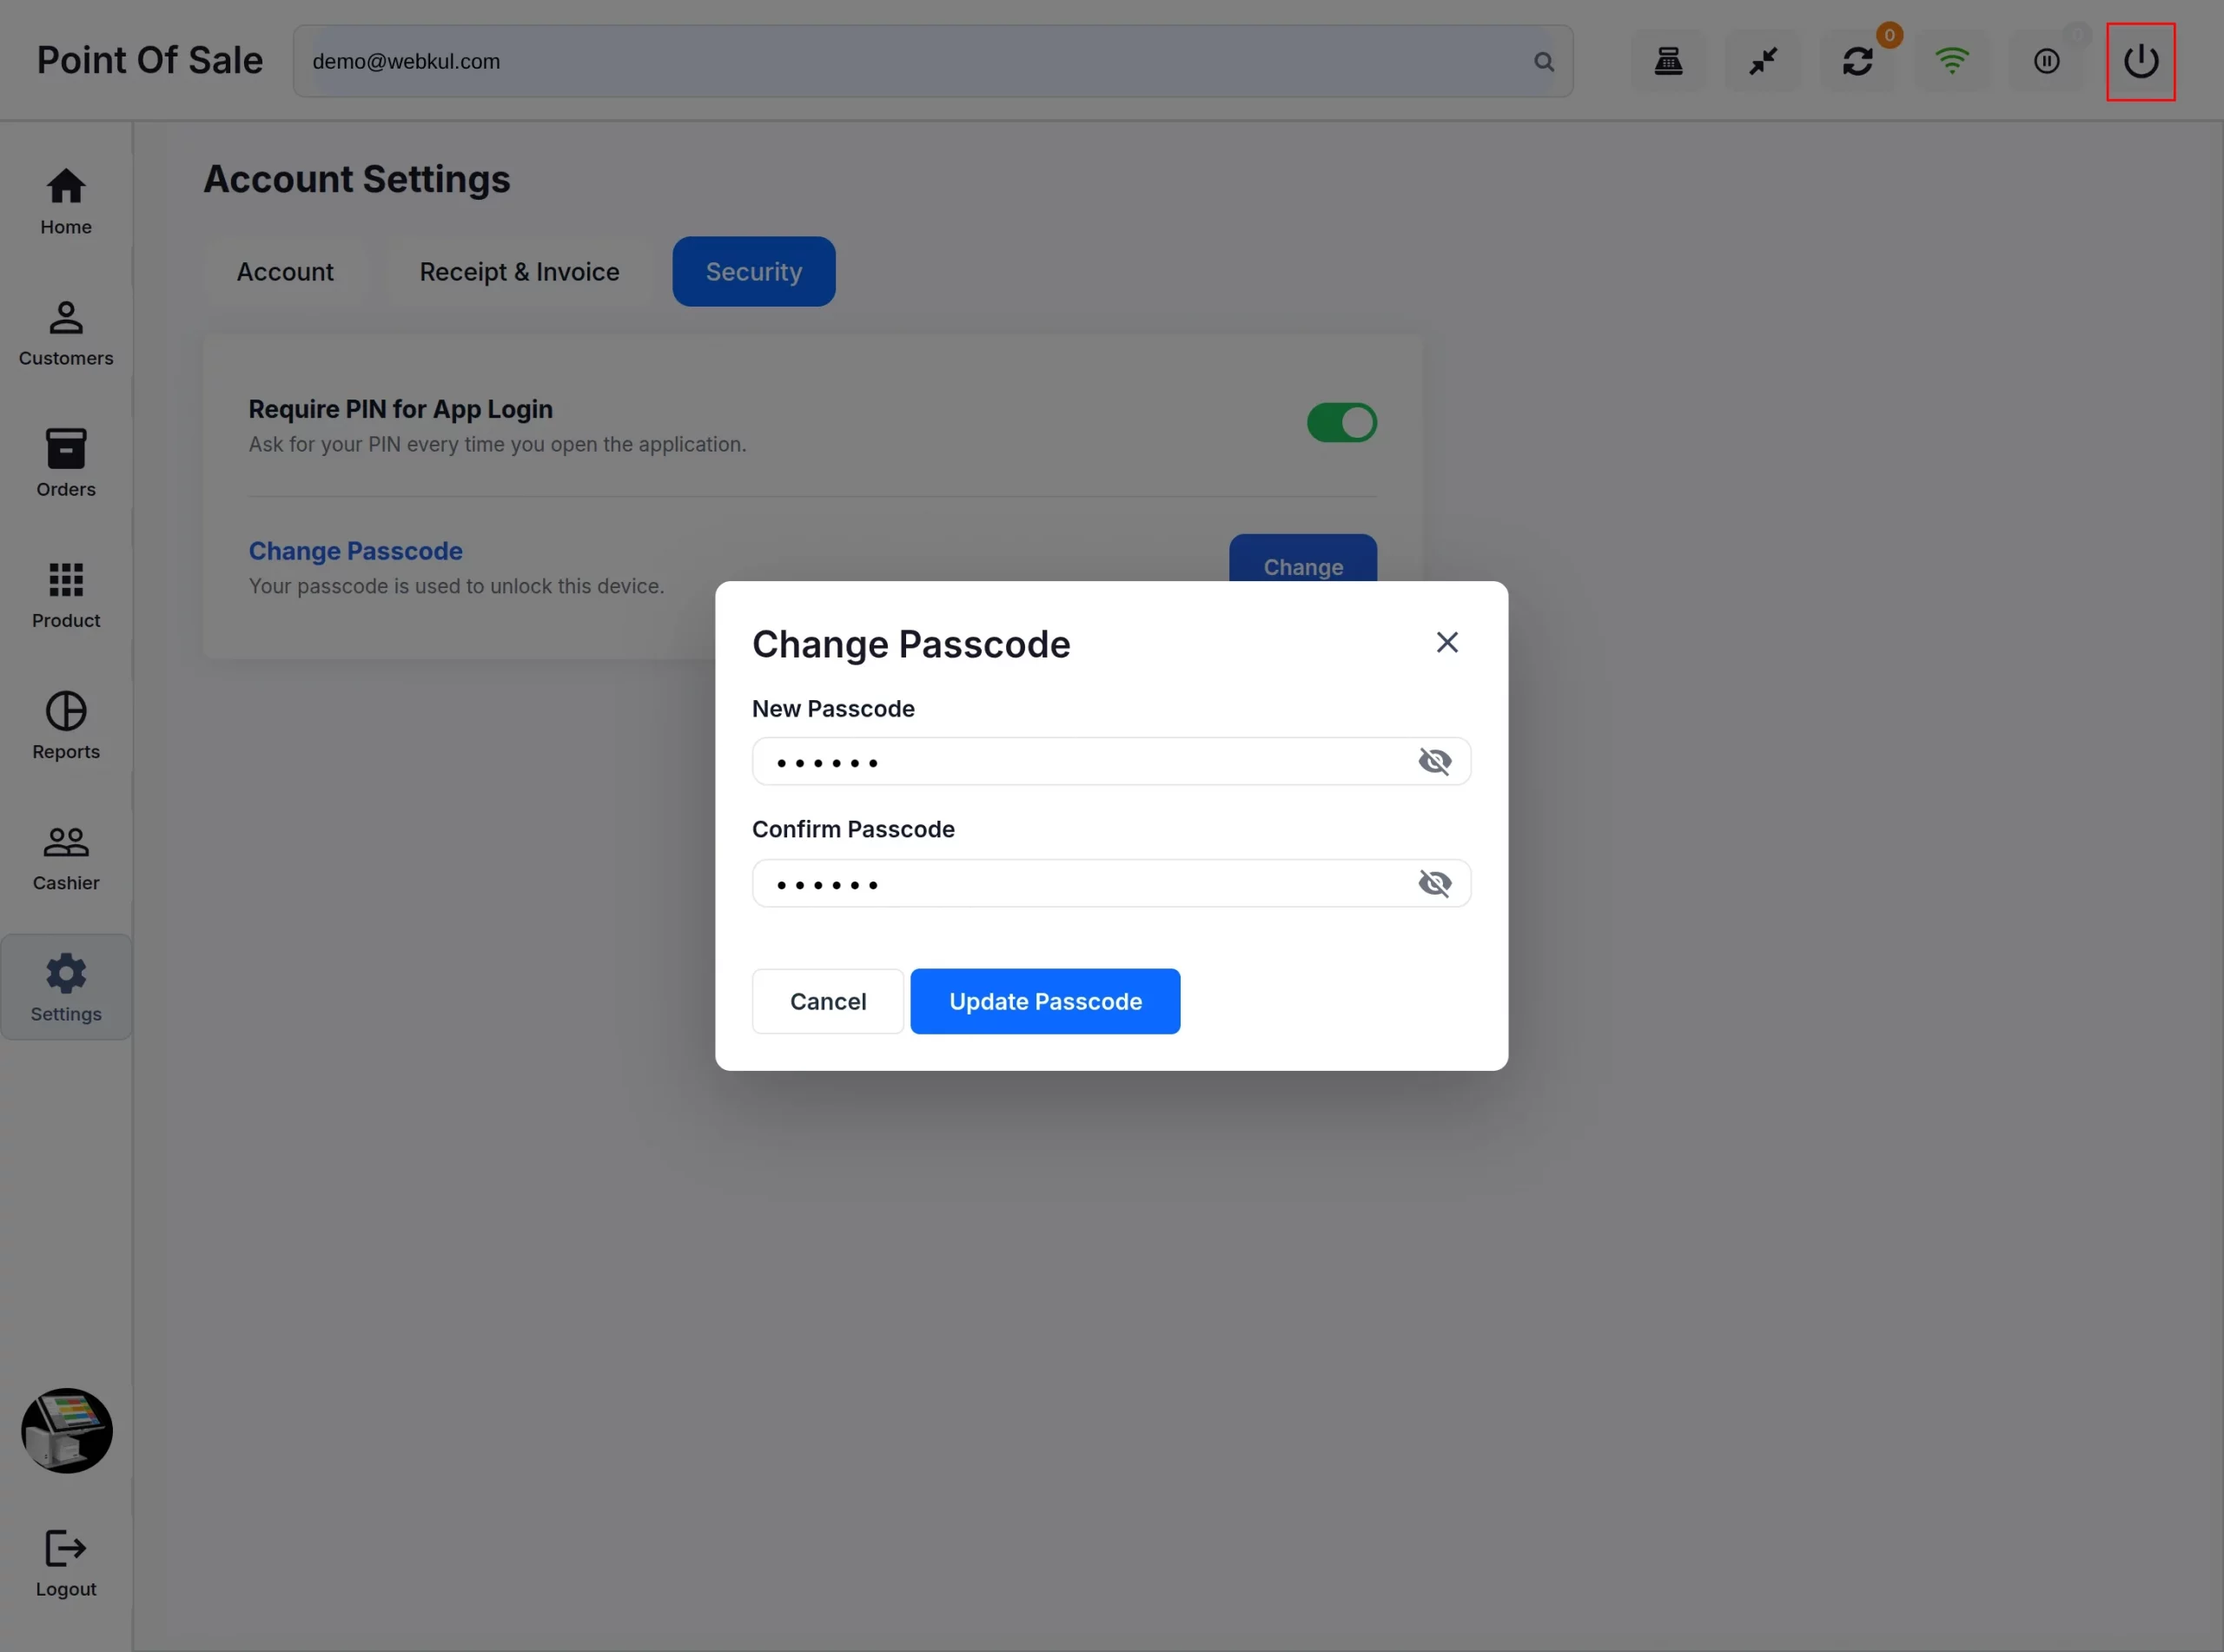
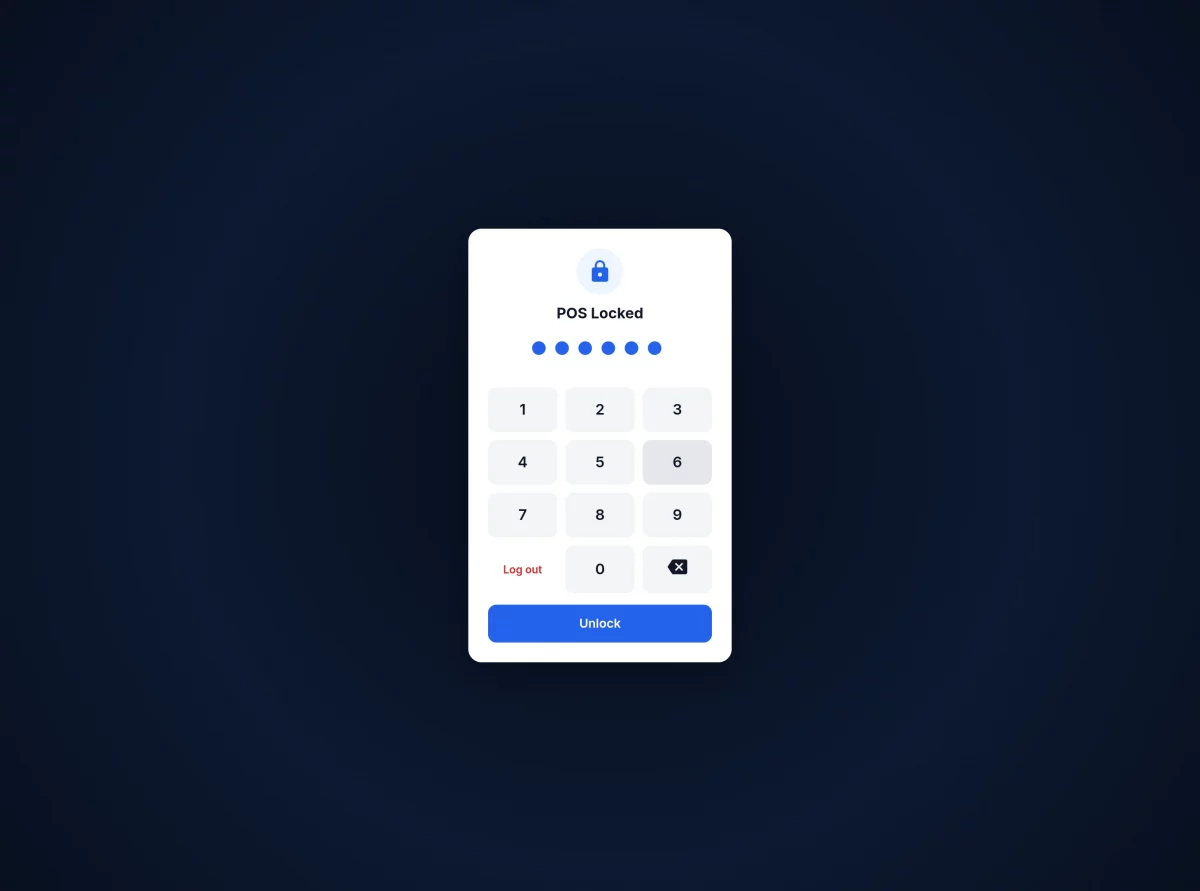
From here, agents can set a security PIN.
After locking the screen, agents must enter their security PIN to unlock the POS.
Open the Cash Drawer
After signing in, open the cash drawer to start placing orders.
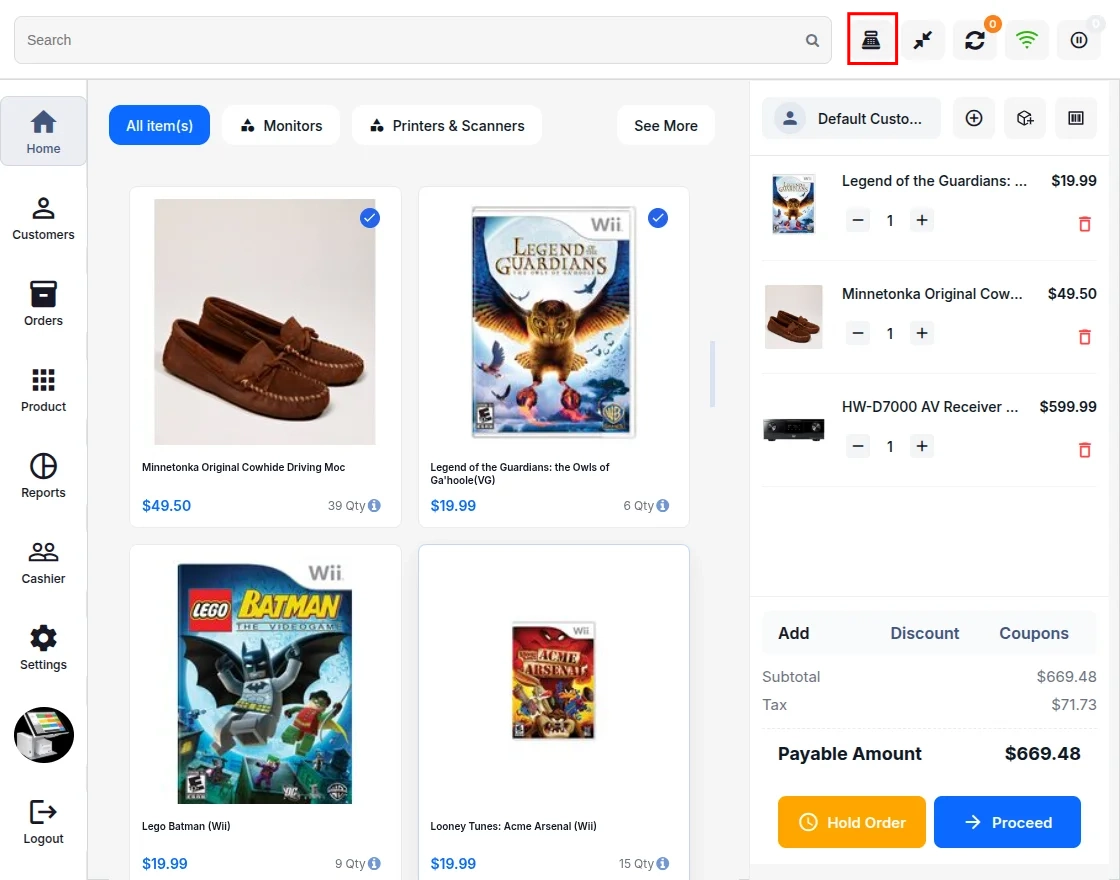
Note: Customers cannot place orders until the cash drawer is opened.
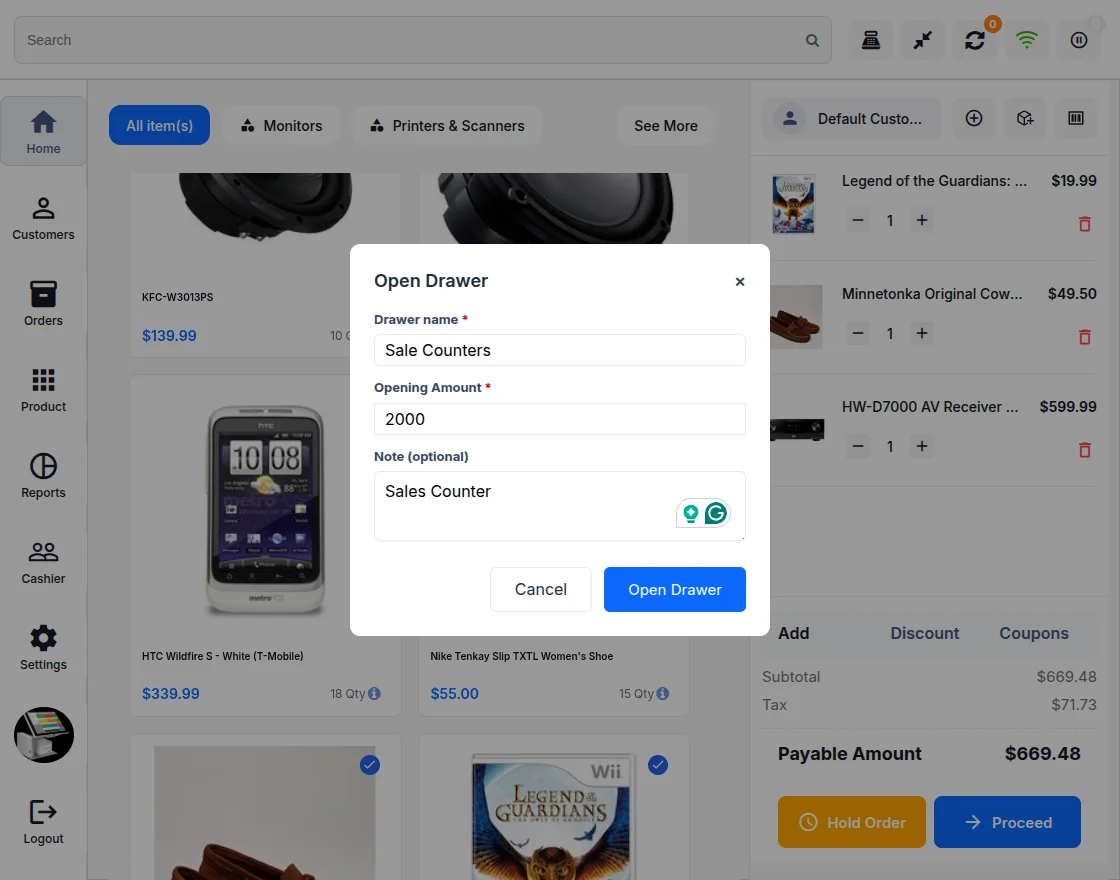
Fill in the drawer name, opening amount, and notes, then click Open Counter
Place Order
Agents can place an order by selecting products from the POS.
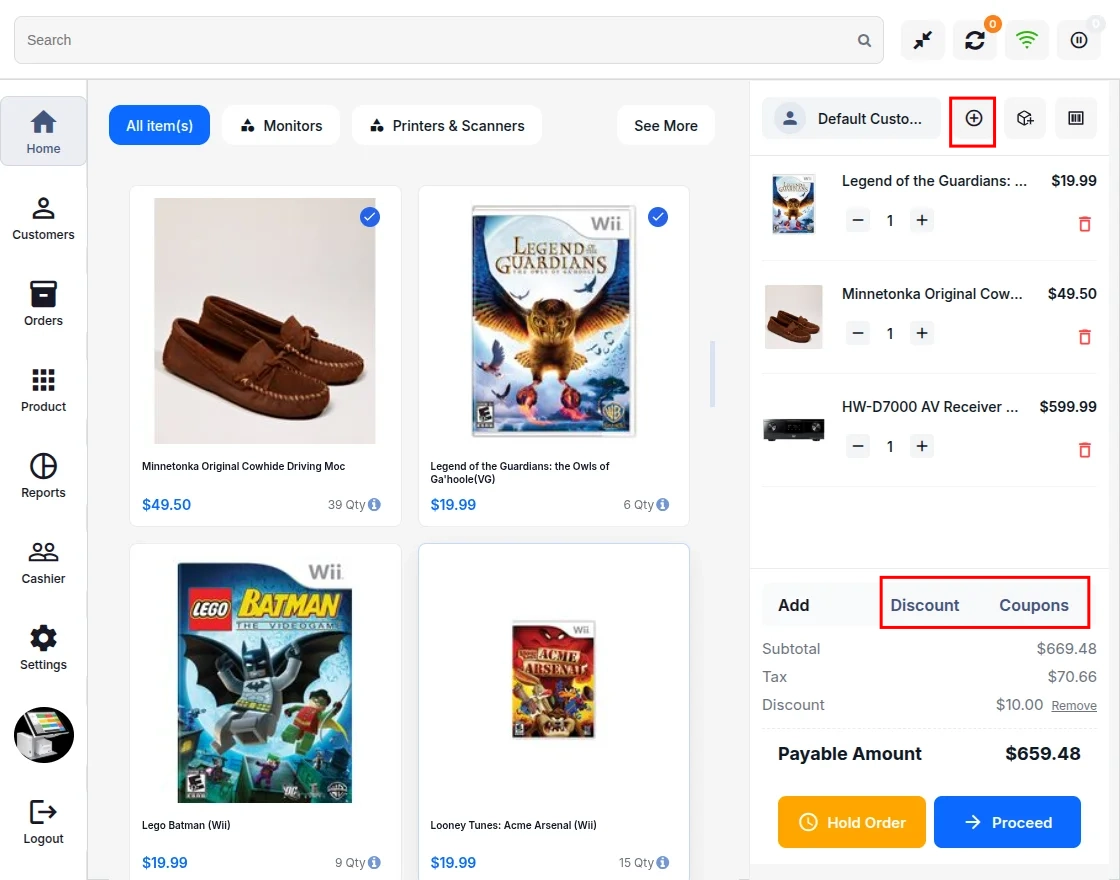
Vendors can apply discounts or coupon codes to the order.
Note: Before placing an order, agent must select a customer.
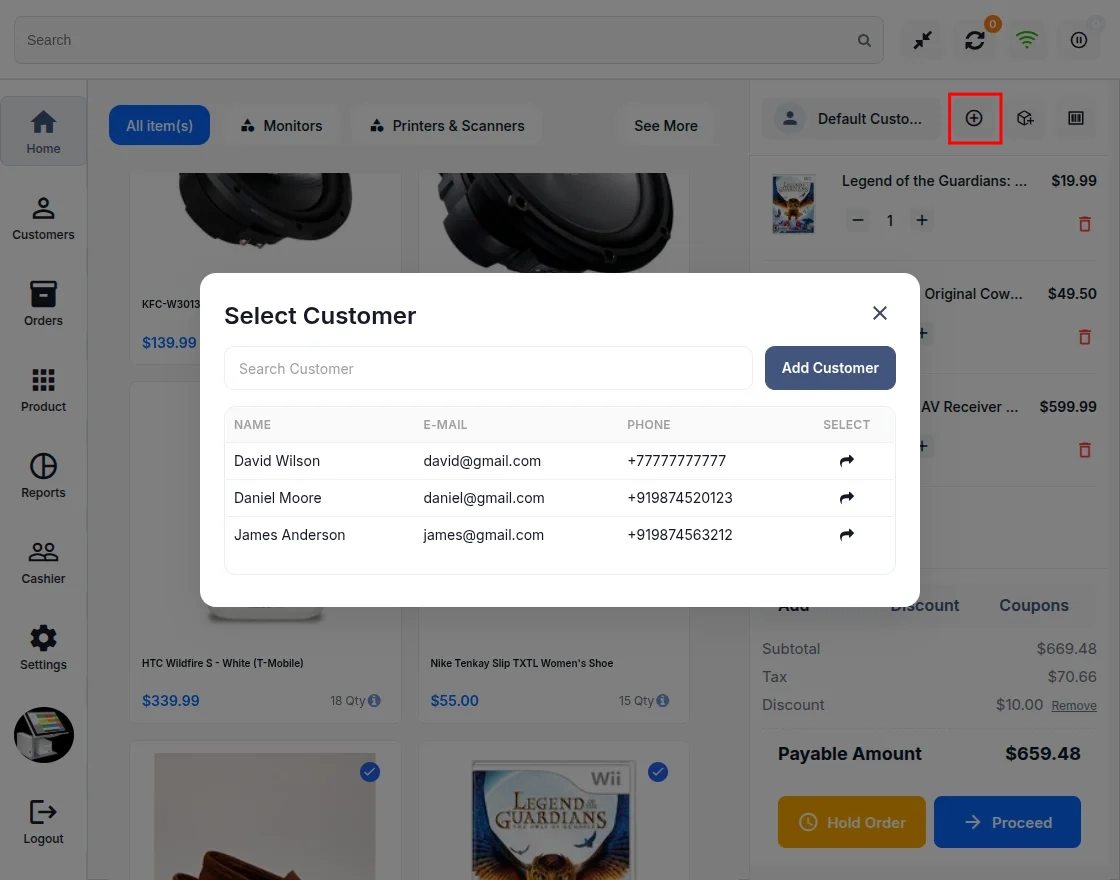
After selecting the customer, the agent can proceed to place the order.
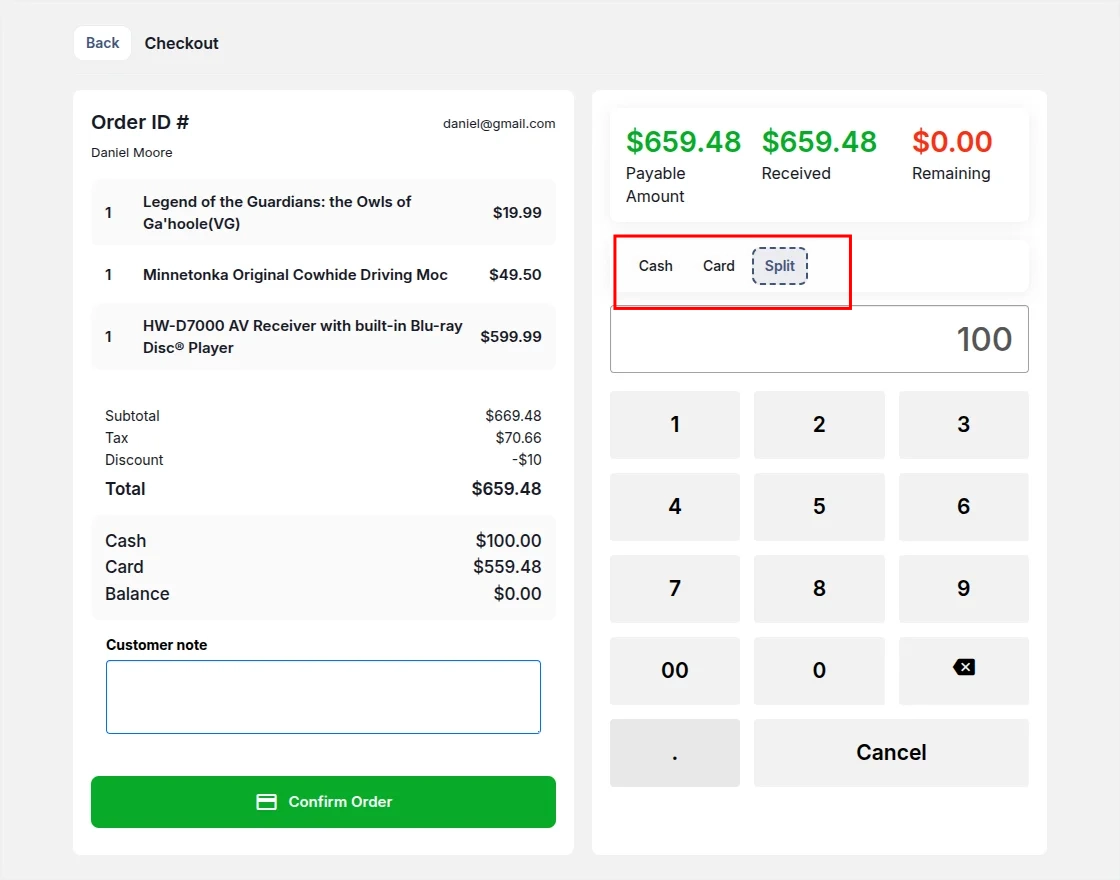
Agents can select the payment method and confirm the order.
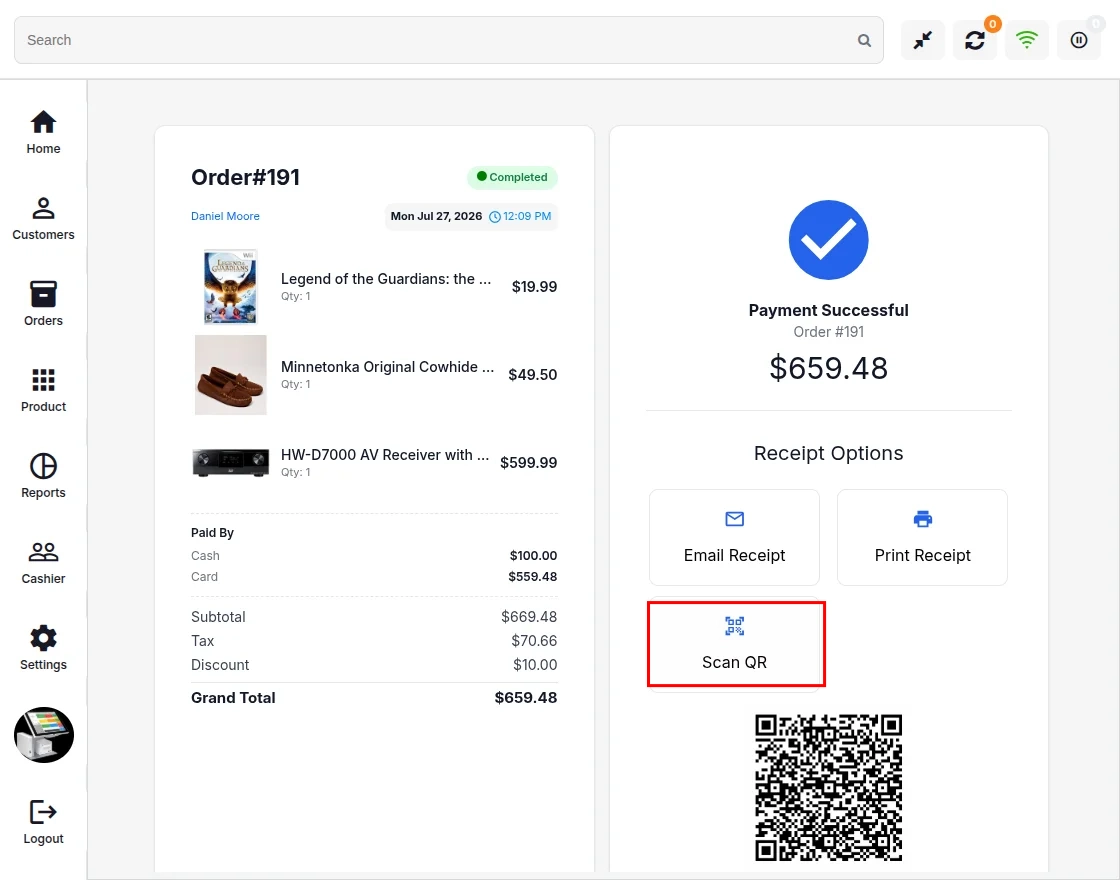
After placing the order, agents can send the receipt by email, print the receipt, or share it using a QR code.
Click Scan QR to scan an order QR code.
Hold Orders
Agents can hold orders and complete the checkout later.
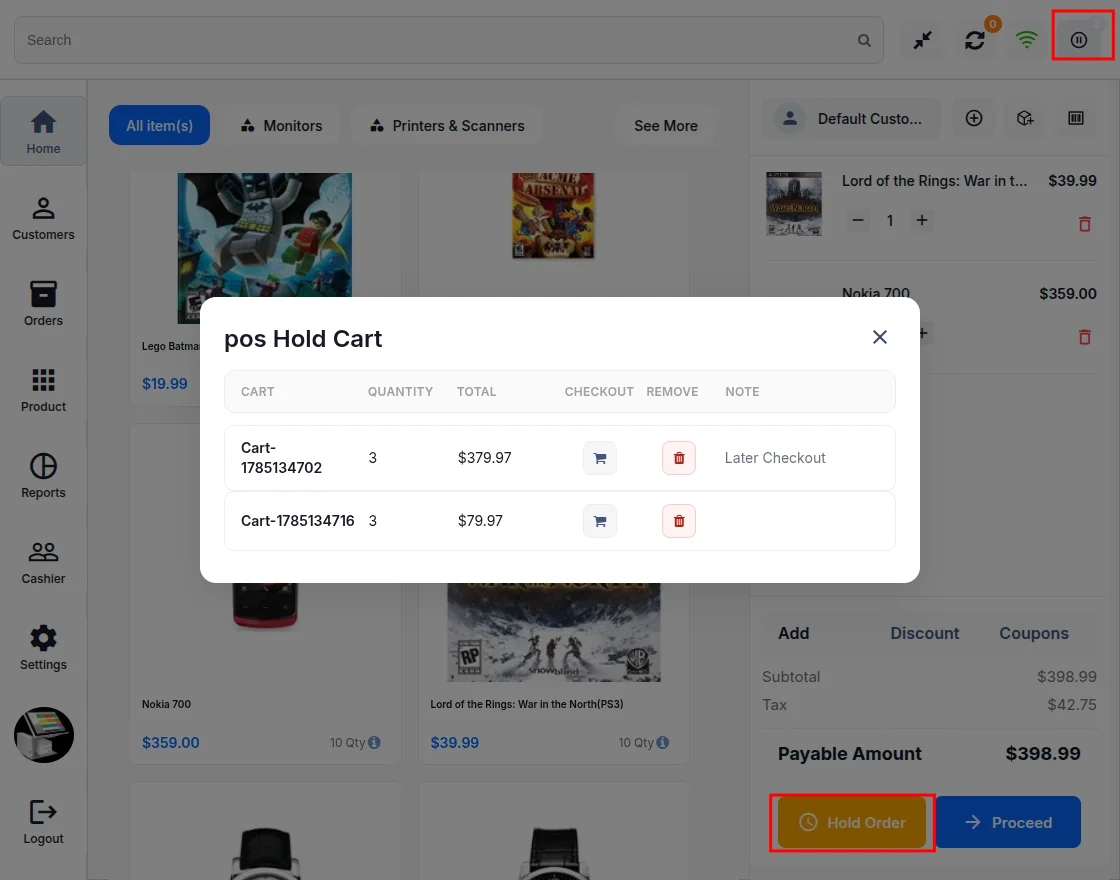
While placing an order, agents can hold the order and complete it later from the Hold Orders tab.
Barcode
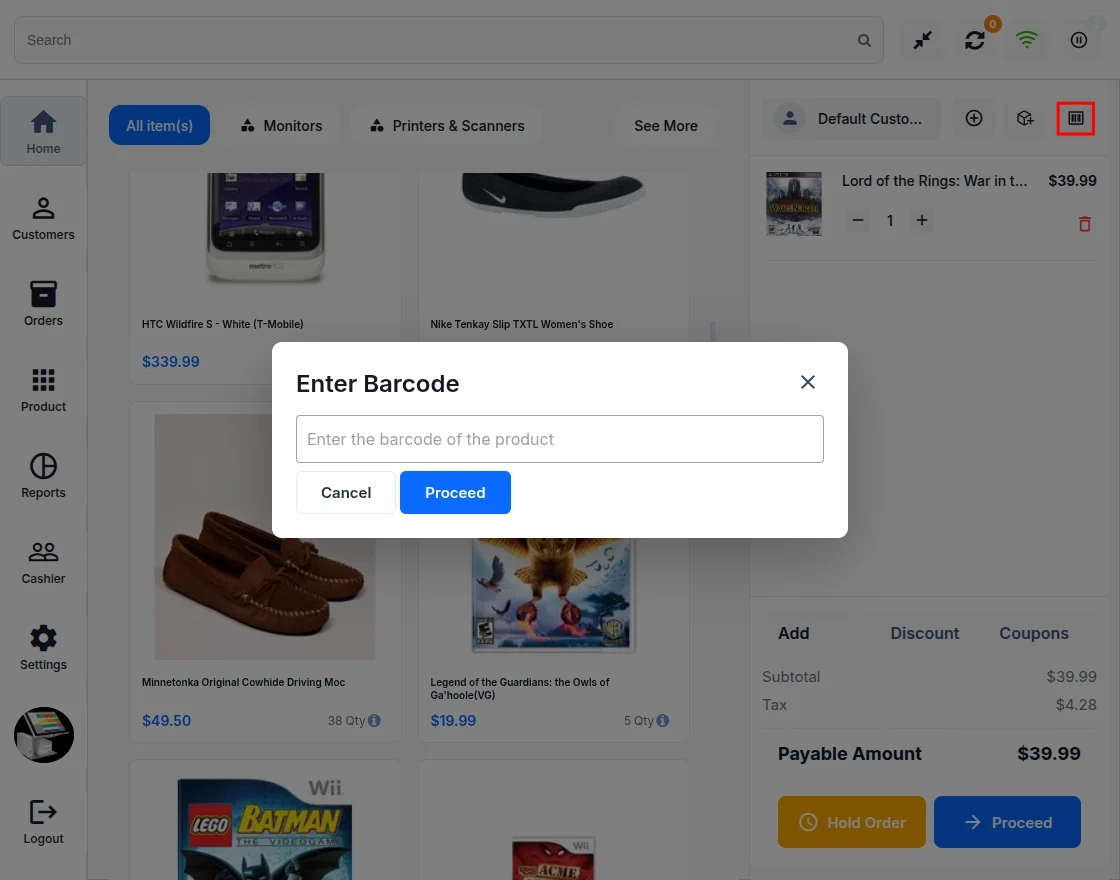
Agents can scan barcodes to add products to the cart.
Add Products
Agents can add products and sell them after admin approval.
Product Details
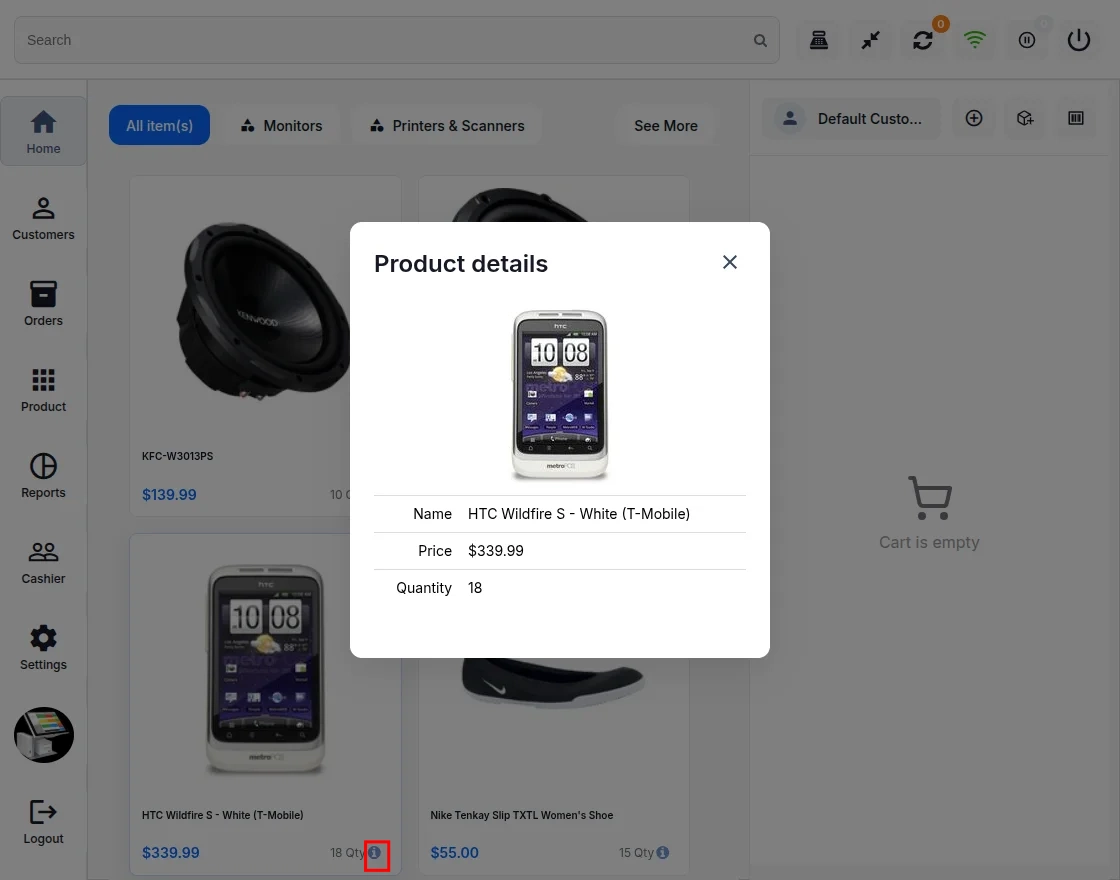
Agents can view product details by clicking the Info button.
Customers
Navigate to the Customers tab to manage customers.
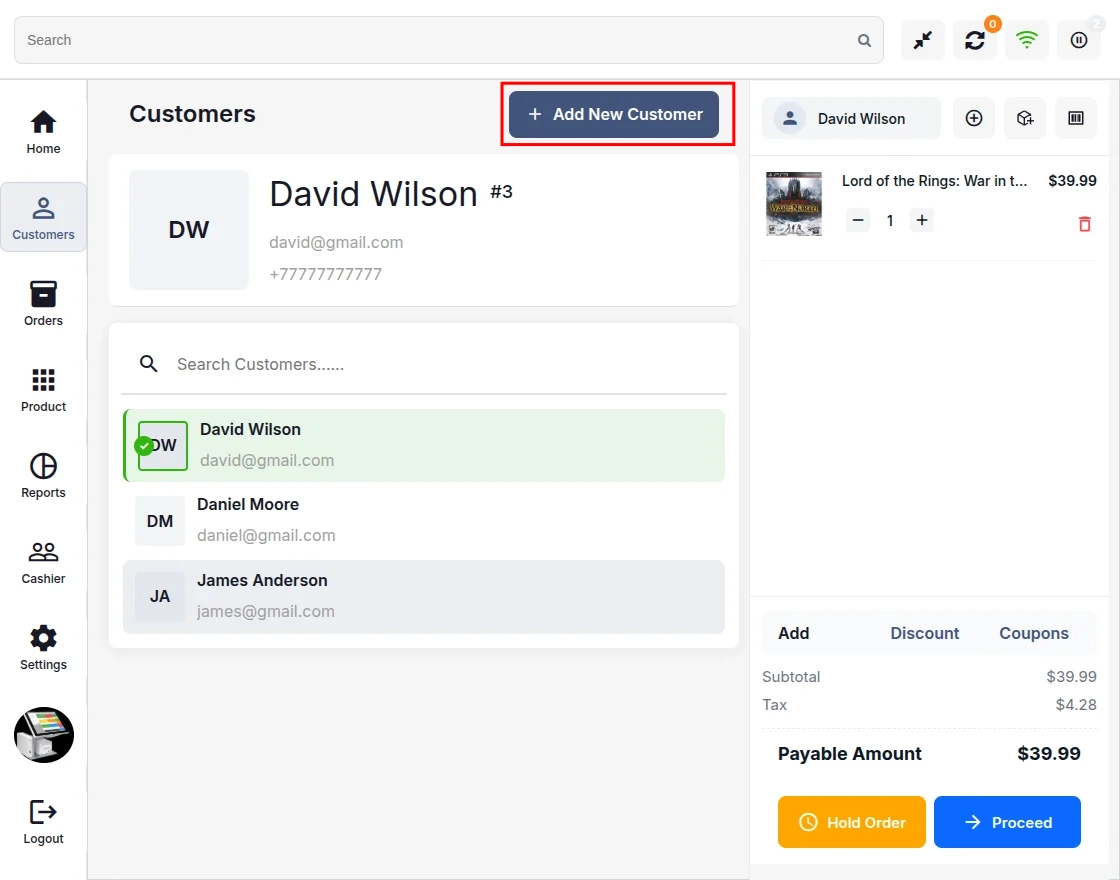
From here, agents can view the customer list and add new customers.
Note: A new customer is added to the CS-Cart store after the first order is placed with the same customer.
Orders
Navigate to the Orders tab to manage orders.
From here, you can apply filters to find and view order details.
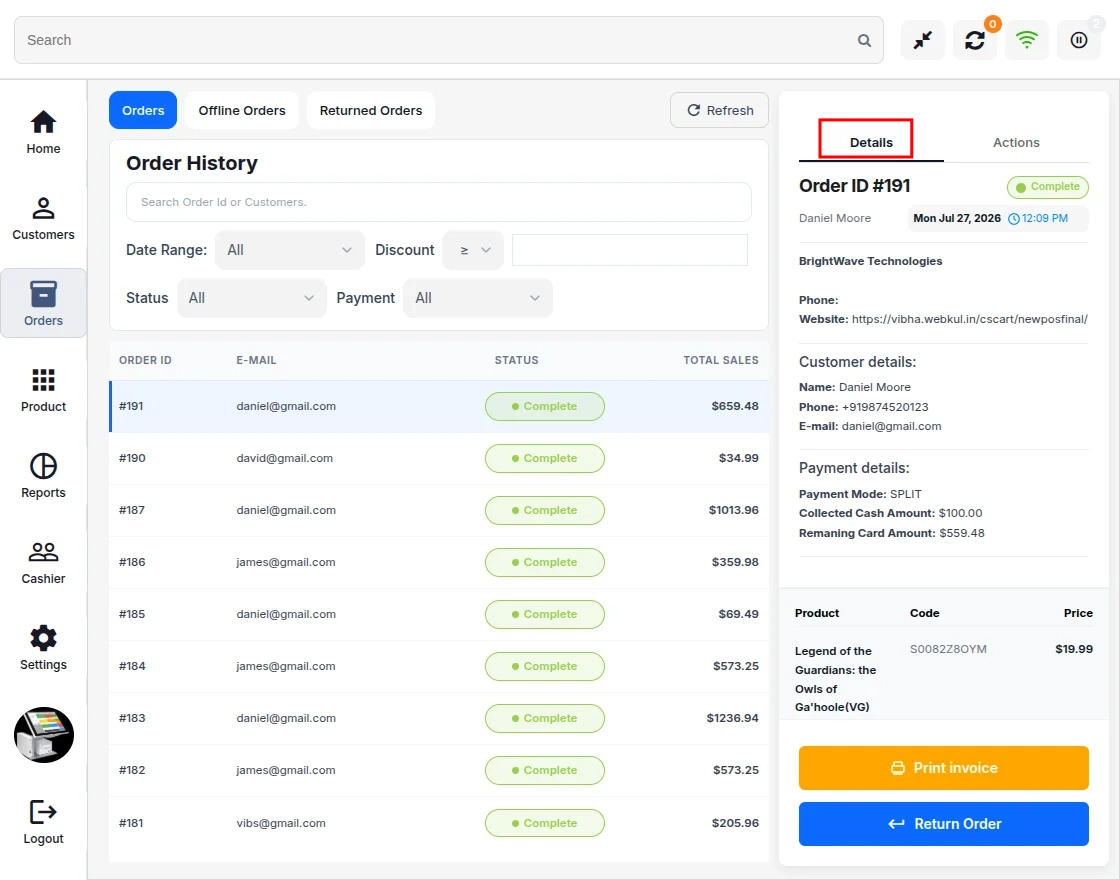
Select an order to view its details, print the invoice, or return the order.
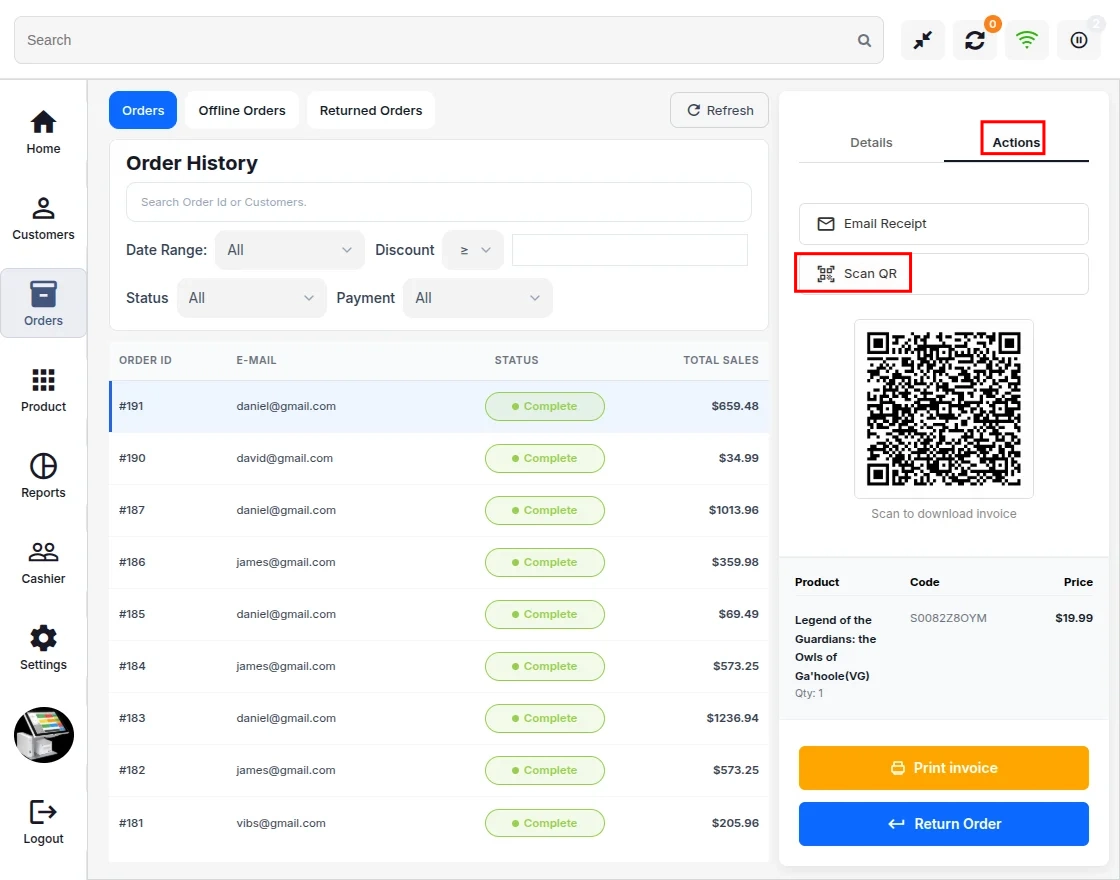
Navigate to the Actions tab to send the receipt by email or scan the QR code.
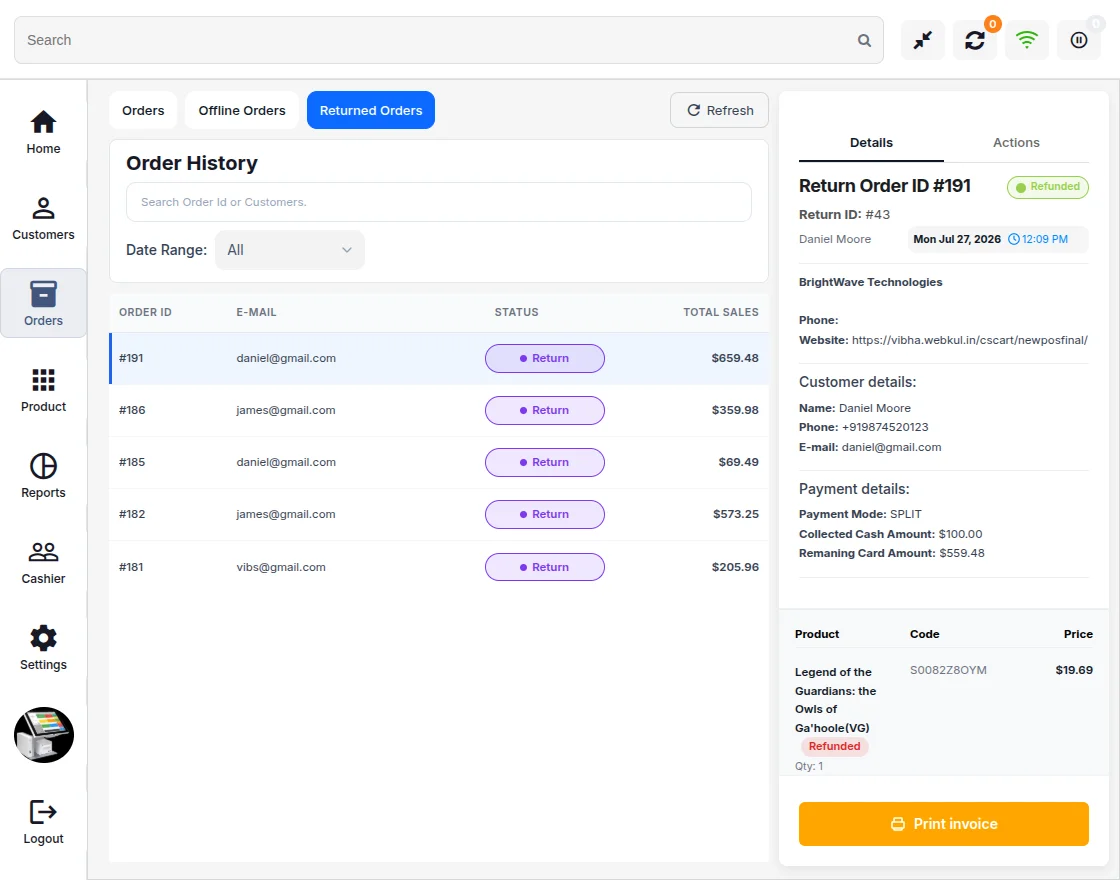
Return Orders
To return an order, agents need to select the order and create a return request. They can choose Refund or Replacement and select a return reason.
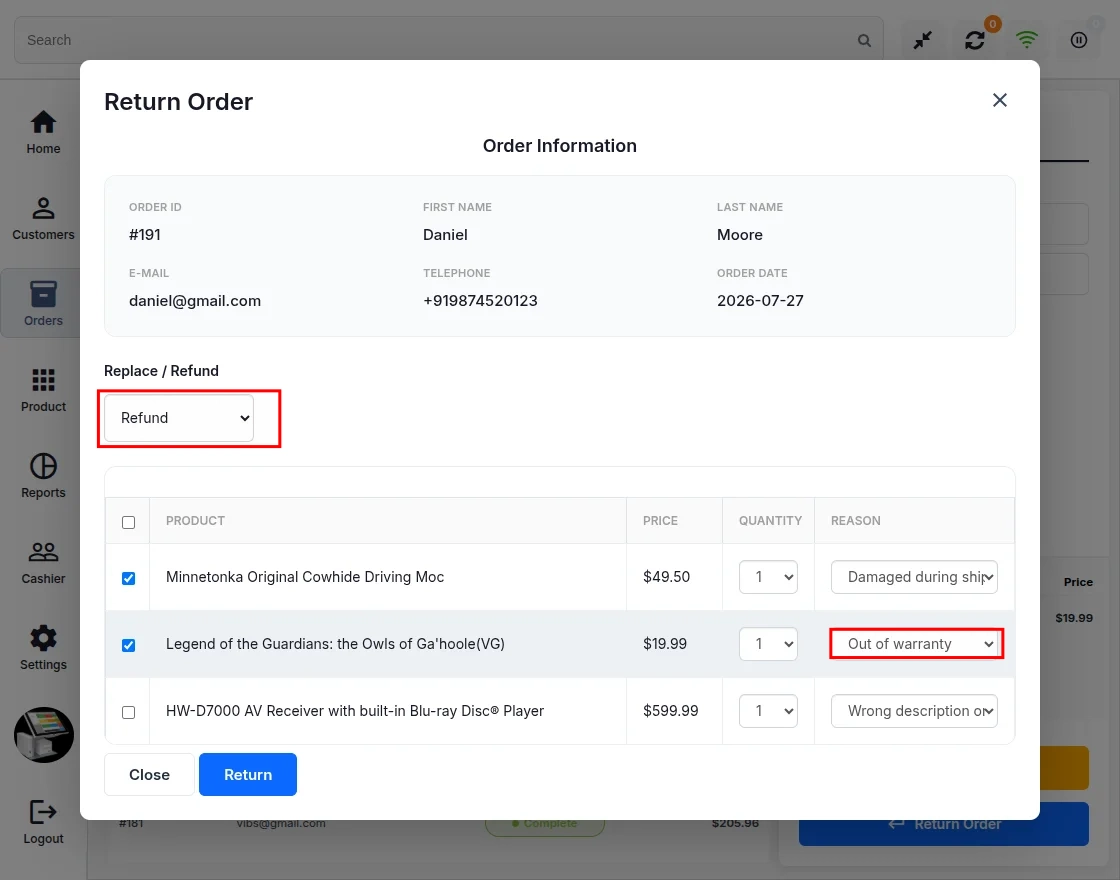
Navigate to the Returns tab to view return details.
Offline Orders
Navigate to the Offline tab to view offline orders.
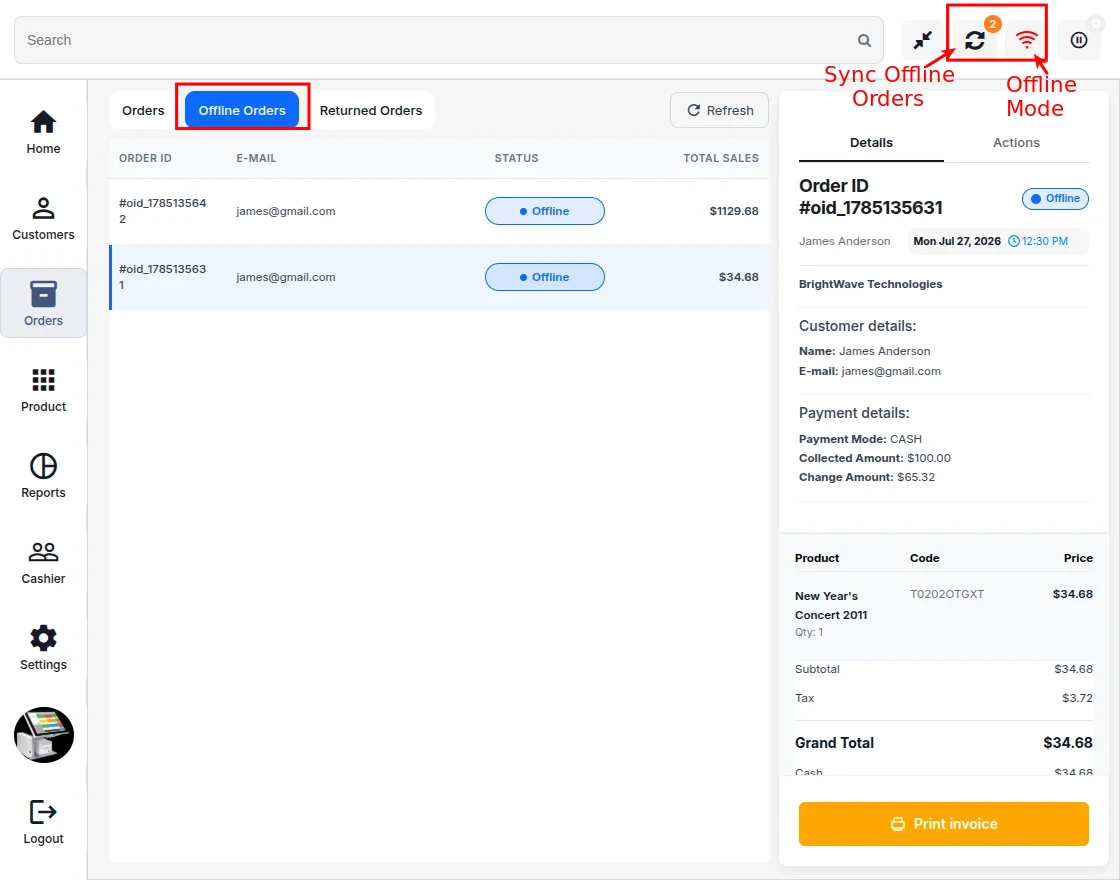
Note: Offline Mode must be enabled to create and manage offline orders.
When the POS goes online, offline orders are synced automatically. You can also sync them manually if needed.
POS Reports
Navigate to the Reports tab to view sales reports.
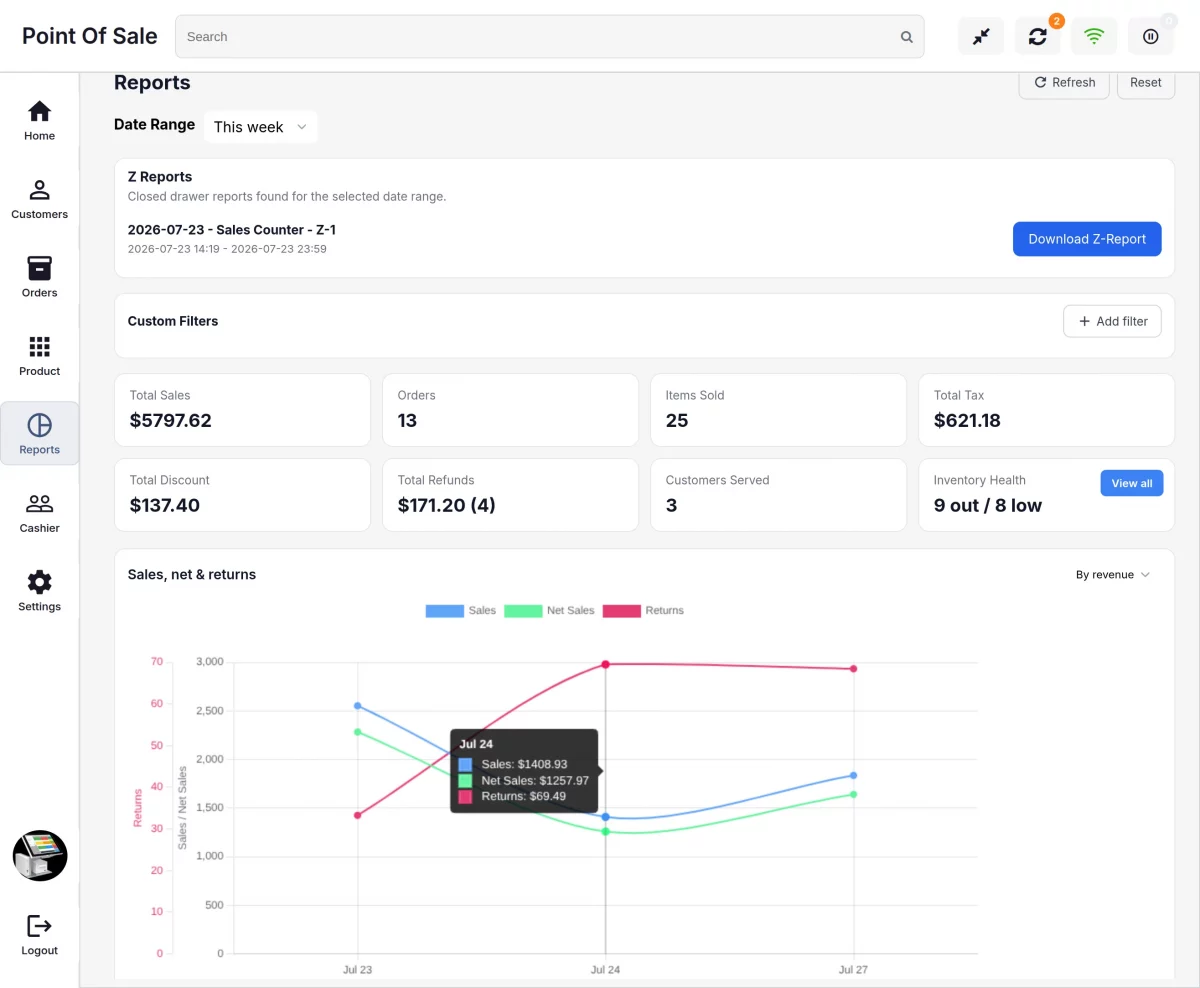
Date Range: Apply a date filter to view reports for a specific period.
- Z-Report: Download the Z-Report for a drawer session.
- Custom Filters: Apply filters such as order amount, order status, payment method, and tax to find specific reports.
- Total Sales: Displays the total value of completed orders.
- Orders: Displays the total number of orders placed during the selected date range.
- Items Sold: Displays the total number of products sold during the selected date range.
- Total Tax: Displays the total tax amount collected during the selected date range.
- Total Discount: Displays the total discount amount applied during the selected date range.
- Total Refund: Displays the total refunded amount during the selected date range.
- Customers Served: Displays the total number of customers who placed orders during the selected date range.
- Inventory Health: Displays out-of-stock and low-inventory products.
Note: Refunded orders remain in the reports with adjusted totals; refunds are also shown separately.
Sales, net & returns
- Total Sales: Displays the total sales amount, which is equal to the total order value.
- Net Sales: Displays the sales amount after deducting taxes from the total sales.
- Returns: Displays the total refunded amount.
You can filter the report by Revenue or Quantity.
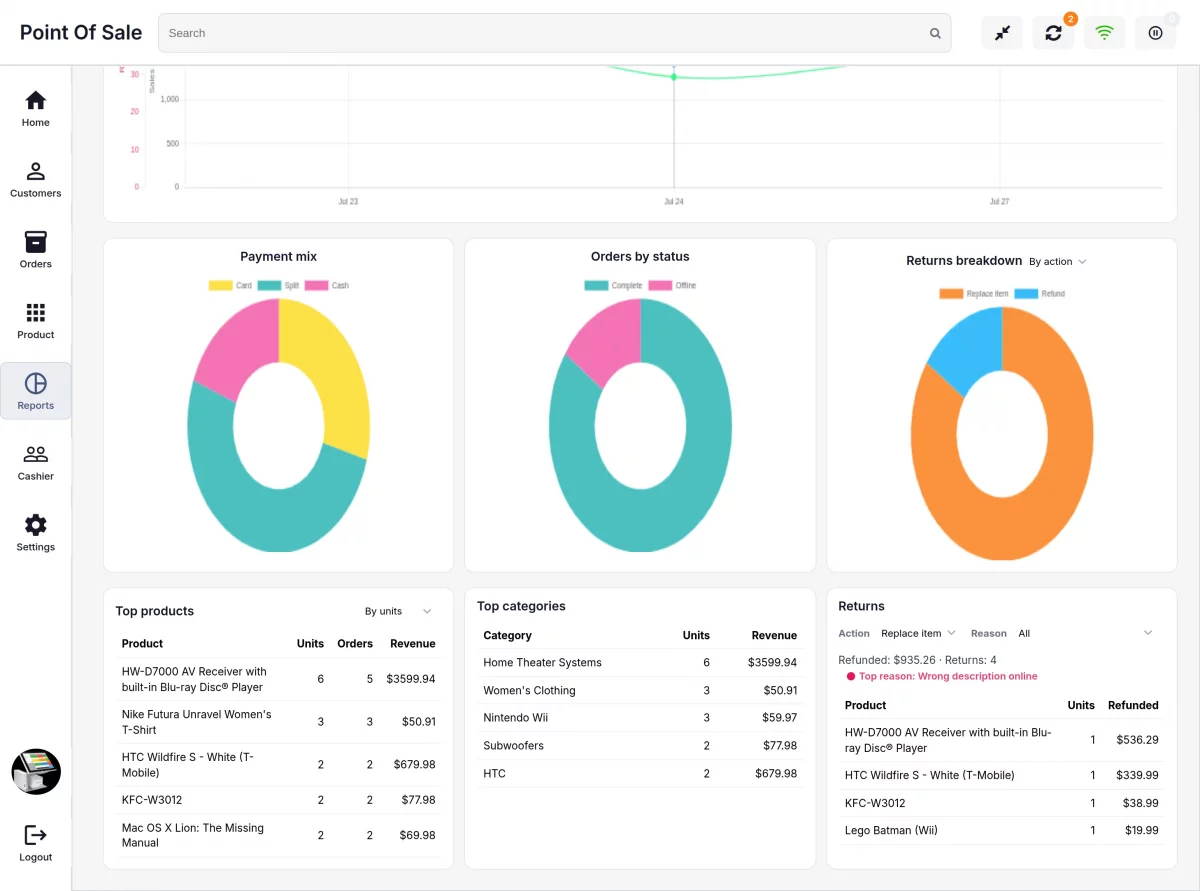
KPI cards
- Payment Mix: Displays the percentage of orders by payment method.
- Orders by Status: Displays the number of orders based on their status.
- Returns Breakdown: Displays the total returns based on the return type.
- Top Products: Displays the best-selling products based on the number of items sold.
- Top Categories: Displays the best-selling product categories based on the number of products sold.
- Returns: Displays the returned orders along with the refund amount and return status.
Cashier
Navigate to the Cashier tab to view cashier details.
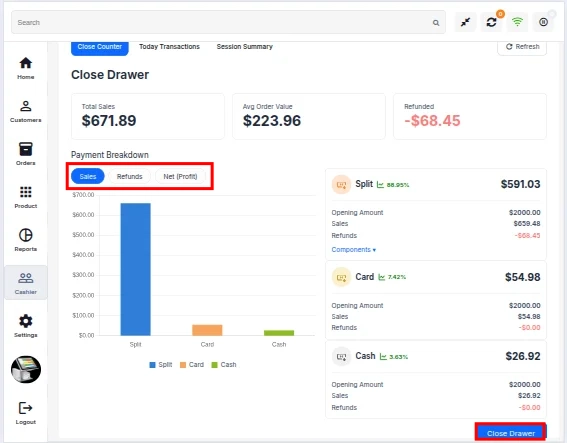
- Total Sales: Displays the total sales amount for the current day.
- Avg. Order Value: Displays the average value of orders.
- Refunds: Displays the total refunded amount.
Payment Breakdown
- Payment Breakdown: Displays the sales summary by payment method.
- Sales: Displays the total amount of all orders in the selected cashier session.
- Returns: Displays the total refunded amount in the selected cashier session.
- Net Sales: Displays the sales amount after deducting refunds from the total sales.
Net Sales = Total Sales − Refund Amount
Today Transaction
Navigate to the Today’s Transactions tab to view all transactions.
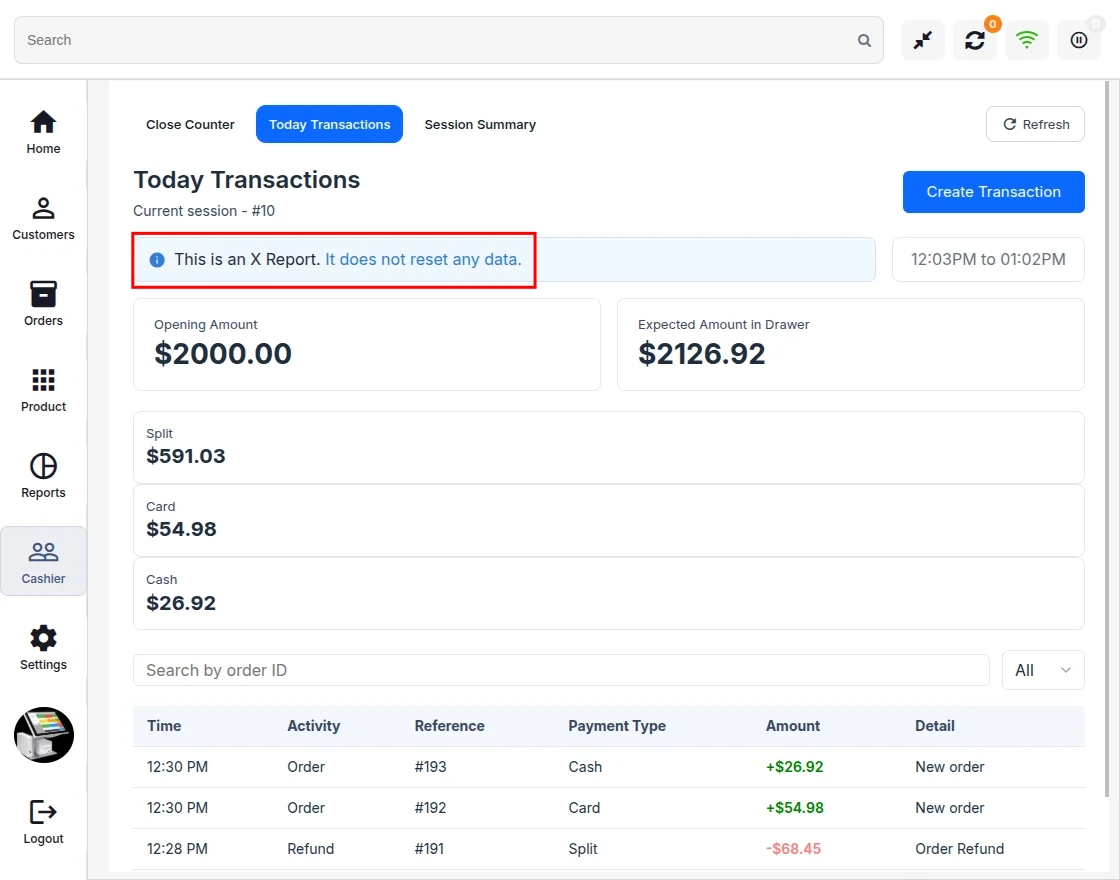
- X-Report: Download the current drawer report without closing the cashier session.
- Create Transaction: Create a cash drop or cash transaction for the current drawer session.
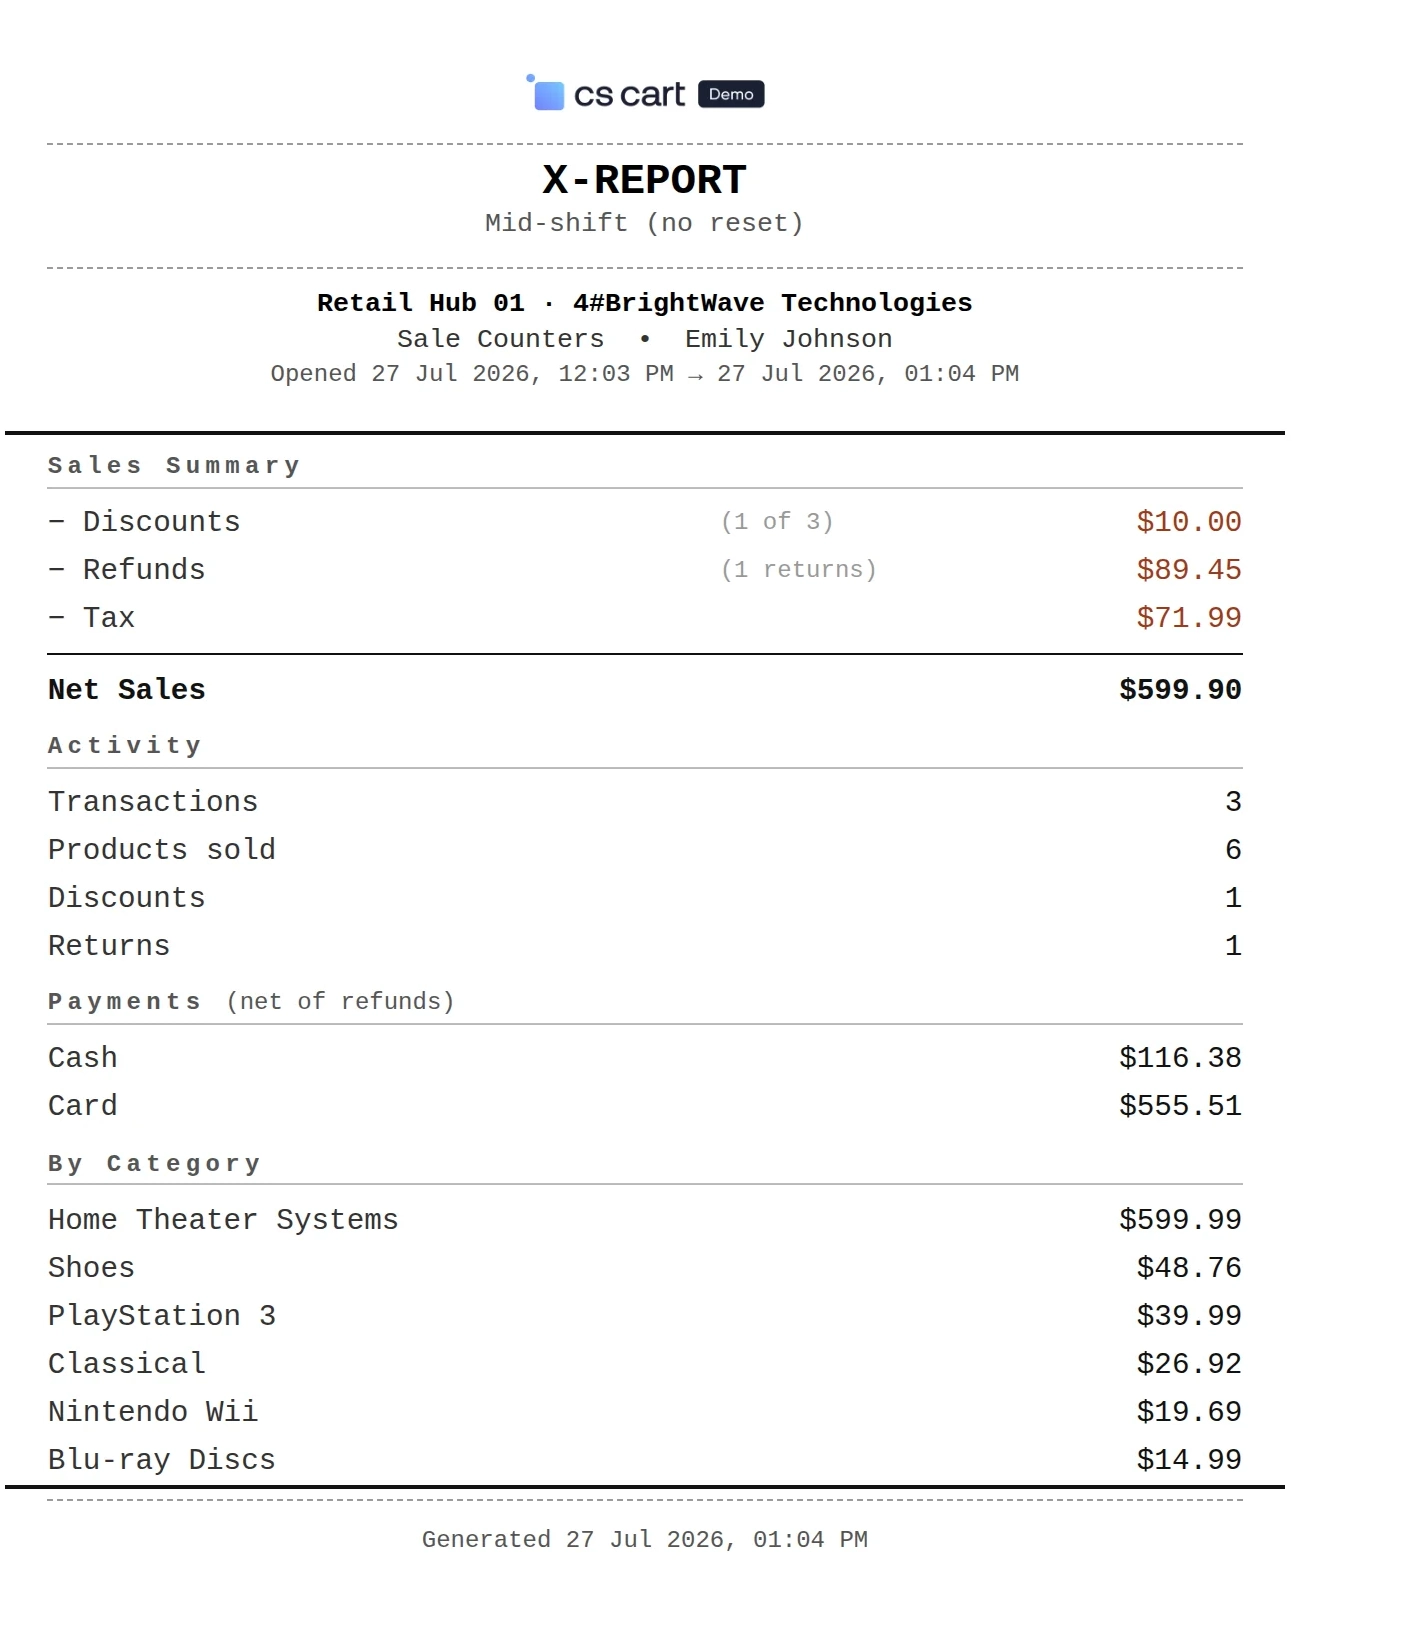
X-Report
X-Report can be generated while the cashier session is open.
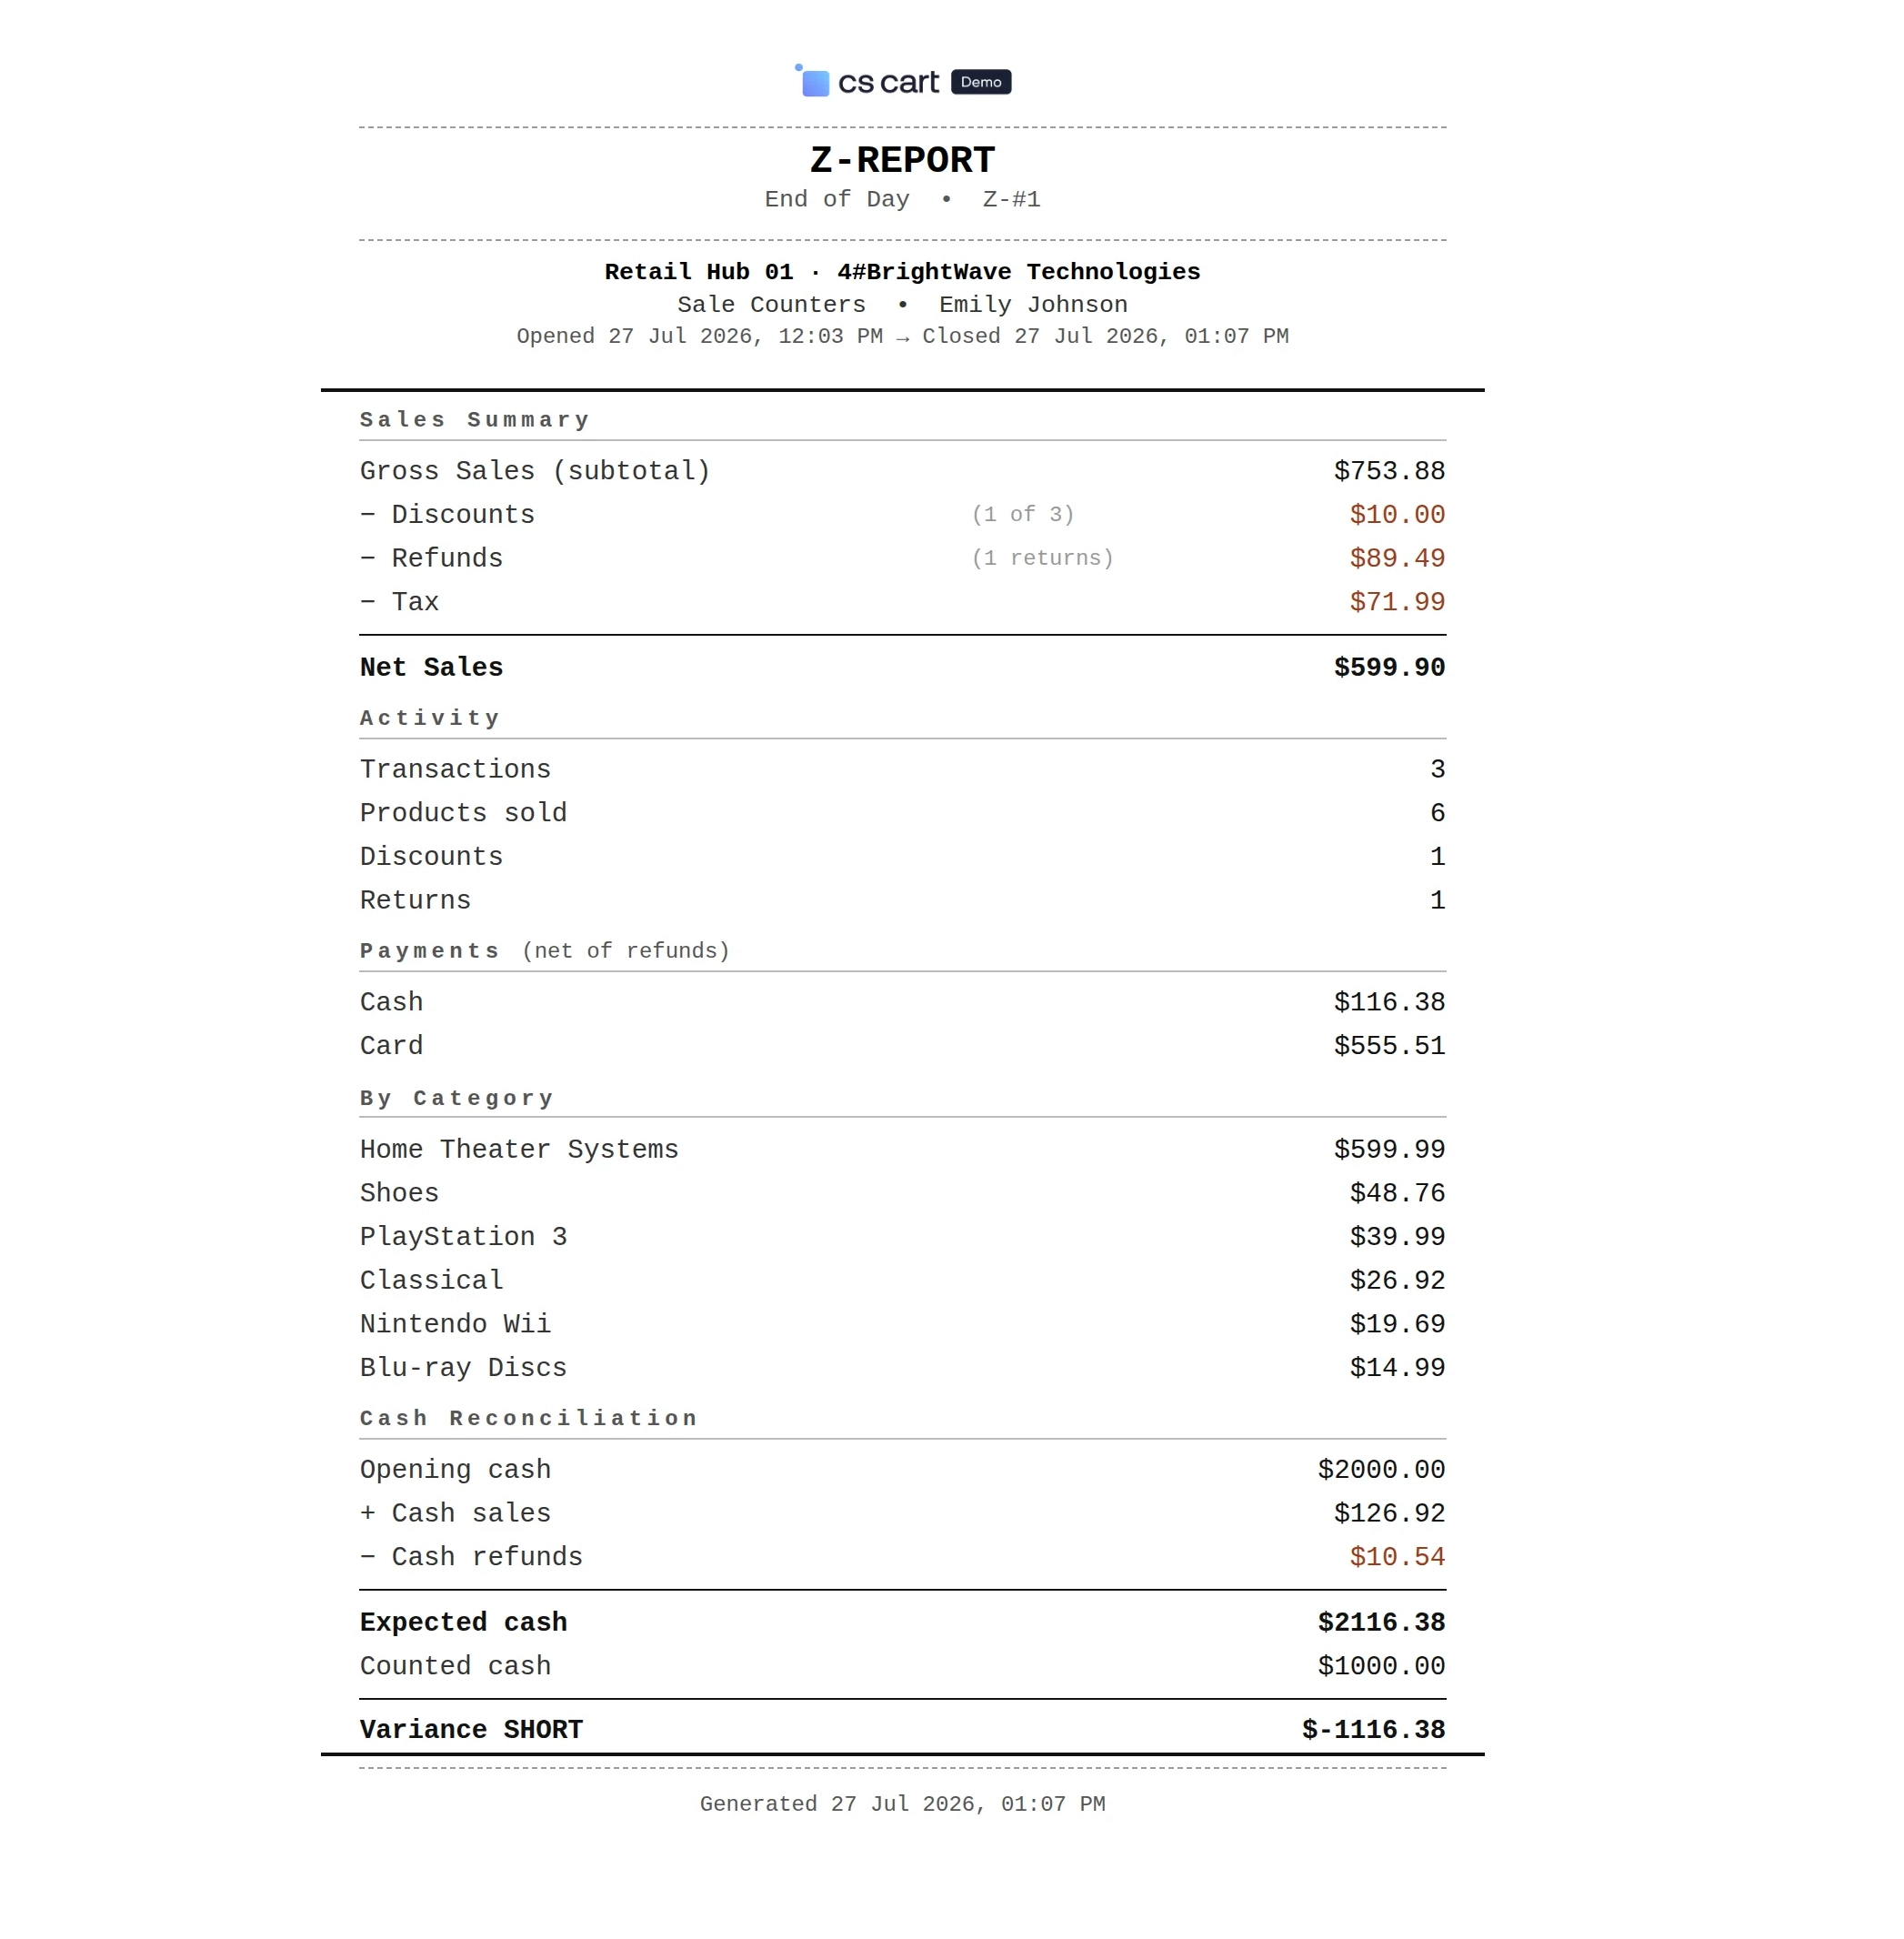
Z-Report
A Z-Report is generated automatically when the cashier session is closed.
Session Summary
Navigate to the Session Summary tab to view the summary for each cashier session.
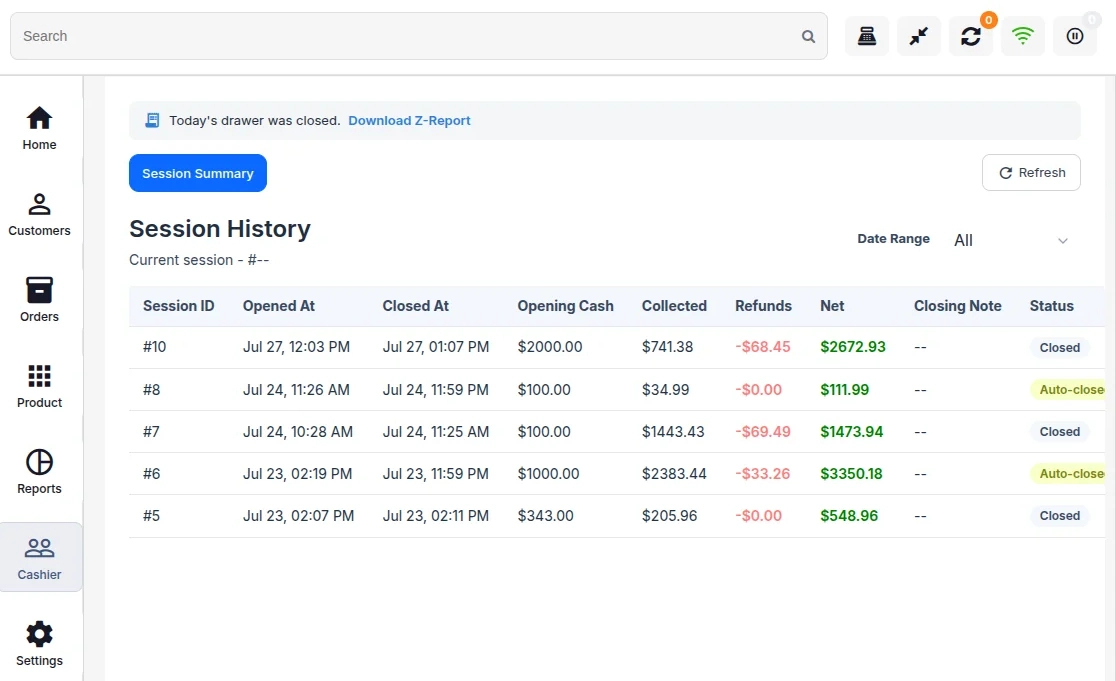
- Opening Cash: Displays the cash amount entered when opening the cash drawer.
- Collected Cash: Displays the cash amount counted and entered while closing the cash drawer.
- Net Cash: Displays the final cash balance, calculated as Opening Cash + Collected Cash − Refunds − Transactions.
Note: The cashier session automatically closes at the end of the day.
Support
That’s all for the add-on. If you still have any issues, feel free to write here http://webkul.uvdesk.com and let us know your views to make the module better.
Please explore our CS-Cart Development Services and Quality CS-Cart add-ons.
Current Product Version - 4.0
Supported Framework Version - 4.18.x,4.19.x,4.20.x


Be the first to comment.