Magento 2 Advanced Import Export is an extension that goes beyond Magento’s default import and export. It adds support for Orders, Invoices, Categories, CMS Pages, and more.
It connects to multiple data sources, including File Upload, FTP, SFTP, and REST API, for automated data exchange. This helps admins move store data quickly and without manual effort.
Managing imports and exports manually takes time and often leads to errors. It also limits store data to the few entities Magento supports by default.
This module solves these issues by adding 18+ entity types and a built-in Job Scheduler. It keeps every operation logged and lets admins automate recurring tasks.
This extension is ideal for store owners managing large catalogs, multi-source data, or recurring data syncs. It helps maintain accurate, up-to-date store data with minimal manual work.
Now, if you want to create invoices, shipments, and update multiple orders in bulk from the admin panel you can check the Magento 2 Bulk Order Processing Extension.
Features
- Adds support for 18+ Magento entities not covered by default import and export.
- Imports Orders, Invoices, Shipments, and Credit Memos via CSV, and exports them as CSV, XML, or JSON
- Supports Categories, CMS Pages, Coupons, and URL Rewrites for import and export.
- Connects to File Upload, FTP, SFTP, and REST API as data sources.
- Includes a built-in Job Scheduler for recurring import and export jobs.
- Runs scheduled jobs in the background using Magento message queue consumers.
- Logs every operation automatically in a detailed Run History.
- Tracks row-level status, including processed, skipped, and failed records.
- Sends email notifications when a scheduled job completes.
- Offers Add/Update, Replace, and Delete options for import behavior.
- Provides export attribute filtering to include or exclude specific fields.
- Supports custom field separator, value separator, and empty value handling.
- Allows sample CSV downloads for every supported import entity.
- Supports key-based and password-based authentication for SFTP.
- Falls back cleanly to the default Magento flow when the module is disabled.
- Improves data accuracy and saves admin time across large-scale operations.
Installation
#1 Download Module
Firstly, you need to log in to the Webkul Store, go to My Account>My Purchased Products section, verify, and then download and extract the contents of this zip folder on the system.
#2 Upload Folder
Once the module zip is extracted, follow path src>app and then copy the app folder into the Adobe Commerce Cloud root directory on the server as shown below:

#3 Run Commands
After uploading the module folder, you need to run the following commands in the Magento 2 root directory:
php bin/magento setup:upgrade
php bin/magento setup:di:compile
php bin/magento setup:static-content:deploy
php bin/magento indexer:reindex
php bin/magento cache:flush
php bin/magento cron:install
php bin/magento cron:run
php bin/magento queue:consumers:start advimp.job.execute &
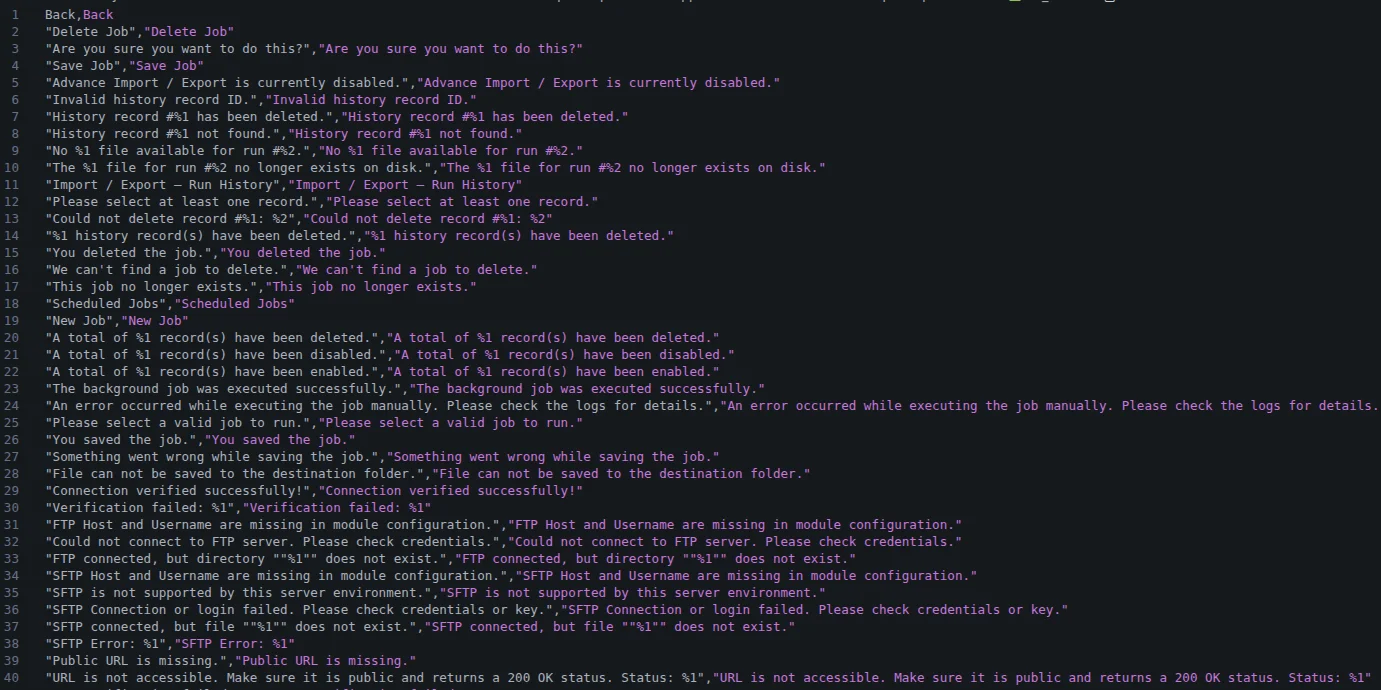
Language Translation
If you need to do the module translation, please navigate to the following path in your system app/code/Webkul/AdvancedImportExport/i18n.
Open the file named en_US.csv for editing as shown in the below screenshot.

Once you have opened the file for editing. Replace the words after the comma(,)†on the right with your translated words.
After editing and translating the CSV file, you need to save the translated file name according to your region language and country code such as – de_DE.csv.
Then upload the translated file to the same folder from where you obtained it. Now your module translation is complete.

Note – If you want to track and audit admin activity across your store, check out our Magento 2 Admin Action Logs extension.
Module Configuration – Magento 2 Advanced Import Export
After successfully installing the Advanced Import Export module, the admin can navigate to: Stores → Configuration → Webkul → Advanced Import Export.
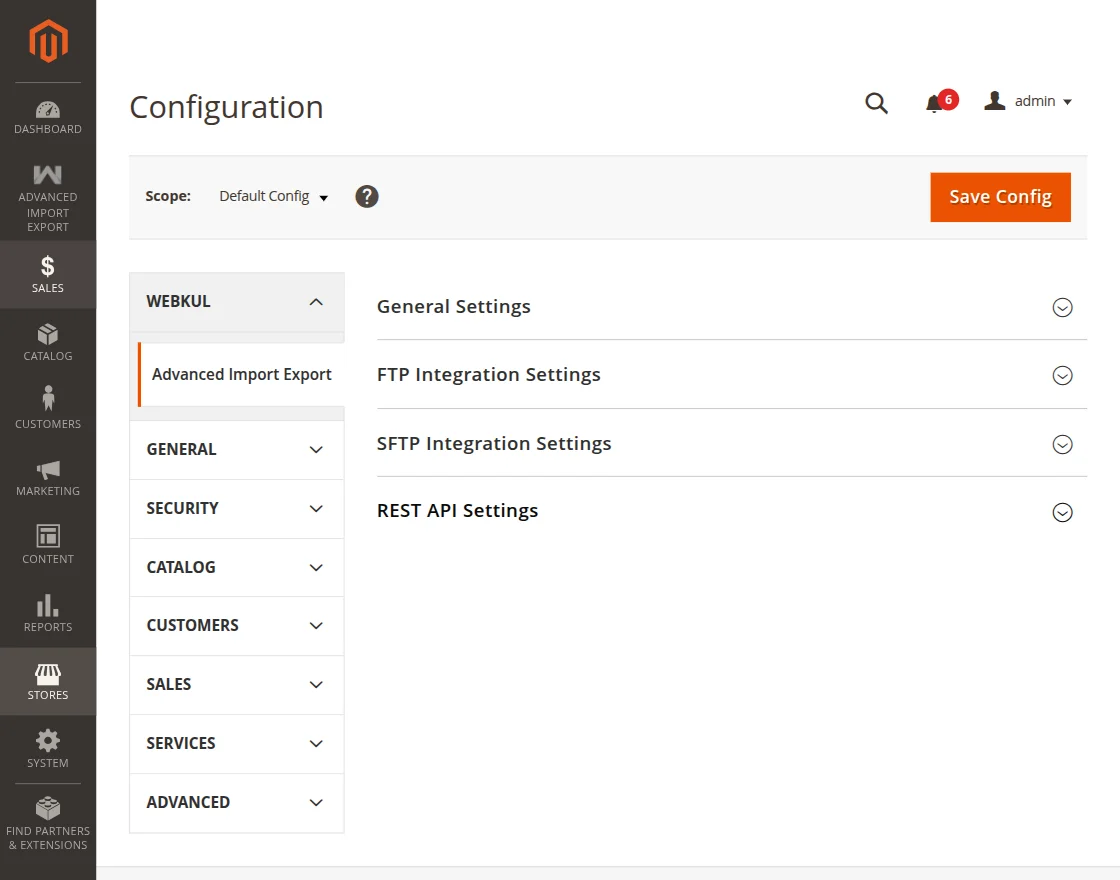
The following configuration options are available for the admin:
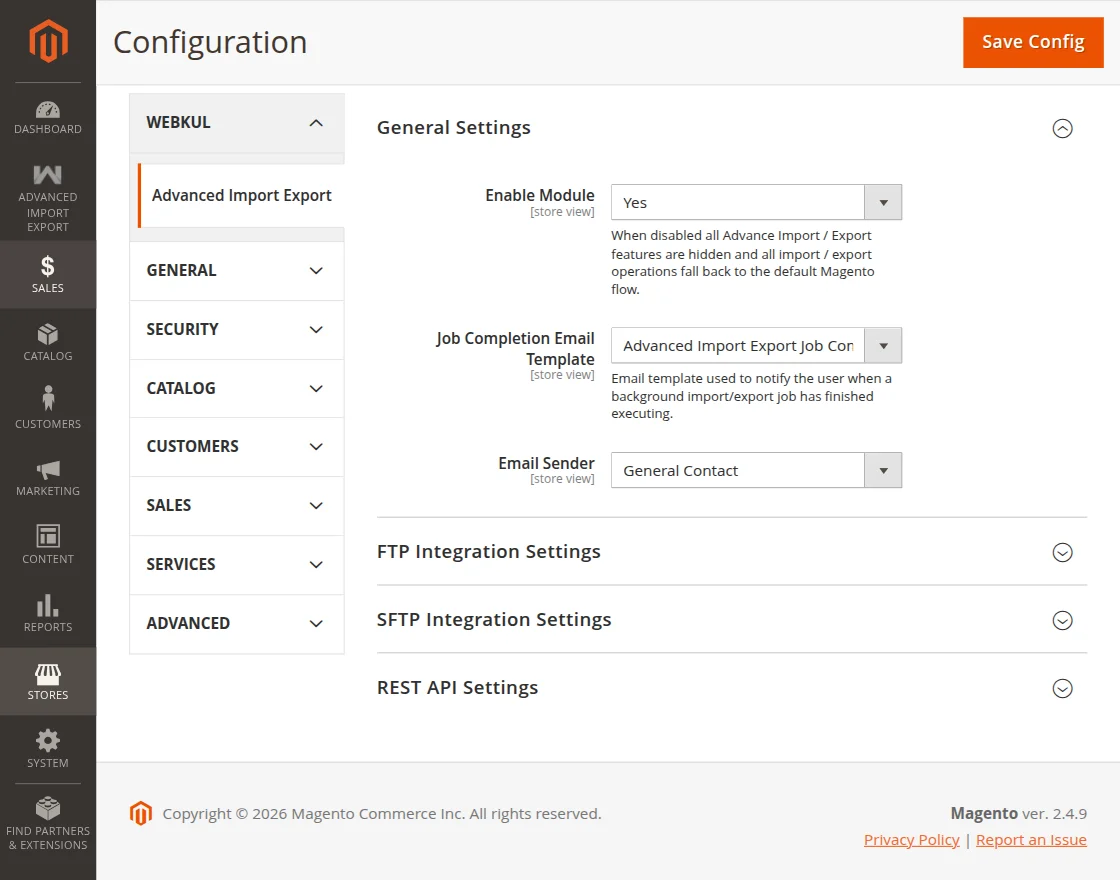
General Settings:
- Enable Module: Dropdown to enable or disable the extension.
- Job Completion Email Template: Dropdown to select the email template used to notify the admin when a job finishes.
- Email Sender: Dropdown to select the sender identity used for job completion emails.
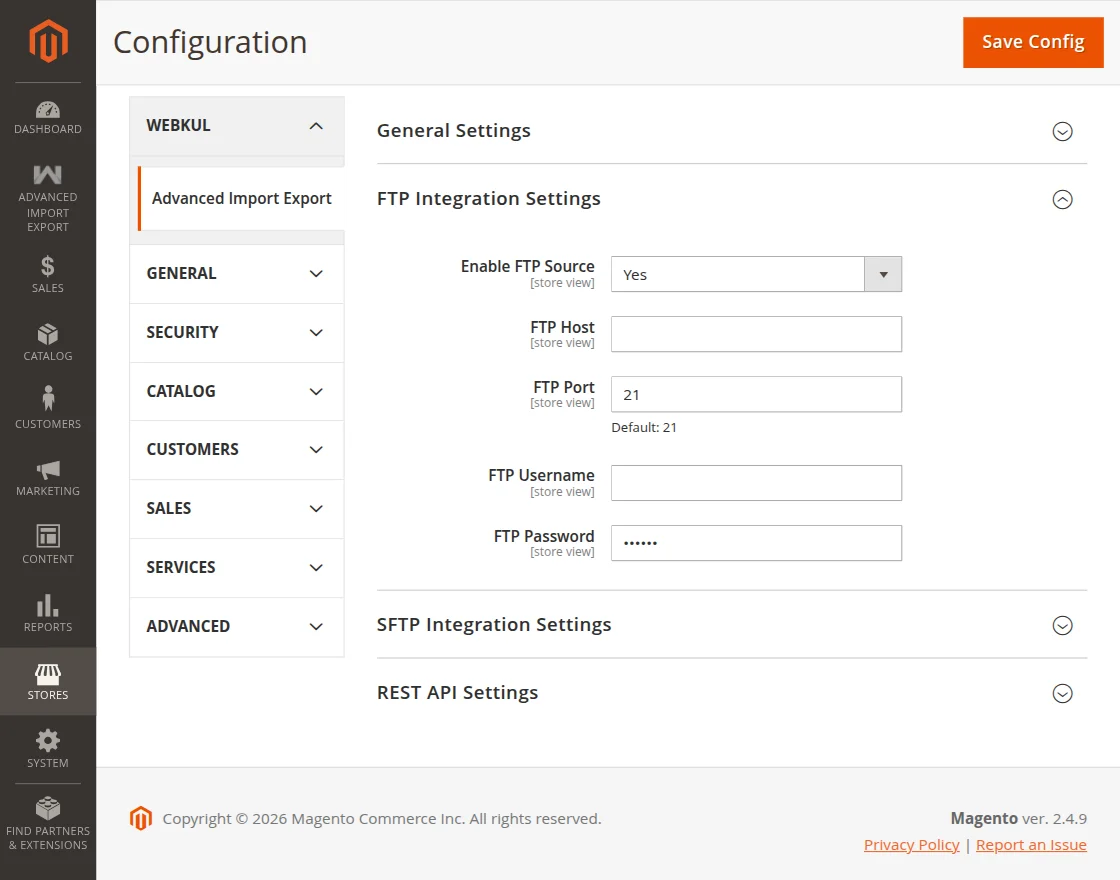
FTP Integration Settings:
- Enable FTP Source: Dropdown to enable or disable FTP as an import source.
- FTP Host: Enter the FTP server host.
- FTP Port: Field to input the FTP port.
- FTP Username: Input the FTP username.
- FTP Password: Field to input the FTP password.
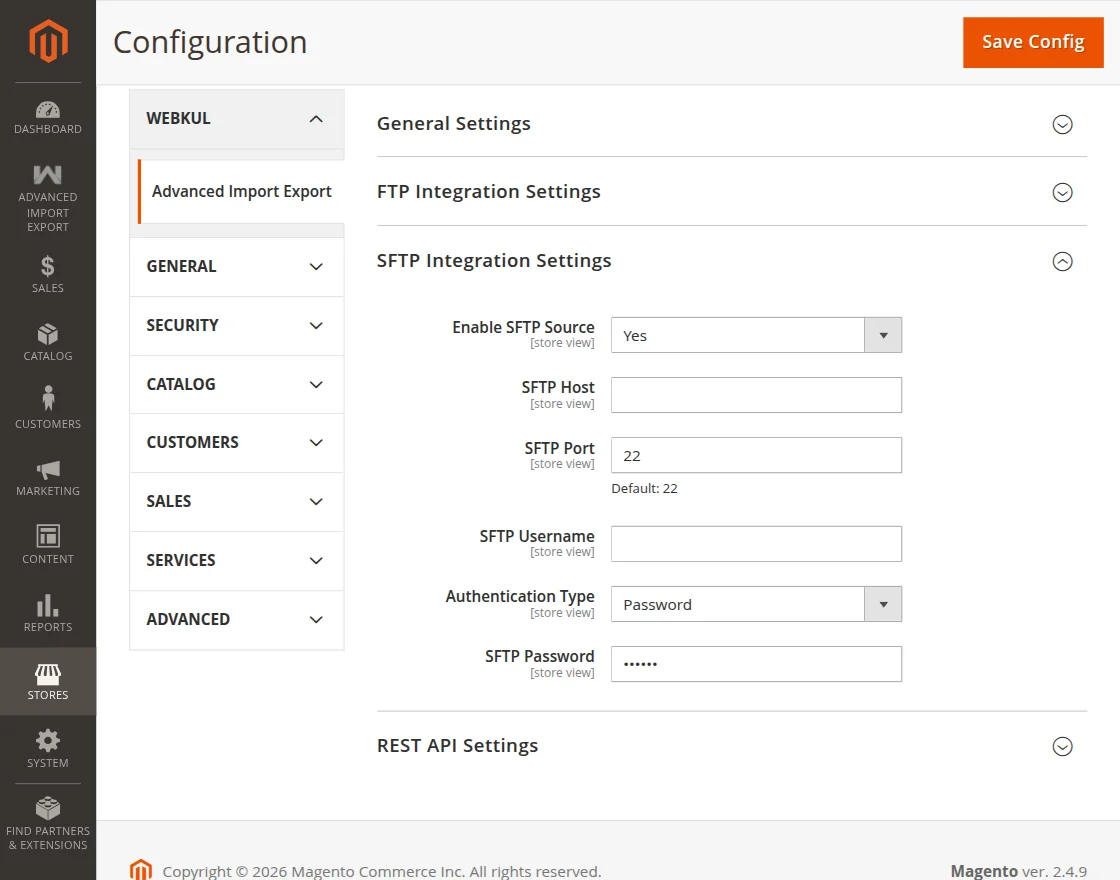
SFTP Integration Settings:
- Enable SFTP Source: Dropdown to enable or disable SFTP as an import source.
- SFTP Host: Enter the SFTP server host.
- SFTP Port: Input the SFTP port.
- SFTP Username: Enter the SFTP username.
- Authentication Type: Dropdown to select Password or Key-based authentication.
- SFTP Password: Field to input the SFTP password. (Visible when Authentication Type is Password.)
REST API Settings:
- Enable REST API Source: Dropdown to enable or disable REST API as an import source.
- Base API URL: Enter the base URL of the external REST API.
- Default Authorization Header: Input the authorization header value.
Click the Save Config button to apply and save the configuration changes.
How to Import Data – Magento 2 Advanced Import Export
To import data, navigate to System→Data Transfer→Import from the admin sidebar menu.
This has three sections:
Import Settings:
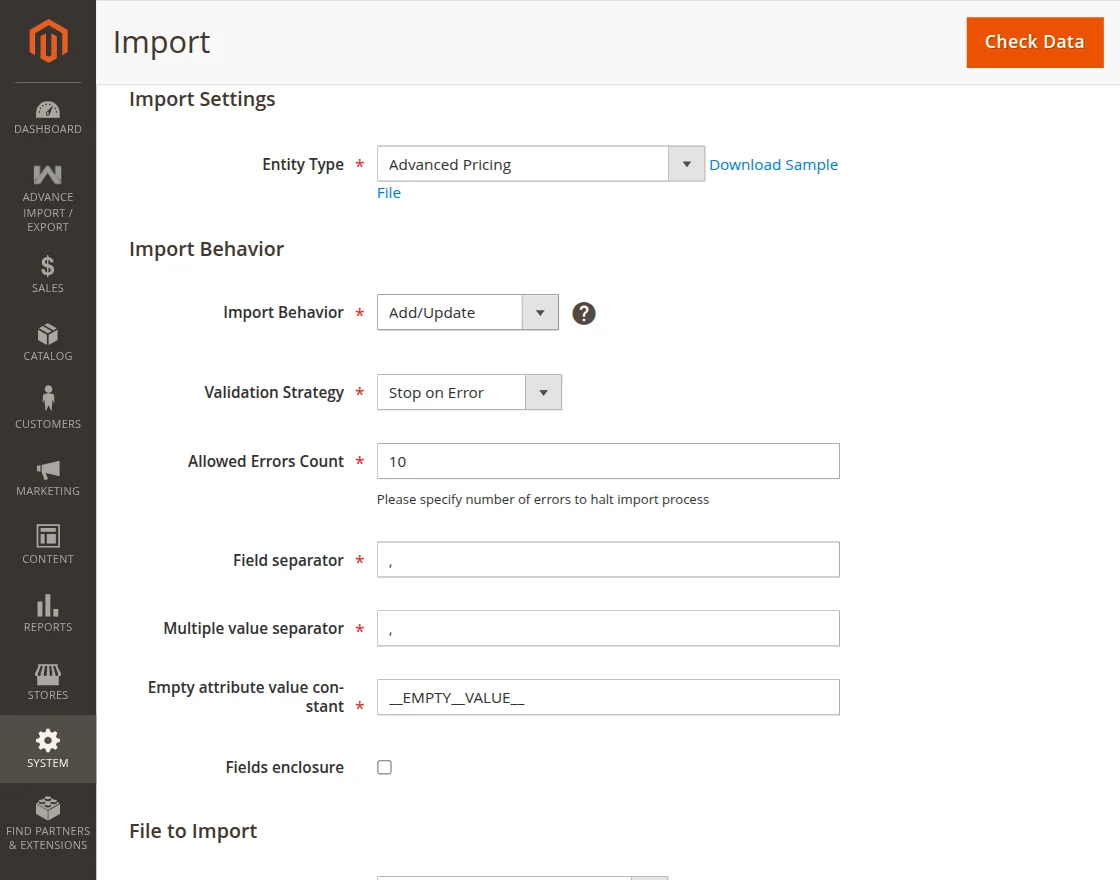
- Entity Type: Select the entity you want to import. This includes Advanced Pricing, Products, Categories, Customers, Customer Addresses, Orders, Invoices, Shipments, Credit Memos, CMS Pages/Blocks, URL Rewrites, Coupons, Product Reviews, Product Attributes, Catalog Price Rules, and Newsletter Subscribers.
- Click Download Sample File next to the Entity Type field to get a correctly formatted CSV reference for the selected entity.
Import Behavior:
- Import Behavior: Choose Add/Update, Replace, or Delete based on your requirement.
- Validation Strategy: Choose Validation Strategy.
- Allowed Errors Count: Specify the number of errors allowed before the import process halts.
- Field separator: Define the delimiter used between fields in the CSV.
- Multiple value separator: Define the delimiter used for multi-value fields.
- Empty attribute value constant: Define the placeholder for empty values
- Fields enclosure: Enable this checkbox to wrap field values in quotes.
File to Import:
- Import Source: Select File Upload, FTP, SFTP, or REST API as the data source.
- Select File to Import: Click Choose file and upload your CSV.
- Images File Directory: Specify Images File Directory.
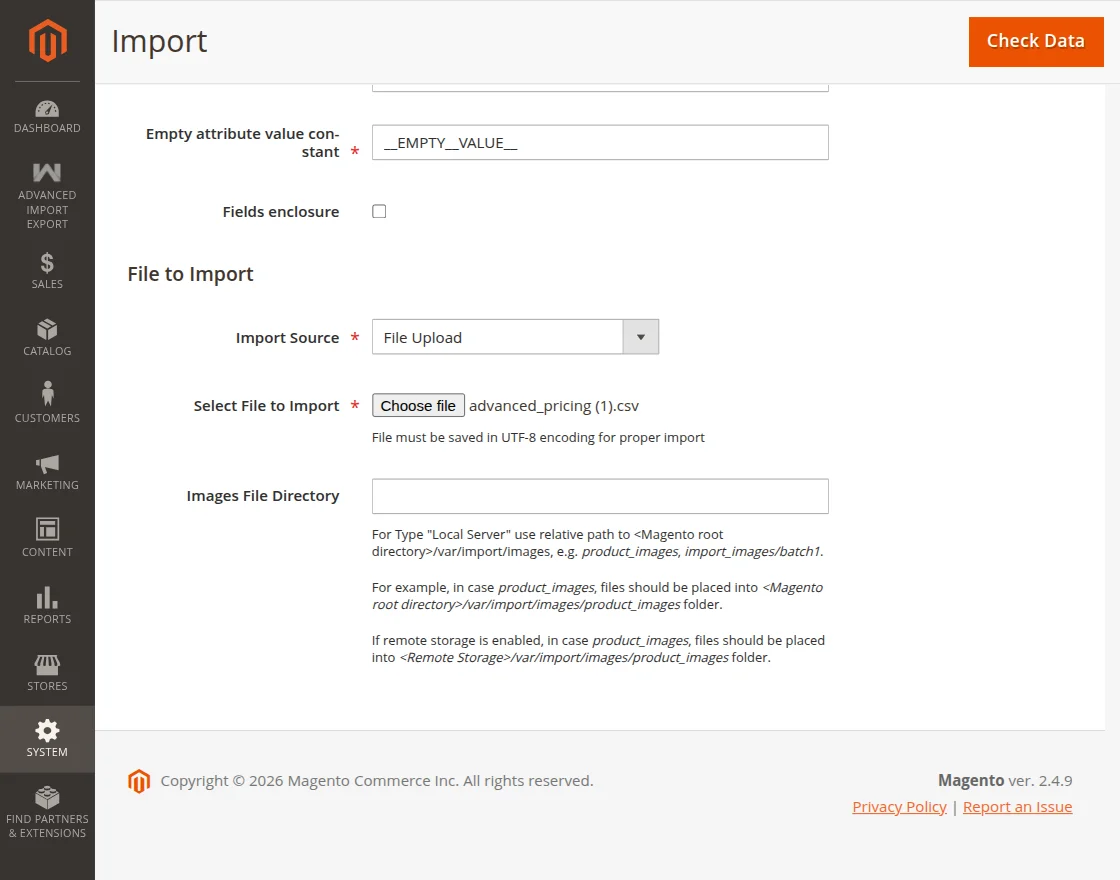
Once all fields are configured, click Check Data in the top-right corner to validate the file before importing.
After clicking Check Data, the module validates the uploaded file and displays the Validation Results below the form.
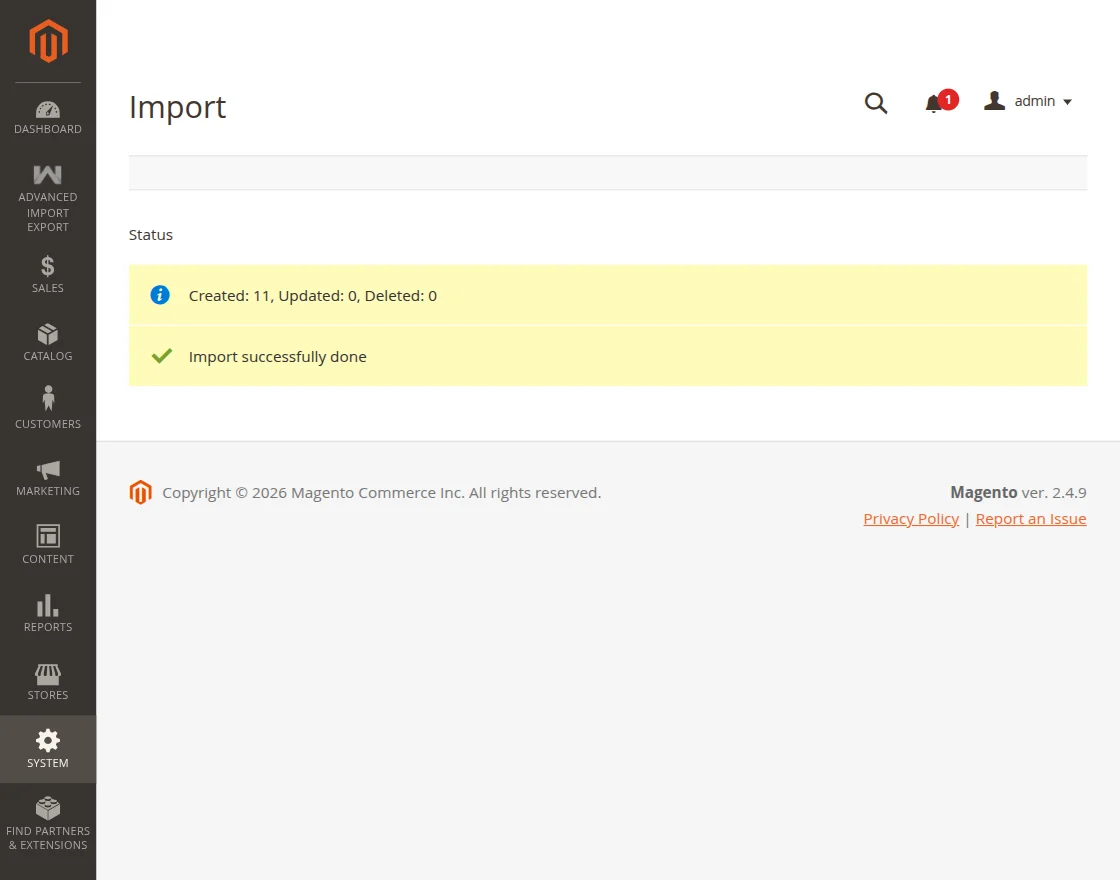
If the file is valid, a confirmation message appears, showing the checked rows, checked entities, invalid rows, and total errors.
Click the Import button shown in the Validation Results section to start the import process.
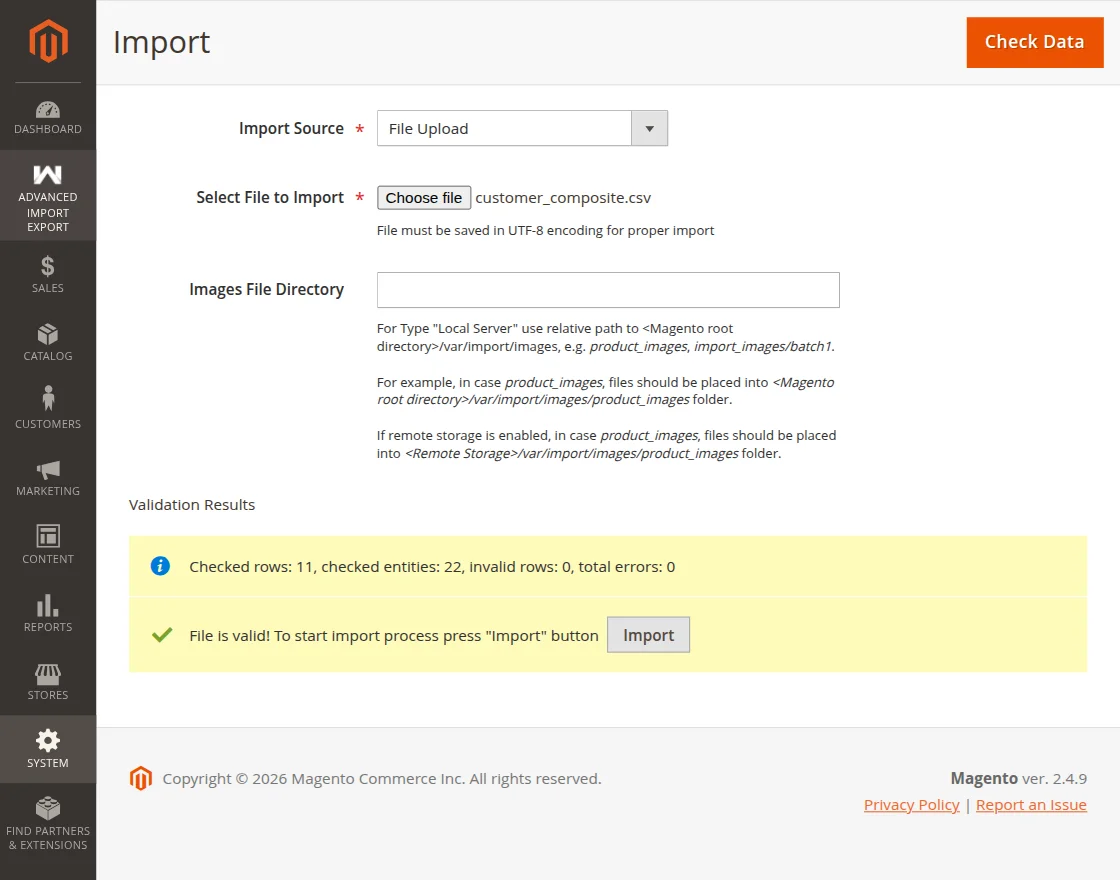
Note: The Import button only appears after a successful validation. You cannot import a file without first running Check Data.
Once the import process finishes, the Status screen displays a summary, including the number of records Created, Updated, and Deleted, along with a confirmation message that the import was successfully done.
How to Export Data – Magento 2 Advanced Import Export
To export data, navigate to System→Data Transfer→Export from the admin sidebar menu.

This has three sections:
Export Settings
- Entity Type: Select the entity you want to export. This includes Products, Categories, Customers, Customer Addresses, Stock Sources, Advanced Pricing, Orders, Invoices, Shipments, Credit Memos, CMS Pages/Blocks, URL Rewrites, Coupons/Cart Price Rules, Product Reviews, Product Attributes, Catalog Price Rules, and Newsletter Subscribers.
- Export File Format: Choose CSV, XML, or JSON as the output format.
- Fields Enclosure: Enable this checkbox to wrap exported field values in quotes.
Entity Attribute
- The grid lists all available attributes for the selected entity, showing the Attribute Label and Attribute Code.
- Use the Exclude checkbox next to any attribute to leave it out of the export file.
- Use the Filter column to narrow down records by attribute value.
- Use Search and Reset Filter to refine the attribute list, and check the record count shown above the grid.
- Click Continue once your settings and filters are ready to generate the export file.
Export File List
- Previously generated export files appear in a grid below, showing the File name and an Action column.
- Click Select → Download to download a generated file directly from the list.

Import Export Run History – Magento 2 Advanced Import Export
To review past import and export operations, navigate to Advanced Import Export → Run History in the Admin Panel.

The Run History grid displays the following details for every operation:
- ID: Unique identifier for the import or export job.
- Entity Type: The entity that was imported or exported.
- Operation: Shows whether the job was an Import or Export.
- Status: Shows the current state of the job, such as Success, Failed, Running, or Cancelled.
- File / Source: The data source or file used for the job.
- File: A direct Download link to the file processed during the operation.
- Created: The number of new records created during the job.
- Updated: The number of existing records updated during the job.
- Skipped: The number of records skipped during processing.
- Failed: The number of records that failed to process.
- Total Rows: The total number of rows present in the file.
- Duration: The total time taken to complete the job, shown in milliseconds or seconds.
- Started By: The user who triggered the operation.
- Started At: The exact date and time the job started.
- Actions: Option to Delete the run history record.
Use the Filters, Default View, and Columns options above the grid to customize the displayed data and search for specific records.
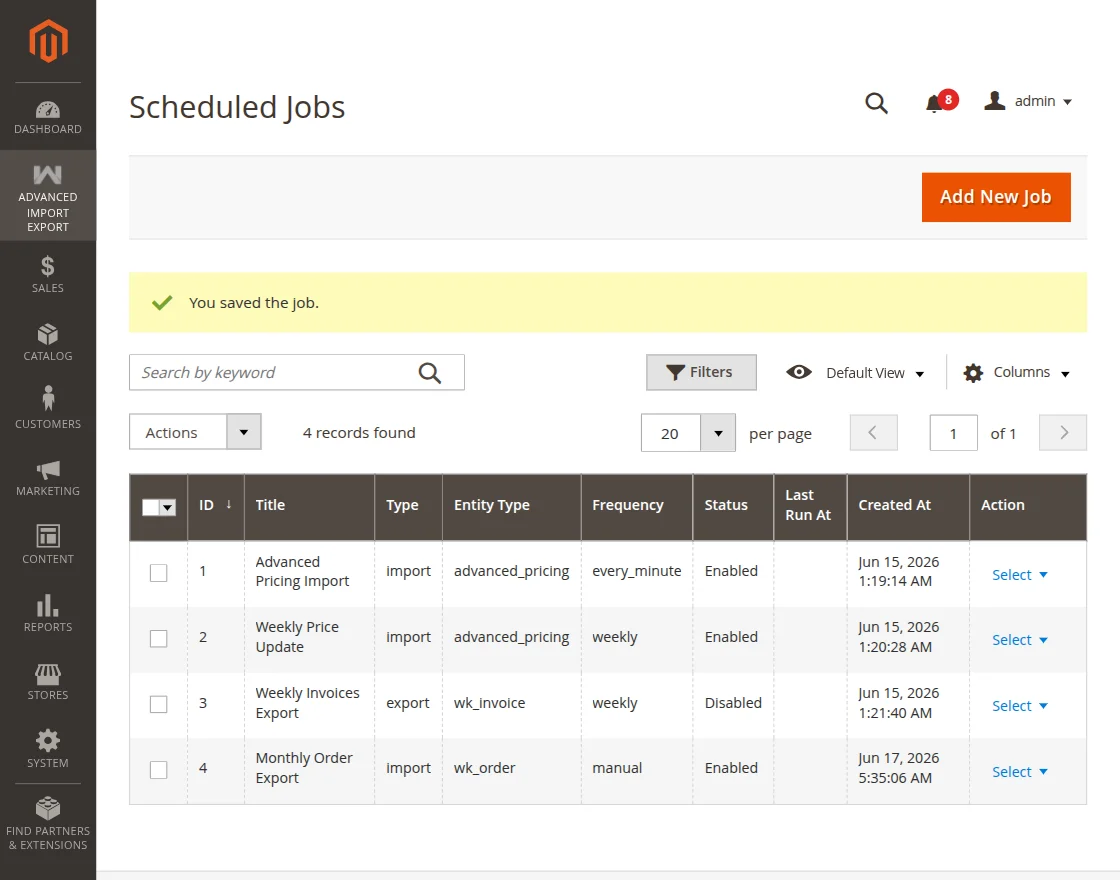
Scheduled Jobs – Magento 2 Advanced Import Export
To create and manage recurring import or export tasks, navigate to Advanced Import Export → Scheduled Jobs in the Admin Panel.
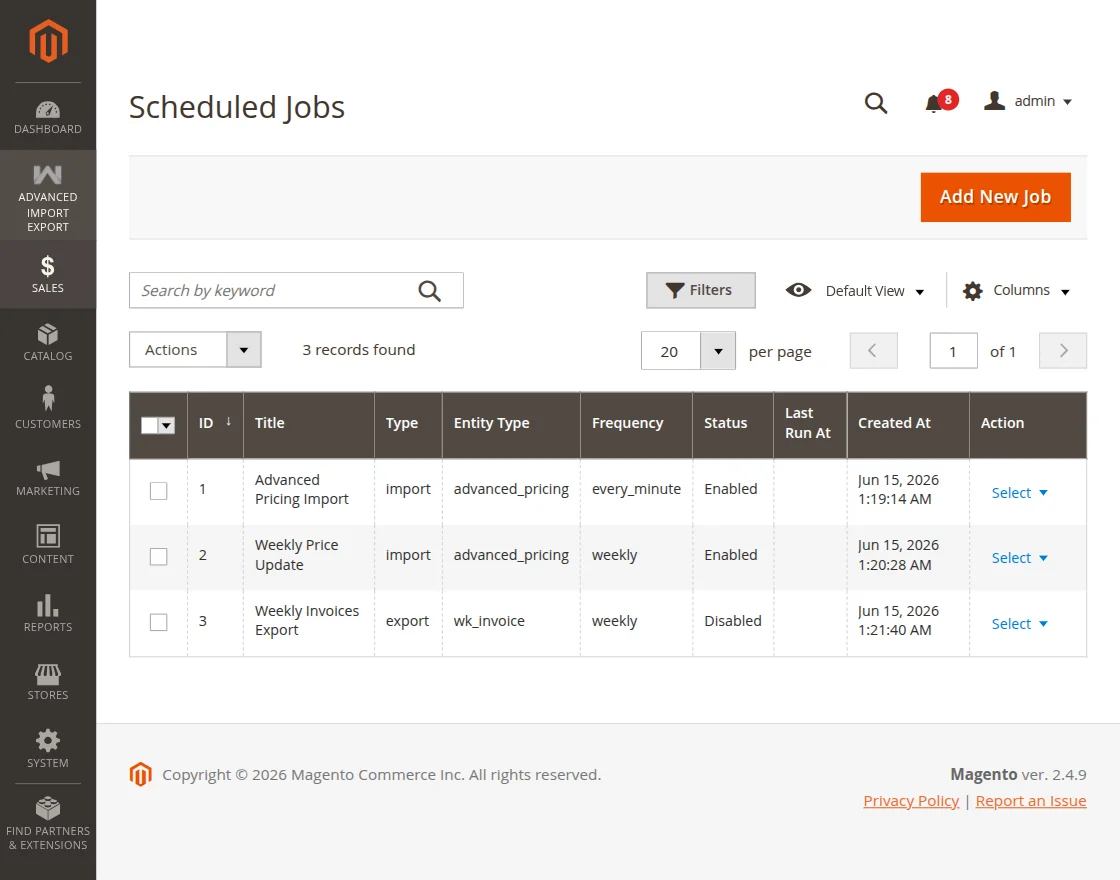
The Scheduled Jobs grid displays the following details for every job:
- ID: Unique identifier for the scheduled job.
- Title: The name given to the job, such as “Advanced Pricing Import” or “Weekly Invoices Export.”
- Type: Shows whether the job is an Import or Export.
- Entity Type: The entity processed by the job, such as advanced_pricing or wk_invoice.
- Frequency: The schedule the job runs on, such as every_minute, weekly, or daily.
- Status: Shows whether the job is Enabled or Disabled.
- Last Run At: The date and time the job last executed.
- Created At: The date and time the job was created.
- Action: Use the Select dropdown to Edit the job or Run Now to trigger it immediately.
Creating a New Scheduled Job
To create a New Scheduled Job, navigate to Advanced Import Export → Scheduled Jobs in the Admin Panel. Click the Add New Job button to open the New Job form.
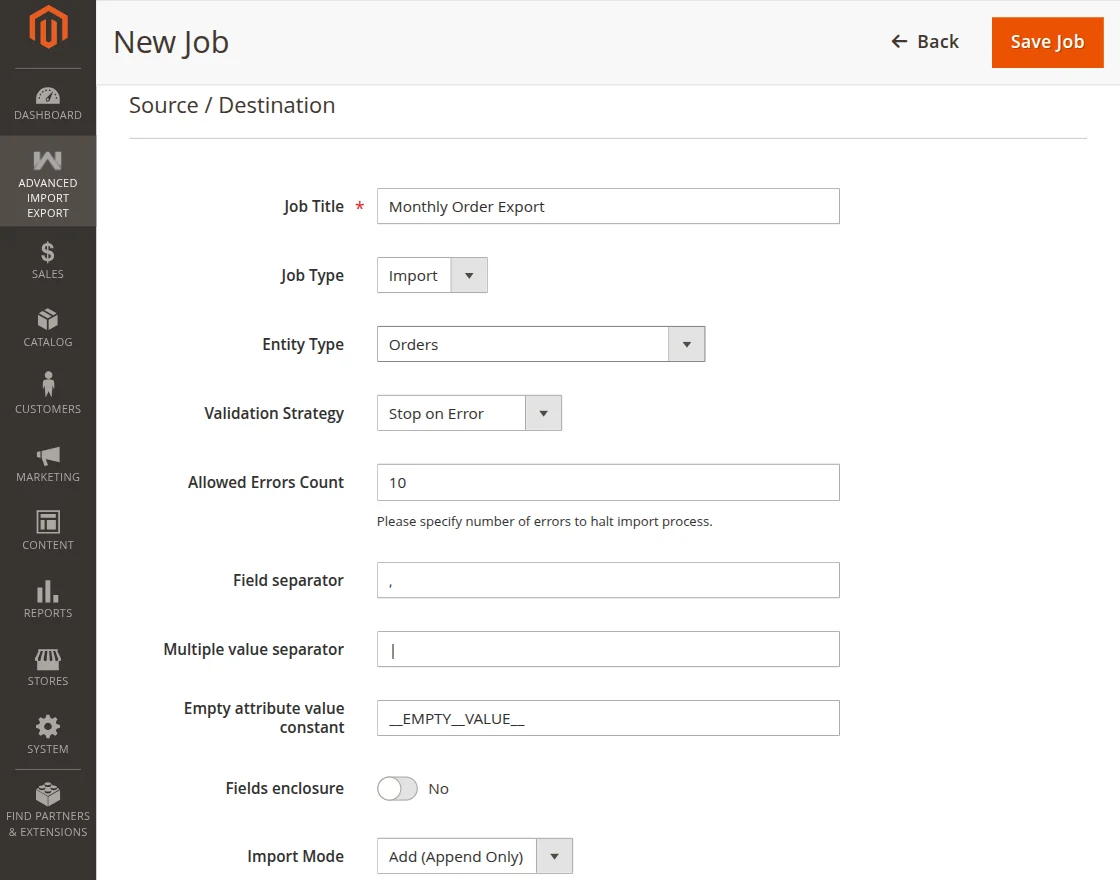
This has following sections:
Source / Destination
- Job Title: Enter a descriptive name for the job.
- Job Type: Choose Import or Export.
- Entity Type: Select the entity to process, such as Advanced Pricing, Products, or Orders.
Import Settings
- Validation Strategy: Choose Stop on Error or an alternative strategy to skip invalid entries.
- Allowed Errors Count: Specify the number of errors allowed before the import halts.
- Field separator: Define the delimiter between fields.
- Multiple value separator: Define the delimiter for multi-value fields.
- Empty attribute value constant: Define the placeholder for empty values.
- Fields enclosure: Toggle this option on to wrap field values in quotes.
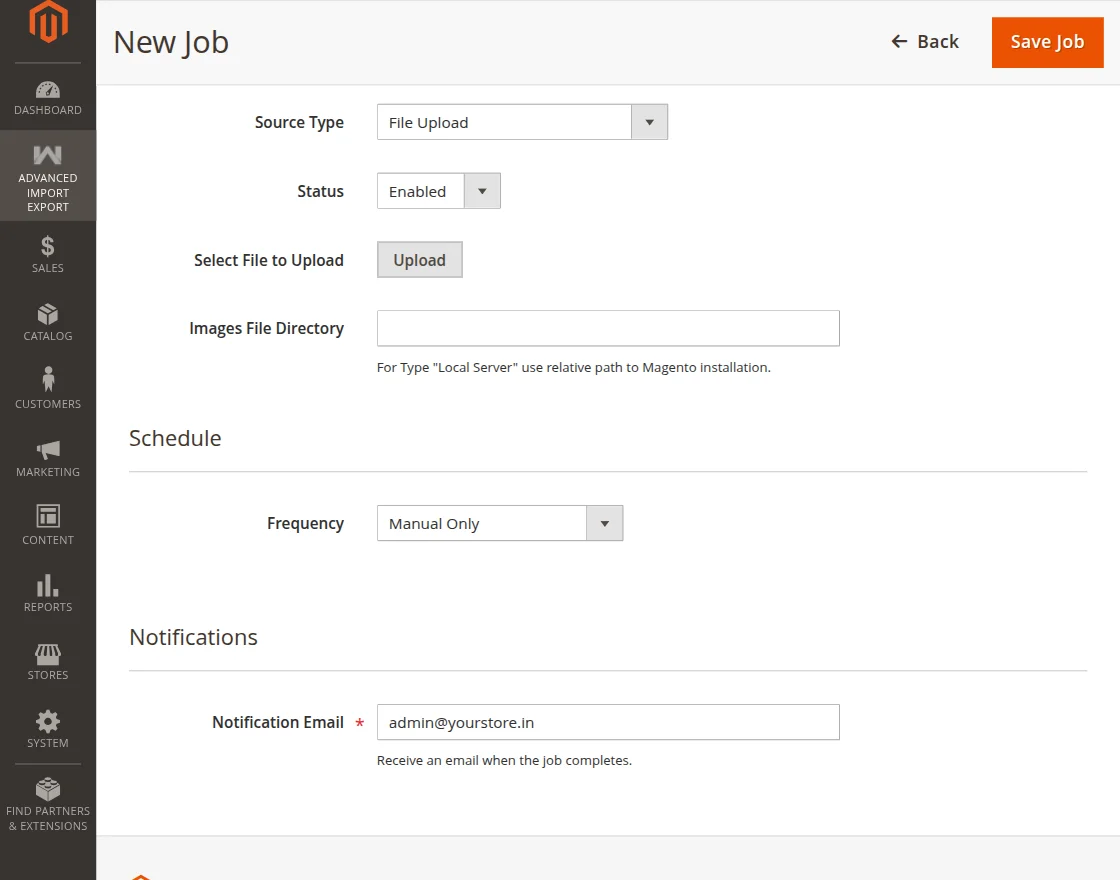
- Source Type: Choose File Upload, Direct URL, REST API, or SFTP Server.
- Select File to Upload: Click Upload to attach the file for the scheduled job.
- Images File Directory: Specify a relative path to the Magento installation for product image imports.
Schedule
- Frequency: Choose how often the job runs. Options include Manual Only, Run Once at Specific Time, Every Minute, Hourly, Twice Daily, Daily, Weekly, or Custom Cron Expression.
Notifications
- Notification Email: Enter an email address to receive an alert when the job completes.
Click Save Job to schedule the job. Once saved, it appears in the Scheduled Jobs grid and runs automatically based on the selected frequency.
Support
That is all about the Magento 2 Advanced Import Export extension.
If you have any queries regarding the plugin, please contact us at Webkul Support System.
Current Product Version - 4.0.0
Supported Framework Version - Magento 2.0.x, 2.1.x, 2.2.x,2.3.x, 2.4.x

Be the first to comment.