Opencart Marketplace Store Pickup module allows the customers to use the pickup option for the Marketplace seller products. Under this module, sellers can add different pickup locations. Also, the sellers can add products, the quantity of added products for each pickup location. Now using this module the sellers can provide their customers a faster shipping option where customers can go and collect their product right after the purchase.
This module is an add-on of Opencart Marketplace and to use this module you must have first installed the Opencart Marketplace.
Note:
1. This module supports all templates and themes including the Journal theme.
2. Opencart Marketplace Store Pickup module supports the Multi-Store feature of default Opencart.
Check a brief overview of the plugin –
Features Of Opencart Marketplace Store Pickup
- Customers can check all the stores near them.
- Provides faster product delivery option to the customers.
- Customers do not need to pay the shipping fee.
- The Customer can even choose the store from the product page.
- Admin & Sellers can create as many pickup locations as they want.
- The Admin & Sellers can assign products to the pickup location.
- Admin & Sellers can enter product quantity for each of the products.
- The Admin & Sellers can add pickup address and zip code.
- Admin and sellers can set pickup maximum distance.
- This module supports Multi-language feature.
- Customers can now select the delivery method at the checkout page.
Note – Google Map API feature is a paid service.
Installation Of Opencart Marketplace Store Pickup
Installation of Opencart Marketplace Store Pickup is very easy. Under the module zip, there are 3 folders admin, system catalog, and ocmod. you just need to upload admin and catalog folders to the root directory of the website.

Once you have uploaded the file then login to admin and go to Extensions> Extension installer and upload the XML file. The XML file can be found on the ocmod folder.

After uploading the XML file go to the Extensions > Modification and click on the refresh field.

Also, After that in the Admin panel go to System -> Users -> Usergroup. Then edit ‘Administrator’ and select all for both Access and Modify Permission then save it.

After that under Extension > Modules install the Opencart Marketplace Store pickup like this.

To add Webkul Pickup from Store, go to Extension > Shipping > Webkul Pickup from Store edit option, install the extension then edit it to do the configuration. 
Module Translation
As this module supports multiple languages so this section will describe how to make the module work in different languages. Please check this link for language translation.
How To Get Google Location API Keys
To configure this module, you will need a geolocation API key.
You can get this API using the following steps :
- Go to: https://console.cloud.google.com
- Login in and go to API’s and Services > Credentials.

3. Create a project here


4. Select the API key from the option and Click on Create credentials.

5. Credentials will be created

This is how the geolocation API key can be obtained and used to configure our module.
Domain Verification
The user needs to follow the given steps to verify the domain.
Initially, on the Google Cloud Platform page, the user must navigate to APIs & Services > Domain verification as shown below.

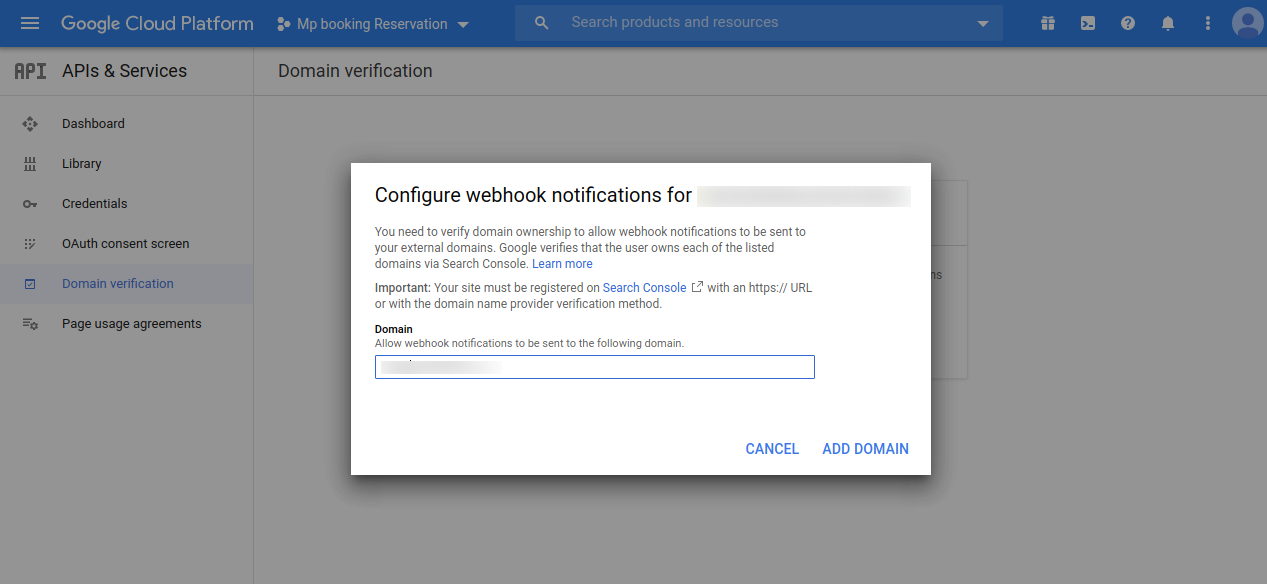
This navigates the user to the Domain Verification page, where the user needs to click on the Add Domain button.

A popup shall appear as shown in the image, where the user needs to fill in the Domain URL (https://example.com/) in the text box and click the ADD DOMAIN button.
On clicking the ADD DOMAIN button, another popup opens up bearing the name Verify ownership.
The user must click on TAKE ME THERE, to proceed further.

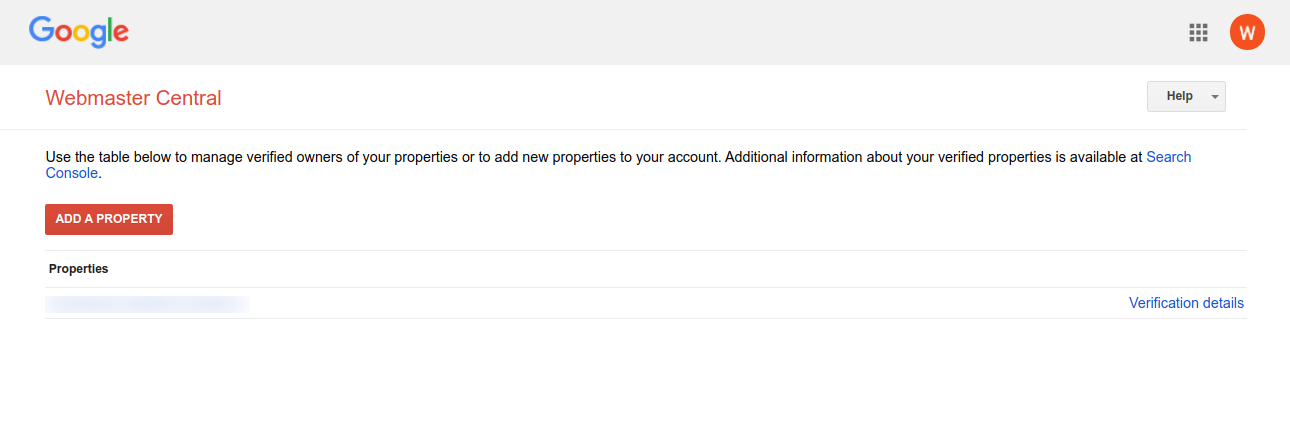
On clicking the same, it redirects the user to the Webmaster Central page as shown in the image below.
The user must click on the ADD A PROPERTY button present on this page.
A textbox opens up where the user needs to add the URL of the property that the user wishes to verify and click on Continue.

Google recommends some steps that the user must follow to verify the URL of the property.

Thereafter, the user can tick-mark the I’m not a robot checkbox and click Verify button.

Once the verification process is completed, the following page shall appear.

Enable Google API Keys
To enable the Google APIs, the user must open up the Google Cloud Platform page and navigate to the Credentials page.
The user will find the All Google Maps APIs dropdown, clicking which the user needs to click on the ENABLE API.

In doing so, a list of Google APIs opens up. If users don’t find the required API, they can type the name of the API in the search box and search for it.
To enable the API, the user needs to click on it.
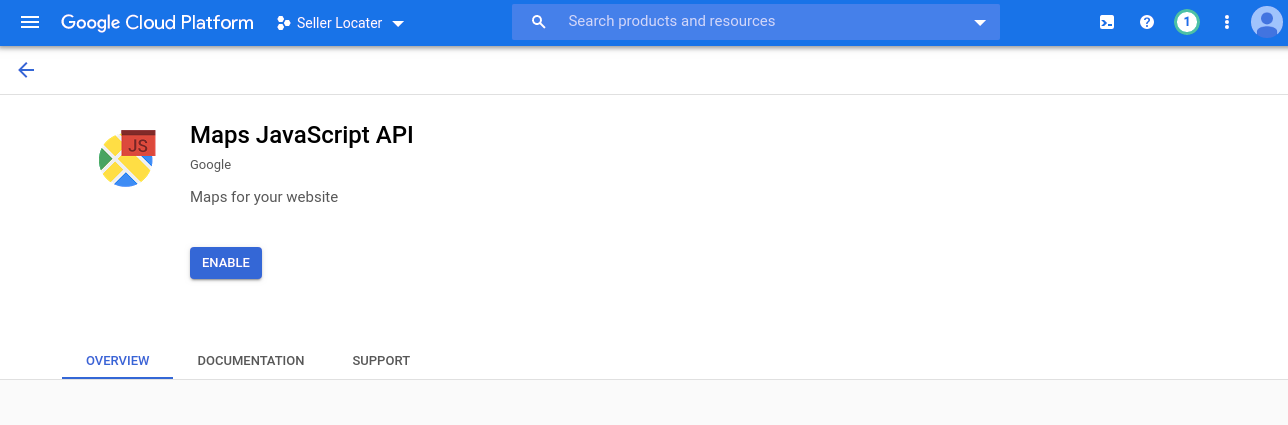
Geocoding & Maps JavaScript APIs

Geocoding API: Enable

Maps JavaScript API: Enable
Places API

Places API: Enable

Admin – Configuration Of Marketplace Opencart Store Pickup
After the module has been installed admin can configure the module to enable it. Also, the admin can set the default distance units under which a customer can find the stores from their location.

Marketplace Store Pickup Status: Enable or Disable the module.
Set the Distance Unit: Set the distance unit for the calculation of the distance.
Set Maximum default Distance: Enter the radius distance under which a customer can see a pickup store.
Google API: Enter the Google API key.
Approve Seller Pickup Point Automatically: If this option is enabled then the seller pickup point need not be approved by the admin if disabled admin will have to manually approve it.
Approve Seller Pickup Point Edit Automatically: If this option is enabled then the seller pickup point will need not to be approved after a seller makes an edit to his pickup if disabled admin will have to manually approve the seller pickup store after the edit.
Approve SellerPickup Point Product Automatically: Enable this option to approve seller pickup point product automatically else select disabled to manually approve seller pickup point.

Approve SellerPickup Point Product Edit Automatically: Set disabled to manually approve the pickup point product edit else select enabled to approve the pickup point product edit.
Mail to Admin after Seller Add a Pickup Point: Set the mail to admin when the seller adds a pickup point so that the admin gets notified.
Mail to Seller after Seller Add a Pickup Point: Set the mail to the seller when the seller adds a pickup point so that the seller gets notified.
Mail to Admin after Seller Edit a Pickup Point: Set the mail to the admin when the seller edits a pickup point so that the admin gets notified.
Mail to Seller after Seller Edit a Pickup Point: Set the mail to the seller when the seller edits a pickup point so that the seller gets notified.
Mail to Seller after Admin Approves his Pickup Point: Set the mail to the seller after admin approves the seller’s pickup point so that the seller gets notified.
Mail to Admin after Seller Add a Pickup Point’s Product: Set the mail to admin when the seller adds a pickup point’s product so that the admin gets notified.
Mail to Seller after Seller Add a Pickup Point’s Product: Set the mail to seller when the seller adds a pickup point’s product so that the seller gets notified.

Mail to Admin after Seller Edits a Pickup Point’s Product: Set the mail to admin when the seller makes an edit to a pickup point’s products so that the admin gets notified.
Mail to Seller after Seller Edits a Pickup Point’s Product: Set the mail to seller when the seller makes an edit to a pickup point’s products so that the seller gets notified.
Mail to Seller after Admin Approves his Pickup Point’s Product: Set the mail to the seller when the admin approves his pickup point’s product so that the seller gets notified.
Marketplace Store Pickup Modal Header Text: Enter the header text for the store pickup pop-up.
Welcome Modal Body Header Text: When the customer clicks on the pickup option for the first time they see the pop-up with this welcome header.
Welcome Modal Body Content Text: Enter the message visible to the customers below the welcome header of store pickup.
Pickup Point Search Button Text: Enter the store pickup search button text.
Now the admin will navigate through Modules->Extensions->Marketplace->Edit and then under the Catalog Configuration admin will select the option Store Pickup to display it under the seller account menu as shown below in the snapshot.

After enabling the module admin can see the pickup option in the admin panel. From here admin can add pickup points according to their choice.

Also, after clicking on the add button, the admin can enter the pickup point name, address, zip code and the distance in kilometres or miles. If the admin has entered the distance then the customer under that distance can see the pickup point for the assigned product.

After clicking on the product list admin can see products that are assigned to the pickup point. From here admin can add/ edit the new products to the list. Admin can also enter the product quantity and the quantities of their options.

Also, after clicking on the add button, the admin receives an autofill search option where they can add products and get the product details.

From here admin can search for a product from the auto-fill search option and click on the get details button to fetch the product quantity details. Here, the admin can enter the number of products and options which are available at that pickup point.

Admin – Configuration Of Webkul Pickup from Store
Now the admin can set the configuration for Pickup from Store Shipping. For that go to Extension > Shipping > Webkul Pickup from Store option, the snapshot below will appear:

Geo Zone: Set the Geo Zone as All Zones, UK Shipping or UK VAT Zone.
Status: Set the status enable or disable.
Sort Order: Enter the sort order number.
Title: Set the title which will be visible on the storefront.
Default Flat Rate: Set the default flat rates as needed.
Seller – Configuration Of Marketplace Opencart Store Pickup
The seller can add the Store Pickup points by clicking the Store Pickup menu item under their account menu.
From here the seller can add pickup points according to their choice.

After clicking on the add button, the seller can enter the pickup point name, address, zip code and the distance in kilometers or miles. If the seller has entered the distance then the customer under that distance can see the pickup point for the assigned product.

Also, after clicking on the product list the seller can see the products which are assigned to the pickup point. From here the seller can add/edit the new products to the list. The seller can also enter the product quantity and the quantities of their options.

After clicking on the add button the seller receives an auto-fill search option where they can add a product and get the product details.

From here the seller can search for a product from the auto-fill search option and click on get details button to fetch the product quantity details. Here, the seller can enter the quantity of products and options which are available at that pickup point.

Opencart Marketplace Store Pickup For Customers
Customers can visit the store and browse products and they can find the option of store pickup on the product page.

If a customer clicks the pickup option the first time, then they will see the welcome header with a message. From here the customers can enter a zip code and check the available pickup location.

If a customer has visited the store and entered the zip code then they do not need to enter the zip code again. The module will show the pickup options available for that product in the previously entered zip code. From here, customers can enter the quantity and click on the add-to-cart button.

In the cart, the customer can see the store name and address.

Now, the customer can add the product to the cart and process the checkout. If the customer has selected the store pickup option then they will not receive the option to enter the shipping address and select a shipping method. After entering the billing address, the customer can directly select the payment method and confirm the order.

If the customer has not selected the store pickup option then they can select the same from the Delivery Method option. After selecting the delivery method the customer can directly select the payment method and confirm the order.

After making the order customer can check the pickup point address in their order information page.

That’s all for the Opencart Marketplace Store Pickup module. If you have any queries or requirements then feel free to add a ticket and let us know your views to make the module better webkul.uvdesk.com
Current Product Version - 3.0.0.8
Supported Framework Version - 3.x.x.x

Be the first to comment.