WordPress Marketplace Buyer Seller Chat for Woocommerce Plugin is a chat system that helps the Marketplace Seller and the Marketplace Buyer to start the conversation.
If you require expert assistance or want to develop custom unique functionality, Hire WooCommerce Developers for your project.
In this WooCommerce Multi Vendor Chat plugin, any buyer can start to chat with any seller.
The buyer can ask queries related to the product that the seller is selling or any upcoming product information, and the seller can also reply to any buyer about their queries.
A healthy conversation between a buyer and a seller leads to more sales conversions. It is user-friendly and customizable.
Where the administrator can customize the theme of the chat window and user list.
Note:
This plugin is based on Socket.IO and the user needs to install a node on their server to use the plugin.
WordPress WooCommerce Marketplace Buyer Seller Chat Plugin is an add-on to WordPress WooCommerce Multi Vendor Marketplace Plugin.
We provide a production version of the plugin. If you want a development version then you can get it at an additional cost. Please contact [email protected] for it.
To use this plugin you must have installed the first WordPress WooCommerce Multi Vendor Marketplace Plugin.
Check out the plugin workflow :
Features
-
Socket.IO based real-time chat management system.
The system is based on Socket.IO to provide seamless chat between buyers and sellers with an effective chat management system
Note:- “We are using the latest Socket.io version 4.5.1”
-
Buyers can chat with any Seller.
Now a buyer can chat with any seller on the marketplace.
He can ask queries related to the product that the seller is selling or any upcoming product information, and the seller can also reply to any buyer about their queries.
-
The seller can change the status to online, busy, and away.
A seller can also change the status to online, busy, and away as per his requirement.
-
Smiley/Emoticon support for an interactive chat between users.
This feature enables to use of Smiley/Emoticon while a conversation between a buyer and a seller.
With the help of Smiley/Emoticon, buyer or seller can express their views in a very interactive way.
-
Multiple chat support for both Buyer and Seller.
This plugin support multiple chats for both buyer and seller. Now a buyer can chat with multiple sellers and a seller can chat with multiple buyers simultaneously.
-
Buyer list for Seller.
A list of all the buyers who communicates with the seller will be available. He can check the history of chats with the buyers.
-
Seller can manage their chat profile and can update them.
Sellers can manage their chat profiles and can update their accounts accordingly.
-
Buyer and seller can view the chat message timestamp with the date.
The buyers and sellers can see the time and date for any received or sent message from their chat account.
-
Buyers can do instant login from the chat window.
The buyers can log in to their chat window directly from the product page of any seller to start a conversation with him.
-
Seller and customers can view their chat conversation history.
The sellers and buyers can view their chat history from their chat account to get an overview of their last conversations.
-
Will work with HTTPS enabled websites.
The users can also use the plugin for HTTPS-enabled websites by just adding the server details (Private Key, Certificate Key).
-
View chat history/ conversation between the seller and the customer.
The admin can view the chat history/ conversation between the seller and the customer.
-
Notification Sound.
Support for notification sound when message receives for seller and buyer.
-
Chat on Seller Profile Page.
Now, the chatbox option is also available on the seller profile page.
-
Offline chat
Allow the buyer to start chat with the seller even seller is offline.
-
Admin Chatbox
The buyer and seller can initiate the chat with the admin from their panel for the admin’s product only.
-
Block Buyer
The Admin and seller can block the buyer.
-
Chat History
The Admin can view the chat history between the any Seller and the Buyer .
NOTE:
1. This module is now compatible with WooCommerce’s latest feature Cart and Checkout blocks.
2. This module is now compatible with WooCommerce’s new High-Performance Order Storage (HPOS) feature.
Installation
The user will get a zip file which he has to upload in the “Add New” menu option in the WordPress admin panel.
For this login to WordPress Admin Panel and Under the Dashboard hover your mouse over the “Plugins” menu option which brings out a Sub-Menu and then select the “Add New” option.

Further, you will see an option on the top of your page that is “Upload Plugin”, click the option to upload the zip file.

After clicking on the “Upload Plugin” option, below that you will see a button “Choose File” click on the button to browse for the zip file as per the snapshot below.

After browsing the file, click the “Install Now” button to install the plugin as per the snapshot.

Now when the plugin is installed correctly, you will see the success message and an option to activate the plugin. Click on “Activate Plugin” to activate the installed plugin.

That is all for the installation part of the WordPress WooCommerce Marketplace Buyer Seller Chat Plugin.
After the installation you need to flush the permalink to update the permalink structure. Navigate to Settings > Permalink, select post name, and click enter to update the permalink.

NOTE: Check how to activate your WooCommerce plugin through the purchase code.
NOTE: Check how to get updates on Webkul Modules directly on the Plugins page.
Configuration
After successful installation of the WordPress Woocommerce Marketplace Buyer Seller Chat Plugin, the admin can configure this under “Buyer Seller Chat> Configuration”.

If the user has enabled HTTPS for his website then the user has to add the server details (Private Key, Certificate Key).
So that the chat features can work in HTTPS enabled mode accordingly.
Host Name – Enter the hostname of your online store.
Port Number – Enter any available port number for the chat system.
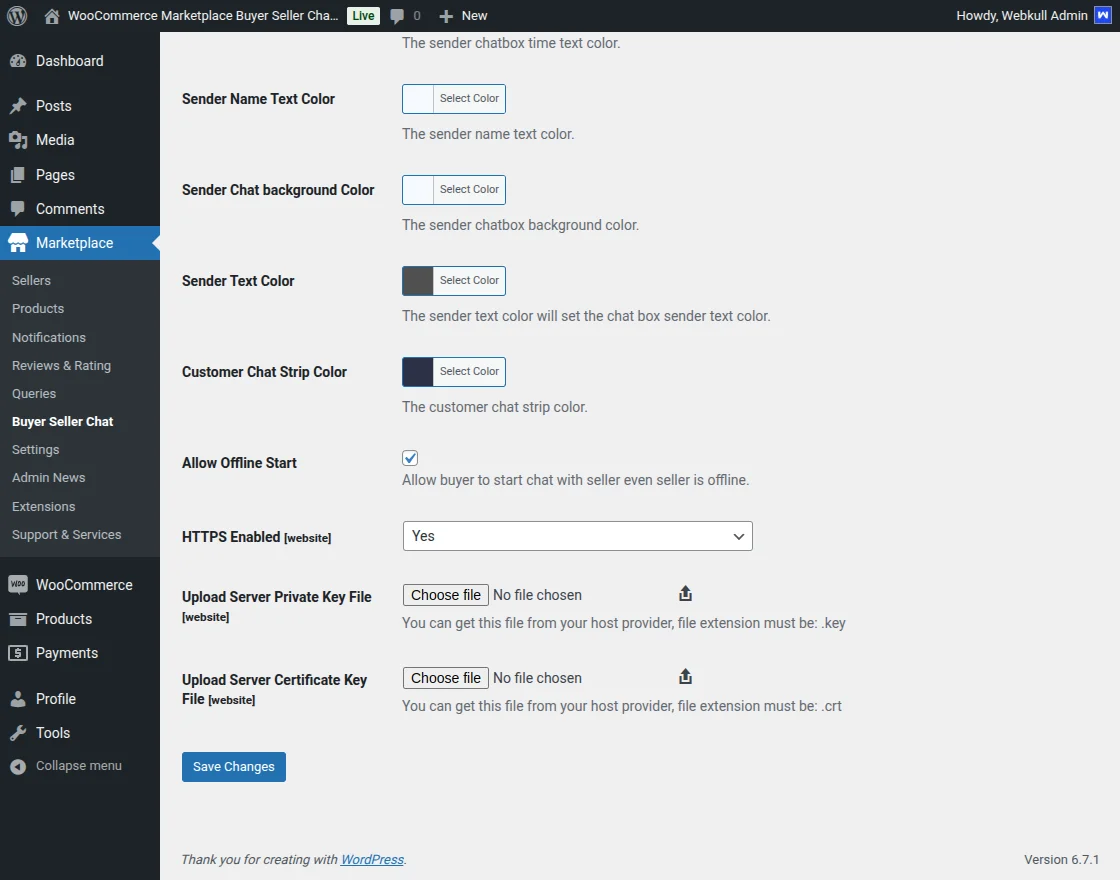
Receiver Chat Time Text Color – The admin can select the text color of the chat time displayed on the receiver chat.
Receiver Chat Background Color – The admin can select the receiver chat background color.
The Receiver Text Color – The admin can set the chatbox receiver text color.
Seller Chat Strip Color – The admin can select the seller chat strip color.
The Sender Chat Time Text Color – sender chat time text color can be set by the admin here.
Sender Name Text Color – Admin can set the sender name text color here.
Sender Chat Background Color – The admin can select the sender chat background color.
Customer Chat Strip Color – The admin can select the customer chat strip color.
Allow Offline Start – Allow the buyer to start chat with the seller even if seller is offline.
HTTPS Enabled – The admin can enable or disable the https.
Upload Server Private Key File- Upload the server private key provided by the server service provider.
Upload Server Certificate Key File – Upload the server certificate key provided by the server service provider.
Chat History
The admin can also view the chat history of the chat between the seller and the customer as shown in the image below.

The admin can view the list of customer and seller and also start the chat with the customer in the Admin chat section as shown in below snapshot.

Buyer-End management
A buyer can start to chat with any seller on the marketplace. For this, he just needs to navigate to the product page and log in to start the conversation.

After logging in, the buyer can start the conversation with that seller.

If the seller is not online, the buyer can’t initiate a chat with the seller but if the buyer has already initiated a chat with the seller, the message will be delivered to the seller.
Buyers can also use emoticons for an interactive chat with the seller.
The customer can see the response from the seller in his chat window.

The customers can send attachments in the chat messages. They can also preview the image in the chat window as shown in the below snapshot –

The seller

Seller-end Management
After Logging in as Marketplace Seller a customer chat option will be available on the left side of the page or You can navigation through “My Account” > “Customer chat”.
The seller has to click this icon to slide the list of customers out. In the list of customers, All those users who have started the chat with the seller will be viewed in the customer’s list.
In this list of customer, The seller can click on any customer’s option to start a chat.

If a buyer is online then the message will be delivered to him.
Else if the buyer is offline then the message will also be delivered to the buyer and a message will be shown to the seller as the user is not available for chat.
At buyer-seller chat, the seller can view the chat history of the given slots as per the below image.

The seller can send and receive attachments from the customers in the chat messages. They can also preview the image in the chat window as shown in the below snapshot –

The seller can view the chat history of the chat conversation with the customer.
There will be four options available for filtering the chats – Last 24 hours, Last 7 – days, Last 30 Days, and Forever as shown in the below snapshot –

The Seller can Block the Customer to stop the conversation or chat with customer as shown in below snapshot –

Seller Profile Page
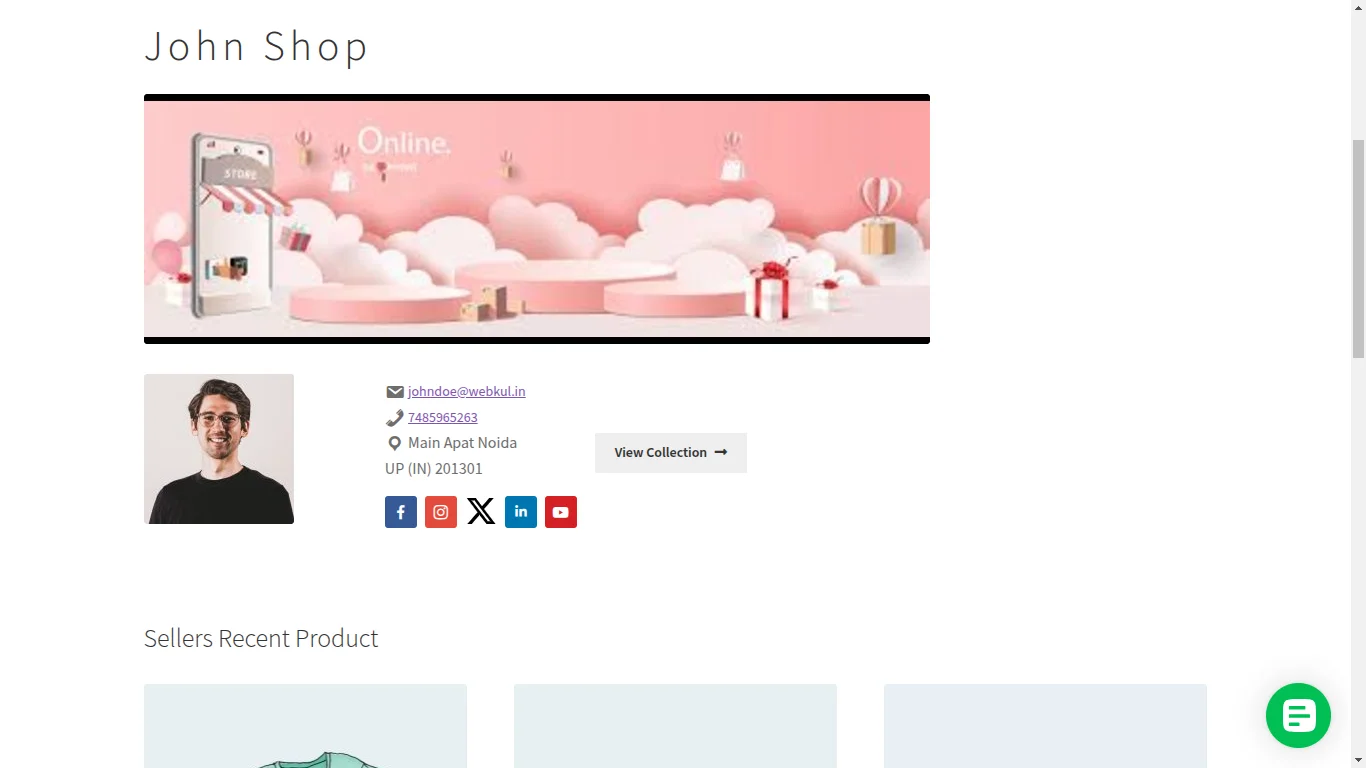
The newly added feature helps buyers chat with respective sellers on their profile page now as shown in the below image.

Here, If the buyer clicks on Seller: John Shop link, It will redirect to a new page of seller profile page as shown in below snapshot –
Here, When Buyer clicks on “Write a Review option” then the buyer can give review and rating to the seller by their Price, Value, Quality and Review as shown in the below image –

When the Buyer Clicks on “Submit Review” button. A “Feedback added Successfully” notification will show and the review is pending for the approval as shown in the below snapshot –

Here, If the Seller clicks on “Contact Seller” button, the buyer can start a chat or send any queries to seller on the seller chatbox as shown in the below image.

Seller Profile Settings
The seller can manage the settings for his chat system by clicking on the Profile Settings option in the top right corner of the chat system.

After clicking on Profile Settings, the seller will get a pop-up window where he can change his profile logo, last name, and first name as shown in the below image –

The seller can also update his status like – Online, Busy, Away and Offline as shown in the below snapshot –
The seller can see a new message from the buyer in his chat system.

Chatbox on Admin Profile Page
The admin can also chat with buyers and sellers from their profile page.

Once the chat is initiated by the seller or buyer from their panel it will reflect on the admin end.

For any technical assistance please raise a ticket or reach us by email at [email protected]. Thanks for Your Time! Have a Good Day!
Also, discover various solutions to add more features and enhance your online store by visiting the WooCommerce plugins.
Current Product Version - 3.1.0
Supported Framework Version - WordPress: 6.7.1 WooCommerce: 9.5.2 WooCommerce Marketplace: 6.0.0

can we track the sales reports through Google analytics?