WordPress Helpdesk Plugin integrates UVdesk with WordPress site. This Support Ticket System Plugin allows your customers to create Ticket for any query from website front and Admin can manage all the Tickets from WordPress backend.
This customer support extension makes use of the UVdesk API to deliver the content using which you can streamline support requests and better serve your customers.
The Helpdesk builds on definition to serve customers by creating a powerful ticket management platform that allows you to centralize all tickets with ticket status, priority, types & much more.
The updates/replies on the tickets will be instantly update on both platforms. That is if the admin responds to a ticket using the WordPress website then the reply updates on the UVdesk.
All the changes are in real-time on both platforms.
This Free Support Ticket System plugin makes use of the UVdesk API to deliver the content.
Features Of WordPress Helpdesk plugin
- Integrates the UVdesk Helpdesk System with your WordPress Website.
- Absolutely Free of Cost Support Ticket System plugin.
- Provides easy interaction between Admin and Customers.
- A customer can Create Ticket related to any query from front-end.
- Admin can manage Tickets from WordPress back-end.
- Admin can reply to the Tickets created by the Customer.
- Admin can Delete the tickets from WordPress backend.
- Admin can use different Filters to search any specific ticket.
- Customers can reply to the tickets from their WordPress front-end account.
- Real-time synchronization between UVdesk Helpdesk System and WordPress website Tickets.
Installation Of WordPress Free support Ticket system
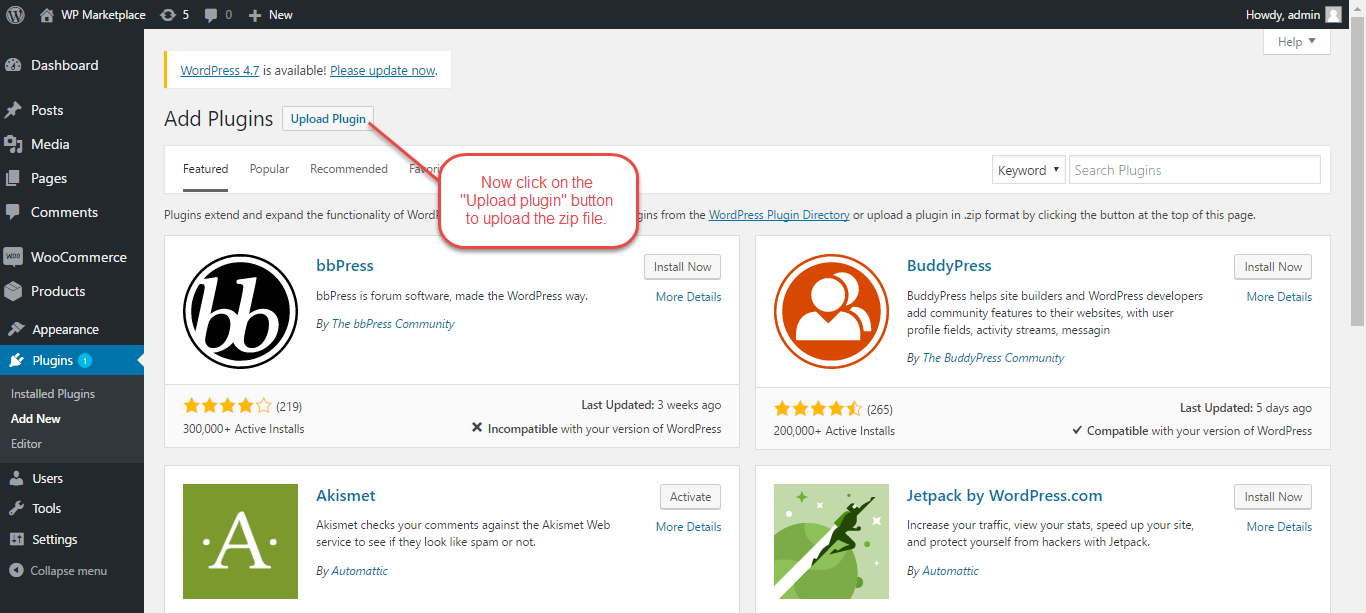
The user can easily install the plugin after he has purchased it. The user will get a zip file which he has to upload in the add new plugins menu option in the WordPress admin panel. You will navigate through Plugins->Add New and click the “Add New” menu option as per the snapshot below.
Now, you will see an option on the top of your page that says “Upload Plugin“, click the option to upload the zip file.
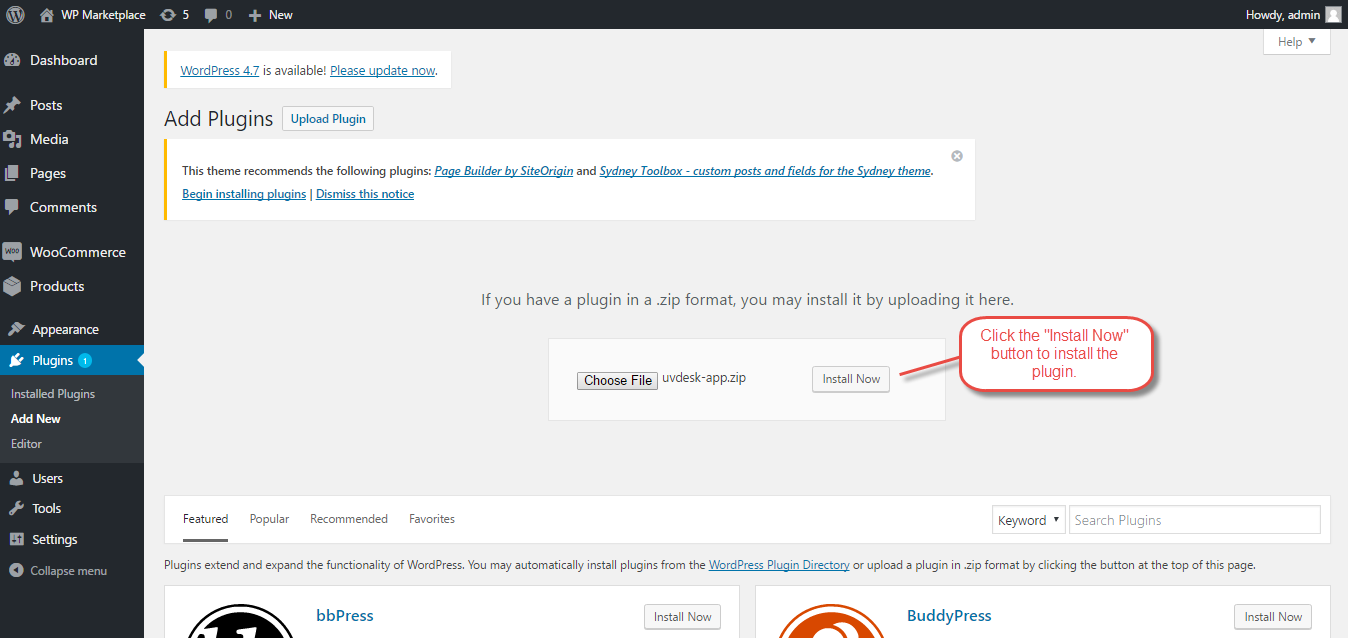
After clicking on the upload plugin option, below that you will see a button “Browse” click on the button to browse for the zip file as per the snapshot below.
After browsing the file, click the install now button to install the plugin as per the snapshot.
Now when the plugin is installed correctly, you will see the success message and an option to activate the plugin.
Configuration Of WordPress Advanced Ticket System
After the installation is over, the admin will navigate to UVdesk Ticket System – Settings and click on settings to configure the plugin accordingly.

Admin has to enter the following information to configure the module.
- Access Token – Enter the UVdesk Access Token.
- Company Domain – Enter the Domain Name of your company.
- Client Key – Enter the Client key generated from google recaptcha.
- Secret Key – Enter the Secret key generated from google recaptcha.

How to get Uvdesk API??
In order to use this add-on, the admin needs to have the UVdesk access token, please visit this link and login to your UVdesk account. In case you don’t have a UVdesk account, you can create a free account as well.

Step 1: Here the user needs to enter a valid email id and click on “Get Started”.

Step 2: Once the user enters their email ID, an OTP will be generated and sent to them. They must then input the received OTP and proceed to click on the “Verify OTP” button.

Step 3: In this scenario, the user is required to input their email address, name, phone number, organization, and subdomain. After providing these details, they can proceed by clicking the “Signup” button.

Step 4: Once the user completes the sign-up process, they will receive an email to set their password.
After successfully setting a new password, the user can conveniently access their account by using their registered email and the newly created password.

After successfully creating your UVdesk account, log in and go to the edit profile section.

Clicking on the “New Token” button to create a new API Access Token.

So, after clicking “New Token”, here the users need to enter their API name and click on “Save Token”.

The user can see the new API access tokens created and can copy them to be used for module configuration at the WordPress end.

How to setup Recaptcha??
You can make use of google recaptcha while sign up by the customer in frontend in your WordPress store by entering the client key and secret key. You can create recaptcha keys from Google Recaptcha Site.


Admin Management Of WordPress Help Desk plugin
Once the module is configured, the admin can view all the tickets under Uvdesk Ticket System tab using the Helpdesk Ticket System.
For managing and viewing the UVdesk system, the admin has to click on UVdesk tab under Dashboard.
Here admin can see all the UVdesk tickets and can view and reply back on the tickets. Admin can also delete tickets from here. Admin can also use the filters to search for any particular ticket.

Here the admin can filter the tickets on the basis of:
- Status – Open, Pending, Answered, Resolved, Closed, Spam.
- Priority – Low, Medium, High, Urgent.
- Filter by Agent Name
The admin can also change the status of a ticket, change the priority of a ticket, and can assign an agent to a particular agent. The admin can also take action on the tickets in bulk.

When the admin clicks on a ticket, the admin can see and reply to the ticket from there.

Frontend – Customer Ticket Management
Customers will be able to log in from the member login page. Here the customer will register if he is a new customer and then after login to his account will be able to create the tickets accordingly using the Helpdesk Ticket System.

After login, the customers can see all the tickets created by them. The customer can also view the ticket page by clicking on the ticket. The customer can also sort the ticket on the basis of Ticket Id and Agent Name.

To create a ticket the customer will click on the create ticket button and then create the ticket as shown in the image below using the Helpdesk Ticket System.

UVdesk – Synchronization
All the updates and replies on tickets using the WordPress store will be synchronize in the UVdesk account.
The Admin can log in to his UVdesk account and can check all the customer tickets by clicking on the “Tickets” tab.

That’s all for the UVdesk – WordPress Free Helpdesk Ticket System still have any issue feel free to add a ticket and let us know your views to make the module better at webkul.uvdesk.com or mail us at [email protected]
Current Product Version - 1.0.0
Supported Framework Version - 4.6

Be the first to comment.