WooCommerce Flutter Native POS Mobile App allows the store owners to manage the POS system just by operating the mobile phones.
The sales agent can generate invoices, complete orders, and make payment using their mobile devices very easily.
Moreover, this is a flutter native app that allows seamless operation in both the platforms that are iOS and Android.
This system will be most usable in case the physical stores have a long queue of people which makes the available sales agent insufficient.
In such emergency cases, the extra sales agents can work using their mobile phones and manage the complete scenario in just minutes, as it will make the checkout process faster.
The complete system is synchronized so the changes done at any end will be reflected in all the other ends like the web store.
Meanwhile, let’s have a basic knowledge about Flutter Native.
Also, if you want to use WooCommerce POS as a desktop application to use on a desktop or a laptop you can check the WooCommerce POS desktop App.
We provide a production version of the plugin. If you want a development version then you can get it at an additional cost. Please contact [email protected] for it.
Check the Flutter Native POS Mobile App workflow –
You can also make use of the WooCommerce Mobile app to allow users to access your WooCommerce website on their mobile devices.
What is Flutter?
Flutter is a powerful technology, or we can say a tool backed by Dart language packed with a powerful mobile framework that can be used in both iOS and Android applications.
Flutter is often used with DART, which is an object-oriented programming language by Google.
The Flutter development tools come with a graphics library and material design, and the Cupertino design allows faster operations of the app.
Also gives the app a stunning look, irrespective of its operating platform!
The biggest advantage of Flutter is that it can be used to create cross-platform apps.
Using Flutter, one can create iOS apps, Android apps, Websites, and many cross-platform software in just one go, there is no need to write code for different platforms.
Note:
The main configuration of this WooCommerce Flutter Native POS Mobile App will be done from the web end plugin.
So it is a must to purchase and install the Point of Sale System for the WooCommerce plugin first.
Features
- Real-Time Synchronization
- Easy Product Search
- Interactive Home Page
- Flutter Native App
- Online Mode
- Print Invoice
- Discount Coupon
- Invoice Generation
- SKU Product Search
- Cash Drawer Checking
- Order List
- Create New Customers
- Manage Printer
- Seamless Checkout
- Change product quantity from the cart page
- Support Sunmi Printer
Mobile App Functionalities
Initially when the sales agent starts the mobile application, then the first requirement is to log in to the mobile application.
Login and Cash Drawer
First of all, the admin will enter the login credentials in the mobile application. The credentials will include the Username/ Email and Password.
Just after login the sales agent will navigate to the Cash Drawer page and enter the Opening Amount and click on the Submit Button.


This opening amount will be added to the cash drawer of the sales agent that can be used to make the cash returns to the customers in future sales.
Homepage
Further, the homepage of the mobile application includes four options in bottom Navigation bar, that are as follows:
- Home
- Orders
- Categories
- More
Home
The sales agent will be able to see the list of products under this section. In the starting, the sales agent can see NO SALE written on the floating rectangle box as shown in the left image below.
Whereas, if the sales agent will click on the desired product then the product will get added to cart and its price will increase accordingly.
Further, the subtotal will be visible in the rectangle box as shown in the right image below:


The sales agent can click on the product multiple times to increase the quantity of the same. The quantity of multiple product types added to the cart will also be visible in the same floating box.
Search Product
Moreover, the sales agent can also search the desired product by typing its name in the search box as shown in the image box.

Orders
The sales agent can click on the orders option for checking the previous customer orders.
The order list includes brief details like Order ID, Ordet total, and Date of order as shown in the left image below:

Further, the sales agent can view any order by clicking on it. The details of order will include the date of order placed, items ordered, customer notes, coupon details, and price details.
Generate Invoice
By clicking on the Generate Invoice button, the sales agent can point the order invoice for the customer.
Further, the sales agent will get directed to the print pdf page and the sales agent can connect with the desired printer.
And simply by this, the sales agent can print invoices using the mobile application.


Note: In case the printer is not available to work, then the sales agent can also save the PDF and send it via mail to the customer.
Categories
Under the category option, the sales agent will find the list of categories available in the store. After viewing any specific category its respective products will be listed.
For example, the Music category is viewed and the list of music albums available are visible as shown in the right image below:


More
Under this option, the sales agent can see some more amazing functionalities related to the WooCommerce Flutter Native Mobile Application. These are as follows :
- Printer
- Counter
- Customers
- Reset
- Account
- Logout

Printer
This is one of the most amazing features, as sales can connect the available printer to the mobile application and print the invoice for the customers.
The best point is this, even after using the mobile application, the sales agent can perform all the basic POS system activities.
After clicking on the printer option, the sales agent will navigate to the Choose Printer page.
There the sales agent can select the WIFI Printer option and connect to the available printer to print the invoice.


Note: The application supports Wi-Fi-based printer connectivity. Bluetooth printer integration is also available and included as part of the offering at no additional cost.
Counter
Under this section, the sales agent can check current amount in the drawer. The sales agent can close the drawer when they are for the day.

Customers
Under this section, the sales agent can check the list of all the customers created from the backend or using this mobile application.
The sales agent can see the name and email for each customer and can also search for the desired customer by typing the name in the search box.
Using the delete icon, the sales agent can also delete the customer if any such requirement raises up.

By clicking on the Add Customer icon on the top right corner, the customer can create a new customer and add it to the existing list.
The basic details required are Name, Email, and Address to create the new account as shown in the image below:


Reset
The Reset button in Point Of Sales gives the power to the POS user to refresh the app’s frontend.
After clicking the reset button, the frontend will be refreshed while removing the product from the cart and the sales agent will be redirected to the order list page.
The cart is empty as shown in the right image below:


After resetting the app, cash drawer amount will again reach to the initially added amount by sales agent.
Account Information
Under the account information section, the sales agents will check the details of their own account. They can also reset their password.

Logout
By clicking on the logout option the sales agent will simply get logged out from the mobile application.
Checkout Process
The sales agent will simply make the checkout process as shown in the process below.
First of all the sales agent will add the products to the cart from the list of products as shown in the image below:

The subtotal will be visible in the floating bar as shown in the above image. Click on the button on which the subtotal is visible and it will redirect the sales agent to the cart page.
Here the sales agent will see the list of specific products.
The sales agent can also apply the discount code and under that, the price details will be visible. Price details include the Subtotal, Discount, Tax, and Total amount.
The discount can be applied using the coupon code and its details will be visible under price details.


Add Product Quantity
Meanwhile, the sales agent can also change the quantity of the product from, cart page by clicking on the quantity dropdown.
Also, by clicking on the More option the desired quantity can be added just by typing as shown in the images below:


Also, the sales agent can also sect the customer for the respective order by clicking on the customer option. The list is shown in the image below:

Further, the sales agent will process the payment by clicking on the CONFIRM AND ACCEPT PAYMENT button as shown in the image below.
After that, the list of payment methods will be visible like Paypal, Stripe, etc.
After selecting the mode of payment, the sales agent will navigate to the Collect Cash page. There the sales agent will enter the received amount.
The sales agent can also add the customer note for the order that will be visible with the order details.


Finally, after clicking on the DONE button, the order will be completed and the customer will navigate to the order success page.
An email is also sent to the customer for order details. The success page shows the Cash Collected, Order Total, and Change Due.
The customer can also click on the Back To Home button for navigating to the home screen.

Eventually, when the order is complete, the sales agent can check the drawer amount increases. Because the order amount adds to the drawer amount in POS mobile app.

Barcode Scanner
The POS Mobile App has an in-built product barcode scanner as well. It is used to scan the barcode of the products and further add them to the cart.
The sales agent can simply tap on the scanner icon available on the top right to open the barcode scanner.
Next, they will scan the barcode and a pop up will appear to confirm to add the product to cart.


The Sales agent will now approve or cancel adding the product to the cart by tapping on the respective cross/tick-mark buttons as shown in the below image.
If the agent taps on the tick-mark button, the product will be added to the cart for further processing.


Note: The WooCommerce POS Mobile App is compatible with SUNMI devices, enabling seamless operation with SUNMI’s smart POS hardware for an even more efficient in-store experience.
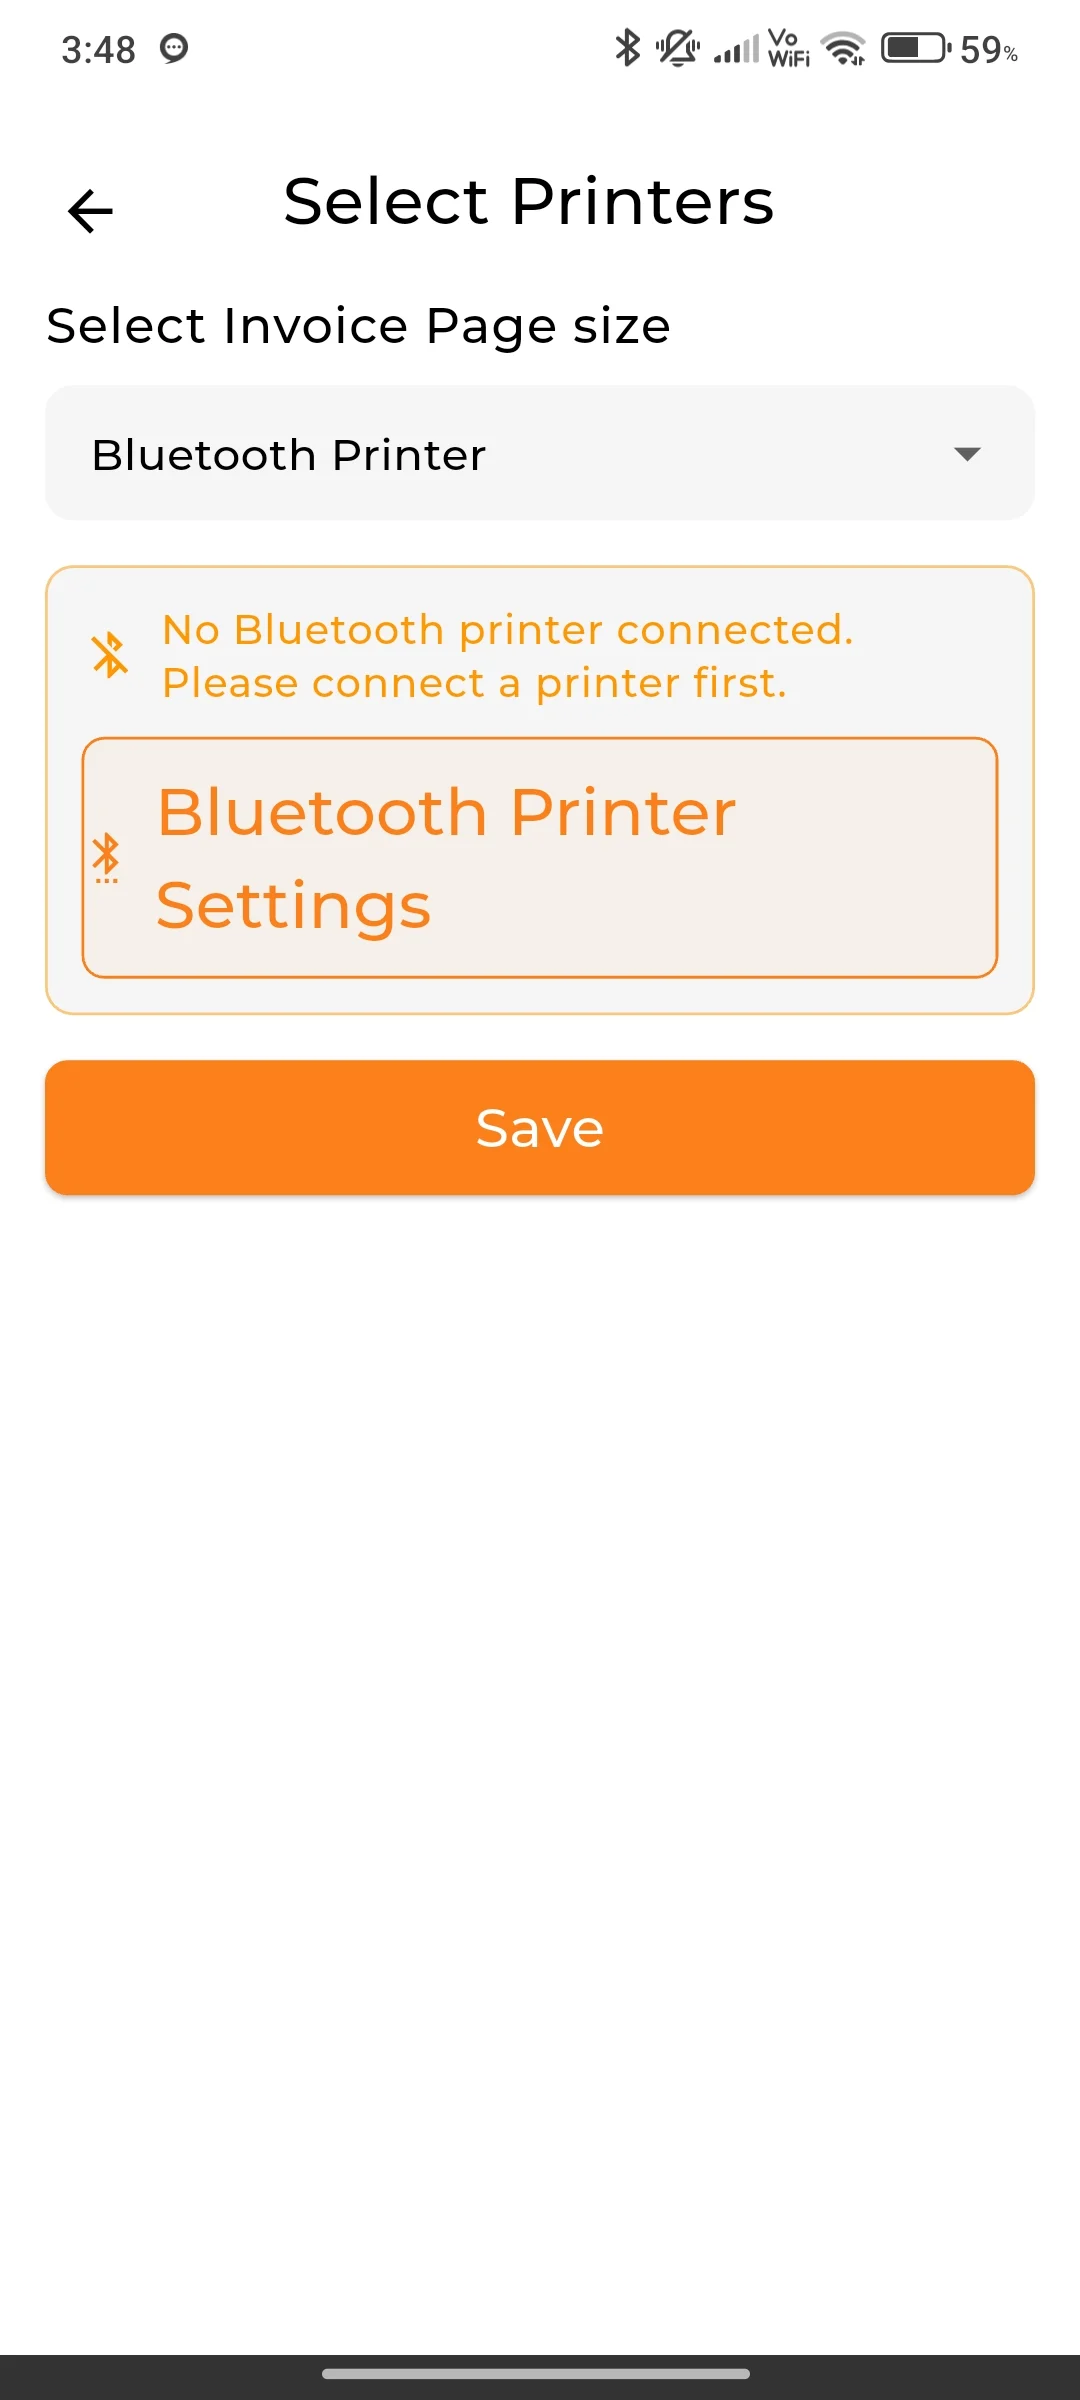
Bluetooth Printer
The POS Mobile App supports an in-built Bluetooth printing feature. It allows the sales agent to print receipts directly from the device using a connected Bluetooth printer.
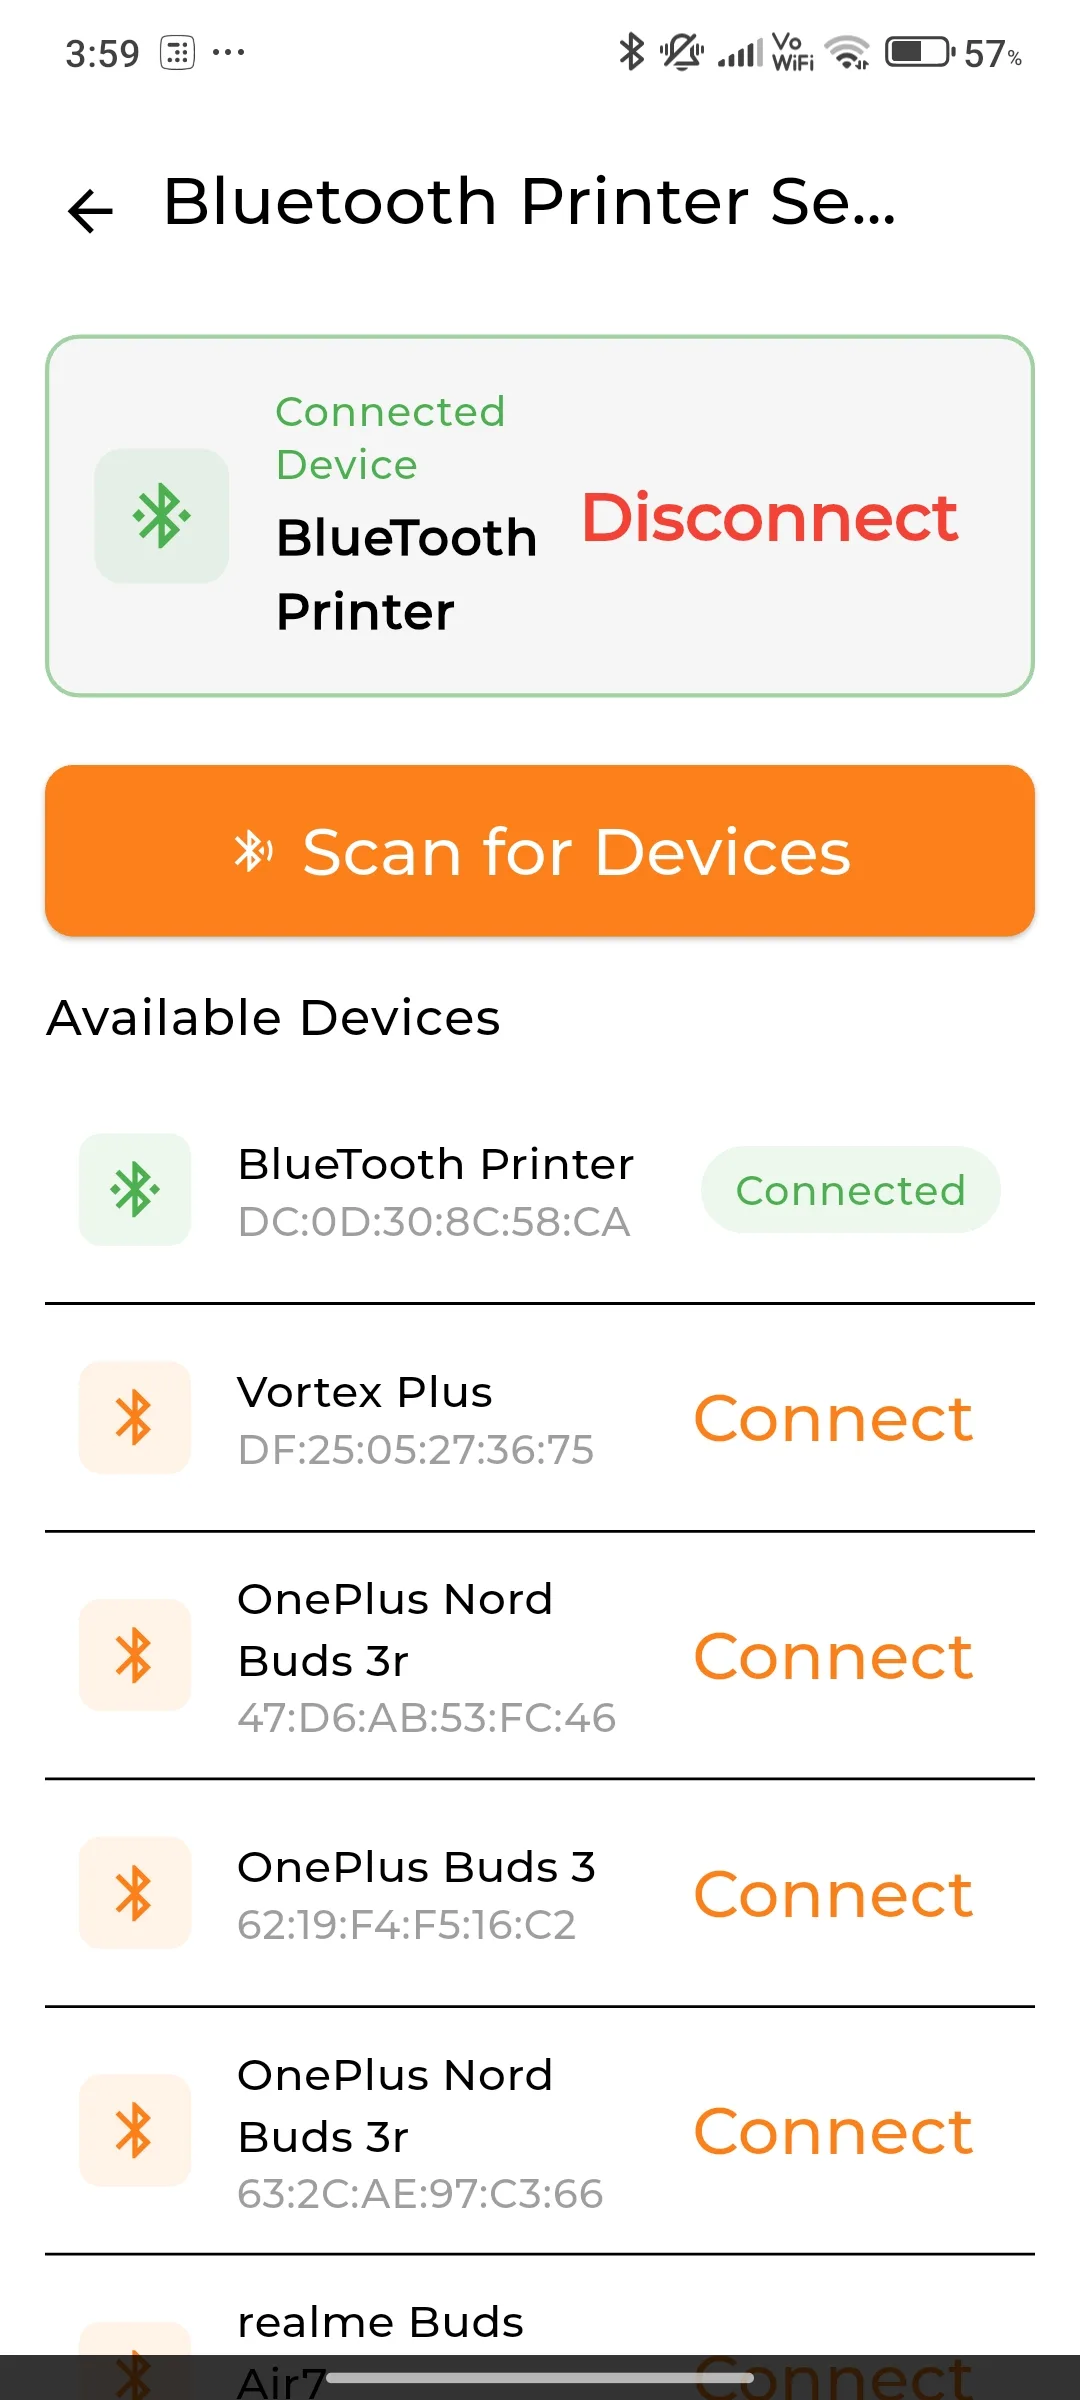
To set up the Bluetooth printer, the sales agent needs to tap on the More option available at the bottom right of the app. From there, navigate to All Settings and then open the Printer section.
Next, select a Bluetooth printer from the available list of devices. Once the connection is successful, the printer status will be displayed on the same screen.
Bluetooth Printing
Print receipts directly from the POS Mobile App using a connected Bluetooth printer. Set up the printer from More > All Settings > Printer, and once connected, receipts and invoices can be printed instantly for new and previous order
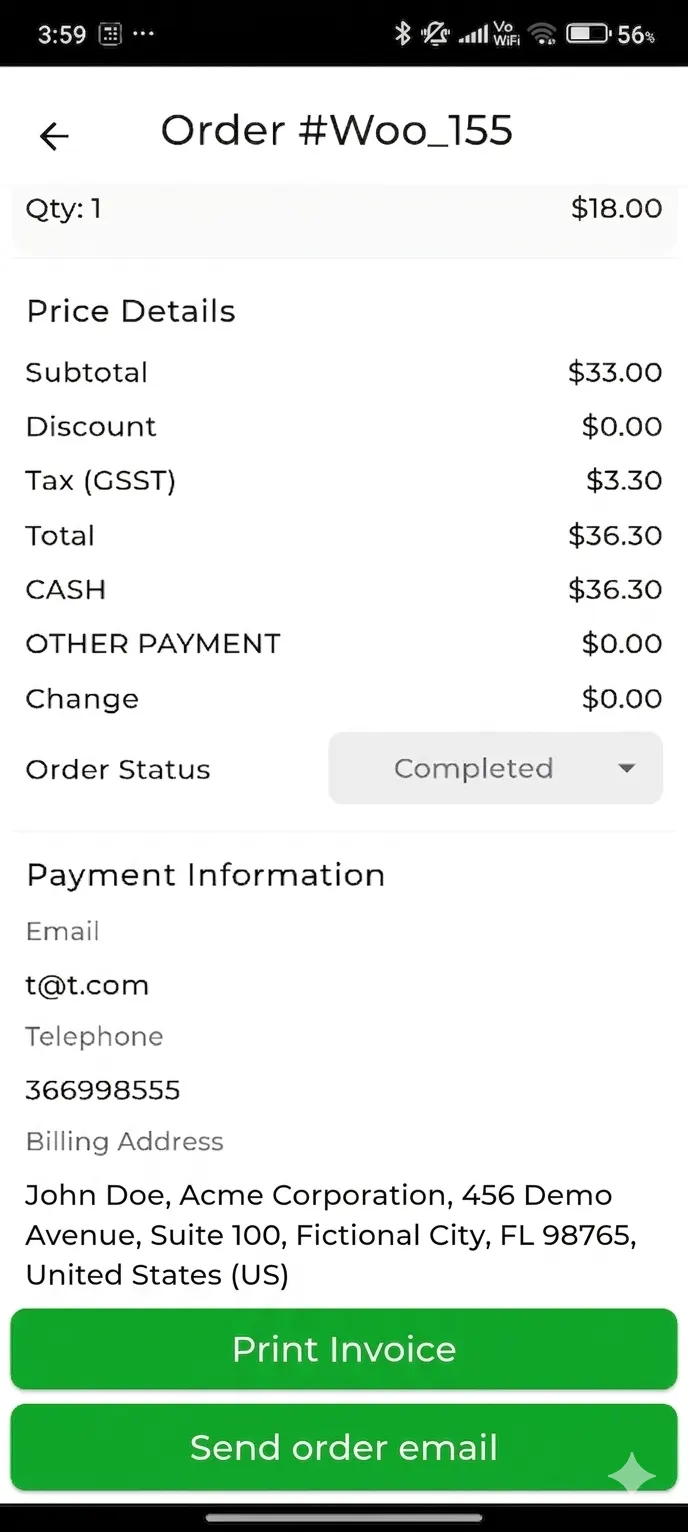
After the printer is connected, whenever an order is placed, the receipt will be printed automatically through the connected Bluetooth printer.
Additionally, the sales agent can also print previous orders. For this, go to the Orders page and open any completed order. Scroll down to find the Print Invoice option. By tapping on it, the invoice will be printed via the connected Bluetooth printer.
The WooCommerce POS Mobile App is compatible with Bluetooth-enabled printers and also supports SUNMI devices, ensuring smooth connectivity with SUNMI’s smart POS hardware for efficient receipt printing.
Note- If a Bluetooth printer requires a custom SDK, it must be provided by the customer. Integration will be carried out based on the SDK’s compatibility, completeness, and the quality of its documentation.
WooCommerce Flutter Native POS Mobile App – Versions Supported
The minimum and maximum versions supported by the WooCommerce Flutter Native POS Mobile App are as follows.
Android:-
Min:- 7, Max:- 16
iOS:-
Min:- 13, Max:- 17
Webkul is a Flutter app development company offering a native WooCommerce POS mobile app for Android and iOS.
It enables sales agents to manage carts, generate invoices, scan barcodes, process payments, and sync data with the website in real time all from their mobile device.
Support
That’s all for the WooCommerce Flutter Native POS Mobile App. If you have any queries or suggestions regarding the extension then you can get back to us at webkul.uvdesk.com.
Also, discover POS Development Services that covers a wide range of solutions, including Custom Integration Services.
Also As a leading Webkul Flutter App Development Company, we specialize in building scalable and high-performance Flutter solutions for modern eCommerce ecosystems.
Thanks for Your Time !! Have a Good Day!
Current Product Version - 1.5.0
Supported Framework Version - WooCommerce - 7.x.x, 8.x.x, 9.x.x; Wordpress - 6.3.x, 6.4.x, 6.5.x

Be the first to comment.