WooCommerce Order Receipt Cloud Thermal Printing plugin facilitates the store admin to print order receipts with the help of thermal printers.
It prints the order receipt automatically from the connected thermal printer and reduces the need for manual printing.
For store admin, the plugin also provides a custom printing functionality. They can simply input a custom text and print it through the thermal printer.
Do check the below video tutorial to get to know the working of the plugin,
Apart from this, if you’re looking to add thermal printer to your POS store, then you can check WooCommerce POS Thermal Printer Add-on.
Note:
- Multi Vendor Marketplace for WooCommerce is also completely compatible with this plugin.
Additional Info:
- This plugin is now compatible with WooCommerce’s latest High-Performance Order Storage (HPOS) and Cart and Checkout block.
- We provide a production version of the plugin. If you want a development version then you can get it at an additional cost. Please contact support@webkul.com for it.
Features
- Plugin is used for the automatic printing of order receipts and invoices directly from thermal printers.
- Printer software for thermal printers is compatible with Linux, Windows OS, and Darwin(Mac OS).
- Store admin has the ability to enable or disable the automatic printing feature for order receipts as needed.
- Option to upload a preferred image for logo to be printed on the receipt.
- Admin can perform bulk actions to print multiple order receipts simultaneously through a thermal printer.
- Various order statuses can be selected for the automatic printing of receipts such as Processing, Complete, Cancelled etc.
- The printed receipts will include the specific admin and vendor store name, along with the address for differentiation.
- Plugin supports simultaneous connection of multiple thermal printers for the printing of order receipts.
- Admin can view the connected thermal printers of the vendors as well and print order receipts through them.
Printers Compatibility
The WooCommerce POS Cloud Printer Add-on is designed to work seamlessly with a wide range of industry-standard thermal printers.
Below is a list of printers that are fully compatible and tested with our module to ensure smooth and reliable performance:
Supported Printer Models
Installation
The user will get a zip file which they have to upload in the “Add New” menu option in the WordPress admin panel.
For this, login to the WordPress Admin Panel, and Under the Dashboard hover your mouse over the “Plugins” menu option. This brings out a Sub-Menu and then selects the “Add New” option.

After that, you will see an option on the top of your page that is “Upload Plugin”, click the option to upload the zip file.

Then click on the “Upload Plugin” option, below that you will see a button “Choose File” click on the button to browse for the zip file as per the snapshot below.

Post browsing the file, click the “Install Now” button to install the plugin as per the snapshot.

Now, when the plugin is installed correctly, you will see the success message. Additionally, an option to activate the plugin.
Click on “Activate Plugin” to activate the installed plugin.

Plugin Translation
Know how to translate the module.
NOTE: To generate JSON from your translations, save your translation file in the default WordPress languages directory.
Then run the following command in the same directory: Note xx_YY refers to the locale (eg. en_US)
“`wp i18n make-json wc_pos-xx_YY.po –no-purge
Flush Rewrite Rules
The admin has to flush the permalink by navigating to Settings > Permalinks so that the links to the WooCommerce Order Receipt Cloud Thermal Printing work correctly.

Plugin Activation and Updates
Checkout how to Activate WooCommerce Plugin through the purchase code and get updates on Webkul Modules directly on the Plugins page
WooCommerce Order Receipt Cloud Thermal Printing-Configuration
After successfully installing the WooCommerce Order Receipt Cloud Thermal Printing plugin, the admin has to configure it.
They will navigate to Webkul WC Addons>Order Receipt Thermal Printing from the WooCommerce admin dashboard.
The following sections are available for the admin,
Server Configuration
For Connecting Through Remote Server
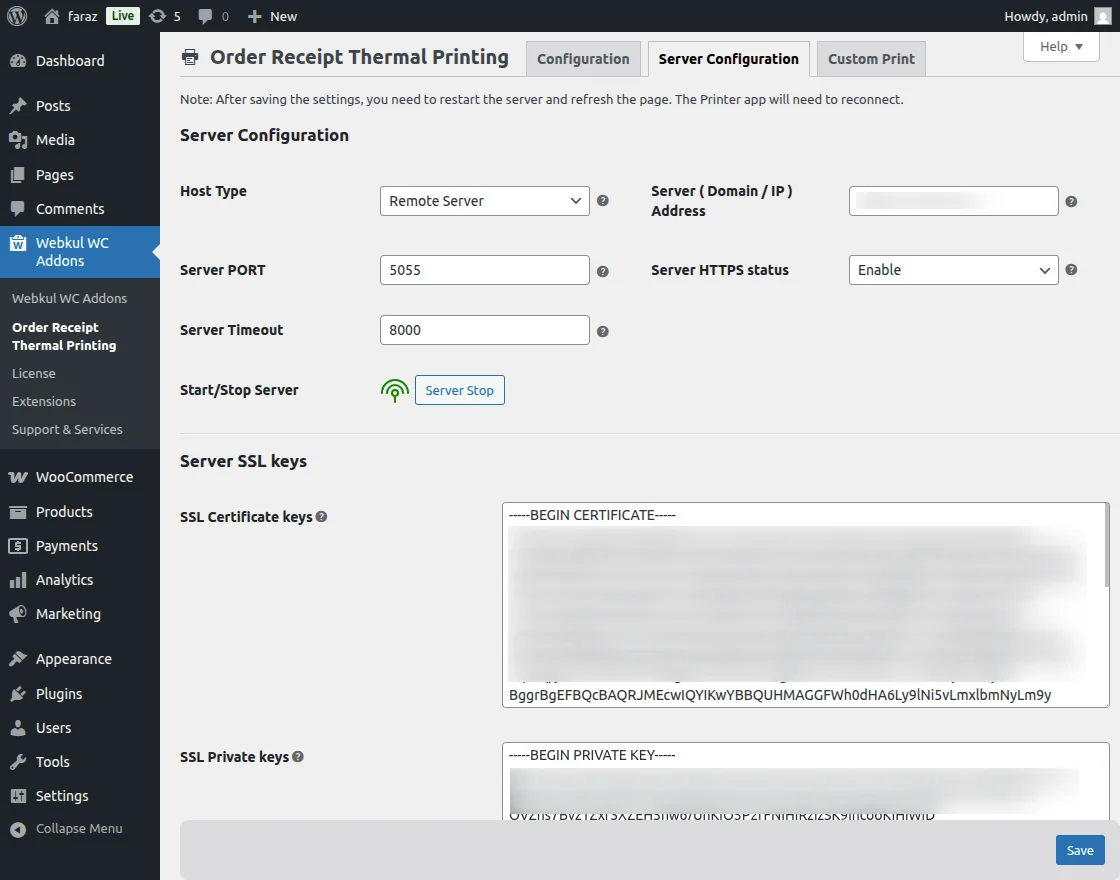
Under this section, the server settings are configured, the following fields have to be setup,
Server Configuration
- Host Type: Select the type of host.
- Server ( Domain / IP ) Address: Enter Domain/IP address without http or www prefix
- Server PORT: Enter Server Port number. Node server will start on this port.
- Server HTTPS Status: Enable this option if your site has SSL installed.
- Server Timeout: Enter the node server api request timeout.
- Start/Stop Server: Button to Start or Stop the server.
Server SSL Keys
- SSL Certificate Keys: Enter the SSL Certificate Key
- SSL Private Keys: Enter the SSL Private Key
Note –
- SSL keys will be different for different servers.
- This is not provided for the HTTP.

For Connecting Through Localhost/Local Server
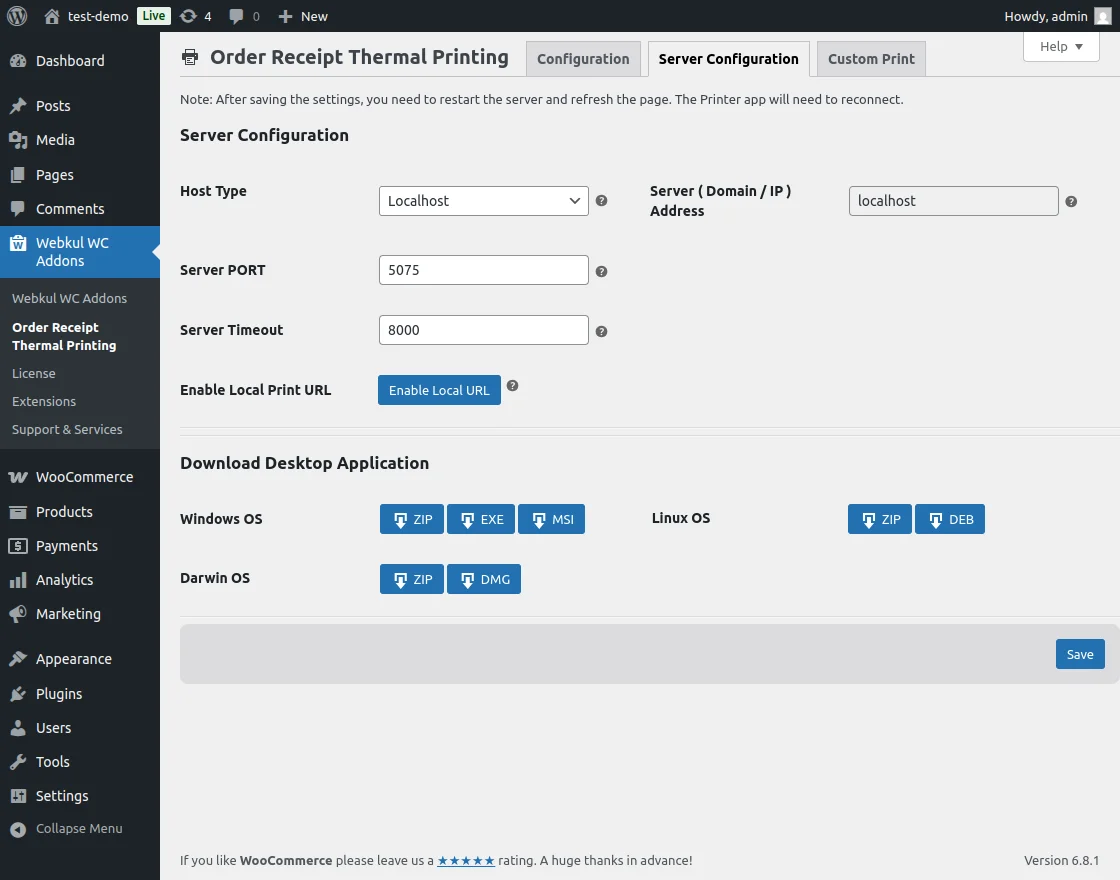
If the admin requires to connect through Local host or server then Certificate and Private Kets are not required. In this, the following fields have to be setup,
Server Configuration
- Host Type – Select Host type for thermal printing server
- Server ( Domain / IP ) Address – In the case of localhost, this field is not editable.
- Server Port – Enter Port
- Server Timeout – Enter Server Timeout
- Enable Local Print URL – Button to enable the local print URL.
Note
Shared hosting is not recommended. Please ensure that the required port (e.g., 3000) is enabled on the server.
Download Desktop Application
Download the thermal printer desktop application from this section. The required and compatible files for Windows OS, Linux OS and Darwin (Mac OS) are provided here.
For Windows OS
Click on the ZIP, EXE, or MSI button to download the application on your Windows system. Once you click on the button the file will download to your system.
When you download the exe file, the file will be directly downloaded to the system.

After that, a pop-up will appear and you can click on run anyway to proceed further

Then you have to enter the domain detail.
Linux OS
Similarly, the admin can download the app on their Linux OS.

Then extract the Zip file on your system.

Now right-click on the Launch.sh file and move to the permission option.

Once the execute permission is enabled the admin can launch the app on their system.

Darwin OS
Similarly, the admin can install the app for Apple desktop in Darwin OS.

Once the Zip is installed extract and open it.

Click on the open icon and the process will run in the background.

Once the app gets installed the admin can check the icon on their home screen.

Click on the app, the app will open in your Darwin OS.

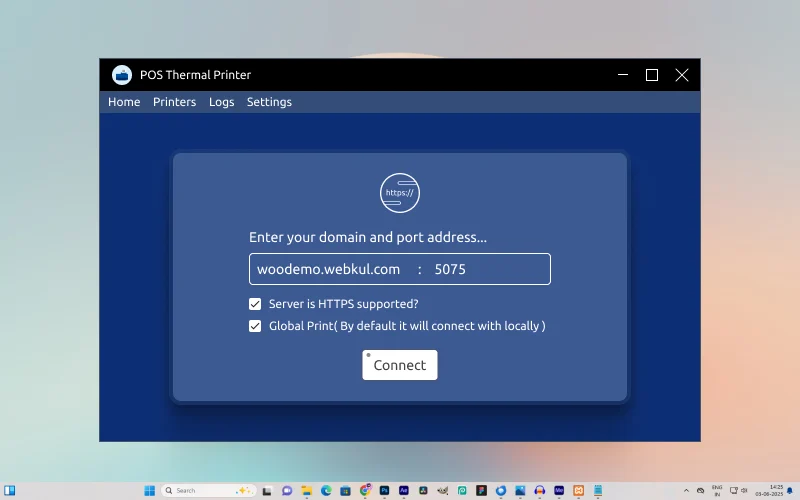
App Settings
Once the app gets installed the admin can configure the app settings.
The admin will enter the domain URL or IP address and port number.
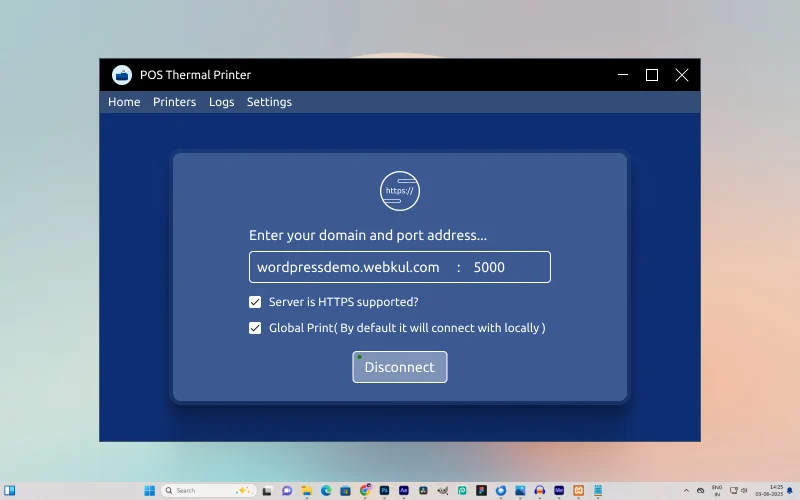
Note –
- Both the Checkboxes i.e 1) Server is HTTPS Supported and 2) Global Print have to be enabled to connect with server and perform printing.
- Additionally, if these checkboxes are not enabled, then by default it’ll be connected locally.
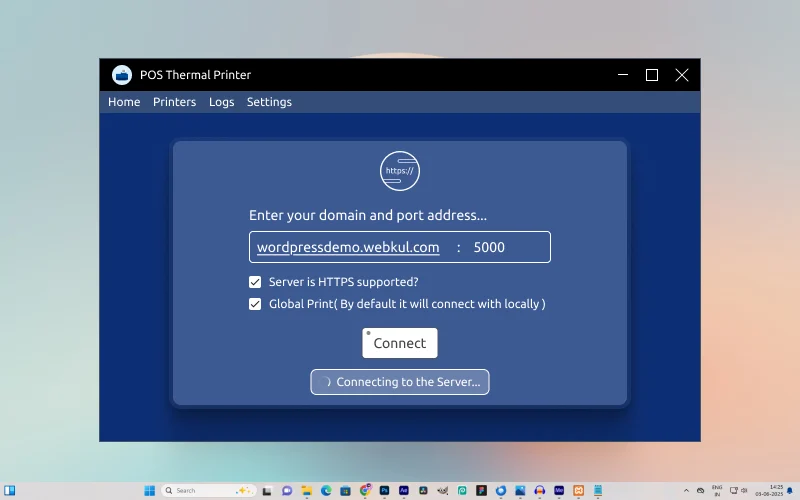
The admin needs to click on the connect button to connect the app to the server port.

Click on the printer’s option to check the connected printers and connect new ones.

Check the log setting on the app and download or clear any logs from the POS thermal app.

Once you click on the download button the log file will download in your system.

Check the log file directly on your system with every detail of the POS thermal printer app.

If the admin wants to clear the log they can simply click on the clear button and the log will be cleared from the app.
Configuration
Next, the admin has to configure the Thermal Printer settings. The options which will be available are as per the image below,
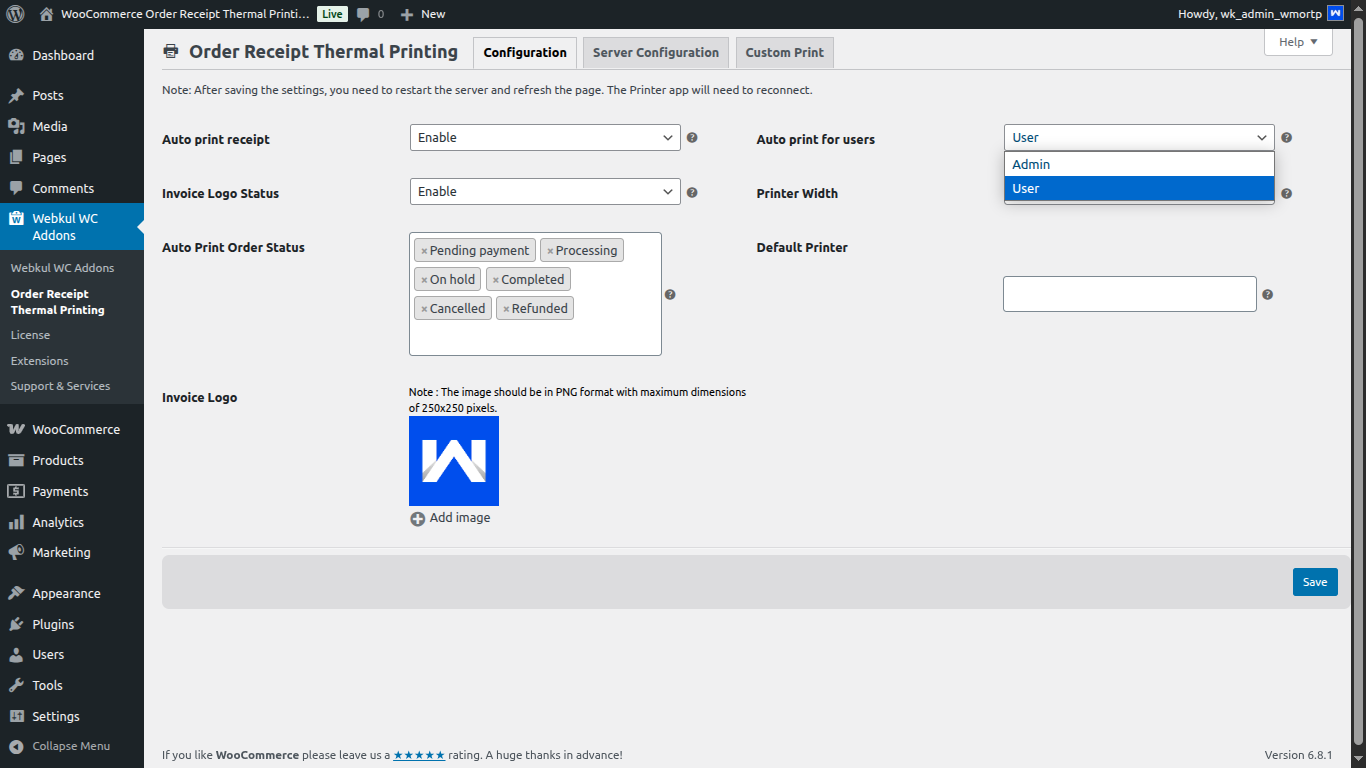
- Auto Print Receipt: Enable this to print the order receipt without the order confirmation pop-up
- Auto Print for Users: select Admin or User for automatic printing.
- Invoice Logo Status: Enable or disable the option to include the invoice logo on the order receipt.
- Printer Width: Adjust the printer width for receipt printing.
- Auto Print Order Status: Select the order status for which automatic printing will be triggered.
- Default Printer: Select the default printer for order receipt printing.
- Invoice Logo: Upload the image for the invoice logo.
Note: If Admin is selected, the print will only trigger when the admin is actively logged in. If the user is selected, the print will work even if the admin is logged out.
Custom Print
This section is available to the store admin to print custom text over the order receipts.
The admin can input any text in the provided text area and tap on the Print button. This will print that text on the receipt paper through the connected thermal printer.

Admin can enter the custom print text in HTML format or ESC-POS printer format language. They can select it from the dropdown menu provided.
An example of Custom custom-printed receipt is in the image below.
Hello, Greetings for the day!
We hope you’re doing well,
Admin Manual Printing
The admin can also print the order receipts manually as per their requirement. They have the option to print order receipts specifically or in bulk.
First, they’ll have to navigate to WooCommerce>Orders. From here, they’ll tap on the printer icon under the Print Invoice column to print the order receipts specifically.

Additionally, if they wish to print the order receipts in bulk, they’ll select the orders, then tap on Bulk Actions and hit Print Invoice to print all the selected order receipts at once.

Storefront Working
Now that the plugin and printer have been configured, the order receipts will now be printed from the thermal printer.
The Customer will log in to the storefront, select the products and add it to the cart as per image below,

Next, they will proceed to the checkout page, where they’ll add the contact information, billing address and payment options,

After tapping on Place Order, the order will be successfully placed and the customer can view the order details.

Now, if the store admin had Automatic Printing enabled, once the order has been successfully placed, the Order Receipt will be printed automatically. The receipt will be as below,

Vendor Flow
This plugin is also completely compatible with the Multi Vendor Marketplace for WooCommerce.
Therefore, the functionality to print order receipts through a thermal printer is extended to the vendors listed on the marketplace as well.
From their seller dashboard, they’ll navigate to My Profile>Print Config to access the configuration.
They’ll be able to configure the thermal printer settings as per the image below.
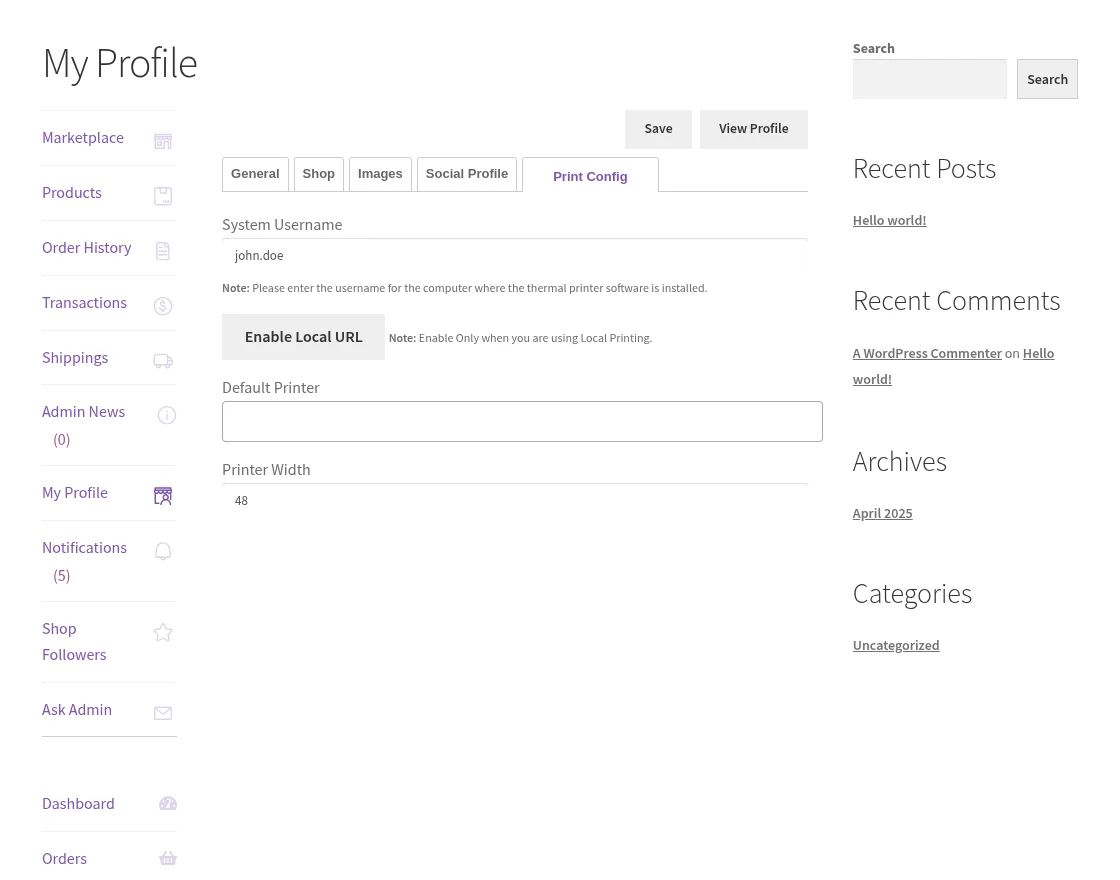
System Username: Enter the System Username. (Enter the username for the computer where the thermal printer software is installed)
Enable Local URL: Dedicated button to enable the local URL. (Enable only when you are using Local Printing.)
Default Printer: Select the default printer from which to print the order receipt.
Printer Width: Field to set the printer width.
Once the thermal printer has been configured, the seller can start printing invoices of their orders.
They’ll navigate to Order History and tap on the Print icon on the specific order to print the receipt.

The vendor order receipt will look as below,

Support
So that is all for the WooCommerce Order Receipt Cloud Thermal Printing plugin.
If you have any more queries or require further assistance, please reach out to us through support@webkul.com or create a ticket.
You can also check our WooCommerce Marketplace Development Services.
Current Product Version - 1.1.1
Supported Framework Version - WordPress - 6.8.1, WooCommerce - 9.8.5, WooCommerce Marketplace - 6.2.0

Be the first to comment.