WordPress WooCommerce Order Attachment plugin helps customers to buy medicines from an online pharma shop by uploading a prescription for the medicines.
File attachments are useful for uploading a doctor’s prescription for buying medicines, vaccines, or other types of drug products online.
Furthermore, the admin can choose products that can be bought only after uploading a prescription and the ones that don’t need any prescription.
The admin can easily check the prescription and then approve or disapprove the prescription/order as required.
Note: the types of files supported for uploading a prescription/attachment are jpg, png, jpeg, doc, docx, and pdf.
Note: This plugin is now compatible with WooCommerce’s latest High-Performance Order Storage (HPOS) and Cart and Checkout block.
We provide a production version of the plugin. If you want a development version then you can get it at an additional cost. Please contact [email protected] for it.
Check the plugin in action at the storefront along with the setup as in the video mentioned below –
Features
The Admin:
- Allow customers to buy medicine only when they have a doctor’s prescription.
- Pending, Approved, and Rejected the Uploaded prescription attachment by the user.
- See a complete list of orders placed for the prescription type of products.
- Set up the prescription heading and the content that is visible to the users at the front end.
- Enable or disable the prescription section for the products as required.
- View the prescriptions uploaded by the customers.
- All of the created prescription products are visible under a separate section.
- Can set which products can be bought only after uploading a prescription and the ones that don’t require one.
- Once a prescription is rejected, the admin can allow the customer to upload a new prescription.
Customers:
- Can easily upload their doctor’s prescription and buy medicine online.
- Can upload the prescription even after placing the order.
- The customer will be notified via email when the admin updates the prescription status.
- Guest users will need to attach the prescription at the time of placing the order.
Module Installation –
For installing the extension, follow the points mentioned below:
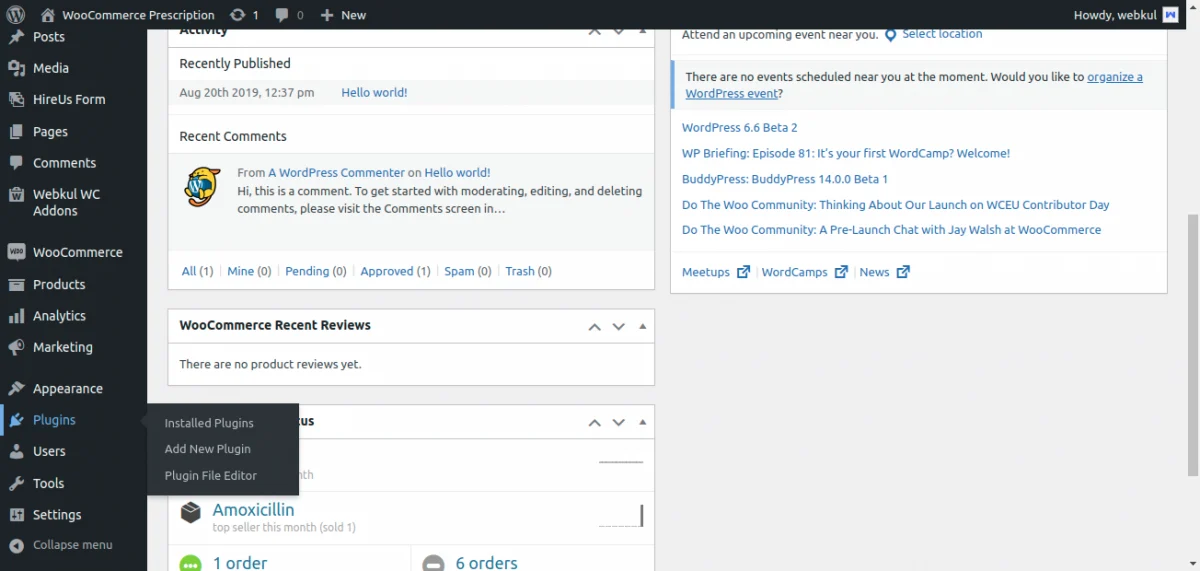
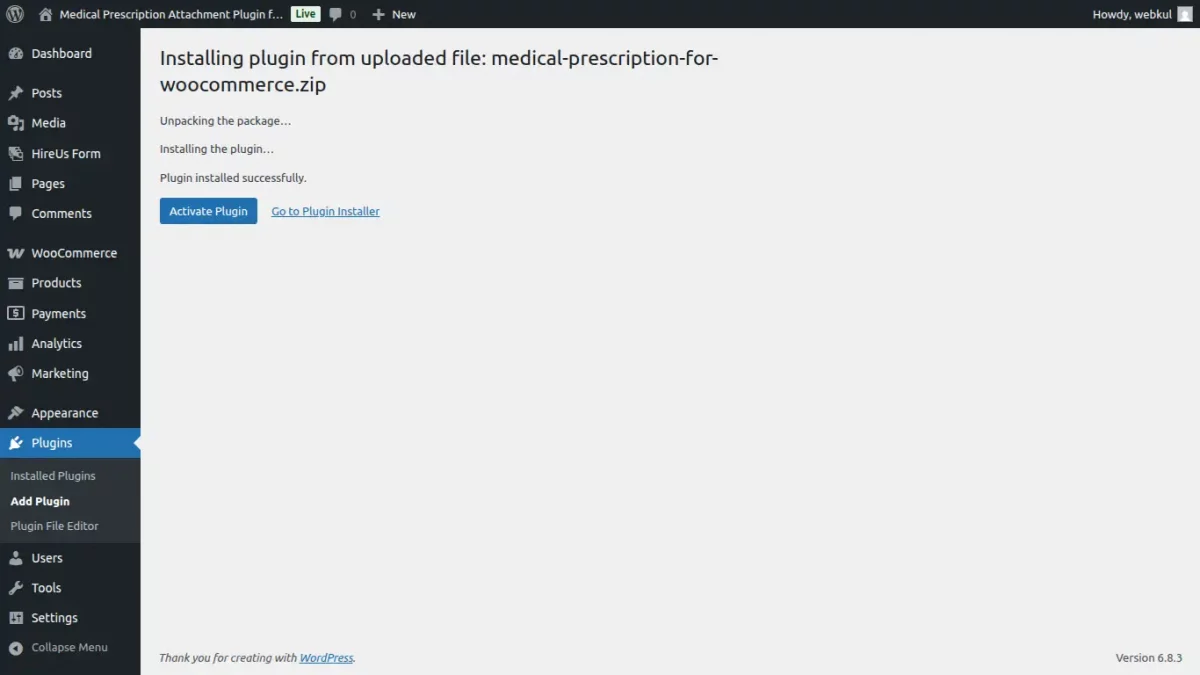
1: Log in to WordPress Admin Panel and navigate through ‘Plugins-> Add New Plugin‘.
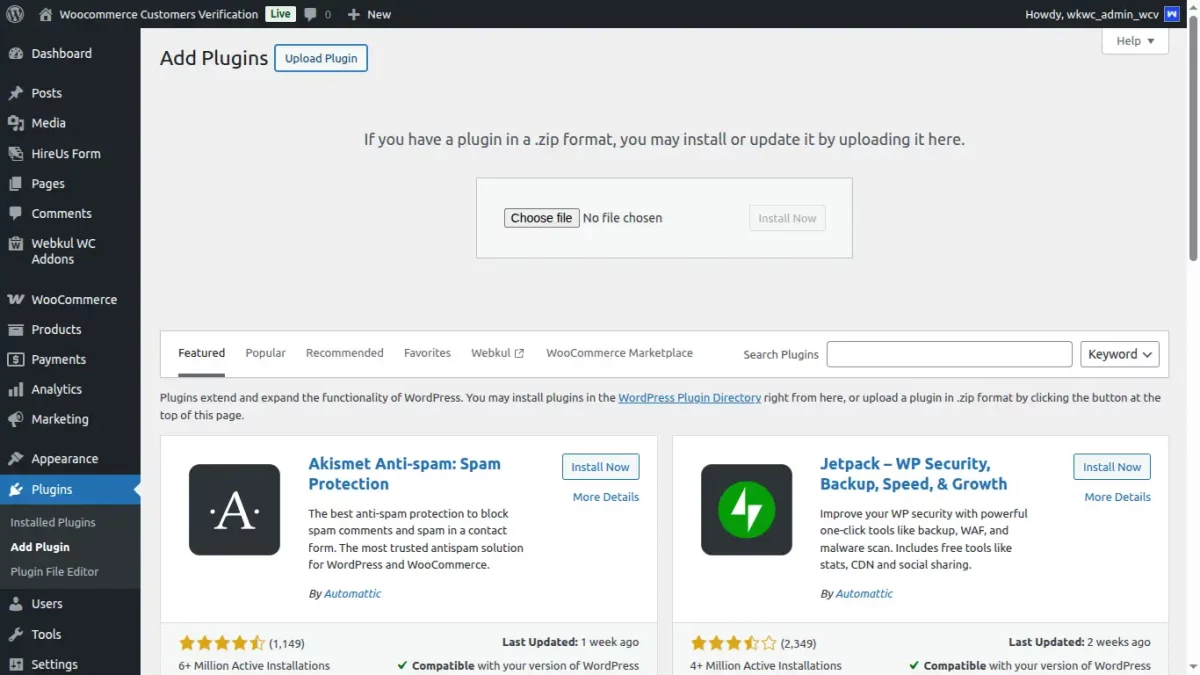
2: Click on the ‘Upload Plugin‘ button on the top of your page to upload the zip file.
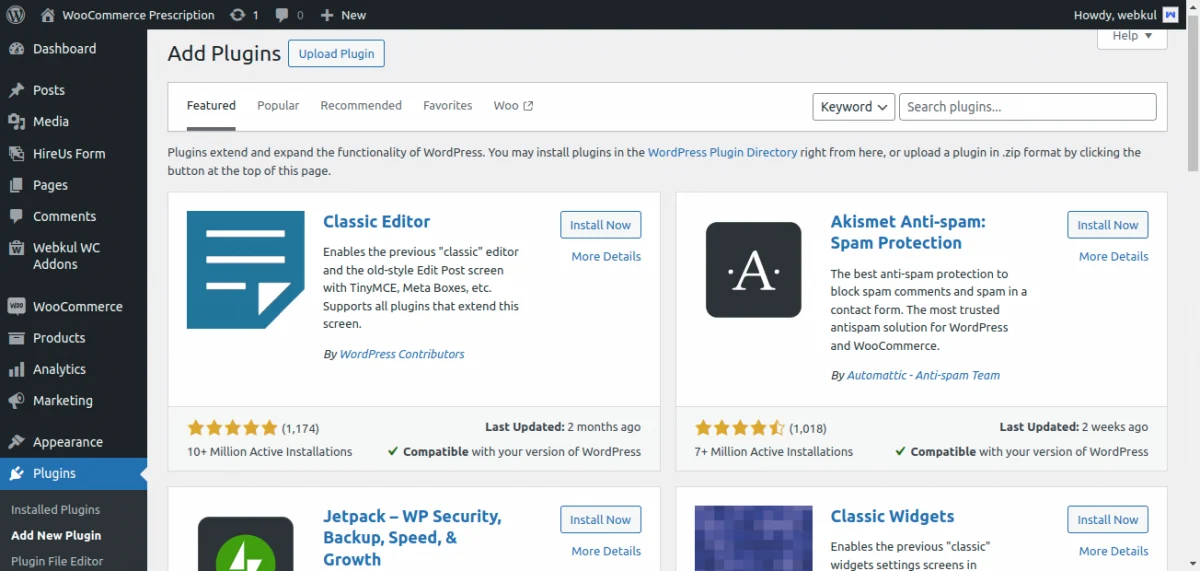
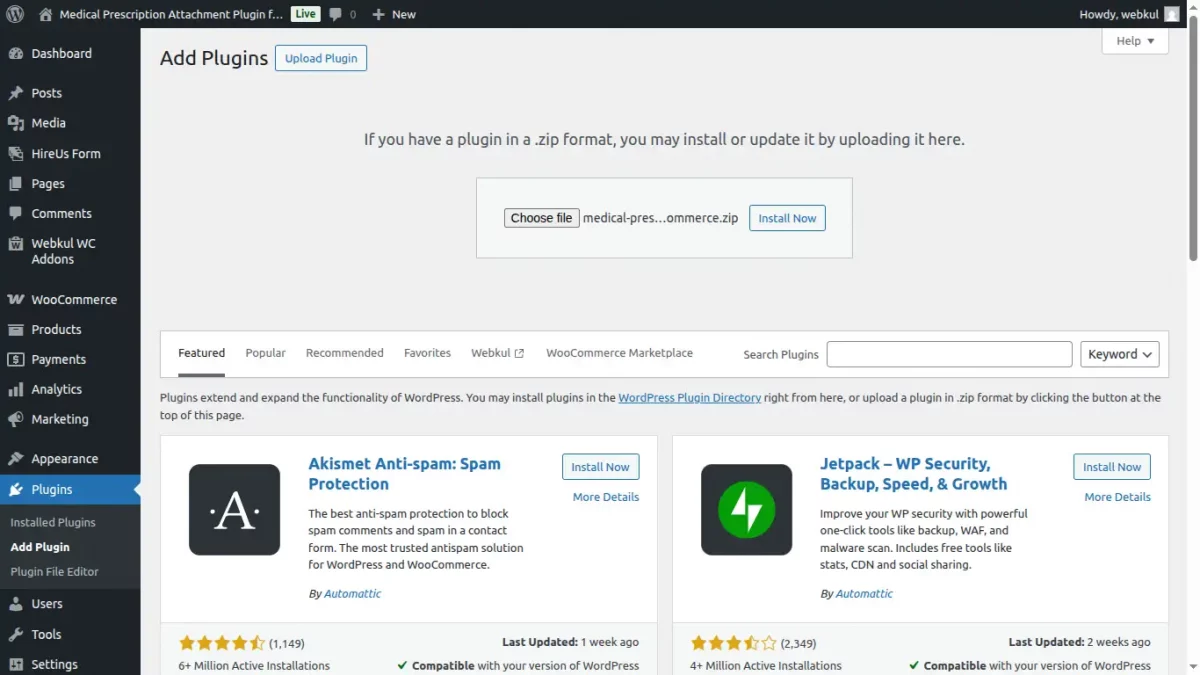
3: Now, tap the ‘Choose File‘ button to browse for the zip file.
4: After selecting the zip file, tap the ‘Install Now‘ button to install the plugin.
5: After successful installation, a success message is visible along with an option to ‘activate‘ the plugin. Tap on ‘Activate Plugin‘ to activate the installed plugin.
Module Activation:
Check out how to activate WooCommerce plugin through the purchase code and get updates on Webkul Modules directly on the Plugins page
Module Configuration – Settings
After the successful installation of the WordPress WooCommerce Order Attachment plugin.
Settings
The admin can easily configure the module configuration settings by navigating through WooCommerce Prescription ->Settings.
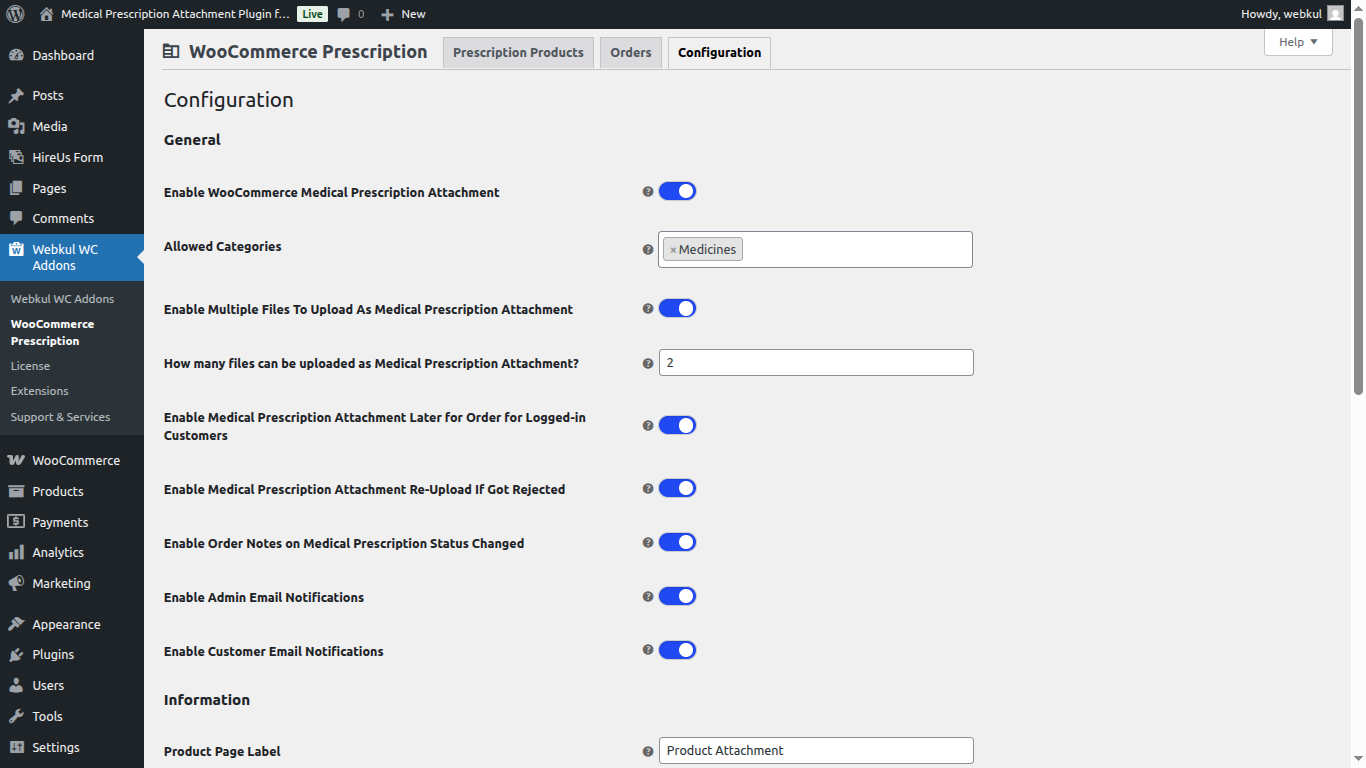
Here, the admin has to set the WooCommerce Prescription Settings by enable/disable the –
- WooCommerce Medical Prescription Attachment.
- Admin can input the categories for which medical prescription is mandatory.
- The medical prescription attachment for the order for customers.
- Field to set the number of files that can be uploaded as medical prescription.
- Reupload the medical prescription attachment if it is rejected for the order for customers.
- Adding order notes on the change of the medical prescription status for the order.
- The email notifications that are going to be sent to admin regarding uploaded prescriptions by the customer on the order.
- The email notifications that are going to be sent to customers regarding approval of uploaded medical prescriptions are done by the admin on the order.
Tapping the heading brings a pop-up with the description set up for fields.
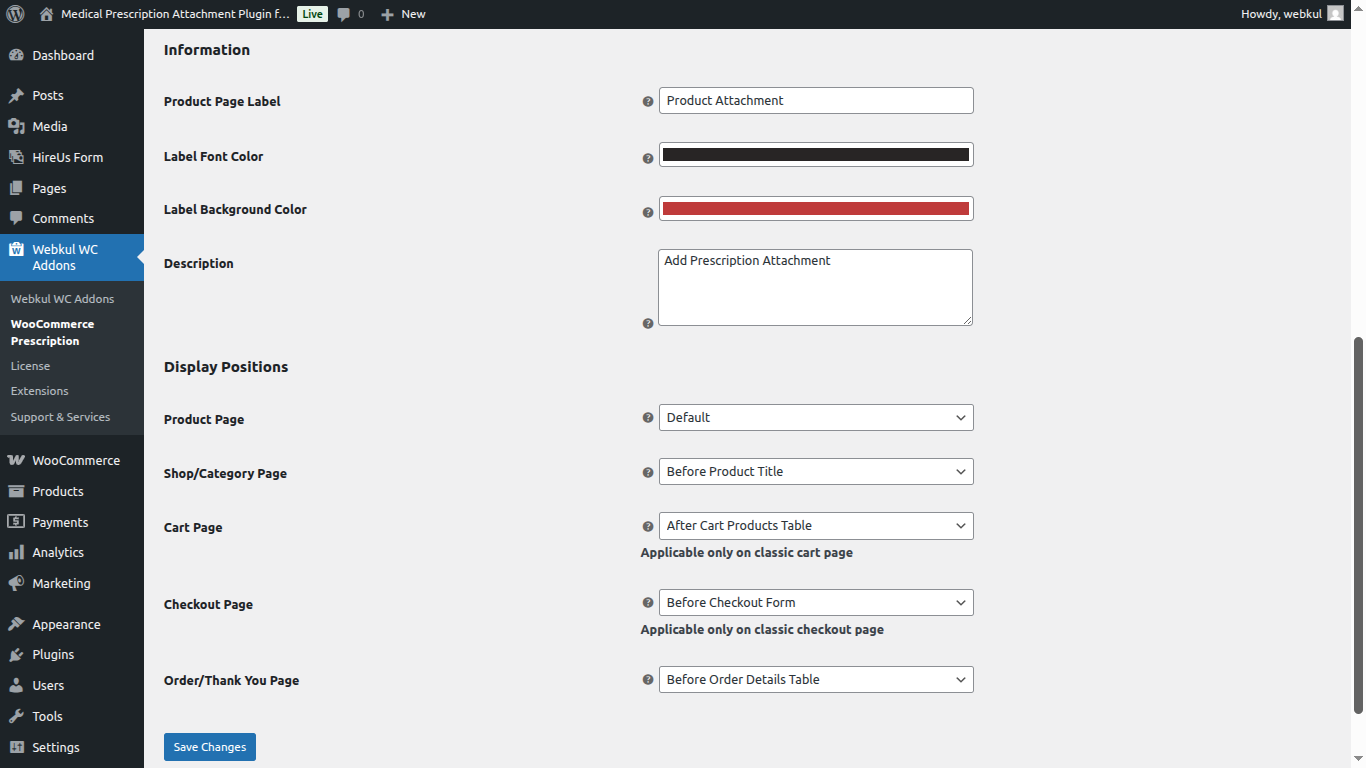
- Informing customers that they need to upload a valid prescription for making a checkout.
- The admin can change the background color of the cart page heading.
- The admin can change the color of the text in the cart page heading.
- Set the display positions of the product page label on the product page, and category page.
- Also, set the position of the prescription attachment on the cart page, checkout page, and order page.
This is how the admin set heading and prescription content gets visible to the customers within the cart.
Lastly, tap on the Save Changes button to save the set prescription setting, information, and display positions.
WooCommerce Prescription
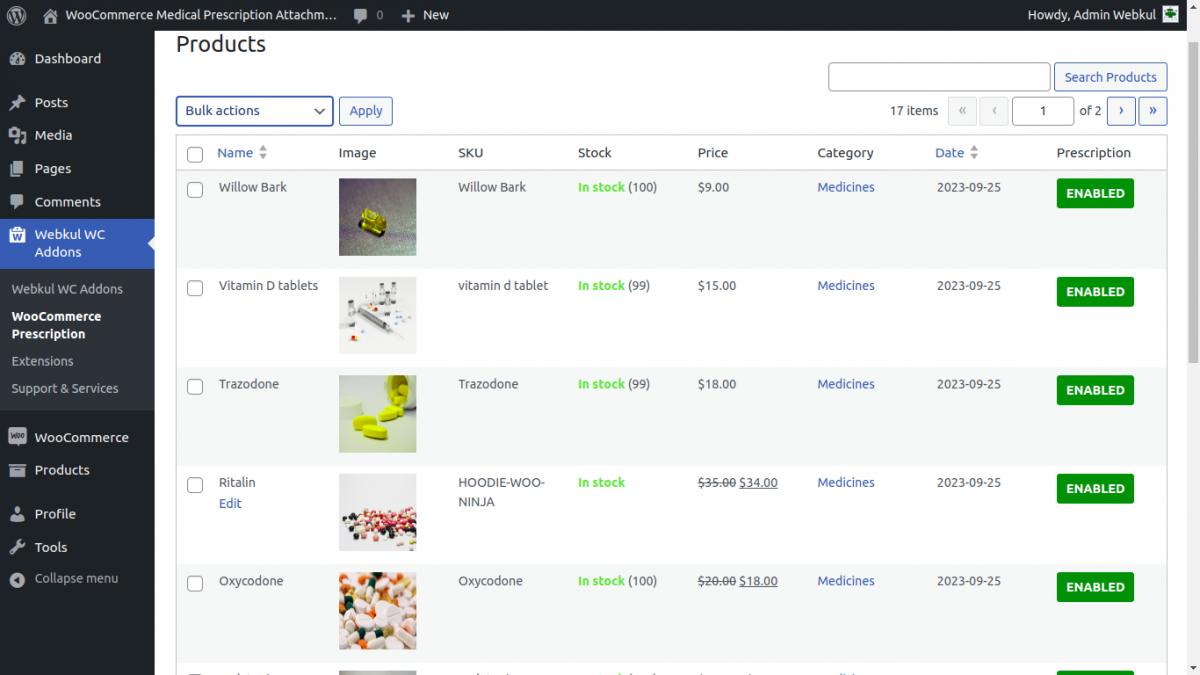
Under this extension, the store owner can easily check the products that have been marked as prescription products.
Further, the admin can set up the option to enable/disable the prescription attachment for the products.
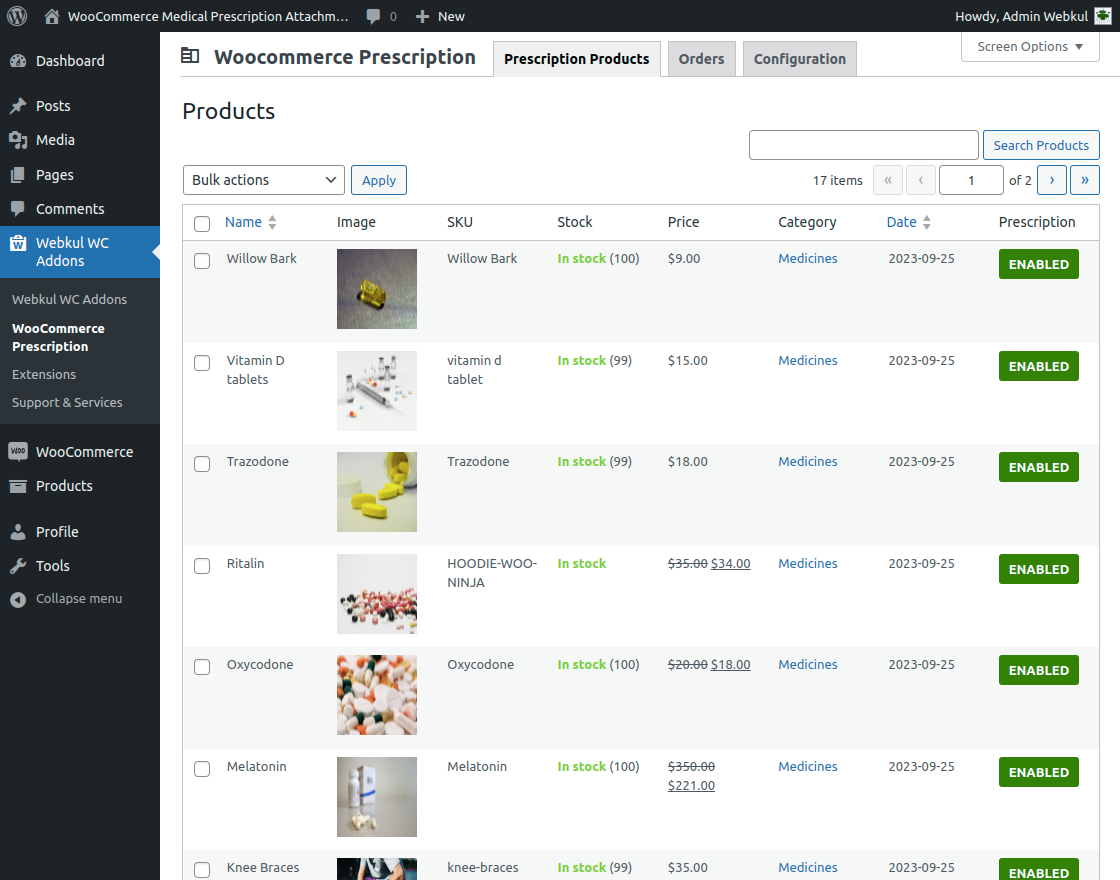
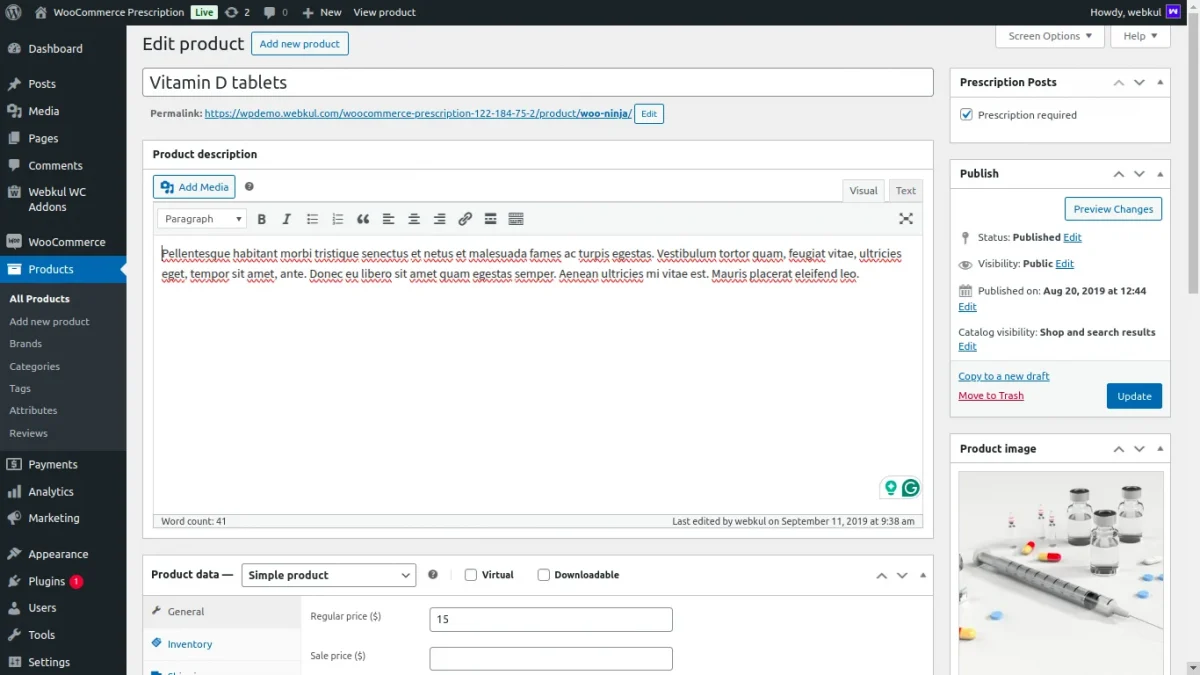
Admin can also edit the product by tapping on Edit Product button. It is displayed as per image below,
Enable/Disable – Prescription Products
To do so, select the products and then from the drop-down option choose Enable Prescription or Disable prescription as required.
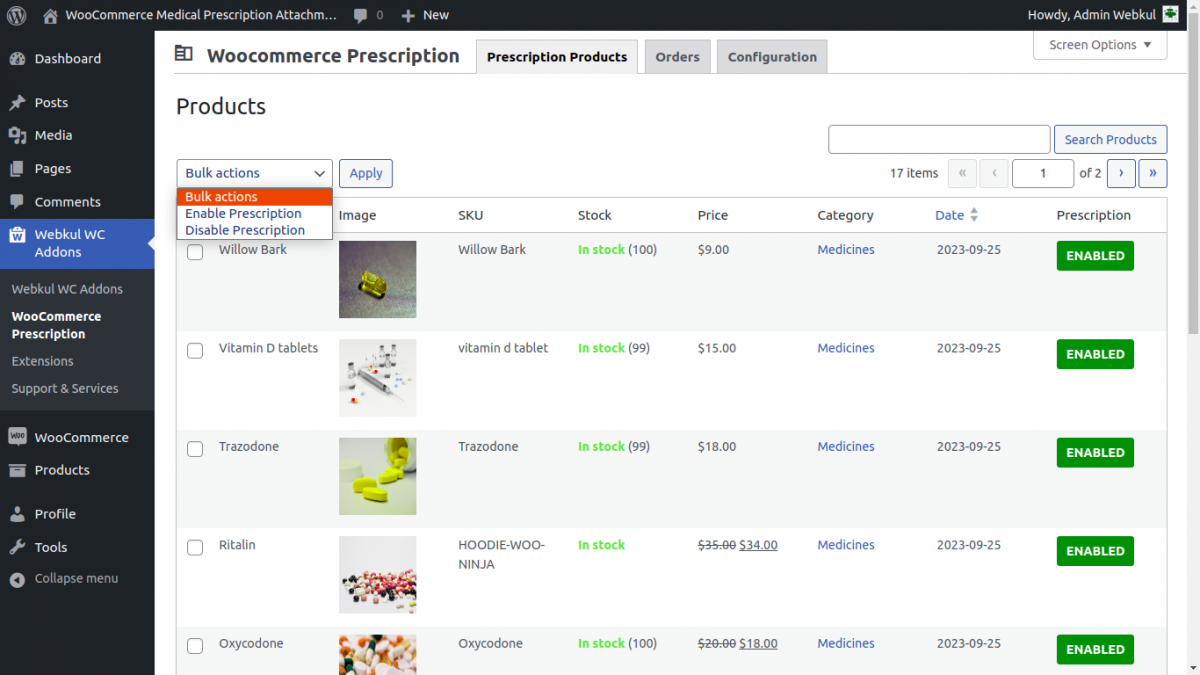
Apart from that, the admin can also edit any of the products by tapping the Edit button for the respective product.
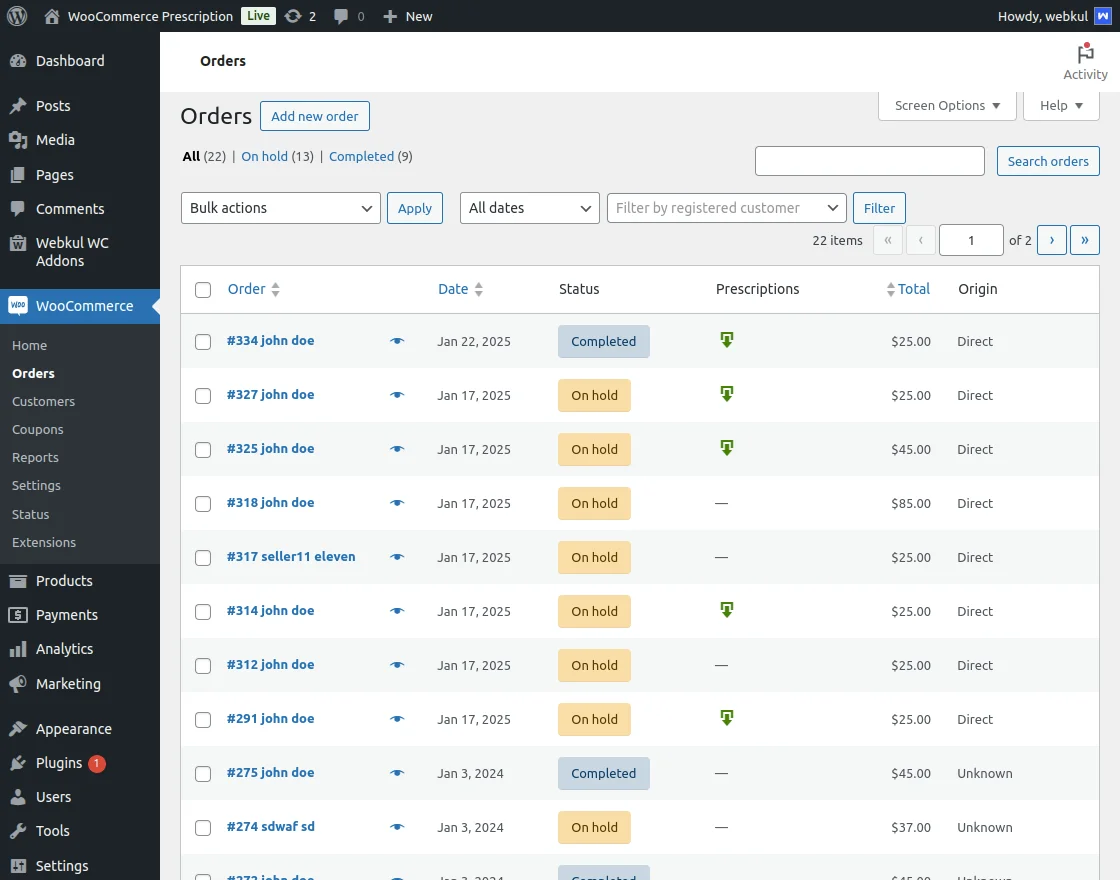
Orders – WooCommerce Order Attachment
Under this section, the admin will find all the prescription attached pharma products that the customers have placed the orders for.
The admin can see the details for the order which include –
Order(No. and Customer Name), Date(date when order placed), Status of the order, Prescription Status, and the total(order amount).

The order status can be the following as shown in the below screenshots.
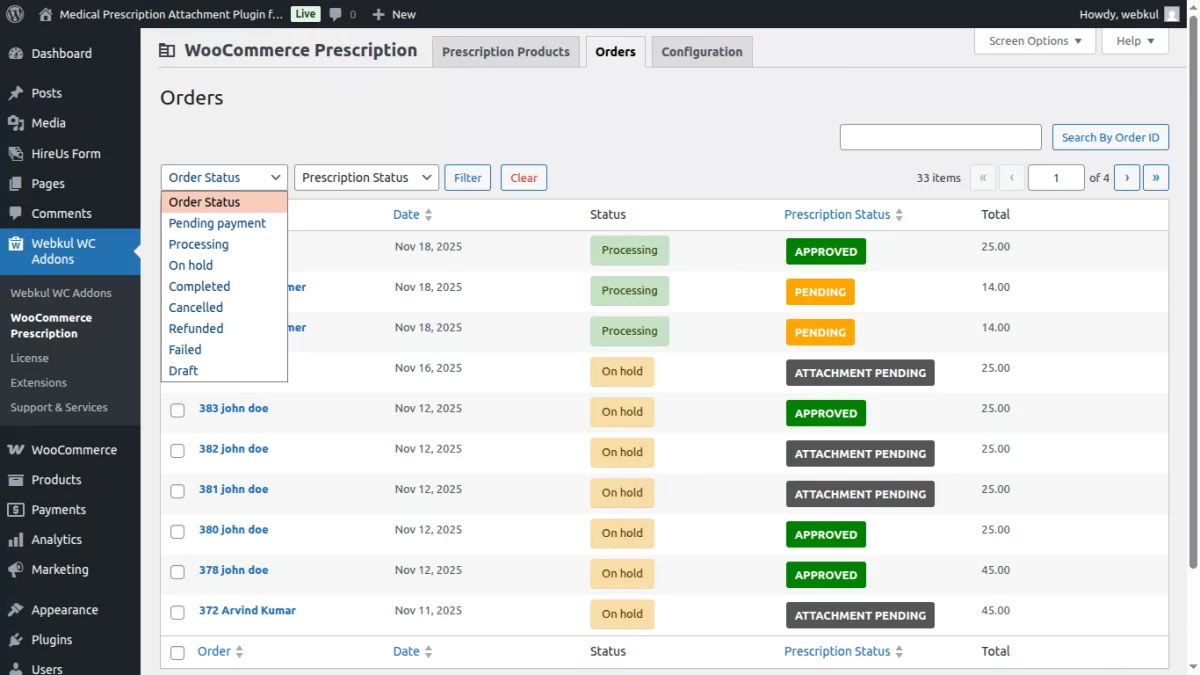
The Prescription Status can be Pending, Approved, and Rejected as shown in the below snapshot.
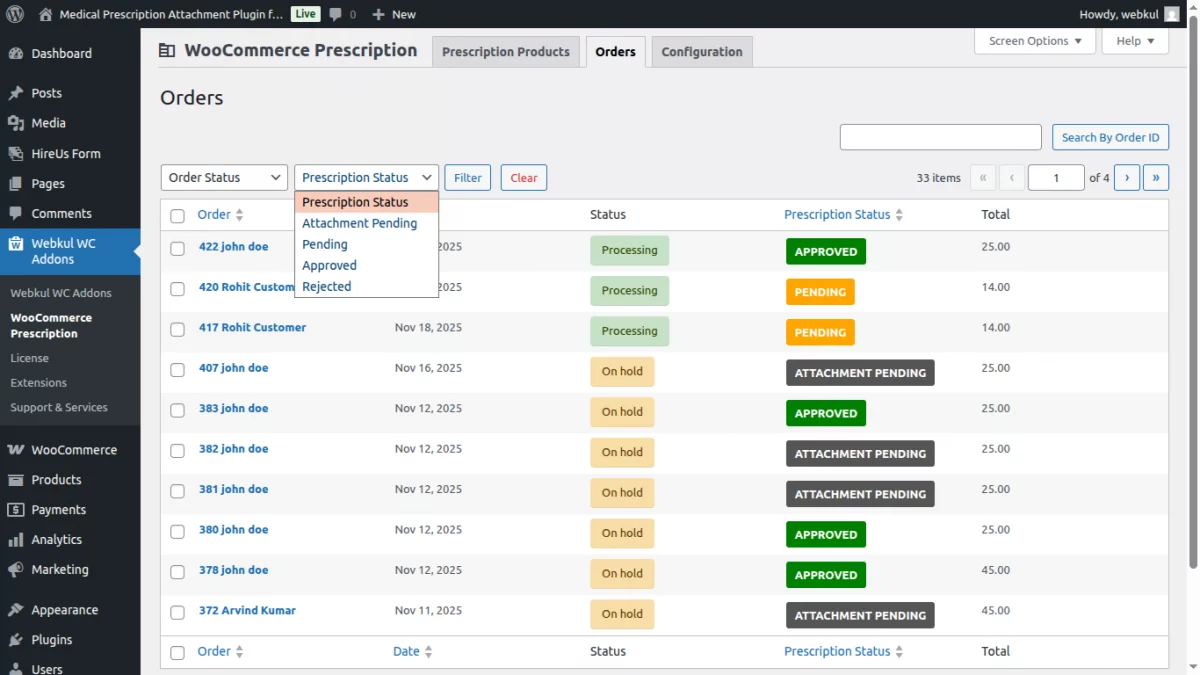
Moreover, the admin can also tap on the link under the Orders column to open the details of a particular order.
Customer flow
Placing an Order with a File Attachment
At the pharma retail store frontend (Shop page), the customers can find all of the available medicines as products for purchase.
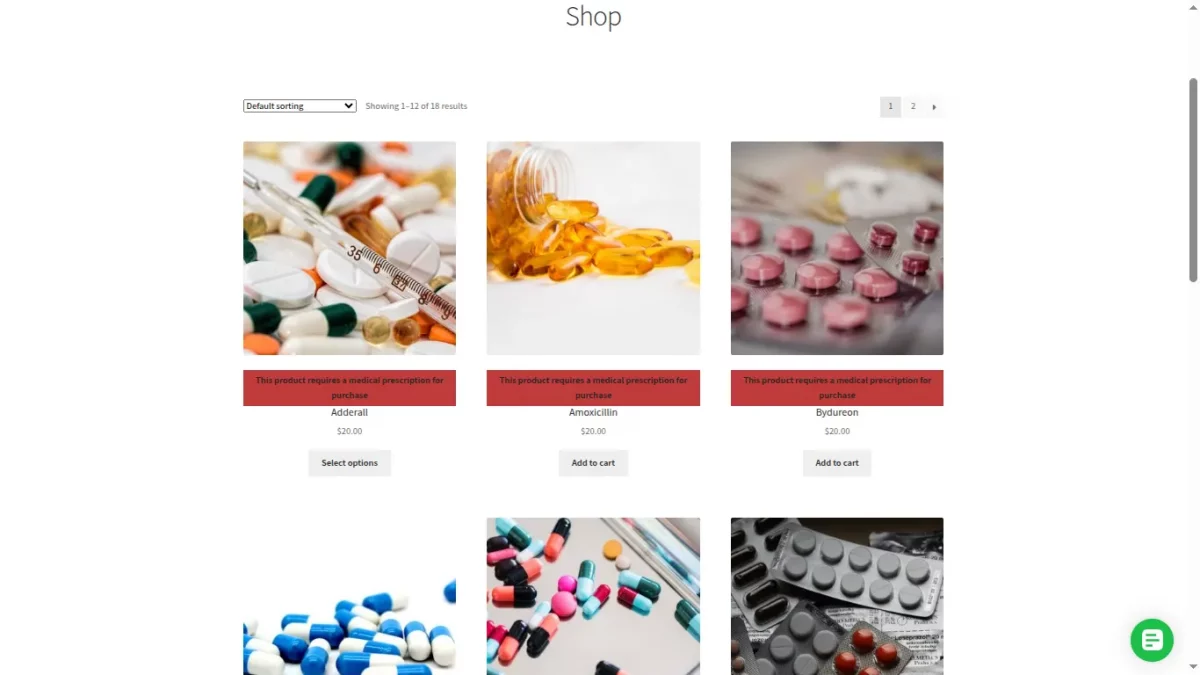
After tapping a product that the user wants to purchase online, the details of the same are visible to the user.
Here, the user can see a “Requires Prescription” note on the product and the same is required to be uploaded for purchasing the product.
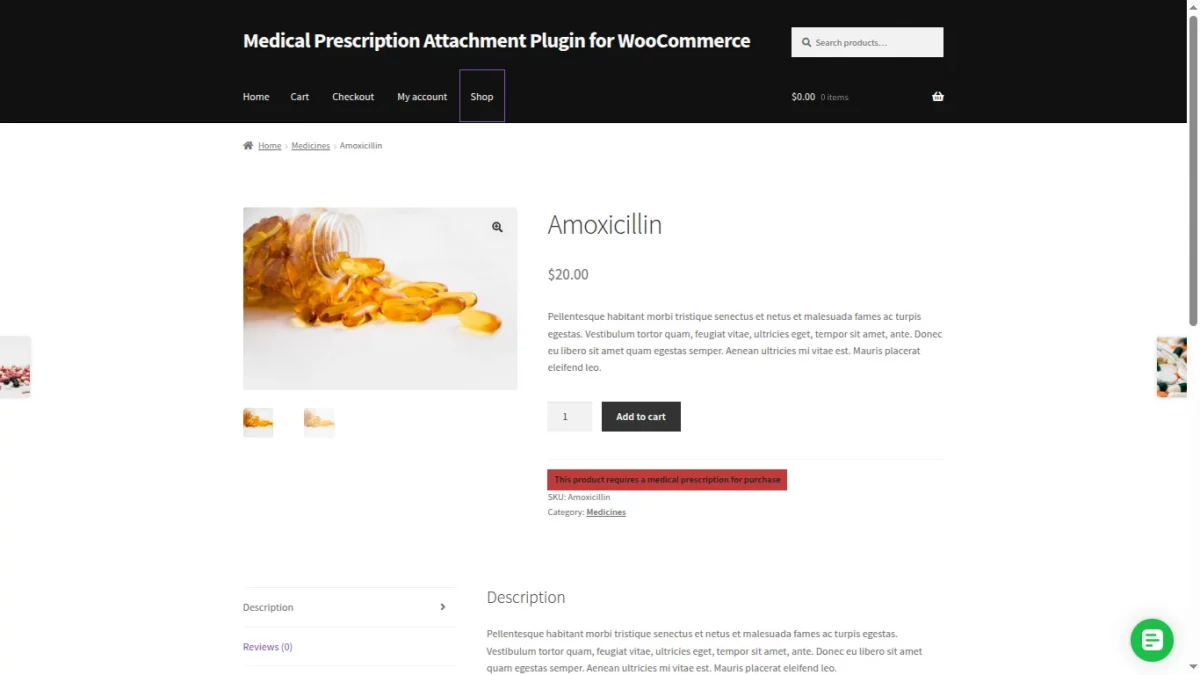
Now, the user can select the options if any for the medicine and then add it to the cart by tapping the ‘ Add to Cart ‘ button.
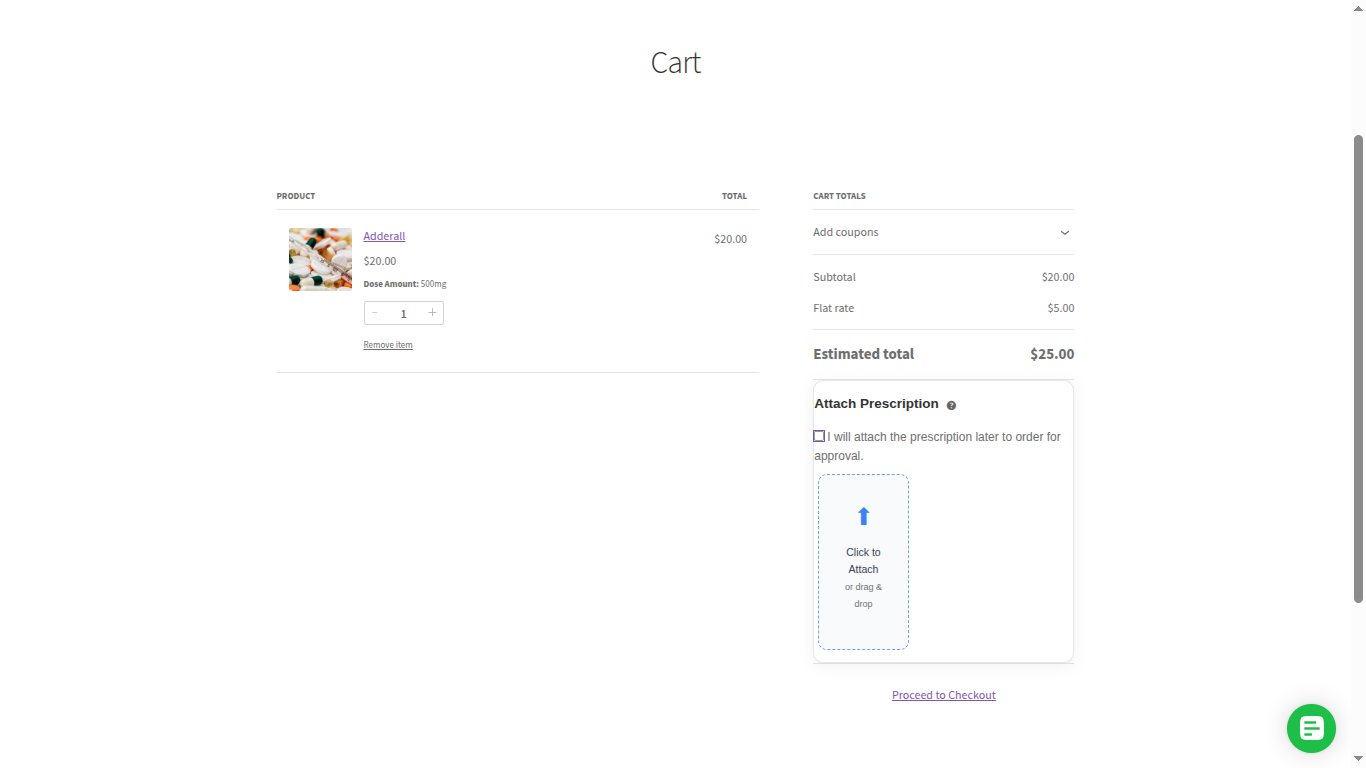
Within the cart, the customer can see the 2 options for attaching the prescription –
- Attach Later
- Attach Now
The customer can choose to attach the prescription right now or at a later point in time.
After choosing the option to attach now, the customer needs to upload the prescription image file by tapping on the Attach Prescription button.
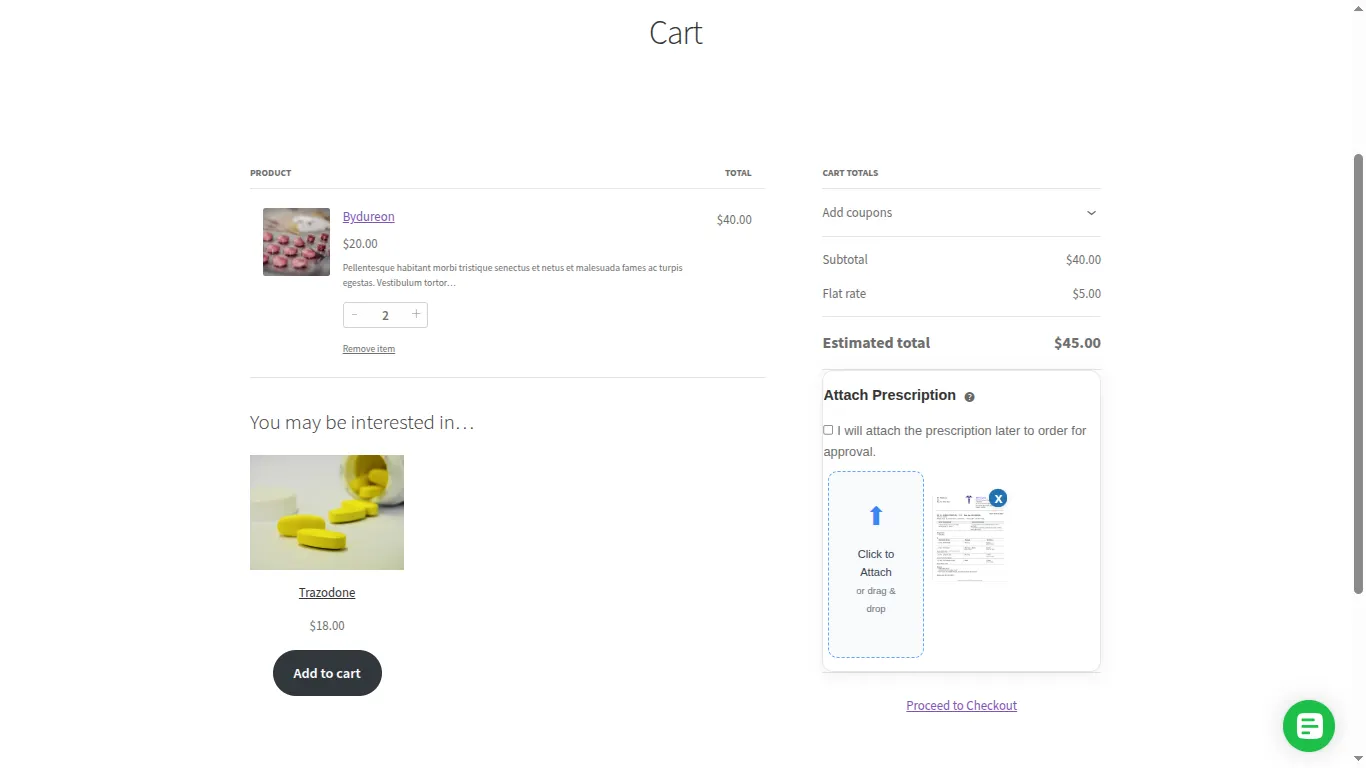
Supported file types for uploading a Prescription file are jpg, png, jpeg, doc, docx, and pdf.
Thereafter, the customer can see the uploaded prescription file and can also remove the file by tapping the remove button just below the uploaded document file.
Once the customer uploads the prescription file from the cart page, the attachment will automatically appear on the Checkout page as well. This ensures transparency and helps the customer verify the file before placing the order.
On the checkout page, the customer will be able to:
- Preview the uploaded prescription file, such as an image or document icon.
- Remove the file using the delete/remove icon if they want to upload a different file.
- Re-upload the prescription immediately from the same section if required.
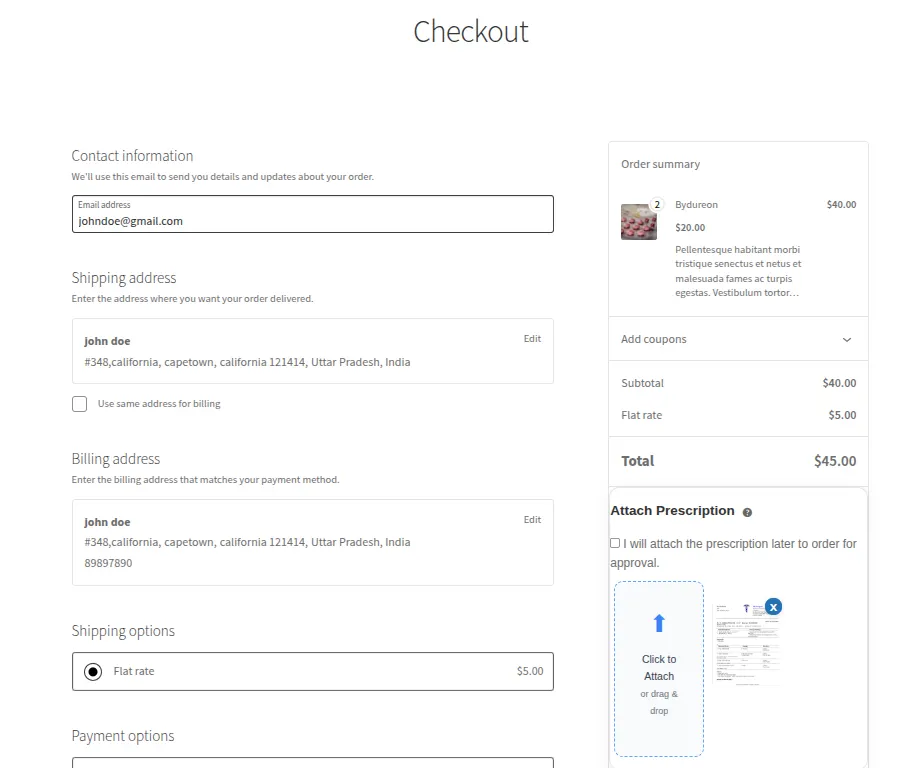
After reviewing the prescription file on the checkout page, the customer can proceed to place the order.
Once the customer taps Place Order, the system automatically redirect to the thank you page. The prescription status is set to Pending, indicating that the admin must review the uploaded document. The system also sends the standard WooCommerce order confirmation email to the customer.
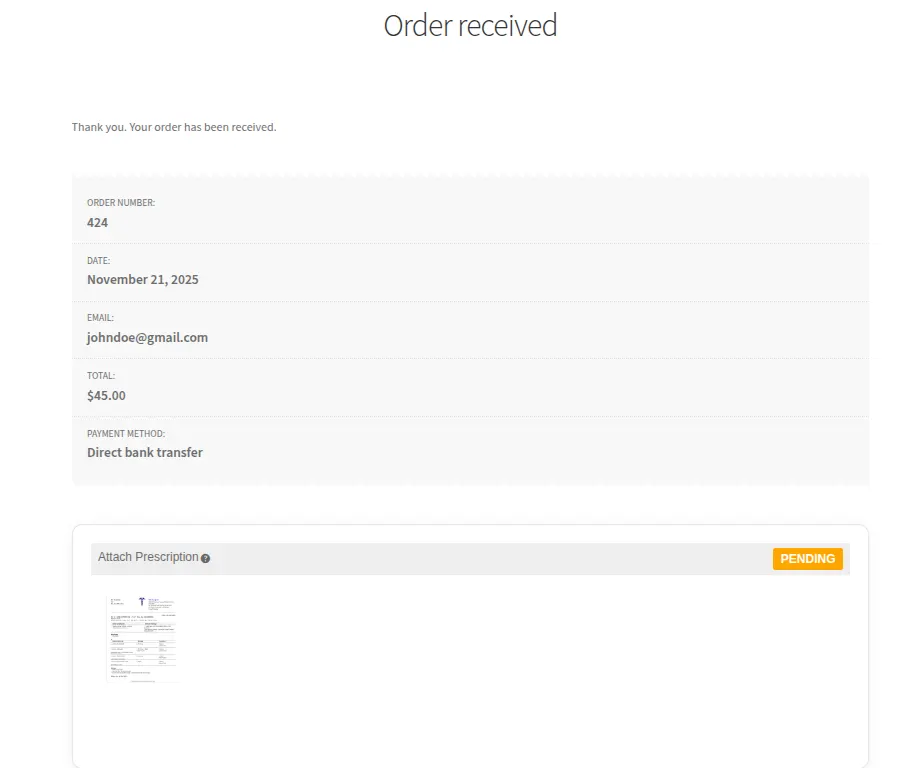
If the customer chooses the Attach Later option instead of uploading the prescription immediately, the order is still created. However, the prescription status on the order will show “ATTACHMENT PENDING”, prompting the customer to upload the required document from their Order Details page.
Attaching the Prescription file at a later time
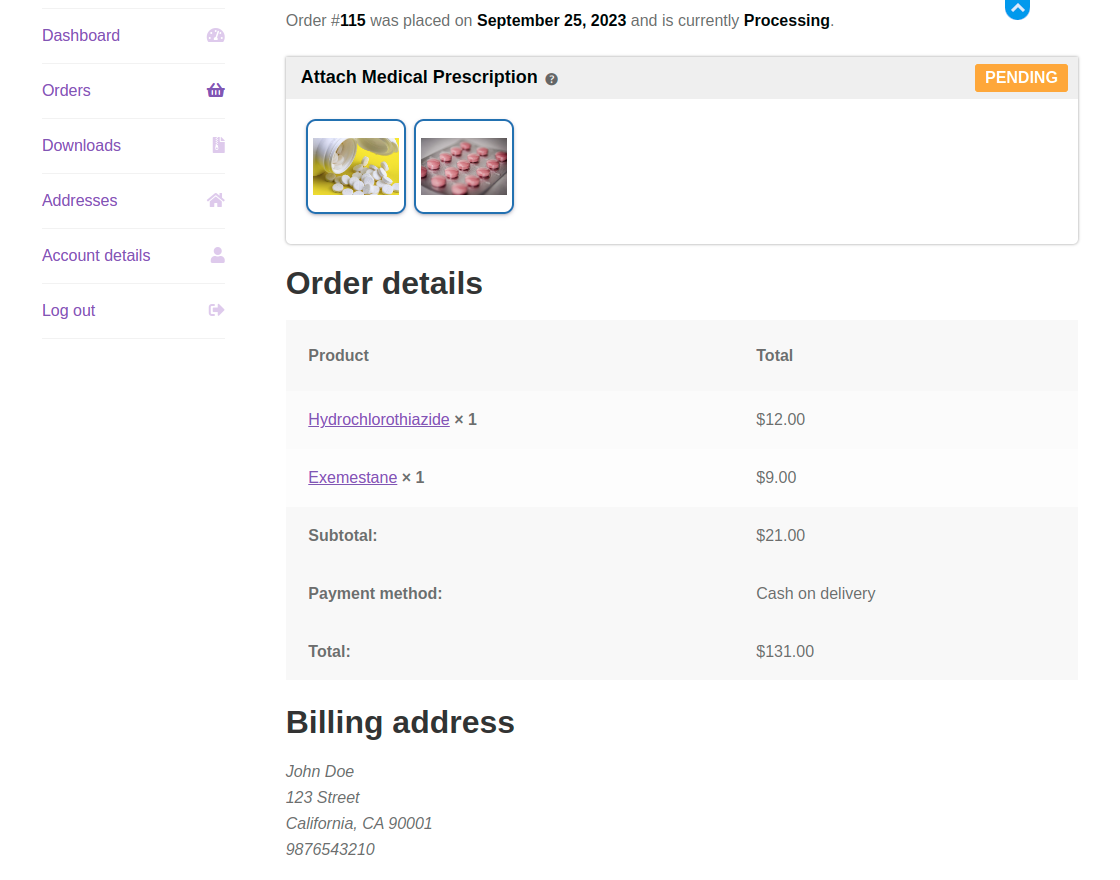
To do so, the customer after placing the order needs to navigate under his account panel to the Orders section.
Here, the customer can see the Prescription Approval Status as – ” Waiting for the prescription to upload ” .
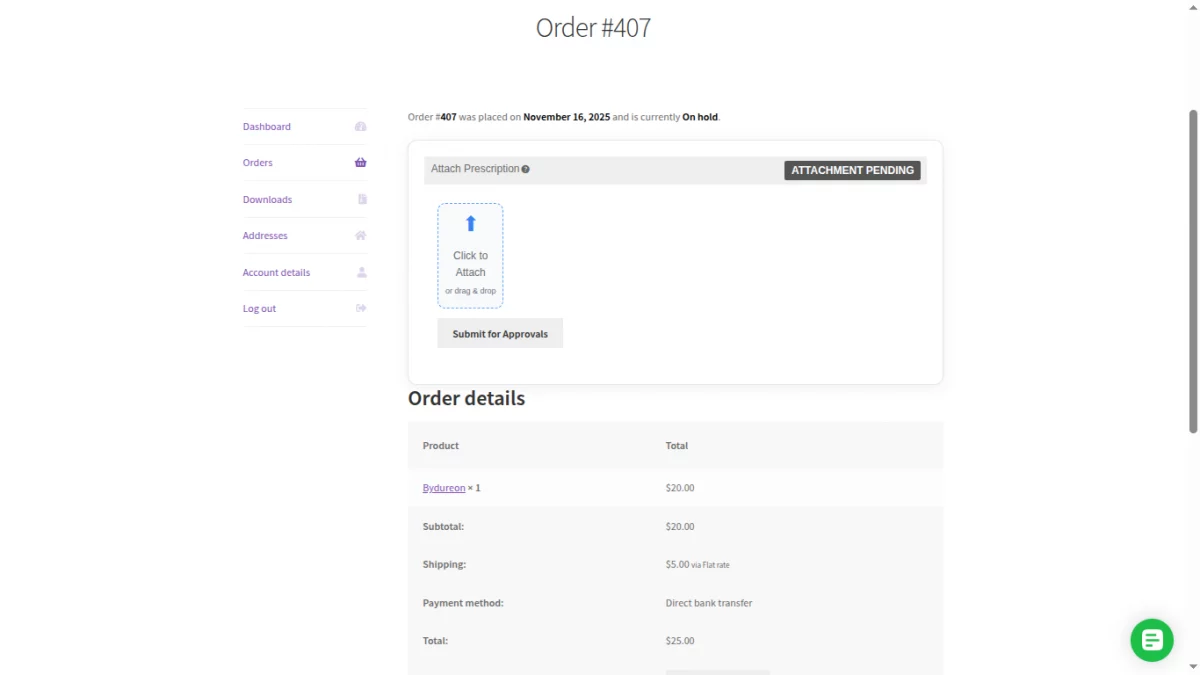
Now, to attach a prescription, scroll down a bit and tap the Option “Attach Prescription” .
This uploads the prescription for the order and the Prescription Approval Status gets changed to Waiting For Approval.
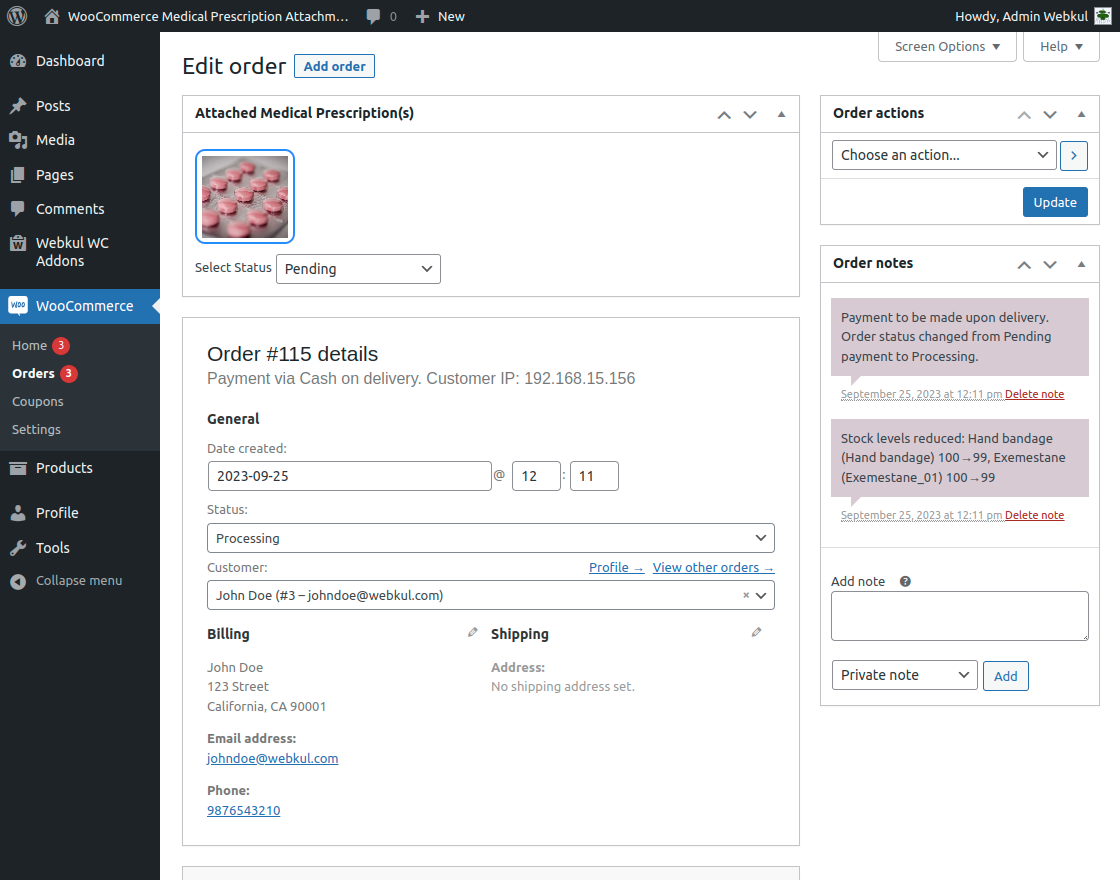
Admin Review of Prescription Orders
They’ll navigate to WooCommerce>Orders and from here they can view the order list and also download the prescription for the given button.
They can tap on any order to edit it as well. It is displayed as per the image below,
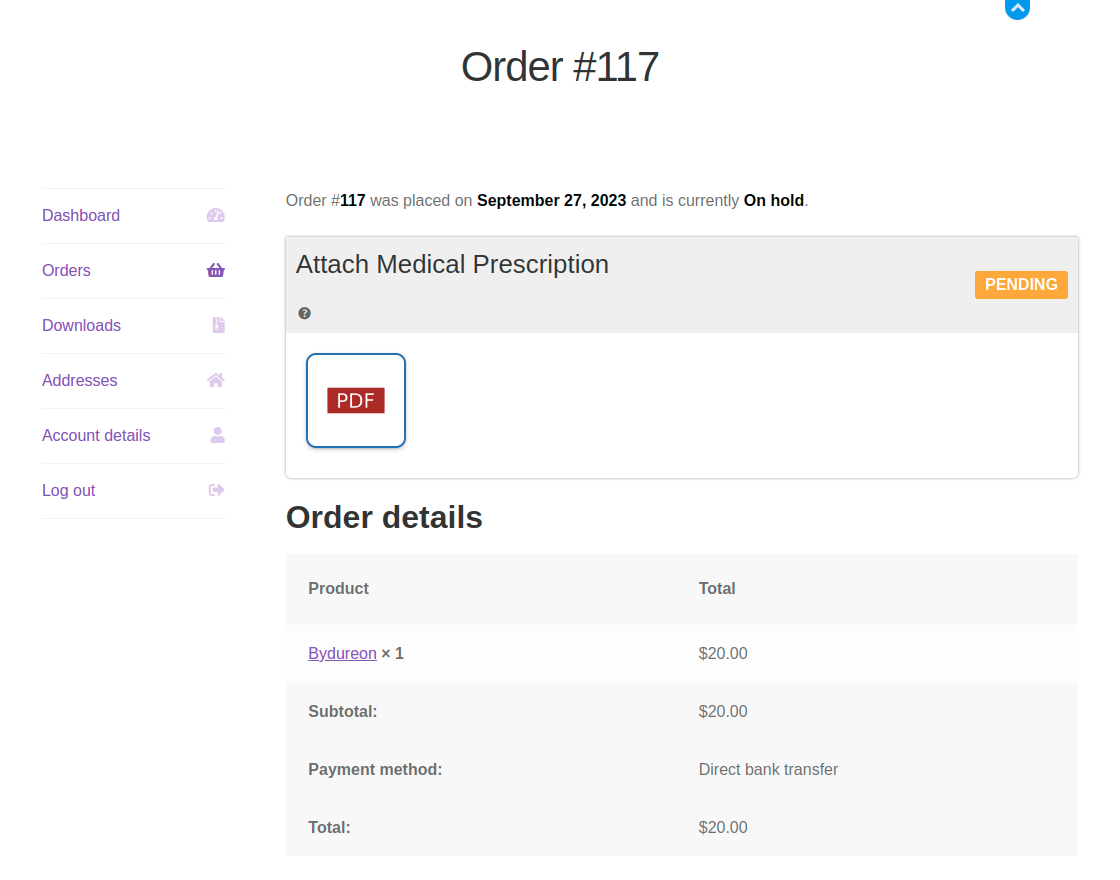
If the medical prescription got rejected, then the admin gets the status of the order in the order notes i.e. Prescription status is changed from Pending to Rejected as shown in screenshots.
The customer needs to re-upload the medical prescription.
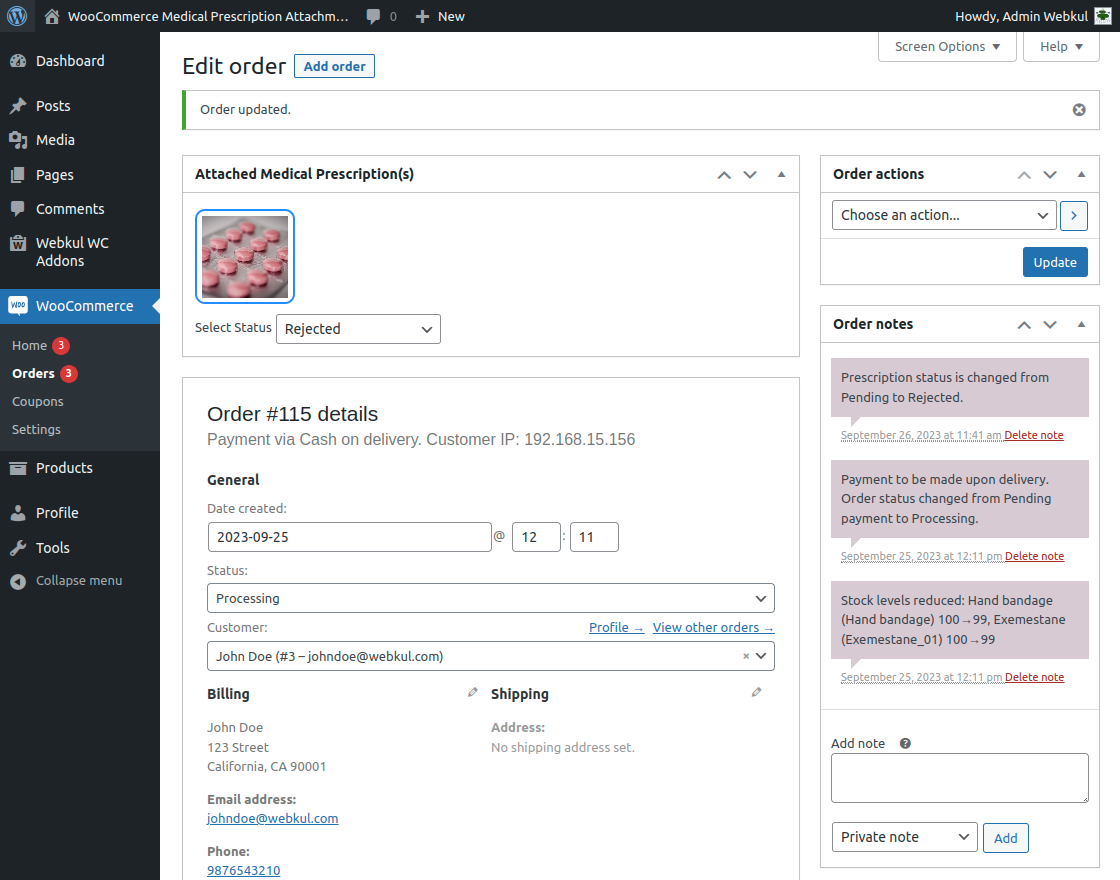
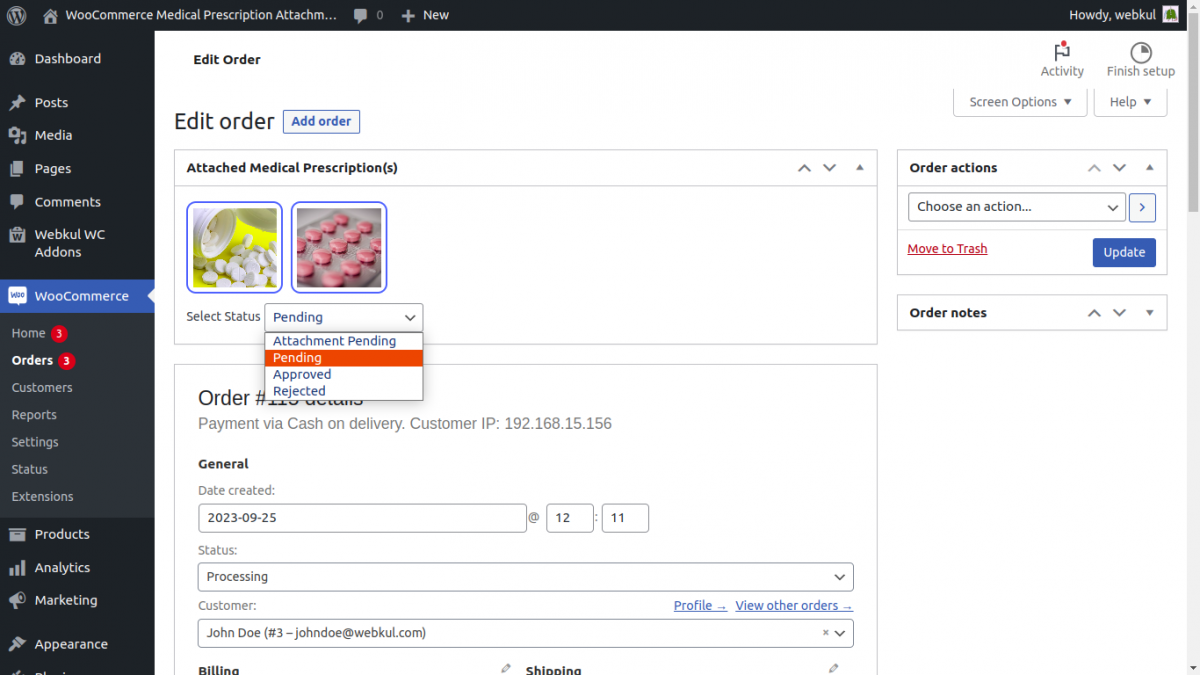
Approve/Reject Uploaded Prescription File
To approve/Reject the uploaded prescription, the admin will navigate through WooCommerce Prescription->Orders.
After that, under the Order column tap on the order number or the customer name and this displays the order’s details.
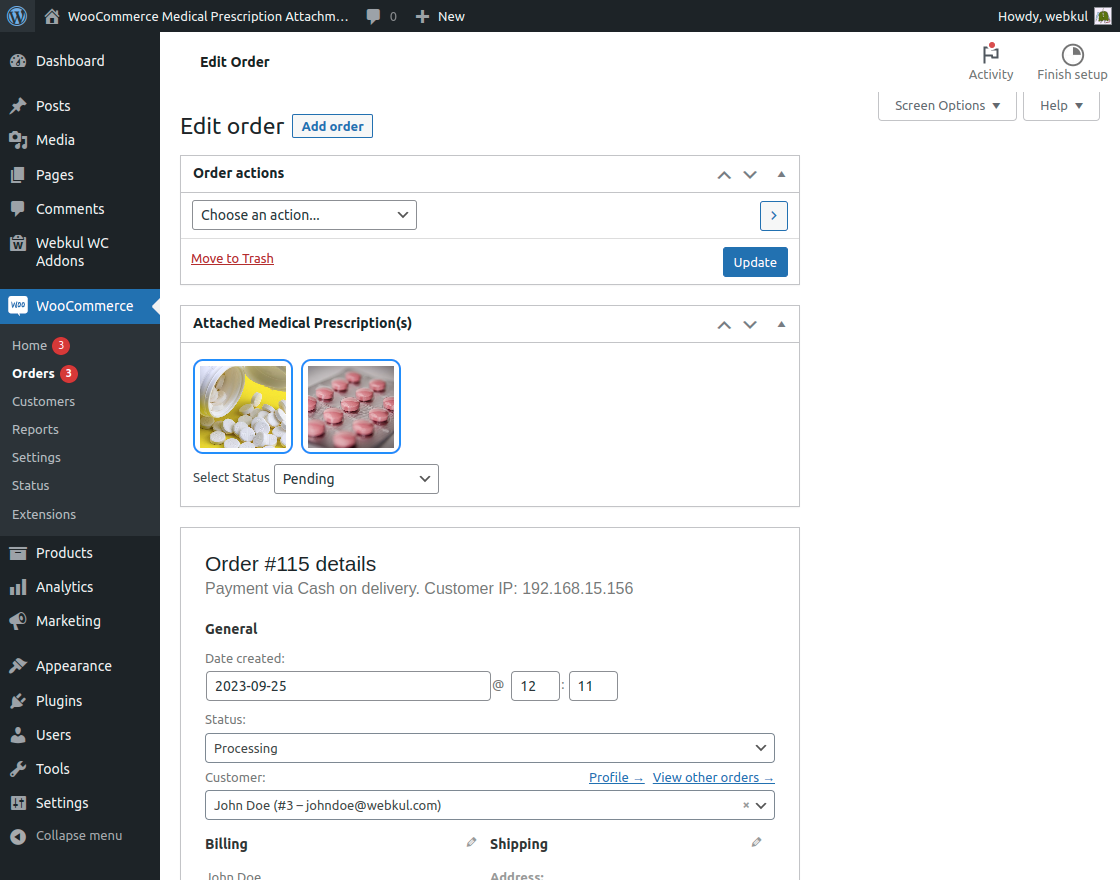
Here, the admin can see the Prescription(s) text along with an image and below that, the option “Select Prescription Status” .
The admin can choose to approve/reject the prescription uploaded by the customer.
After selecting the appropriate option for the prescription, the same gets reflected under the Orders section under the customer’s account panel.
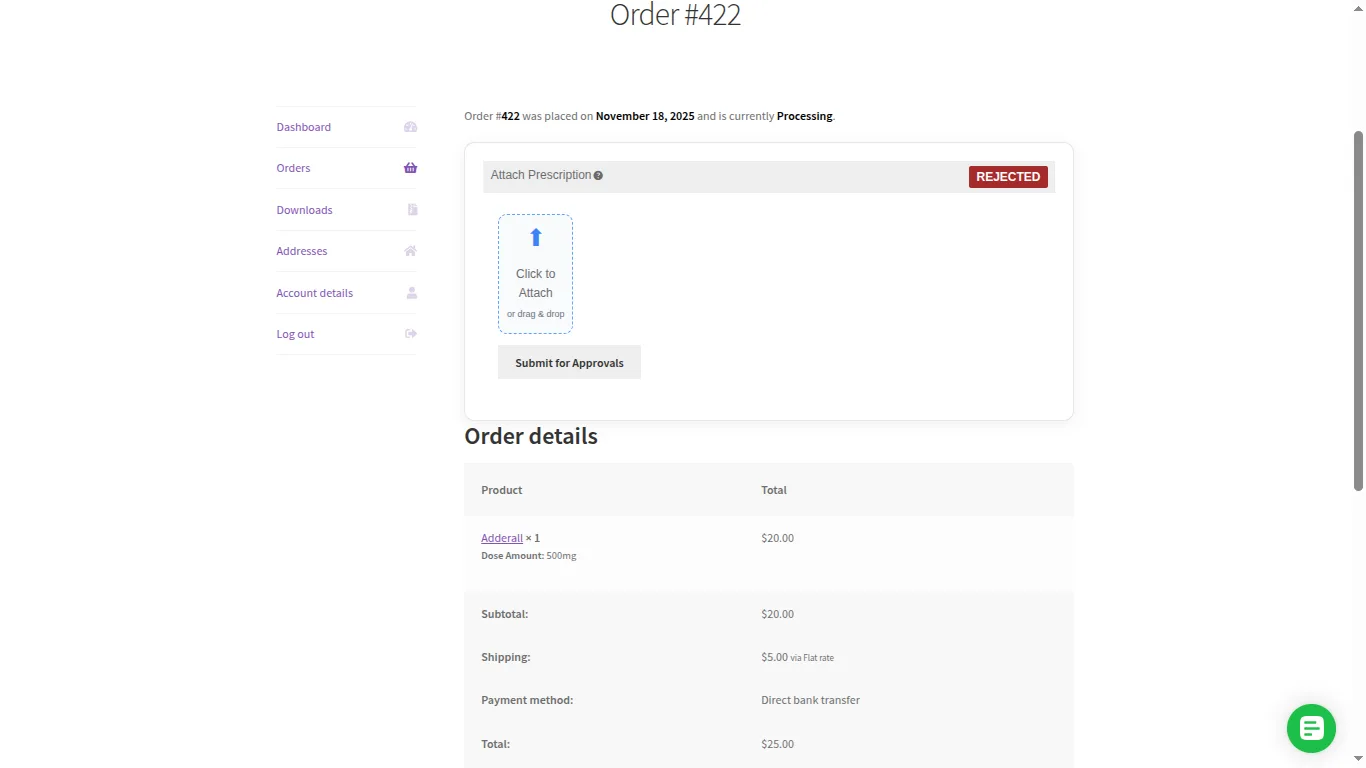
However, if the prescription status is set as Rejected, then the customer can again re-upload a prescription file by tapping the Attach Prescription button.
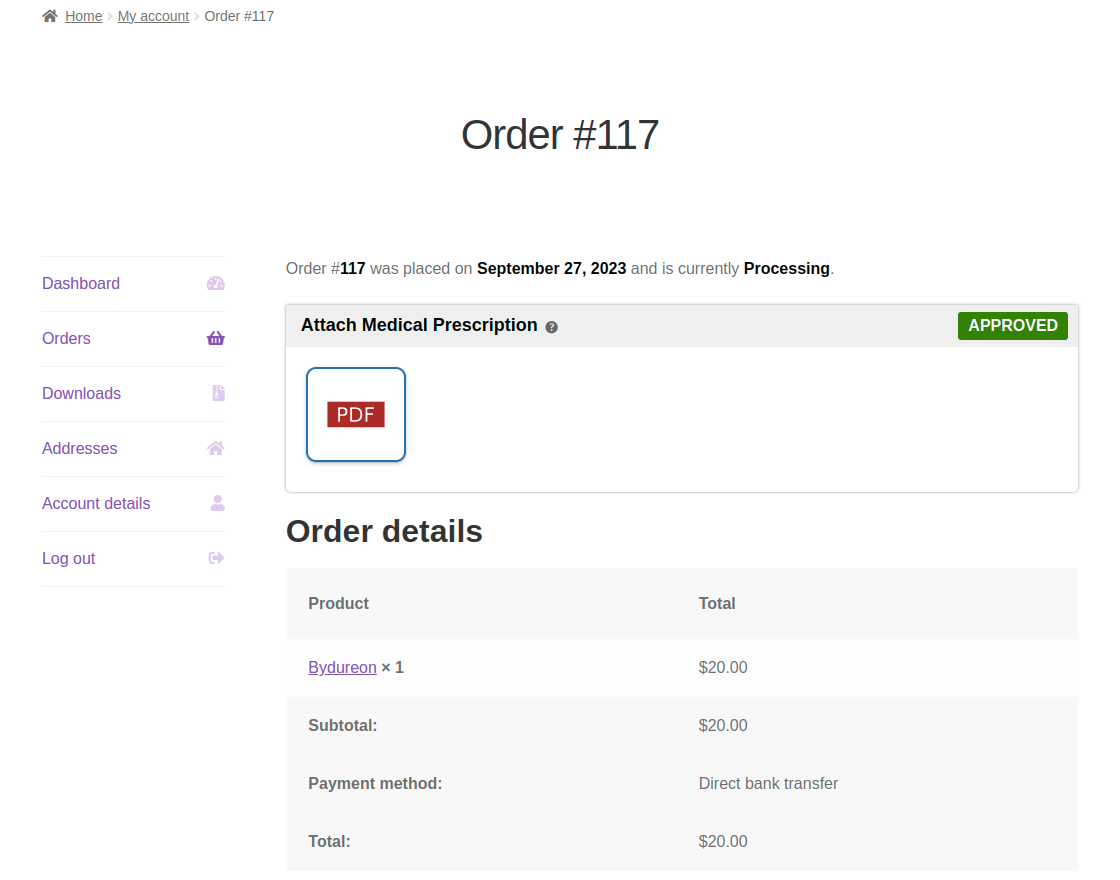
Now, after the admin has approved the customer’s uploaded order prescription from the admin backend the status gets changed from Pending to Approved.
As you can see the prescription status is changed from pending to approved in the order notes.
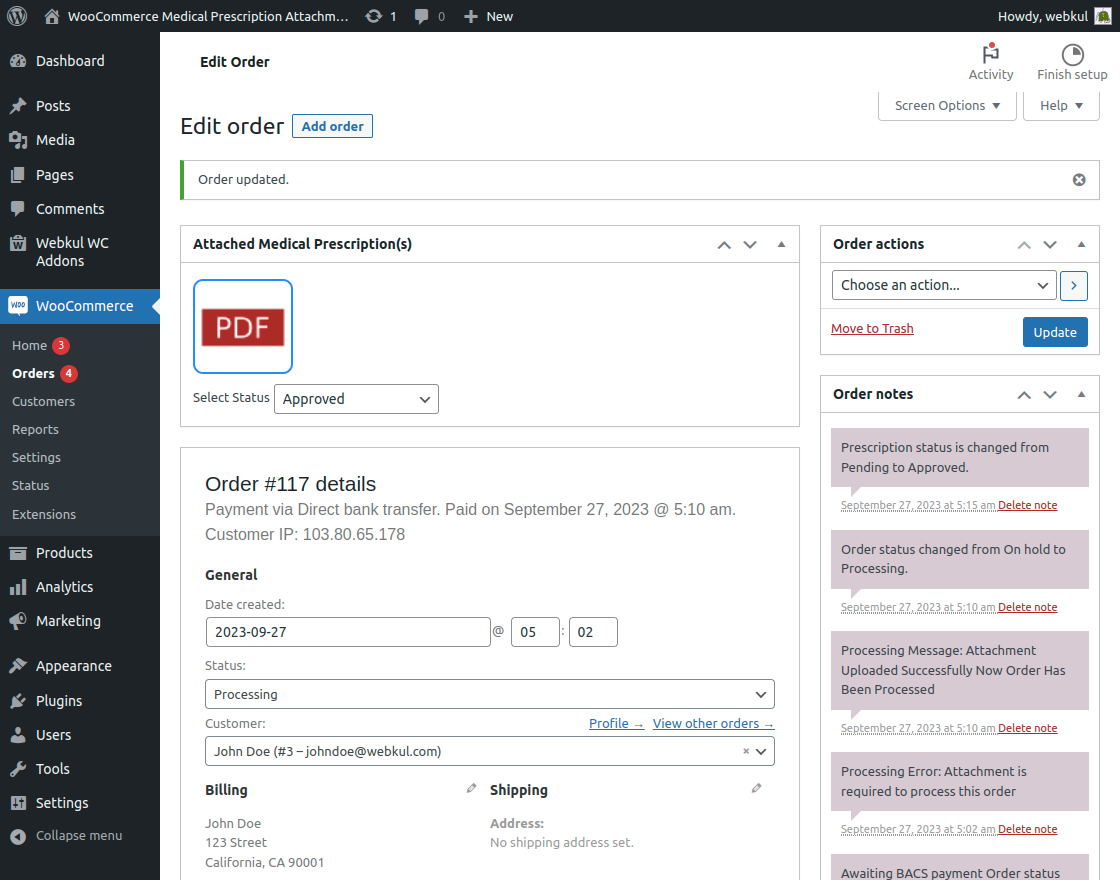
When the admin updates the prescription status, the system sends an email notification to the customer.
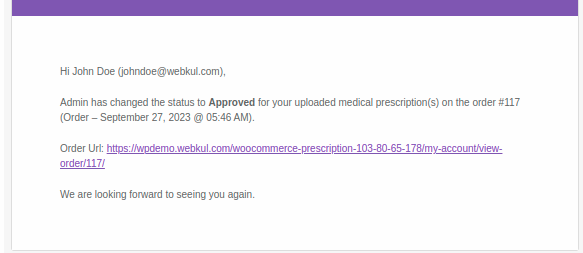
lastly, the customer can see the Prescription Approval Status changed to Approved.
Guest Checkout in WooCommerce Order Attachment
The guests can add the product into the cart and can navigate to the checkout page thereafter.
And before placing the order,the guest has selected the option Attach Now without adding the attachment the customer will not be able to place order to complete the Order.
If a guest user selects the option Attach Now, then they may also upload the prescription like registered customers.
Support
Dear Customers, that was much for the WordPress WooCommerce Order Attachment plugin.
For any question/query, please raise a ticket at our WooCommerce Helpdesk system.
We are always happy to help you out. You can also get back to us at [email protected]
Current Product Version - 1.3.0
Supported Framework Version - WordPress version : 6..x.x, WooCommerce version : 10.x.x

9 comments
Hello Anand,
Yes, this plugin supports multiple files, so the customer can easily upload the front and backside of the prescription.
Thanks,
Webkul Team
1) Does this support the most recent versions of WooCommerce (4.5.2) and WordPress (5.5.1)?
2) Our store has about 1000 products… can the ‘Prescription Required’ feature be added in bulk to an entire category or sub-category?
Thanks in advance!
1) Does this support the most recent versions of WooCommerce (4.5.2) and WordPress (5.5.1)?
– Yes it supports the latest WooCommerce & WordPress versions.
2) Our store has about 1000 products… can the ‘Prescription Required’ feature be added in bulk to an entire category or sub-category?
– This can be done but by the help of customization on our plugin.
To know more about the customization, kindly email us at [email protected]. So we can assist you out faster and better.
Thanks,
Team Webkul
This module works fine with the multi vendor plugin, but the admin can only user the feature of the this module not the sellers.
If you want this module feature for marketplace sellers also, then it can be done via customization.
For the same, you can click here to generate the ticket.
Thanks and Regards,
Webkul Team
Once you purchase the module, you can easily download the zip file from your Codecanyon account and install it.
Further, if your query is related to attachment uploaded as a prescription file then currently the patient can upload the image of the prescription and that image can be viewed by the admin by clicking on the image by going through Woocommerce Prescription> Orders.
For further queries, you can mail us at [email protected] and we will for sure assist you.
Thanks & Regards,
Webkul Team