WordPress WooCommerce Event Manager facilitates the store owner to add events into the store. The admin can define the various type of tickets as well. He can add price and the quantity as well for the tickets. The user can synchronize the event to his Google Calendar also. A different page will be created where all the events will be listed.
Watch the below video tutorial to understand the plugin workflow:
Support
Dear Customers, if you have a question/query, please raise a ticket at webkul.uvdesk.com. We will do our best to answer as quickly as it is possible. Don’t give us a low rate without contacting support on the issue you’ve faced with. We are always happy to help you.
Features of Event Manager
- The store owner can add events to the store.
- He can add different types of tickets and can define the price and quantity as well.
- The user can synchronize the event details to his Google Calendar in a single click.
- All the events will be listed under upcoming events.
- The user can check the event location in Google Maps in a single click.
Installation of Event Manager
The user will get a zip file which he has to upload in the “Add New” menu option in the WordPress admin panel. For this login to WordPress Admin Panel and Under the Dashboard hover your mouse over the “Plugins” menu option which brings out a Sub-Menu and then selects the “Add New” option.
After this, you will see an option on the top of your page that is “Upload Plugin”, click the option to upload the zip file.
Clicking on the “Upload Plugin” option, below that you will see a button “Choose File” click on the button to browse for the zip file as per the snapshot below.
After browsing the file, click the “Install Now” button to install the plugin ahttps://webkul.com/blog/woocommerce-event-manager/s per the snapshot.
Now when the plugin is installed correctly, you will see the success message and an option to activate the plugin. Click on “Activate Plugin” to activate the installed plugin.
Module Translation
To know how to translate the module, you can click here.
Creating Project Credential
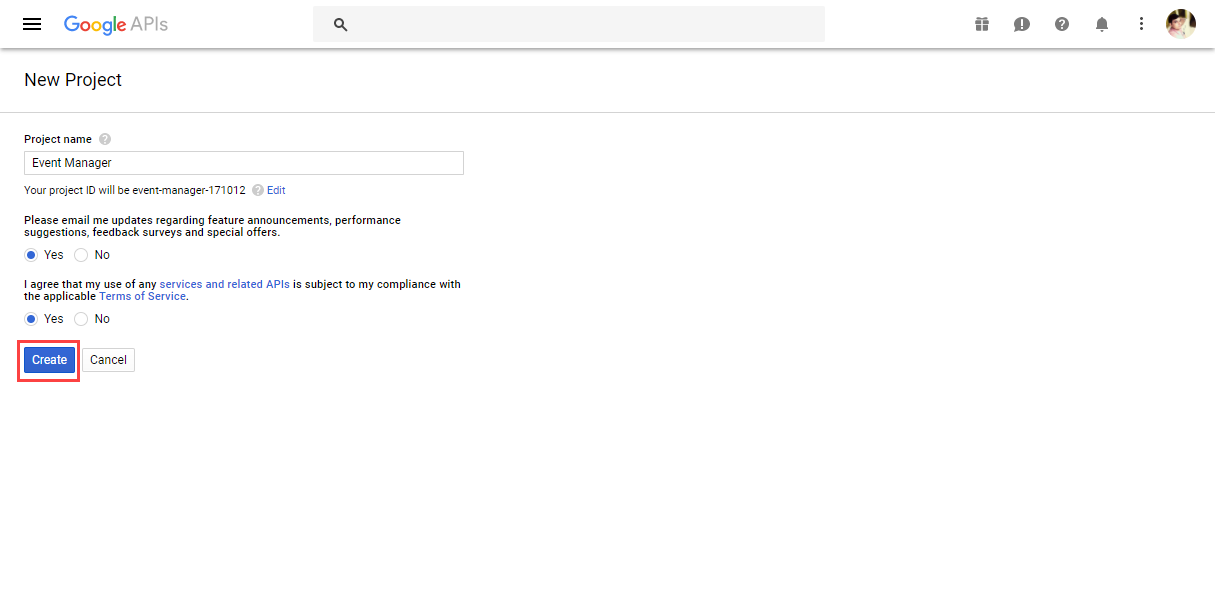
To use this plugin, you must have API Project Credentials. Google API Project Credentials are required to configure this plugin. Please click here to create a new project with your Gmail account.
1. After opening the page under “Credentials”. Please click the “Create” button as shown in the below screenshot.
2. Enter the name of the project as you want to create.
3. Click “Create credentials” to choose the credential type.
4. Select “OAuth client ID” from the list.
5. Enter the Store URL and the redirect URL.
6. Copy credentials to enter into the configuration of the plugin. 
Configuration of Event Manager
Now the admin can configure this plugin under “WooCommerce Event Manager> Settings”. Here the admin will enter the credentials to configure the Google Calendar Account.

Client:
id – Enter client id collected from Google.
Secret – Enter the client secret collected from Google.
Redirect URL – Enter redirect URL for the upcoming events of the website.
Now by clicking on the Event Orders, the admin can view the list of all the events as shown in the image below –

By clicking on the Edit button, the admin can edit the existing event, using the View button the admin can view the event page.
Also, the admin can click on the View Orders button to view all the orders of that particular events as shown in the image below –

Admin End Management
After the successful installation of the Event Manager, the admin of the store can add a new event by adding a new product.
Here the admin needs to choose the product type as “E-Tickets” and mark as Virtual Product. Here the admin enters the base price of the event.

Now under the “Inventory > Manage stock” enable stock management at the product level.

Under “E-Ticket” the admin can configure the ticket as per the below screenshot:

Enable terms: Enable this option to display the terms and conditions of the event.
Event:
Term – Enter the event term. Event term will be displayed on the front end as below image:
start-time – Enter the start time of the event.
End Time – Enter the end time of the event.
Location – Enter the location of the event.

Under “E-Ticket Options” the admin can add various options with their price, stock, and the sort order.
Front End Workflow
On the front end, the customer can view all the events under the “Upcoming Events” menu like below snapshot.
Furthermore, the user can also search the upcoming events using the location.

Now by clicking on the Add Event, the event will be added to the google calendar as shown in the image below –
After that, by clicking the “Buy Ticket” the customer will be redirected to the event page. Over there the customer can select the available option and then add the event product to the cart –
Now after adding the product to the cart the customer can move to the cart page –

From here, the customer can click on the “Proceed to checkout” and move further.
Now, the customer can enter the Billing details, and select the payment method and place the order.

After placing the successful order the customer will be able to view the complete order details as shown in the image below –

That’s all for the WordPress WooCommerce Event Manager Plugin, still, have any issue, feel free to add a ticket and let us know your views to make the plugin better at webkul.uvdesk.com
Current Product Version - 1.1.0
Supported Framework Version - WordPress: 6.3.1, WooCommerce: 8.1.1


thanks for that plugin
What I miss is an widget for the sidebar?
Greeetings Markus