Magento 2(Adobe Commerce) UVDesk Helpdesk Ticket System is an amazing free extension that allows customers to create support tickets regarding their queries.
The customers can easily create a ticket from the UVdesk option available in the My Account section.
The admin or its assigned agents can manage the tickets either from the Magento (Adobe Commerce) backend or from UVdesk Dashboard.
With the help of UVdesk Connector, all the information about the tickets is automatically synchronized between your Magento store and your UVdesk Dashboard.
Every ticket has a unique ticket number assigned to it which helps in managing them.
Information such as ticket status, ticket priority, ticket labels, the number of replies, etc can also be visible by the admin and agents.
Having a Magento 2 helpdesk ticket system for any kind of business small or big is very much necessary for providing customer service and support.
Please Note – To use this extension, you must have a UVdesk account. You can create a free UVdesk account Magento 2 helpdesk.
Now you can integrate UVdesk help-desk Support service with your Magento.
Watch video tutorial below to understand the module workflow:
Features of Magento 2(Adobe Commerce) Ticket System
- The admin can enable or disable this module from the back-end.
- This module integrates UVdesk Helpdesk System with Magento Store.
- Only registered users can create a ticket from the front end.
- Send ticket reply either from Magento back-end or UVdesk Dashboard.
- Use the filter option to search for any specific ticket using various properties.
- Show detailed ticket information using different labels and statuses.
- The admin and assigned agents have an option to attach any supported file in its reply message.
- Manage all the tickets either from Magento back-end or UVdesk Dashboard.
Installation of Ticket System
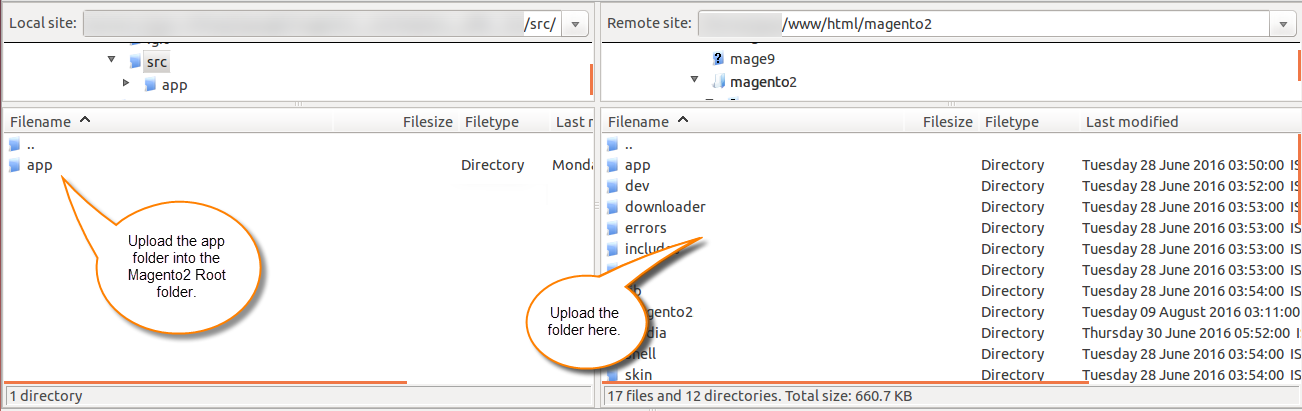
Download the zip file and extract its content on your computer. The extracted folder will have a folder named src, inside this folder, you will find the app folder.
Copy this app folder into the Magento2 root directory on the server as shown below:
After the successful installation, you have to run these commands in the Magento 2 root directory:
php bin/magento setup:upgrade
php bin/magento setup:di:compile
php bin/magento setup:static-content:deploy
php bin/magento indexer:reindex
php bin/magento cache:flush
Module Translation of Ticket System
For module translation, please navigate through Store > Configuration > General > Locale Options and then select your desired language from the Locale drop-down menu.

How to get Uvdesk API??
In order to use this add-on, the admin needs to have the UVdesk access token, please visit this link and login to your UVdesk account. In case you don’t have a UVdesk account, you can create a free account as well.

Step 1: Here the user needs to enter a valid email id and click on “Get Started”.

Step 2: Once the user enters their email ID, an OTP will be generated and sent to them. They must then input the received OTP and proceed to click on the “Verify OTP” button.

Step 3: In this scenario, the user is required to input their email address, name, phone number, organization, and subdomain. After providing these details, they can proceed by clicking the “Signup” button.

Step 4: Once the user completes the sign-up process, they will receive an email to set their password.
After successfully setting a new password, the user can conveniently access their account by using their registered email and the newly created password.

Step 5 – Go to UVdesk Dashboard
Once your UVdesk account has been created you’ll be redirected to the UVdesk dashboard. Please go to the Profile option.

Step 6 – Create a New Token
Then, go to API Access Tokens and click the New Token button.

Enter any name for the token and click Save Token, it will generate Token Key.

Copy and paste the Token Key into the Magento module configuration.

UVdesk Ticket System Configuration
After successfully installing this module, navigate to Stores>Configuration>UVdesk Connector. Here you can manage the settings of this module.
Accounts – To use this module set this option to Enabled. Or Disabled, if you don’t want to use it.
Access Token – Enter the UVdesk Access Token copied from your UVdesk account.
Company Domain – Enter the Domain Name of your company. For instance – your helpdesk URL is – https://abc-support.uvdesk.com then the company domain name would be – abc-support
Click the Save Config button to save your changes.
Customer Front-end View in Ticket System
UVdesk Tickets Panel
Now the customer can create a support ticket for their query by going to My Account>UVdesk. Here the customer can see all the tickets created so far.
To create a new ticket the customer will simply click the Create Ticket button.

Create Ticket in Ticket System
The customer needs to provide the following information while submitting a ticket query. First, select the Ticket Type, Enter the Subject, and Message content. The customer can also upload file attachments on the ticket.

Email Notifications
After creating the ticket, the customer will get an email notification also.

View Ticket
If some agent has sent a reply to the ticket, the customer will get the email notification and can check the ticket from My Account section.

Collaborator View
A customer can also add collaborators in the ticket by entering their email addresses. Collaborators can view and reply in the ticket thread.

Email Notification
When a customer adds a collaborator, two emails will be sent to the collaborator’s email address. In the first email, the collaborator will find a link for setting a password on the UVdesk account. In the second email, the collaborator will find the ticket thread link.

Collaborator UVdesk Panel
After successfully logging in UVdesk, a collaborator can check the ticket thread and can communicate over this ticket. Any new replies sent by a collaborator will be seen by both customer and the UVdesk agent.

Ticket System Management
To manage your tickets, the admin needs to login to the backend panel and go to UVdesk Connector>Tickets. The admin can now see the overview of the tickets. All the tickets are labeled as New, Unassigned, Not replied, Mine, Starred, and Trashed.

Ticket Status
The tickets are automatically divided according to various events as follows:

Open – A new ticket that has arrived and not been assigned to anyone.
Pending – A new ticket that has been assigned to someone and reply is pending.
Answered – A ticket whose query has been answered and waiting for the user’s reply.
Resolved – A ticket where the user is satisfied with the answer to its query.
Closed – A ticket that is complete and cannot be reopened by the user.
Spam – A ticket that is irrelevant or contains no message.
Ticket Information:
Priority – The tickets basis of their importance has four different priorities- Urgent, High, Medium, and Low.
Ticket No. – A unique number is assigned to each and every ticket for sorting them.
Customer Name – The name of the customer/user who has created the ticket.
Subject – The subject or title of the ticket query created by the user.
Date Added – It shows the created date and time of the ticket.
Replies – Number of messages sent by the agent or the admin to the user.
Agent – The assigned person who will reply to the ticket.
Ticket Filters
As there are a huge number of tickets created by the customers, the admin can use various filters for finding specific ticket queries. The tickets can be filtered using:-
Assigned To – Get all the tickets assigned to an UVdesk agent.
Customer – Find all the tickets created by a customer.
Group – Discover all the tickets for a specific group.
Team – Find tickets for a team.
Priority – Find all the tickets by priority such as high, low, medium.
Type – See all the tickets according to their type.
Tag – See all the tickets according to their tag.
Mailbox – See all the tickets according to their mailbox.

How to add tags in the tickets from UVdesk
Firstly log in https://magentotoken.uvdesk.com/en/member/login .And can view all the tickets.

When you click on the ticket it will open and can enter tags as per the below image:


How to create Mailbox from UVdesk
After login at UVdesk end, click on Mailbox.

Then, click on New Mailbox for create new mailbox.

Enter your mailbox name and mailbox address (id) which you have to mailbox creation section over it and click on proceed.

You can easily copy the secret email address by clicking the COPY button as per the below image:

How to configure Gmail with Mailbox?
After steps will be followed by these steps as mention in the link in settings:
https://support.uvdesk.com/en/blog/uvdesk-how-to-configure-gmail-with-mailbox
Assign Agent in Ticket System
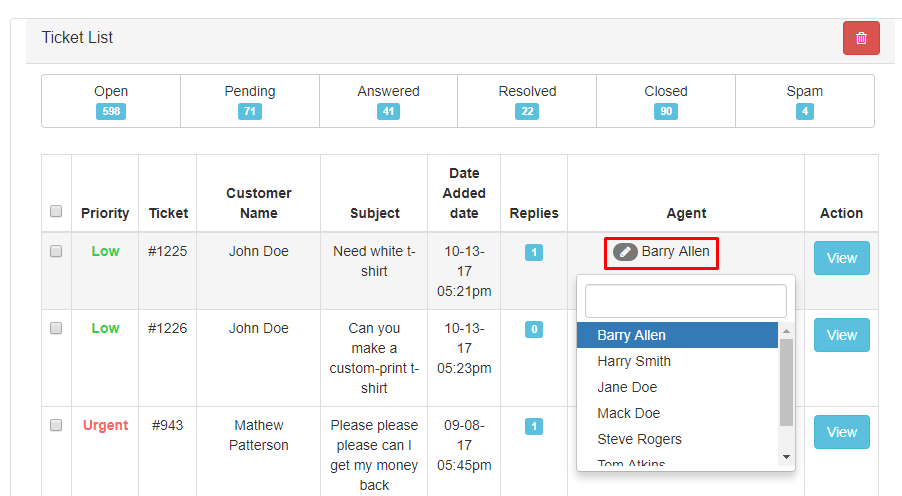
The admin can also assign a ticket to any other agent, please click the Agent Edit icon and then select the agent name from the list. Further, the assigned agent can then reply to the ticket.
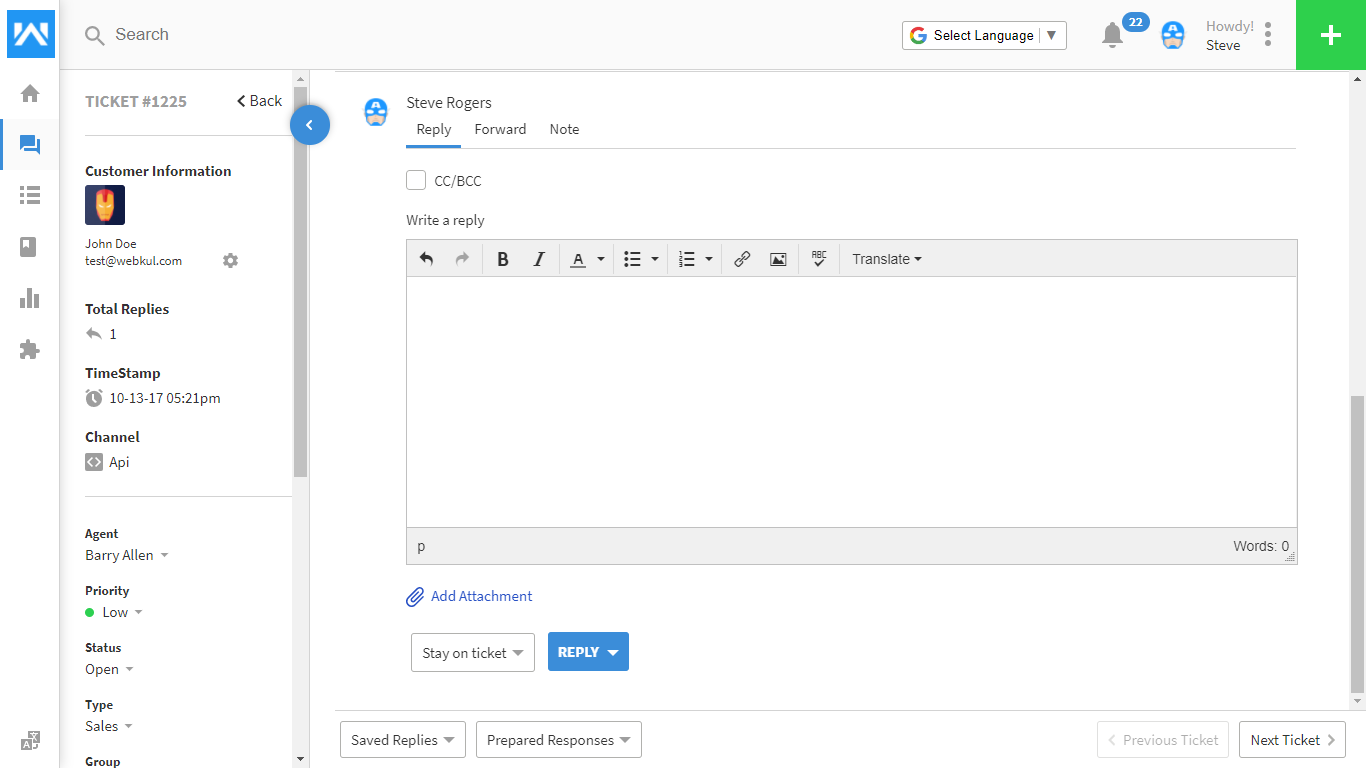
Click the View button in the Action column to send a reply or view more information about the specific ticket. A new page will open, which will show detailed information about the ticket. Please refer to the screenshot below.
Now, here you can see the customer name and its email address. Additionally, the agent can attach any file with the message. Click the Reply button to send the message to the customer.

Consequently, after sending the reply successfully to the customer, the admin will get a successful notification message on top.
Managing Tickets from UVdesk Ticket System
Therefore, once a user creates a ticket in Magento 2 store, it will reflect on the UVdesk Dashboard also. Further, to view the tickets on UVdesk login to your UVdesk account and navigate to the Tickets section.
UVdesk Ticket View
Furthermore, the agent or the admin can also send a reply through UVdesk to its customers by clicking any of the tickets in the list. Even, all the information about the ticket is visible on the Ticket View page.
Reply Ticket in Ticket System
Moreover, the agent can send a reply to the customer from UVdesk. There are various options available for text formatting as well. File attachments are also supported.
Reply Options in Ticket System
Various options available while replying to the customer. Therefore, when the agent sends the reply message, the status of the ticket will update.

UVdesk Ticket Management
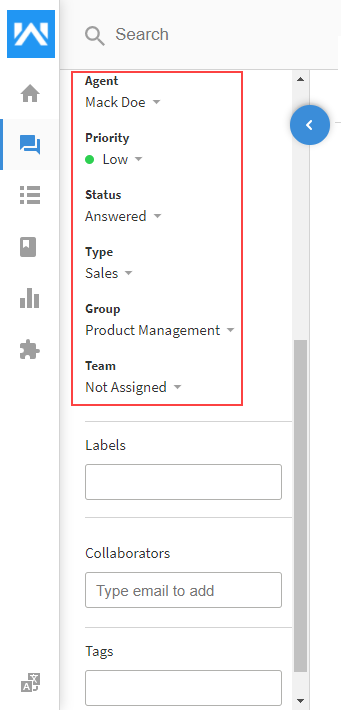
Once the agent has opened the ticket after that agent can update the priority, status, type, group, team details for that ticket. Moreover, the agent can also add tags, labels, and collaborators for the ticket.
Ticket Options
When the agent views the ticket, it can edit the ticket using Ticket options menu.
- Edit Ticket
- Print Ticket
- Mark as Spam
- Mark as Closed
- Delete Ticket

Support
That’s all about UVdesk Magento 2 (Adobe Commerce)Free Ticket System.
Thank you for viewing this blog, please share your kind views about this module on http://webkul.uvdesk.com/.
Current Product Version - 4.0.1
Supported Framework Version - Magento 2.0.x, 2.1.x, 2.2.x,2.3.x, 2.4.x

12 comments
Please mail us at [email protected] so that we can look into it and update you accordingly.
Thanks
To view the ticket thread, you need to login first. This is the current module workflow. To modify the same please share your customization requirements on [email protected]
Thanks
Please create a support ticket, the issue will be resolved.
https://webkul.uvdesk.com/en/customer/create-ticket/
Thanks.
Can the customer attach a file when creating ticket from customer account?
Yes that part is already there. Customer information with order information will be displayed.
Yes you can attach a file while creating ticket. Thanks