PIM for Shopify is a free tool that connects your Shopify store to the open-source PIM, UnoPim.
Shopify PIM software makes it easy to add and update products, collections, and variants.
You can now export catalogs from UnoPim to Shopify, including categories and both simple and variant products.
Key product details such as title, description, multiple images, SEO information, SKU, barcode, price, quantity, and weight can be easily transferred.
Shopify PIM integration helps keep your online store organized and up to date with minimal effort.
If you are looking for an open source DAM solution, you can check out UnoPIM DAM (Digital Asset Management).
Features of PIM for Shopify
- Export UnoPim categories as ‘Collections’ in Shopify.
- Export product data including variations
- Specify variation’s price, SKU, quantity, barcode, weight
- Send multiple product images to Shopify
- Update exported products on Shopify by running the export job again.
- Map UnoPim attributes with Shopify product details.
- Map UnoPim media attributes (like image and gallery types) for both export and import mapping. These mappings ensure media data is sent to Shopify or fetched from it during product sync.
- Map product units (weight, volume, dimensions) under Export Mapping to ensure proper unit sync with Shopify, for fields like
weight,volume, ordimension. - Add and manage metafield definitions in UnoPim similar to Shopify. Currently supported types include Single line text, Multi-line text, Color, Rating, URL, and JSON. These can be added and exported without additional mapping.
- Export product data to your Shopify store in multiple languages.
- This connector supports Shopify API version only 2025-01.
- Connect multiple Shopify stores with UnoPim by providing separate credentials
- Multiple attribute mapping by concatenating the attributes
- Import jobs include Shopify Category, Shopify Attribute, Shopify Family Variant Attribute Assignment, Shopify Product, and Shopify Metafield Definitions.
- The source code is open for customization.
Explore UnoPim Maker Checker Workflow extension for easy product and asset approvals with role based access and tracking.
You can also check the UnoPim Public Image URL for simplified media management.
Shopify API Credentials
Log in to your Shopify admin panel and click Settings.

In the left sidebar of the Shopify admin panel, click on Apps and sales channels.

Once on the Apps page, locate and click on Develop apps in the left-hand menu.

Click Create an app, enter an App name, and choose an App developer.

Click Configure Admin API scopes and select read and write for required scopes.

Ensure that the “read and write” checks for the following scope categories are selected:
1. Shop locales
write_locales
read_locales
2. Fulfillment services
write_fulfillments
read_fulfillments
3. Inventory
write_inventory
read_inventory
4. Product listings
write_product_listings
read_product_listings
5. Products
write_products
read_products
6. Translation
write_translations
read_translations
7. Sales Channel
write_channels
read_channels
8. Location
write_locations
read_locations
9. Publications
write_Publications
read_Publications
Please note that UnoPim needs read and write access; you should select all checkboxes that start with “read and write”.
Click Save and then Install app in the dialog box.

Access your API credentials in the API credentials tab., Here you will get the data for UnoPim credentials, enter your app’s “Admin API access token”.
UnoPim Shopify Connector Installation
For the module, there are two different installation processes available.
- Composer Installation
- Manual Installation
Composer Installation
To install the unopim/shopify-connector package using Composer and run the necessary migrations and cache clearing, follow these steps:
Install the Package: Open your terminal and run the following command:
composer require unopim/shopify-connector
Run Migrations and Clear Cache: After the package is installed, execute the following commands:
php artisan shopify-package:install;
php artisan optimize:clear;
Manual Installation
Download and unzip the respective extension zip. Rename the folder to Shopify and move into the packages/Webkul directory of the project’s root directory.
Regsiter the package provider In the config/app.php file add the below provider class under the providers key
Webkul\Shopify\Providers\ShopifyServiceProvider::class,
In the composer.json file register the test directory under the autoload psr-4 section
"Webkul\\Shopify\\": "packages/Webkul/Shopify/src"
After that run below given commands:
composer dump-autoload
php artisan shopify-package:install
php artisan optimize:clear
Setup UnoPim Credentials
After installing the UnoPim Shopify Connector, you will see an additional Shopify icon on the left side of the dashboard.

After that navigate to the Credentials tab and click on Create Credentials to add your new Shopify credentials.
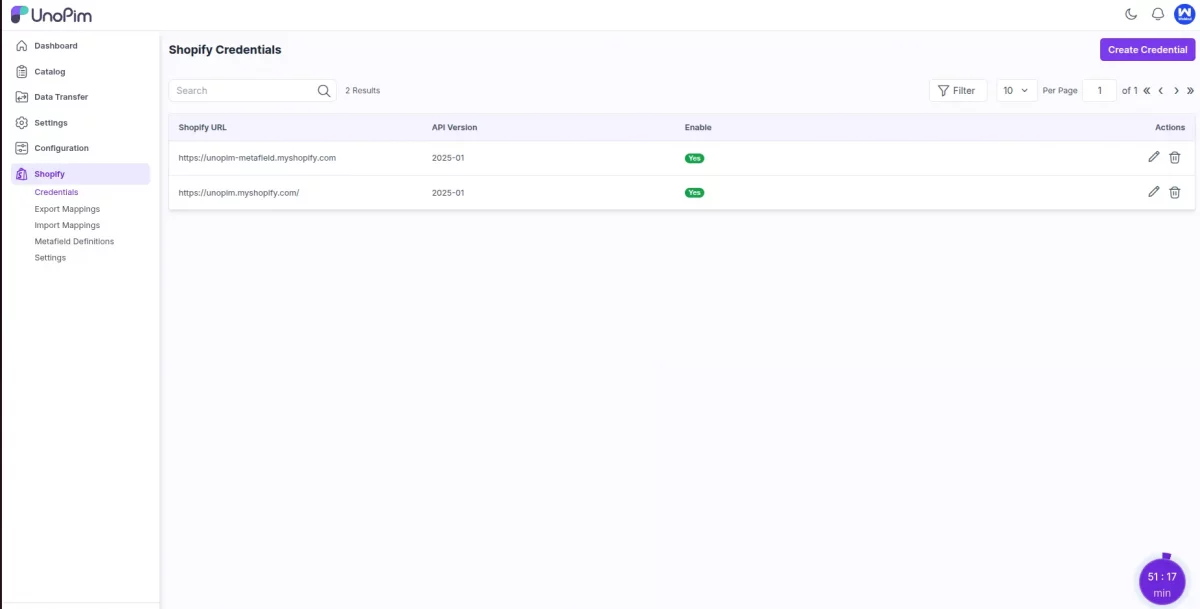
Then enter the details like Shopify URL, Admin API access token and select API version.
Note: Currently UnoPim Shopify Connector is compatible with api version 2025-01

You can also add more than one Shopify store with this connector.
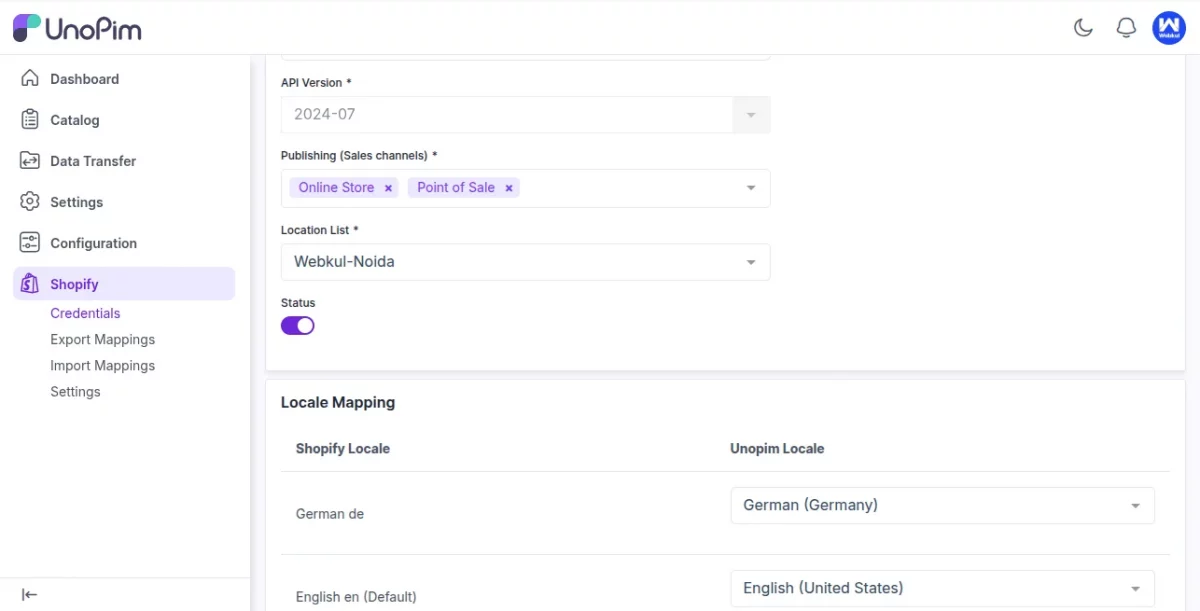
After creating credentials, update the edit credential redirection and required fields:
- Publishing (Sales channels)
- Location List
- Status
Note: Publishing (Sales Channel) and Location List must be created and present at Shopify end first for them to be fetched.
All the Shopify locales will be fetched automatically. You just need to map them accordingly.
Export Attributes Mapping
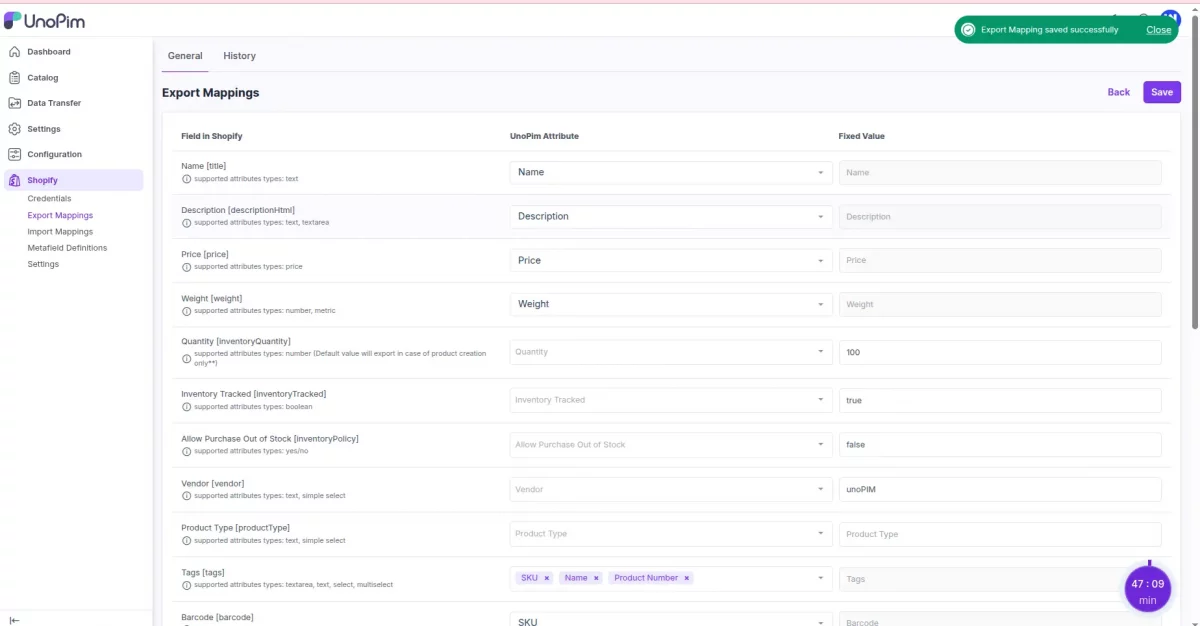
You can sync detailed product information from UnoPim to Shopify, but first, you need to map UnoPim attributes to Shopify product fields.
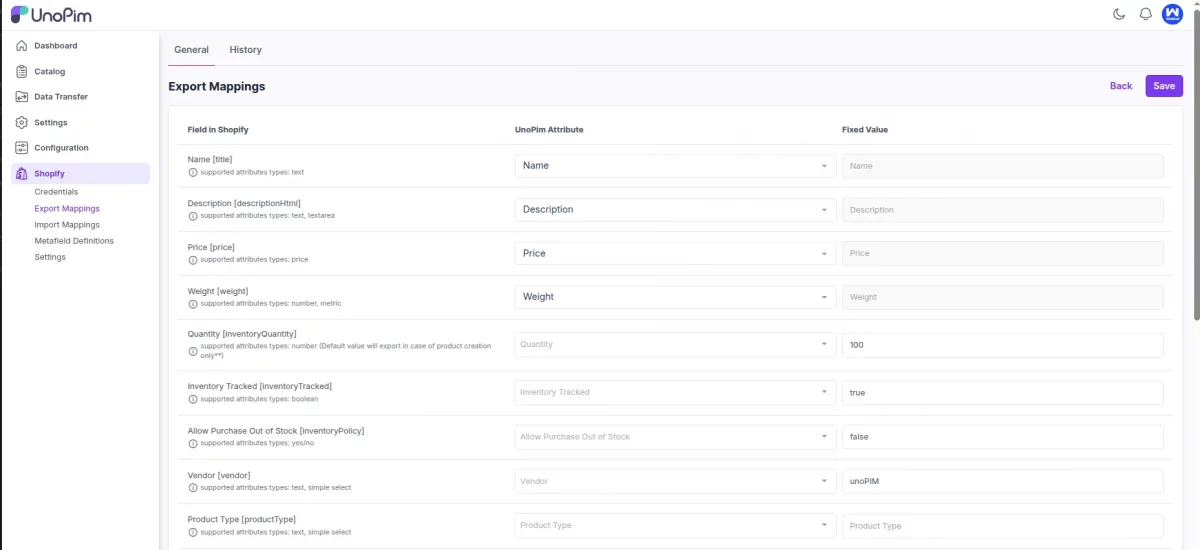
Navigate and click on the Shopify logo from the left sidebar and click on the Export Mappings tab to configure attribute mappings for Shopify export.
On the left side, you will find all the product fields available for synchronization with UnoPim attributes.
Field Mappings: UnoPim -> Shopify
- Name
[title]– Product title shown on storefront. - Description
[descriptionHtml]– Detailed product description with HTML support. - Price
[price]– Actual selling price of the product. - Weight
[weight]– Product weight for shipping calculations. - Quantity
[inventoryQuantity]– Available stock quantity in Shopify. - Inventory Tracked
[inventoryTracked]– Enables inventory tracking for the product. - Allow Purchase Out of Stock
[inventoryPolicy]– Allows backorders if stock is zero. - Vendor
[vendor]– Brand or supplier of the product. - Product Type
[productType]– Defines the category or type of product. - Tags
[tags]– Keywords for filtering or search in Shopify. - Barcode
[barcode]– Unique identifier for scanning or inventory systems. - Compare Price
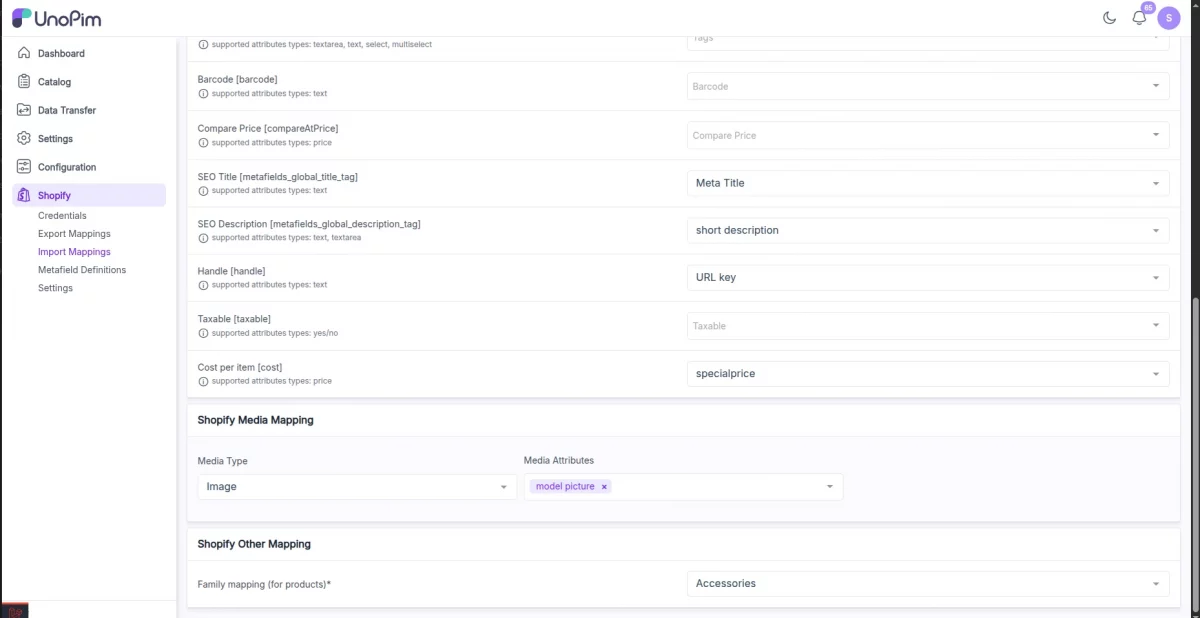
[compareAtPrice]– Shows original price for discount comparison. - SEO Title
[metafields_global_title_tag]– Custom page title for SEO. - SEO Description
[metafields_global_description_tag]– Meta description for search engines. - Handle
[handle]– URL-friendly version of the product name. - Taxable
[taxable]– Marks whether the product is subject to tax. - Cost per item
[cost]– Cost of goods sold (COGS) for profit tracking.
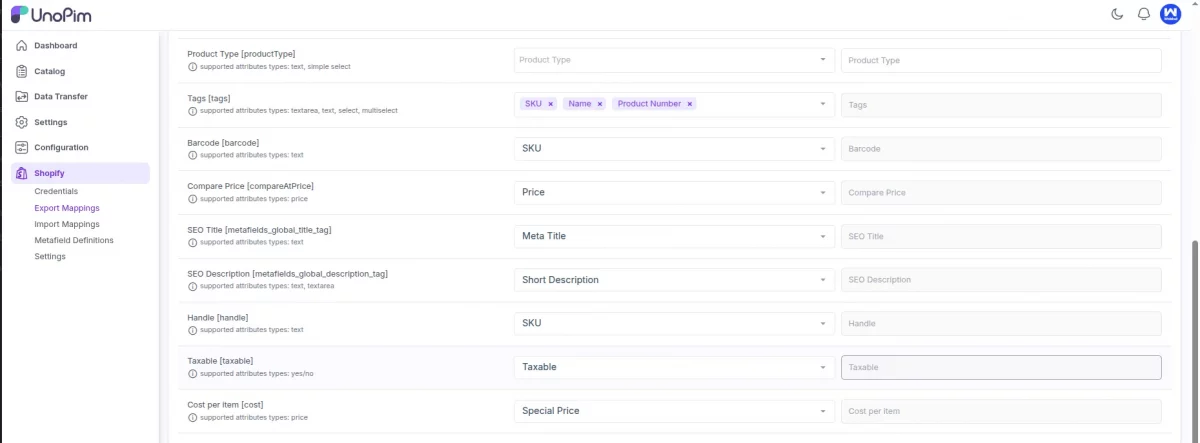
As shown in below image, You can map above shopify fields with unopim.
Use This Fixed Value
If you want to assign the same value for an attribute across all exported products (e.g., set quantity to 100 for every product), you can use the Fixed Value option.
To enable the Fixed Value field, you must deselect the UnoPim attribute from the dropdown.
Once deselected, the Fixed Value input becomes editable.
You can then enter a value directly. For example, to export all products with a Quantity of 100:
- Deselect the UnoPim attribute
- Enter
100in the Fixed Value field
This way, all exported products will have their quantity set to 100 in Shopify, regardless of their value in UnoPim. check below image .
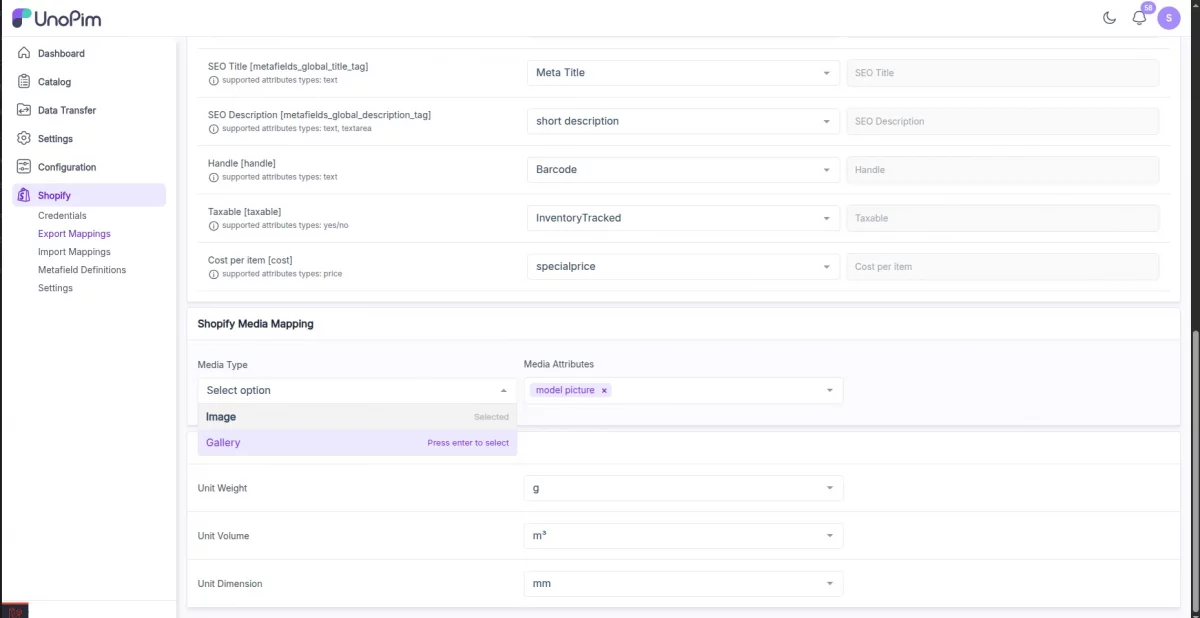
Shopify Media Mapping
UnoPim now supports Media Mapping for Shopify, allowing you to export and import product images more efficiently.
Set Up Media Mapping:
- Navigate and click on the Shopify icon in the left sidebar.
- Click on Export Mappings or Import Mappings depending on your use case.
- Select the mapping type as Media Mapping.
- Under the Media Type field, choose one of the following:
Media Type Options:
1. Image
- Use this when you want to send multiple image attributes (e.g., front image, back image, zoom view).
- You can map multiple UnoPim image-type attributes.
- During export, all mapped images will be sent as product images to Shopify.
2. Gallery
- Use this when product images are grouped in a single attribute (gallery).
- This is ideal for use cases where a media gallery-type attribute is maintained in UnoPim.
- During export, images from the gallery will be sent collectively to Shopify.
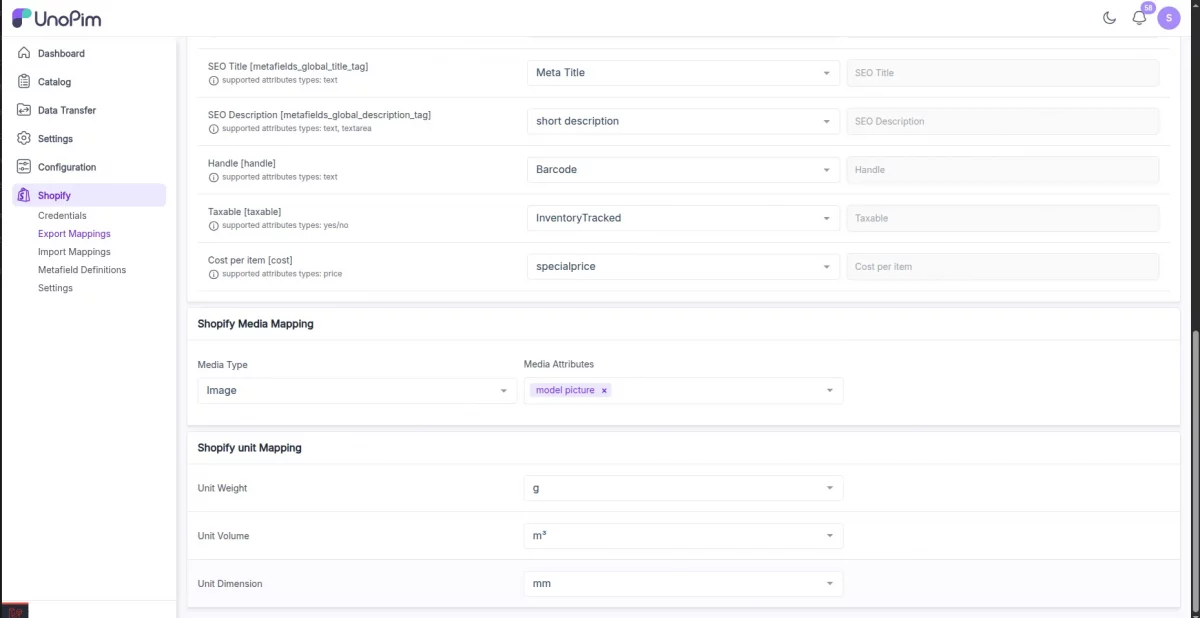
Shopify Unit Mapping
Our connector allows you to map product measurement units (such as weight, volume, and dimensions) to ensure accurate shipping and display on the Shopify side.
Where to Configure:
- Navigate to Shopify > Export Mappings
- Select or create a Product Export Mapping
- Locate the Shopify Unit Mapping section
Map Unit Weight: Defines the unit used for product weight — e.g., grams (g), kilograms (kg), ounces (oz) etc.
Map Unit Volume : It is used for shipping setups that require volume-based calculations.
Common units: ml, l, cm³, in³
Map Unit Dimension : Used for shipping methods that require dimensions like height, width, and depth.
Units include: cm, mm, inches
When these mapping is configured, then product unit will automatically appear on the Shopify product page next to the weight,volume, dimension .
Note : For each unit mapping—weight, volume, and dimension—you can also create a corresponding Shopify metafield from Metafield Definition to store the unit value .
For example, if you want to export volume in litres, you can map unit for volume under “Unit Volume” and create a metafield like volume.litre.
This approach ensures Shopify reads the correct unit type.
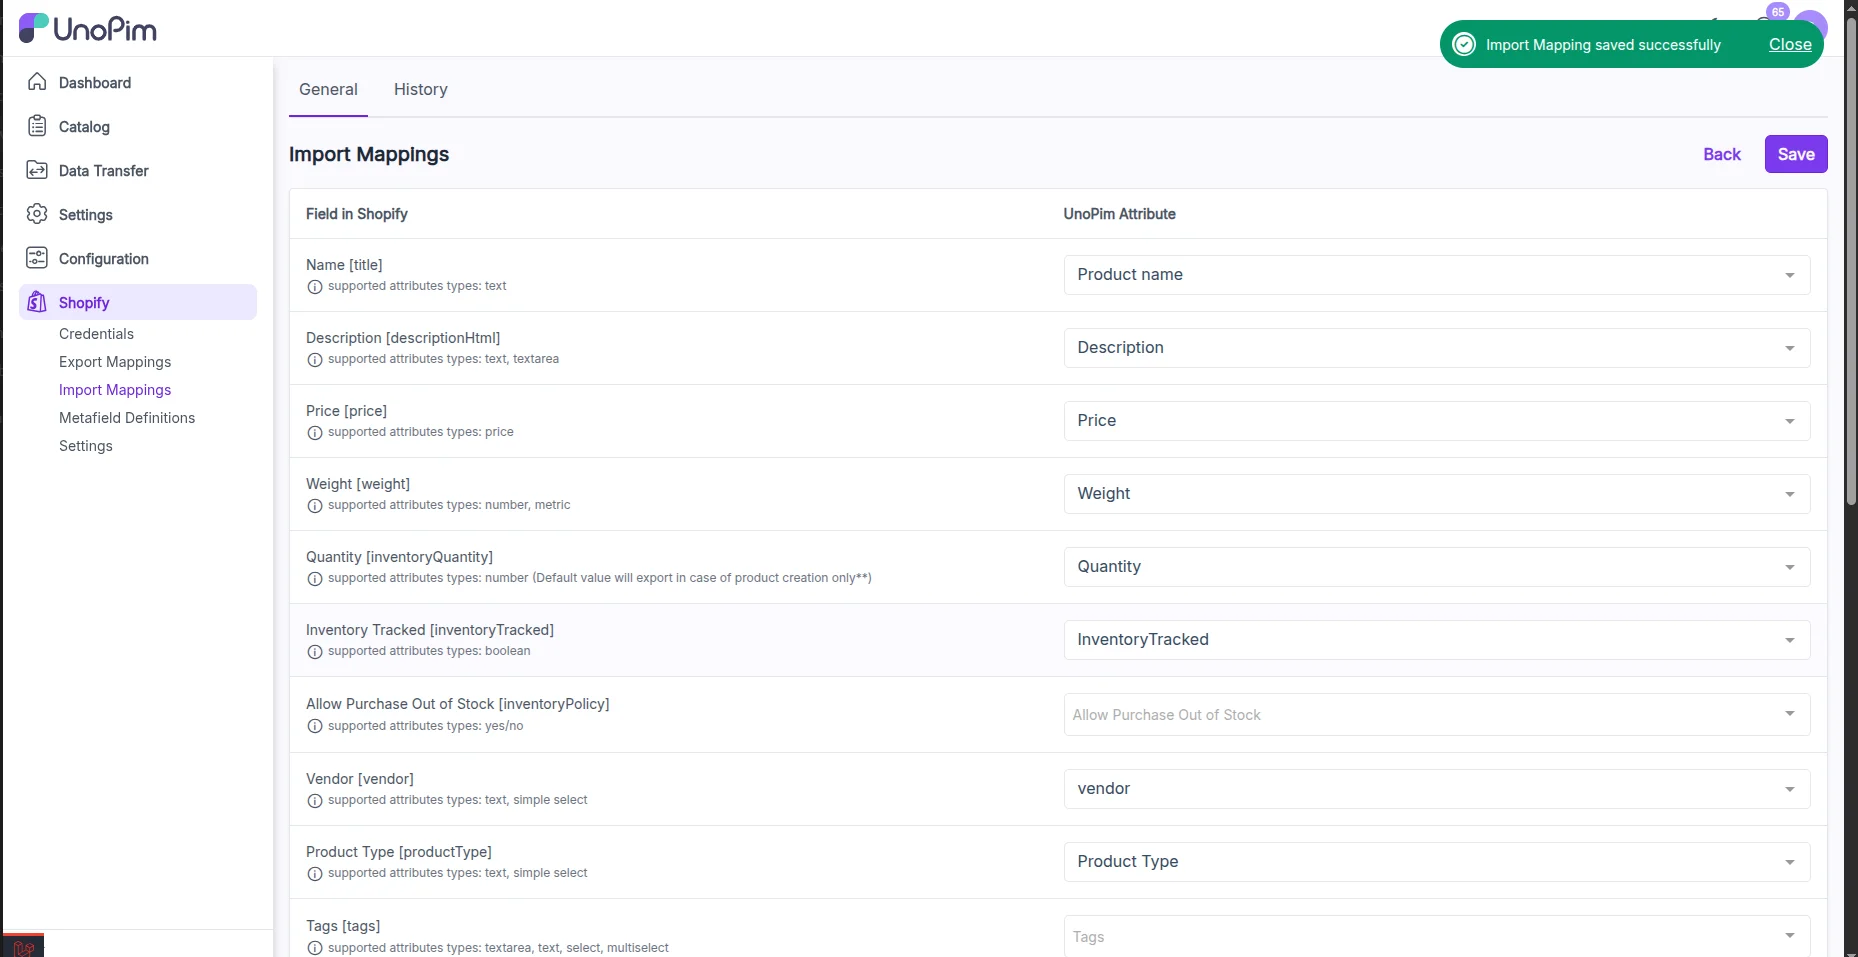
Import Attributes Mapping
To sync detailed product information from Shopify to UnoPim, you first need to map UnoPim attributes to the corresponding Shopify product fields under the import mapping settings.
Navigate and click on Shopify logo from the sidebar and click on the Import Mappings tab to configure attribute mappings for Shopify import.
On the left side, you will find all the shopify product fields available for synchronization with UnoPim attributes.
Field Mappings: Shopify -> UnoPim
- Name
[title]– Product title shown on storefront. - Description
[descriptionHtml]– Detailed product description with HTML support. - Price
[price]– Actual selling price of the product. - Weight
[weight]– Product weight for shipping calculations. - Quantity
[inventoryQuantity]– Available stock quantity in Shopify. - Inventory Tracked
[inventoryTracked]– Enables inventory tracking for the product. - Allow Purchase Out of Stock
[inventoryPolicy]– Allows backorders if stock is zero. - Vendor
[vendor]– Brand or supplier of the product. - Product Type
[productType]– Defines the category or type of product. - Tags
[tags]– Keywords for filtering or search in Shopify. - Barcode
[barcode]– Unique identifier for scanning or inventory systems. - Compare Price
[compareAtPrice]– Shows original price for discount comparison. - SEO Title
[metafields_global_title_tag]– Custom page title for SEO. - SEO Description
[metafields_global_description_tag]– Meta description for search engines. - Handle
[handle]– URL-friendly version of the product name. - Taxable
[taxable]– Marks whether the product is subject to tax. - Cost per item
[cost]– Cost of goods sold (COGS) for profit tracking.
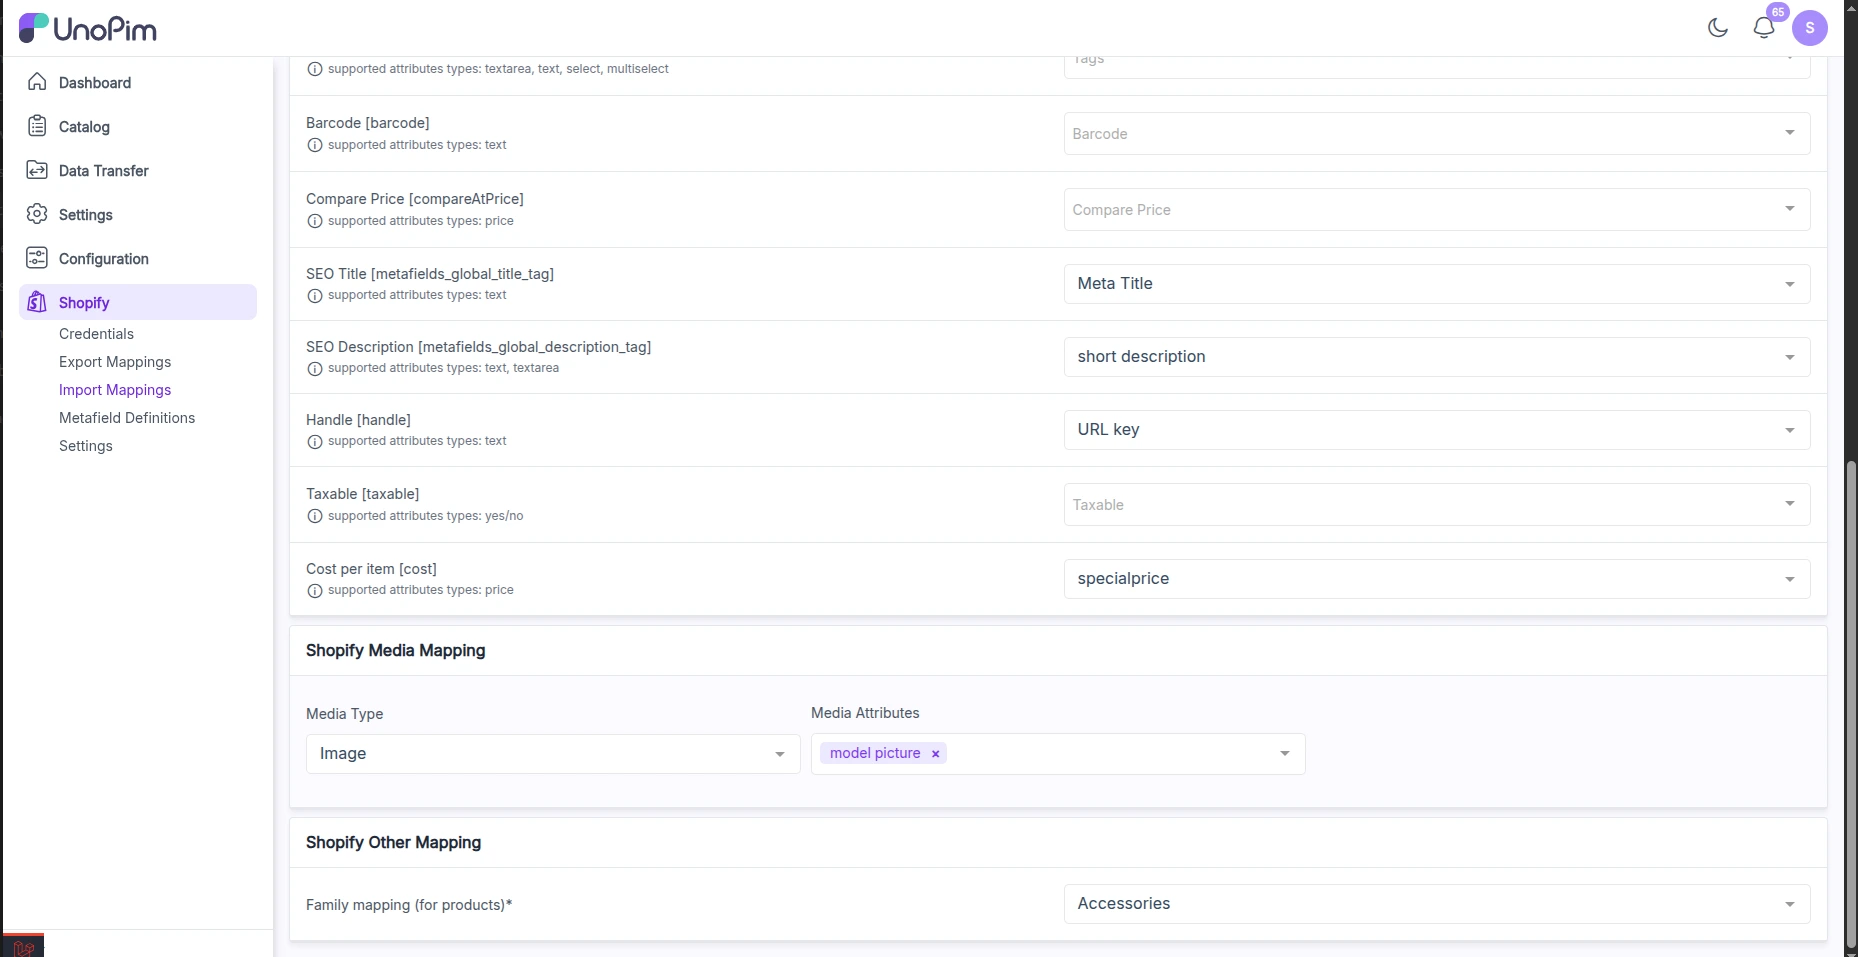
Shopify Other Mapping
This section is also a part of import mapping
- Family mapping (for products): To ensure a smooth and successful import of products and their variants into Shopify, make sure to select a valid product family—such as “Accessories”—during the import mapping.
The below image is illustrating shopify other mapping section.
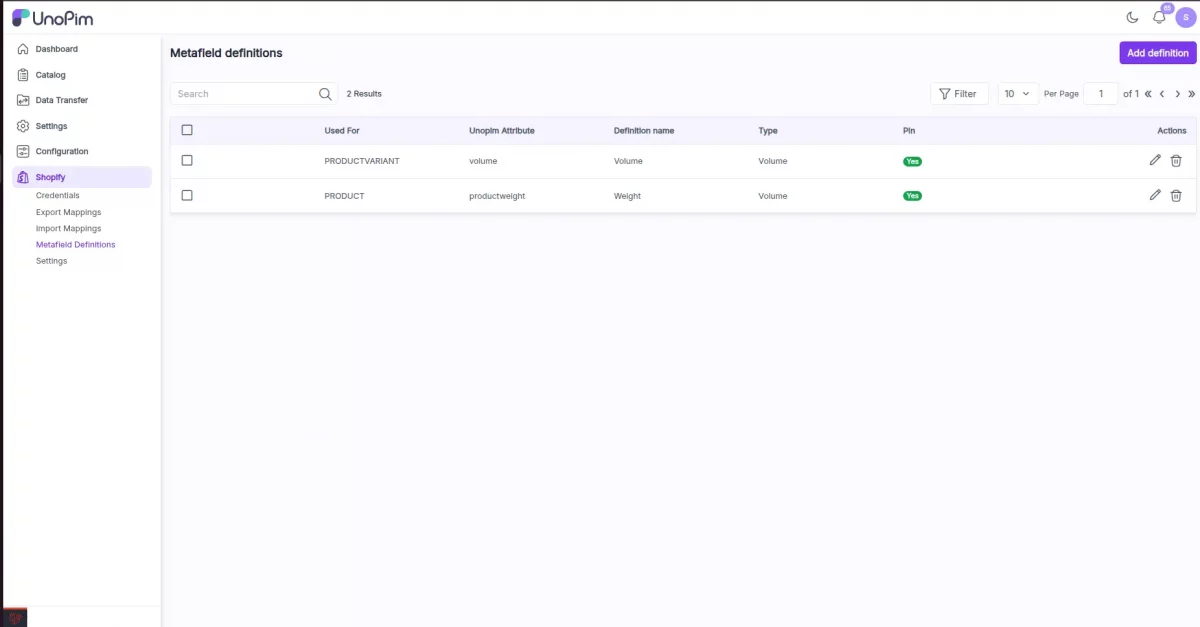
Add & Manage Shopify Metafield Definitions
To define and manage Shopify metafields directly from UnoPim , follow below steps:
- Navigate and click Shopify icon in the left sidebar.
- Click on Metafield Definitions.
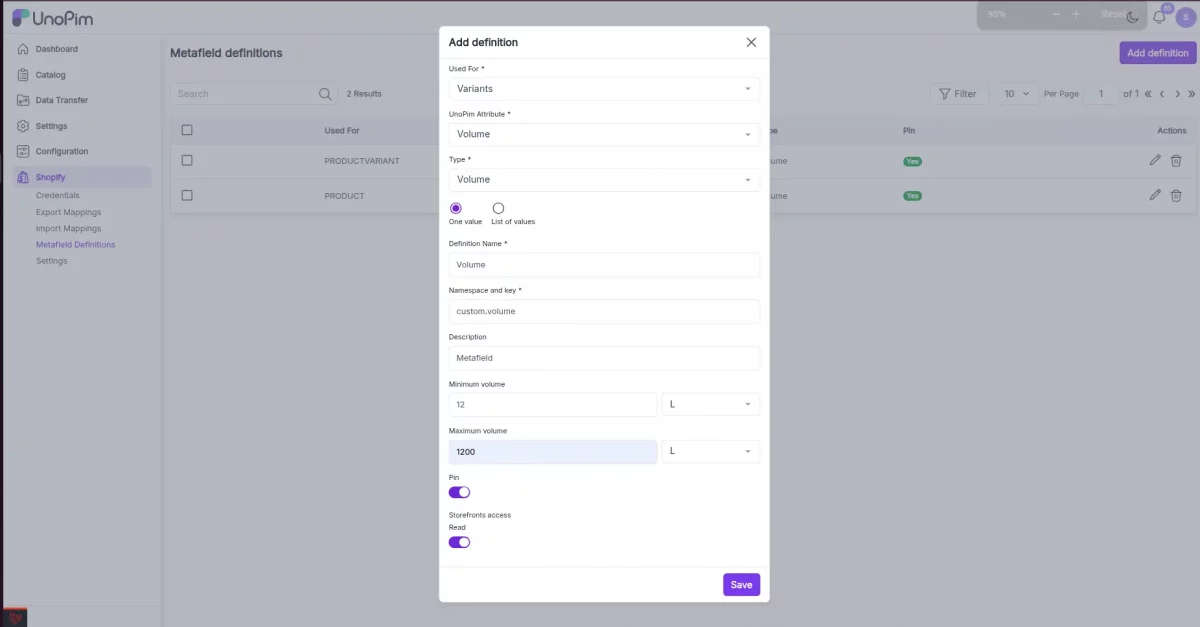
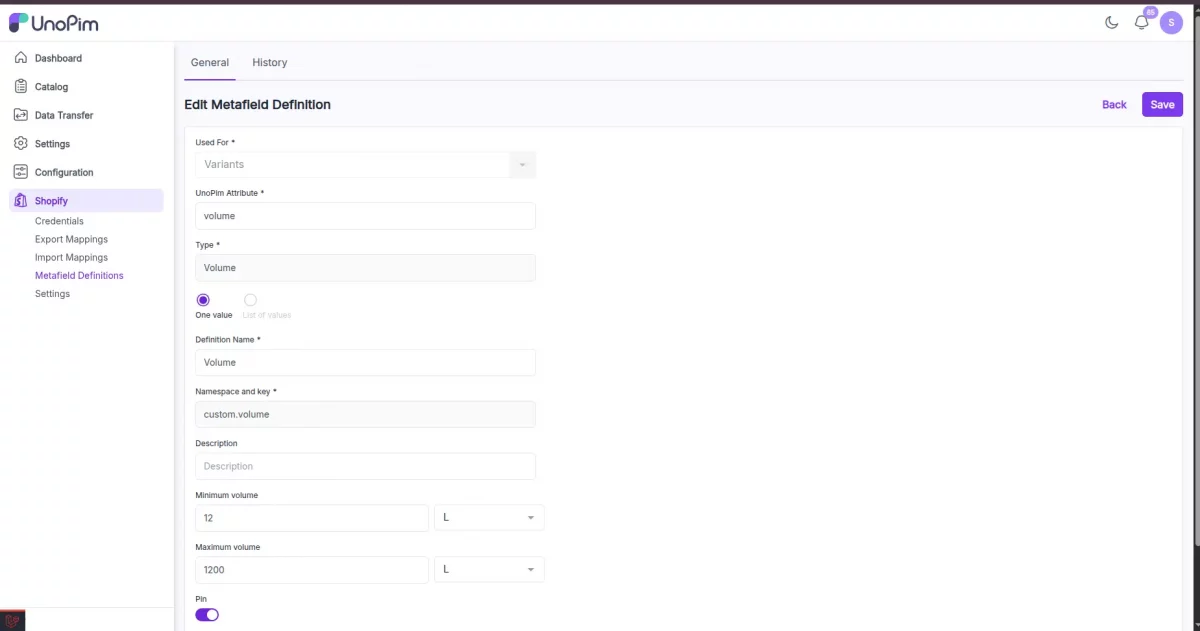
- Click the Add Definition button (top right corner).
Now fill in the following fields:
Field Descriptions:
- Used For
Select the Shopify entity this metafield is related to — e.g., Products, Variants.
This helps UnoPim apply the metafield correctly during export. - UnoPim Attribute
Choose the UnoPim attribute you want to link to this metafield. - Type
Choose the data type for your metafield — e.g.,
• Single line text
• Multi-line text
• Color
• Rating
• URL
• JSON - Definition Name : Provide a user-friendly label — e.g., Material, Warranty Info, Color Code.
- Namespace and Key : This is the unique identifier used by Shopify APIs.
Format:namespace.key(e.g.,custom.color)- Namespace groups metafields and avoids naming conflicts.
- Description (Optional) : Add internal notes to describe the purpose of the metafield.
- Minimum / Maximum Character Count : Use this to enforce input length limits .
- Pin : Enable this to pin the metafield in Shopify admin UI.
This makes it visible when editing entities (like products) under the “Metafields” section.
If not pinned, it will still sync via API but won’t appear in the Shopify UI by default. - Filtering for Products : Enable if you want this metafield to be used as a filter on the Shopify storefront. (Only works for product-type metafields.)
- Smart Collections : When enabled, this metafield can be used as a rule in Shopify Smart Collections — allowing you to auto-group products based on its value.
- Storefronts Access (Read) : Allows this metafield to be exposed via Shopify Storefront API.
This is especially useful for displaying metafield data on custom Shopify themes or headless frontends.
Example: If you want to show acustom.fabricCompositionfield on your product page, you must enable this.
One Shopify metafield creation steps shown in the below image.
UnoPim Shopify Connector Setting
Tags Export Setting – These tags will be exported from UnoPim to Shopify, and there are two types of tags you can export:
You want to pull tags as Named Tags –If you want to include the attribute name in the tag, enable this option after enabling this option.
Do you want to pull through the attribute name as well in tags – If you enable this, you can export both the name and tags, separated by a dash, colon, or space it will be visible on Shopify admin.
Use Attribute Name Separator in Tags – If you enable the option to include the attribute name in the tags, this option will become visible.
Then you will need to select a separator, which can be a dash, colon, or space.

Shopify Admin Panel

Creating Product in UnoPim
To create a product in UnoPim, go to navigate to Products then click the Create button. After that, you need to choose the product type – Product or Configurable Product.
Product – Select this type for creating a simple product.
Configurable Product – Select this type for creating a product having multiple variations such as colors, and sizes.

Then enter the required SKU, choose a family, and click the Save button.
Add Product Details
After that, you need to provide the basic details about a product such as a name, description, select categories, erp name, etc.

In this connector, you can upload images by clicking on the image attribute. This will change the status of the product.
Creating Export Job
To export your product data, you first need to create a job profile. Go to Data Transfer >> Exports >> Create Export Profile.
There are currently three types of export jobs: Shopify Product , Shopify Category and Shopify Metafields Definitions.

Export Category:
To export UnoPim categories to Shopify, create a category export job, enter a unique code, and select the job.

After that, click the “Export Now” button to start the category export process.
Below image depicts some categories which have been exported as collections on Shopify end.

Export Product:
After that to export product or configurable product create product export job, enter a unique code and select the job.
If you have multiple Shopify stores, you can choose the store credentials for the export.
Then, select the channel and currency for the exported products. If you want to export a specific product, enter its SKU.

Once you have filtered the products and saved your export job profile, click the “Export Now” button.

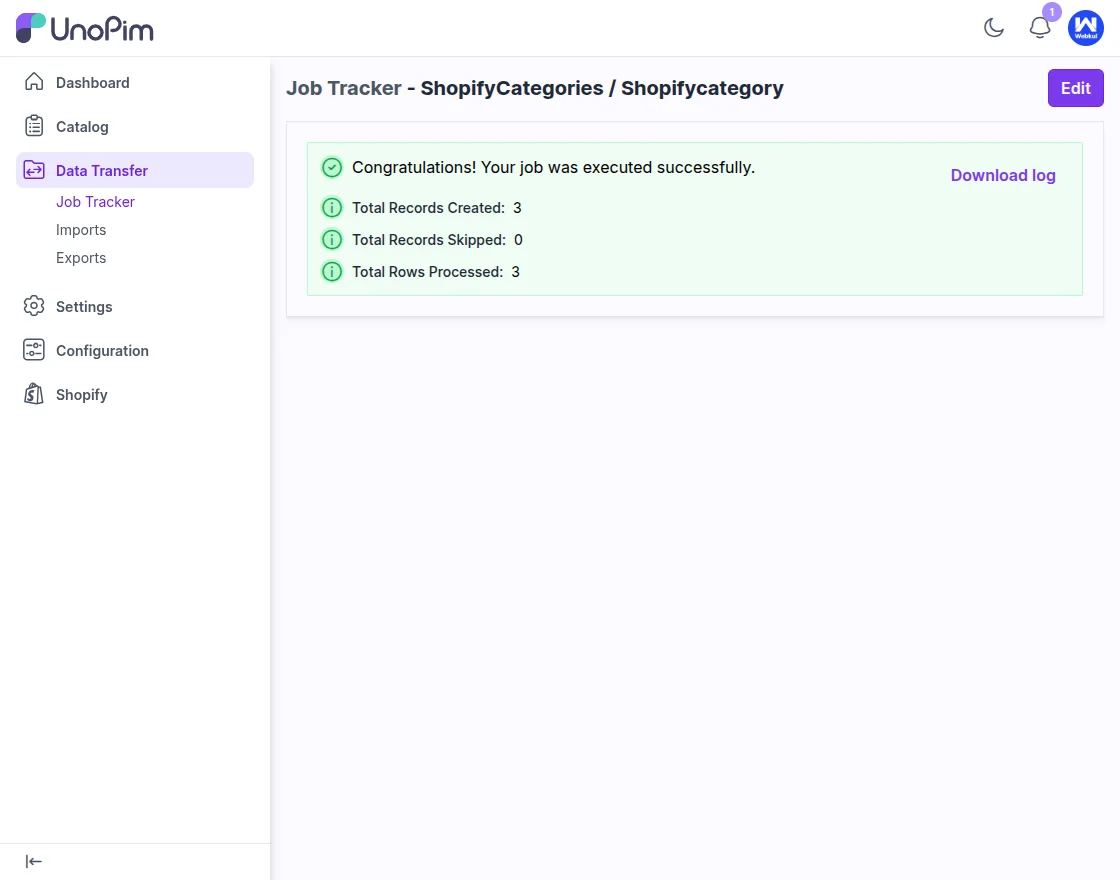
After that, the export process will start, and you can check the execution process as shown in the image below:

After the completion of the execution process, you can see the number of products exported from UnoPim to Shopify, and also see the status as completed.
Once the job is complete, you can review the download log for detailed export information.
View Products in Shopify
After that, you can see the products created in UnoPim, which have now been fully exported to the selected Shopify store, along with all the product details.

You can then edit and update any product information as needed.
Note: Inventory will be added on first-time product export.

If you have exported Shopify multi-local value, you can check whatever locale value you added here.


Shopify Storefront
Once the export job is complete, the products will appear on the storefront. Customers will see the name, price, images, and description on the product page.

Export Metafields Definition
The Shopify Metafields Definition Export job allows you to export precreated metafield definitions from UnoPim to your connected Shopify store.
This is useful when you want to sync newly created metafield ensuring that your custom attributes are recognized properly on Shopify.
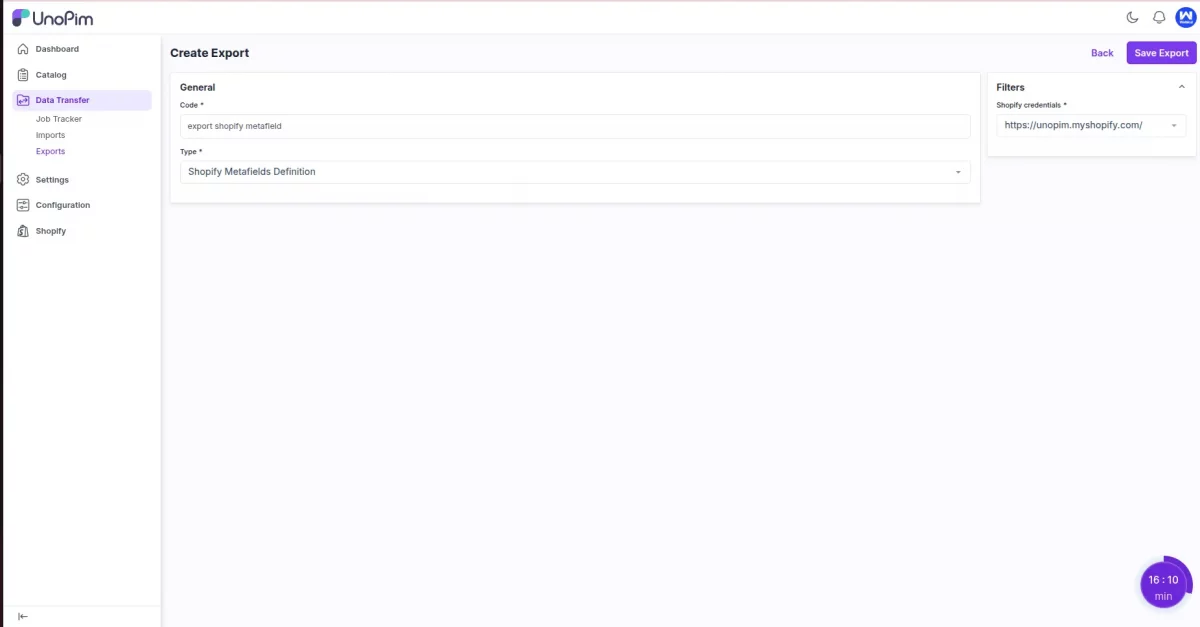
To export Metafields Definitions,
- Navigate to
Data Transfer > Exportsfrom the UnoPim sidebar. - Click the “Create Export” button on the top-right corner.
- In the General section:
- Code: Enter a unique identifier for this export job.
- Type: Select
Shopify Metafields Definitionfrom the dropdown list.
- On the right panel under Filters:
- Shopify credentials : select shopify credential.
- Click “Save Export”> Export Now .
Import Jobs in UnoPim Shopify Connector
The UnoPim Shopify Connector also supports importing from Shopify to UnoPim. To create an import job, Users navigate to Data Transfer>Imports and then tap on Create Import button.
After navigating to the specified path, the user will see the interface shown in the image below.

Let’s check the import jobs below,
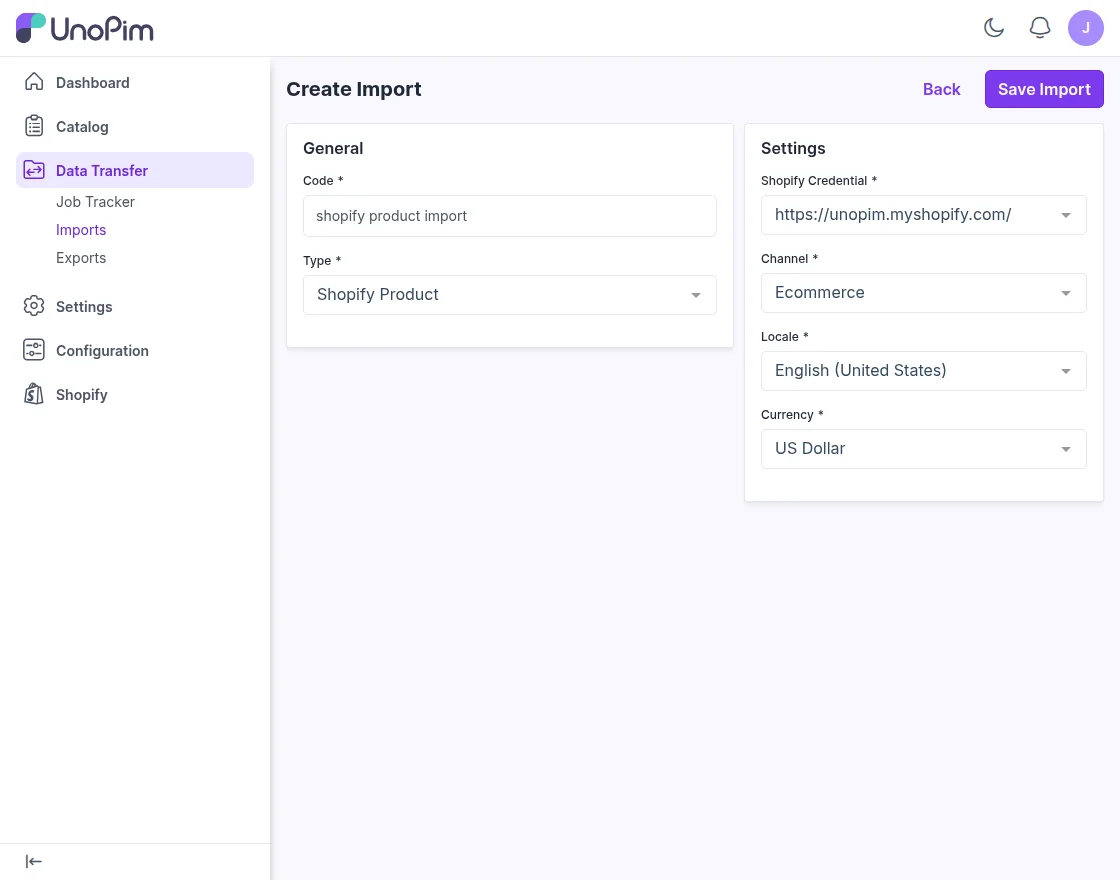
Shopify Product Import
Within the Shopify Product section, the user is required to complete the general fields, including Code and Type, selecting the appropriate job type.
Subsequently, under the Settings section, the user must enter the necessary Shopify credentials.
After providing these details, the user should proceed to select the appropriate Channel, Locale, and Currency, as illustrated in the image below.
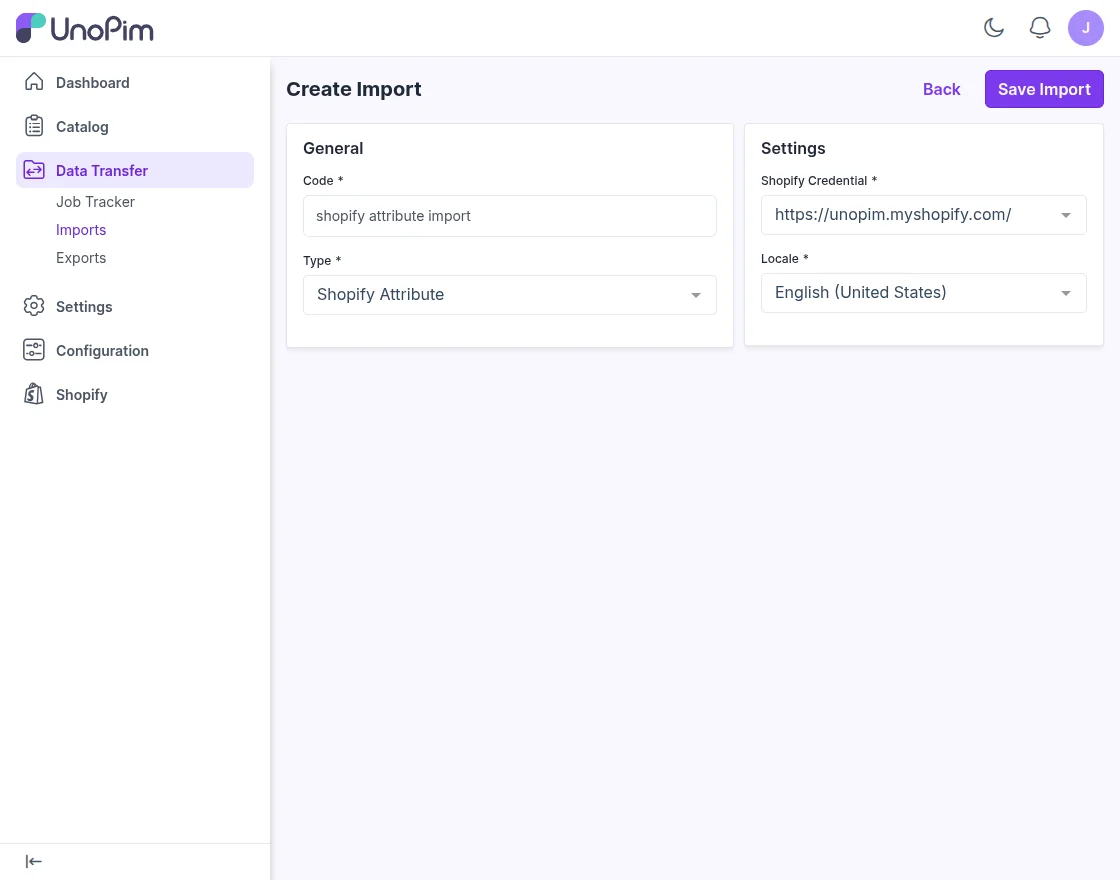
Shopify Attribute Import
Within the Shopify Attribute section, the user is required to complete the General fields. In this section, the user must enter the Code and select the Type as ‘Shopify Attribute’.
Next, under the Settings field, the user should select the appropriate Shopify Credentials and Locale. Finally, the user must click the ‘Save Import’ button to complete the process.
Shopify Category Import
Within the Shopify Category Import section, the user is required to complete the General fields. In this section, the user must enter the Code and select the Type as ‘Shopify Category Import’.
Next, under the Settings field, the user should select the appropriate Shopify Credentials and Locale. Finally, the user must click the ‘Save Import’ button to complete the process.

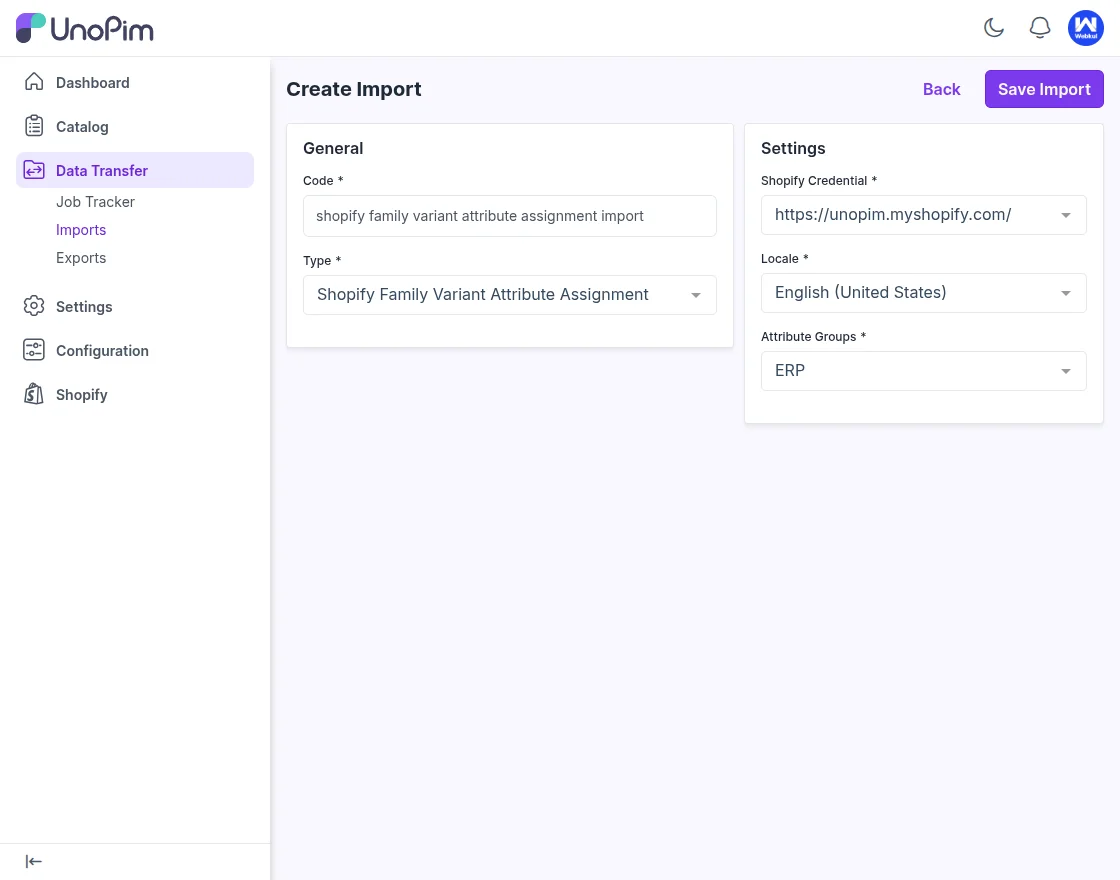
Shopify Family Variant Attribute Assignment Import
In the Shopify Family Variant Attribute Assignment Import section,
The user must first complete the General fields by entering the Code and selecting the Type as ‘Shopify Family Variant Attribute Assignment Import’.
Next, under the Settings section, the user should select the appropriate Shopify Credentials, Locale, and Attribute Group. To finalize the configuration, the user must click the ‘Save Import’ button.
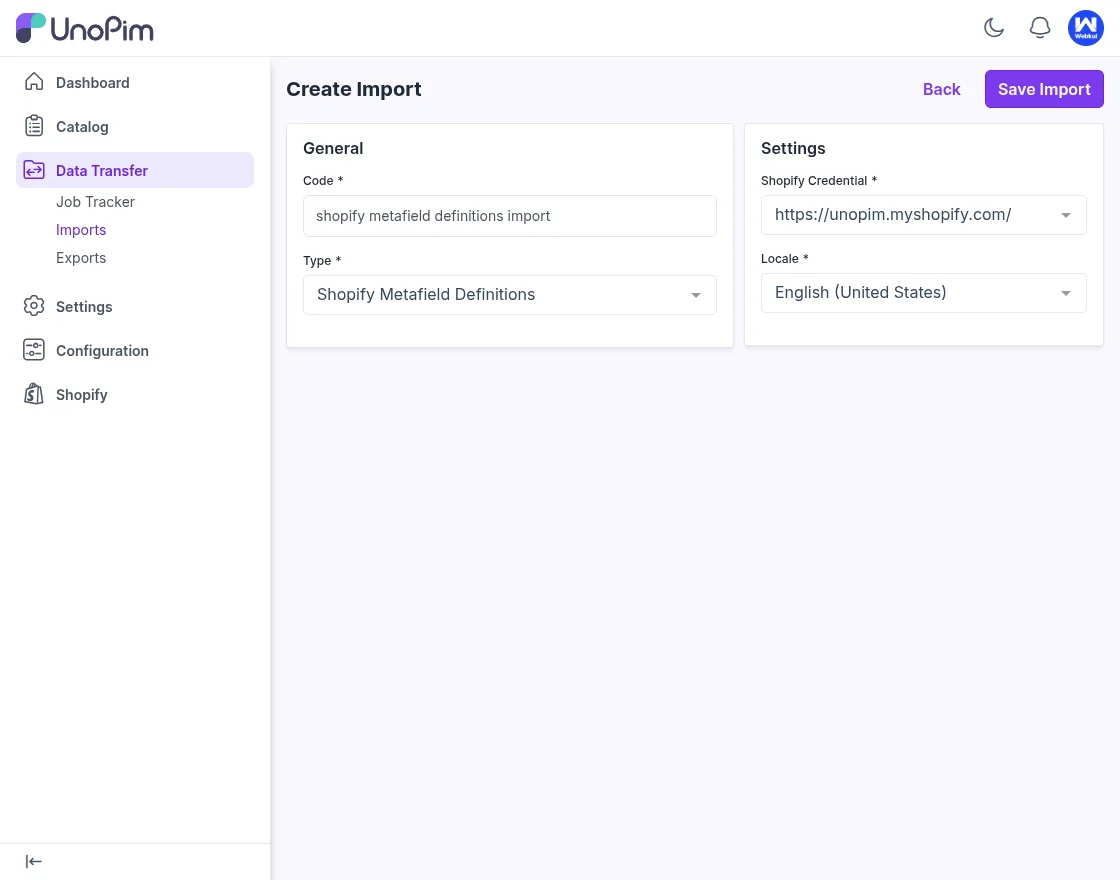
Shopify Metafield Definitions Import
In the Shopify Metafield Definitions Import section, the user must complete the General fields by entering the Code and selecting the Type as ‘Shopify Metafield Definitions’.
Under the Settings section, the user is required to select the appropriate Shopify Credentials and then choose the corresponding Locale.
Support
So, that concludes the User Guide for the UnoPim Shopify Connector.
For any queries or doubts, feel free to reach out to us at [email protected]. You can also raise a ticket through our HelpDesk System for assistance.
Additionally, if you’re looking to connect UnoPim with a Magento 2 store, don’t forget to check out our UnoPim Magento Connector.
Current Product Version - 2.1.0
Supported Framework Version - UnoPim 0.2.x , 0.3.0

1 comments