Before starting the details about Crowd Funding App for Shopify, let’s first understand what crowdfunding means. Crowdfunding is the concept of ‘money from many’ to complete a project.
A process of raising funds/money from the mass for a project/venture, where the project owner explains and informs about his/her idea of the project and then sets the budget which will be required for the completion. Then the public contributes towards the project if they feel that the project is worthy enough.
On a similar concept, we have created this amazing app called Crowd Funding App for Shopify.
So let’s get started with the installation first.
Installation

To install the app Click here on this link, enter your store URL and click on the Install button to start the Installation.
WORKFLOW

Once your installation is complete, you will be landed here on the home page of the app which will be showing you all the related statistics of your projects.
The app is divided into three major sections:
-HOME
-CONFIGURATION
-PROJECTS
Let’s look into them in detail.
Home Page
From the home page, you can check all your ongoing campaigns, projects and notifications in the app. Moreover, clicking the “View Status” button, you can view the complete details of the project.

Clicking the view status button, you can check the details about your project & no of backers who contributed to your project. Also, you can add an amount to your project in order to boost your campaign.

Clicking the ‘backers’ button, you will get the list of all the backers who contributed to your project. You can delete the backer if required.

Configuration
The configuration section manages the configuration of the app. The works totally on the basis of how you enter details here in this section. The configuration section of the Crowd Funding App is further divided into four sections:
-General Configuration
-Label Configuration
-Theme Configuration
-Mail Configuration
General Configuration


From this section of the configuration, you can manage the general settings like configuring your business email id, displaying the donation detail and much more.
Label Configuration
From this section of the configuration, you can change all the front end labels and make them as per your requirement.

Theme Configuration

To change the color of the theme for frontend display use this theme configuration section.
Mail Configuration

From here, admin can configure the mail send to the bidding winners.
Project
This section of the Shopify Crowd Funding App will list and displays all the projects (finished and ongoing). You can view and edit the project from this section.
Also to add the new project you have to click on add project button of this section.

How to add a new project?
By clicking on the add project (as shown in the screenshot above) you have to start the process of creating a new project.
The add project process involves three stages.
-Project Detail
-Donation & Reward
-Additional Detail

Your Projects can be of two types:
- Normal Projects.
- Customer Choice Projects (with Bidding Feature)
Let’s understand how to create projects.
PROJECT DETAILS


You can start creating a project from this section. Enter all the details related to the selected project like Project Type, Title, description, image, duration of the project and goal amount and click on save and proceed to proceed further.
DONATION & REWARDS
From this section, you can create rewards for those donors who are contributing to your projects.
In this section, the Crowd Funding App fill in all the donation and rewards details that you want to create for your customers for funding the project.
Donation & Rewards for Normal Projects


Donation & Rewards for Customer Choice Projects


ADDITIONAL DETAILS


Put any additional details about the video to make the public understand more about your project. From this section, you can upload any related additional detail of the project here in this section for the customer to know more about the project.
You are Done. Congratulations you have just created your project.
Configure front-end

You need to configure your theme to make this Crowd Funding App work. Copy the code given on the homepage of the app as an important note and paste it to their respective files as specified.
- Go To Themes.
- Click on Customize Theme button.
- Click on the Edit Code button.
- Select the respective template or .liquid file as given in instructions.
- Paste the code and save it.
New Customer Account Compatibility for Crowdfunding
The Crowd Funding app is now updated to support Shopify’s New Customer Accounts. It was previously available only for legacy accounts, and now it works with the latest customer account system as well.
Configure Frontend for New Customer Accounts
This setup is available only for stores that have enabled New Customer Accounts.
Steps to Setup:
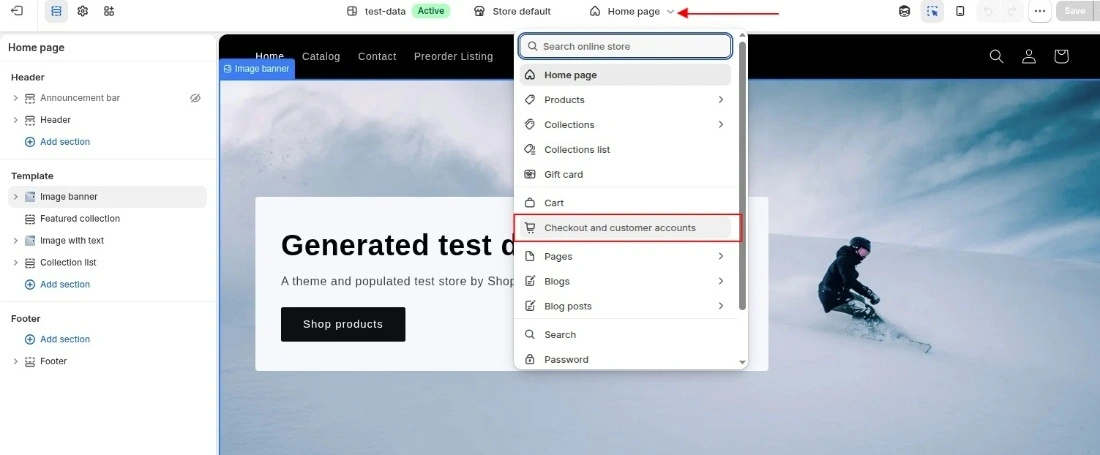
Go to your Shopify admin panel and navigate to Online Store > Themes, then click on Edit Theme. From the top dropdown, select Checkout and Customer Accounts.
In the Apps section, add Webkul Crowdfunding customer-account-ui and place it on the Order Page.
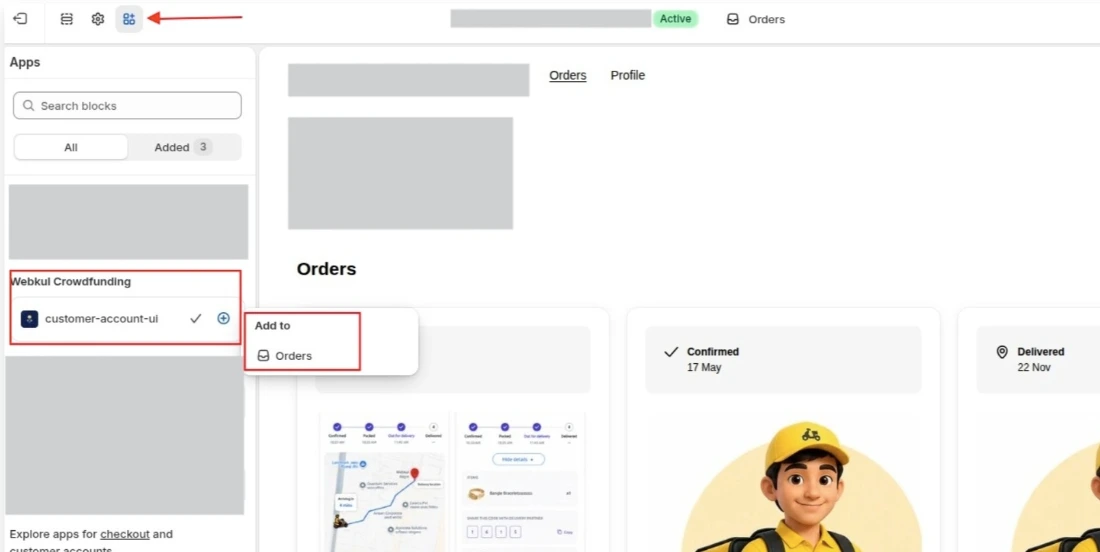
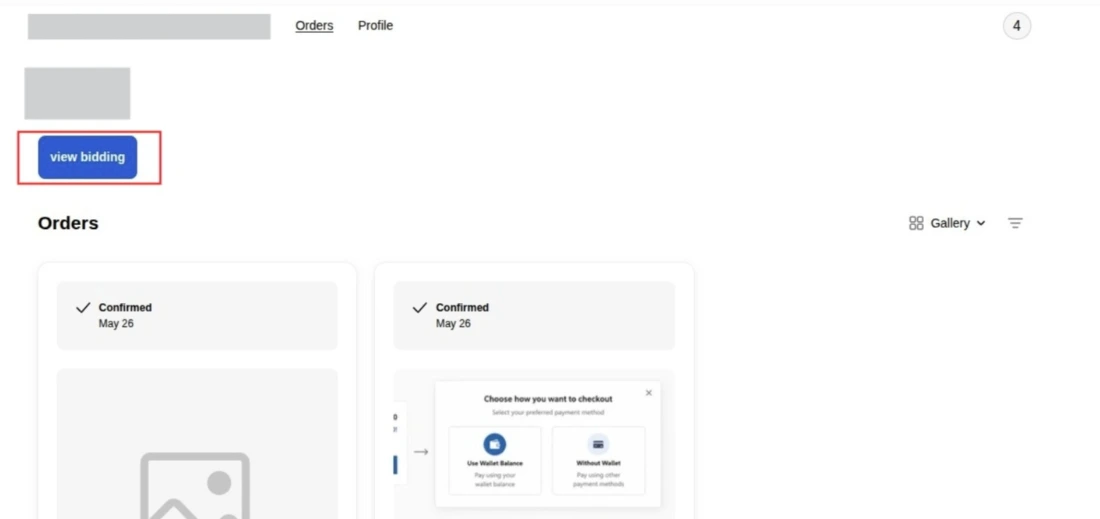
Click on Save to apply the changes. After saving, the feature will be displayed on the customer account page.
Code Pasting for Online Store 2.0
If you are using Online store 2.0 (Example- Dawn), you need to follow the steps to add the codes.
To show donate button & rewards on product description page, add the codes to sections/main-product.liquid:-
<div id="wk_crowdsourcing" product_id="{{ product.id }}" variant_id="{{ product.variants[0].id }}" product_tags = "{{ product.tags }}" product_type = "{{ product.type }}" customer_id = "{{ customer.id }}" customer_name = "{{ customer.name }}" customer_email = "{{ customer.email }}"></div>
Also, to show project story like video, description & rewards listing details on product description page, add the codes to sections/main-product.liquid:-
<div id="wk_crowdsourcing_story" product_id="{{ product.id }}" product_tags = "{{ product.tags }}" product_type = "{{ product.type }}"></div>
To show comments on the product page, add the codes to sections/main-product.liquid file:-
<div id="wk_crowdsourcing_comments" product_id="{{ product.id }}" product_tags = "{{ product.tags }}" product_type = "{{ product.type }}"></div>
Also, to show the Progress Bar on collection page, add the codes to snippets/product-card.liquid file:-
<div class = "wk_crowdfunding_bar" product_id="{{ product_card_product.id }}"></div>
To hide the add to cart button, price & variants on project’s product page, add the codes to sections/main-product.liquid file:-
{% if product.type != "wk_project" %}
{% endif %}
To show bidding page on customer account page, add the codes to templates/customers/account.liquid file:-
<div id = "wk_view_crowdfunding" customer_id="{{ customer.id }}" customer_email = "{{ customer.email }}"></div>
Now, to show the Pie Chart of donations, add the codes to layout/theme.liquid file:-
{{ "https://www.gstatic.com/charts/loader.js" | script_tag }}
Front-end display
Once you have created the project and have configured your app and your theme by pasting the codes, then on the front end this is how your project will get displayed.

From here donors can choose the donation amount and click on the donate button to make the contribution and can even view other ongoing projects by clicking on view all button.
Backers adding Comments
You can now allow backers to add comments on the projects while donating for the projects. You need to enable the option in the app.
Go to App>>Configuration>>General Configuration.
Enable Allow Backers to Add Comment

Donate as Anonymous
You can enable this option if you want to display the backer’s name as an anonymous commenter on the product page.

To show comments on the product page, you have to paste the below code on Sections/product-template.liquid file:
<div id="wk_crowdsourcing_comments" product_id="{{ product.id }}" product_tags = "{{ product.tags }}" product_type = "{{ product.type }}"></div>
The same appears like this on the front end:-

Demo Details
https://crowdfunding-demo.myshopify.com/pages/demo
Support
Furthermore, if you need any kind of support/Consultancy then please raise a ticket at http://webkul.uvdesk.com/ or drop an email at [email protected]
Thanks for reading this blog!!! 🙂

2 comments
Thanks for the appreciation!
In case of any query regarding the app, please raise a ticket here https://webkul.uvdesk.com/en/ or you can mail us at [email protected]. We would be very happy to assist you.
Best Regards,
Supriya