INTRODUCTION
Prestashop Odoo Bridge is a perfect extension for you to seamlessly synchronize data between Prestashop and Odoo.
Prestashop is a platform trusted by more than 300,000 merchants to manage their eCommerce/ Marketplace. Whereas, Odoo is known for its strong inventory management and accounting.
If you are a business looking to integrate these two platforms, then our PrestaShop Odoo Bridge is the perfect solution for you.
Further, the module allows you to synchronize data like Products, Categories, Customers, Orders, etc. between Odoo and PrestaShop.
In addition, The module makes data synchronization easy, the user guide gives you an insight into the features, installation, configuration, and workflow of the connector module.
FEATURES
1:- Bi-directional product synchronization between Odoo and Prestashop.
2:- Bi-directional synchronization of Product Categories between Odoo and Prestashop.
3:- Real-time export of Sales orders from Prestashop to Odoo.
4:- Exports Customers from Prestashop to Odoo.
5:- Real-time update of order status like cancellation, payment accepted, and delivery.
6:- Real-time Stock update from Odoo to Prestashop.
Check the video mentioned below for a detailed overview of the extension:
INSTALLATION PROCESS
Once you purchase our Prestashop Odoo Bridge module, you will get two module files that need to be installed, each at the Odoo and Prestashop ends.
ODOO END INSTALLATION
a.) Extract the file on your system after the download finishes.
b.) Copy and paste this folder inside your Odoo Add-Ons path.
c.) Now, open the Odoo and click on the Settings menu. Here, click on Activate the Developer Mode. Moreover, one can also activate the developer mode by typing ‘debug’ after ‘web?’ in the URL.
d.) After that, open the Apps menu and click on ‘Update Modules List’.
e.) In the search bar, remove all the filters and search the module.
f.) You will see the module in the search result. Click on the ‘Install’ icon to install it.
Are you looking For a Powerful BI Tool ?? Do check out our Odoo Power BI Connector.
PRESTASHOP END INSTALLATION
a.) To install the module on Prestashop, Go to “Module Manager” in the ‘Modules’ menu
b.) Click on the ‘Upload a module’ icon in the top right corner.
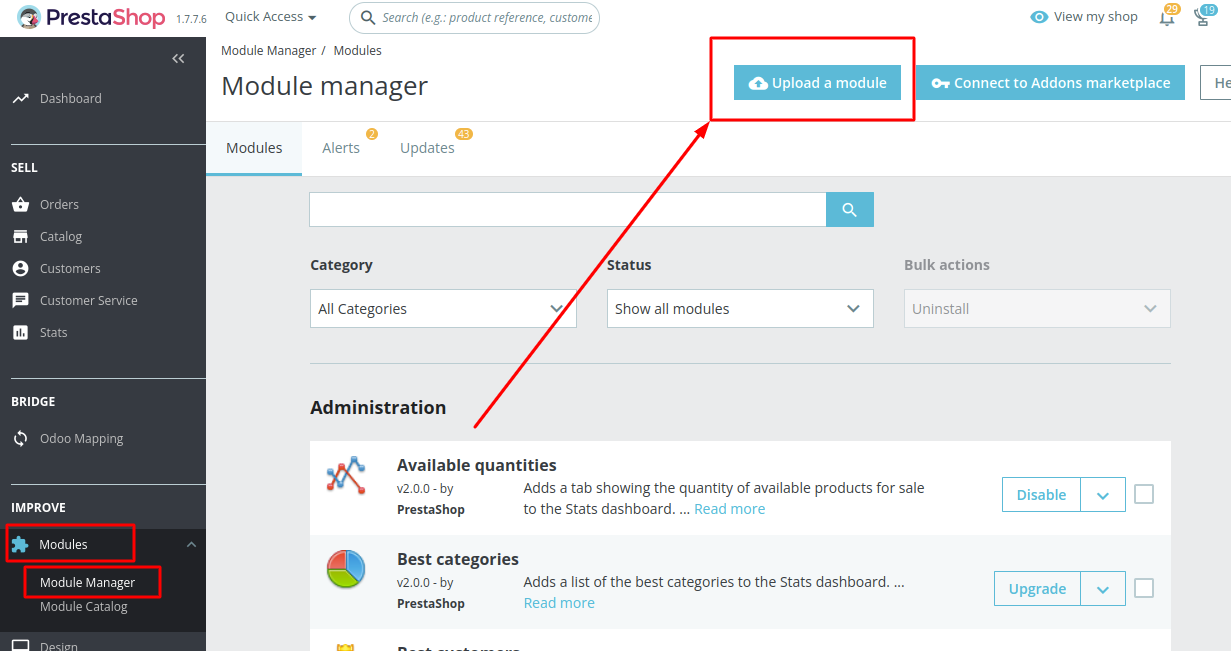
c.) Upload the ‘prestaerp’ module that needs to be installed at the Prestashop end.
d.) Once uploaded, search the module in the Modules list. You will see the module in the search result. Click on the ‘Install’ icon to install it.
CONFIGURATION
Once the installation is done you need to configure the module on both Prestashop and Odoo ends.
Note to remember:
1) Firstly, you need to configure at Odoo end followed by configuration in Prestashop end.
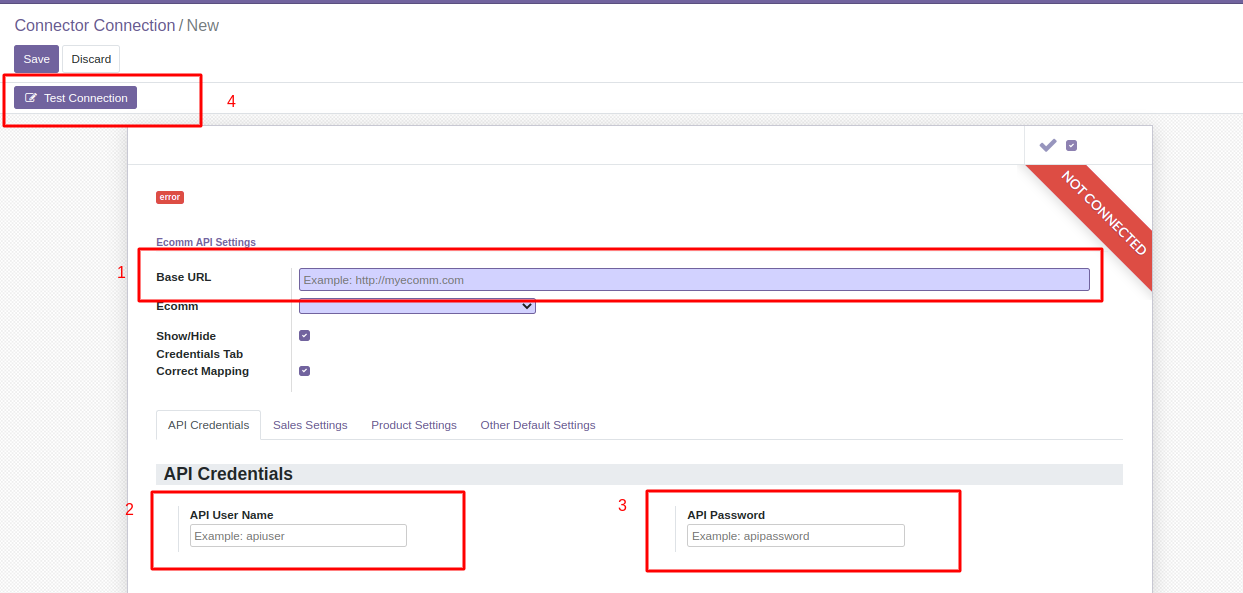
2) Please remember that while testing the Prestashop Connection, Odoo connection should be active.
ODOO END CONFIGURATION
You need to enter the Base URL of Prestashop with the API URL and API Key in order to test and make the connection.
Following are the synchronization settings that need to be updated:
1:- Sales Settings
a.) Update the payment terms, that you want to keep Odoo to automatically update it in Prestashop Orders.
b.) After that, add the Prestashop Salesperson in Odoo to use it in Prestashop Orders.
c.) Add the Prestashop Sales Team in Odoo to use in Prestashop Orders.

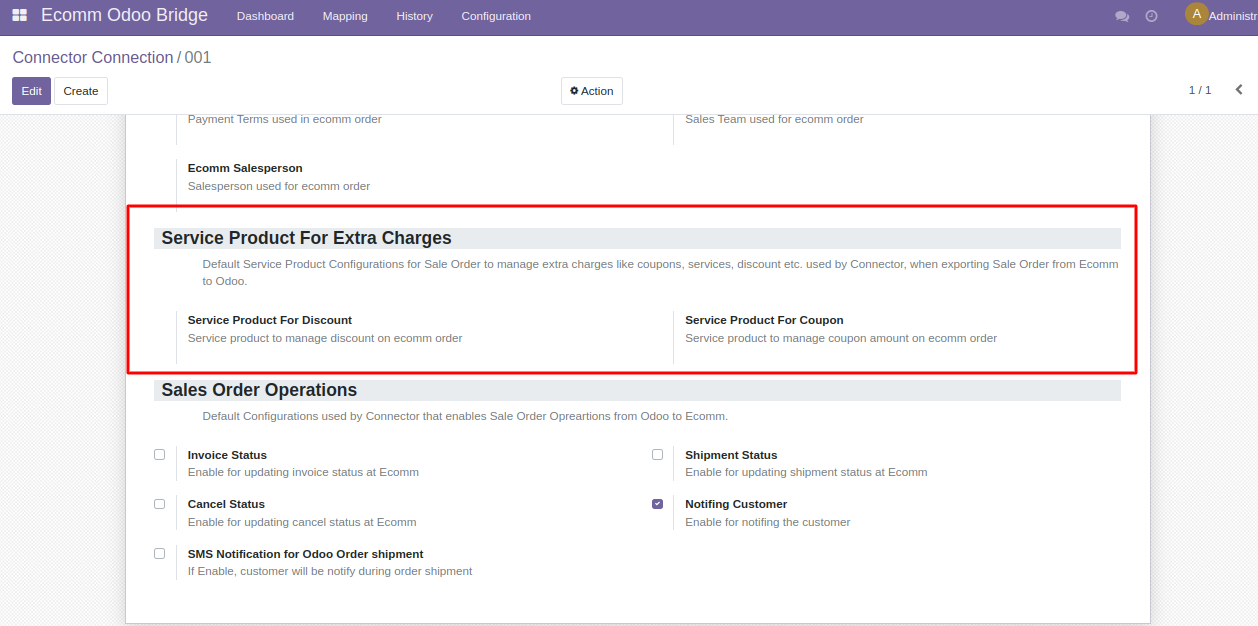
d.) Select a Service product for discounts, the selected service product will be used to manage discounts on ecomm orders.
e.) Select a Service product for Coupon, selected service product will be used to manage coupon amount on ecomm order.
f.) Enable invoice status option, to update invoice status at Prestashop end.
g.) Enable Cancel Status, to update Cancel Status at Prestashop end.
h.) Enable Shipment Status to update Shipment Status at the Prestashop end.
i.) Enable Notify Customer to notify customers via emails at Prestashop.

2:- Product Settings
a.) Default Category: After Product import, the selected default Category will get assigned as the internal product category at the Odoo end.
b.) Set the Invoicing Policy for Orders, i.e on the basis of Ordered Quantity or Delivered Quantity.
c.) Select the default Tracking to be used for traceability.
d.) Enable the “Avoid product duplicity” option to avoid product duplicity based on ‘SKU’ & ‘Barcode’ during product synchronization from ecomm to Odoo.
e.) Enable the “Avoid category duplicity” option to avoid category duplicity based on ‘Name’ & ‘Parent’ during category synchronization from ecomm to Odoo.
f.) Enable the “Avoid attribute duplicity” option to avoid Attribute & value duplicity based on the Name during attribute synchronization from ecomm to Odoo.

3:- Other Default Settings
a.) Update the default language for Prestashop.
b.) Select the default Odoo Company that needs to be used for data synchronization.
c.) Select the default “Warehouse”. The selected default warehouse will be used for stock synchronization.
d.) Inventory Update, selected inventory update option will be used for inventory synchronization from Odoo to Ecomm.
e.) “Stock Based On” option allows you to select stock synchronization on the basis of On Hand Quantity or Forecasted Quantity.

PRESTASHOP END CONFIGURATION
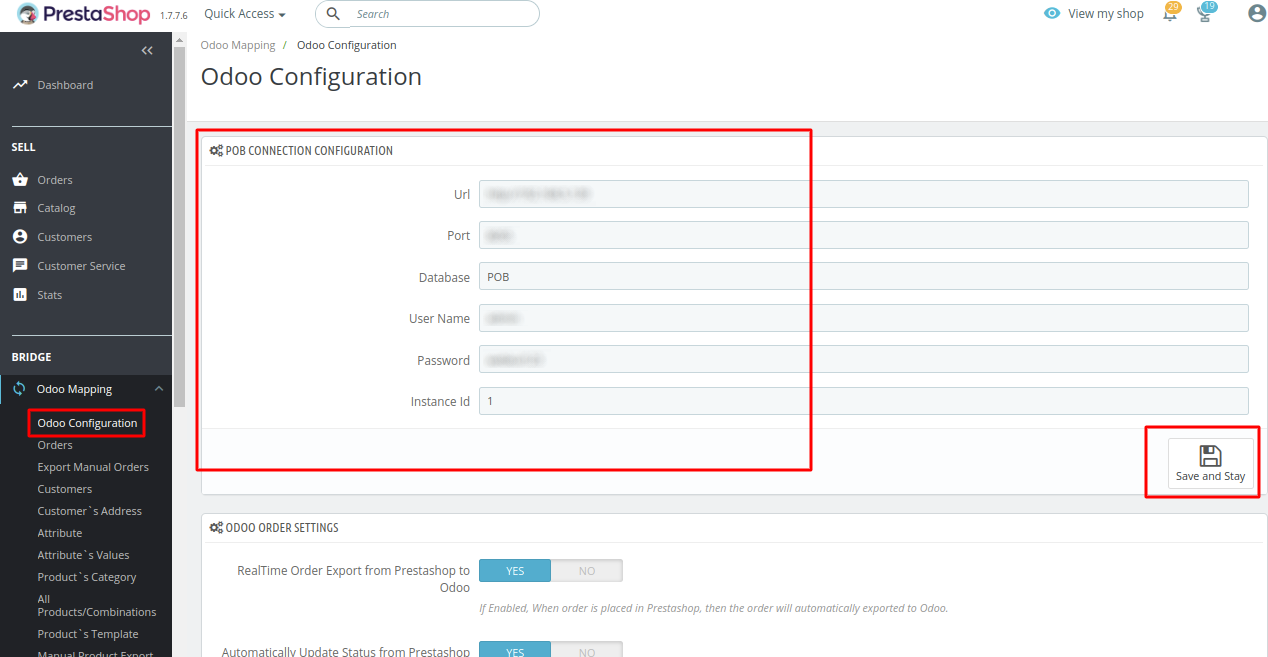
Once done, go to “Odoo Mapping” and select the “Odoo Configuration” option.

1:- POB CONNECTION CONFIGURATION
a.) Enter the require fields, Url, Port, Database, User Name, Password and Instance Id. After entering all the details click on “Save and Stay”.
2:- ODOO ORDER SETTINGS
a.) RealTime Order Export from Prestashop to Odoo, if Enabled, orders are automatically exported to Odoo in real-time.
b.) Automatically Update Status from Prestashop to Odoo, if Enabled, then any change/update in the Order status at the Prestashop end is also updated to the Odoo end.
c.) Automatically Confirm Orders, if Enabled, orders created from the Prestashop end will automatically be created as Sale Orders in Odoo
d.) Automatically Generate Invoice, if Enabled, the Invoice will be automatically created in Odoo for exported orders.
e.) Manual Map of product from Prestashop to Odoo,
If Enabled, You can manually map (product(Odoo) and combination(Prestashop) and (product templates(Odoo) and products(Prestashop) of Odoo and Prestashop
Click on the Save button to save the changes.

3:- BACKUP OPTIONS
a.) Drop Database Tables during Update, if enabled this feature allows you to drop all mapping tables during module update.
b.) Click on the Save button to save the changes.
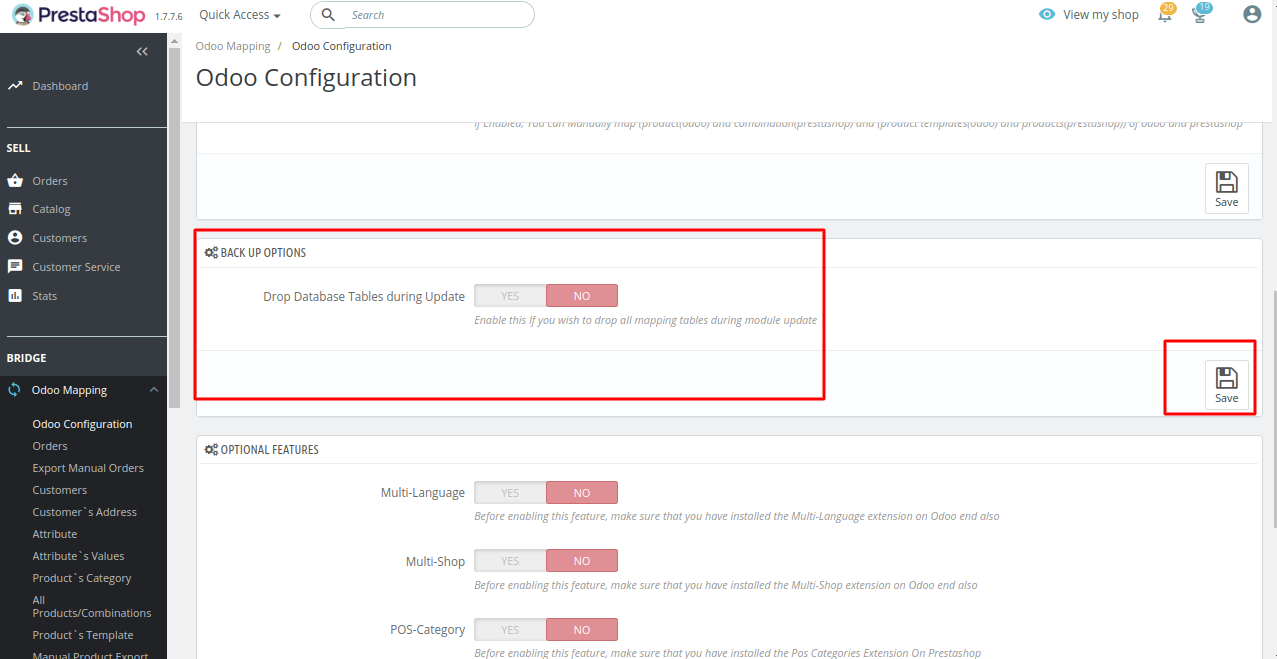
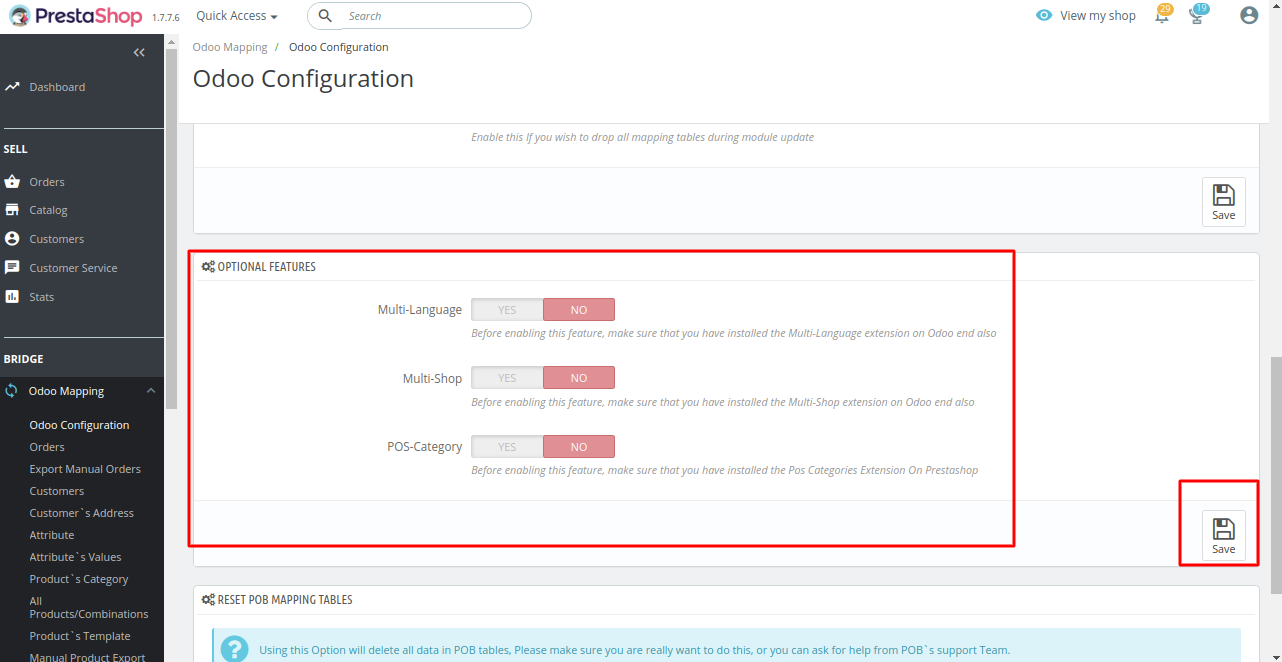
4:- OPTIONAL FEATURES
a.) Multi-Language, this feature needs to be enabled if you are using POB- Multi-Language extension.
Prestashop Multi-language Support POB extension allows you to Export/import Products and categories translation in their default and regional languages.
Prestashop Multi-language Support POB extension>>> https://store.webkul.com/Multi-language-POB-extension.html
b.) Multi-Shop, this feature needs to be enabled if you are using the Multi-Shop extension.
Prestashop Multishop POB Extension allows you to integrate your multiple Prestashop stores with Odoo.
Prestashop Multishop POB Extension >> https://store.webkul.com/Multishop-extension-prestashop-openerp-connector.html
c.) POS-Category, this feature needs to be enabled if you are using our POS-Category POB extension.
Odoo Bridge for Prestashop POS Categories extension allows you to synchronize the Prestashop category with the POS category in Odoo.
Odoo Bridge for Prestashop POS Categories extension >> https://store.webkul.com/Odoo-Bridge-for-Prestashop-POS-Categories.html
d.) Lastly, click on the Save button to save the changes.
WORKFLOW
Data Export( from Prestashop to Odoo)
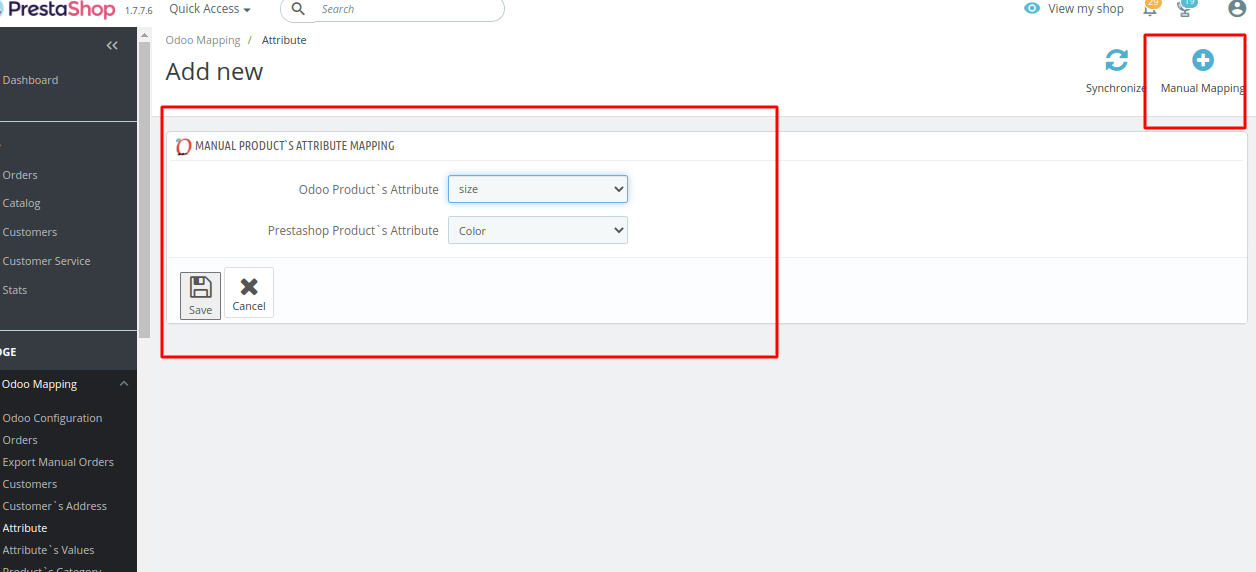
1:- Attributes Export and Mapping ( from Prestashop to Odoo)
a.) Go to Odoo Mapping and select the “ Attributes” option.

b.) Click on the “Synchronize” button to import and map all Attributes from Prestashop to Odoo end.

c.) If attributes are already present at Odoo and Prestashop end, then you can manually map the attributes using the “Manual Mapping” Option.
2:- Manual Product Export( from Prestashop to Odoo)
a.) Go to Odoo Mapping and select the “ Manual Product Export to Odoo” option.

b.) Select the Products that need to be exported and select the “Exported to Odoo option” in Bulk Actions.

3:- Bulk Product Export and Mapping ( from Prestashop to Odoo)
a.) Go to “Odoo Mapping”, and select “All Products/Combinations” option

b.) Click on the “Synchronize” button to import and map all products from Prestashop to Odoo’s end.

4:- Customer Export and Mapping ( from Prestashop to Odoo)
a.) After that, go to “Odoo Mapping”, and select “Customers”.

b.) Click on the “Synchronize” button to import and map all Customers from Prestashop to Odoo end.

5:- Taxes Export and Mapping ( from Prestashop to Odoo)
a.) Go to “Odoo Mapping”, Select “ Taxes”

b.) Click on the “Synchronize” button to import and map all taxes from Prestashop to Odoo.

c.) If taxes are already present at Odoo and Prestashop end, then you can manually map the taxes using the “Manual Mapping” Option.

6:- Carrier Export and Mapping ( from Prestashop to Odoo)
a.) Go to “Odoo Mappings” and select the “Carriers” Option.

b.) Click on the “Synchronize” button to import and map all Carriers from Prestashop to Odoo.

c.) If Carriers are already present at Odoo and Prestashop end, then you can manually map the Carriers using the “Manual Mapping” Option.

7:- Currency Export and Mapping ( from Prestashop to Odoo)
a.) Go to “Odoo Mappings” and select the “Currency” Option.

b.) Click on the “Synchronize” button to import and map all Currencies from Prestashop to Odoo.

c.) If Currencies are already present at Odoo and Prestashop end, then you can manually map the Currencies using the “Manual Mapping” Option.

8:- Payment Methods Export and Mapping ( from Prestashop to Odoo)
a.) Go to “Odoo Mappings” and select the “Payment Methods” Option.

b.) Click on the “Synchronize” button to import and map all Payment Methods from Prestashop to Odoo.
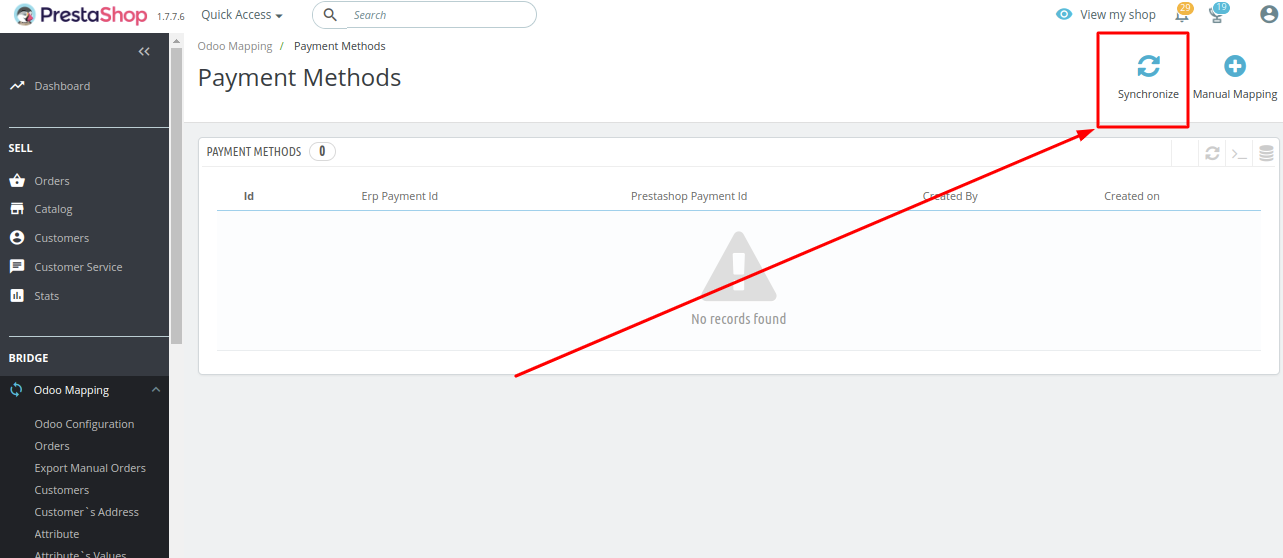
c.) If Payment Methods are already present at Odoo and Prestashop end, then you can manually map the Payment Methods using the “Manual Mapping” Option.

9: – Manual Order Export (Prestashop to Odoo)
a.) Go to “Odoo Mapping” and select the “ Export Manual Orders” option.

b.) Select the Orders that need to be synchronized to the Odoo end and Click on the “Synchronize to Odoo” option in Bulk Action.

Data Export ( from Odoo to Prestashop)
1:- Export Attributes and their values (from Odoo to Prestashop)
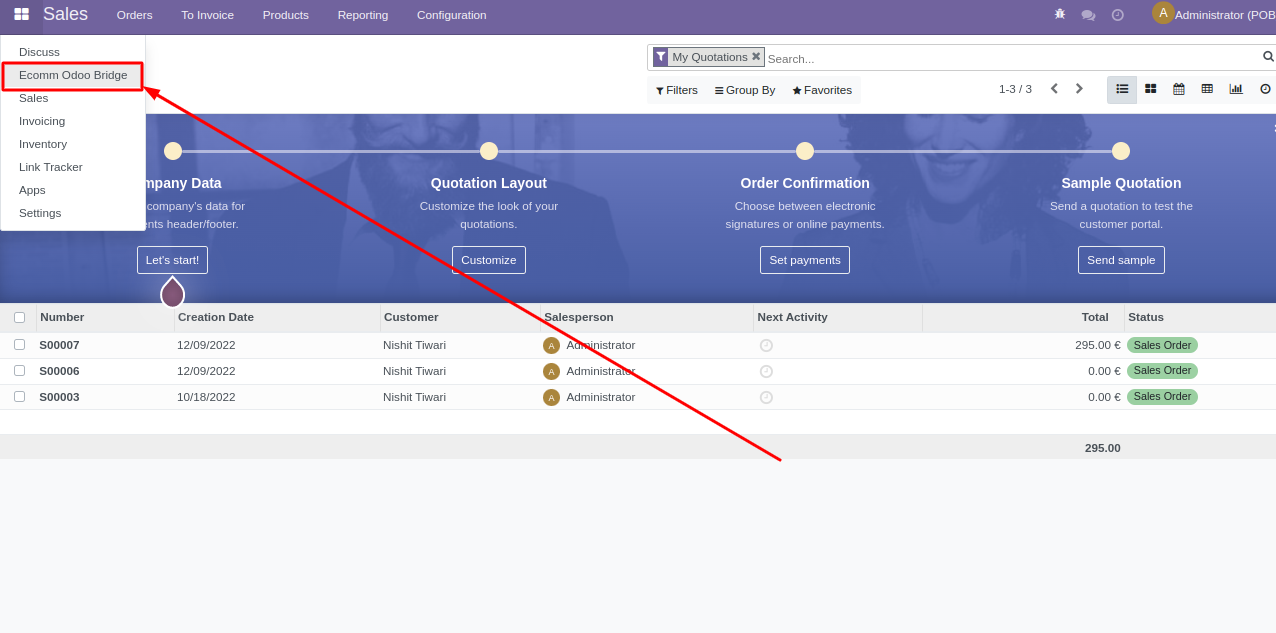
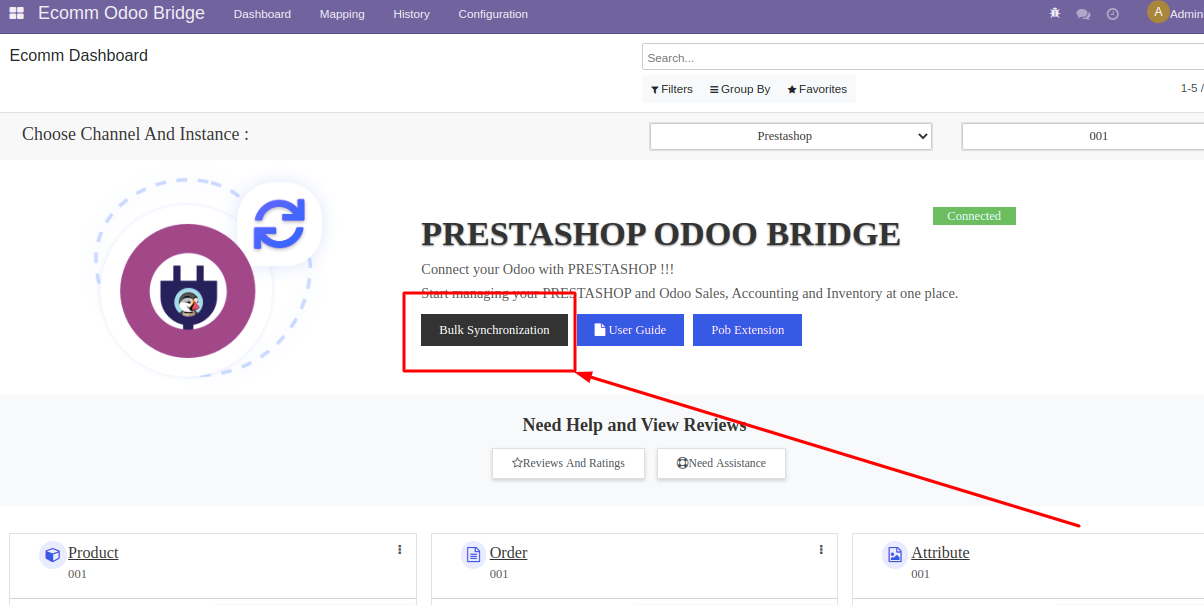
a.) Go to “ecom Odoo Bridge” Module at the Odoo end.

b.) Select the “ Bulk Synchronization” Option.

c.) Select “Export All Attributes and their Values”.

d.) Select the eCommerce Channel and click on Synchronize now button. It will export all the attributes to the Prestashop end

2:- Bulk Product Export (for Odoo to Prestashop)
a.) Go to “ecom Odoo Bridge” Module at the Odoo end.

b.) Select the “ Bulk Synchronization” Option.

c.) Select the “Synchronize Products” option.

d.) Select eCommerce Instance and click on Synchronize Now button. It will export all the Products to the Prestashop end

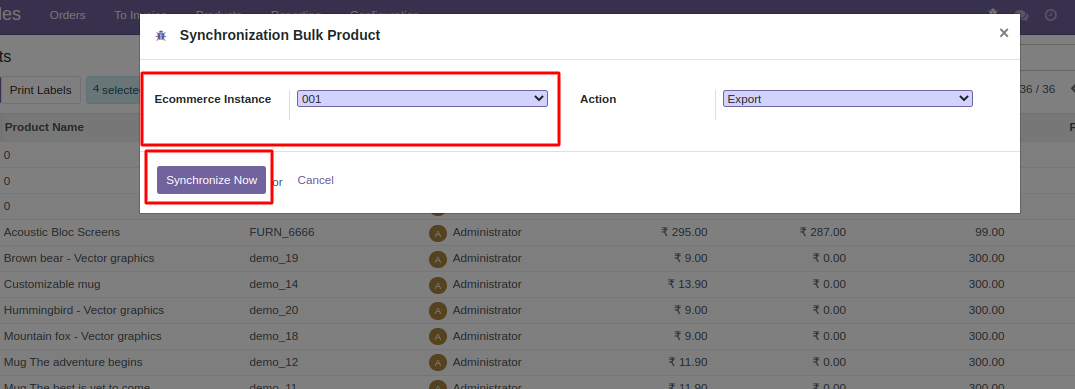
3:- Manual( Selected) Product(s) Export (for Odoo to Prestashop)
a.) Go to Sales and open Product.

b.) Change the layout to list view.

c.) Select the Products to export and click on the “Synchronize to Ecommerce” option in the Action tab.

d.) Select eCommerce Instance and click on Synchronize Now button. Selected products will get exported to the Prestashop end.
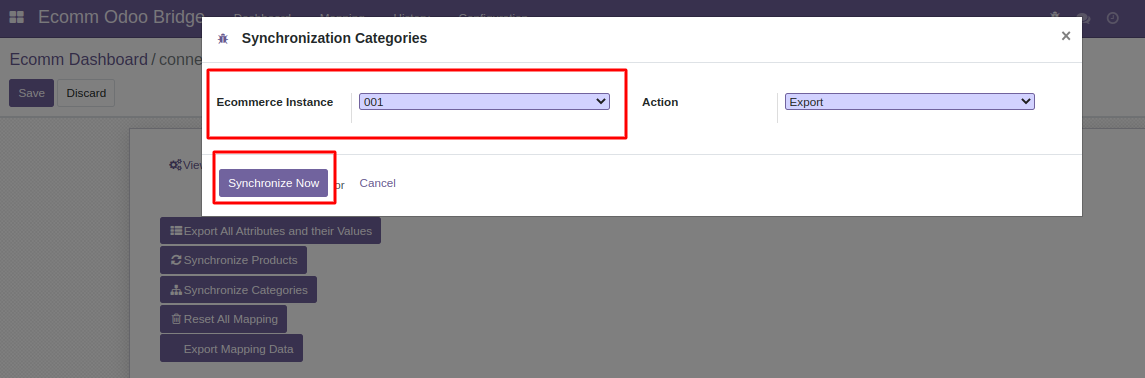
4:- Product Category Export ( from Odoo to Prestashop)
a.) Go to “ecom Odoo Bridge” Module at the Odoo end.
b.) Select the “ Bulk Synchronization” Option.
c.) Select the “Synchronize Categories” option.
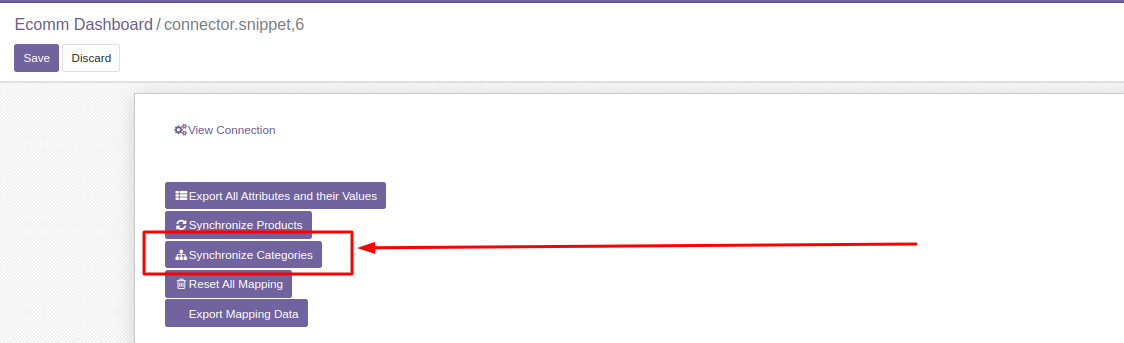
d.) Select eCommerce Instance and click on Synchronize Now button. It will export all the Categories to the Prestashop end
Odoo Bridge For Prestashop User Guides for Other Versions
NEED HELP?
Hope you find the guide helpful! Please feel free to share your feedback in the comments below.
If you still have any issues, doubts, or queries regarding the module, please raise a ticket at https://webkul.uvdesk.com/en/customer/create-ticket/.
Also, please explore our Odoo development services & an extensive range of quality Odoo Apps.For any doubt, contact us at [email protected].
Thanks for paying attention!!
Current Product Version - 4.1
Supported Framework Version - Odoo 19,18,17 & Prestashop 8.1, 1.7

Thank you