Opencart Shipstation Shipping: One of the most essential aspects of any online business is Shipping.
Opencart Shipstation Shipping is one of the best solutions which provides satisfactory shipping services to the customers by allowing various shipping carriers such as USPS, UPS, FedEx, DHL, etc.
After enabling the shipping method, the admin can simply configure its title and shipping carriers. Also, the admin defines the weight and length class of the package.
The admin also defines the handling fee which shall add up with the shipping method in the frontend.
Further, in the front end, the customers can view the available shipping methods with real-time freight rates. The tracking number for the order is also visible to the customer.
Therefore, it is imperative for business entrepreneurs to follow business strategies such that they stand up to the latest e-business competition and make a mark in the digital industry.
Note: Kindly use your own credentials to check the demo of this add-on.
Watch the below video tutorial to understand the extension workflow:
Features
- The admin can retrieve the API key and the API secret by creating the Shipstation account.
- A title of the Shipstation Shipping is set by the admin.
- The shipping carriers such as USPS, DHL, FedEx, UPS can be set by the admin.
- The admin can add the weight and the length class for the package.
- A handling fee may be added by the admin which adds up with the shipping fee in the frontend.
- The admin can even add the geo zones and postal code.
- The admin can manage the tax class for the shipstation.
- The shipstation rate will be display with applicable tax.
- Once the customer places the order, the admin can export the order to shipstation.
- Also, the admin can generate a shipping label for the order.
- The admin can generate the packing slip and the dispatch note for the order.
- In the frontend, the customer can view the available shipping methods with real-time freight rates.
- The customer can view the tracking number for the order.
- The admin can calculate shipping cost on the basis of dimensions(Length, width, height & weight).
Installation
Upload Files
First, extract the downloaded zip file. After that, open the correct Opencart Version Folder. According to Opencart Version installed in your system.
Then, upload admin, catalog and Packer.php to the Opencart root directory.
Refresh Modifications
The user can navigate through Extensions > Modifications. Now click the Refresh button as visible in below screenshot.
Edit User Groups
After that, go to System > Users > Usergroups. And then edit ‘Administrator’. Click Select All for both Access Permission and Modify Permission and Save it.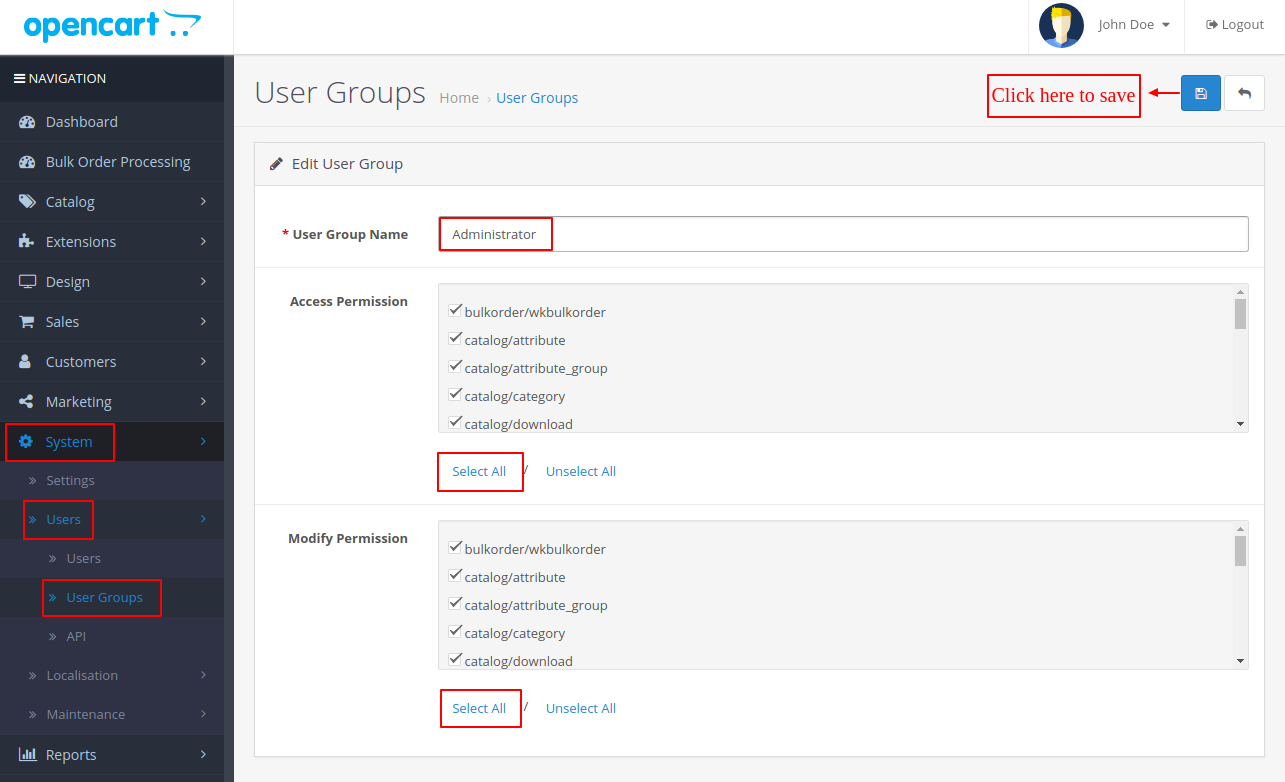
Install
Now navigate to Extensions > Extensions > Shipping. Find OpenCart Shipstation shipping from the list. Click the Install button as visible in the screenshot below.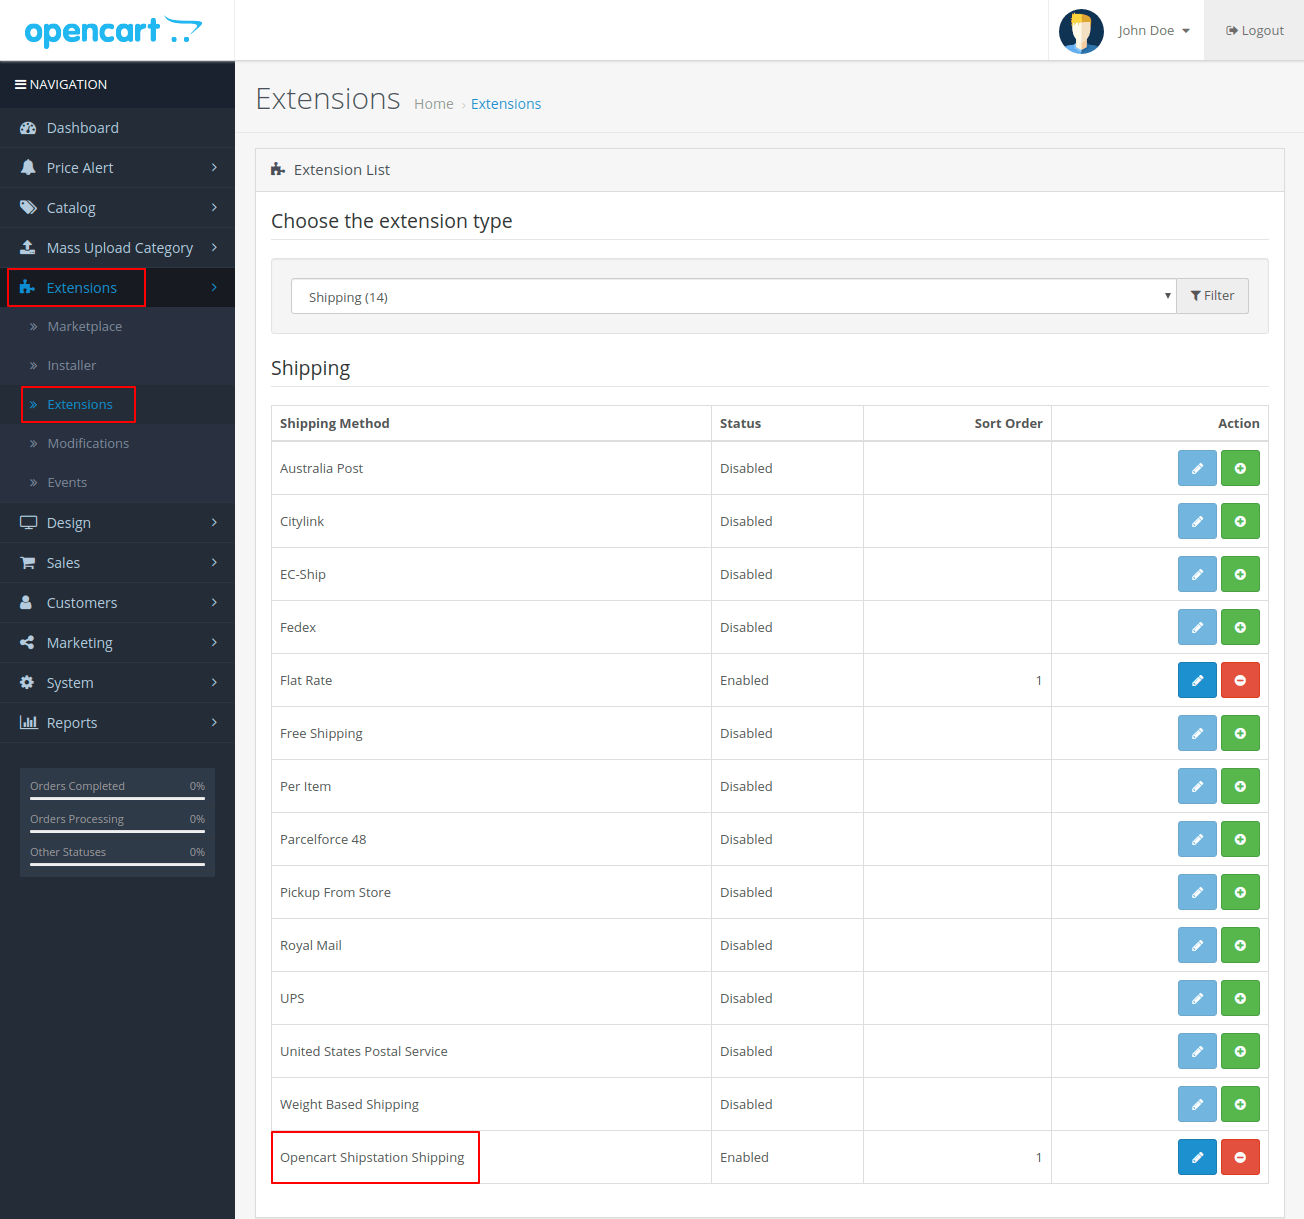
Retrieving Shipstation Credentials
Initially, to configure the module, the user will require the API Keys & API Secret.
To get the API Keys & API Secret, the user will have to register themselves on the ShipStation website.
In the Create My Account page, the user will have to enter all the details, and read all the terms & conditions and submit the details as shown in the image below.

On submitting the details, the user will receive a a verification email in the entered email id while filling in the details.

The user needs to visit the email account and check the verification email there.
On clicking the verification link the user’s account is verified.

Futher, the user needs to navigate to the ShipStation login page and add the credentials to login to the ShipStation account.
The Shipstation lets the user manage the store and get insights into the sales & customer engagement, manage orders, shipments, products, calculate the rate of the shipping etc.

To get the API Key & Secret, the user needs to navigate to the Account Settings -> API Settings.
Under API Keys, the user will find both, the API Key & Secret as shown in the image below, which can be further used to configure the Shipstation Shipping with OpenCart

Carriers and Fulfilment
The user can manage the shipping & fulfillment providers by navigating to Account Settings>Shipping>Carriers & Fulfillment>Add a Provider Account.
Shipping Providers (Carriers) are used when postage and print labels are purchased.
Fulfilment Providers are used when the user wants to use the third party service for packaging and shipping.

On clicking the Add a Provider Account, the user or admin can add an account with a Shipping or Fulfilment Provider which will be visible under “Allowed Carriers,”.
While the admin configures the Shipstation Shipping module.

Ship From Location
Under this, the user configures the origin and return shipping address of the packages which shall be shipped through ShipStation.
To set the Ship From Location seller need to navigate through Account Setting > Shipping > Ship From Location as shown in the image below.

In the My Default Location, the user adds the Ship From Address details and the Return Address deatils.
The user can also set the address as a default address for managing the incoming order.
International Shipping:
To manage the custom information for each order that is imported with an international destination, the admin must navigate to Account Setting > Shipping > International Settings.

Admin Permissions- Shipstation Shipping
On successfully installing the OpenCart Shipstation Shipping, the admin can navigate through Extensions > Extensions > Shipping to set configurations
The OpenCart Shipstation Shipping is present in the given list of Shipping extensions, which the admin needs to select for further module configurations.
Clicking the Edit button for Opencart Shipstation Shipping, redirects the admin to Edit Shipstation Shipping page as shown in the image below.
Wherein, in the Edit Shipstation Shipping page, the admin needs to configure the following fields such as Title, API key, API Secret, Allowed Carriers, Weight Class, etc.

The admin can configure the Shipstation Shipping fields as under:
Title: The title or the name of the Shipstation Shipping, that will display on the frontend.
API key: The admin receives API key from the Shipstation’s official website.
API Secret: The admin receives the API Password from the Shipstation’s official website.
Allowed Carriers*: By default it includes Stamps.com which is already configured with Shipstation.
* To integrate additional shipping carries such as DHL, FedEx, , etc, the admin has to pay as they are paid services for the Shipstation Shipping.
*The admin can simply click on the Get Carriers, to add the shipping carriers while setting the configurations.
Weight Class: The admin adds a Weight class for the package such as ‘Gram’ in the above image.
Length Class: The admin also adds a Length Class for the package.
Tax Class: The admin can manage the taxes applied for shipstation.
Geo Zone: The admin can either choose All Zones, UK Shipping or UK VAT Zone.
Handling Fee: The admin may specify the Handling Fee amount. This amounts adds up with the shipping in the frontend and will not be visible, individually.
Status: The admin can Enable or Disable the status of the Shipstation Shipping.
Sort Order: The Sort Order for of the Shipstation Shipping.
Postal Code: The admin has to define a Postal code so as to ship the package.
3D Packaging Setting
By using this option, the admin can calculate shipping cost on the basis of dimensions(Length, width, height & weight).
3D visualization of box packing linked directly from your order shows you how to best pack your order.

3D Packaging Setting: The admin can enable/disabled the 3D Package Setting.
Shipstation Shipping Visibility: For Customers
In the frontend, the customers can make a purchase in a usual way.
The customer will have to login, choose the product(s) and add the chosen products to cart.

On adding the product(s) to cart a success message, “Success: You have added Black Jacket to your shopping cart.”
Thereafter, the customers can simply proceed to checkout by clicking the Chekcout option as shown in the image below.

In the Checkout page, the customers need to fill in the Billing and the Delivery Details.
Further, the customers will find the Shipstation Shipping method under Delivery Method.
As Stamps.com is set as a default carrier option for Shipstation Shipping, various USPS shipping options shall display under Shipstation Shipping method as shown below.

The customers can choose any option under Shipstation Shipping method to ship the products.
Thereafter, the customer can choose the Payment Method and proceed to confirm the order under Confirm Order option.
In the image below, one can see that the shipping method, which the customer chooses, displays under Confirm Order.
Also, if any handling fee is applicable, then it will get add to the chosen shipping method (it won’t display separately).
Suppose, the admin configures the handling fee as $20 and the customer chooses USPS Priority Mail Intl- Package bearing price $83.72.
The handling fee of $20 shall add up to the price of USPS Priority Mail Intl- Package, i.e. $83.72+ $20= $103.72
If there is any tax applicable according to the country then the tax will also be calculated with the shipping charges as shown in the below screenshot.

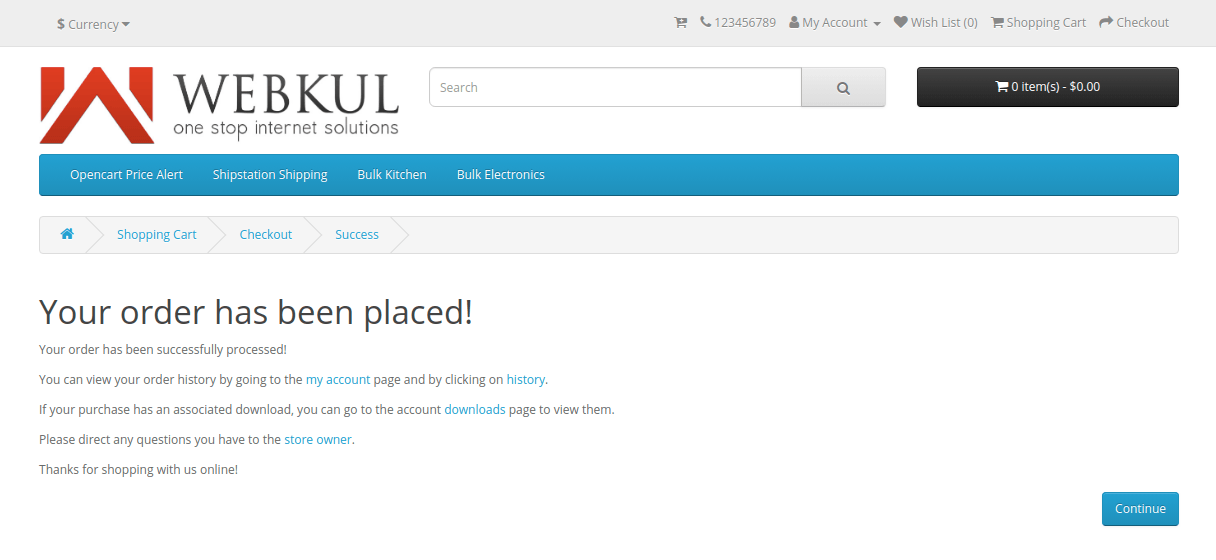
Further, on confirming the order, a success message shall display as shown in the image below.
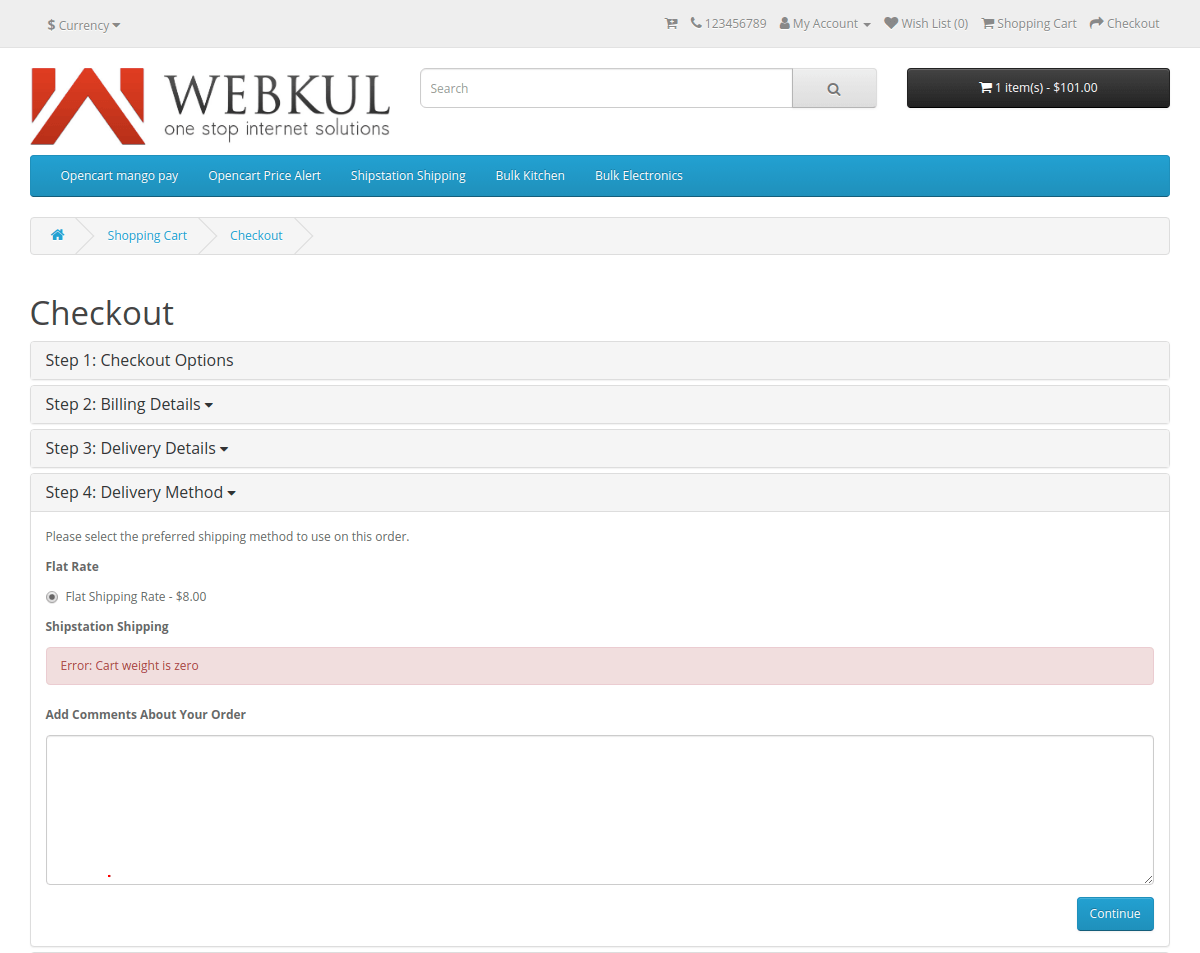
 Error Messages: When Product Weight is Zero or Negative:
The products of the order must bear some weight i.e. the weight of the product(s) should not be zero or negative.
When Product Weight is Zero:
If the admin sets the product weight as zero, an error message, “Cart Weight is Zero,” displays in the checout page as shown in the image below.
When Product Weight is Negative:
On setting a product’s weight as a negative value results in an error message,”Cart Weight is Negative,” on the checkout page as shown below.

Once the admin receives the purchase request, in the backend, the admin has to carry out the Export to Shipstation process.
Let’s see how the admin achieves this.
Export to Shipstation
Once the admin receives the purchase request, the admin has to carry out the Export to Shipstation process by navigating to Sales > Orders.
The Order List page opens up as shown in the image below, where the admin can choose the order.

The admin will have to click on the View tab for the respective order, which redirects the admin to the Order Details page of the order.
In the Order Details page, the admin must click on the Export to Shipstation tab as shown in the image below.

A success message, “Success: Order is successfully export to Shipstation” displays as shown in the image below.

Here, can check the order exported to shipstation.

Also, the Generate Label tab appears as shown in the image, once the export process is successful.
To generate the shipping label for the order the admin needs to click on the Generate Label tab.
The shipping label will gets preview automatically within the browser after clicking on the Generate Label button.
After that, the admin can download/print the shipping label.
This generates the label for the respective order as shown in the image below.
 On refreshing the page, a success message,”Success: Label generated successfully” shall display and the tracking number for the order will be visible as shown in the image below.

A packing slip for the respective order can also be generated as shown in the image below.

The admin can also print the Dispatch Note for the order.
To print the Dispatch Note, the admin needs to click on the Print Shipping List icon, present in the Order Details page.
An image for a Dispatch Note for Order #19 is shown in the image below.
 The customers in the frontend can view the tracking number under Account > Order History > Order Information, as shown in the image below.

Shipping Rate Calculation on Multiple Products
Here you can check how Shipstation will calculate the shipping rate if customer add multiple products to their carts.
Condition 1:
Product 1- Lenght 10, Width 15, Height 7.
Product 2- Lenght 20, Width 12, Height 5.
Then calculation will apply to only maximum values such as length 20, width 15, height 7.
And now it will calculate- length +2*width+ 2*height.
Note– After the calculation, if the limit exceeds more than 165 inches the customer will get an error.
Product 1- Lenght 10, Width 15, Height 7, Weight 16.
Product 2- Lenght 20, Width 12, Height 5, Weight 13.
Here the calculation will be applied based on weight such as length 20, width 15, height 7, and weight 29.
Note: If 3D Packing enable then this calculation will not work.
That’s all for the OpenCart Shipstation Shipping extension. If you face any issues, feel free to raise the issue and add a ticket at webkul.uvdesk.com.
Current Product Version - 2.1.0.4
Supported Framework Version - 3.x.x.x

Be the first to comment.