Opencart POS Customer Cart Screen provides customers with a transparent and interactive checkout experience.
With the help of a customer-facing display integrated with the Opencart POS system, cart activities are shown in real-time during checkout.
Customers can view complete cart details on the screen, including total amount, applied discounts, vouchers, and product quantities added to the cart.
Note: This module is an add-on to the Opencart Point of Sale (POS) System But firstly opencart Point of Sale (POS) must be installed in the system.
Check a brief overview of the plugin –
Features
- Customers can view the cart details in real-time on the customer screen.
- Description and slider images added by the admin will be displayed on the screen.
- The customer screen updates instantly with any changes made at the POS.
- The admin can set the background as image or color for the customer screen.
- The admin can add and manage the slider images and description.
- Admin needs to generate the Point of Sale (POS) user token.
- The module supports real-time synchronization using Socket.io or Google Firebase.
- Additionally, the POS screen can be enabled to display for customers during checkout.
Server Configuration
Before installing the module, it is mandatory to install Node, Socket, Express, and CORS packages.
Open a terminal and run the following commands:
npm install node
npm install socket.io
npm install express
npm install cors
npm init -y
Installation
First, extract the downloaded zip file. that opens the correct Opencart Version Folder. According to Opencart Version installed in your system.
Then, upload the admin, cart screen, catalog, composer.json, and system to the Opencart root directory.
Note: It is mandatory to run both commands of composer.json.
Therefore in the terminal, navigate to the same folder where composer files exist and run the following commands:
curl -s http://getcomposer.org/installer | php
php composer.phar install

Once you have uploaded the file then login to admin and go to Extensions > Extension Installer and upload the .zip file- opencartPOScustomerscreen.ocmod.zip.
The zip file can be found in the ocmod folder for 3.x.x.x version and .xml file for 2.x.x.x version.

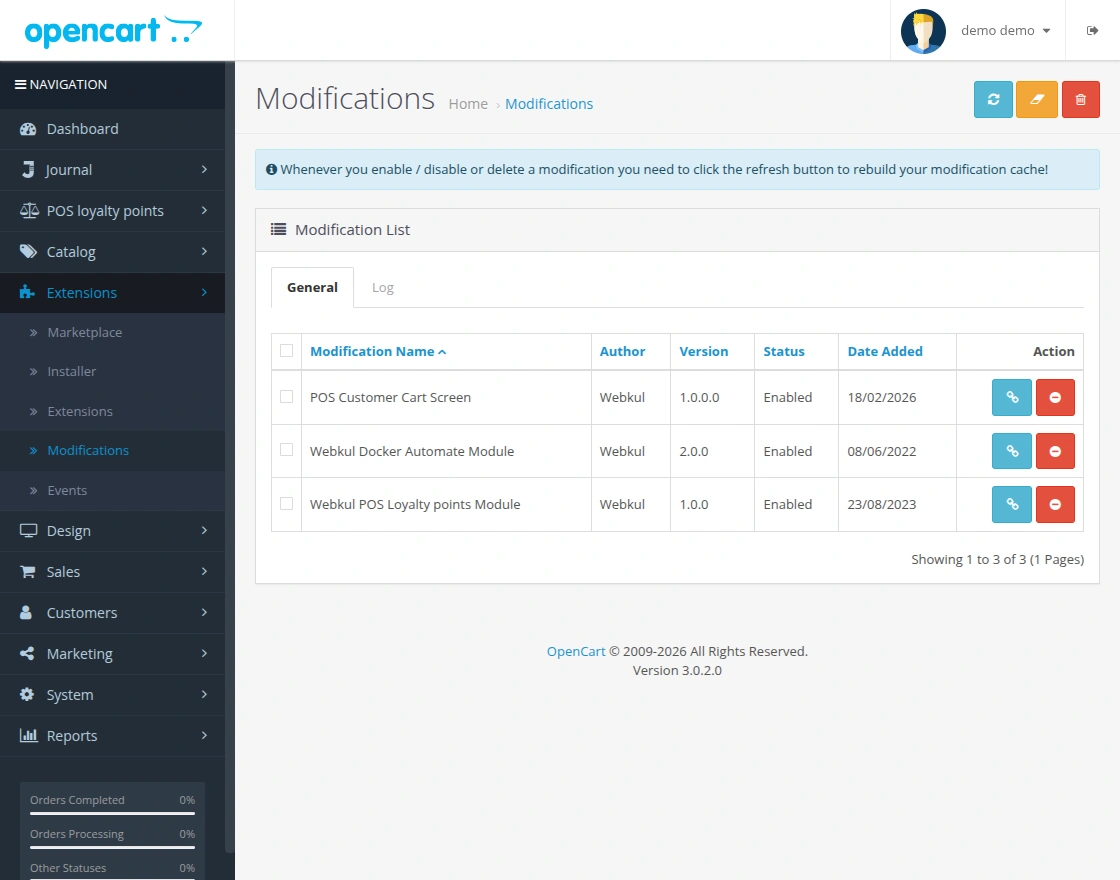
After uploading the zip file go to the Extensions > Modification and click on the refresh field.
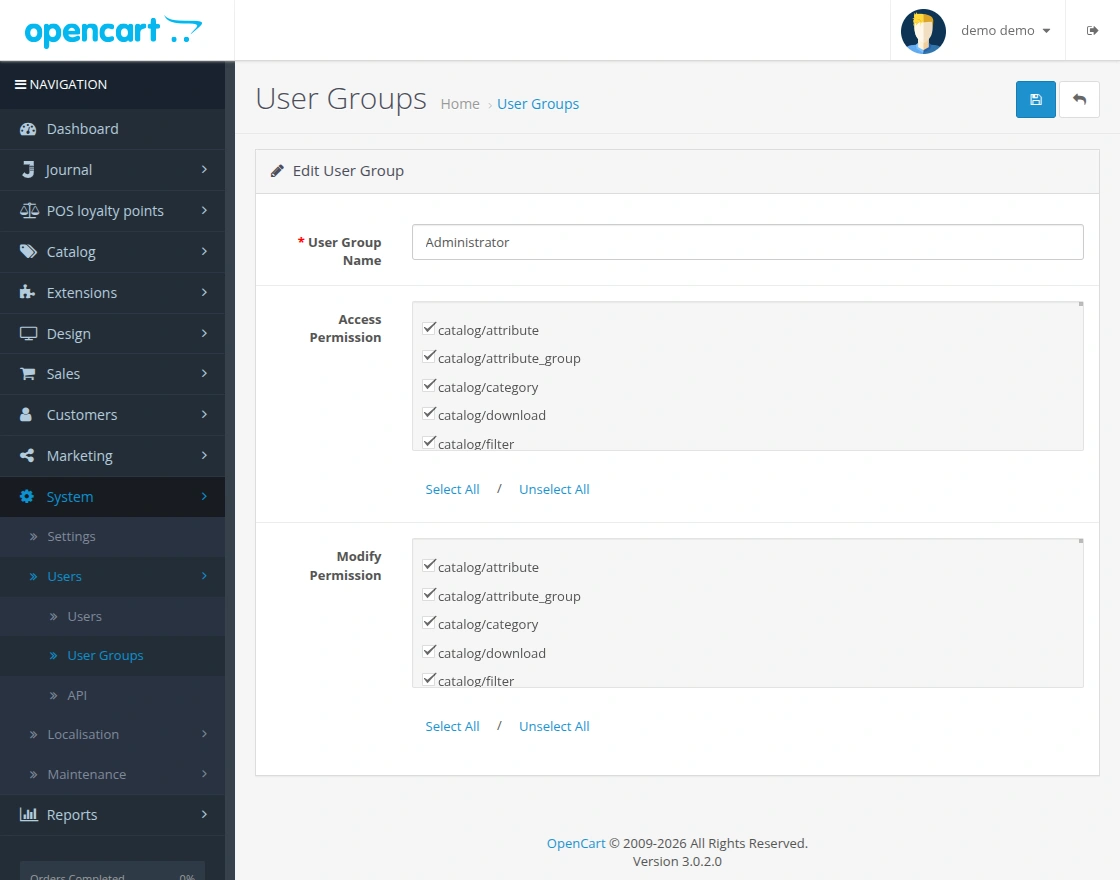
After that go to System > Users > Usergroups. And then edit ‘Administrator’.
Select the shown checkboxes for both Access Permission, Modify Permission and Save it.
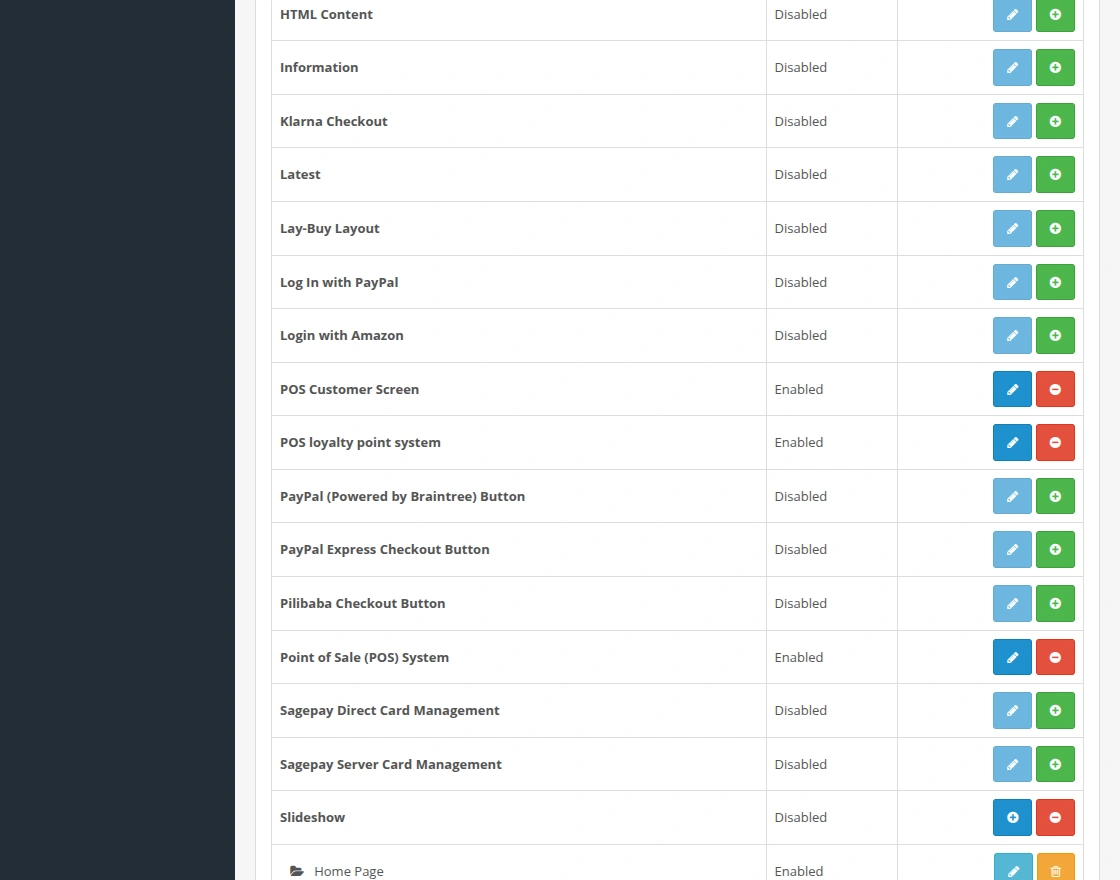
Now navigate to Extensions > Extensions > Modules. Find POS Customer Screen from the list. Click the Install button as visible in the screenshot below.

Server Setup with SSL and Node.js
1. Configure SSL in . env
To run the POS Customer Screen securely, you need to configure SSL certificates and start the Node.js server. Follow the steps below in .env file.
SSL_KEY=path/to/your/private_key.pem
SSL_CERT=path/to/your/certificate.pem
PORT=8080
APP_URL=https://your-domain.com
SSL_KEY→ Path to your private key file-
SSL_CERT→ Path to your SSL certificate file HOST→ Domain name or server IP where the app will runAPP_URL→ Complete URL used to access the POS Customer Screen
2. Install Dependencies
Inside your project root, install the required Node.js packages:
npm install
3. Start the Server
Run the Node.js server using:
node server.js
Note: This command must run permanently on the server for POS Customer Screen to work.
Opencart POS Customer Cart Screen Configuration
After the successful installation of the module, the admin can configure the POS Customer Screen settings from the admin panel.
To configure the module, navigate to:
Extensions > Extensions
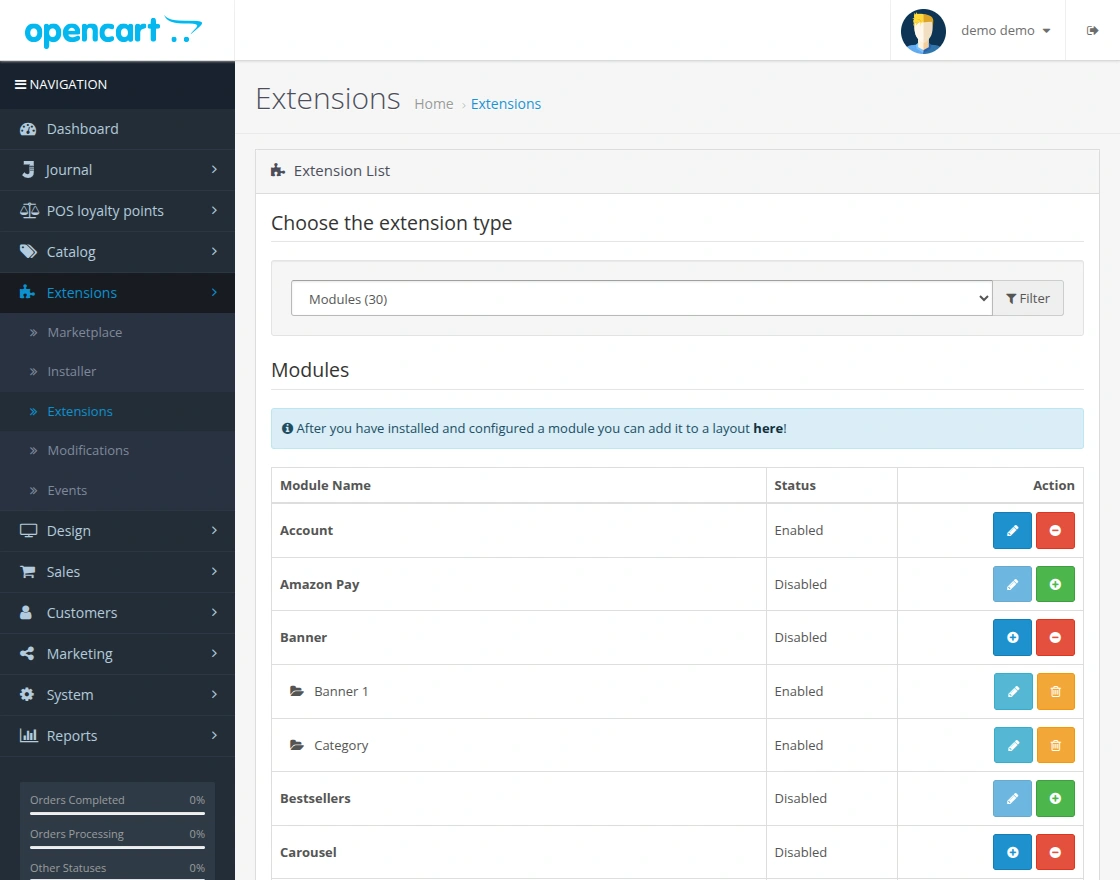
Now, select Modules from the extension type dropdown. The list of available modules will appear.
From the module list, find POS Customer Screen and click on the Edit button to configure the settings.

After clicking on the Edit button, the admin will be redirected to the module configuration page where all the settings related to the customer screen can be managed.
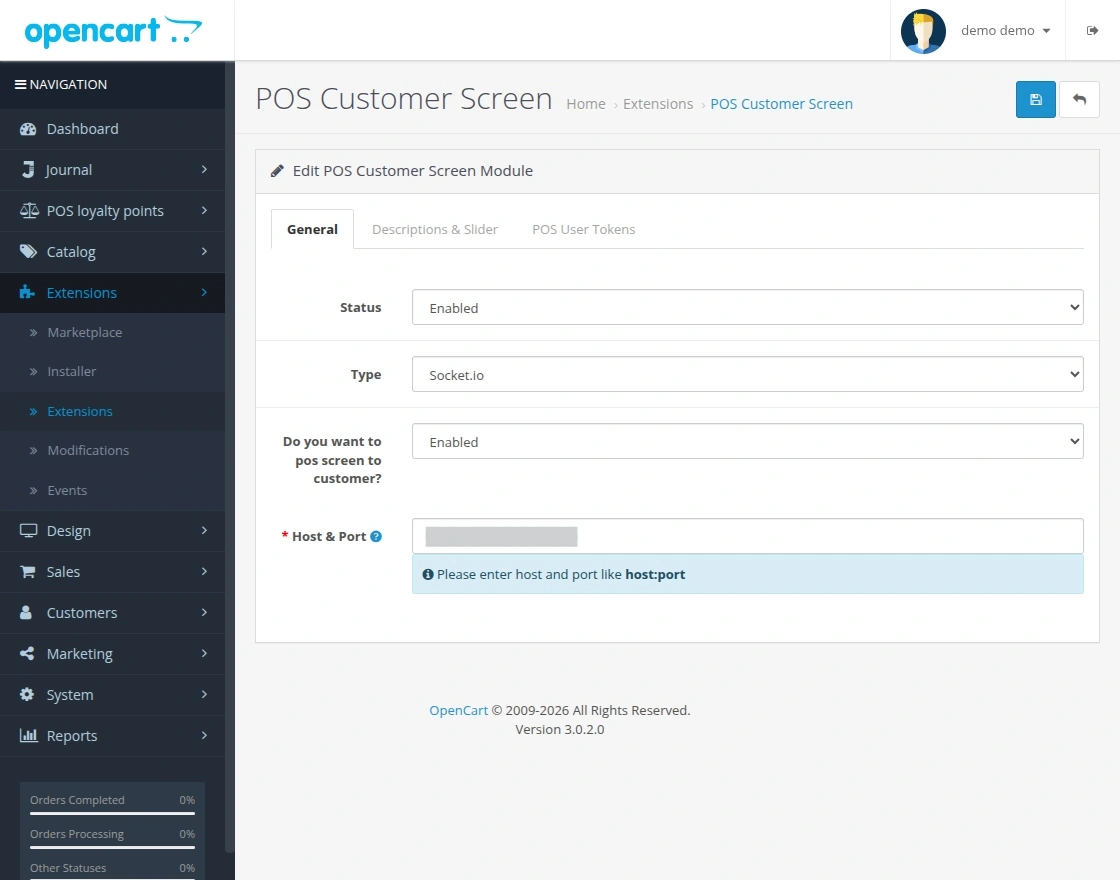
General Tab Settings
In the General tab, the admin can configure the basic settings for the POS Customer Screen.
Status:
Admin has to enable the status to use this module.
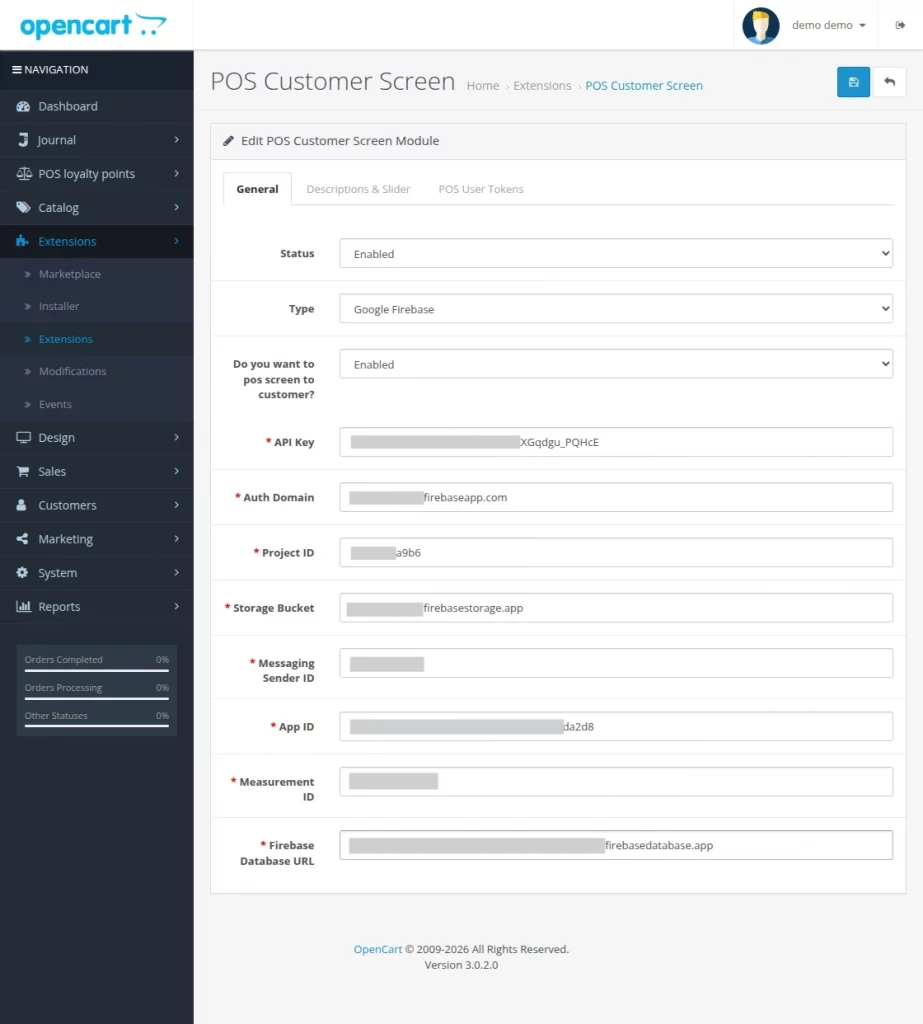
Type:
Admin can select the connection type for real-time synchronization. The module supports two types – Socket.io and Google Firebase.
Do you want POS screen to customer?:
Admin needs to enable this option to display the POS screen on the customer display.
Socket.io Configuration
If Socket.io is selected:
Host & Port:
Admin needs to enter the host and port of the POS server in the format host: port to establish the real-time connection between POS and the customer screen.
Google Firebase Configuration
If Google Firebase is selected, the admin needs to enter the following details:
- API Key – Connects the application with Firebase.
- Auth Domain – Firebase authentication domain.
- Project ID – Unique project identifier.
- Storage Bucket – Firebase storage location.
- Messaging Sender ID – Used for messaging services.
- App ID – Application identifier.
- Measurement ID – Used for analytics tracking.
- Firebase Database URL – Realtime database URL for data synchronization.
These details enable real-time data synchronization between the POS and the customer screen.
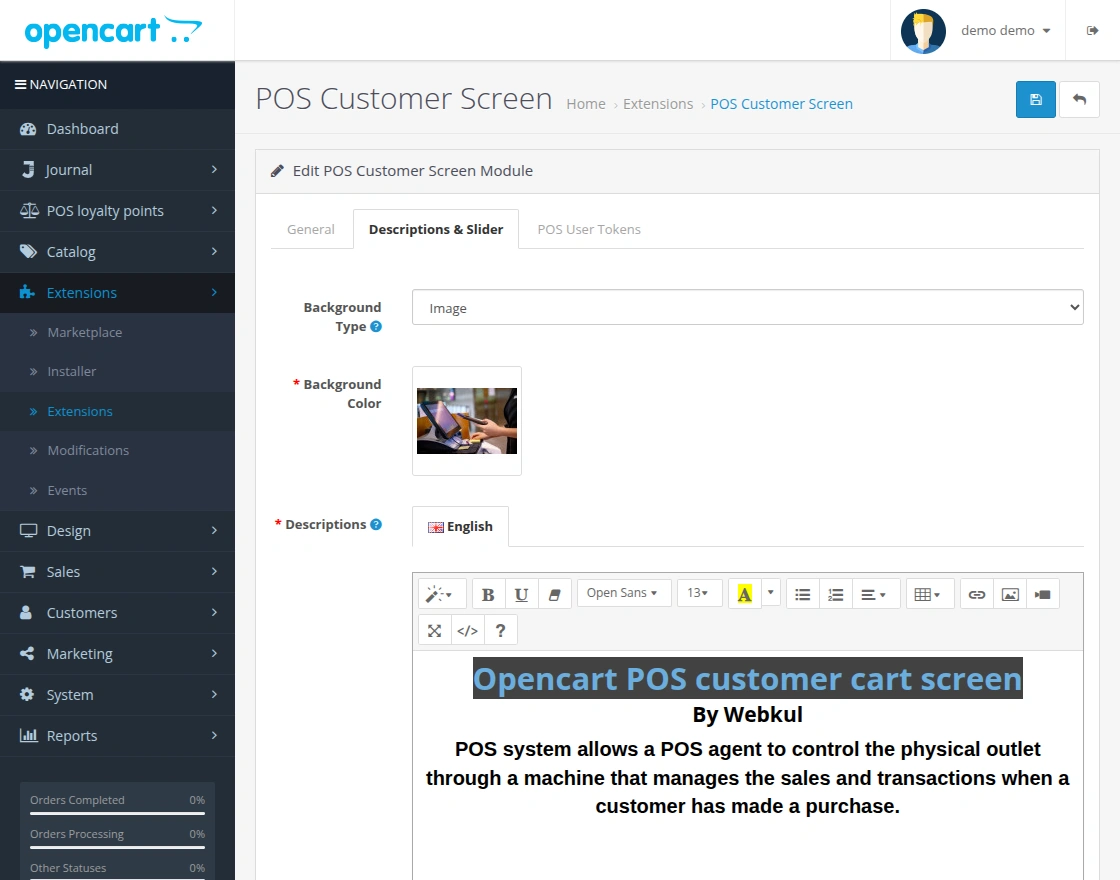
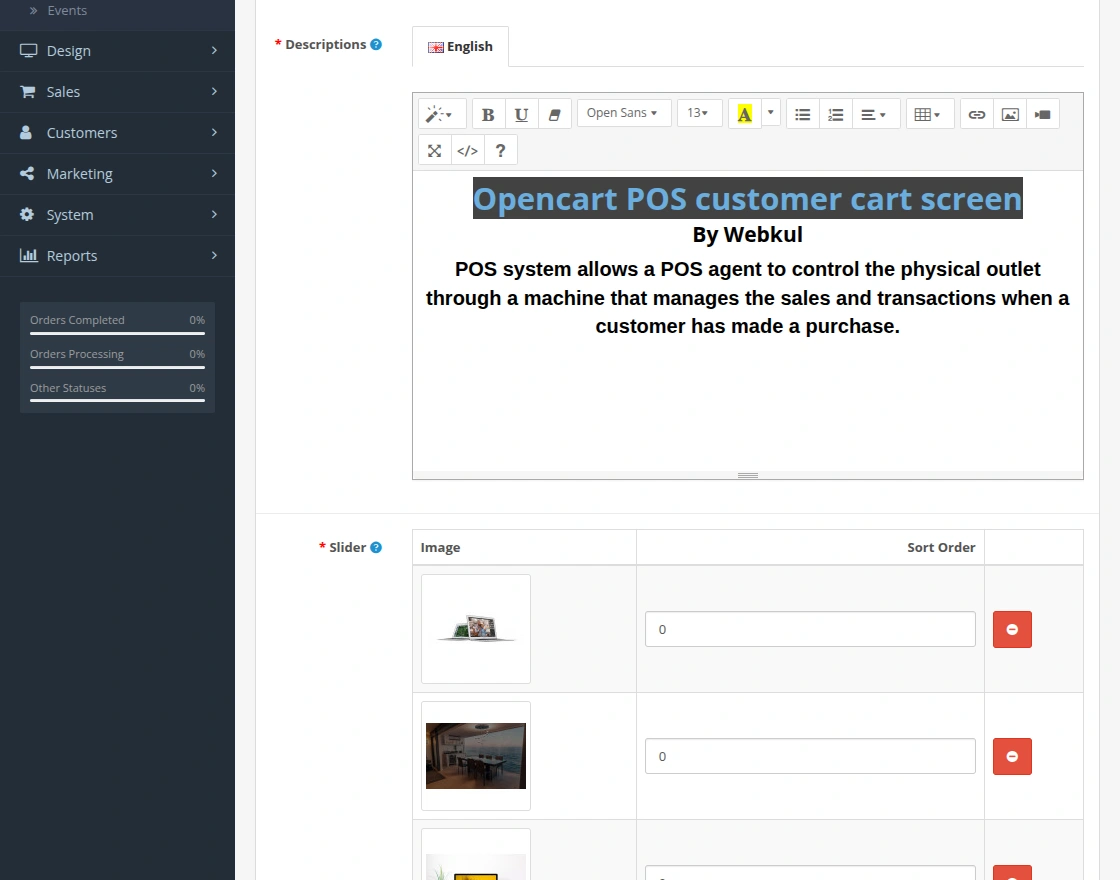
Descriptions & Slider
In this tab, the admin can manage the content and appearance of the customer screen.
Background Type:
Admin can select the background type for the customer screen. The background can be set as Image or Color.
Background as Image:
If the admin selects the image option, they can upload a background image for the customer screen.
Background as Color:
If the color option is selected, the admin can choose a background color for the customer screen.
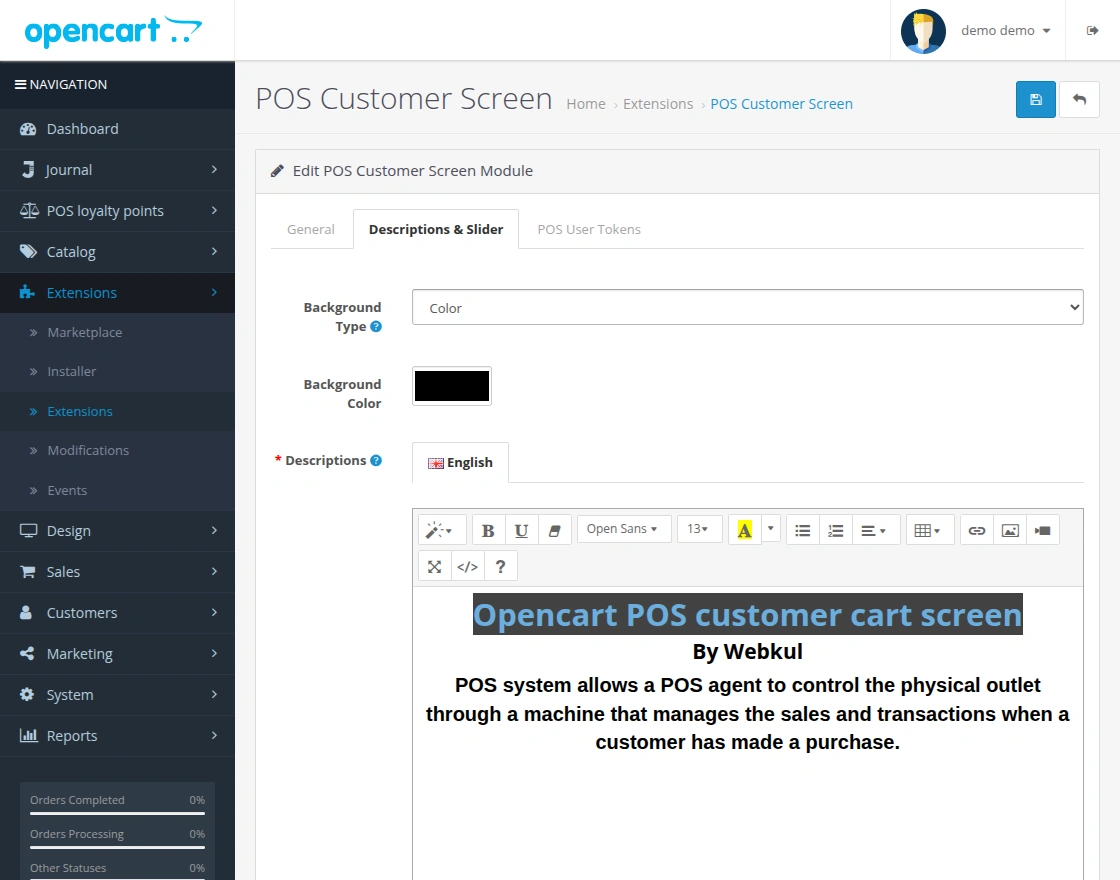
Description:
Admin can add and edit the description that appears on the customer screen.
Slider:
Admin can add multiple images and set their sort order. These images will be displayed in the slide bar on the customer screen.
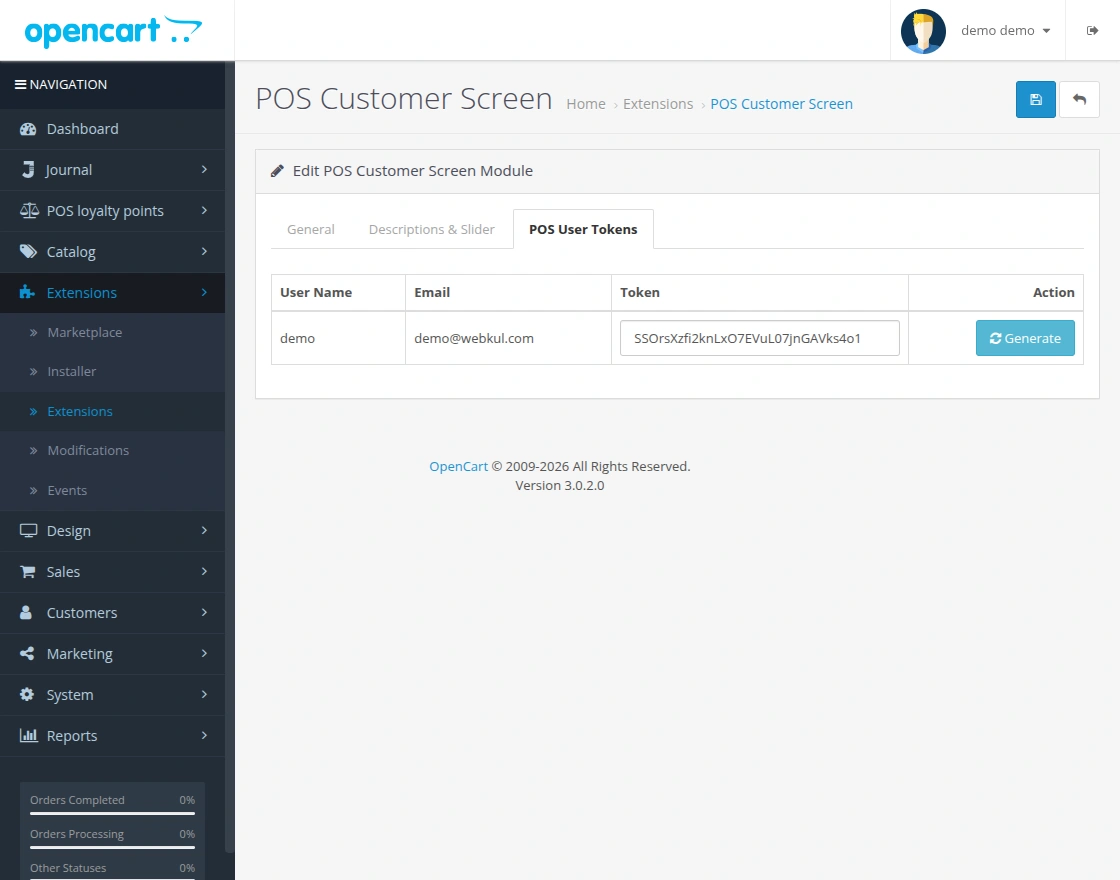
POS User Tokens
In this tab, the admin can generate and manage POS user tokens required for connecting the customer screen.
User Token Generation:
The admin needs to click on the Generate button to create a unique token for the POS user.
This token establishes a secure connection between the POS system and the customer screen.
Token Details:
The admin can view the user name, email, and the generated token for the respective POS user.
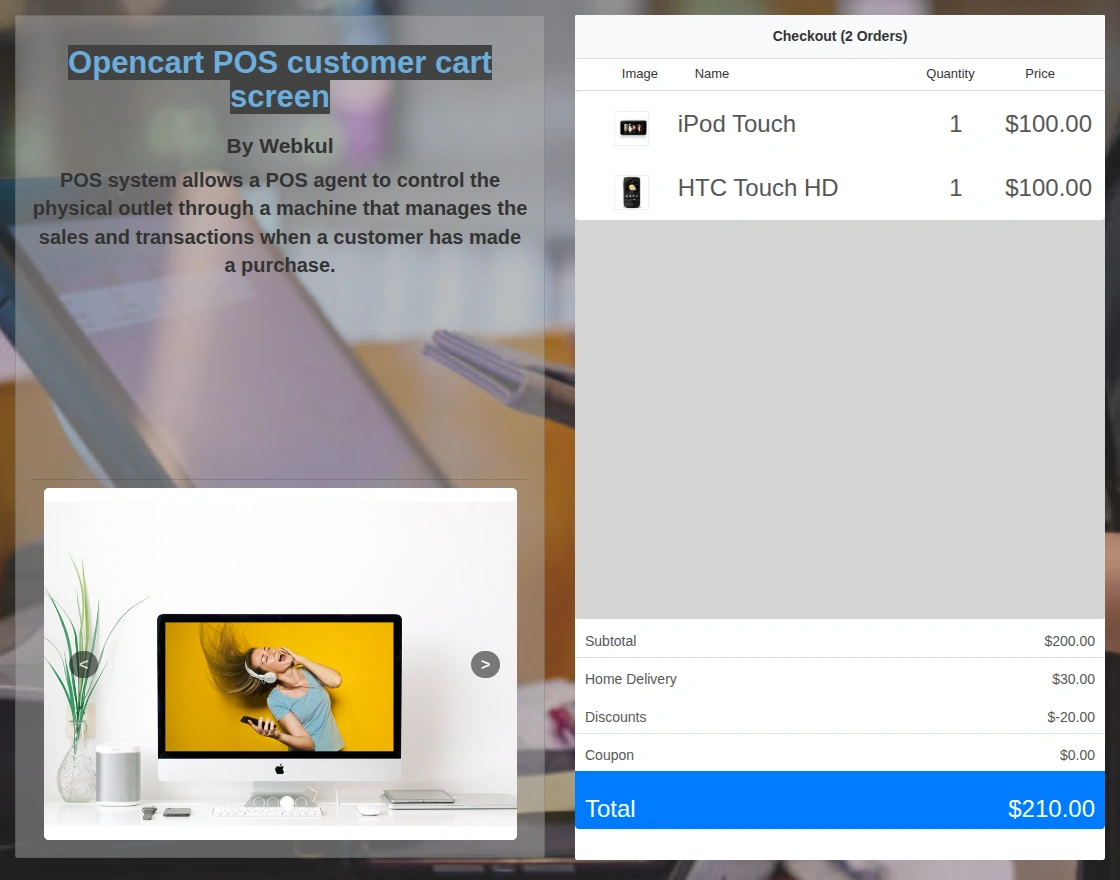
Opencart POS Customer Cart Screen – Customer View
After completing the configuration from the admin panel, the POS user can start processing orders from the POS interface.
The POS user can browse products and add them to the cart. The system instantly updates the selected products, quantities, and total amount.
The user can also perform actions such as selecting a customer, applying discounts or coupons, holding orders, or proceeding to checkout.

Customer Screen View
When the POS user adds products to the cart, the system displays the order details on the customer screen in real-time.
The customer can see the product name, quantity, price, and the final payable amount. The screen instantly reflects any changes at the POS, such as product updates, discounts, or coupons.
The screen also shows the configured background, description, and slider images to create a more engaging customer experience.
Support
If you have any questions, suggestions, or customization requests, feel free to contact us at [email protected] or submit a ticket at webkul.uvdesk.com.
Current Product Version - 3.0.0.0
Supported Framework Version - 3.x.x.x

Test comment