Introduction:
OpenCart DHgate Dropship Connector allows the website owner to import products from the DHgate(website).
Apart from that, the admin will be able to assign the imported products to the warehouses.
Also, price rules apply to the products that get import from DHgate or when created by the Warehouse managers.
DHgate provides a platform that works to facilitate the sale of manufactured products from suppliers to small and medium retailers.
It is the largest B2B-cross-border e-commerce trade platform in China.
Prerequisite:
- You must have installed the Google Chrome extension – DHgate Product Importer Chrome
- Enter the Google Maps API key ( Google Cloud Platform Console ) in the module configuration settings. It allows for setting up the store location automatically (Latitude and Longitude automatically).
Note:
- This module supports all templates and themes including the Journal theme.
- The module supports the Multi-Store feature of default Opencart.
- This module will not work on AWS & Google Cloud servers.
- Do the SSH login & run the following command.
- curl “https://www.dhgate.com” -H “User-Agent:example.com”
- If this command result is showing HTML content of the page then this module will work on the server else if the command result is showing as blank then the Dhgate doesn’t support the server.
Watch the video to understand the extension workflow:-
Features
- Import products from Dhgate marketplace to your OpenCart store.
- One can import products with variations from DHgate and these variations are created within the OpenCart store as well.
- Allow Warehouse Managers to add products under their account panel. Product approval for products added by the warehouse managers.
- Configure product fields that are accessible for adding products by the warehouse managers.
- Import Product reviews for the DHgate products and choose to enable them or keep them disabled even after importing.
- Add new keywords that allow removing the keywords collectively from the DHgate products.
- Add the imported products after choosing the store where products.
- The language in which the product’s name, description, etc, is to be chosen, will add into while importing the products from DHgate to the OpenCart store.
- Select the default quantity of the products which is set for each product while importing the same from the DHgate store.
- Enable/ disable the option for pushing the products directly to the OpenCart store without any approval.
- Option to generate multiple tokens for the OpeCart store authorization before importing the products.
- Option to set the order status which must be ‘Complete’ for warehouse product’s order.
Getting API Keys for Google Maps
To get an API key:
- Go to the Google Cloud Platform Console and log in with your Google account.

- Click the project drop-down and select or create the project for which you want to add an API key.

- Click the menu button and select APIs & Services > Credentials.

- On the Credentials page, click Create credentials > API key.
The API key created dialog displays your newly created API key.
- Click Close.
The new API key is listed on the Credentials page under API keys.
(Remember to restrict the API key before using it in production.)
Installing DHgate Product Importer Chrome Extension
1. Navigate to the Google Play Store link – DHgate Product Importer Chrome extension and then tap the Add to Chrome button.

2. Tap on the Add Extension button.

3. You can see that the extension has been installed successfully on the top right-hand side of the browser next to the address bar.

How to Import Products Via DHgate Chrome Plugin
After that, successful installation of the Product Importer, the plugin is visible on the top right-hand side of the chrome browser next to the address bar.
To import the products from DHgate, first, navigate to the DHgate.com website and go to the category or any of the product pages.
Here, the products can get import in two ways –
- One by One or in
- Bulk
But before importing the products we have to authenticate our store by entering the Username and the Token, which is a one-time process.
For importing products one by one you can tap the Importer icon on the product that you want to import.
After this, a pop-up will appear. Enter the Username, Token, and tap the Submit button to verify your store first.

Both of these values can be found in the module configuration settings for the extension as shown below in the snapshot.

After tapping the Submit button, and Authentication done Successfully message gets on screen.

Now, tap the Importer icon to import a single product first, and a message that “Product Details Have been Fetched” is visible.

And then you can see the Edit This Product pop-up. Tap Submit to import the product to the OpenCart store.

After this, you will see a success message after the product gets imported. You can edit the product price as per requirement or any other data in the description.

Now, in the admin backend panel navigate through DHgate Management ->DHgate Products. Here, the admin will find the product which get import.

To import the products in bulk, select the products to import and tap the Bulk Import floating button on the right-hand side of the webpage.

The bulk import option allows you to import multiple products but you need to tap the Submit button for each before importing. So that there’s no need to tap the importer icon again and again.
Configuration Settings
After the successful installation of the extension, the admin will navigate through Extensions->Extensions->Modules->DHgate Dropshipping and will tap the Edit button present against the module name.

This brings up the configuration settings for the module as per the snapshot below.

Here, we have three tabs that are required to be configured before using the module.
- General
- Product and
- DHgate
Under the General Tab, the admin will –
- Enter the Google Map API. The API key, which helps locate the Latitude and Longitude of the Warehouse location which the admin needs to add.
- Choose a User Group from the drop-down of users that will be the user group of the warehouse.
- Select an order status that will be supposed to be a complete order for the warehouse products.
Product
Under the product tab, the admin will configure the settings for the products for the different warehouses.

Here, the admin will –
- Warehouse Manager Can Add Product
Select a Yes to allow the Warehouse Managers to add products under their warehouse account panel else select No to disallow warehouse managers to add products. - Direct To Store
Select Enabled to push the products directly to the OpenCart store (visible at frontend) without any approval else select Disabled to enable the approval first. - Approval Required After Adding Products
Select Enabled to approve the products that have been added by the warehouse managers else select Disabled to approve them first. - Product Field Tabs
Select the product field tabs that the admin wants the warehouse managers to use while creating products. Only the chosen fields will be available to the warehouse managers.
DHgate

Under this tab, the admin will be able to configure –
- User Name
Enter a user name, that authenticates the Chrome extension. It can be set as need be. - Token
The admin generates a token used to authenticate the Chrome extension. On refreshing the page, the admin can generate a new one. - Default Quantity for Importing products
The admin can set the default quantity and assign it to the products which the warehouse managers add or import from the DHgate website itself. - The default language for adding products
Select the language in which the product name, description, etc, will be set while importing the products from DHgate. - Import Review of the product also
Select Enabled to make visible the Imported product reviews at the storefront else select disabled to make admin approval of the reviews first before making the reviews visible. - Default Store
Select a store to add the product after completion of the import process. - Remove Keywords
Here, you can add new keywords which omit from the product’s name, meta-description, description, etc. while importing via DHgate.
After configuring all three tabs the OpeCart Dhgate Dropship Manager is ready for use, just tap the Save button at the top right-hand corner.

DHgate Management —

Warehouse Management
Under this section, the admin will be able to manage the warehouses.
Further, the admin can create multiple warehouses, edit or delete them. Moreover, apart from that, the admin can assign products to the warehouses.

Create Warehouse
To create a warehouse, tap on the Add button on the top right-hand side. This brings up the section to create a warehouse.

Here, the admin will –
- Add the Code for the Warehouse.
- Enter the Title for the warehouse.
- Set the Description for the warehouse.
- Select a User for this particular warehouse.
- Choose the Origin Country of the warehouse.
- Select Origin City.
- Add Origin Street for the warehouse.
- Enter the Postal Code.
- The latitude and longitude values for the chosen origin country and state are auto-filled (through the API key in the module configuration settings).
- Choose the status of the Warehouse as Enabled or Disabled as required
- Lastly, choose the applicable shipping methods that will be available for this warehouse.
- Tap the Save button thereafter.
After creating a warehouse, the admin can see a success message for the same.

To assign products to the warehouse tap the Assign Products button next to the edit option for the respective warehouse.

This brings up the section to assign the products to the warehouse with their quantity.

The admin can assign the products to this warehouse by selecting them and entering the quantity for the respective warehouse.
Furthermore, for assigning the products, the admin needs to enter a quantity in the Quantity tab. On saving the details, it assigned the products to a warehouse.
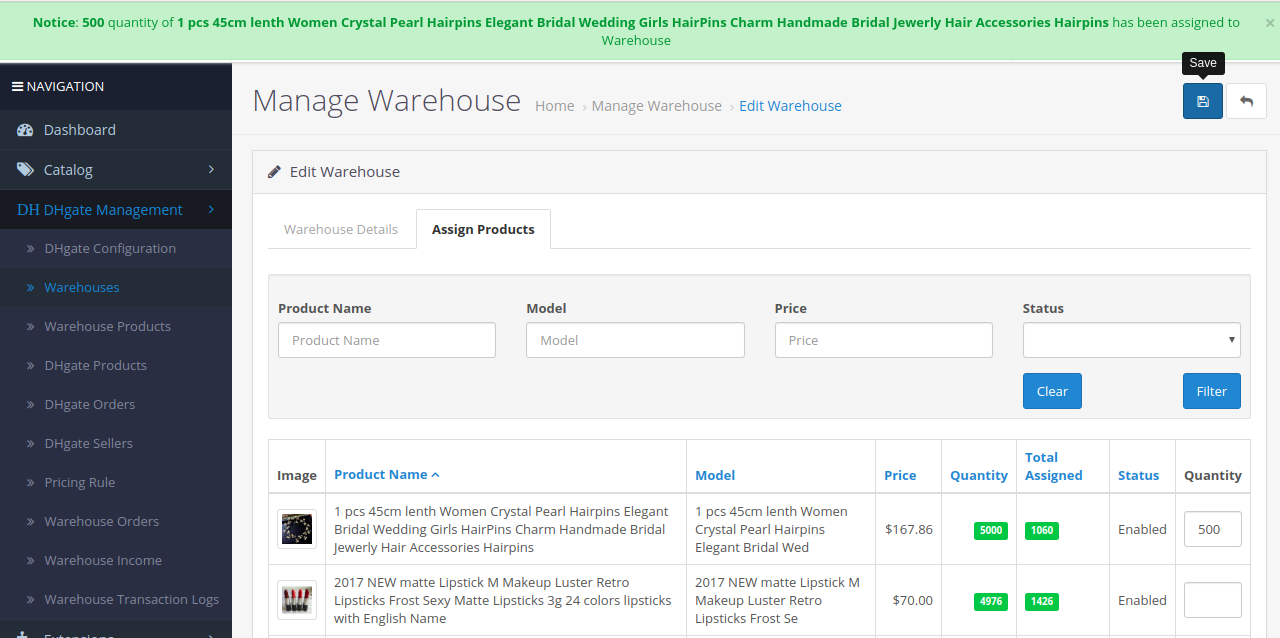
Hence, on assigning the products, a message shall display on top of the Manage Warehouse page. Assign products gets notification too.
Warehouse Products
Under here, the admin will be able to view all of the products that have been assigned to the various warehouses.
Here, the admin will be able to approve, disapprove, and delete and the products which will get assign to the various warehouses.

DHgate Products
Under this section, the admin will find all of the DHgates products after completion of the import process from the Dhgate web store’s category or product pages.

The admin can also edit the imported products by tapping the Edit button under the Action column.
After editing the product details, the admin can tap the Save button to save the changes.

Apart from that, the admin can also Update the DHgate products by tapping the Update button.
This navigates the admin to the DHgate’s store’s respective product page.
Thereafter, the admin can sync the product data again to update it (same as importing products from DHgate).

Pushing Imported Products to OpenCart store’s Catalog
Subsequently, the admin can first select the products and then tap the “Push the products to Stores Catalog” button, next to the Delete button even before pushing the import products to the OpenCart store’s catalog.

Thereafter, the list of products will display on the store frontend and the customer can purchase it.
Completing Order Process at DHgate Website?
After adding the product (DHgate) to the cart, the customers can proceed to checkout.

After tapping on a product, the customer can view the details of the product as shown below in the snapshot.

Further, the customer will select the options of the product and can add the product to the cart thereafter.

Lastly, to place the order the customer will tap the Confirm Order button within the OpenCart web store.

After placing the order for the DHgate product, the order is visible under the Dhgate Orders section in the admin backend panel.
The admin will now tap on the cart icon under the Place Order column.

Note :
- The admin needs to have an account at DHgate.com to place the order at DHgate.
- Also, the admin must use the same Chrome browser that was used was initially for installing the product importer & then importing products from DHgate to the OpenCart store.
On tapping the Cart icon, it redirects the admin to the DHgate website for completing the order at the DHgate website.

At the time of redirect, the details of the particular order are also visible within the Product Importer icon (after tapping the icon).
Thereafter, as in the above DHgate page, the admin will see that the product is automatically get plus into the cart.

Further, it auto-redirects the admin to the cart page.

After that, the admin can log in and can view the shipping details, which enters automatically (after logging in)
Else, the admin will have to log in first (on the pop-up that appears).

Lastly, it auto redirects the admin to the Review Your Order page to enter the card details to Place & Confirm the order.

In conclusion that’s how the admin of the Opencart website can complete the order placed at the DHgate website.
DHgate Orders
Under this section, the admin will be able to check all of the orders that the customers place for the imported DHgate products, listed on the Opencart web store frontend.

Here, the admin can see the name of the customers who place the order for the DHgate products, the order total, date, and the DHgate Order Status, and a section for placing the order at the DHgate web store.
After a customer places the order for the DHgate products, the order gets listed under this section.
After that, the admin will have to manually tap the Cart icon under the Place order column to place the order at DHgate online store.
Above all, admin must have an account at DHgate to do so.

Here we have 3 different Dhgate Orders Statuses –
- Not Placed – If the admin has not even once been redirected to the DHgate website for the respective placed order then the order status will get as Not Placed.
- Processing – If the admin gets redirected but does not place the orders at DHgate then the order status will reflect as Processing.
- Placed – If the admin gets redirected and has made a complete checkout at DHgate for the respective order then the status will be reflected as Placed.
If the admin is already logged in, then the admin will be redirected to the checkout page. Now the admin will make the payment and place the order.
Dhgate Sellers
Under this section, the admin will be able to see a complete list of Dhgate sellers whose products have been imported from Dhgate to the OpenCart store.

Here, the admin will be able to –
- See the Dhgate Seller Names.
- Check the date when products will get add.
- Total Number of products that will get import for each of the respective sellers.
- View/ Update and Edit the products which the sellers import.

Pricing Rules
Under this section, the admin of the website can find a list of pricing rules. If it’s the first to use, then this section will be empty.

Create New Pricing Rule
To create a new pricing rule tap the Add button at the top right-hand side. This brings up the section to create a new rule.

Here, the admin will have to –
- Enter the name for the pricing rule so that it is recognizable.
- Choose the Channel for which the pricing rule will apply like – DHgate products or Manual (for own/warehouse added products).
- Enable or Disable the status of the pricing rule.
- Set the Price range From and Price Range To Values within which the products will fall so that the pricing rules will apply.
- Choose the Operator type as Increment(+) or Decrement(-) and accordingly, the price adds up or is subtracted from the product’s actual price.
- Select the Amount Type as Percentage or Fixed as need be.
- Enter the Amount that should apply to choosing Percentage.
Lastly, tap the Save button to save the price rule and the admin can see a success message for the same.

Note:
If a price range is already in use then you must choose a different price range so that the values don’t belong in the range of present price rules.

Application of the Price rule to the products?
Example: If the cost of the product at Dhgate is $100, now while the admin creates a price rule that ranges from $1-$500, the operation is chosen as (+), and amount type as Fixed ($200), Then in this case –
- When the product will get import from the DHgate store to the OpenCart store the price of the product increases by $200.
Similarly, if the rest part is the same as the above example but the operation is (–), in this case –
- When the will product get imports from the DHgate store to the OpenCart store the price of the product decreases by $200.
Warehouse Orders
Under this section, the admin will be able to check all of the orders that customer places for the warehouse products.
Above all, this includes the admin assigned (default and DHgate products), warehouse manager creates products.

Here, the admin can view different details regarding the orders which the customers place under the different warehouses.
For any particular warehouse, the admin can tap the View button under the Actions column to check the details of the particular orders.

Subsequently, the admin can filter the warehouse orders using the –
- Order Id
- Warehouse
- Warehouse Code
- Order Date
- Order Status
Warehouse Income
Consequently, under this section, the admin can check the warehouse’s income.

Warehouse Transaction Logs
Meanwhile, the admin will be able to check the transaction logs of all the warehouses within the OpenCart DHgate Dropship connector transaction log section.

Support
Moreover, in case you need more information or require any customization for the OpenCart DHgate Dropship connector, then kindly shoot an email to [email protected] or raise a ticket at our HelpDesk system.
Current Product Version - 2.0.0.5
Supported Framework Version - 3.x.x.x

Be the first to comment.