This Opencart extension allows the customers to select the Canada Post shipping method for their product delivery. The Opencart Canada Post Shipping extension calculates the shipping rates using the API.
Moreover, it displays the estimated delivery time & shipping cost of each Canada Post shipping service.
Now, Configure tax class, geo zones, delivery time offset, applicable countries, and select shipping services. Even, the admin can set the minimum order amount for availing the free shipping.
Notes:
- The estimated delivery time shows for Canada, the US, and some other International addresses.
- The shipping rates are based according to the delivery details and product weight.
- If the weight of the product is zero, this shipping method will not work.
- An active Business Purpose Canada Post account is required for getting the API credentials.
Check a brief overview of the plugin –
Features
- Enable/Disable Canada Post Test Mode for debugging.
- Include Tax Class with Canada Post shipping.
- Allows selecting Geo Zones for Canada Post shipping.
- The admin can select the Canada Post shipping services.
- Select the Applicable Countries for Canada Post shipping.
- Show/Hide Estimated Delivery Time to customers.
- Show/Hide Canada Post shipping error message to customers.
- The admin can add an Estimated Delivery Time Offset.
- Choose Free Shipping Method for Canada, USA, other International countries.
- Configure Handling Fee – Fixed or Percent based.
- Set Minimum Order Amount to avail Free Shipping.
- Support multiple languages translations
- Source code is open for customization
- Admin can generate a shipping label for the product.
- The admin can also generate the tracking number for the customer to track the products.
- The custom address option is available in the origin address option.
- Shipping title is also available in multiple languages.
- The custom error message option is available for the error that occurs in the rate calculation.
Installation
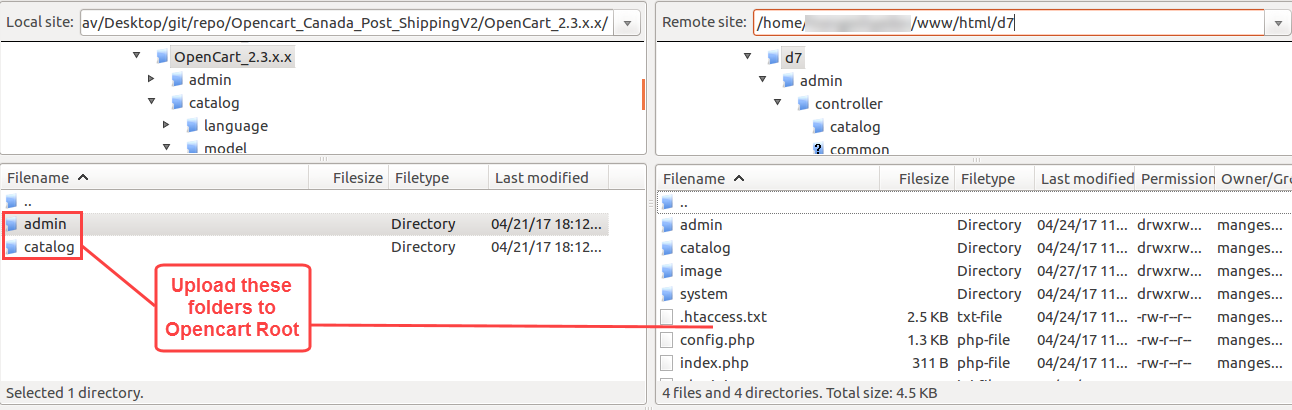
Upload Folders
First, extract the downloaded zip file. After that, open the correct Opencart Version Folder. According to Opencart Version installed in your system. Then, upload admin and catalog folders to the Opencart root directory.
Install-Module
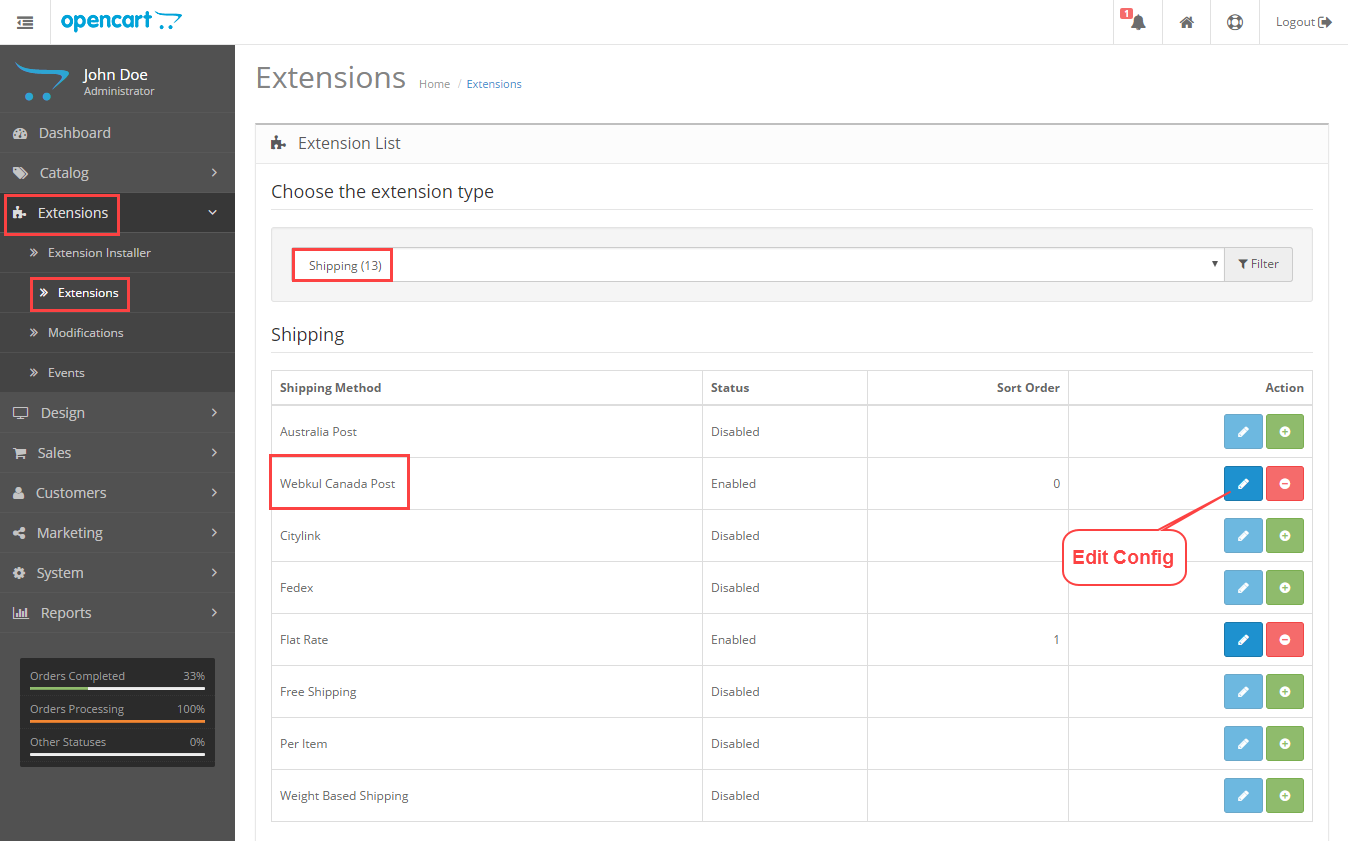
Now, navigate to Extensions>Shipping. Find Webkul Canada Post from the list. Click the Install button as visible in the screenshot below.

Language Translation
Furthermore, the module supports multiple languages, please click here to read about Opencart language installation and translation.
How to get Canada Post Credentials
Before doing the module configuration, the admin needs to have the Canada Post credentials. The admin needs API Key, API Password, Customer Number, and Contract Id (if any). Please Note: – You need Business Purpose Canada Post account to get these credentials.
Create Account:
First, click here to visit the Canada Post homepage. Then the following page will appear, now click on Sign In and then click Sign Up to create a new account.

After clicking the Sign-Up, the following page will appear. Now, fill in the information as required. Please make sure to select Yes for Is this account for business purposes?

Now, Choose Profile Type as Small Business, and click the Select and continue button.

And in this step, enter your contact information- business address, phone, first & last name, job title, etc. After filling in all the necessary information click Continue.

After providing the contact information, now you will get your Canada Post Customer Number. Please save this as it will be required for the Opencart module configuration.

Now, you will arrive at the dashboard page after clicking continue in the previous step. Navigate to Business Solutions>Developer Program.

Then the following page will appear after clicking the Developer Program. Forthwith, click Join Now for creating API Key and Password.

A pop-up window will appear about the Canada Post Developer Program Agreement. After reading the document, please click Agree and Continue.

Finally, you can now have your API Key and API Password. There will be two types of credentials, one for the Development (Test/ Sandbox Mode) and others for Production (Live).

Module Configuration
After the module installation, the admin needs to do the Opencart Canada Post Shipping configuration. Now, navigate to Extensions>Shipping and find Webkul Canada Post from the list. Then click the Edit button as visible in the screenshot below:
After clicking the Edit button, the following page will appear. Then the admin will find two tabs – General and Advanced Shipping Configuration for this module.

General Shipping Configuration
Shipping Title – Now enter the shipping title in the desired language.
API Key – Then put your Canada Post Account API Key.
API Password – Enter your Canada Post Account Password.
Customer Number – After that fill your Canada Post Customer Number.
Contract Id (if any) – Thereafter Enter the Contract Id if applicable.
Test Mode – Now select Yes to use the testing mode for finding any errors/bugs. Select No for production mode and go live.
Tax Class – Then select the tax class to include with this shipping method.
Geo Zone – After that Pick the geo zones for this shipping method.
Services – Now, select which shipping services to offer to customers.
Custom Error Message – Then enter the error message which will display in case of error occurs in the rate calculation.
Origin Address – If you select the store address option then the default store address will be used for Canada post shipping origin address else you can add the different address using the custom address option.
Canada Post Shipping Status – Now, set the Canada Post Shipping Method status as Enabled / Disabled.
Sort Order – Then, enter the order sequence of the Canada Post Shipping Method.
Advanced Shipping Configuration

Shipping Countries – Elect the applicable countries, where Canada Post Shipping is valid.
Show Estimated Delivery Time – After that select Yes /No to show the estimated delivery time at the front end.
Display Error to Users – Then decide Yes/ No to show the error message to the users.
Delivery Time Offset – The admin can add additional offset time in estimated delivery.
Method For Canada (Free) – Select which shipping service to use for free shipping in Canada.
Free Method For USA – Determine which shipping service to use for free shipping in the USA.
Free Method For International – Decide which shipping service to use for free shipping in other international countries.
Handling Fee Status – Select Enabled/ Disabled to apply handling fee with this shipping method.
Calculate Handling Fee – Determine how to calculate the handling fee amount – Fixed or Percent.
Fee Amount/Percent Handling – If Fixed, the entered value here will be the handling fee. Else, the Percentage of shipping cost will add as the handling fee. For eg. If the shipping cost is $50 and the Handling Fee Percent is set as 10%, then the Handling Fee will be $5. The total shipping and handling cost will be $55.
Free Shipping with Minimum Order Amount – Select Yes/ No to apply free shipping with the minimum order amount.
Shipping Minimum Order Amount – Enter the minimum order amount for availing the free shipping.
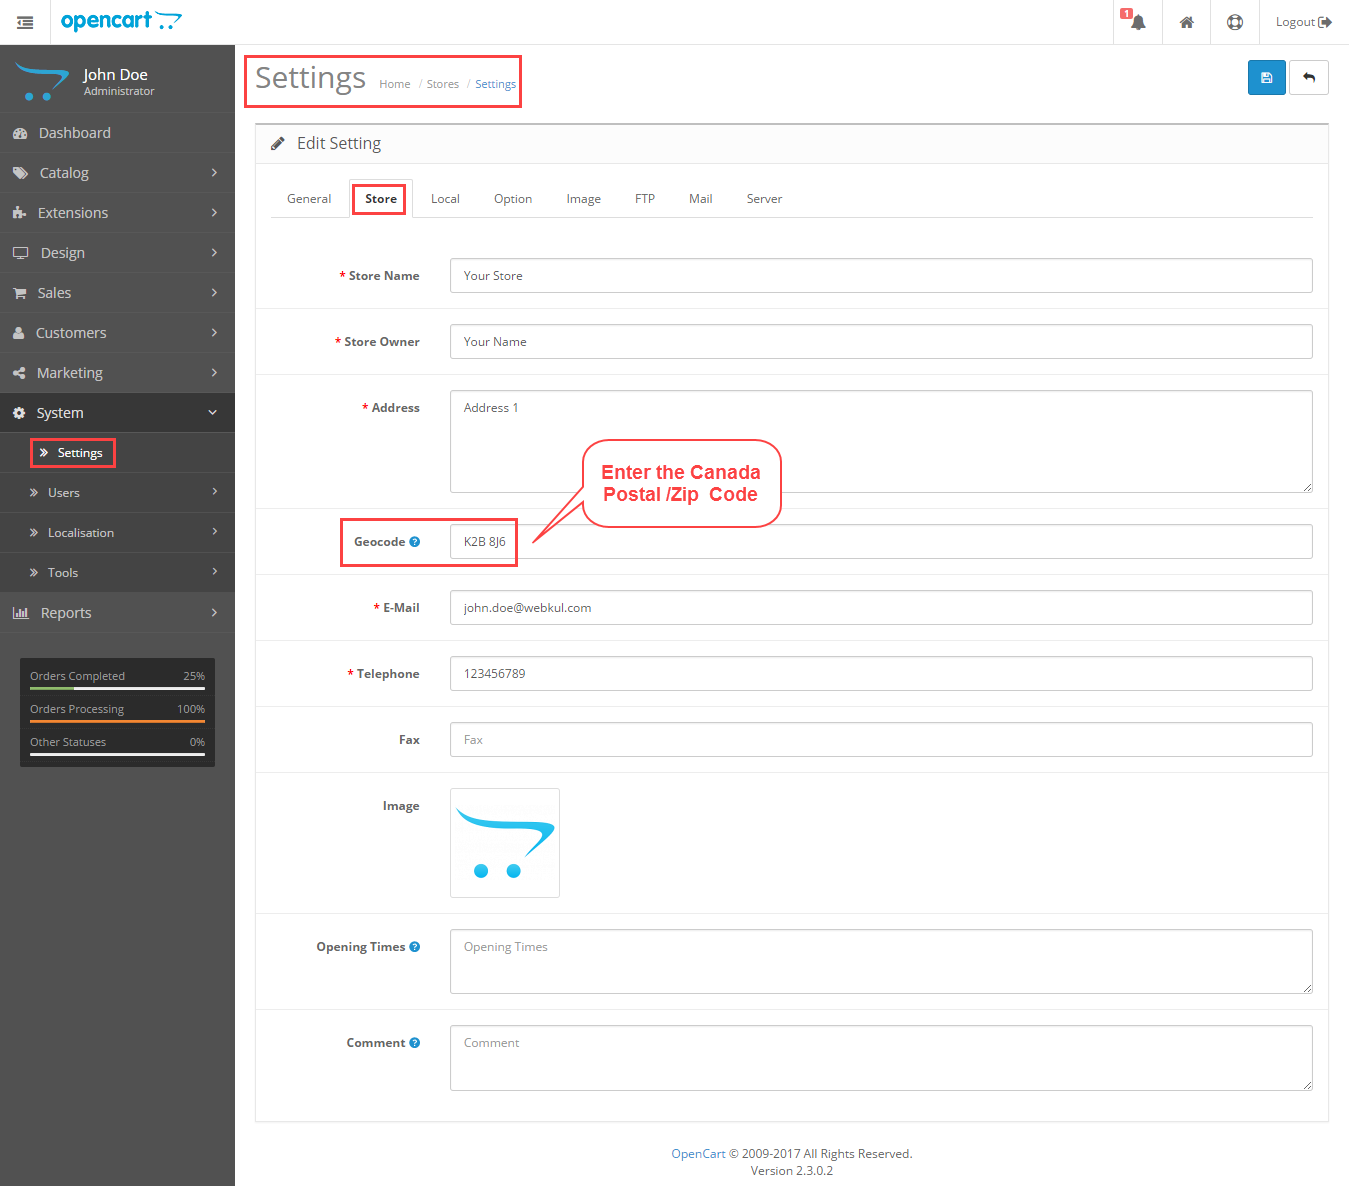
Canada Geocode
Furthermore, the admin needs to enter a Canada Postal /Zip code to make this module work. Moreover navigate through System>Settings>Store. In the Geocode field, please enter the store Postal / Zip code.
Customer Front-End View
Shopping Cart
After adding the products to the cart, the customers can check the available shipping methods. Moreover, on the shopping cart page, select Country, Region/State, and enter Pin Code, click Get Quotes.
Further the following pop-up window will appear showing Webkul Canada Post Shipping.
On the basis of the delivery details, the pop-up window will show the available Canada Post Shipping services. It will also show the estimated delivery date including the shipping rates.

Checkout
In the checkout process, customers can select the Webkul Canada Post Shipping. After that all the available shipping services will be visible with estimated delivery time & cost.

On the confirm order step, the selected Canada Post Shipping will appear. It will show the estimated date of delivery with shipping costs.

Order View
The customers can view the order information by navigating through My Account>Order History click View button. The following page will appear showing the order information, the customers can view the selected Canada Post Shipping Method. It will also show the estimated date with the shipping cost and the order Tracking number.

Admin Back-End View
Order View
The admin can navigate through Sales>Orders, click View. The following page will appear showing the order information, order detail, shipping details, product, and history. The print invoice and shipping list buttons are available on the top along with the edit option.

Generate Shipping Labels
Forthwith, the admin can generate the shipping label for the products by using the create Canada post-shipment button. Also can navigate through Sales>Orders>Products>create Canada Post Shipment.

Even, the admin can also print or download the shipping label. Navigation through Sales>Orders>Products. And in products under the shipping label, there is an option for the print shipping label and download shipping labels using that admin can print or download shipping labels.

The shipping label is an identification label that is attached to the container of the product and it specifies the content of the shipping label.

Then the Tracking Number will appear after generating the shipping label.
Print Invoice
Thus, here is the sample invoice mentioning Canada Post Shipping with estimated time and shipping cost. The invoice will also contain the store details, order ID, invoice #, payment & shipping address, payment method.
Moreover, the product details will include the name, model, quantity, unit price, and total.

Shipping List
So, here is the sample shipping list mentioning the store details, customer name, shipping address, contact details, product name, weight, model, and quantity. Additionally, it will show the selected Canada Post Shipping with estimated delivery time and shipping cost.

That’s all about Opencart Canada Post Shipping Module.
Furthermore, in case of any query, you can create a ticket at webkul.uvdesk.com or contact us at store.webkul.com/contacts/ to let us know your views to make the module better.
Current Product Version - 3.1.0.2
Supported Framework Version - 3.x.x.x

Be the first to comment.