Introduction
Amazon Odoo Connector is a simple integration tool that connects your Amazon store with Odoo ERP system.
It automatically manages products, orders as well as inventory between both platforms without manual work.
Amazon Odoo Connector module allows you to connect your Amazon store to your single Odoo instance so that everything can be managed efficiently from one place.
Features
- You can easily import products from Amazon to Odoo.
- You can easily import orders from Amazon to Odoo.
- Cron for automated scheduled import of orders.
- It helps in real-time stock updates from Odoo to Amazon.
- Real-time Order Fulfillment Confirmation from Odoo to Amazon
- Detailed Configurations to configure module as per requirement.
Installation
1. Once you buy the App from the Webkul store, you will receive the link to download the zip file of the module.
2. Extract the file on your system after the download finishes. You will see a folder named- ‘ amazon_odoo_bridge’.
3. Copy and paste this folder inside your Odoo Add-Ons path.
4. Now, open Odoo App and click on the Settings menu. Here, click on Activate Developer Mode.
5. Then, open the Apps menu and click on ‘Update Modules List.’
6. In the search bar, remove all filters and search ‘amazon_odoo_bridge’.
7. You will be able to see the module in the search result. Click on ‘Install’ to install it.
Configuration
Setting up the connection between Odoo and Amazon in Amazon Odoo Connector
Currently, there are two available connection methods to integrate Amazon with Odoo.
Option 1: Use Webkul Service (User Central – Paid Externally)
In this method, the customer connects their Amazon Seller Account using Webkul’s User Central Platform.
The customer purchases the Webkul User Central subscription to connect their Amazon account through the User Central platform.
Authentication and data synchronization are handled centrally via the User Central API, eliminating the need for separate SP-API or PII access configuration and simplifying the overall process.
You can purchase the User Central subscription from the following link: Amazon Central
Option 2: Use Your Own Credentials: In this method, the customer connects Amazon directly using their own credentials.
Customer enters their Amazon SP-API credentials directly in the connector configuration to establish a direct connection between Odoo and Amazon.
This method has no dependency on external services, and the customer is responsible for managing SP-API and PII access.
Further, the process remains the same after access is obtained for both connection types.
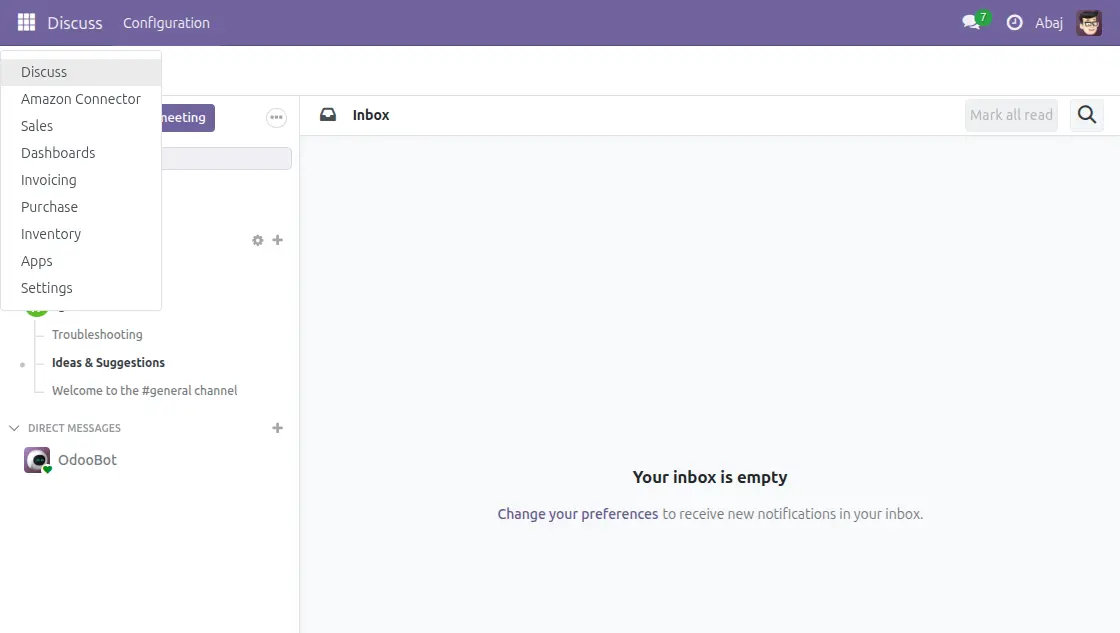
1. First, Log in to your Odoo account and open the Amazon Odoo Connector.
2. To begin, click the “New” button to create a new instance, and afterward connect your Amazon account with Odoo in the Amazon Odoo Connector.

3. Initially, add a name for the instance, and afterward go to the Credentials tab to connect Odoo with Amazon in the Amazon Odoo Connector.
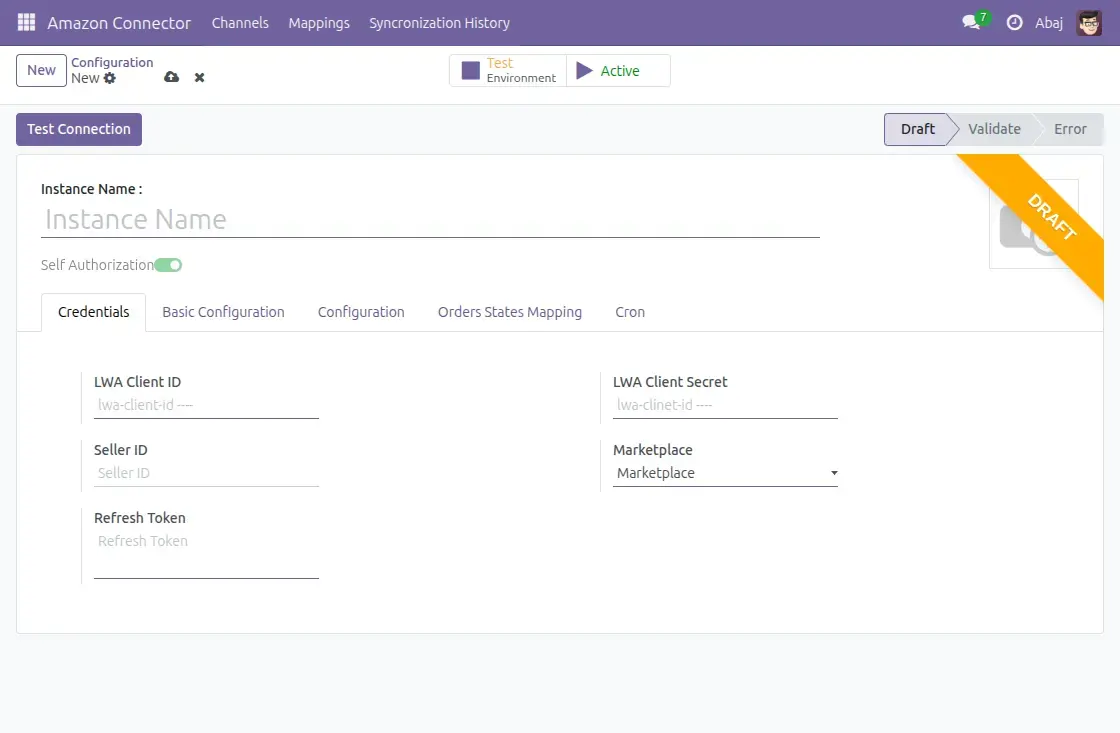
Credentials Tab
Enter the following credentials to establish the connection.
Client Key: You can see this key in your Amazon app under the name LWA Client ID.
Secret Key: This key will be visible in your Amazon app, with name LWA Secret ID.
Seller ID: Mention the seller ID in the seller ID field.
Marketplace: Select the region(country) of your Amazon Marketplace.
Refersh Token Credentials Tab: Next, you need to generate the refresh token from your Amazon app by clicking the Self Authorization button.

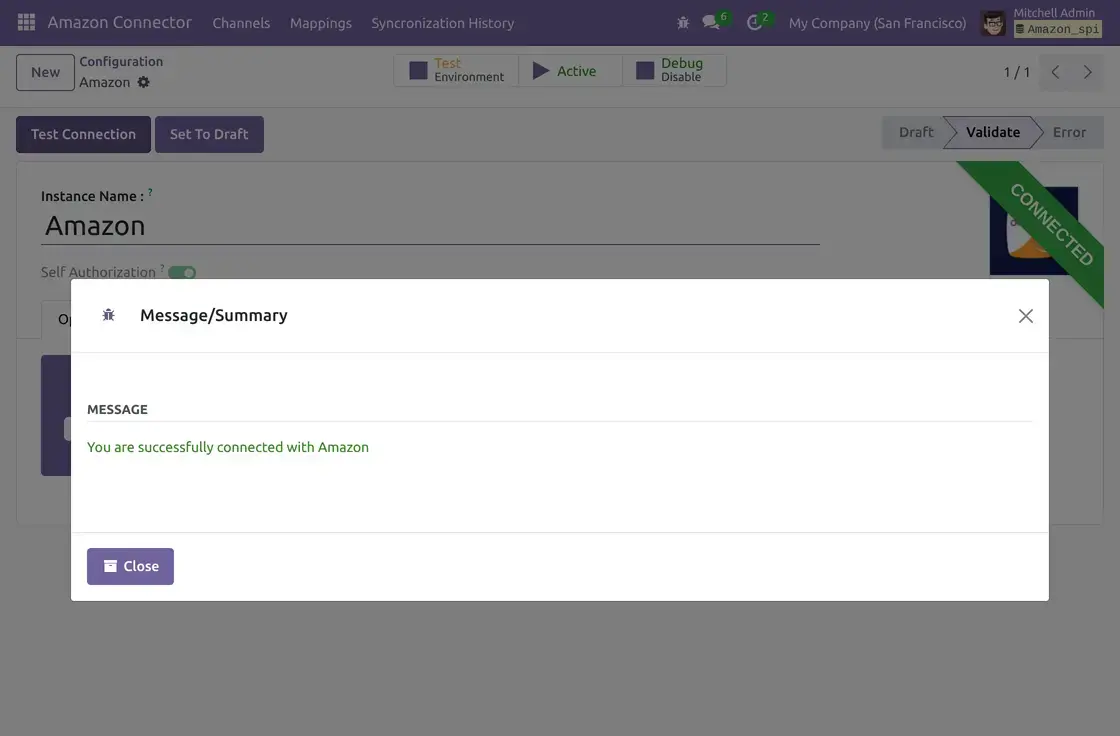
After you enter the credentials, click the Save button and proceed to Test Connection. Then, the connection success wizard appears once Odoo and Amazon connect.
After that, you will see the connection success wizard when Odoo and Amazon connect successfully.
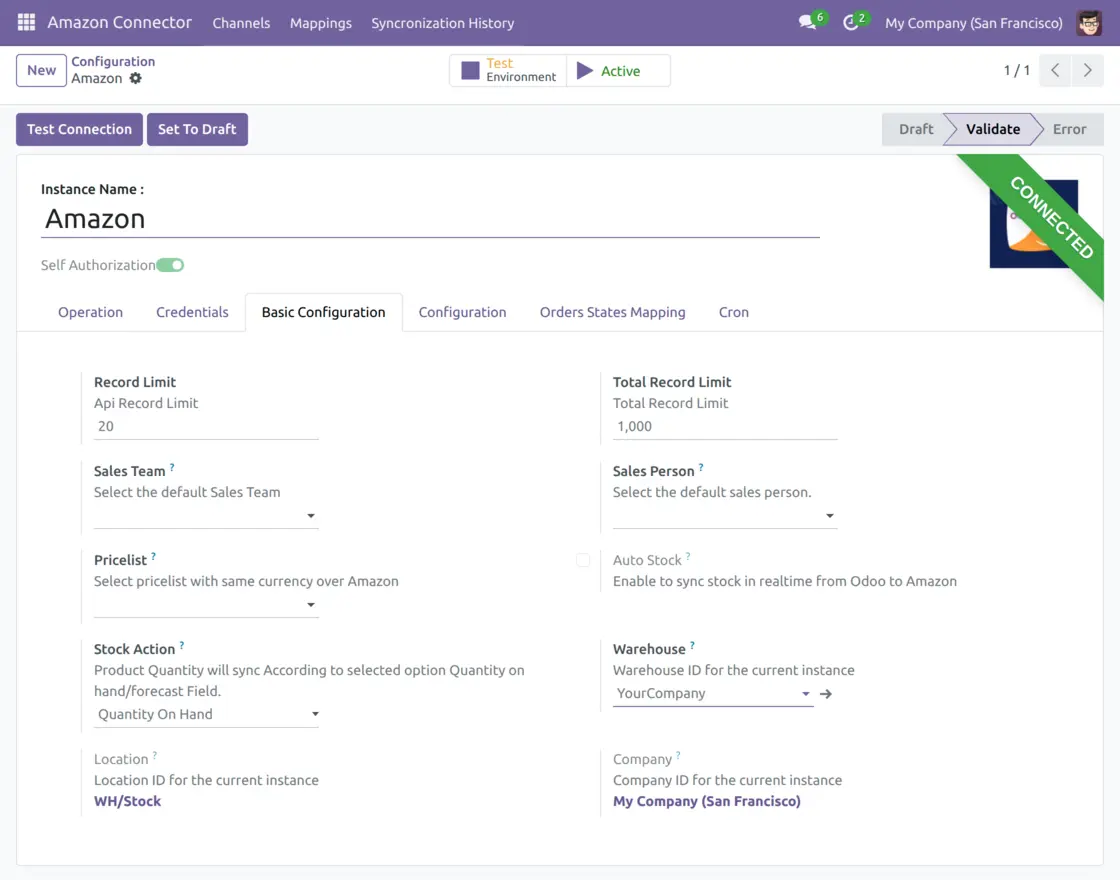
Basic Configuration Tab
a.) Record Limit: Record limit defines the maximum batch size during the data import. Recommended batch size is 100, and the default value is already set.
b.) Total Record Limit: Set the maximum number of records to be imported in a single import operation( applicable for both Manual and cron import). Needs to be set 0, for no restriction.
c.) Sales Team: At this point, set the default sales team for the imported orders. Then, chosen sales team will be used for all imported orders in Odoo.
d.) Sales Person: For this field, choose the default Salesperson. Then, Odoo will use the selected Salesperson for every imported order.
e.) Pricelist: Set the default pricelist for the connected instance. During product import from Amazon to Odoo, product prices will be stored in this pricelist.
f.) Warehouse: In this setting, set the default warehouse for the connected instance. Odoo then uses the selected warehouse to synchronize stock and manage deliveries.
g.)Auto Stock: As soon as you enable this option, Odoo sends stock updates to Amazon in real time.
h.) Location: In this setting, choose the default location within the default warehouse. Odoo then uses the selected location to manage product stock.
i.) Company: Set the default Odoo company for the instance. After that, Odoo synchronizes all imported Amazon data to the selected company.
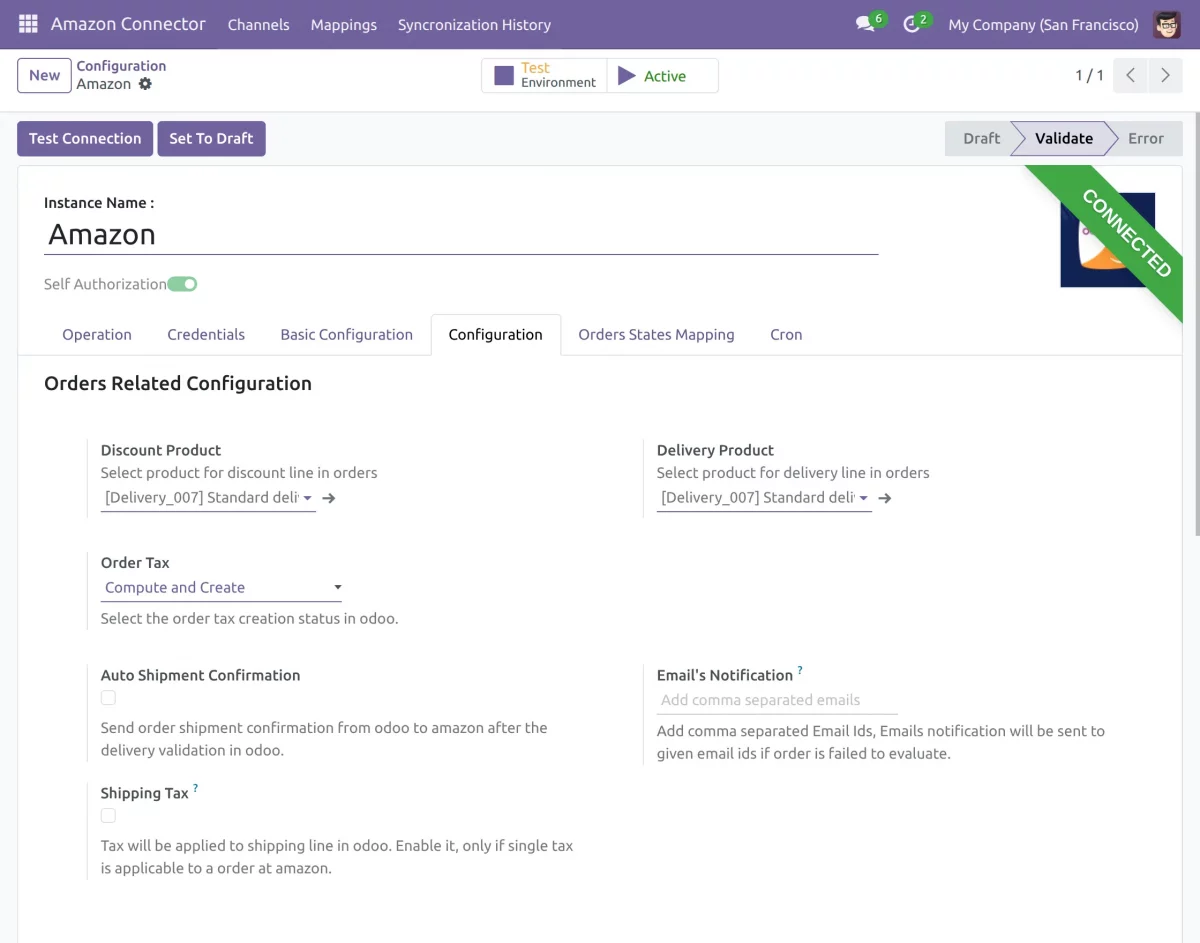
Configuration Tab
a.) Discount Product: Select a discount product. Then, Odoo will use the selected product for discount lines in all orders.
b.) Delivery Product: Select a delivery product. Then, Odoo will use the selected product for delivery lines in all orders.
c.) Order Tax: Select the method for creating taxes in Odoo during order import. You can choose between “Compute and Create” and “Default Tax.”
- Compute and Create: During order import, Odoo imports the tax applied to the order and creates a corresponding tax rate automatically.
- Default Tax: In this case, you need to set a default tax rate, which Odoo applies to all orders imported from Amazon.
d.) Auto Shipment Confirmation:
Once enabled, Odoo automatically sends shipment confirmation to Amazon in real time after validating the delivery in Odoo.
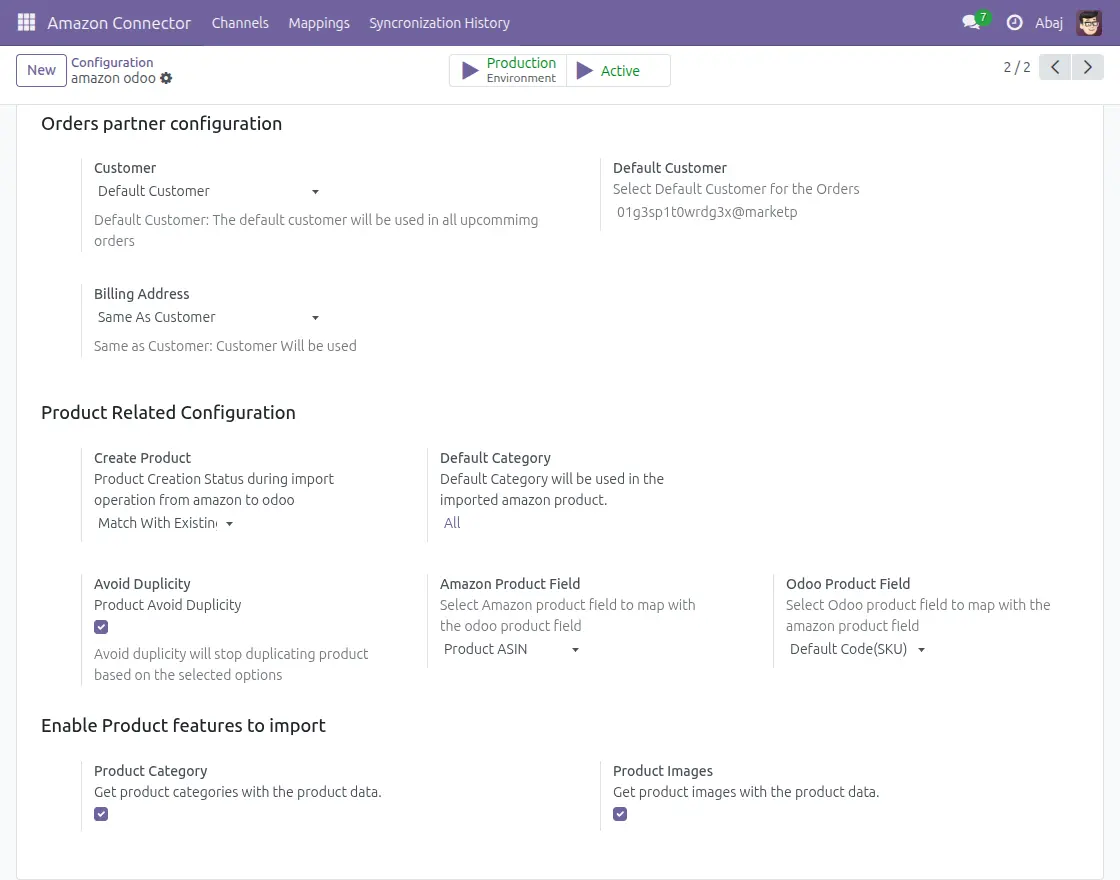
e.) Customer:
Set the customer configuration to use during order import.
- Default Customer: If you select default customer, Odoo uses the set customer for all orders imported from Amazon.
- Create Customer: If you select create customer, Odoo creates a new customer during order import.
f.) Billing Address:
Set the default billing address configuration for orders imported from Amazon to Odoo.
- Same as Delivery: Odoo uses the delivery address as the billing address.
- Default Address: Select the default address; as a result, Odoo applies it as the billing address in every order.
- Same as Customer: Similar to customers, set the default customer details, and then Odoo uses them for the billing address in all orders.
g.) Create Product:
Set the product creation status during the import from Amazon to Odoo.
- Create New Product: Odoo creates new products during product import from Amazon.
- Match with Existing: During product import, Odoo only maps the products with existing products. No new records are created.
h.) Default Category:
Set the default category to use for all products imported from Amazon to Odoo.
i.) Avoid Duplicity:
Enable the Avoid Duplicity option to prevent duplicate products during import.
j.) Product Mapping:
Select the Amazon and Odoo product fields to map products. Then, Odoo uses these fields to create product mapping during import.
k.) Product Images:
If enabled, Odoo imports the default product image along with the product.
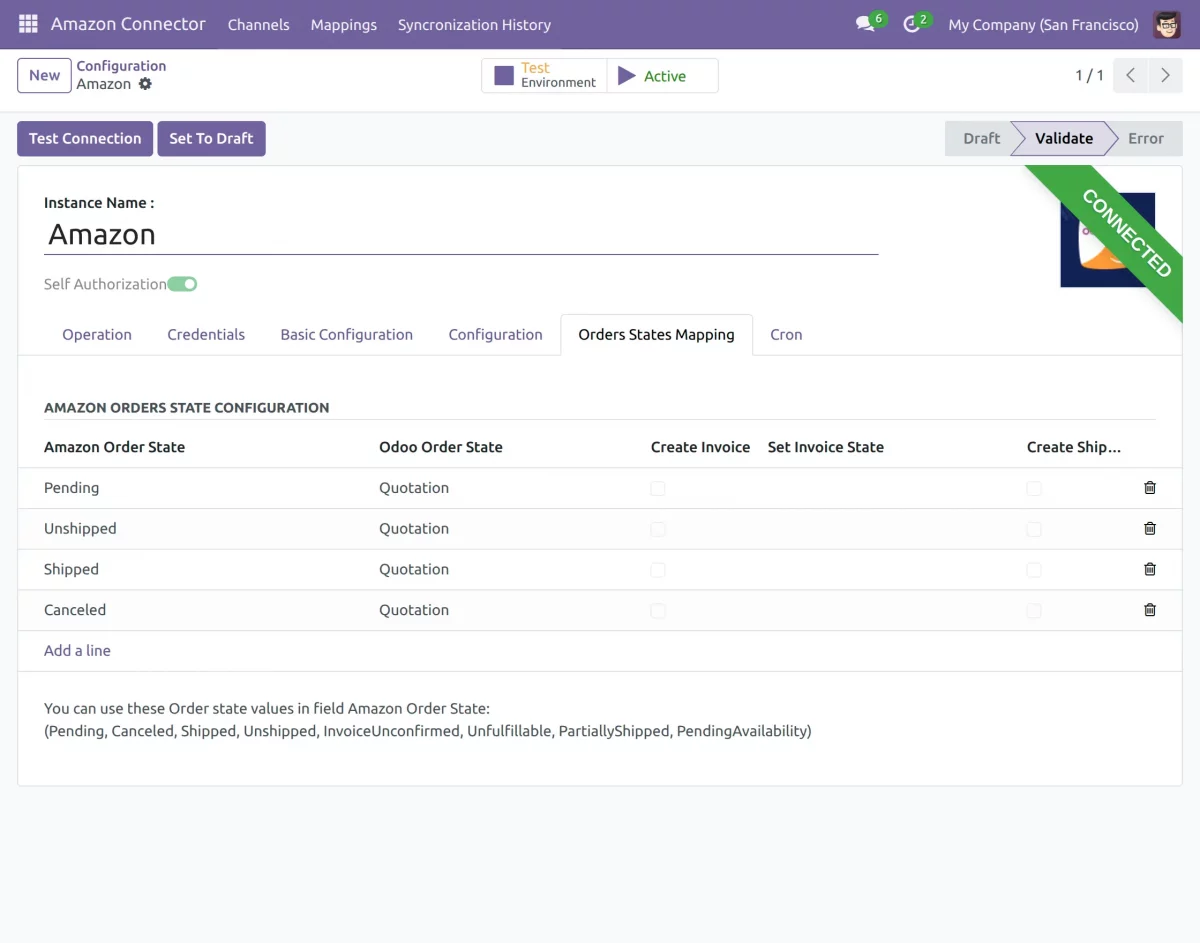
Orders State Mapping
a.) Order State Mapping Table: Map Amazon order states (e.g., Pending, Shipped, Delivered) to corresponding Odoo sale order states. Orders are imported according to this mapping.
b.) Create Invoice & Shipment Options: For each mapped state, you can enable/disable automatic creation of invoices as well as shipments in Odoo.
c.) Automated Order Processing: The connector imports orders based on the defined mapping.
If invoice and shipment creation are enabled, the order is imported as a Sale Order with invoice and shipment, reducing manual effort and streamlining workflow.
For example, an Amazon order in Pending can be mapped to a Confirmed Sale Order in Odoo.
When the order status changes to Delivered on Amazon, the connector applies the mapping and imports the updated order automatically.
Cron
Enable the cron to automatically schedule product imports from Amazon to Odoo.
a.) First, click the “Products” checkbox to enable the product cron.
b.) After that, set the Cron start date. The cron imports all products created after the set date.
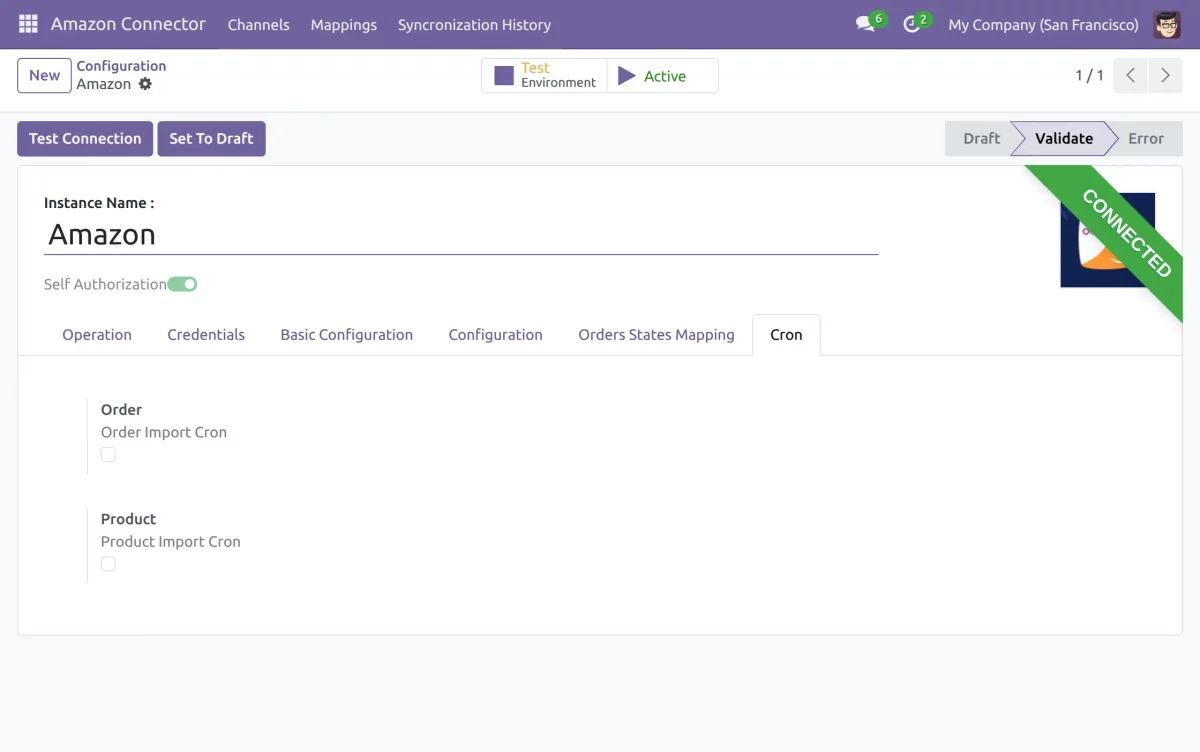
c.) In this step, click the “Order Cron Configuration” menu to set up the cron.
Set the cron execution interval, therefore, ensure that the minimum time between two cron executions is 30 minutes.
Activate the cron, and save the configuration. Cron is now enabled.

Once you save the configuration, the instance is configured, and you can begin importing data.
Workflow
Product Import
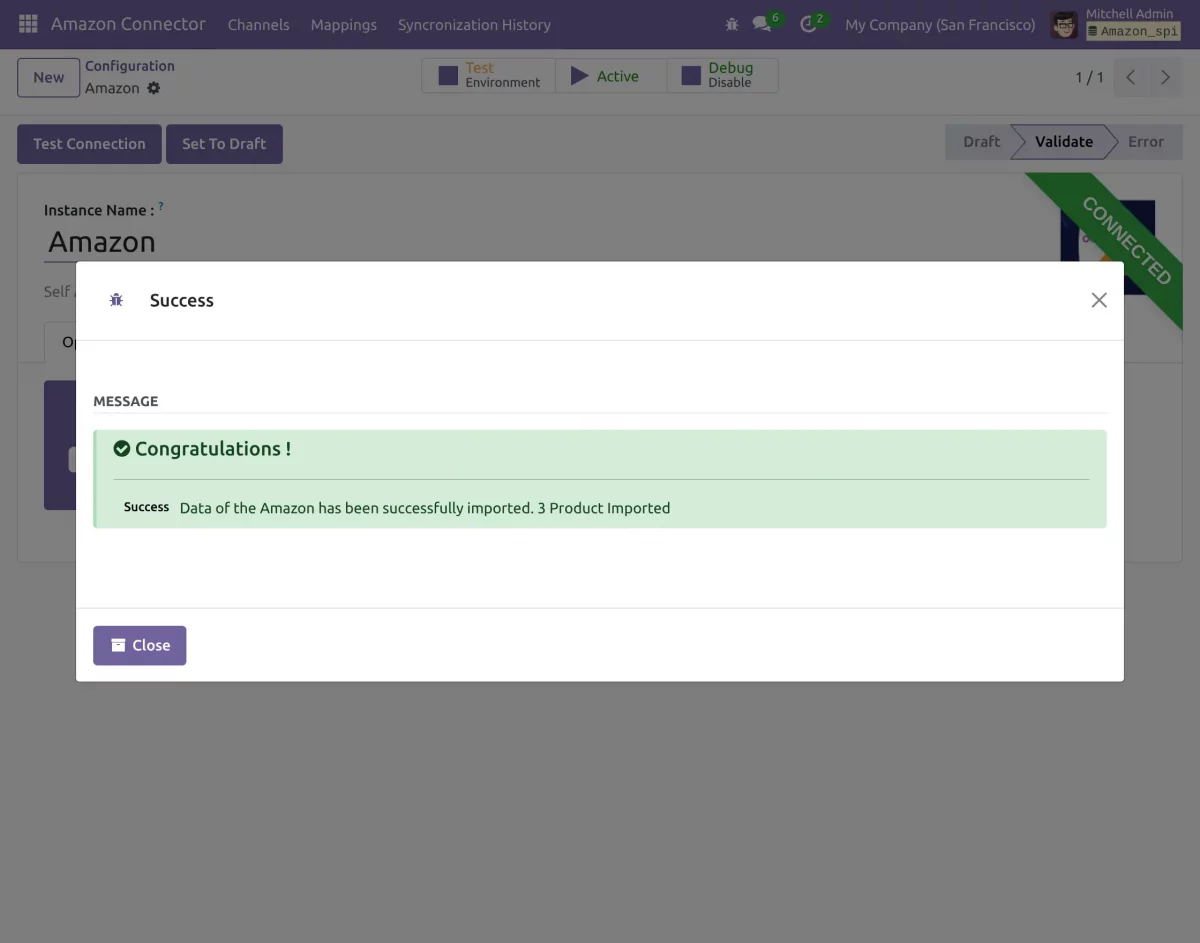
a.) Go to the connected Amazon instance in Amazon Odoo Connector, and then click the import icon.
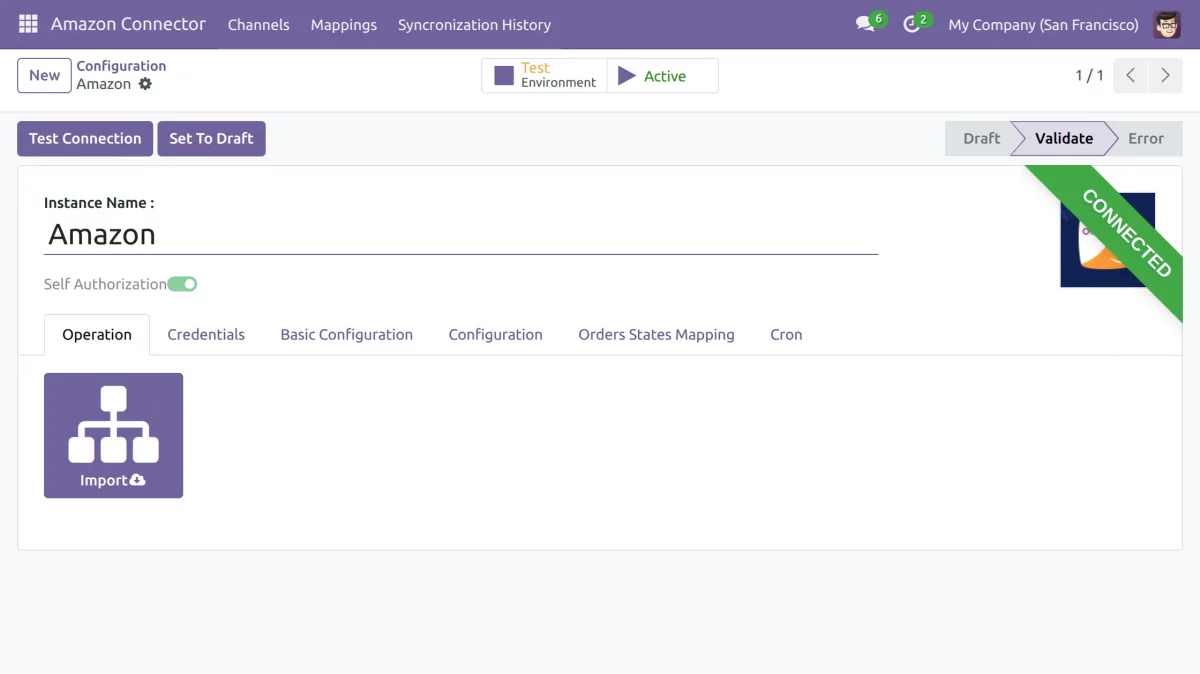
b.) Select “Product” as the object, and then choose a “Filter type” for the import operation.
Currently, the module supports product import using Object ID (ASIN) and SKU. Then, based on the selected Filter Type, enter the product’s Object ID (ASIN) and SKU

c.) Click the “Confirm import” button, and as a result, Odoo imports the products.
Order Import
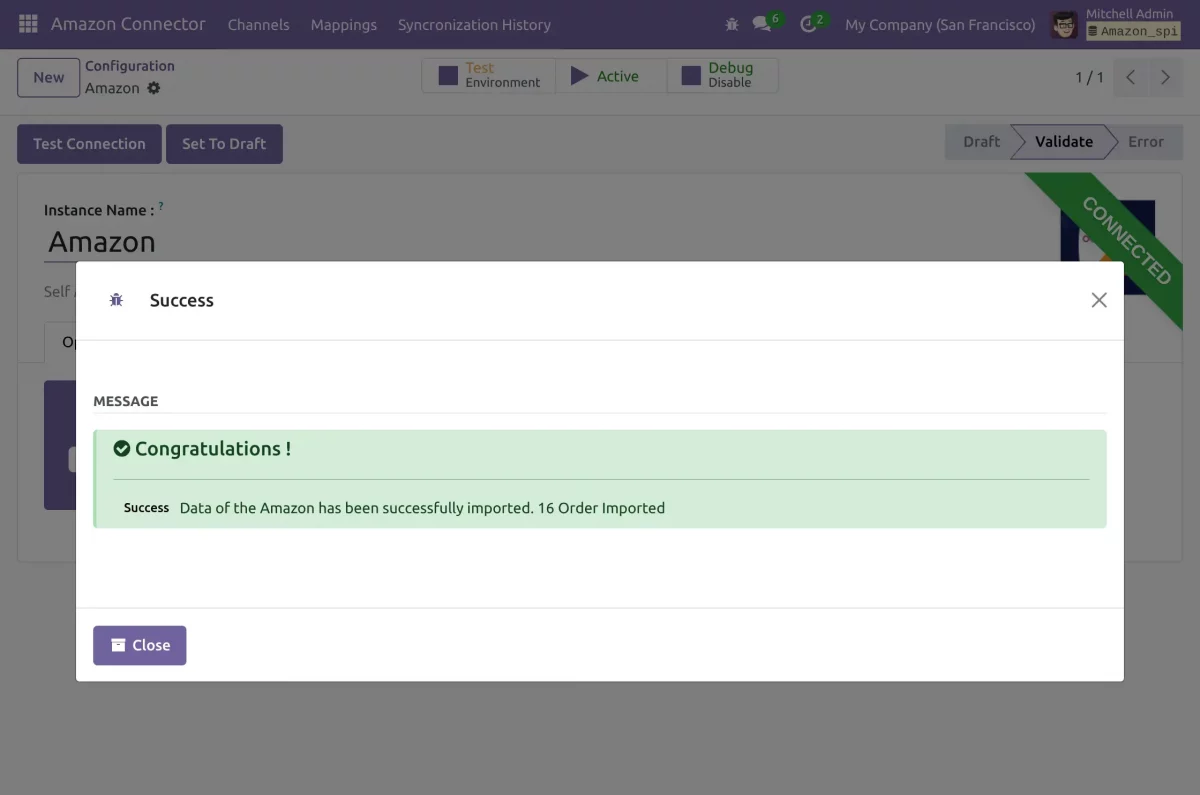
a.) In Amazon Odoo Connector, go to the connected Amazon instance. Next, click the import icon.

b.) Select “Order” as the object, as well as choose a “Filter type” for the import operation. Currently, you can select All, Object ID, or Date Filter to import orders.
- In case of all, orders created in the past 90 days will be imported.
- In case of Object Id, enter the order id’s that needs to be imported.
- In case of Date filter, enter the date range, all order created within the selected date range will be imported.

c.) Click the Import Order button, and then Odoo imports the orders.
Need Help?
Hope you find guide helpful! Please feel free to share your feedback in the comments below.
If you still have any issues/queries, please create a ticket at the UV Desk.
I hope this helps. In case of any further queries, contact us at our support mail.
Thanks for paying attention!!
Current Product Version - 2.0.0
Supported Framework Version - V19, V18, V17

Thanks and regards