INTRODUCTION
Odoo Mobile App for Android & iOS will convert your Odoo Store into a flutter mobile application. Now it is unnecessary to have desktops/laptops to shop from your store.
Everybody looks for comfort and an easier way to shop online. This attracts customers to go for things available with ease. Reviewing the studies, the customers prefer to shop online via mobile phones rather than desktops.
This customer behavior inclined the interest of people toward online shopping. Thanks to e-commerce, people can purchase things from anywhere and get them delivered wherever they want.
It offers a better user experience and the customers can easily install the app on their mobile devices; hence, they can shop for the products effortlessly.
Bring the customers to your Odoo Marketplace through their mobile phones with the Odoo Multi-Vendor Mobile App. The app is designed to render the perfect shopping experience to the customers.
Check a brief overview of the Android Mobile App Backend configuration –
Check a brief overview of the frontend workflow at the android device end –
FEATURES
- One-Time Setup required- Setup and Configure your App with Odoo backend once and you are good to go.
- It allows the customer to sign up and reset their account password right through the app.
- Customers can Social Login* to their account as well (Gmail, Facebook, Twitter) (a paid feature)
- Customers can easily search for products by scanning barcodes in the app.
- Odoo Mobile App for Android & iOS supports all types of products with or without attributes.
- It provides the facility for users to publish/unpublish products and categories on the app separately from Odoo Website.
- The platform (Website/App) from which the customer has bought the products frequently is tracked.
- This Odoo apps help in managing unlimited Banners and Published/Expiry dates of every banner separately and product sliders and sliders modes(fixed/sliding)
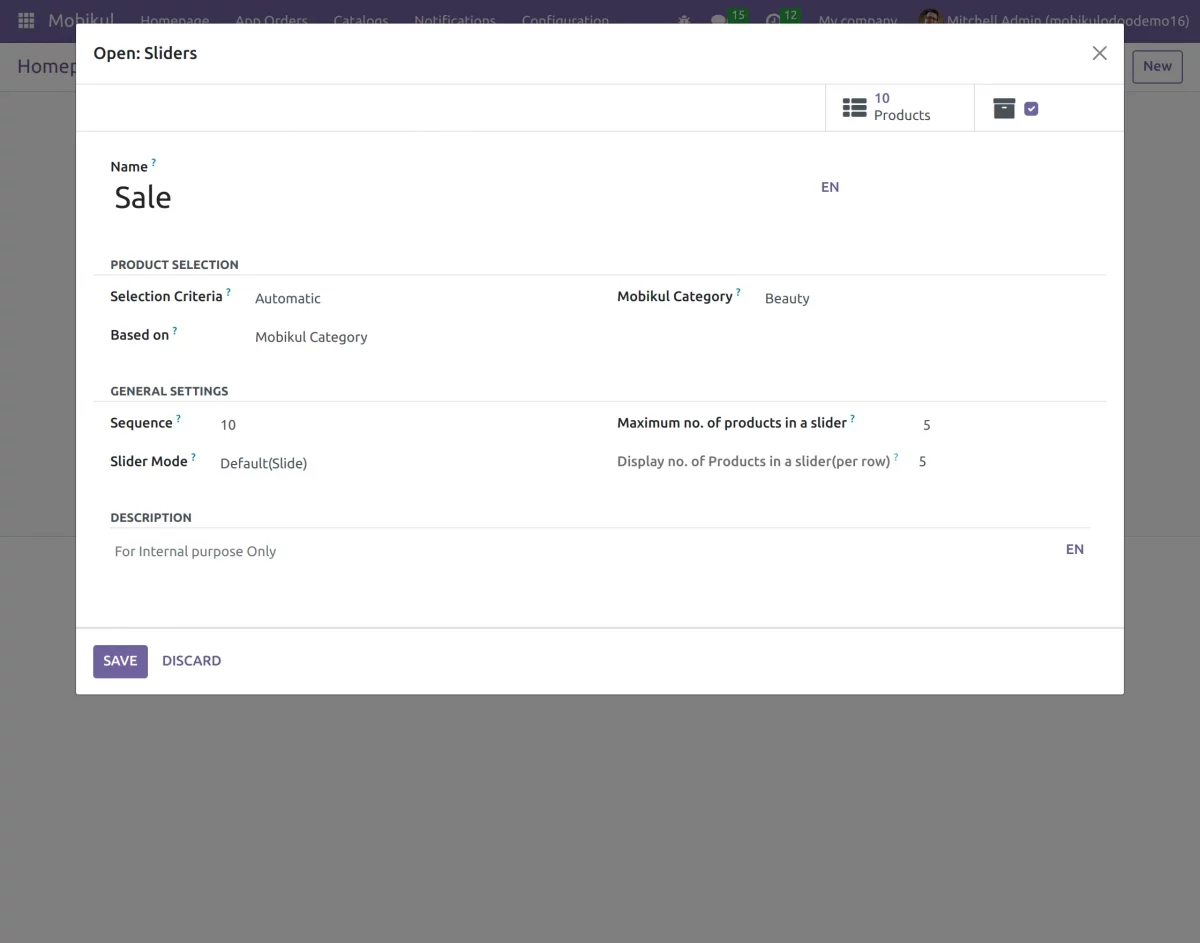
- Allows the user to configure the selection criteria of products like New products etc in an Automatic/Manual.
- Enables customers to deactivate or delete their accounts from the Odoo Apps.
- Logged-in users can add/remove products to the wishlist on the app.
- Added multi-currency settings for customers to choose the required one.
- Bi-directional product cart sync from the website to the app and vice versa.
- Introduced a support page for customers to connect via email or contact number.
- Customers can track the live location of the Delivery Boy in the Application (it requires installation of Odoo Delivery Boy App).
- Customers can also see the picking location from where the delivery boy picks up the order(requires Odoo Delivery Boy App ).
OTHER FEATURES
17. Odoo Mobile App for Android & iOS also helps in managing push notifications.
18. The user can configure an action to trigger on the customer click like a product/category/custom collection page.
19. Odoo Mobile App for Android & iOS helps in managing unlimited featured product categories.
20. The homepage displays the highlights of the popular categories.
21. It also supports products with multiple images and with features like Zoom-in, Zoom-out, and optimized images for faster loading.
22. It facilitates the User to Configure the Pricelist at the backend to Apply Special discounts on the product(s) such as “App Only” discounts or vice-versa.
23. The Odoo Ecommerce Mobile App allows customers to compare different products to make the best purchasing decision.
24. The admin can add the walkthrough images in the app. The customer can see the walkthrough guide.
25. With the help of the Odoo mobile app customers can proceed to checkout as guests without logging into the application.
Isn’t it great that your delivery boy can navigate to the delivery address through the map after accepting the delivery for an order? The Odoo Delivery Boy App allows admins to manage their network of delivery boys, assign orders, and enable push notifications for various actions in Odoo
INSTALLATION
- Once you purchase the App from the Webkul store, you will receive the link to download the zip file of the module.
- Extract the file on your system after the download finishes. As a result, you will be able to see a folder named- ‘mobikul’
- Copy and paste this folder inside your Odoo Add-Ons path.
- Now, open the Odoo App and click on the Settings menu. Here, click on Activate the Developer Mode.
- Then, open the Apps menu and click on ‘Update Modules List.’
- In the search bar, remove all the filters and search ‘mobikul’
- You will be able to see the module in the search results. Click on ‘Activate’ to install it.
Before moving further, explore our Odoo development services & an extensive range of quality Odoo Apps.
WORKFLOW
Configuration
1. Login to your Odoo instance and go to Mobikul Module.
2. Now, click on the Settings menu under Configuration Tab; here you can set extra features and addons for the module, and under Mobikul Configuration, you need to click on configuration.

3. Here, you can add the name of the app and set the API credentials;
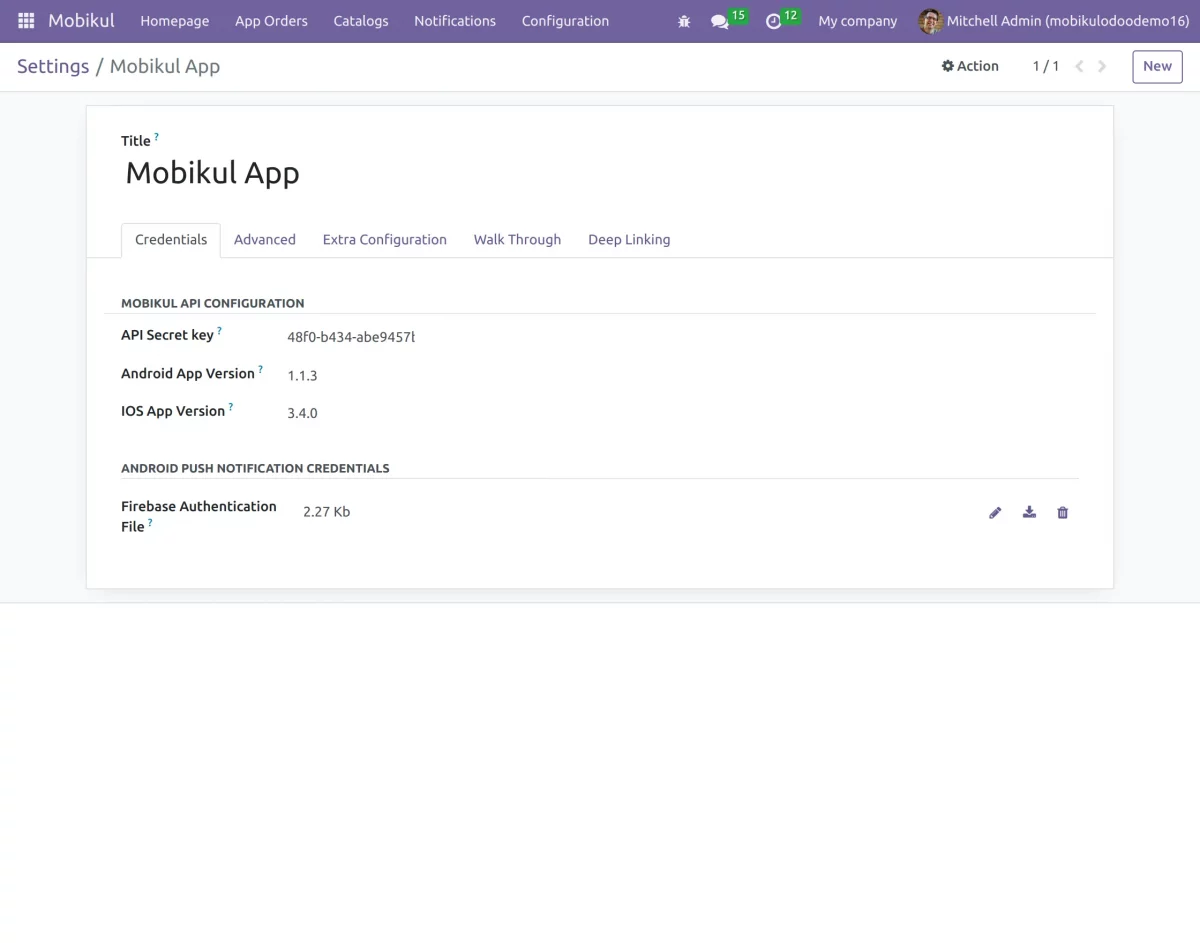
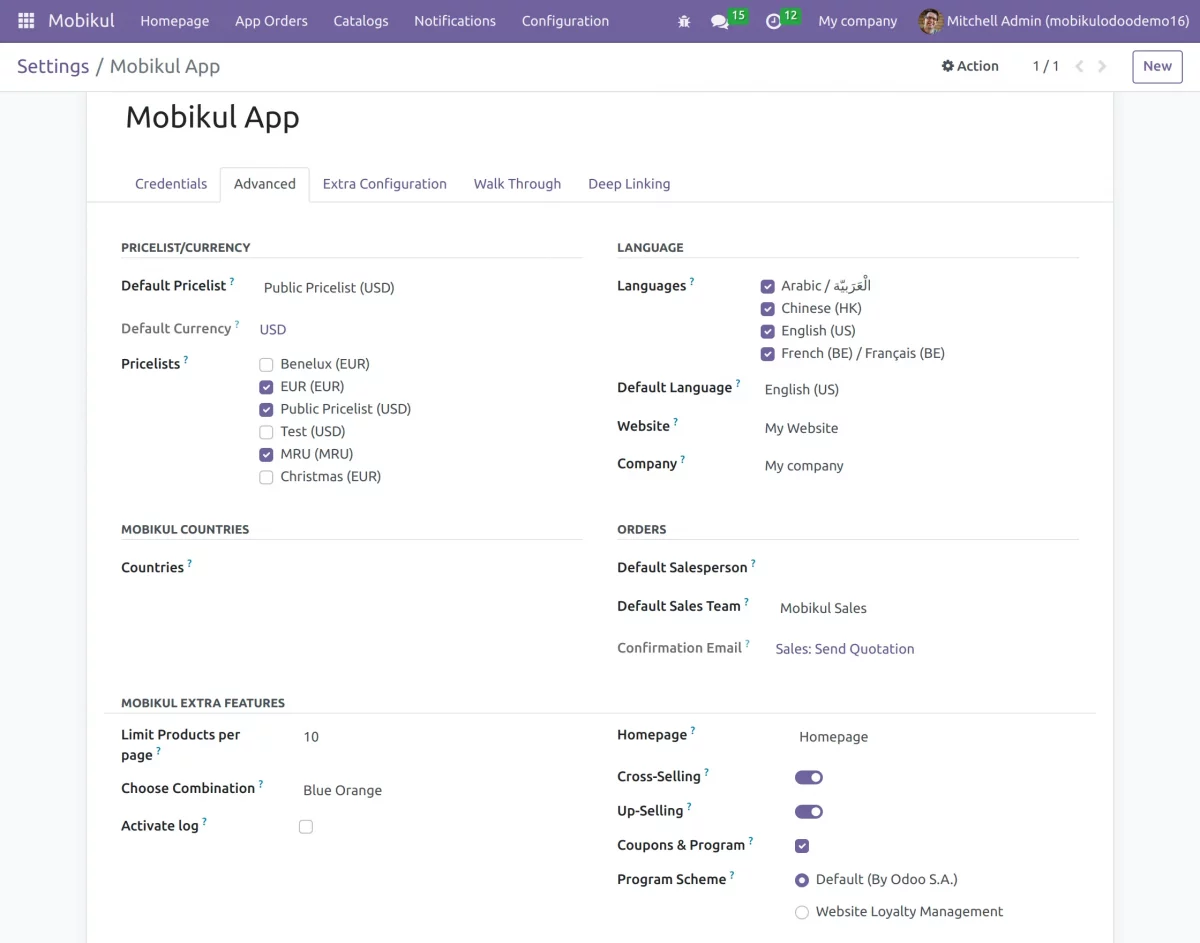
4. Now, click on the Advanced tab to set price list, country, orders, language, and other features.
5. We can also enable Cross-selling, Upselling, and Coupon programs, and we can set the app homepage that you created in the homepage configuration to display on the home section in the mobile app.
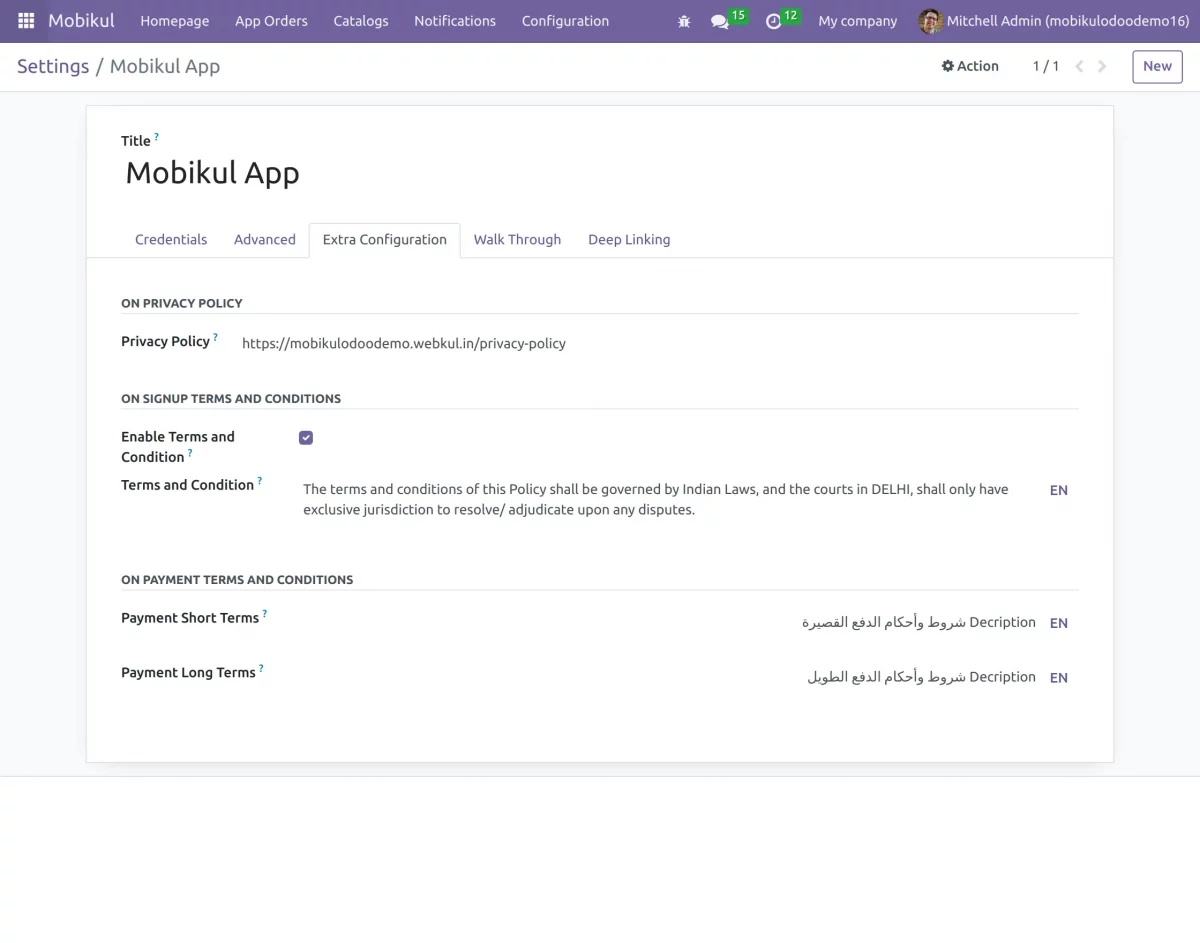
6. Once done, go to the extra configuration Tab; here you can set terms and conditions for sign-up payment terms.
7. Configuration >> Extra Addons >> Enable Product Compare
Configuration >> Extra Features >> Allow Guest Checkout.
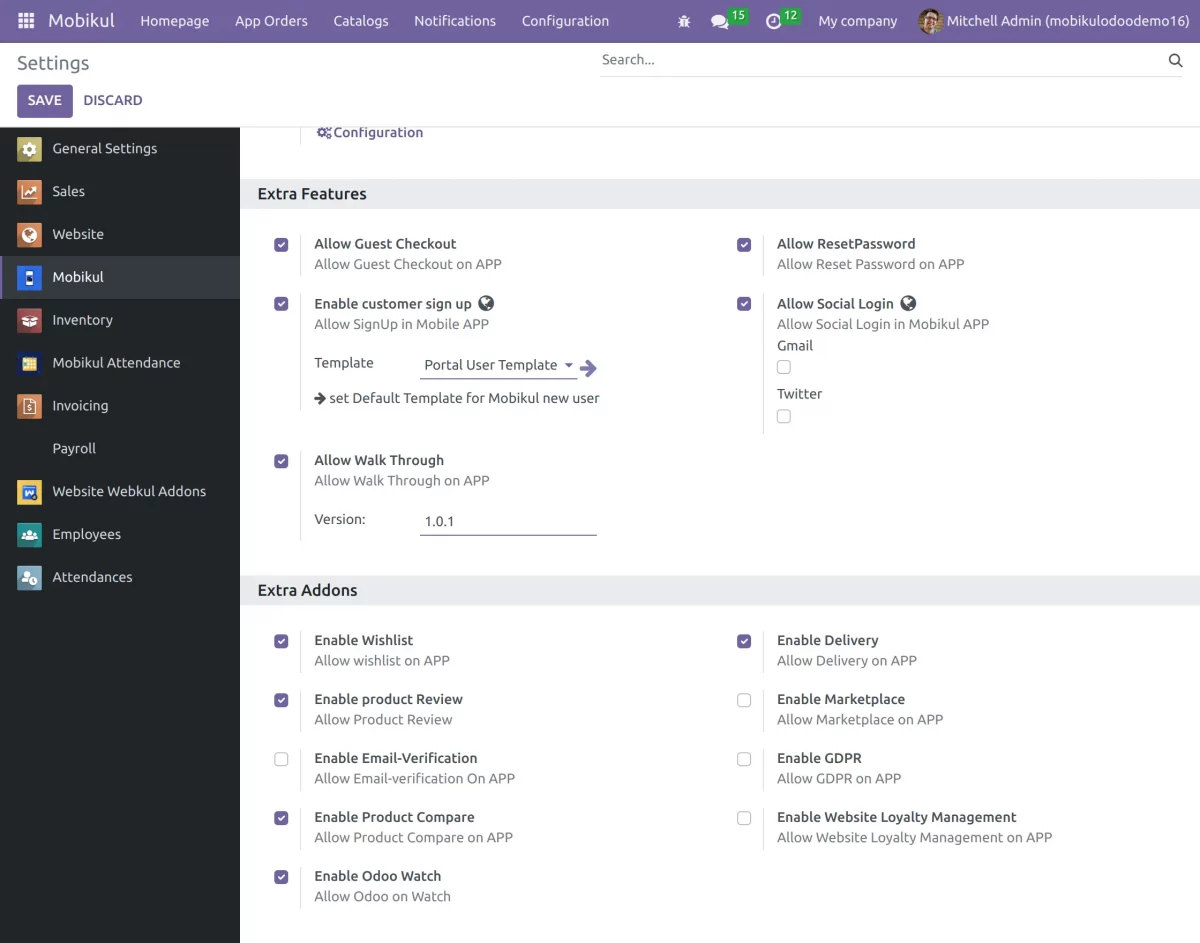
8. Active walkthrough can be seen and can be set to Enable/Disable to display on the app.

Configuration Tab
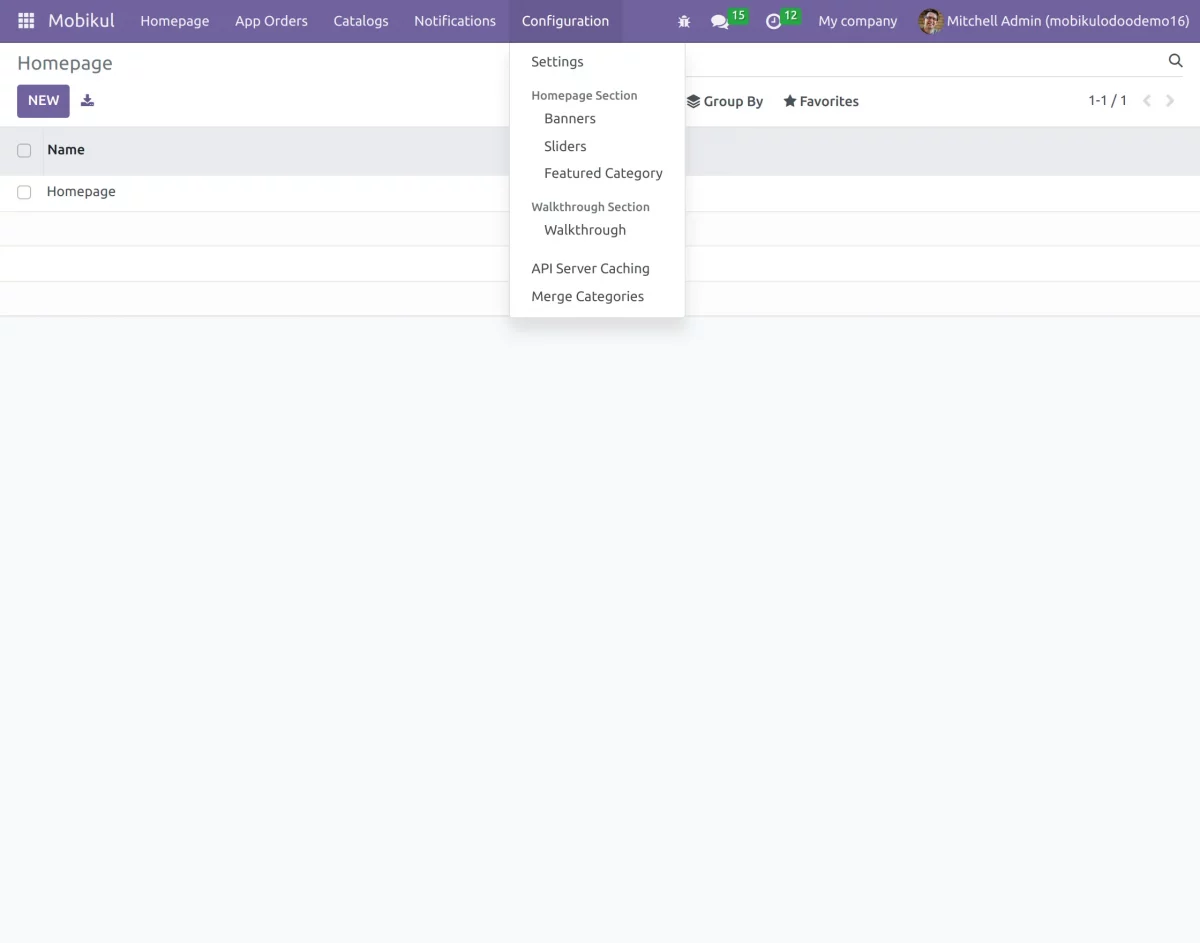
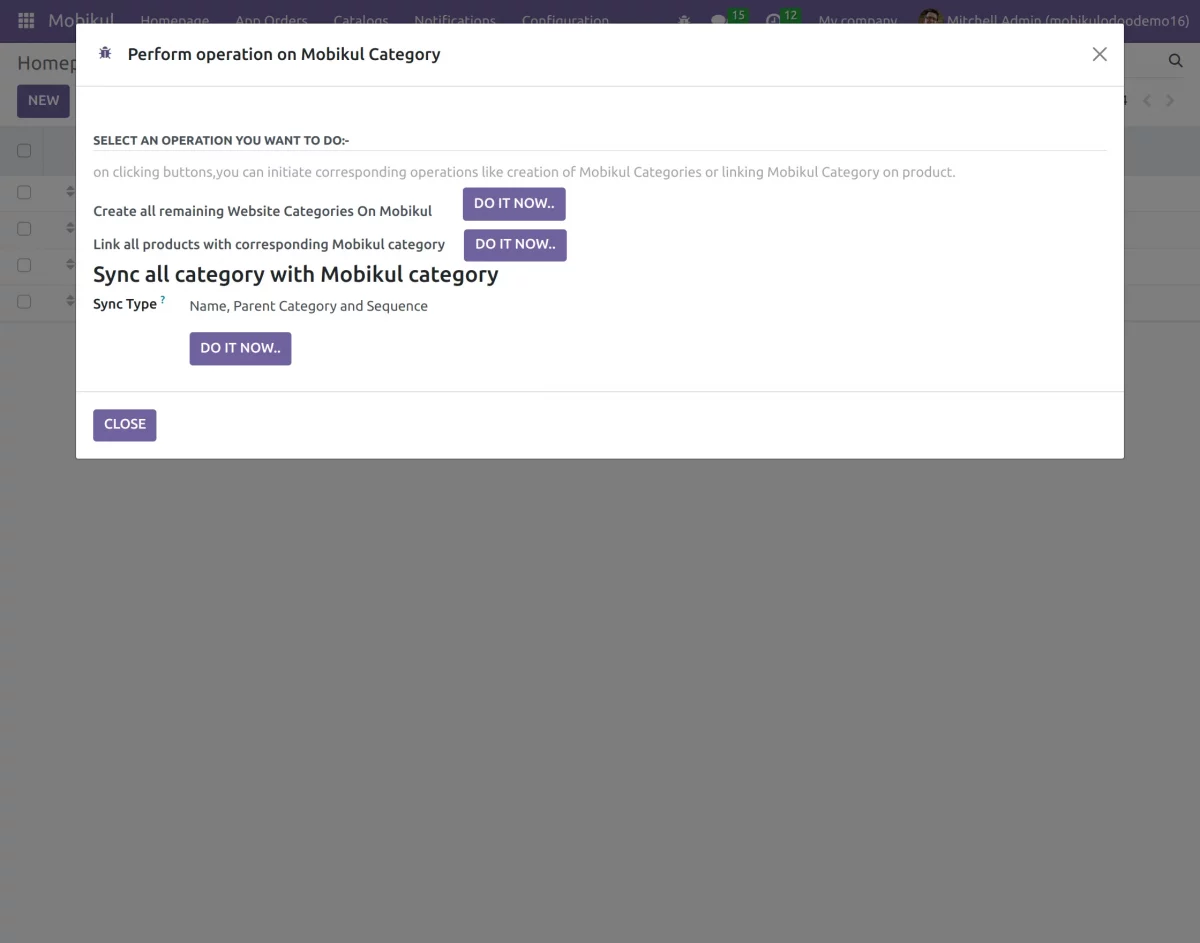
9. Here, you can also merge categories.
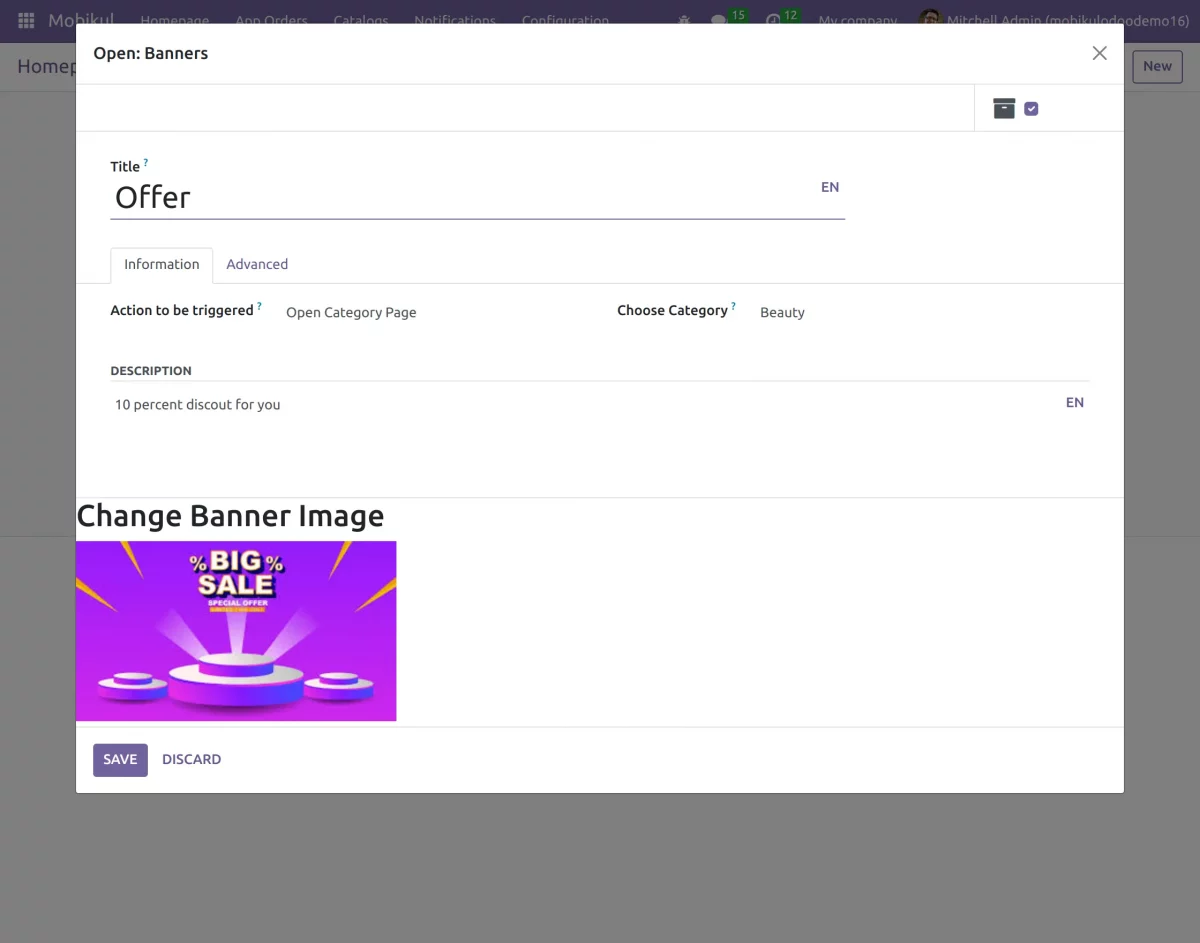
10. Navigate to the Configuration >> Banner menu.
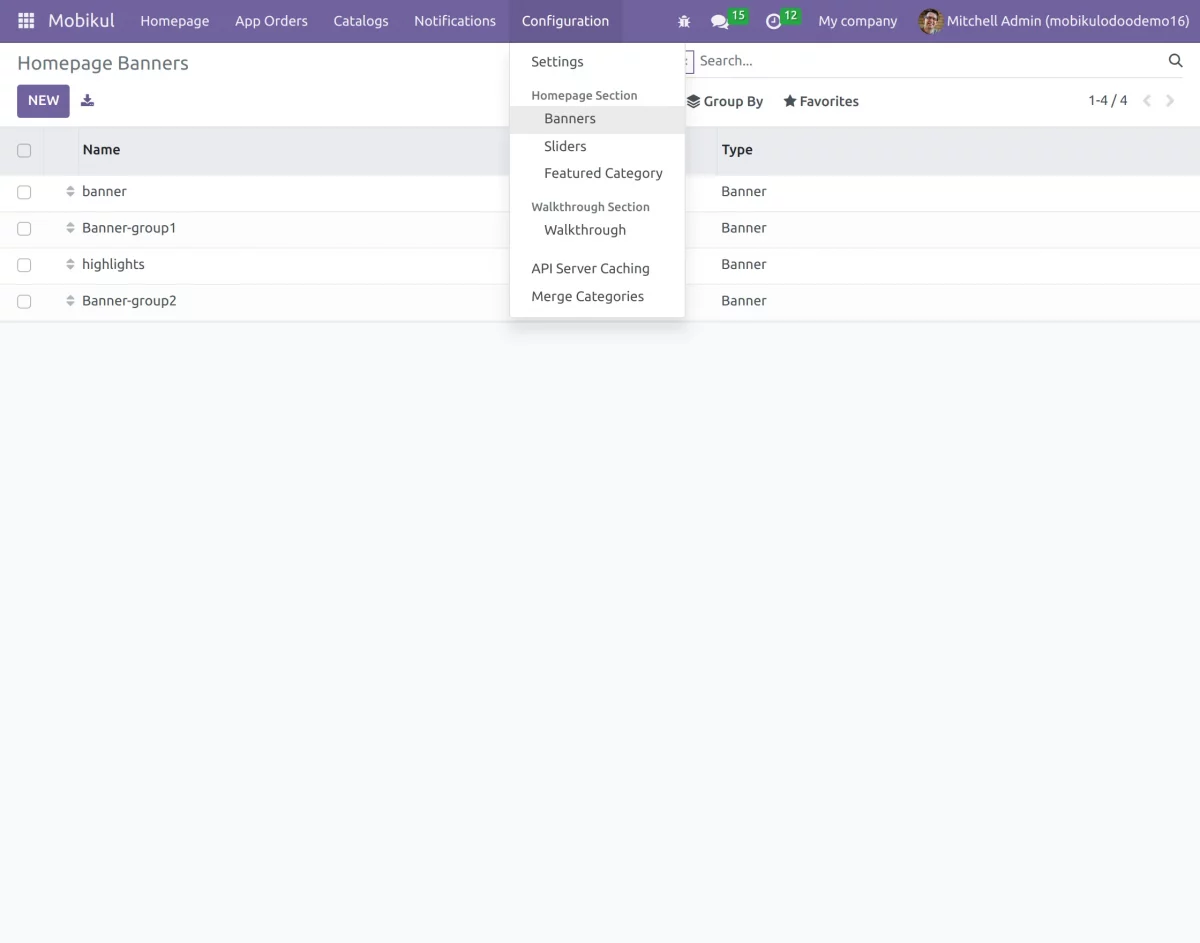
11. Click on New to create a new banner.
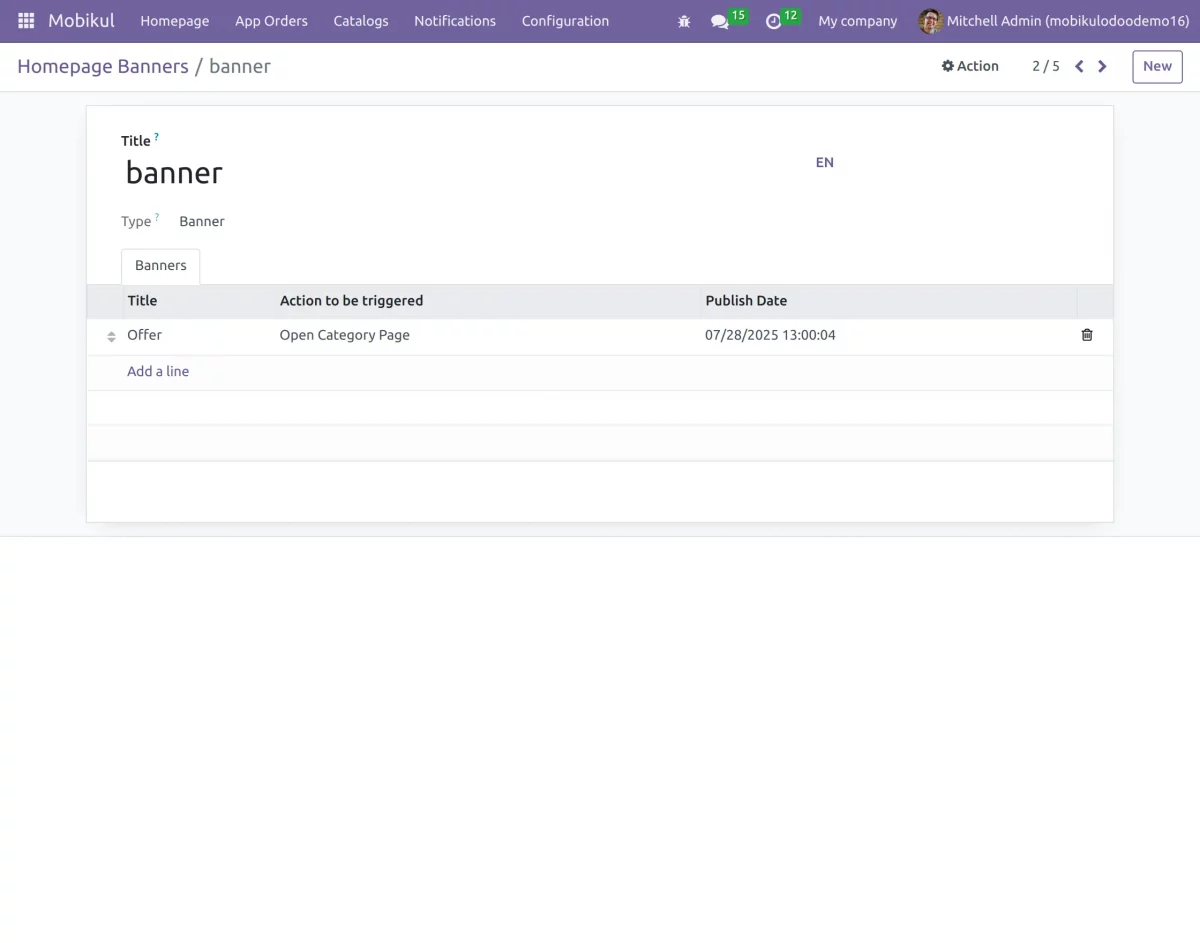
12. Active/Inactive– The banner could be in any state Active/Inactive, that is if admin wishes to show the banner it can be in an active state whereas if the admin wishes to hide the banner it can be in an archived state.
13. Action to be triggered – This means the admin can set the activity when a customer clicks on the banner. They can be-
- Open product page- A product may be assigned to the banner which opens up when we click on the banner.
- Now, Open Category page- A category may be assigned to the banner which opens up when one clicks on the banner.
- Open Custom Collection page- A banner may be assigned a set of customizable products.
14. Description– This section is for the admin to add any detailed information related to the banner.
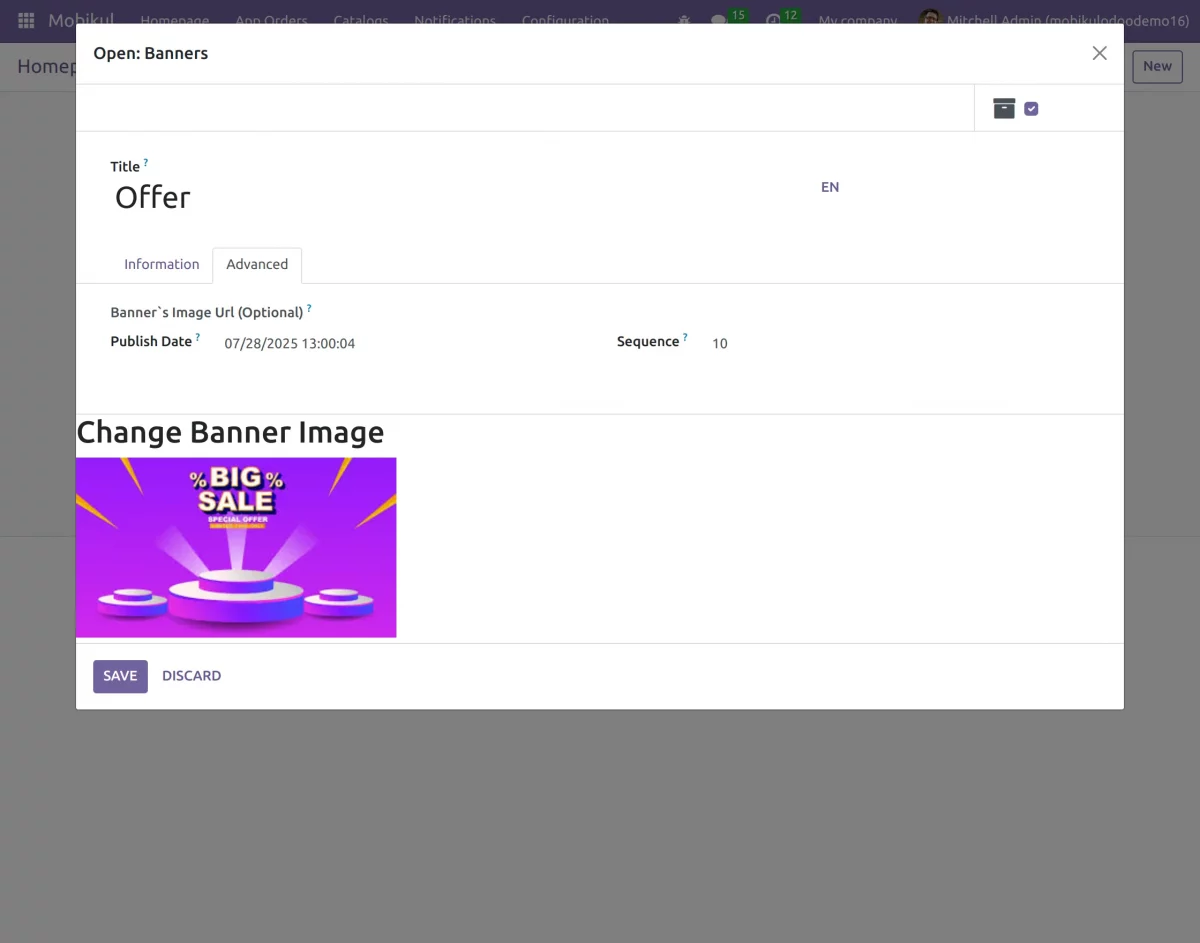
Advanced Section– Allows you to set publish date and sequence of the banner to be displayed.
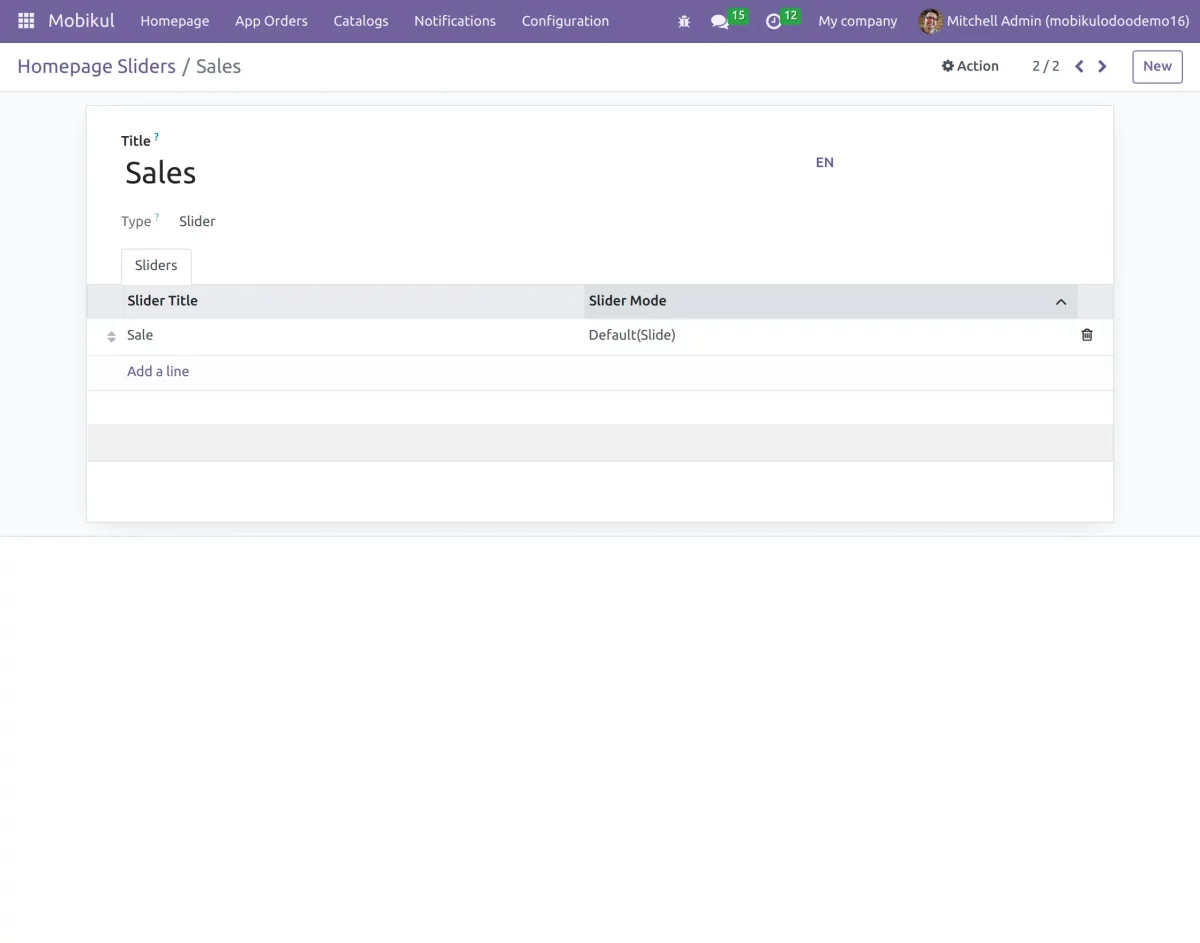
15. Navigate to the Product Sliders; From here, the admin can either create a new slider or edit the existing one.
Details
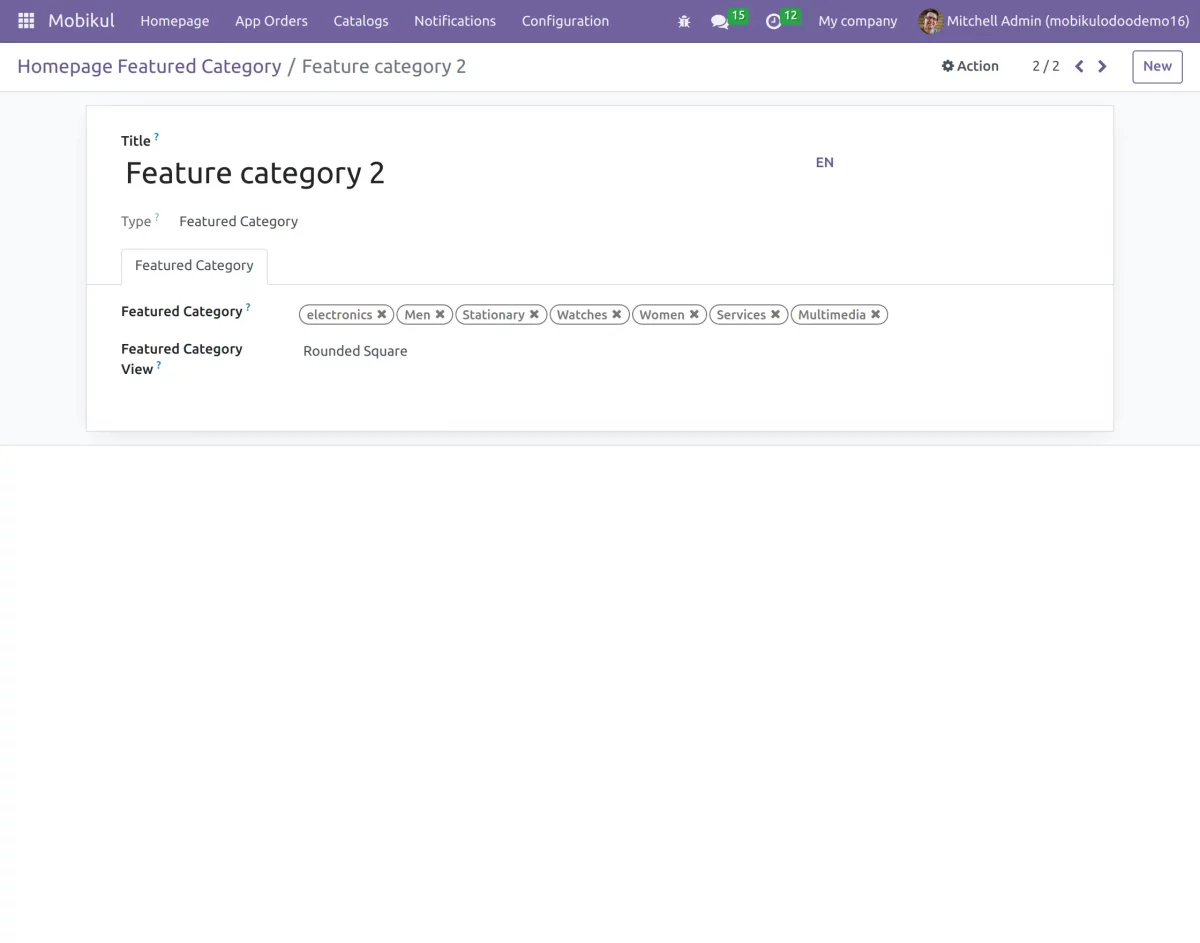
16. After that, you can create the Featured Category by navigating to Configuration >> Featured Category.
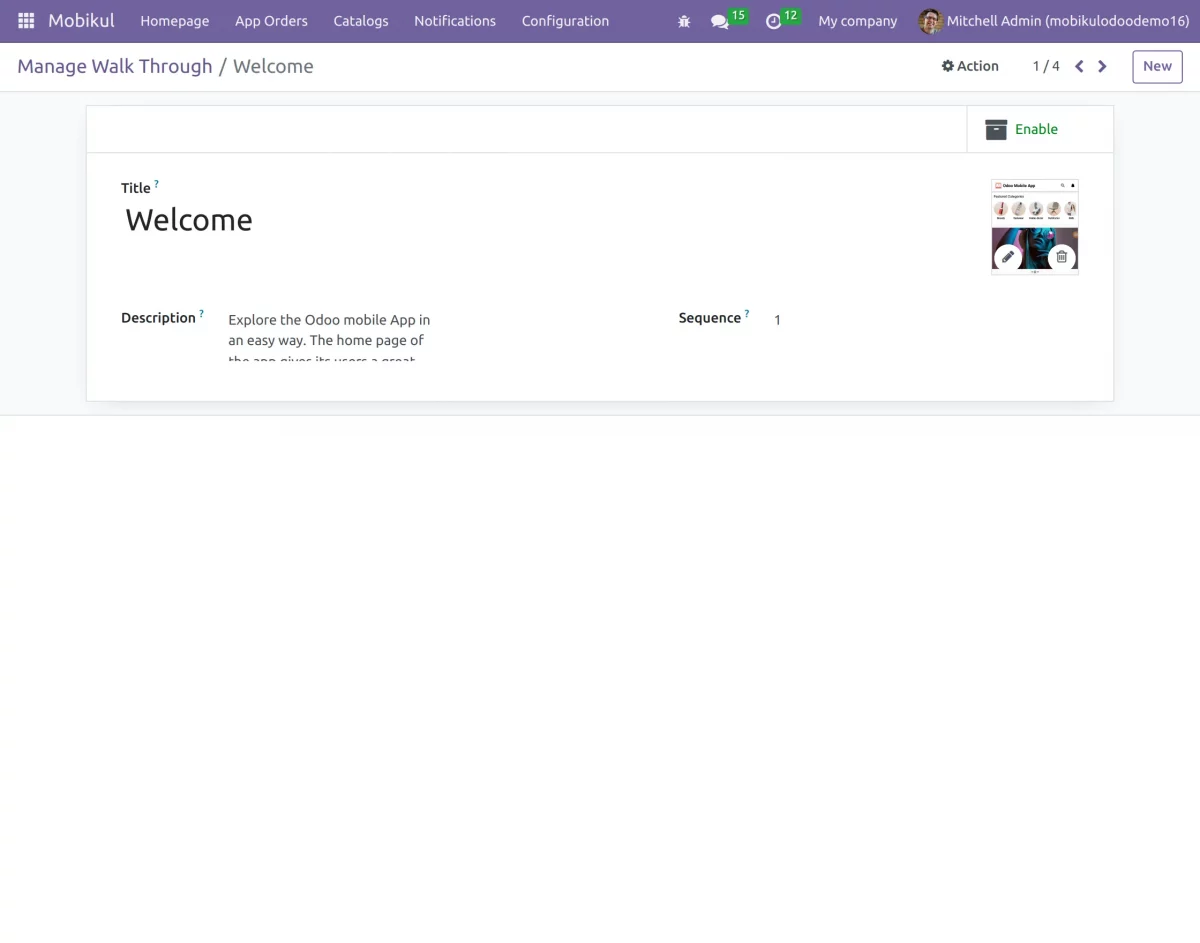
17(a). Configuration >>Walkthrough :
Here, you can Add or Manage walkthrough
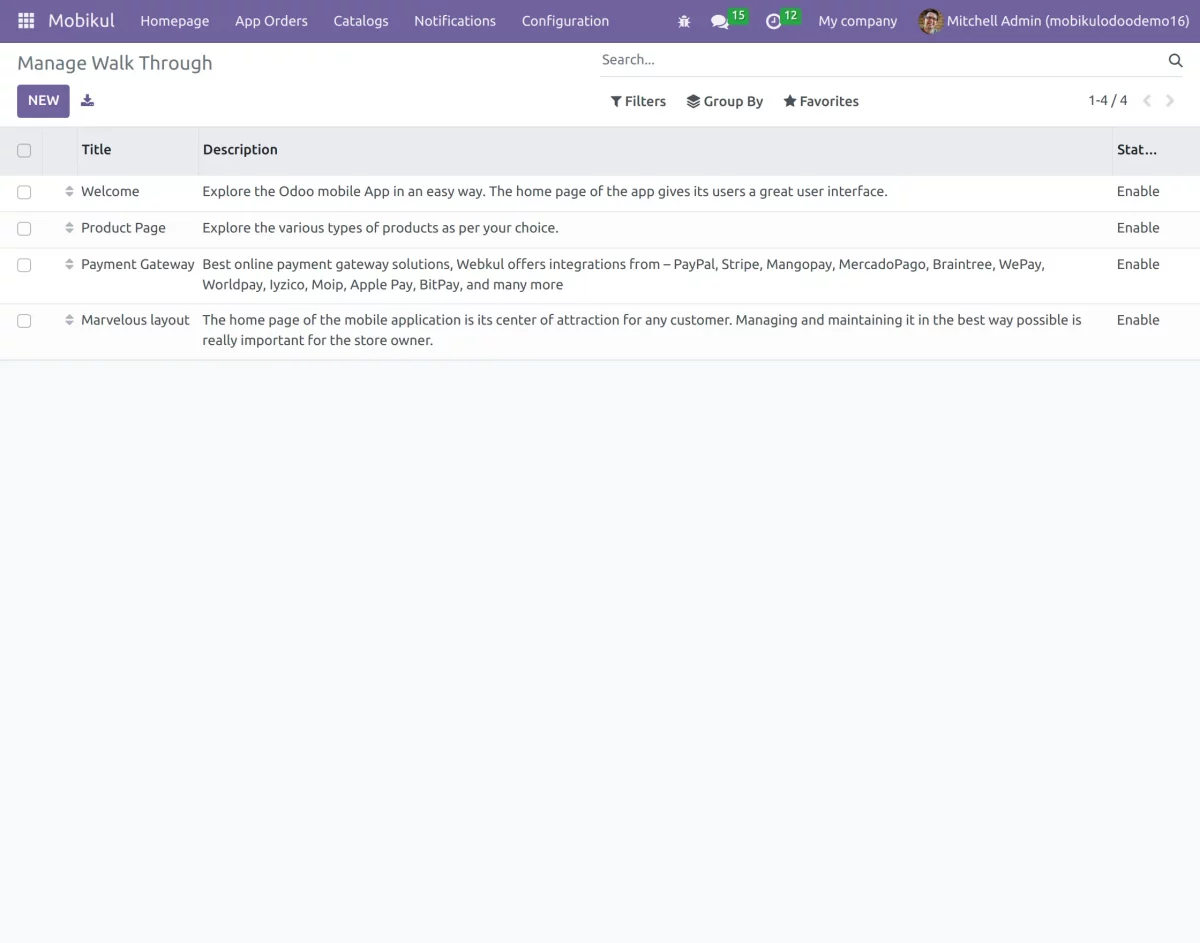
17(b). You can create a new walkthrough by clicking on New.
When creating a walkthrough, give a title, Description, and sequence.
Notifications
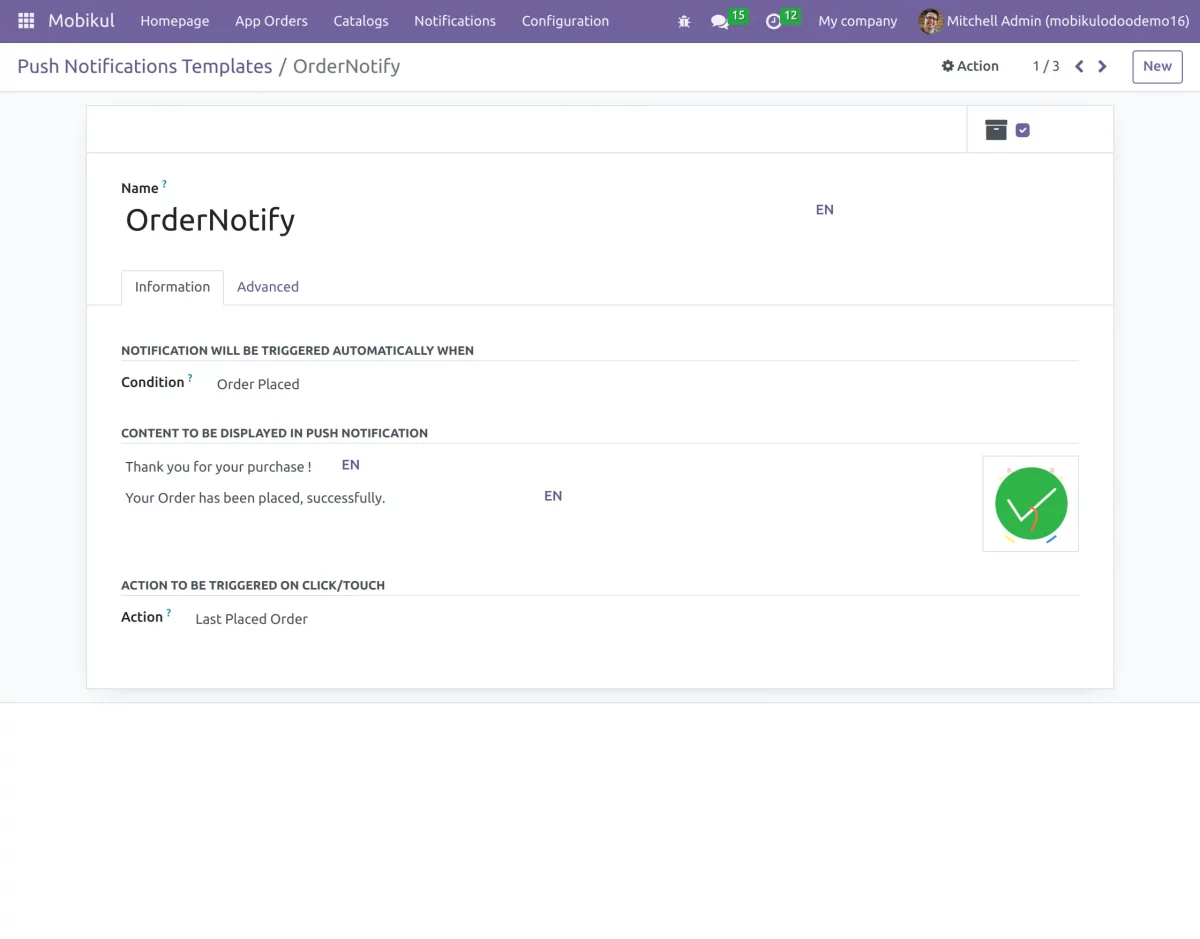
18. You can also manage notification templates easily
Notifications Templates – This is a condition-based Notification sent to the customer on the accomplishment of a particular condition. The admin can here enter conditions as per which the notifications get triggered on the front-end. You can associate a product, category, or custom collection page with the notification, or do nothing. The admin can even edit the Notification’s image.
19. You can also manage Notifications Messages easily.
Notification Messages– These are customer-centric notifications that are assigned to a particular customer. Here, along with the customer name admin can enter the display message, banner image, icon image for notification, and Banner-related to the notification.

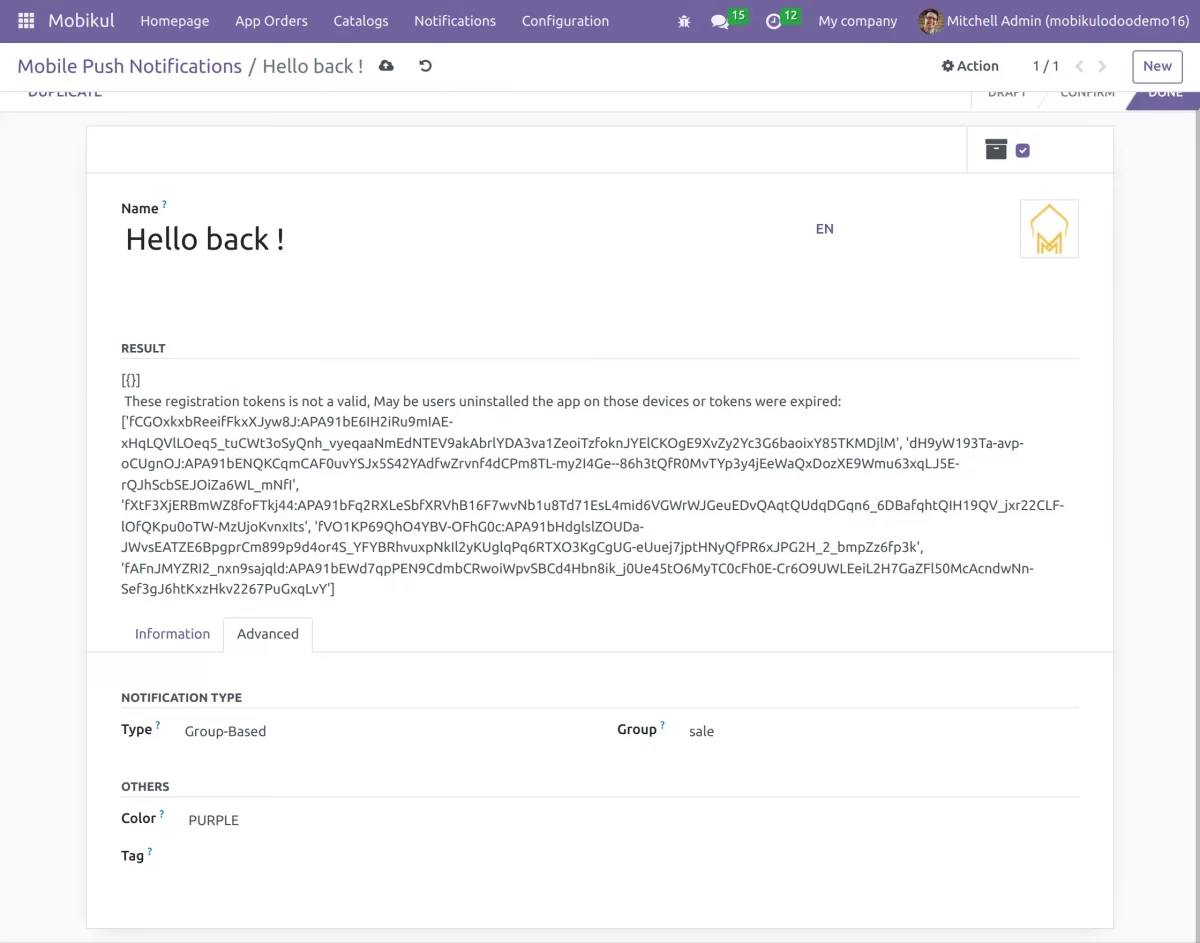
20. One-Time Notification– They appear only for one time as the admin hits on ‘Push Now’. The admin needs to enter the content to be displayed in the notification and assign a product, category, custom collection page, or nothing to the notification. In advance setting, the admin can set the notification Type–
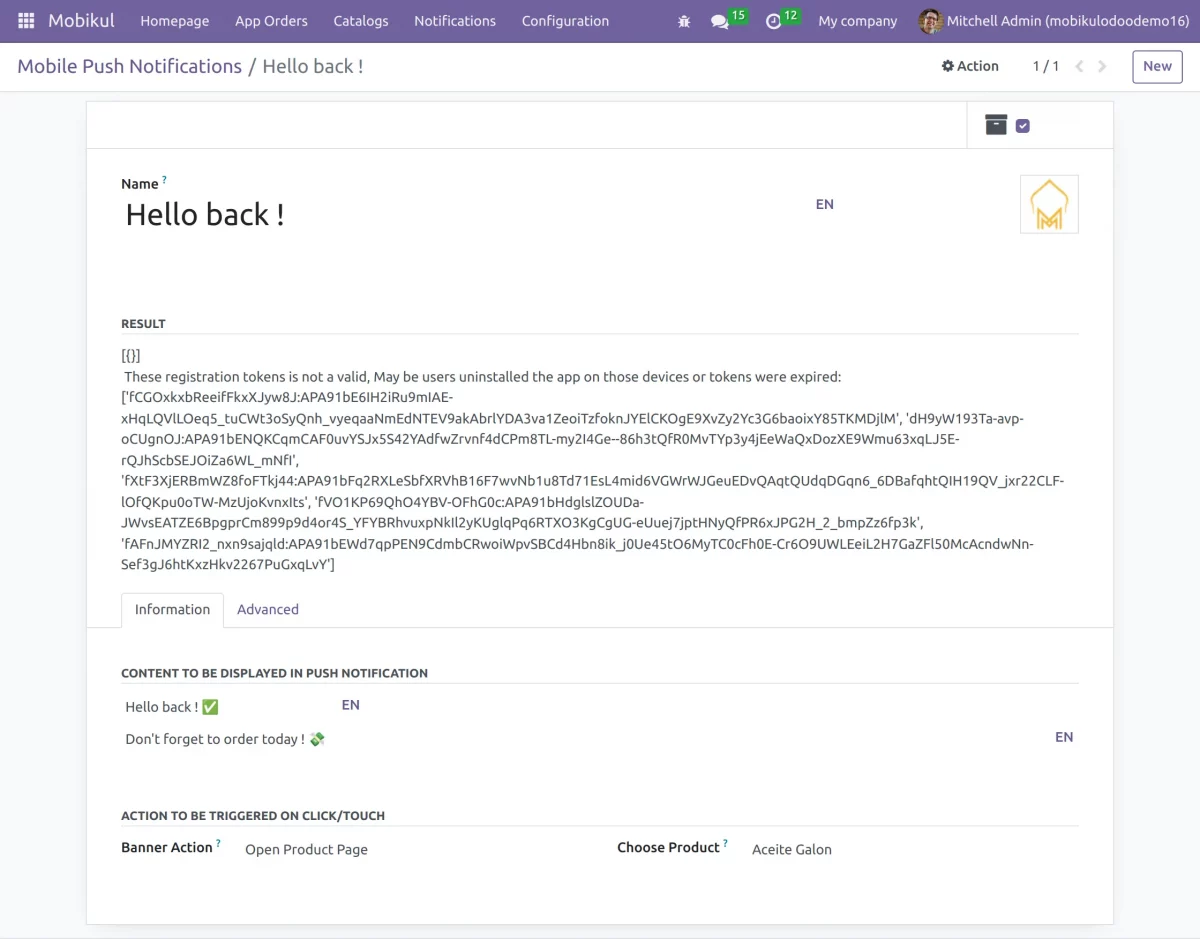
- Token-Based(All Reg. Devices)– In this case, the notifications will be sent to all the registered devices.
- Token-Based(Selected Devices)-In this case, the notifications will be sent to selected devices.
- Topic-Based- Here, the notifications will be sent to according to FCM topics.
- Group-Based-The notifications will be directly sent to the selected groups.
FCM
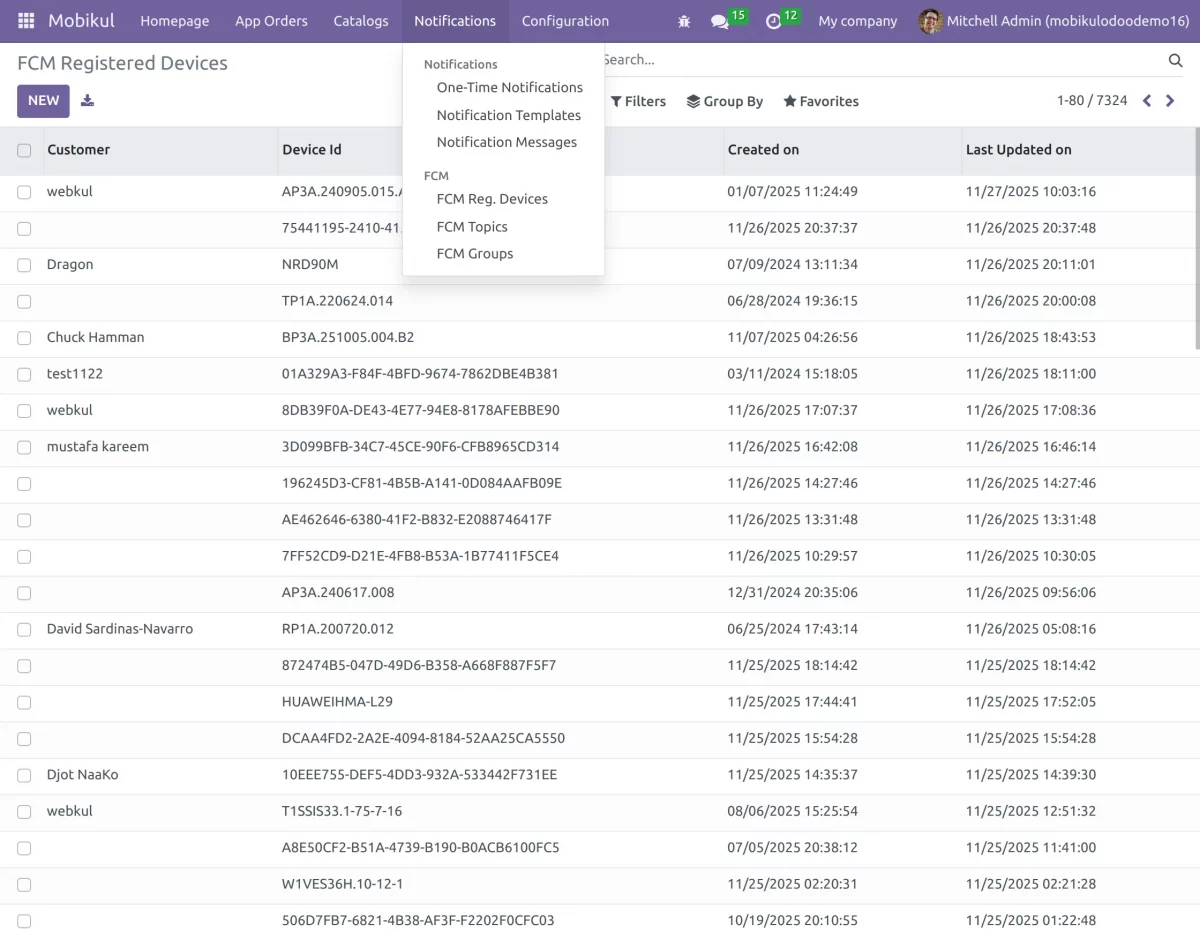
21. FCM Registered Devices:- Go to FCM Registered Devices to check the devices.
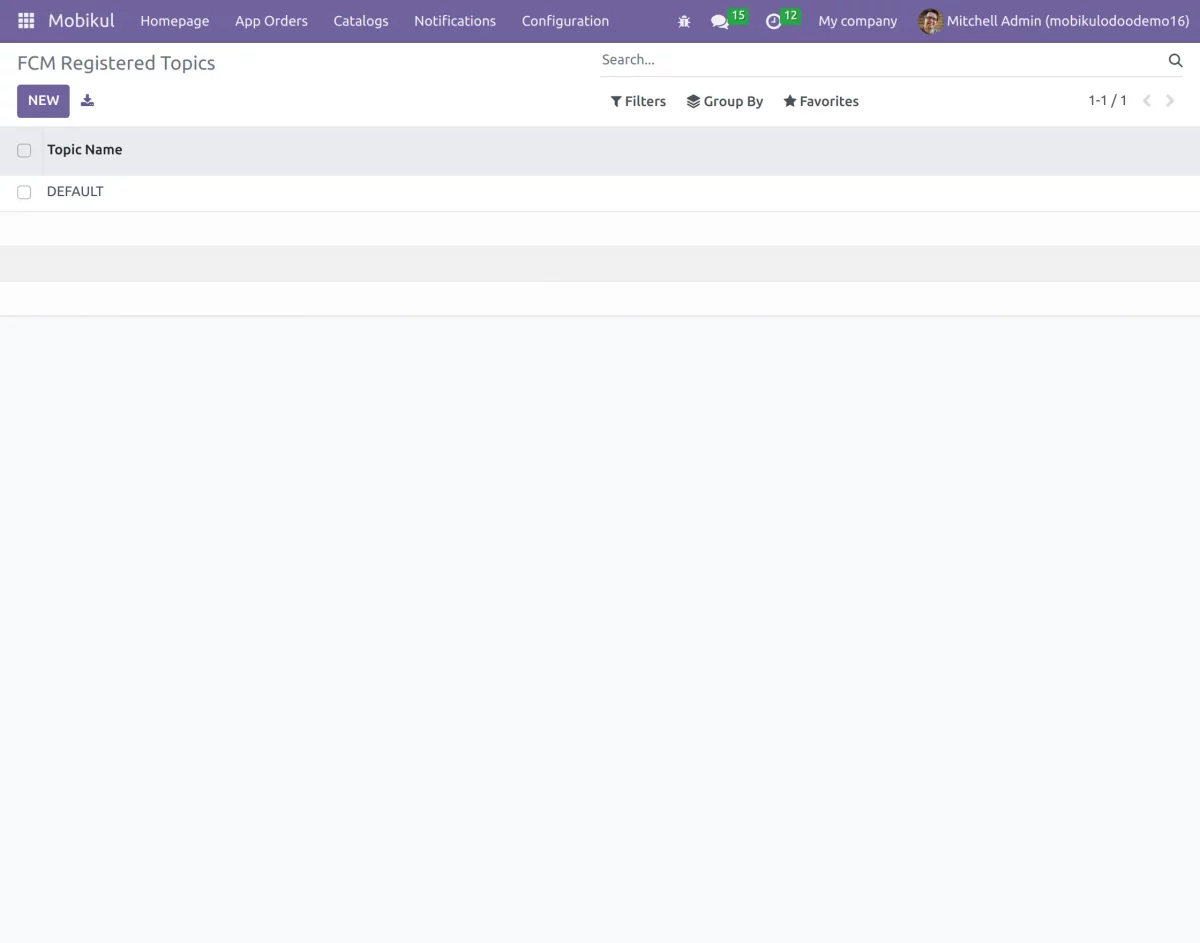
22. Go to the FCM Registered Topics to create and manage these topics.
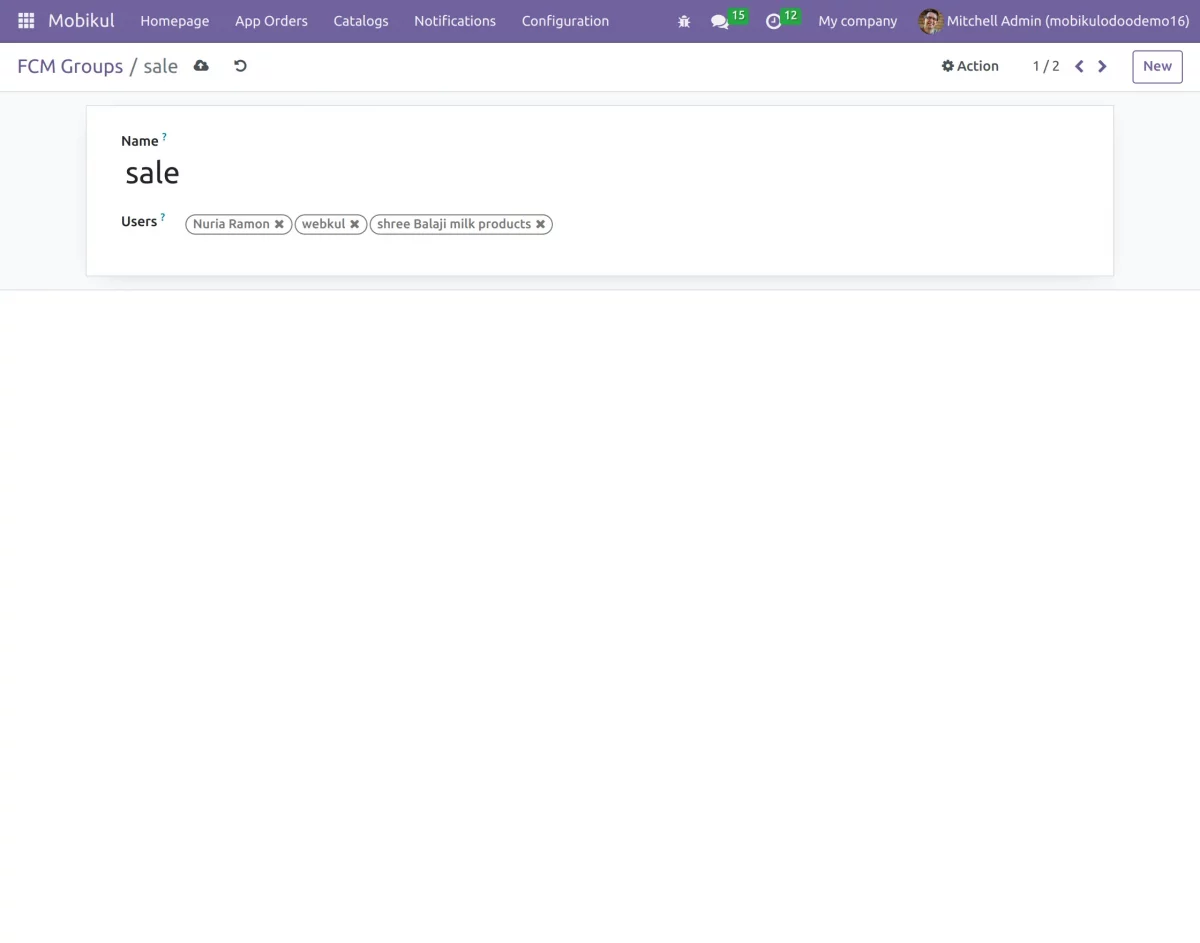
23. FCM Groups:- Here you can define set of groups that can be used to categorize the users. These categories can be directly selected to sent the notifications.
- You have to navigate to the One-Time Notification, then select the Banner and move to the Advanced section. Here, you can select Type as Group-based (refer point 20).
App Orders
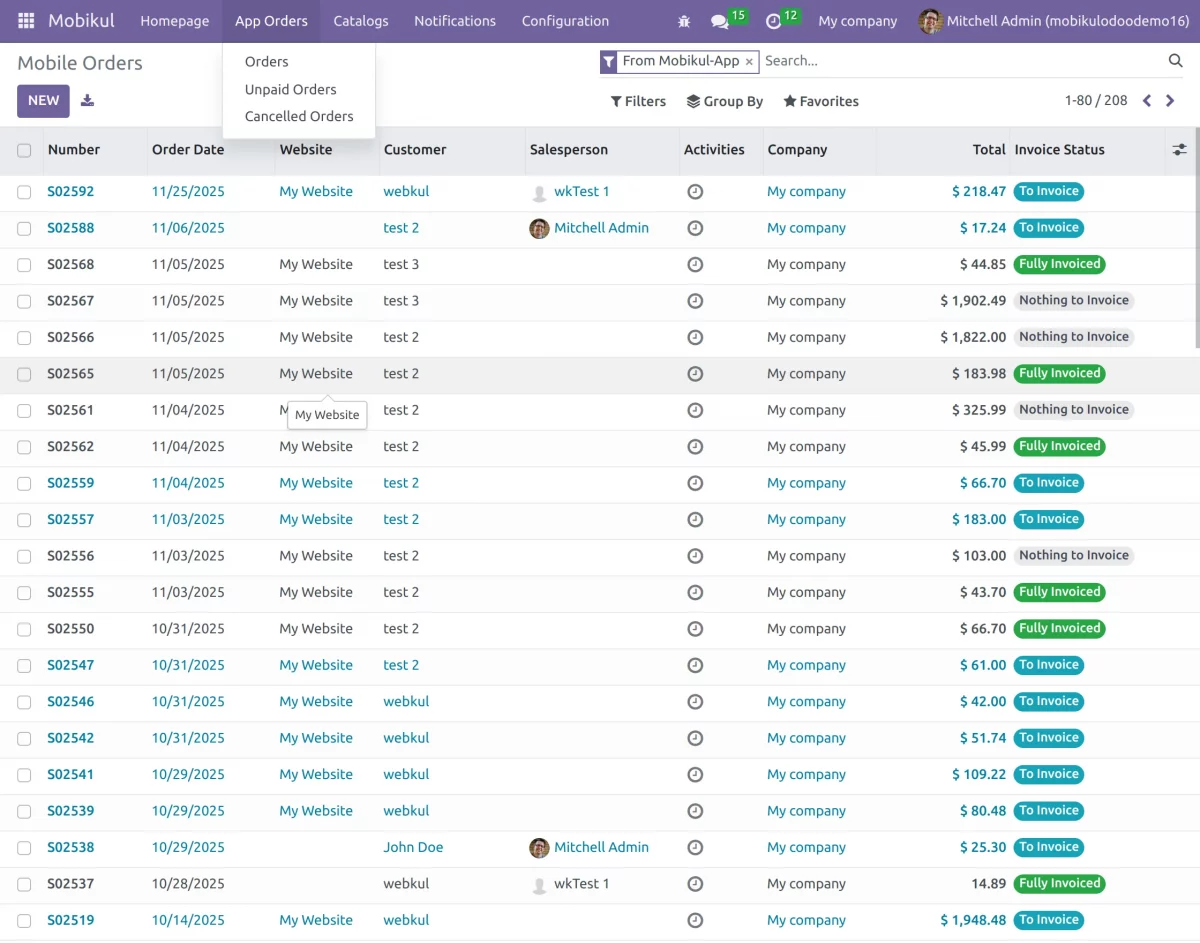
24.In App Orders section, click on Orders to see the list of orders placed in the Mobile app.
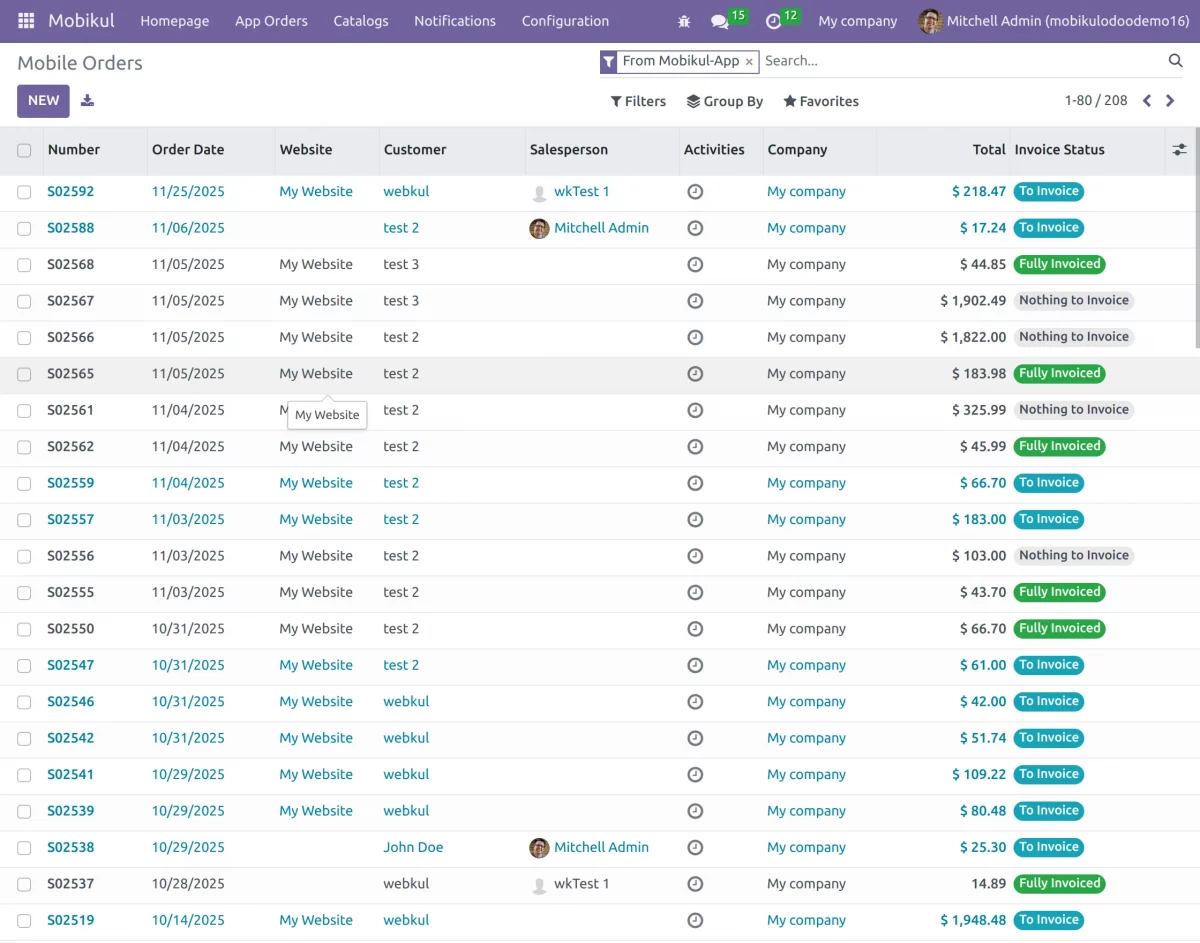
25. Unpaid Orders– This tab shows all orders that have been placed but not yet paid by the customer.
26. Cancelled order– Displays all orders that were placed but later cancelled by the customer or the system.
Homepage
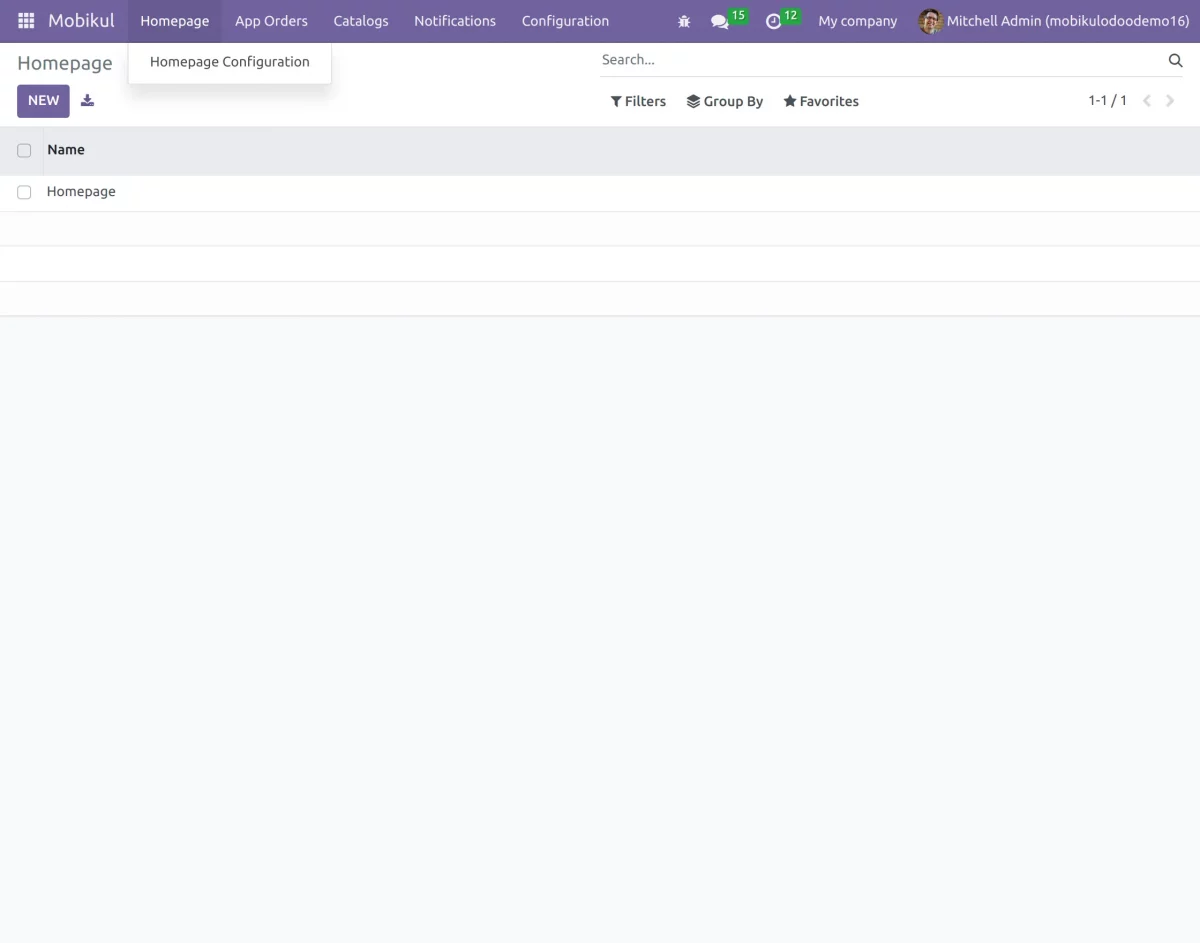
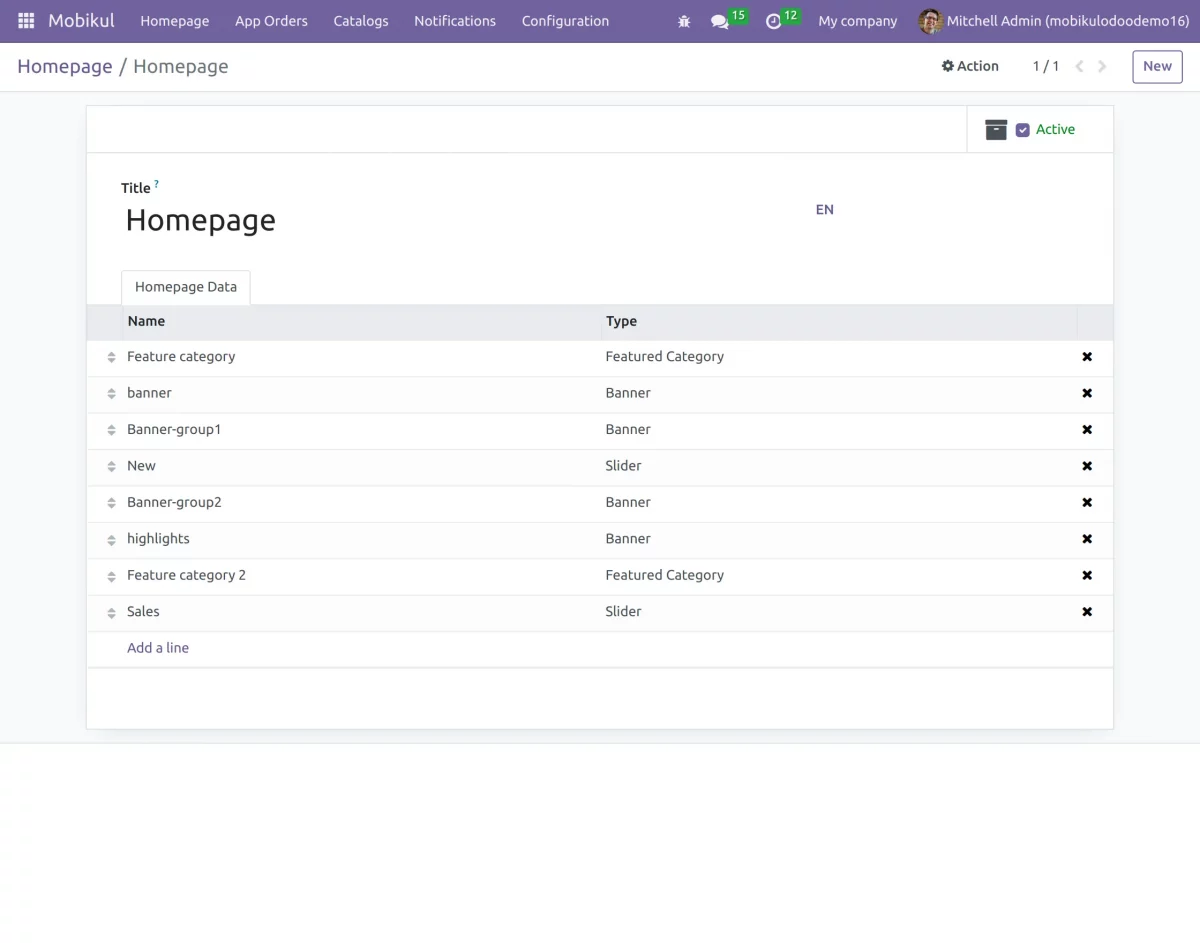
27. Navigate to Homepage >> Homepage Configuration, here you can see the ready to use homepage templates that can be displayed on the app.
28. Click on New to create and configure a new homepage to display on the mobile app.
Use the Add line Option to select the banners, sliders, and feature category for the homepage.
And Set it as ACTIVE.
Android & IOS Login Page:
Your business is successful when you have an attractive business that is really important. As a result, we have both the view of Android and IOS through which you can log in to the account.

Android and IOS view of the Homepage
Homepage functions as a store-front window. The homepage is a page displaying a huge advertisement, without errors, or irrelevant news. It displays all the important stuff like etc. It also shows the Product featured Categories, Banner, and Product Slider. Moreover, the Homepage plays an important role in enhancing the sale of the products or any offers on your e-commerce app as it is the next step toward a visitor becoming a customer. On the homepage of this particular app, a user will get featured product category details, product banner, and product slider.

Some important parts of the Homepage:
- Featured Category and associated Products– While shopping a customer can add any product to his bag and then continue with the shopping further. On the bag page, the customer will find the product added to the cart. The customer can also update the quantity of the product from the bag page. In order to highlight the popular categories on your app, you can convert any category to a featured category.
- Banner -A banner should be attractive enough to easily grab the attention of the users. You can display special offers on your banners. Similarly, our Odoo Mobile app allows you to manage unlimited banners. From the Odoo backend, you can configure what to trigger when a customer clicks on the banner updated on the Mobile app like – a product, a category of mobile collection page.
- Product Slider – Product Sliders display the rotating products, and configure the number of products to display on the Product Slider from the Backend. You can create various product sliders like deals of the day, discount offers, Seasonal Sales, etc.
- Drawer– Drawer includes all Mobikul categories like Accessories, Men, Women, Electronics, sales, VIP, Eyewear, Home&decore, and Jewellery.

Search Suggestions in both the platforms
In the mobile app, users can easily search for products with integrated search suggestions that offer relevant recommendations as they type. For a more personalized and accurate experience, users can refine their search by scanning barcodes, uploading product images, or using AI-powered text queries.

Barcode Search: Users can easily search for products by scanning barcodes in the app.

Android and IOS View of My Account
“My Account” displays all the relevant information of a user’s account. As a result, it displays the information like Account Info, Address Book, All orders, My Wishlists, Languages, and Sign out. The below screenshot shows the dashboard view of both Android and IOS views.

Android and IOS view of Sign-in
If a user wants to log in or sign up for his account then fill in all the credentials of the account.

Bags and wishlist
While scrolling down Flipkart, Myntra, or any other e-commerce website, generally users collect their desired product in their wishlist of user accounts and they are not willing to purchase. On contrary, a bag is a place where the customer collects the products which he wants to purchase. After the completion of the payment, review the order of the product order.

The Checkout Process
In an e-commerce business, the Checkout Process is an important part of the customer’s journey. As a result, when a customer places orders for the product, various stages while the processing out the checkout payment is Billing and Shipping Address, Shipping method, Payment Method, and at last Review of the order. Moreover, you can edit the billing and shipping address on the delivery address.

The below screenshot shows the review of an order after the selection of payment method.

Push Notifications
Push Notifications display the relevant information directly on the screen of devices. As a result, the chances of gaining the user’s attention are very high. Therefore, it is convenient for customers because without logging into the app every time, customers will get information through these notifications about ongoing deals. As a result, a notification will appear on their Mobile Device consisting of the same.

Email verification
Therefore, with the help of this app if a new user signs up or if the existing user login with some other social account initially he has to verify his email i.d then he needs to verify his account after that he will get access to place the order from the app. Therefore, send the verification link to the account. Once it’s verified a customer can place the order.
Delete/ Deactivate Account
The Odoo Mobile App user can delete their account. Also, if they don’t want to delete their account then they can deactivate the same either temporarily or on a permanent basis.

Add to Cart
Improved the Add to cart feature and make it bi-directional. Now users can add products from the cart on the website and check them from the mobile app. However, you need to ensure that both platforms are logged in via the same user credentials.


Support Page
The mobile app now has a support page that helps customers to get in touch with the support team. Also, you can call the support team directly via the contact number which opens up the mobile phone dialer.

Multi-Currency
The Mobile app now supports multi-currency. It means now customers can select their desired currency which will update the product price on the website to the selected currency.

Wishlist
Wishlist is further improved to easily add or remove products from it. It allows customers to save the desired products for future purchases. Additionally, you can create multiple wishlist for different requirements.


Product Comparision
The Odoo Ecommerce Mobile App enables customers to compare products, making informed purchasing decisions. Users can add or remove products by clicking on the two opposite arrow icons, focusing on similarities and differences, and purchasing products that meet their specific needs.

Walkthrough
The Odoo Ecommerce Mobile App allows admins to add walkthroughs for customers, enhancing their understanding of the app’s features and functionalities. Users can install the app to view walkthrough images, and customers can skip the walkthrough.

Real time tracking
The feature enables customers to track the real-time location of the delivery boy within the application. Additionally, customers can view the pickup location from where the delivery boy collects their order.
Live Tracking Feature only works in conjunction with Odoo Delivery Boy App.

NEED HELP?
Hope you find the guide helpful! Please feel free to share your feedback in the comments below.
If you still have any issues/queries regarding the same, please raise a ticket at the UV Desk.
I hope this helps. In case of any further queries, contact us at our support mail.
Thanks for paying attention!!
Current Product Version - 1.1.1
Supported Framework Version - Odoo V19, V18, V17, V16, V15, V14, V13,

Can you help?