Marketplace PayUmoney Payment Gateway for Magento 2: Well, who doesn’t know PayUmoney is one of the best payment gateways in India. So, we have introduced Magento2 Marketplace PayUmoney module for the marketplace.
Using Marketplace PayUmoney Payment Gateway for Magento 2, the marketplace owner can integrate the PayUmoney payment gateway to the marketplace store.
This module helps the marketplace vendors to accept the payments online.
This module supports split payments functionality, where the amount is automatically divided between the sellers and the store owner at the time of checkout.
The customers can use PayUmoney payment method to pay for their purchases during the checkout with ease as the payment is done through this gateway are fully secure.
Please Note:
- You need to have Magento 2 Multi Vendor Module to use this module
- For now, this module supports INR Currency only.
Check the video showing the customer flow & initial configuration of the plugin –
The rest of the admin flow and the PayuBiz flow along with the refund process will be shown in the upcoming video of the plugin.
Features
- Customer can pay the order amount using PayUmoney and PayUBiz Payment Methods.
- Fully PCI Compliant, no card details submitted to the client-server
- The admin can refund the invoiced amount.
- The admin can refund invoiced amount partially
- Allow admin to manage refund before release payment or after release payment.
- Enable/disable payment method from admin panel
- Payment automatically splits to sellers at the time of checkout
Installation
Customers will get a zip folder then they have to extract the contents of this zip folder on their system. The extracted folder has an src folder, inside the src folder you have the app folder.
You need to transfer this app folder into the Magento 2 root directory on the server as shown below.

After the successful installation, you have to run these commands in the Magento 2 root directory.
First command- php bin/magento setup:upgrade

Second Command – php bin/magento setup:di:compile

Third Command – php bin/magento setup:static-content:deploy

After running the commands, you have to flush the cache from the Magento admin panel by navigating through System>Cache management as shown below in the snapshot-

Language Translation
For translating the module language, navigate through src/app/code/Webkul/MpPayUMoney/i18n then edit the en_US.csv file.
Thereafter, rename the CSV as “en_SA.csv” then translate all right side content after the comma in the Arabic language. After editing the CSV, save it.
Then upload it to the path src/app/code/Webkul/MpPayUMoney/i18n where the Magento 2 is installed on the server. The module gets translated into the Arabic Language. It supports both RTL and LTR languages.

Module Configuration
The admin can configure the module from the back-end easily. To configure the module, the admin can navigate to Stores> Configuration> Sales> Payment Method.
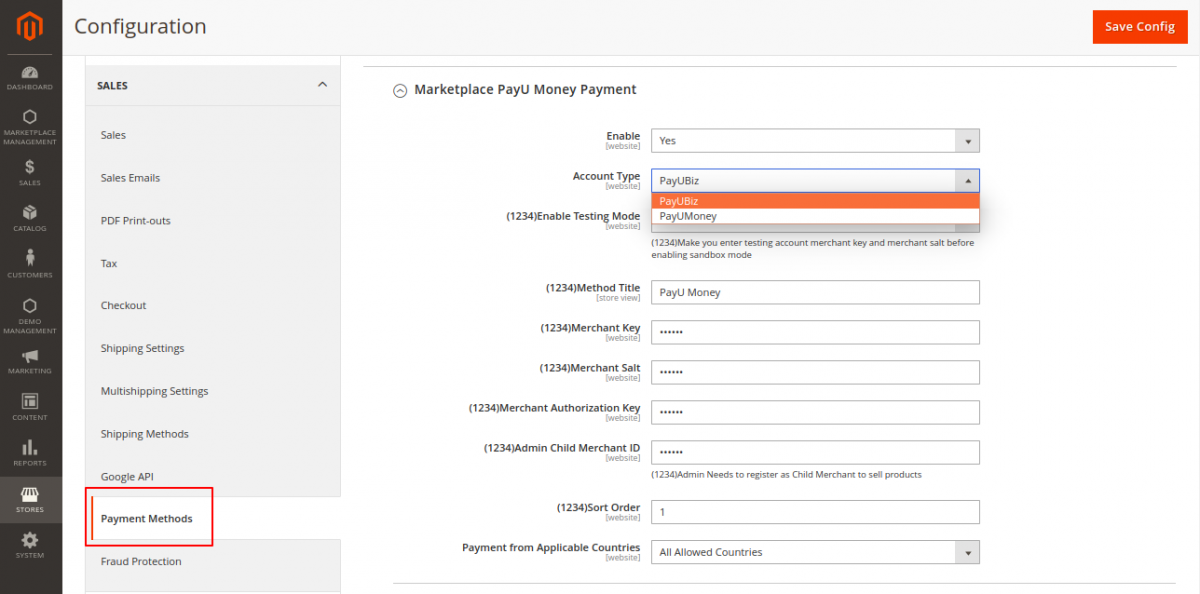
Here, the admin can-
- Enable or disable the module accordingly.
- Enable the module in testing or live mode.
- Enter the title for the payment method, that will be shown on the front page while customer selects the payment method.
- Enter Merchant Key, Merchant Salt, Merchant Authorization Key, and Admin Child Merchant ID (For the credentials, please contact to PayUmoney)
- Sort the order for the module to show on the website.
- Select the Applicable Countries for the Payment.
- Select the Specific Countries for the Payment.
Note: Admin needs to register as Child Merchant to sell products.
How to set up a test account-
The admin can set up a test account from the link https://test.payumoney.com/
To create a new child account then view the transaction details, first, the admin needs to login from the link https://test.payumoney.com/

now enter the test details to log in to the account-

Now enter the password to login to the test account-

after successful login, the admin can view the Aggregator Profile as shown in the image below-

The admin can also view the aggregator transaction details as shown in the image below-

Similarly, the admin can create the new child merchant by filling the required details-

The admin can search for the child merchant by the child merchant ID then also view the details of the child merchant by clicking on the view button as shown in the image below-

Also, can see the details of the child transaction as shown in the image below-

Log in as a child account:
Child users can also log in to the child account using the child account details.

Now click on the login button then enter the email Id and password to continue to the child account dashboard.
After a successful login to the child account, there is a child account dashboard available from where the transactions and other details for the child account can be accessed as shown in the image below-

details can be seen of the transaction by clicking on the view details button under the actions of the particular transaction-

Seller-end
The seller can enter the PayUMerchant ID in Manage PayU Money Details in order to receive the payment directly to the account after the customer completes the order.

The seller can see the order history of the own store. To see the invoice details, the seller can navigate to My Account> My Order History (in the marketplace dashboard)> View order
The status of the order will be shown in the Invoice (if the payment is done online) as Paid. The seller can also see the payment information as PayUmoney, when a customer pays the amount using the PayUmoney.
The seller can also see the total vendor amount and as well as admin commission on the items invoiced as shown in the image below-

Customer-End
The customer can make the payment using PayUmoney payment method. To purchase the product the customer can select the product and the item to the cart as shown in the image below-

Now, the product will be added to the customer’s cart and the customer can click on the Proceed to Checkout button as shown in the image below-

After processing to the checkout, the customer can select the shipping address to place the order as shown in the image below-

Now, the customer can select the PayUmoney as the payment method to place the order.

After clicking on the Place Order, the customer will be redirected to the PayU Money where the customer can log in to the PayUmoney or can select the payment mode to pay for the product accordingly.

If the customer selects the payment mode as a Credit/Debit card, the customer will need to enter the Card Details to complete the payment.

After successful payment, the customer will be redirected to the Thank you page.
View Order History –
Now, the customer can navigate to My Orders> View Order> Invoices, to view the invoice of the orders. Here, the customer can see the invoices for both, products and as well as for the shipping and handling charges.
The customer can also see the Order Information from here.

Admin-End
View Order And Transaction Details –
To view the details of the order, the admin can navigate to Sales> Orders, here, the admin can see-
- Information
- Invoices
- Credit Memos
- Shipments
- Comments History
- Transactions
Information: From the information section, the admin can see the complete information regarding the order. Here, the admin can see the order & account information, address information, payment & shipment method, items ordered, order total as shown in the image below-

Invoices: The admin can see the invoice for the order from the Invoice section. Here, the admin can see two different invoices for the same order.
The first one is for the product and another one is for the shipping and handling as shown in the image below-

Transaction: In the transaction section, the admin can see the complete transaction done by the customer with the details of the PayUmoney transaction as shown in the image below-
Refund process
The admin can easily refund the amount of the customer using this module. In Magento 2 Marketplace PayUmoney Payment Gateway, both the admin as well as sellers can process the refund of an order.
Note: The sellers will be able to process the refund if admin allows the sellers to manage orders from the admin panel.
To initiate the refund, the admin has to navigate through Sales > Invoice then select the order for which the admin wants to refund to the customer.
Now, the admin can click on the Credit Memo button as shown in the image below-

Then click on the Refund button accordingly.

Thus the admin can easily refund the amount of the customer and can also see the refunded product from the Sales> Orders> Select Order> Transactions

The vendor can also see the details of the refunded order from the marketplace dashboard by navigating to- My Order History> View Order> Refunds> View

Customers are also able to see the details of the refunded order by navigating to My Orders> View Order> Refunds

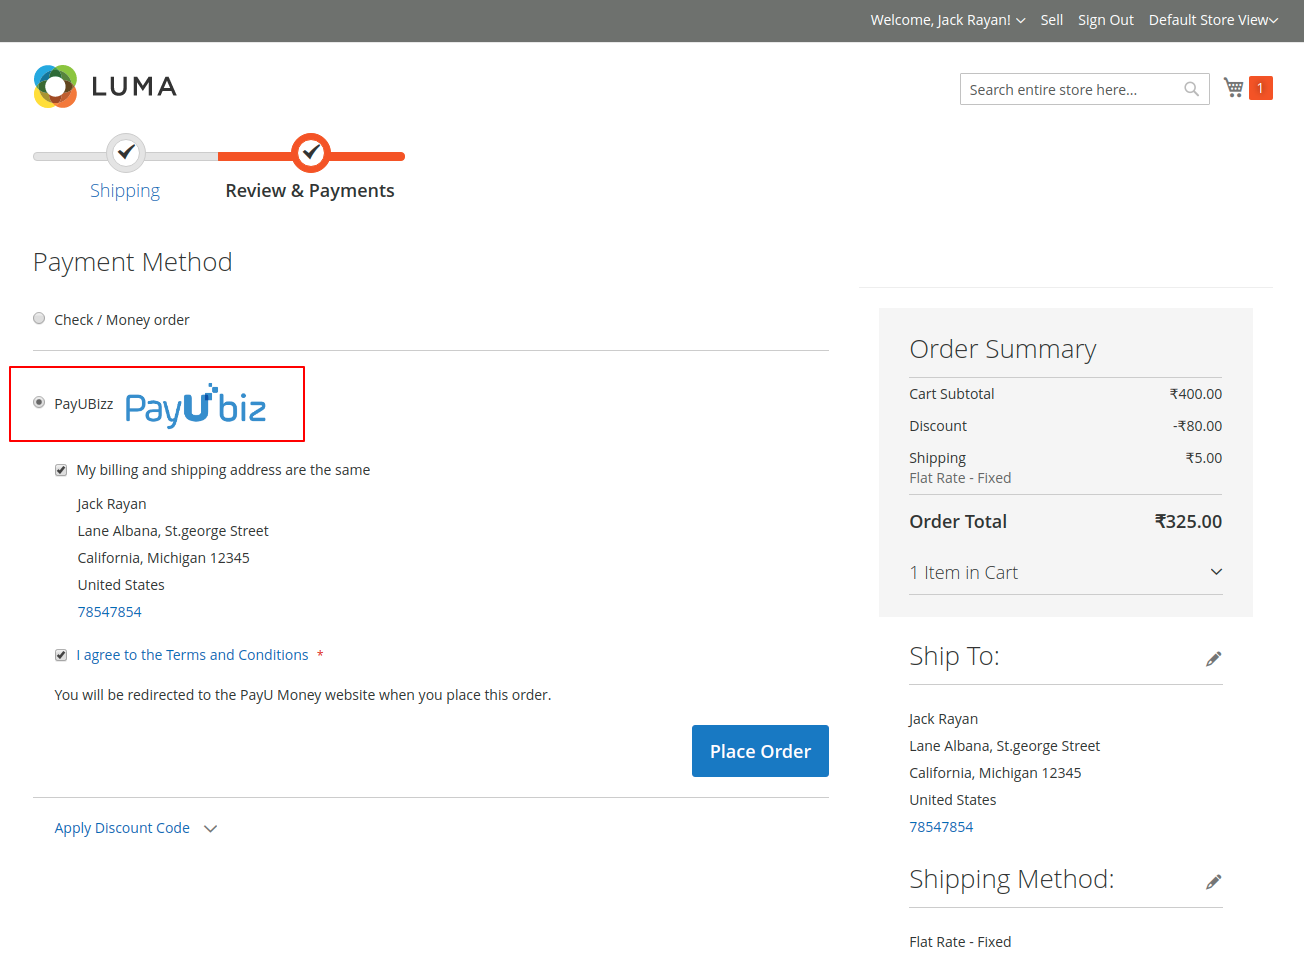
PayUBiz Payment Method: For Customers
The second payment option for the customers is the PayUBiz payment option which the admin may allow while setting the configurations.
The customers can make a purchse in a usual way. For instance, the customers chooses the Striped_Sling_Bags product and adds it to the cart as shown in the image below.

In the checkout page, the customers will find the PayUBiz payment method as shown in the image below, which can be chosen in order to make payment for the order.
 On clicking the Place Order button, it redirects the customer to the PayUBiz payment page as shown below.
The customer needs to add the card details so as to make the payment for the order and click on the Pay Now button. 
The Pay Now button redirects the customer to the paymnet gateway, where the transaction process takes place as shown in the image. 
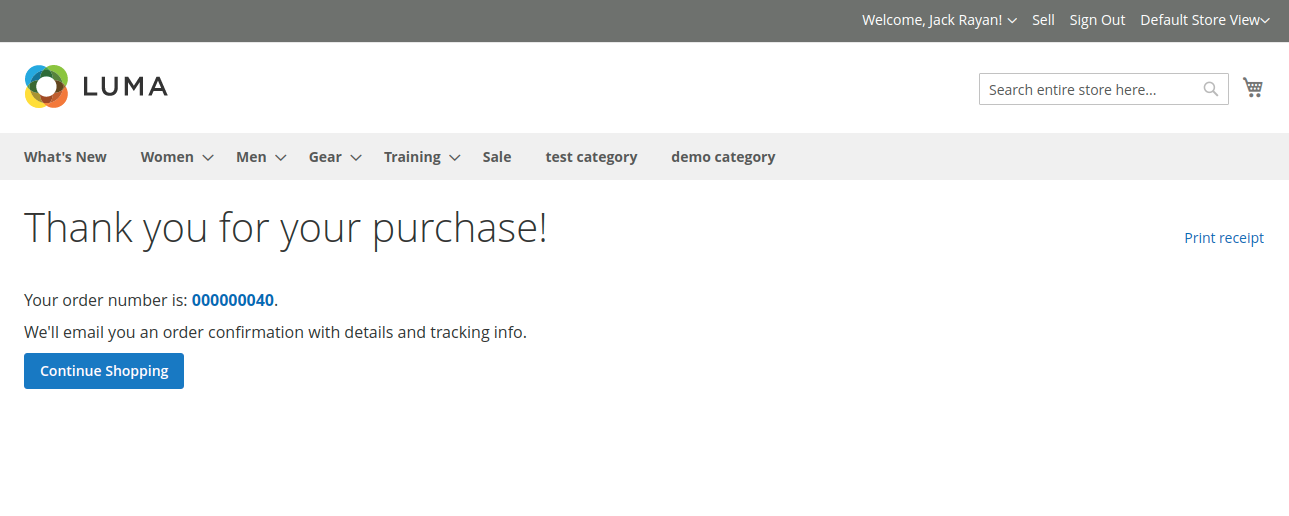
Once the payment is made, the customer receives a order confirmation notification as shown in the image below.
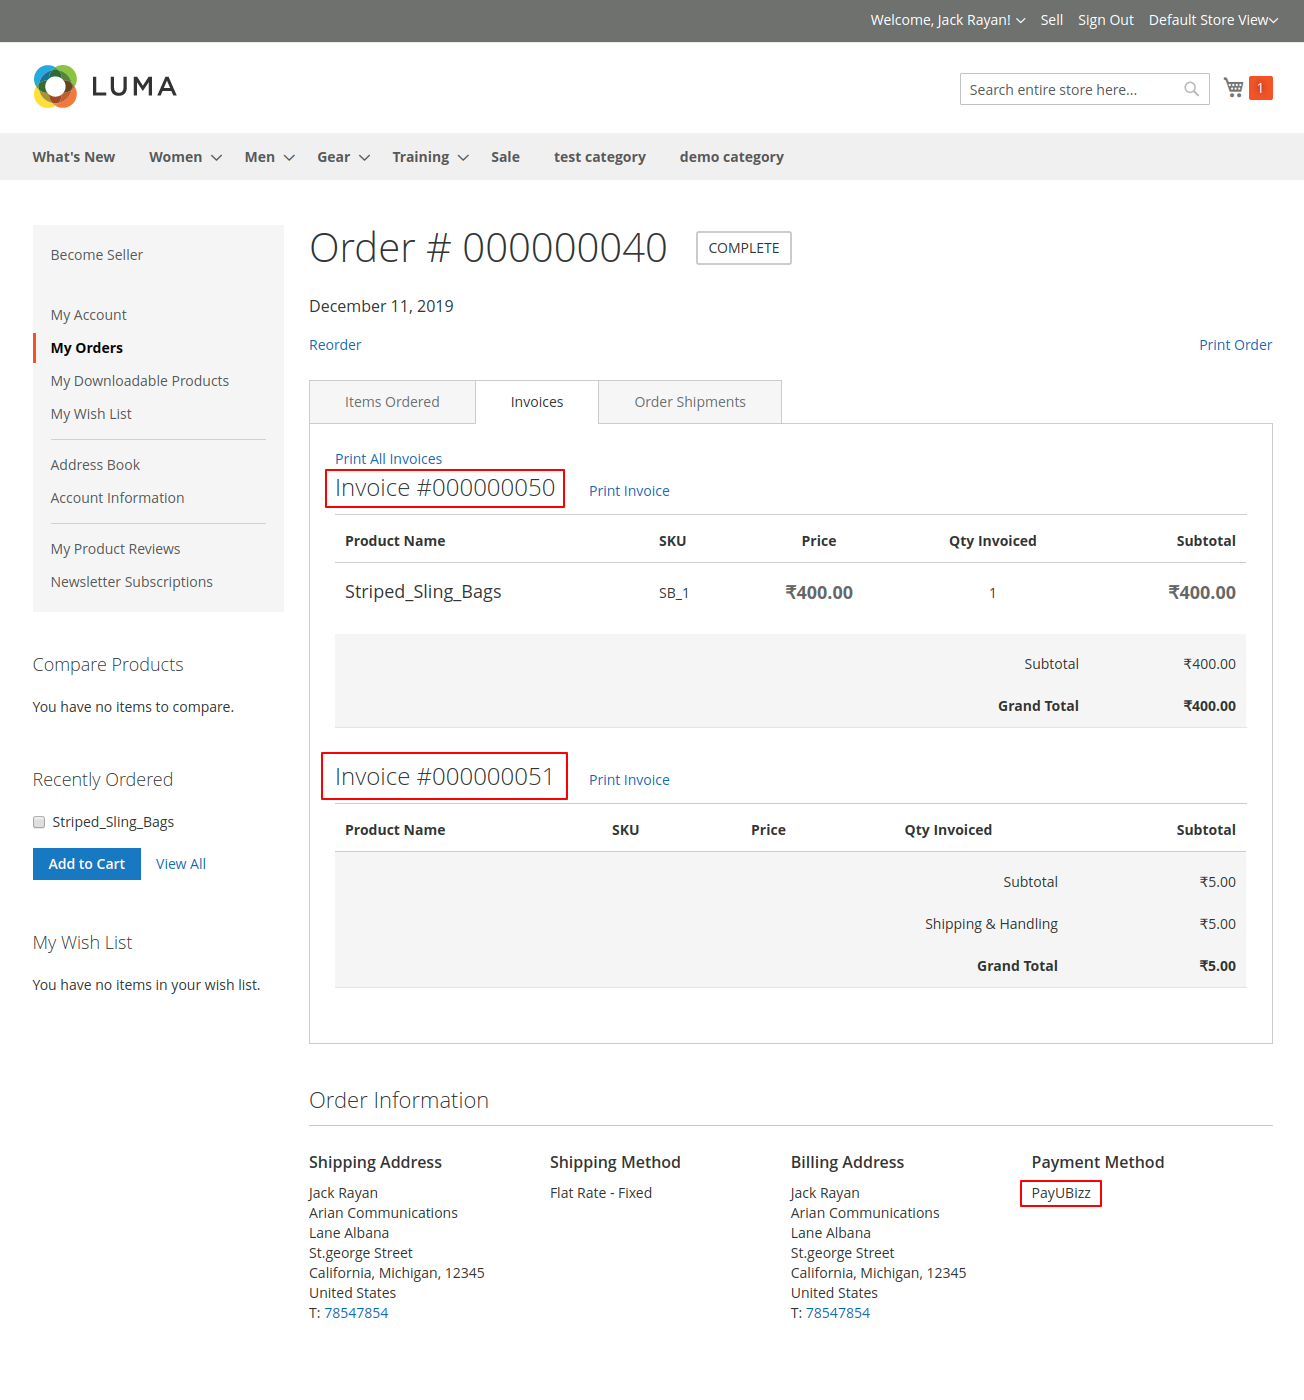
 Order History: Customer End
On navigating to My Account > My Orders > View Order > Invoices, the customer can view the invoice of the respective order.
The customer will find the invoices for the products and the shipping and handling charges as shown in the image below.
Order History: Admin End
In the admin panel, the admin will receive the order and can view the order information under Sales > Orders by clicking the order id for the respective order.

As the payment is split, it generates two invoices for the respective order.
Note:
- To carry out the split payment process manually, the admin must click on the Split Payment option present on the Order Information page.
- Else, the admin can set up the cron for splitting the payment automatically.
The admin can navigate to the Invoices tab and view the same as shown in the image below.

Payment Release: By the Admin
Once the admin splits the payment, and invoices are generated for the same, the admin can release the payment.
This is done by simply tapping the Release All option present in the header of the Order & Account Information page as shown in the image below.

As soon as the payment is released, a success message, “Payment Released Successfully” shall display as shown in the image below.

Further, the admin can release the payment for the seller as well.
For this, the admin needs to navigate to Marketplace Management > Manage Seller > Manage Seller’s Order page.
For the resepective order, the admin can navigate to the Release Payment column, under which the option for Release Seller Payment is present. On tapping the same, the admin can release the seller’s payment.

Meanwhile, the admin can view the complete transaction for the order and the PayUBiz transaction details under Transaction tab as shown in the image below.

Refund Process
If in case there is a need to refund the amount, the admin and even the sellers can process the refund in their respective panels.
Note:
- The sellers can process a refund only if the admin allows the sellers for the same in the admin panel.
The admin needs to choose the order for which the refund is to be processed under Invoices tab.
Thereafter, the admin taps on the Credit Memo option present in the header of the Order and Account Information page of the respective order as shown below.

On clicking the Refund tab, the admin will be able to refund the amount to the customer for the respective order.

Under Transactions tab, the admin can view the Refund for the resepctive order/ invoice, which took place thorugh PayUBiz.

Refund Process: Seller End
Besides this, to view the refund details for an order, the seller can navigate to My Order History > View Order > Order Details > Refunds> View Credit Memo.
The status of the order alters to Closed as shown in the image below.

Furthermore, the customers can also view the refund details for the order under by navigating to My Orders > View Order > Refunds.
The customer will find the complete details for the refunded order as shown in the image below.

That’s all for the Marketplace PayUmoney Payment Gateway for Magento 2 extension. Still, have any issues please raise a ticket or get back to us at [email protected]
Current Product Version - 5.0.0
Supported Framework Version - Magento 2.0.x, 2.1.x, 2.2.x,2.3.x, 2.4.x
Be the first to comment.