Magento 2 Multi Vendor Dropship extension allows the admin to create and manage warehouses for the marketplace sellers and add shipping rules data using the CSV file.
Using Magento 2 Multi-Vendor Dropship, the marketplace sellers will be able to assign their products to various warehouses while editing their products.
When the customer places an order, it will be assigned to the nearest available warehouse.
However, the warehouse manager has the authority to ship the products to the customer’s shipping address. So, the warehouse managers can also add their shipping rules for their own warehouse.
Please Note –
- This extension is a Marketplace Add-On and you must have Webkul’s Magento 2 Multi Vendor Module installed first.
- The module is not compatible with Magento 2 Multi Shipping Marketplace Add-on.
- It will only work with the below default Magento shipping methods:
- Tablerate Shipping
- Free Shipping
- DHL
- UPS
- USPS
- FedEx
Features
- Google API key is only required for auto-assigned warehouse configuration settings.
- The admin can add, delete, and change the status of multiple warehouses.
- Assign/unassign a single product to multiple warehouses.
- The admin can mass assign/unassign products to the warehouse.
- The admin can create, delete, and assign the Shipping Rule (Table Rate Shipping) to various warehouses.
- Shipping is calculated from the warehouse location.
- The warehouse manager can manage shipments for his orders after admin approval.
- The warehouse manager will be able to add and delete the shipping rules for his warehouse.
- The customer can select the shipping method according to the warehouse in the same order.
- Shipping will be calculated according to the warehouse.
- The vendor can assign a warehouse during adding a new product.
- The admin can view the associated products of the warehouse.
- The admin can use filters to search vendor dropship orders.
- When the product is not assigned to any warehouse then also, the seller can assign a quantity to the warehouse from the order history page.
- GraphQL is implemented for the Magento 2 Multi Vendor Dropship extension.
Note: It will only work with the below default Magento shipping methods:
- Tablerate Shipping
- Free Shipping
- DHL
- UPS
- USPS
- FedEx
Installation

Customers will get a zip folder and they have to extract the contents of this zip folder on their system. The extracted folder has an src folder, inside the src folder you have the app folder. Thus, you need to transfer this app folder into the Magento 2 root directory on the server.
After the successful installation, you have to run the below commands in the Magento 2 root directory.
php bin/magento setup:upgrade
php bin/magento setup:di:compile
php bin/magento setup:static-content:deploy
php bin/magento indexer:reindex
php bin/magento cache:flush
Module Translation
For translating the module language, please go to app>code>Webkul>Vendor Dropship>i18n and edit the en_US.csv file. Now, translate the words on the right and upload the modified file to the same location.
The filename of the translated file should be according to the language and region code like de_DE.csv.

How to Get the Google API Keys

The admin needs to get the Google Maps API key to make the address auto-complete feature to work. Please visit the following link for getting the API Key. Log into your Google account and then click the GET A KEY button as visible below:

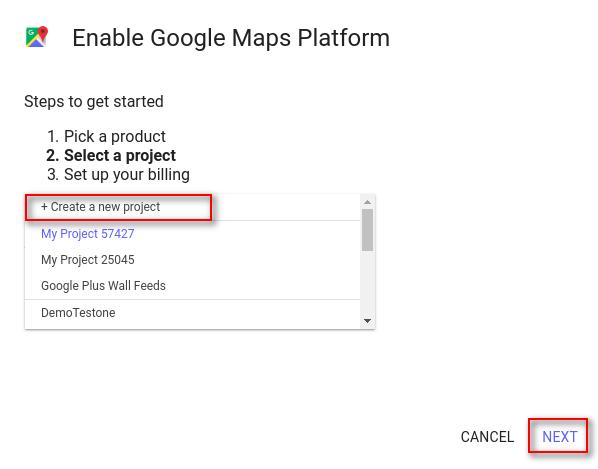
A pop-up window will appear, to enable the platform and select the checkbox as required. Create Project and give any name to it or select the existing one. Henceforth, click Next.
After a few seconds, the API Key will be generated. Copy the API key, it will be used at the time of the widget configuration.
Module Configuration
After the successful installation of the Magento 2 Multi-Vendor Dropship extension, the admin will configure the module for use. To do so, navigate to Stores>Configuration>Webkul>Vendor Dropship Manager.

Here, the admin has two settings to configure –
1. General Settings
- Enter the Name of the Store Owner.
- Enter the Email address of the store.
- Set the default Quantity for the products when assigned to a warehouse.
- Set to Assign Warehouse as – Auto or Manual.
- Enter the Google API key for the Maps.
Note:- Google API key is only required for auto-assigned warehouse configuration settings.
In Auto –
At the time of checkout, the customers will find the Dropshipping method. While placing the order, the nearest warehouse will be assigned where the product is available.
In Manual –
The customers will only find the default shipping methods.
After, placing the order using the available shipping method, the admin will need to assign the nearest warehouse manually where the product is available.
2. Vendor Dropship Transactional Emails
- Set Yes to show the price details in Order Approval mail else select No to hide the price.
- Select the Order Approve email template for the warehouse.
- Select the new account to create an email to the warehouse user.
Lastly, click the Save Configuration button to save the changes.
New warehouse registration mail to warehouse:

Order Approve mail to Warehouse:


Therefore, the admin can set the configurations under Vendor dropship as follows:
Enabled for Checkout: The admin can choose to display the shipping method at the checkout by enabling it.
Title: Set the Title of the shipping method that will display on the checkout page.
Show Method if not Applicable: The admin set this as No or Yes, as need be.
Displayed Error Message: The admin can choose to display an error message when the shipping method is unavailable.
Vendor Dropship Management – Admin Panel
After the successful installation, the admin a new menu option under Marketplace Management>Vendor Dropship Menu as shown below in the snapshot.

Let’s check each of the menu options available to the admin under the Vendor Dropship Menu –
Warehouse Manager
Under here, the admin will be able to see (if it’s not the first time) all of the created warehouses. The admin can add a new warehouse and can edit the existing warehouse information accordingly.
Apart from that, the admin can find the information related to the various warehouses like – Warehouse Title, User Name, Description, Status, and Edit the warehouse.

Warehouse Status – Active or Inactive
From the Actions dropbox menu options, the admin can change the status of the warehouses as Active or Inactive.

A confirmation box will appear for changing the warehouse status, click OK to save the changes.

Add New Warehouse
To add a new warehouse click the Add New Warehouse button and this brings up the section to enter the related information for the warehouse. Here, the admin will enter the following warehouse information:

- User Name: User for warehouse login. Add the name of the Warehouse Manager.
- First and Last Name: of the Warehouse Manager.
- Email: Email address of the Warehouse Manager.
- Warehouse Title: add the title of the warehouse.
- Description: related to the Warehouse.
- Complete Address: of the Warehouse and select it. The rest of the details will get auto-filled.

- Select the Allowed Shipping methods.
- Enter Password for the current Warehouse.
- Confirm Password for the current Warehouse.
- Set the account as Active or Inactive as required.

- Enter the password for your admin account. Lastly, click Save Warehouse to save the new warehouse.
Warehouse Associated Products
In the Associated Products section, the admin can also view the already assigned products in an existing warehouse. Here, various filter options are available to make a quick search based on – product ID, product name, product type, SKU, warehouse available stock, and price ranges.

Warehouse Order Manager (Vendor Dropship Orders)
Under here, the admin can see all the orders that have been placed by the customers. The admin can Approve or Cancel any of the orders visible under this section.
Whenever a customer places an order, according to the selection made in the admin configuration for the Warehouse Assign as – Auto or Manual the warehouse will be assigned.
In the case of Auto Warehouse Assign whenever a customer places an order the nearest warehouse to the customer’s address is assigned to the order.
Therefore, for the Manual Warehouse Assign, the admin has to manually assign the order to the warehouse.

Furthermore, to approve/cancel an order, first, select the order by checking the checkbox and then from the Actions drop-down option click on Approve or Cancel an order as per your requirement and then click the confirmation dialog box.

After, the order has approved the warehouse which has this order will ship the products to the customer. When the invoice gets generated or the order has been approved the status of the order changes from pending to processing.
Thus, to view, the details of the order click on the View link on the extreme right with respect to the order.

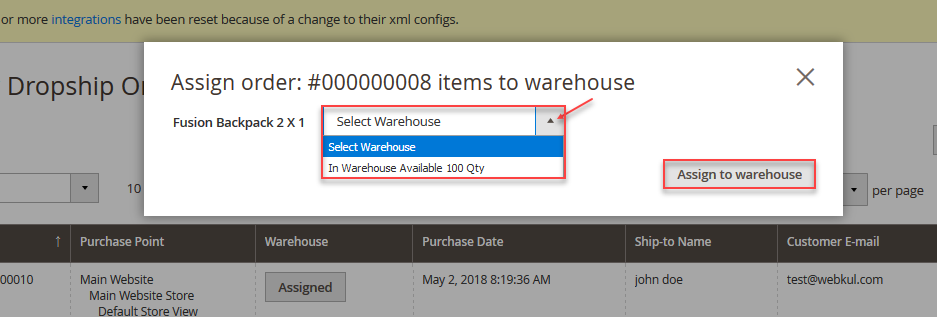
Moreover, the admin can manually assign a warehouse to any of the orders that are unassigned to any of the warehouses. To do so, click the Unassigned tab and after that select the warehouse from the drop-down option and then click the Assign to Warehouse button as shown below in the snapshot.
Warehouse Products (Add Product To Warehouse)
Under this section, the admin will be able to assign/unassign the products to different warehouses. The admin can also assign a single product to multiple warehouses as required.

Therefore, to Assign/Unassign Warehouse to a product, just check the product and click on the Actions drop-down option. Now, select the Assign/Unassign Warehouse button.

Furthermore, select the warehouse where you want to assign the product.

After that, a pop-up will appear and click Ok to assign/unassign the product to the selected warehouse.

Unassign Warehouse
Similarly, the admin can also unassign bulk products from a specific warehouse also. Select the checkboxes and go to the Actions dropdown menu, UnAssign Warehouse, then select the specific warehouse.

After that, a confirmation box will appear, click OK to make the changes.

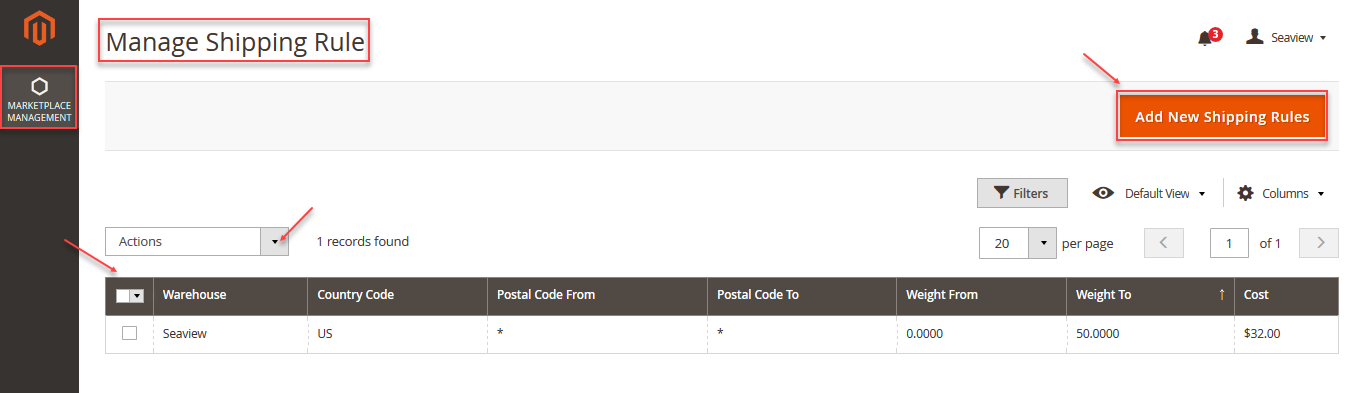
Manage Shipping Rules
Under this section, the admin will be able to create/delete the shipping rules for the various created warehouses.

Add Shipping Rule:
To add a new Shipping Rule for a warehouse, click the Add New Shipping Rules button. This brings up the section to import the shipping rules.


Here, download the Sample File first. Then fill in the table rate data accordingly within the downloaded file and save it.
After that, click on the Browse button and select the downloaded Sample file having the data. Now, from the drop-down option select the Warehouse where you want to assign this shipping rule and click the Save button at the very top. This saves the shipping rule.

Seller Assign Warehouse To Products
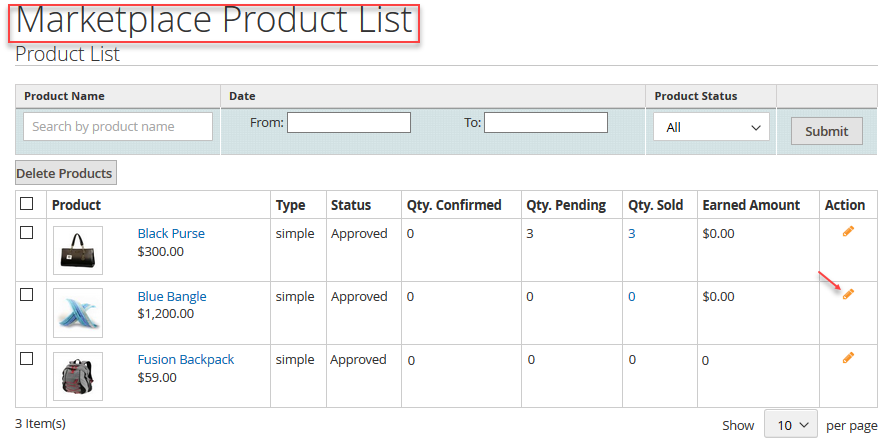
The seller can assign his products to multiple warehouses from their own account panel. To do so, the seller will navigate to the My Products section. Here, the seller will find all of his products.
Now, the seller will edit a product that he wants to assign to the warehouse. After that, go to the Warehouse Stock section and select the warehouses to which you want to assign the product to.

Warehouse Based Shipping Methods

On the checkout page, the customer can select the shipping method according to the warehouses. So, after selecting the shipping method, warehouse shipping will be updated.
The customer can proceed further by clicking the Next button.
After placing the order the customer can see the order details by going to the My Orders section. So, the customer can see Best Way (Table Rate) shipping for the placed order.

Warehouse Based Order History
The Warehouse manager can log in to his account panel using details from the email. Henceforth they can manage the account, shipping, and orders from the Warehouse Manager.
After login, the warehouse manager will have the Vendor Dropship Menu available under the Marketplace Management side panel menu option.
So, here, the warehouse manager has two sub-menu options to manage the Warehouse Order Manager and the Shipping Rules as shown below in the snapshot.

So, let’s go through each of the menu options –
Warehouse Order Manager
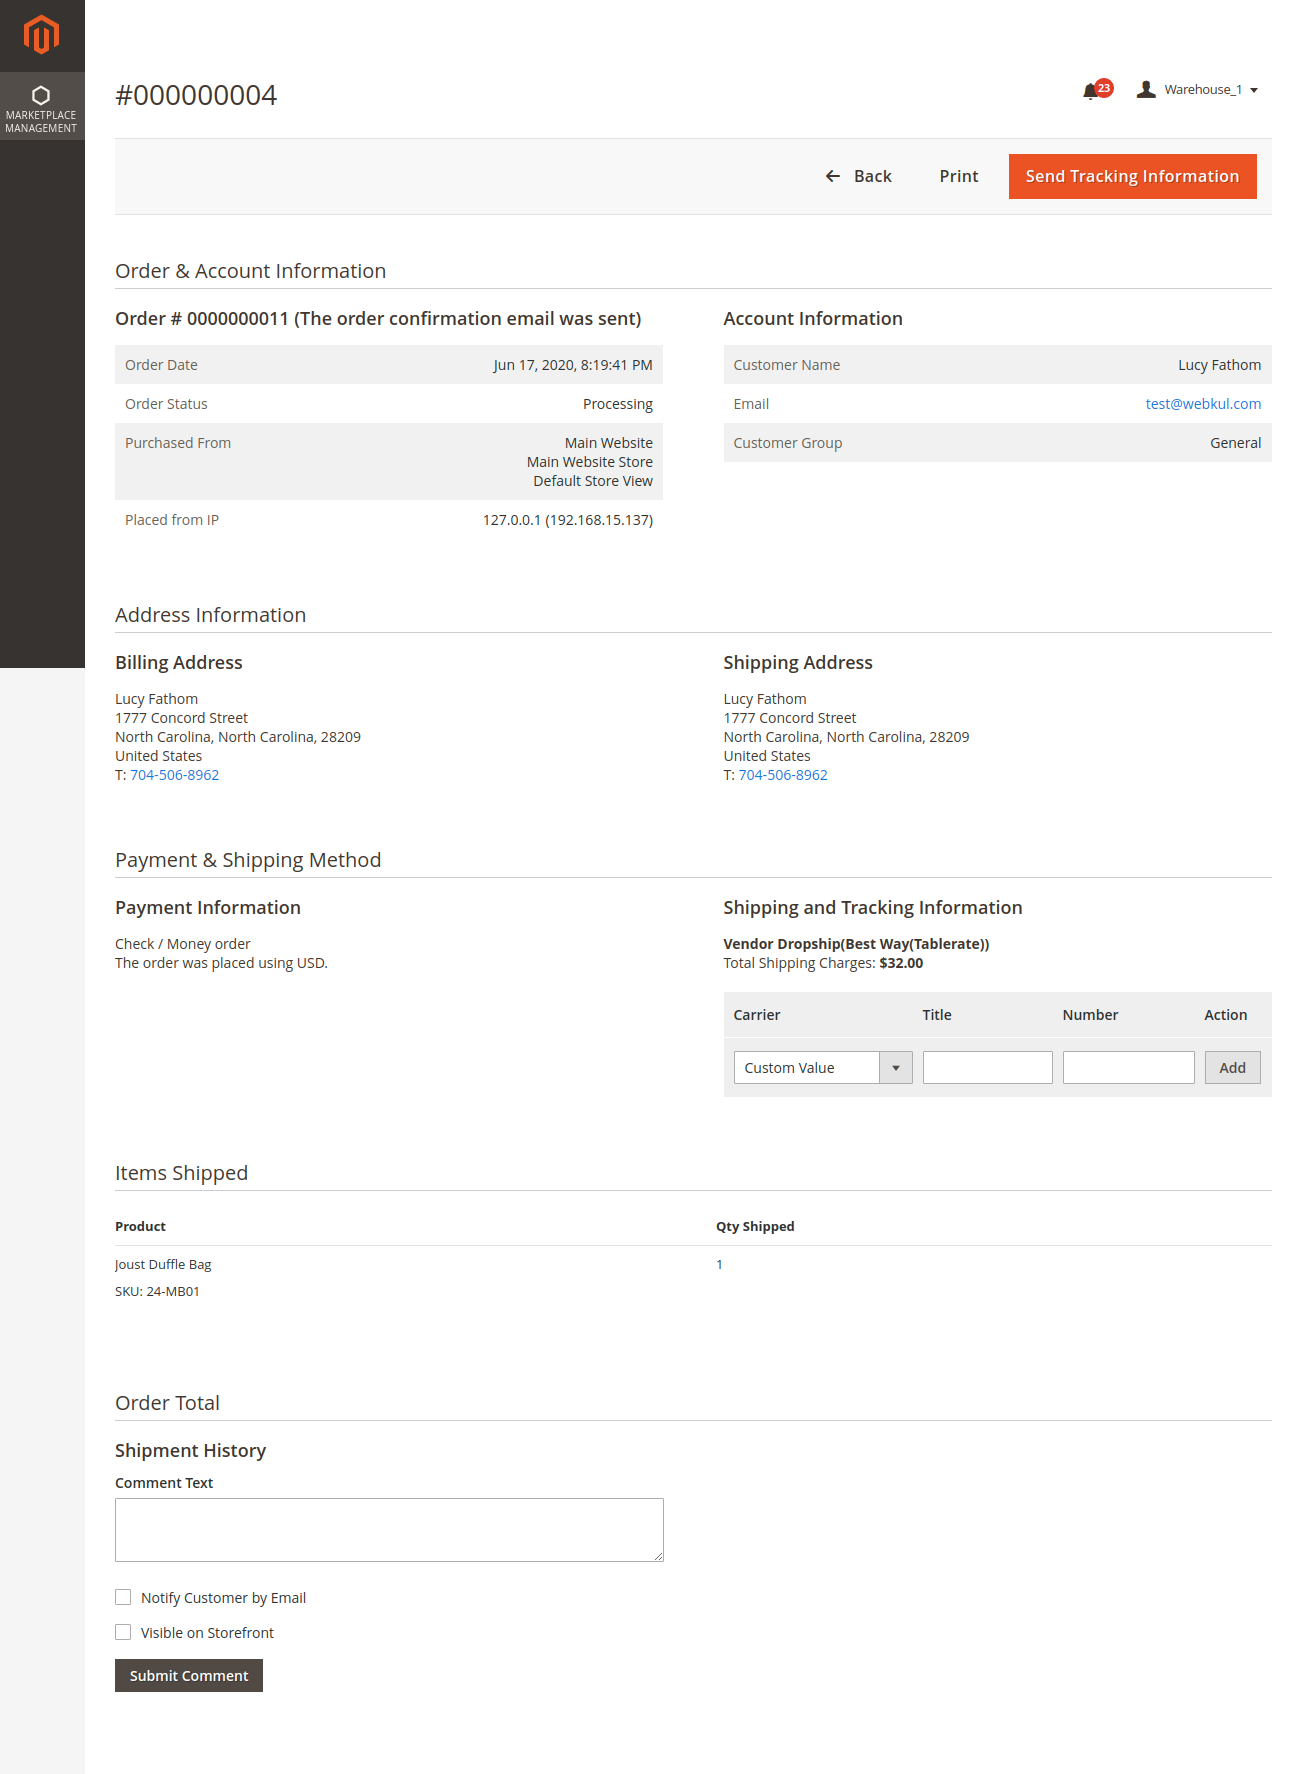
Here, the section has the collection of all those product’s orders for which this warehouse ship method is set an invoice is created. Thus, to generate shipment for the order the warehouse manager will click the Create link as shown below in the snapshot.

Clicking the Create link brings up the section to create a new shipment. Thus, just click on the Submit Shipment button to generate the shipping.
Manage Shipping Rule
Under this section, the warehouse manager will create the shipping rules and can see all of the created shipping rules for his warehouse.
So, the warehouse manager can add and delete the shipping rules as required. To add a new shipping rule click the Add New Shipping Rules button at the top right-hand corner.
After clicking the Add New Shipping Rules button another section will appear to import shipping rules. Here, the warehouse manager has to download the Sample File and fill in the shipping rule as required. Henceforth, upload this shipping CSV file by clicking the Choose File button. Lastly, click the Save button to save the shipping rule.

Support
So that’s all for the Magento 2 Multi-Vendor Dropship module. If you have any suggestions or customization request regarding this extension you can get back to us at our HelpDesk System. You may also browse other Magento 2 marketplace addons and our quality Magento 2 extensions.
Current Product Version - 5.0.5
Supported Framework Version - Magento 2.0.x, 2.1.x, 2.2.x,2.3.x, 2.4.x

Be the first to comment.