Magento 2 Multi Vendor Point of Sale module enables the marketplace sellers to sell their Magento products in the retail stores and the respective orders will be created in the Magento store.
The marketplace sellers can even create multiple salespersons/cashiers for their outlets.
The system works in an online and offline mode both. All the orders and transactions are saved locally in offline mode.
The salesperson can easily synchronize the offline data to the online data in the presence of the internet.
Note:
- To use this module you must have installed Magento 2 Multi Vendor Module in the first place along with the Magento 2 POS module.
- We can manage products only for the default source and not for custom sources at the sellers’ end. As of now, it’s only possible at the admin end.
- To manage the Multi-Source Inventory feature at the sellers’ end. You must have installed Marketplace MSI for Magento 2.
Features
- The admin can create multiple physical outlets for his/her online store and associate products with them.
- The marketplace sellers can create multiple salespersons/cashiers for their outlets.
- Default address assignment to the outlet.
- Optimized catalog search functionality.
- Works with the configurable and downloadable products as well.
- The cashier can refresh individual products.
- The cashier will get Login credentials via email.
- Cash drawer print option.
- The admin can create multiple cashiers.
- Separate Panel for a sales agent for sales management.
- The admin and seller can Print Barcode Slip.
- Add the Invoice logo from the configuration.
- Product Inventory division for Web and POS through configuration.
- A new customer can be added from the Sales agent POS panel.
- Easy real-time synchronization of sales and transactions.
- The products can be added to cart in three ways- on clicking the product, through SKU and through Barcode Reader.
- The agent can Put the POS in full-screen mode.
- The POS easily operates in offline mode as well to provide better processing.
- The Product list and Category list can be Refreshed from the frontend.
- Hassle-free payment and checkout process.
- A sales agent can hold an order or cart.
- The sales agent can view the cash drawer for computing the profit generated in a day or days by them.
- The sales agent can even file the return and generate a cash memo for the product(s).
Please Note-
- The Magento POS connects to the Printer, and barcode reader.
- It doesn’t connect directly with the cash drawer and card swapping machine.
- POS requires a browser to work on it.
- POS supports a 7.5 screen size minimum.
Installation
To use this module you must have installed Magento 2 Point of Sale in the first place.
Please Note : You need to use the Next.js files provided in this module’s ZIP package instead of the files from the Magento 2 Point of Sale module.
Customers will get a zip folder and they have to extract the contents of this zip folder on their system.
The extracted folder has an src folder, inside the src folder you have the app folder. You need to transfer this app folder into the Magento 2 root directory on the server as shown below.

After the successful installation, you have to run these commands in the Magento2 root directory.
php bin/magento setup: upgrade
php bin/magento setup:di: compile
php bin/magento setup:static-content: deploy
php bin/magento indexer:reindex
php bin/magento cache:flush
Language Translation
For translating the module language, navigate through
Thereafter, rename the CSV as “en_SA.csv” and translate all right side content after the comma in the Arabic language. After editing the CSV, save it.
Then upload it to the path src/app/code/Webkul/VendorPos/i18n where the Magento 2 is installed on the server.
The module gets translated into the Arabic Language. It supports both RTL and LTR languages.

Module Configuration : Multi-Vendor Point of Sale
To check the admin’s end module configuration, tap this link and follow the steps given in the blog.
Multi-Vendor Point of Sale Management – Admin End
The user can follow the steps given in this blog link, and follow the steps given under the admin’s end POS Management.
Multi-Vendor Point of Sale Management – Vendor’s End
After the admin has successfully installed the Vendor POS add-on, the seller can see the POS menu option under their account panel. The current view is visible after selecting the Separate Seller Panel option from the top right-hand side.
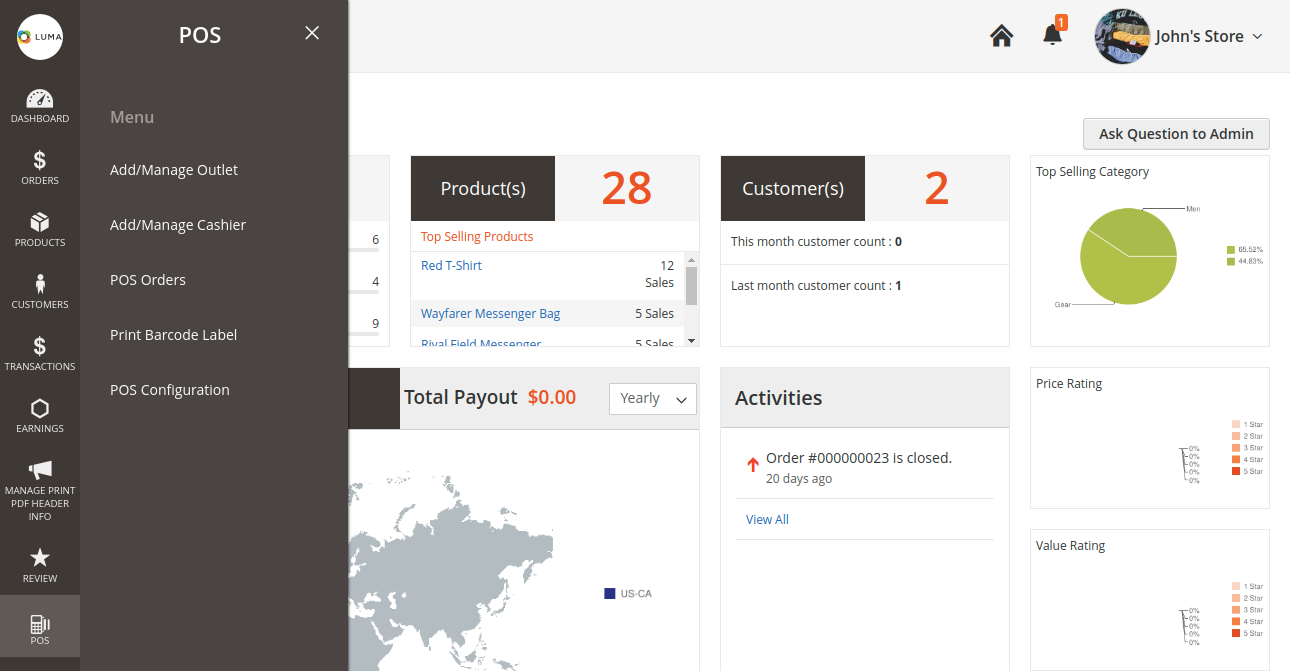
The seller has access to different menu options under their account panel to manage the Vendor POS.
Add/Manage Outlet
Under this section, the seller will be able to add multiple outlets as required.

Here, the seller can:
-
- View the complete list of the outlets.
- Delete/ Disable/ Enable the selected outlets via “Actions” drop-down.

- Edit the created outlets
- Add New Outlets as required
Add New Outlet –
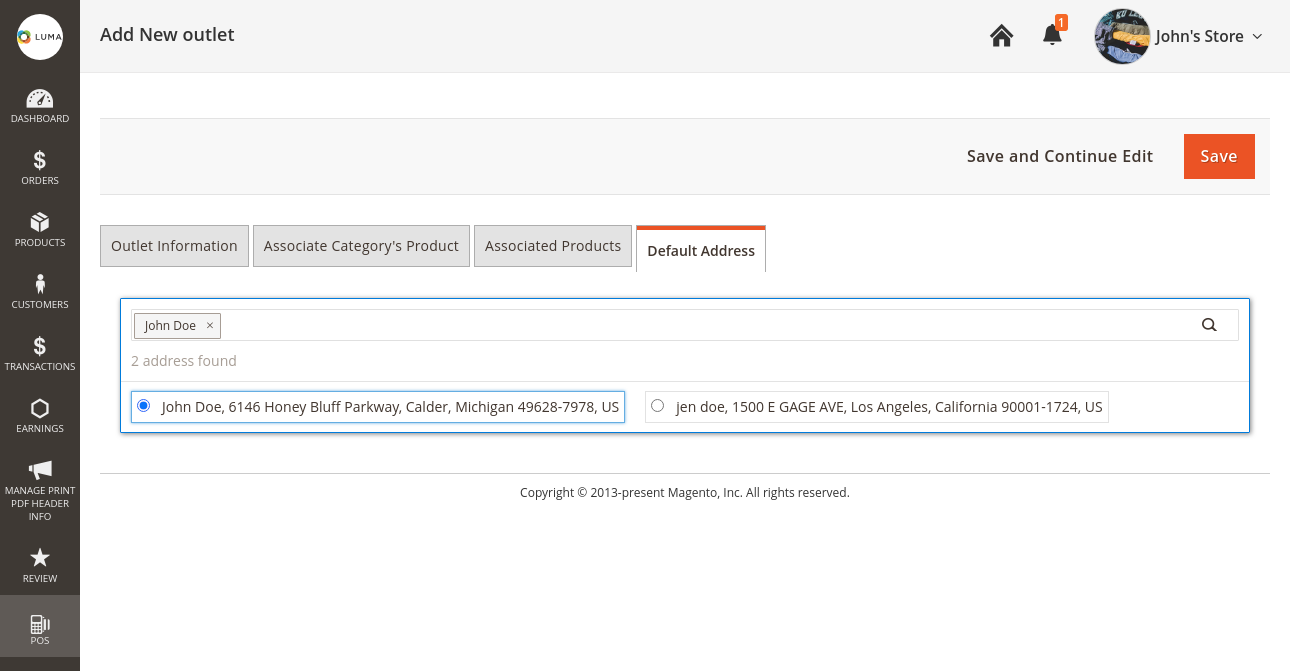
To do so, tap the Add New Outlet button at the top right-hand corner. This brings up the section with 5 tabs –
1. Outlet Information

Here, the vendor will –
- Define the Outlet Name.
- Select the Product Assignment basis from –

- Set the Default Customer option as Yes or a No.
- Enter the Outlet Address.
- Set the outlet Status as Enabled Or Disabled.
After entering/ selecting the required information above, the vendor must select at least a single category or a product before saving the outlet depending upon the selection made for the option, i.e. Category Based or All Products.
2. Associate Category’s Product
please note that this section is applicable only when the “Product Assignment basis” is selected as “Category-based“, also product inventory is the same for POS and Website.

Under this section, the vendor will select the categories that should get assigned to the POS while the vendor has selected the option “Product Assignment basis” as “Category Based“.
3. Associated Products
The Associated Products will display the products as shown in the image below.

4. Default Address
If the vendor has selected the option “Default Customer” as Yes under the Outlet information, then the vendor will have to select the Default Address first before saving the outlet.
Add/Manage Cashier
Under this section, the admin will manage the multiple cashier managers for his outlets.

Here, the vendor can:
- View the complete list of the cashiers.
- Edit the existing cashier accounts by clicking the Edit link.
- Create a new cashier account by clicking the Add New Cashier button.
- Update the cashier account by performing the actions from the Actions drop-down list as per the below image.

From the Actions drop-down list, the vendor can:
- Delete Cashiers: Select the cashier from the list whose account the vendor wants to delete and hit the “Delete Cashiers” option.
- Disable Cashier: Select the cashier from the list whose account the vendor wants to disable and hit the “Disable Cashier” option.
- Enable Cashier: Select the cashier from the list whose account the vendor wants to enable and hit the “Enable Cashier” option.
To add a new cashier, the vendor has to click on the ‘Add New Cashier‘ button on the top right-hand side of the Cashier Manager page.

Here, the vendor will configure the cashier account information:
- Image: upload an image of the cashier.
- First Name: enter the first name of the cashier.
- Last Name: enter the last name of the cashier.
- Email Address: enter the email address of the cashier.
- Contact No.: enter the email contact no. of the cashier.
- Password: enter the password of the cashier account.
- Confirm Password: Confirm the password of the cashier account.
- Outlet: assign the outlet to the cashier account.

- Status: enable or disable the cashier account.
POS Orders
Under this section, the vendor can view the complete list of POS orders.

Subsequently, to view, the complete order details click View Order details for the respective order.

Print Barcode Label
The Barcode Slip could be printed by navigating to the POS -> Print Barcode Label.

On the Print Barcode Label page, the vendor needs to check the products for which barcodes need to be printed. And then, from the Actions drop-down list select Print Barcode Slip option.
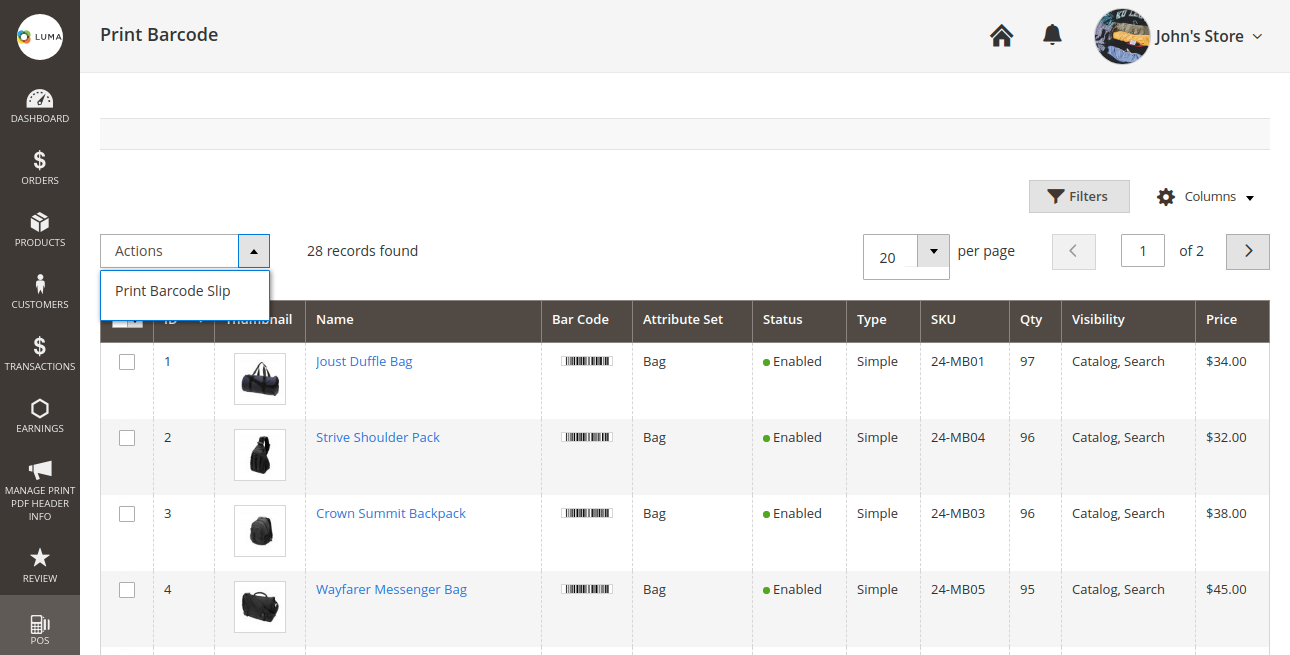
This brings up the section with the respective barcodes for each of the selected products and a Print button. Tap the Print button to print the labels.

POS Configuration: Multi-Vendor Point of Sale
To reach the POS configuration options navigate through POS -> POS Configuration. From here, the vendor will be able to navigate directly to the module configuration.

Here, the vendor will be able to configure certain settings for the POS system –
- Product Page Load Size – Set the product load size at the time of POS initialization.
- Choose Attribute For Barcode – Select the attribute that should be used for generating the Barcodes.
- Invoice Slip logo – Upload invoice slip logo that the vendor wants to make use of. Allowed file type s include – JPG, JPEG, GIF, PNG.
Front-End Point of Sales panel
To check the frontend – Point of sales panel workflow check this link.
Support
Hence, if you have any issue, please feel free to add a ticket at our HelpDesk System and let us know your views. You may also browse other Magento 2 marketplace addons and our quality Magento 2 extensions.
Current Product Version - 5.0.3
Supported Framework Version - Magento 2.0.x, 2.1.x, 2.2.x,2.3.x, 2.4.x

Be the first to comment.