Australian Post Shipping is an Australian government-owned corporation that provides postal service both locally and internationally.
Now, we have integrated it with the Webkul Magento 2 Marketplace.
Magento 2 Marketplace Australia Post Shipping, the admin and the sellers can provide their customers to select the Australia Post shipping method for getting their shipments delivered.
Thus, this shipment method can be used for shipping products within Australia and internationally.
To make use of this extension you must first install the Magento 2 Multi Vendor Module .
Features-Magento 2 Marketplace Australia Post Shipping
- The admin can enable or disable the Marketplace Australia Post method.
- The admin can set the Marketplace Australia Post shipping method name that will be shown on the front end.
- The handling fee can even be specified by the store owner.
- Australia Post shipping rate will be calculated from the seller’s address.
- The admin can allow sellers to save their Australia Post Credentials.
- Shipments can be delivered domestically/locally(within Australia) and internationally(from Australia to other countries).
Install Extension from Webkul Store
#1 Download Module
Firstly, you need to log in to Webkul Store, go to My Account>My Purchased Products section, verify and then download and extract the contents of this zip folder on the system.
#2 Upload Folder
Once the module zip is extracted, follow path src>app and then copy the app folder into the Adobe Commerce Cloud root directory on the server as shown below:

#3 Run Commands
After uploading the module folder, you need to run the following commands in the Magento 2 root directory:
php bin/magento setup:upgradephp bin/magento setup:di:compilephp bin/magento setup:static-content:deployphp bin/magento indexer:reindexphp bin/magento cache:flush
Configuration For Multi-Lingual Support
For multilingual support, the admin will navigate through Store->Configuration->General ->Locale Options.
Thus, select the locale as German (the language into which the admin wants to translate his store content).

Translation
If you need to do the module translation, please navigate the following path in your system app/code/Webkul/MpAuspost/i18n. Now, open the file named en_US.CSV for editing.

Once you have opened the file for editing. Replace the words after the comma(,) on the right with your translated words.

After editing the CSV file, save it and then upload it to the same folder. Now your module translation is complete.

Admin Configuration – Magento 2 Marketplace Australia Post Shipping
Thus, post the successful installation of the extension, the admin will navigate to Stores->Configuration-> Sales->Delivery Methods->Webkul Marketplace Australia Post Shipping.

Hence, to configure the extension, the admin will –
- Selects “Yes” to enable the extension for use else selects “No” to disable the extension.
- Enter the Shipping Title that is visible to the customers at the front-end.
- Enter the API key for the Admin’s Australia Post account.
- Select the weight unit as “Pounds” or “Kilograms” as per the requirement.
- Select Ship to Applicable Countries as “All Allowed Countries” if you want to ship to all countries else you can select “Specific Countries” and then select the specific countries under the option “Ship to Specific Countries” where you want to ship.
- Thus, go for the “Yes” to show the Method if not applicable for “Show Method If Not Applicable” else select “No“.
- Enter the Error Message that is displayed when the shipping method is not available.
- Set the Handling Fee if any that will be applicable.
- Under “Allow Sellers to Save Australia Post Details” set as “Yes” to allow the sellers to save their Australia Post Shipping credentials else select “No“.
- Set the package length, Width, and Height of the parcel(enter these values for domestic shipping).
How to get the API Key
Step 1: The admin needs to have a personal account at the Australian Post website. For creating a new account click here.
Step 2: Now, to get the API key please click here and login using your account credentials. After login, you will see the below screen.

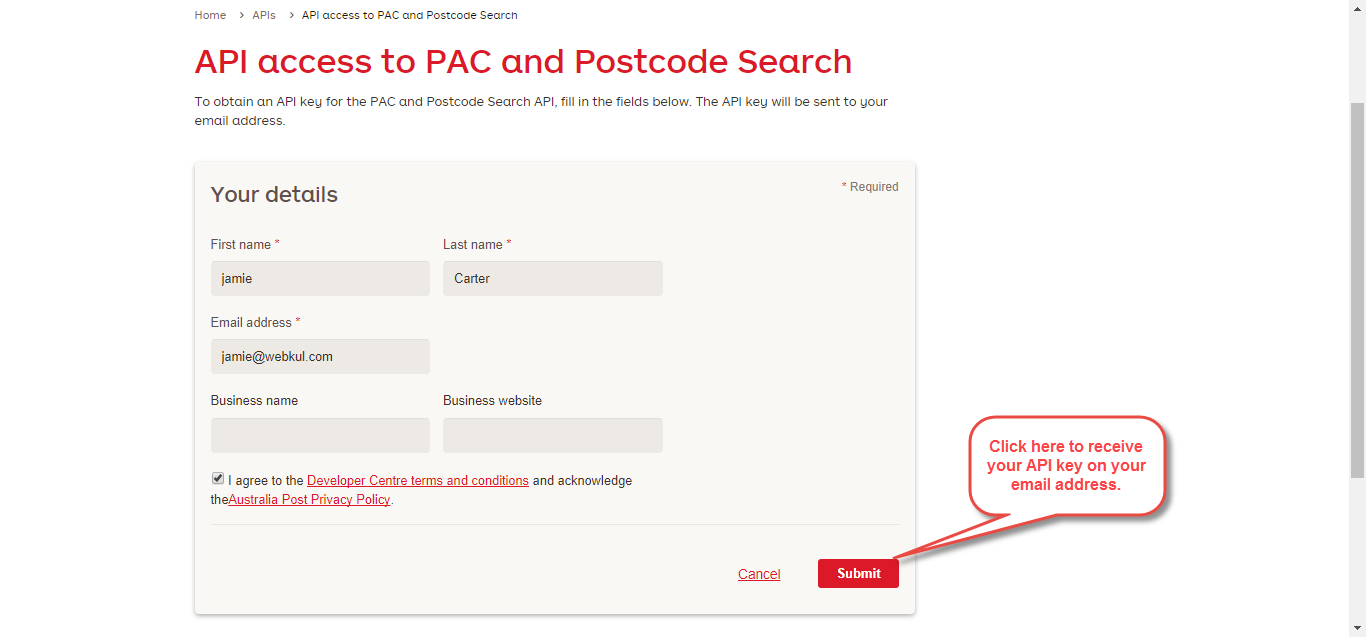
Step 3: Here, click on “Register now to get a PAC API Key” and you will be redirected to another page. Fill in the required information and click the submit button.
Step 4: Lastly, check your email address provided in the previous step for the API key.

Seller’s Configuration – Magento 2 Marketplace Australia Post Shipping
The seller will find a new menu option under their marketplace block – “Manage Australia Post Shipping”.
Here, the seller needs to enter his Australia Post account-related API Key.
Hereafter entering the key tap the save button to save the configuration.

Customer End – Magento 2 Marketplace Australia Post Shipping
Let’s see how the shipping method works on the website. Thus, for this, the first step required is to add the product to the cart.
Post, this the customer can proceed to the checkout page wherein the shipping method selection takes place. Additionally, along with this, the shipping address must be stated.

Finally, the customer can accomplish the checkout process by selecting the payment method and click on Place Order.

Seller Order Management – Magento 2 Marketplace Australia Post Shipping
Hence, when the order is placed, the seller can see the order under “My Order History” as per the image below.

Now click on the View Order button to see the details for the order. Thus, the seller can see the selected shipping that was selected by the customer.

Shipment Information:
So, the seller can generate Shipment for the orders from the order section.

However, the seller can click on the Tracking information to track the package.
Thus, the seller can also print the packing for the shipment from the shipment page.

Admin Order Management
The admin can view and manage all the orders(along with the seller’s orders). Hence, for this, the admin will navigate to the Sales > Order as per the below image:

Here, the admin can view the complete list of the orders. Hence, to manage and generate invoices, the shipment of the orders, the admin selects the order from the list.
So, the admin can-
- notify the customers by sending them emails,
- cancel/hold the order and
- even edit/reorder the product order.


Invoice
The admin can generate and manage the invoice for their product. However, the store owner can view the invoice of the seller also if it’s part of the order.


Shipment
Thus, the admin can even generate the shipment of the product which can be viewed in the shipment tab. This will also contain the shipment by the seller if the seller’s product is part of the order.


The admin can also print the packing for the shipment from the shipment page.
So, that’s all for the Magento 2 Marketplace Australian Post Shipping module.
If you have any queries regarding the plugin, please contact us at Webkul Support System.
You can also check our complete Magento 2 extensions.
Current Product Version - 5.0.2-p1
Supported Framework Version - Magento 2.0.x, 2.1.x, 2.2.x,2.3.x, 2.4.x

Be the first to comment.